【HarmonyOS】深入了解 ArkUI 的动画交互以提高用户体验
??????? 从今天开始,博主将开设一门新的专栏用来讲解市面上比较热门的技术 “鸿蒙开发”,对于刚接触这项技术的小伙伴在学习鸿蒙开发之前,有必要先了解一下鸿蒙,从你的角度来讲,你认为什么是鸿蒙呢?它出现的意义又是什么?鸿蒙仅仅是一个手机操作系统吗?它的出现能够和Android和IOS三分天下吗?它未来的潜力能否制霸整个手机市场呢?
抱着这样的疑问和对鸿蒙开发的好奇,让我们开始今天对ArkUI动画操作的掌握吧!
目录
ArkUI动画操作
在学习动画操作之前,我们先了解一下动画实现的原理,动画的实现原理说白了就是无数个静态画面快速播放,达到我们肉眼是无法识别的临界值,呈现我们视觉感官的就是动态画面,像电影拍摄拍出来的胶卷就是一帧一帧的画面,它的播放速度是每秒24帧,只要播放速度足够快,人眼就部分识别它是静态的了。
所以接下来我们开始学习如何在ArkUI中实现动画操作,动画可以说是app当中必备的一个功能了,它可以大大提高用户交互时的一个体验。我们在开发应用时实现动画也是一样的,我们只需要把一个物体运动的开始状态和结束状态以及中间的每一帧画面快速地描述出来,那么动画就形成了,当然这个描述肯定不需要我们自己写代码把每一帧都描述出来,ArkUI底层简化了我们的开发,我们只需要把一个组件运行时它的一个初始和结束状态描述出来,ArkUI就会自动帮助我们去填充中间的每一帧画面,这样就有了动画的效果了。
识别动画的实现方式有很多,而在ArkUI中比较常见的实现方式就有以下几种实现方式:
动画是通过设置组件的animation属性来给组件添加动画,当组件的width、height、Opacity、backgroundColor、scale、rotate、translate等属性变更时,可以实现渐变过渡效果。动画设置简单,属性变化时自动触发动画,以下是animation属性可以传递使用的动画参数:
| 名称 | 参数类型 | 必填 | 描述 |
|---|---|---|---|
| duration | number | 否 | 设置动画时长,默认值:1000,单位毫秒 |
| tempo | number | 否 | 动画播放速度。数值越大,速度越快。默认值:1 |
| curve | string|Curve | 否 | 设置动画曲线。默认值:Curve.EaseInOut,平滑开始和结束。 |
| delay | number | 否 | 设置动画延迟执行的时长。默认值:0,单位:毫秒 |
| iterations | number | 否 | 设置播放次数。默认值:1,取值范围 [-1,+ |
| playMode | PlayMode | 否 | 动画播放模式,默认播放完成后重头开始播放,默认值:PlayMode.Normal |
| onFinish | ()=>void | 否 | 状态回调,动画播放完成时触发 |
关于curve属性的详解,以下是其常用的函数名称:
| 名称 | 描述 |
|---|---|
| Linear | 表示动画从头到尾的速度都是相同的。 |
| Ease | 表示动画以低速开始,然后加快,在结束前变慢。 |
| EaseIn | 表示动画以低速开始 |
| EaseOut | 表示动画以低速结束 |
| EaseInOut | 表示动画以低速开始和结束 |
| FastOutSlowIn | 标准曲线 |
| LinearOutSlowIn | 减速曲线 |
| FastOutLinearIn | 加速曲线 |
| ExtremeDeceleration | 急缓曲线 |
| Sharp | 锐利曲线 |
| Rhythm | 节奏曲线 |
| Smooth | 平滑曲线 |
属性动画
属性动画无需使用闭包,把animation属性加在要做属性动画的组件的属性后面即可,想要组件随某个属性值变化而产生动画,此属性需要加在animation属性之前,有的属性变化不希望通过animation产生属性动画,可以放在animation之后。属性动画的接口函数如下:
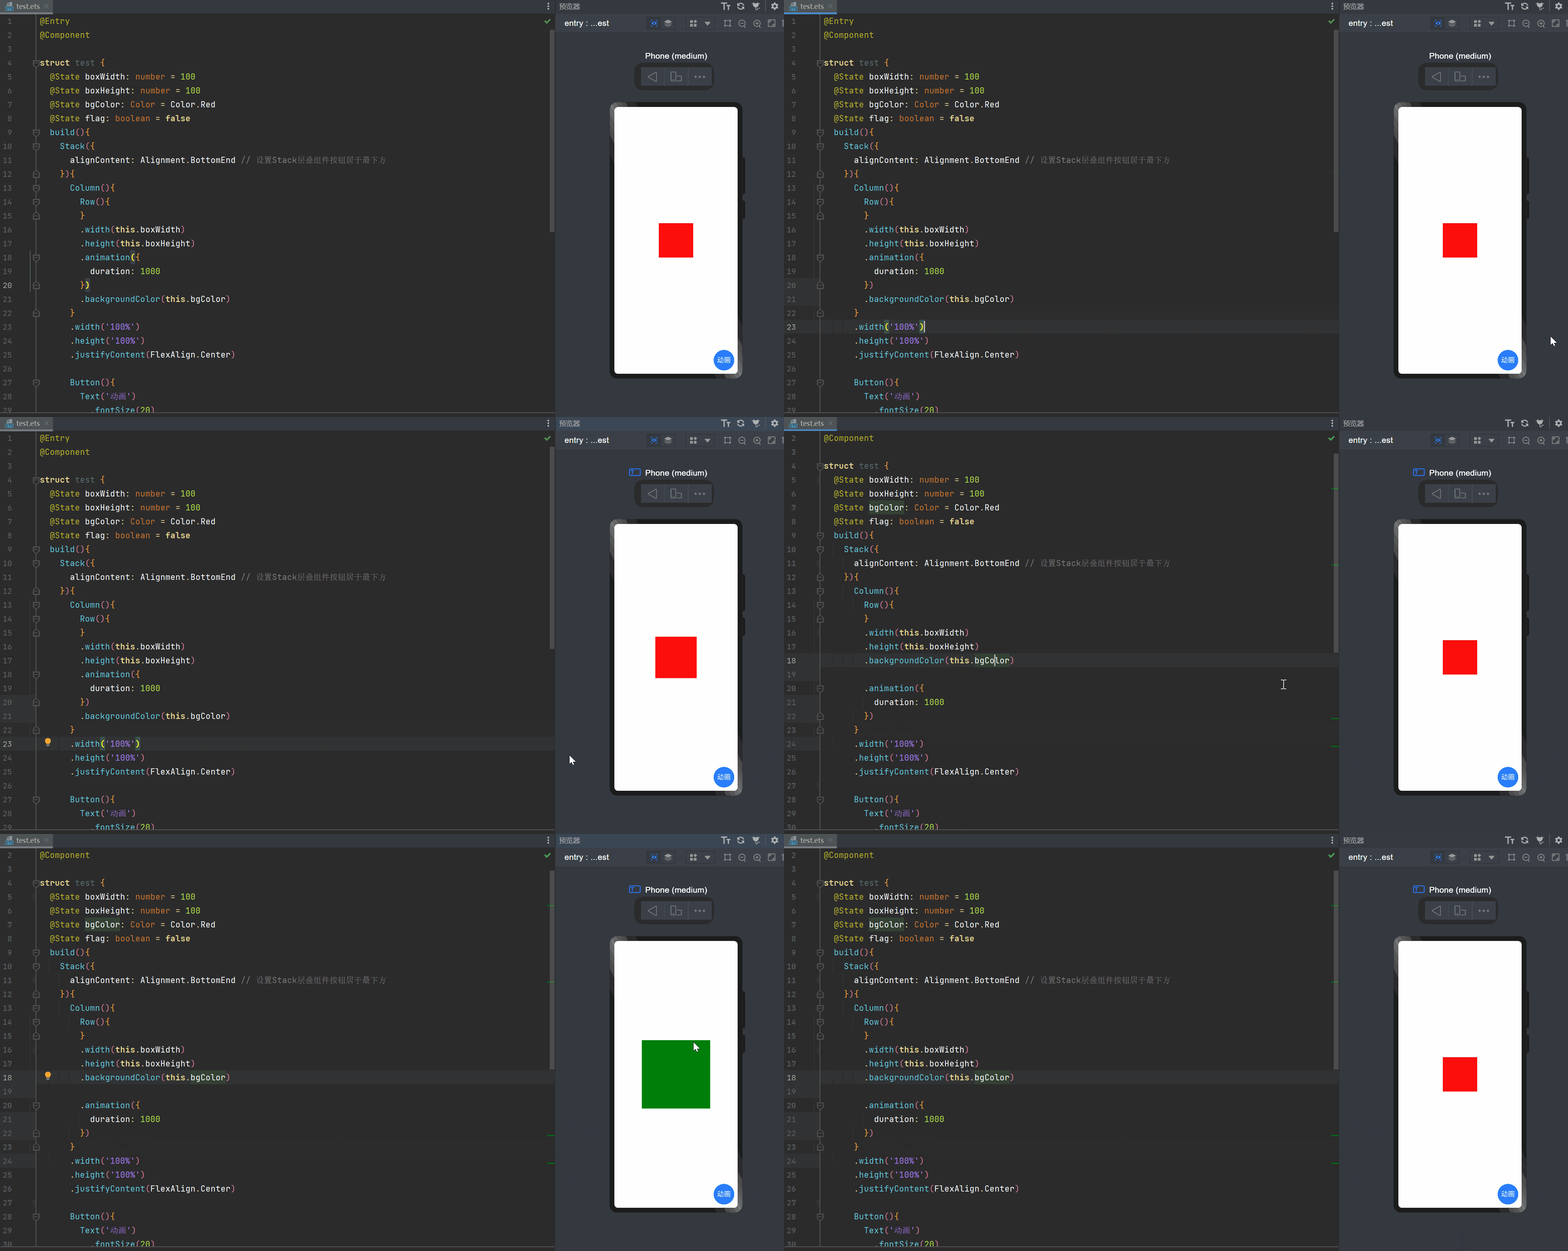
animation(value: AnimateParam)以下给出属性动画执行的范例:?
@Entry
@Component

struct test {
  @State boxWidth: number = 100
  @State boxHeight: number = 100
  @State bgColor: Color = Color.Red
  @State flag: boolean = false
  build(){
    Stack({
      alignContent: Alignment.BottomEnd // 设置Stack层叠组件按钮居于最下方
    }){
      Column(){
        Row(){
        }
        .width(this.boxWidth)
        .height(this.boxHeight)
        .animation({
          duration: 1000
        })
        .backgroundColor(this.bgColor)
      }
      .width('100%')
      .height('100%')
      .justifyContent(FlexAlign.Center)

      Button(){
        Text('动画')
          .fontSize(20)
          .fontColor(Color.White)
      }
      .width(60)
      .height(60)
      .margin({ bottom: 10, right: 10 })
      .onClick(()=>{
        if (this.flag) {
          this.boxWidth = 100
          this.boxHeight = 100
          this.bgColor = Color.Red
        }else {
          this.boxWidth = 200
          this.boxHeight = 200
          this.bgColor = Color.Green
        }
        this.flag = !this.flag
      })
    }
  }
}
最终呈现的效果如下:?

给个下面的案例加深一下印象吧,使用translate改变一下元素的位置:
// 公共样式
@Extend(Text) function actionSheet() {
  .fontSize(18)
  .fontColor('#666')
  .width('100%')
  .height(20)
  .textAlign(TextAlign.Center)
}
@Entry
@Component

struct test {
  @State boxPosition: number = 220
  @State flag: boolean = false
  build(){
    Stack({
      alignContent: Alignment.BottomEnd
    }){
      Column(){
        Button(){
          Text('show actionSheet')
            .fontSize(30)
            .fontColor(Color.White)
        }
        .onClick(()=>{
          animateTo({
            duration: 500
          },()=>{
            if(this.flag){
              this.boxPosition = 220
            }else {
              this.boxPosition = 0
            }
            this.flag = !this.flag
          })
        })
        .width('80%')
        .height(60)
      }
      .width('100%')
      .height('100%')
      .justifyContent(FlexAlign.Center)

      Column(){
        List({ space: 44 }){
          ListItem(){
            Text('相册选择')
              .actionSheet()
          }
          ListItem(){
            Text('相机拍照')
              .actionSheet()
          }
          ListItem(){
            Text('取消')
              .actionSheet()
          }
        }
        .divider({ strokeWidth: 1, color: Color.Gray })
      }
      .width('100%')
      .height(220)
      .justifyContent(FlexAlign.Center)
      .backgroundColor('#efefef')
      .translate({
        y: this.boxPosition
      })
    }
  }
}
结果如下:

显示动画
闭包内的变化均会触发动画,包括由数据变化引起的组件的增删、组件属性的变化等,可以做较为复杂的动画,其显示动画的接口为如下函数,第一个参数指定动画参数,第二个参数为动画的闭包函数。
animateTo(value: AnimateParam, event: () => void): void以下给出显示动画执行的范例:
@Entry
@Component

struct test {
  @State boxWidth: number = 100
  @State boxHeight: number = 100
  @State flag: boolean = false
  build(){
    Stack({
      alignContent: Alignment.BottomEnd // 设置Stack层叠组件按钮居于最下方
    }){
      Column(){
        Row(){
        }
        .width(this.boxWidth)
        .height(this.boxHeight)
        .backgroundColor(Color.Red)
      }
      .width('100%')
      .height('100%')
      .justifyContent(FlexAlign.Center)

      Button(){
        Text('动画')
          .fontSize(20)
          .fontColor(Color.White)
      }
      .width(60)
      .height(60)
      .margin({ bottom: 10, right: 10 })
      .onClick(()=>{
        animateTo({
          duration: 1000, // 动画的执行时间
        },()=>{
          if (this.flag) {
            this.boxWidth = 100
            this.boxHeight = 100
          }else {
            this.boxWidth = 200
            this.boxHeight = 200
          }
          this.flag = !this.flag
        })
      })
    }
  }
}
最终呈现的效果如下:

当然我们也可以给显示动画函数加一些动画参数,使动画效果更有视觉性,如下:

组件转场动画
组件的插入、删除过程即为组件本身的转场过程,组件的插入、删除动画称为组件内转场动画。通过组件内转场动画,可以定义组件出现、消失的效果。transition函数的入参为组件内转场的效果,可以定义平移、透明度、旋转、缩放这几种转场样式的单个或者组合的转场效果,必须和animateTo一起使用才能产生组件的转场效果。组件内转场动画的接口为如下代码:
transition(value: TransitionOptions)以下给出组件转场动画执行的范例:
@Entry
@Component

struct test {
  @State flag: boolean = false
  build(){
    Stack({
      alignContent: Alignment.BottomEnd
    }){
      Column(){
        if(this.flag){
          Row(){
            Image("https://img-blog.csdnimg.cn/direct/b4ef01bec5c54a25b07024e76c8e6b0d.jpeg")
              .width(200)
              .height(200)
          }
          .width(200)
          .height(200)
          .justifyContent(FlexAlign.Center)
          .transition({
            type: TransitionType.Insert, // 显示执行动画
            opacity: 0,
            translate: { x: 300, y: 200 },
            scale: { x: 0, y: 0 }
          })
          .transition({
            type: TransitionType.Delete, // 删除执行动画
            opacity: 0,
            translate: { x: -300, y: 200 },
            scale: { x: 0, y: 0 }
          })
        }
      }
      .width('100%')
      .height('100%')
      .padding(20)
      .alignItems(HorizontalAlign.Center)
      .justifyContent(FlexAlign.Center)

      Button(){
        Text(this.flag ? '隐藏' : '显示')
          .fontColor(Color.White)
          .fontSize(20)
          .onClick(()=>{
            animateTo({
              duration: 1000
            },()=>{
              this.flag = !this.flag
            })
          })
      }
      .width(80)
      .height(80)
      .margin({ bottom: 10, right: 10 })
    }
  }
}
最终呈现的效果如下:?

弹簧曲线动画
ArkUI提供了预置动画曲线,指定了动画属性从起始值到终止值的变化规律,如Linear、Ease、EaseIn等。同时ArKUI也提供了由弹簧振子物理模型产生的弹簧曲线。通过弹簧曲线,开发者可以设置超过设置的终止值,在终止值附近震荡,直至最终停下来的效果。弹簧曲线的动画效果比其他曲线具有更强的互动性、可玩性。
弹簧曲线的接口包括两类,一类是springCurve,另一类是springMotion和responsiveSpringMotion,这两种方式都可以产生弹簧曲线,这里主要给大家讲解一下springCurve实现登录界面抖动动画,其springCurve的接口函数如下:
构造函数包括初速度(velocity)、弹簧系统的质量(mass)、刚度(stiffness)、阻尼(damping)。构建springCurve时,可指定质量为1,根据springCurve中的参数说明,调节刚度、阻尼两个参数,达到想要的震荡效果。
springCurve(velocity: number, mass: number, stiffness: number, damping: number)以下给出弹簧曲线动画执行的范例:?
import curves from '@ohos.curves'
@Entry
@Component

struct test {
  @State translateX: number = 0

  jumpWidthSpeed(velocity: number) {
    this.translateX = 10 // 起始位置
    animateTo({
      duration: 1000,
      curve: curves.springCurve(velocity, 1, 1, 1)
    },()=>{
      this.translateX = 0 // 最终的位置
    })
  }
  build(){
      Column(){
        Row(){
          Text("登录框")
            .width('100%')
            .fontSize(40)
            .textAlign(TextAlign.Center)
        }
        .width(200)
        .height(200)
        .margin({ top: 20 })
        .backgroundColor(Color.Gray)
        .translate({
          x: this.translateX
        })

        Row(){
          Button("jump 10")
            .fontSize(14)
            .onClick(()=>{
              this.jumpWidthSpeed(10) // 以初速度10的弹簧曲线进行平移
            })
          Button("jump 200")
            .fontSize(14)
            .onClick(()=>{
              this.jumpWidthSpeed(200) // 以初速度200的弹簧曲线进行平移
            })
        }
        .width('100%')
        .margin({ top: 40 })
        .justifyContent(FlexAlign.SpaceAround)
      }
    .width('100%')
    .height('100%')
  }
}
最终呈现的效果如下:?

路径动画
通过路径动画也可以实现弹簧曲线,使用路径动画我们可以自定义我们元素的运动轨迹,以下是路径动画实现的接口函数:
path表示位移动画的运动路径;from表示运动路径的起点;to表示运动路径的终点;rotatable表示是否跟随路径进行旋转。
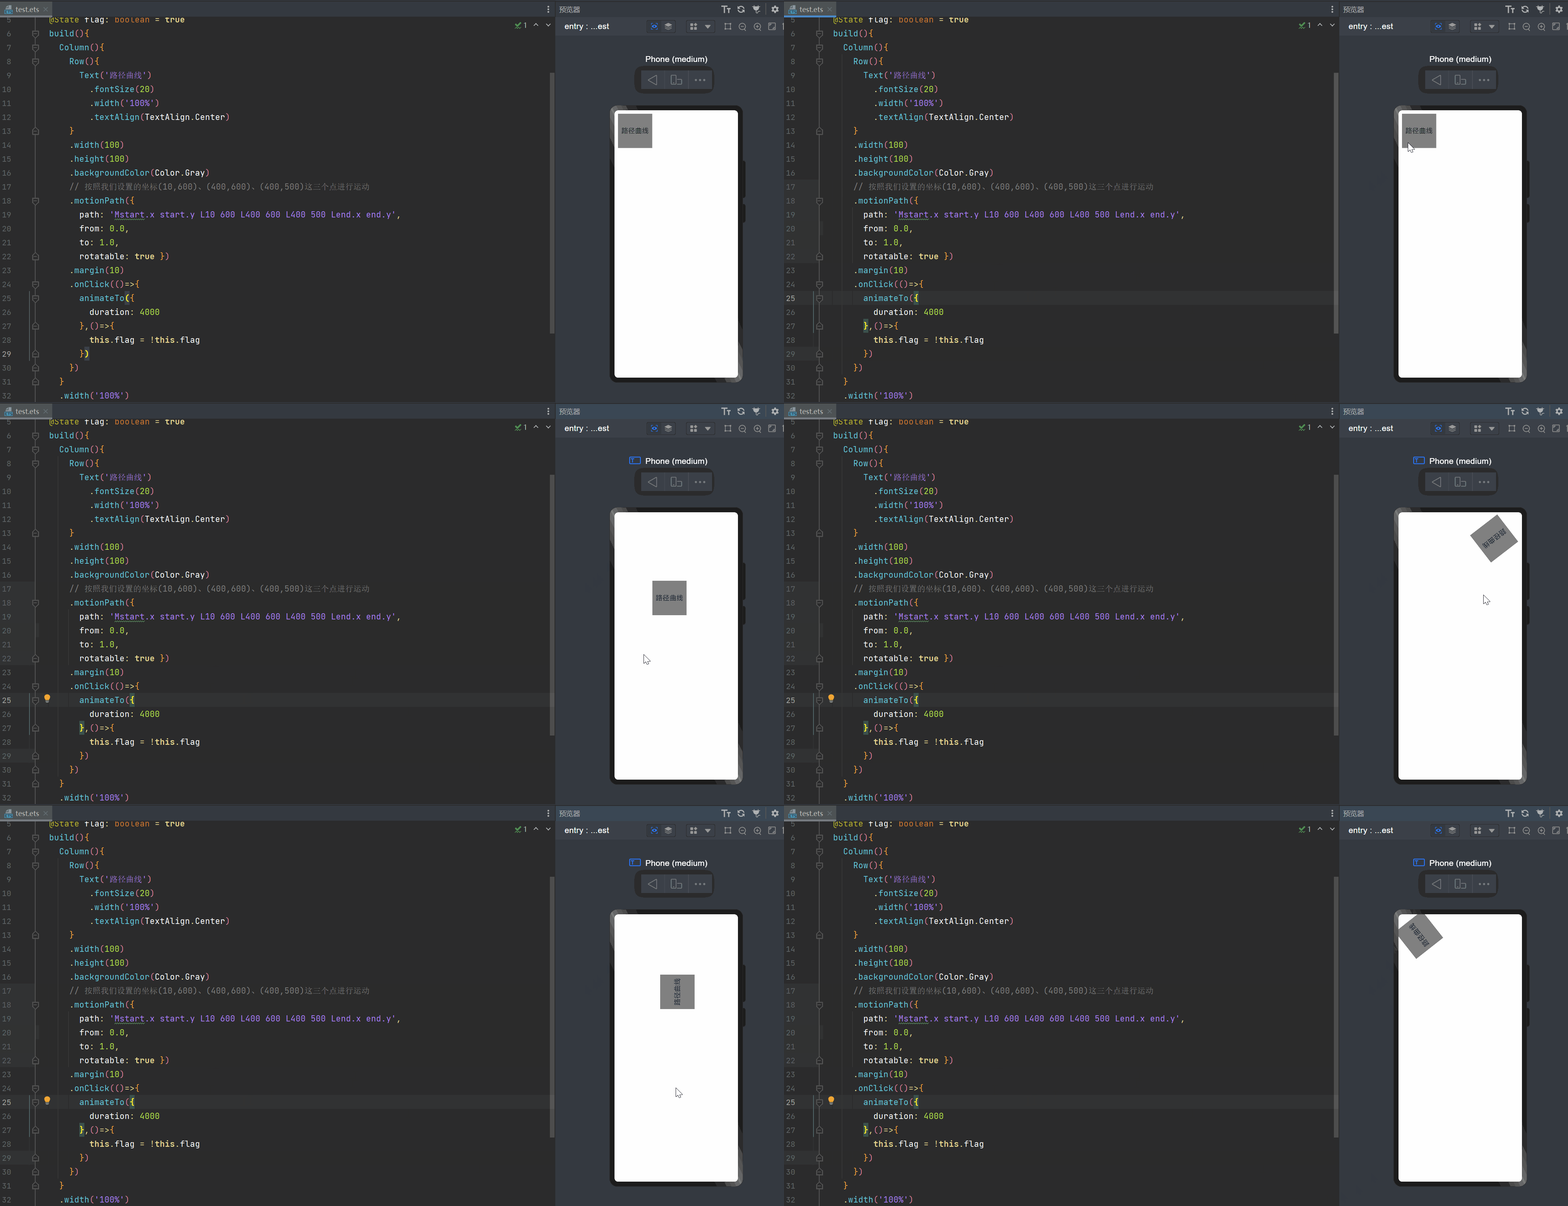
motionPath({path: string, from?: number, to?: number, rotatable?: boolean})以下给出路径动画执行的范例:??
@Entry
@Component

struct test {
  @State flag: boolean = true
  build(){
    Column(){
      Row(){
        Text('路径曲线')
          .fontSize(20)
          .width('100%')
          .textAlign(TextAlign.Center)
      }
      .width(100)
      .height(100)
      .backgroundColor(Color.Gray)
      // 按照我们设置的坐标(10,600)、(400,600)、(400,500)这三个点进行运动
      .motionPath({ path: 'Mstart.x start.y L10 600 L400 600 L400 500 Lend.x end.y', from: 0.0, to: 1.0, rotatable: false })
      .margin(10)
      .onClick(()=>{
        animateTo({
          duration: 4000
        },()=>{
          this.flag = !this.flag
        })
      })
    }
    .width('100%')
    .height('100%')
    .justifyContent(FlexAlign.Start)
    .alignItems(this.flag ? HorizontalAlign.Start : HorizontalAlign.End)
  }
}
最终呈现的效果如下:??

共享元素转场动画
在不同页面间,有使用相同的元素(例如同一幅图)的场景,可以使用共享元素转场动画衔接。为了突出不同页面间相同元素的关联性,可为它们添加共享转场动画。如果相同元素在不同页面间的大小有差异,即可达到放大缩小视图的效果,共享元素转场的接口函数如下:
其中根据sharedTransitionOptions中的type参数,共享元素转场分为Exchange类型的共享元素转场和Static类型的共享元素转场。
sharedTransition(id: string, options?: sharedTransitionOptions)Exchange类型的共享元素转场:交换型的共享元素转场,需要两个页面中存在通过sharedTransition函数配置为相同id的组件,它们称为共享元素。这种类型的共享元素转场适用于两个页面间相同元素的衔接,会从起始页共享元素的位置,大小过渡到目标页的共享元素的位置、大小。如果不指定type,默认为Exchange类型的共享元素转场,这也是最常见的共享元素转场的方式。使用Exchange类型的共享元素转场时,共享元素转场的动画参数由目标页options中的动画参数决定。以下给出实现的基本步骤:
1)我们在首页设置图片的默认转场,通过点击事件进行路由的跳转:

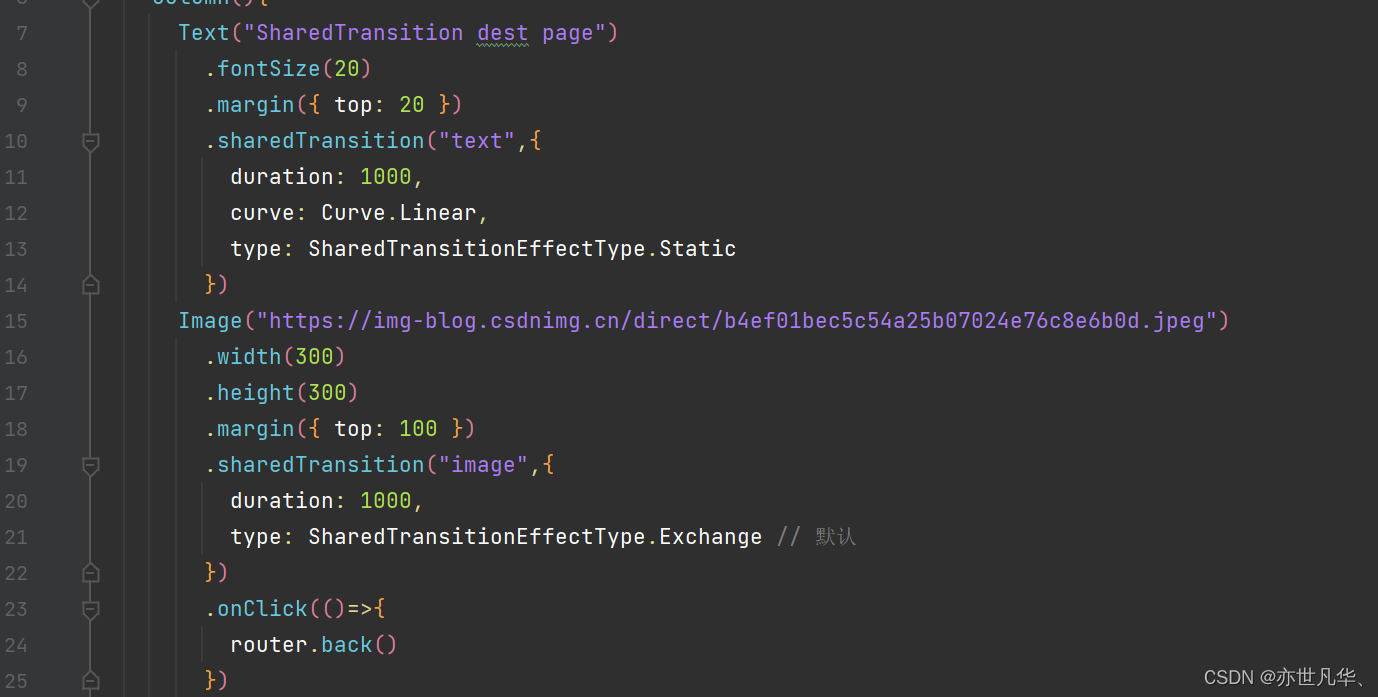
2)在另一个页面中我们通过sharedTransition函数配置为相同id的组件,将图片放大,然后点击图片后再回退到原始页面

实现的效果如下:

Static类型的共享元素转场:静态型的共享元素转场通常用于页面跳转时,标题逐渐出现或隐藏的场景,只需要在一个页面中有Static的共享元素,不能再两个页面中出现相同id的Static类型的共享元素。在跳转到该页面(即目标页)时,配置Static类型sharedTransition的组件做透明度从0到该组件设定的透明度的动画,位置保持不变。在该页面(即起始页)消失时,做透明度逐渐变为0的动画,位置保持不变。以下给出实现的基本步骤:
1)原页面还是通过Exchange给出图片的转场效果

2)另一个页面除了有图片之外,还有其他内容,比如text,这里设置文本内容为Static,有一个淡入淡出的效果实现

实现的效果如下:

结合共享元素转场动画效果,接下来我们实现朋友圈预览图片的效果案例 :
首先我们在主页面设置默认的Exchange转场效果:
import router from '@ohos.router'
interface ImageListData {
  uniqueId: string,
  author: string,
  imageUrl: string
}

@Entry
@Component
struct FriendPage {
  listData: ImageListData[] = [
    {
      "uniqueId": 'Candy-Shop',
      "author": 'Mohamed Chahin',
      "imageUrl": 'https://www.itying.com/images/flutter/1.png',
    },
    {
      "uniqueId": 'Childhood',
      "author": 'Google',
      "imageUrl": 'https://www.itying.com/images/flutter/2.png',
    },
    {
      "uniqueId": 'Alibaba-Shop',
      "author": 'Alibaba',
      "imageUrl": 'https://www.itying.com/images/flutter/3.png',
    },
    {
      "uniqueId": 'Alibaba-Shop1',
      "author": 'Alibaba1',
      "imageUrl": 'https://www.itying.com/images/flutter/4.png',
    },
    {
      "uniqueId": 'Alibaba-Shop2',
      "author": 'Alibaba2',
      "imageUrl": 'https://www.itying.com/images/flutter/5.png',
    },
    {
      "uniqueId": 'Alibaba-Shop3',
      "author": 'Alibaba3',
      "imageUrl": 'https://www.itying.com/images/flutter/6.png',
    },
  ]
  build() {
    Column(){
      Grid(){
        ForEach(this.listData,(item: ImageListData)=>{
          GridItem(){
            Image(item.imageUrl)
              .objectFit(ImageFit.Auto)
              .sharedTransition(item.uniqueId,{
                duration: 300
              })
          }
          .onClick(()=>{
            router.pushUrl({
              url: "pages/FriendImagePage",
              params: {
                uniqueId: item.uniqueId,
                imgUrl: item.imageUrl
              }
            })
          })
        })
      }
      .columnsTemplate(`1fr 1fr`)
      .columnsGap(10)
      .rowsGap(10)
    }
    .padding(10)
    .width('100%')
    .height('100%')


  }

  // 去掉页面转场动画
  pageTransition(){
    PageTransitionEnter({ type: RouteType.None, duration: 0 })
    PageTransitionExit({ type: RouteType.None, duration: 0 })
  }
}
接下来我们在预览效果的页面设置Exchange转场和Static转场效果:
import router from '@ohos.router'
interface ImageListData {
  uniqueId: string,
  author: string,
  imageUrl: string
}

@Entry
@Component
struct FriendImagePage {
  @State uniqueId: string = ''
  @State imageIndex: number = 0
  listData: ImageListData[] = [
    {
      "uniqueId": 'Candy-Shop',
      "author": 'Mohamed Chahin',
      "imageUrl": 'https://www.itying.com/images/flutter/1.png',
    },
    {
      "uniqueId": 'Childhood',
      "author": 'Google',
      "imageUrl": 'https://www.itying.com/images/flutter/2.png',
    },
    {
      "uniqueId": 'Alibaba-Shop',
      "author": 'Alibaba',
      "imageUrl": 'https://www.itying.com/images/flutter/3.png',
    },
    {
      "uniqueId": 'Alibaba-Shop1',
      "author": 'Alibaba1',
      "imageUrl": 'https://www.itying.com/images/flutter/4.png',
    },
    {
      "uniqueId": 'Alibaba-Shop2',
      "author": 'Alibaba2',
      "imageUrl": 'https://www.itying.com/images/flutter/5.png',
    },
    {
      "uniqueId": 'Alibaba-Shop3',
      "author": 'Alibaba3',
      "imageUrl": 'https://www.itying.com/images/flutter/6.png',
    },
  ]
  // build方法执行之前触发
  aboutToAppear(){
    // 获取上一个页面的传值
    let params: object = router.getParams()
    this.uniqueId = params["uniqueId"]
    // 获取轮播图默认选中的索引值
    for (let index = 0; index < this.listData.length; index++) {
      if (this.listData[index].uniqueId == this.uniqueId) {
        this.imageIndex = index
      }
    }
  }
  // build方法执行完毕后触发
  onPageShow(){

  }
  // 页面销毁时触发
  onPageHide(){

  }
  build() {
    Row() {
      Column() {
        Swiper(){
          ForEach(this.listData,(item: ImageListData)=>{
            Image(item.imageUrl)
              .width('100%')
              .objectFit(ImageFit.Auto)
              .sharedTransition(item.uniqueId,{
                duration: 300
              })
          })
        }
        .height('100%')
        .index(this.imageIndex)
      }
      .width('100%')
      .height('100%')
      .backgroundColor(Color.Black)
      .justifyContent(FlexAlign.Center)
      .sharedTransition('bg',{ // 设置淡入淡出的效果
        duration: 300,
        type: SharedTransitionEffectType.Static
      })
      .onClick(()=>{
        router.back()
      })
    }
  }

  // 去掉页面转场动画
  pageTransition(){
    PageTransitionEnter({ type: RouteType.None, duration: 0 })
    PageTransitionExit({ type: RouteType.None, duration: 0 })
  }
}
最终呈现的效果如下:

页面转场动画
两个页面发生跳转,一个页面消失,另一个页面出现,这时可以配置各自页面的页面转场参数实现自定义的页面转场效果。页面转场效果写在pageTransition函数中,通过PageTransitionEnter和PageTransitionExit指定页面进入和退出的动画效果。
PageTransitionEnter的接口为:
PageTransitionEnter({type?: RouteType, duration?: number, curve?: Curve | string, delay?:number)PageTransitionExit的接口为:
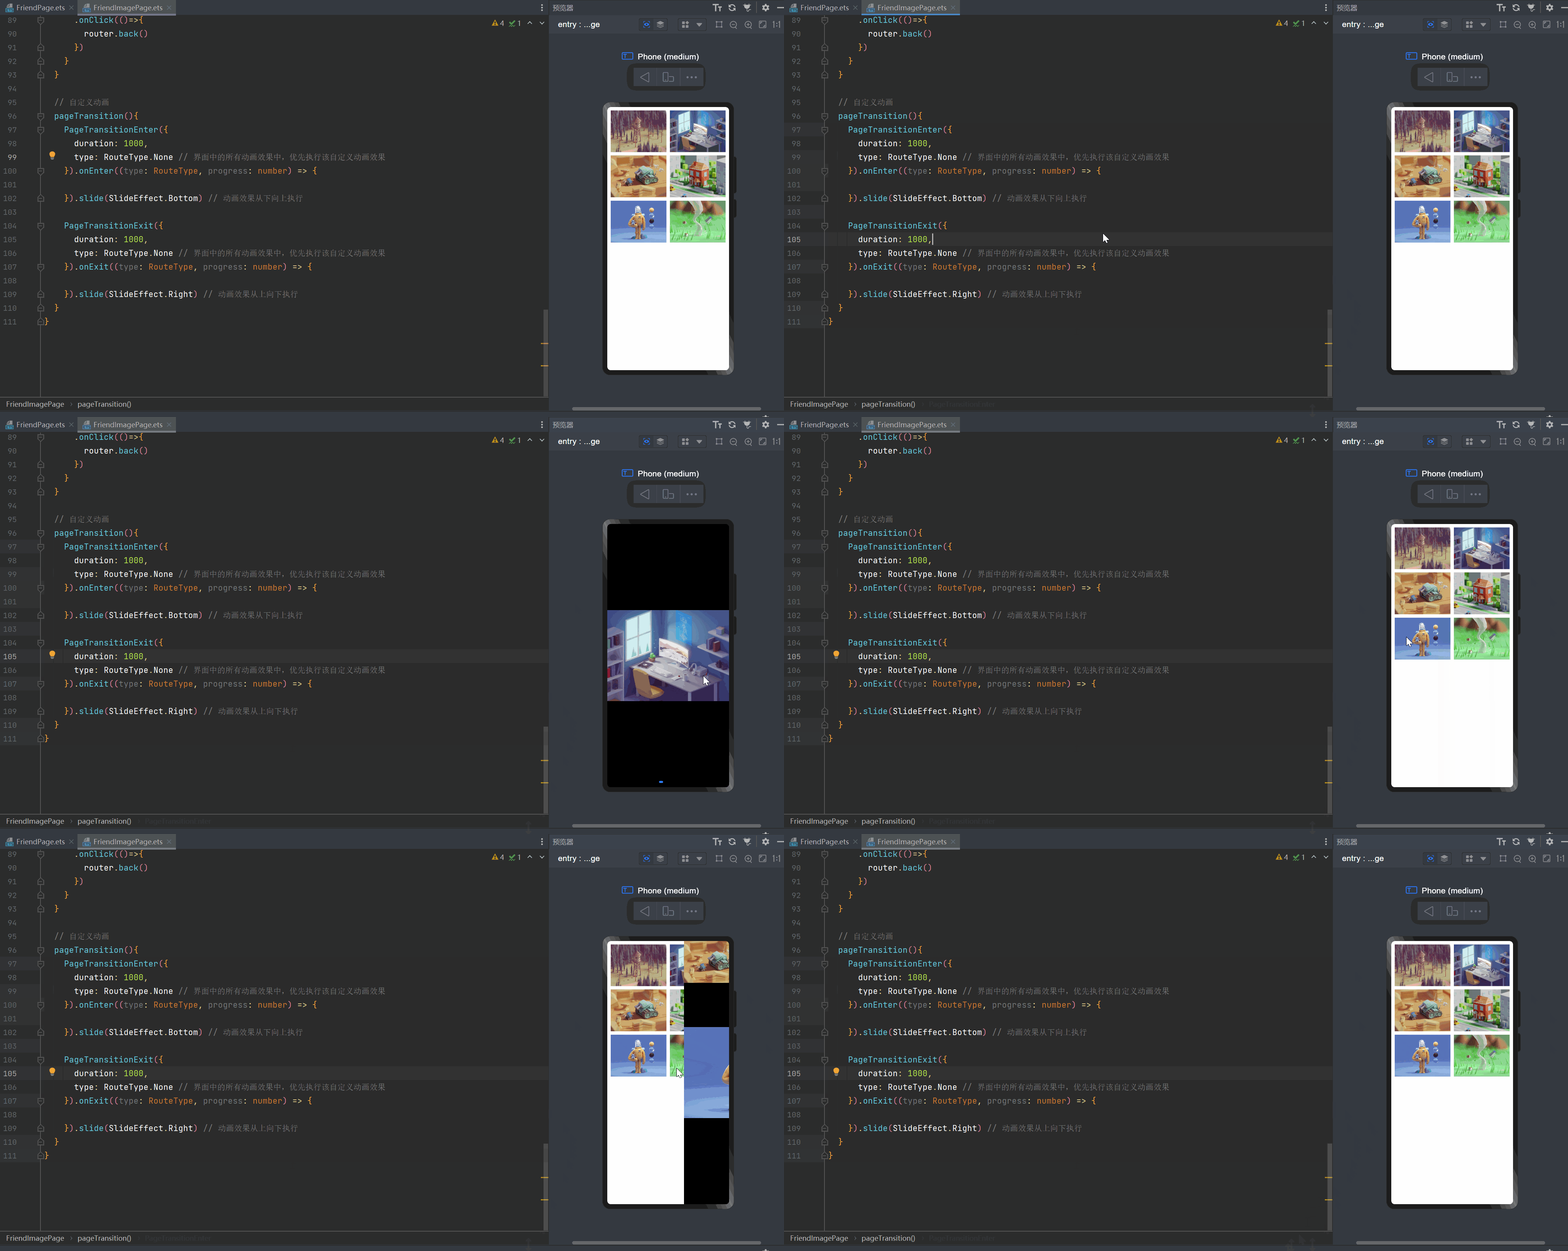
PageTransitionExit({type?: RouteType, duration?: number, curve?: Curve|string, delay?:number})上述接口定义了PageTransitionEnter和PageTransitionExit组件,可通过slide、 translate、 scale opacity属性定义不同的页面转场效果。对于PageTransitionEnter而言,这些效果表示入场时起点值,对于PageTransitionExit而言,这些效果表示退场的终点值,这一点与组件转场transition配置方法类似。此外,PageTransitionEnter提供了onEnter接口进行自定义页面入场动画的回调,PageTransitionExit提供了onExit接口进行自定义页面退场动画的回调。根据这个函数我们可以设置如下效果:
// 自定义动画
pageTransition(){
  PageTransitionEnter({
    duration: 1000,
    type: RouteType.None // 界面中的所有动画效果中,优先执行该自定义动画效果
  }).onEnter((type: RouteType, progress: number) => {

  }).slide(SlideEffect.Bottom) // 动画效果从下向上执行

  PageTransitionExit({
    duration: 1000,
    type: RouteType.None // 界面中的所有动画效果中,优先执行该自定义动画效果
  }).onExit((type: RouteType, progress: number) => {

  }).slide(SlideEffect.Right) // 动画效果从上向下执行
}
拿之前的朋友圈预览图片的案例进行举例,如下:

本文来自互联网用户投稿,该文观点仅代表作者本人,不代表本站立场。本站仅提供信息存储空间服务,不拥有所有权,不承担相关法律责任。 如若内容造成侵权/违法违规/事实不符,请联系我的编程经验分享网邮箱:chenni525@qq.com进行投诉反馈,一经查实,立即删除!