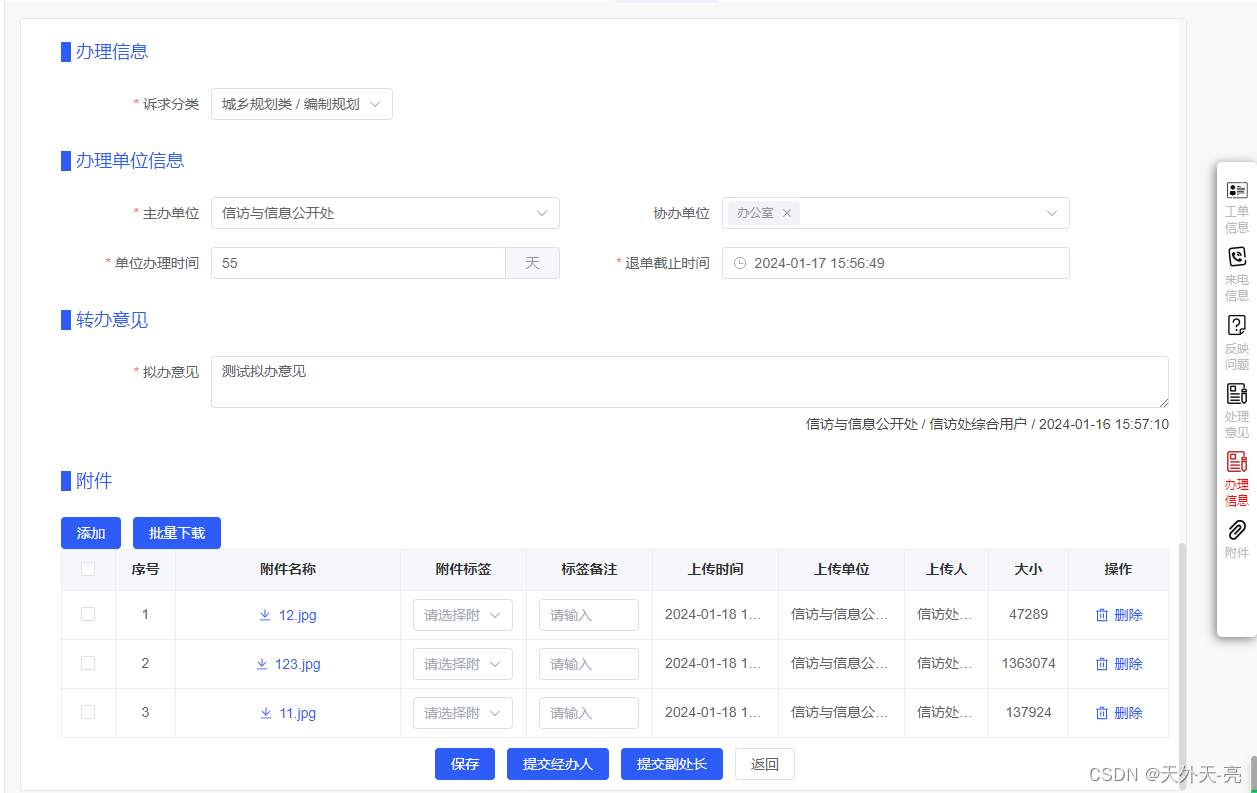
js:锚点滚动到页面对应区域
发布时间:2024年01月18日
锚点跳转到对应页面的区域使用 scrollIntoView
// anchor即你要跳转到的元素
anchor.scrollIntoView({
  behavior: "smooth",
  block: "center",
  inline: "nearest"
});
1、behavior:定义滚动行为。它可以设置为 “auto” 或 “smooth”。默认是 “auto”。
“auto”:立即跳转到元素,没有动画。
“smooth”:平滑地滚动到元素,有动画效果。
2、block:定义垂直方向的对齐方式。它可以设置为 “start”、“center”、“end” 或 “nearest”。默认是 “start”。
“start”:元素的顶部与视口的顶部对齐。
“center”:元素的中心与视口的中心对齐。
“end”:元素的底部与视口的底部对齐。
“nearest”:滚动到最接近视口的位置。
3、inline:定义水平方向的对齐方式。它可以设置为 “start”、“center”、“end” 或 “nearest”。默认是 “nearest”。
“start”:元素的左侧与视口的左侧对齐。
“center”:元素的中心与视口的中心对齐。
“end”:元素的右侧与视口的右侧对齐。
“nearest”:滚动到最接近视口的位置。
下面代码主要是针对具体项目可能遇到的一些问题,主要是我自己做一个记录,上面其实已经给出了答案,大家酌情看下面的内容:

监听滚动的盒子 html 结构
<div ref="scrollFun">
  <div class="compute-nav-num" id="navEle1"></div>
  <div class="compute-nav-num" id="navEle2"></div>
  <div class="compute-nav-num" id="navEle3"></div>
</div>
监听滚动的盒子js逻辑
const scrollFun = ref();
onMounted(() => {
  scrollFun.value.addEventListener('scroll', handleScroll);
});
onBeforeUnmount(() => {
  scrollFun.value.removeEventListener('scroll', handleScroll)
});
const handleScroll = () => {
  handleScroll();
};
const closeEventFun = () => {
  scrollFun.value.removeEventListener('scroll', handleScroll);
}
const openEventFun = () => {
  scrollFun.value.addEventListener('scroll', handleScroll);
}

const handleScroll = () => {
  if (scrollTimer) {
    clearTimeout(scrollTimer);
  }
  scrollTimer = setTimeout(() => {
    // compute-nav-num 这个类名是为了收集所有滚动的盒子里的子集
    const viewList = document.querySelectorAll('.compute-nav-num');
    let active = 0;
    if (viewList.length === 0) return;
    for (let i = 0; i < viewList.length; i++) {
      const top = (scrollFun as any).value.scrollTop + 30;
      if (i === 0) {
        const next = (viewList[i + 1] as any).offsetTop;
        if (top < next) {
          active = i;
          break;
        }
      } else {
        const target = (viewList[i] as any).offsetTop;
        const next = (viewList[i + 1] as any).offsetTop;
        if (top > target || top == target) {
          if (top < next) {
            active = i;
            break;
          }
        }
      }
    }
    activeNavIndex.value = active + 1;
  }, 50);
};
const routerClick = (obj: any) => {
  // i是点亮导航栏的
  activeNavIndex.value = Number(obj.i);
  // id是固定的 是控制滚动的
  viewActive(obj.id);
};
const viewActive = (id: any) => {
  // 当点击导航栏时清除滚动监听,这是因为scrollIntoView事件,也会触发滚动监听
  // 关闭主要是因为,最下面总有几个特别小的盒子,滚动其实是无法点亮对应导航栏的
  // 点击属于最后几个小盒子对应的导航栏时,如果滚动监听也触发了,那最后算的 activeNavIndex肯定不对
  closeEventFun();
  const anchor = document.querySelector('#navEle' + id);
  if (anchor) {
    anchor.scrollIntoView({
      behavior: 'smooth'
    });
  }
  // 下面的事件既是滚动的一个事件间隔,争取在滚动结束后,再放开监听
  setTimeout(() => {
    openEventFun();
  }, 850);
}
导航栏组件
// 这里的数据 id之所以写这里,是为了固定id数值,这样是为了适应,导航栏有时在某些情况下
// 需要隐藏一些,这时 index 就是随机的,加上固定id,点击传出,这样 querySelector 才能找到
let navListObj: any = reactive([
  {
    name: '工单',
    id: '1',
    img: orderInfo,
    imgActive: orderInfoActive
  },
  {
    name: '来电',
    id: '2',
    img: phoneInfo,
    imgActive: phoneInfoActive
  }
]);
// 点击传出参数
const emit = defineEmits(["routerClick"]);
const routerClick = (id: any, i: any) => {
  emit("routerClick", {id: id, i: i});
}
<div class="affix-nav">
    <ul>
      <li v-for="(obj, i) in navListObj" :key="i">
        <a @click="routerClick(obj.id, i + 1)" :class="activeNavIndex === i + 1 ? 'active' : ''">
          <img :src="activeNavIndex === (i + 1) ? obj.imgActive : obj.img" alt="">
          <span>{{ (obj as any).name1 }}</span>
          <span v-if="(obj as any).name2">{{ (obj as any).name2 }}</span>
        </a>
      </li>
    </ul>
  </div>
.affix-nav {
  max-height: 60%;
  position: absolute;
  right: 5px;
  top: 0;
  bottom: 0;
  margin: auto;
  z-index: 1000;
  overflow: auto;
  background-color: #fff;
  box-shadow: -2px 2px 10px rgba(0, 0, 0, .5);
  padding: 20px 8px;
  border-radius: 5px;
  ul {
    padding-left: 0;
  }
  li a {
    text-align: center;
    display: block;
    font-size: 12px;
    margin-bottom: 10px;
    cursor: pointer;
    img {
      position: relative;
      right: 0;
      left: 0;
      margin: auto;
      padding-bottom: 5px;
    }
    span {
      color: #BBBBBB;
      line-height: 16px;
      display: block;
    }
  }
  .active span {
    color: #f00;
  }
}
文章来源:https://blog.csdn.net/weixin_44384273/article/details/135678991
本文来自互联网用户投稿,该文观点仅代表作者本人,不代表本站立场。本站仅提供信息存储空间服务,不拥有所有权,不承担相关法律责任。 如若内容造成侵权/违法违规/事实不符,请联系我的编程经验分享网邮箱:chenni525@qq.com进行投诉反馈,一经查实,立即删除!
本文来自互联网用户投稿,该文观点仅代表作者本人,不代表本站立场。本站仅提供信息存储空间服务,不拥有所有权,不承担相关法律责任。 如若内容造成侵权/违法违规/事实不符,请联系我的编程经验分享网邮箱:chenni525@qq.com进行投诉反馈,一经查实,立即删除!
最新文章
- Python教程
- 深入理解 MySQL 中的 HAVING 关键字和聚合函数
- Qt之QChar编码(1)
- MyBatis入门基础篇
- 用Python脚本实现FFmpeg批量转换
- 技术博客:市面上加密混淆软件的比较和推荐
- 常用python代码大全-python使用datetime模块处理日期和时间
- mongodb aggregate 联表 nest.js +monoose .js实现
- 每日一道编程题:niven 数
- 【深度学习:Recurrent Neural Networks】循环神经网络(RNN)的简要概述
- MCU Pin2Pin w STM32, FPGA Pin2Pin w Altera
- SpringBoot 整合 JWT
- 一个完整的测试流程包括哪些?测试人员需要做什么?
- 学习体系结构 - Arm 通用中断控制器 v3 和 v4
- 【linux】遇到服务(如网站)不可用时,排查思路?