vue2 生命周期基本使用
发布时间:2023年12月20日
基础介绍?
Vue.js 提供了丰富的生命周期钩子函数,开发者可以通过这些钩子函数来控制组件在不同状态下的行为。Vue 组件的生命周期是指从组件实例化、初始化、渲染、更新到销毁的整个过程。
Vue 组件的生命周期钩子函数如下:
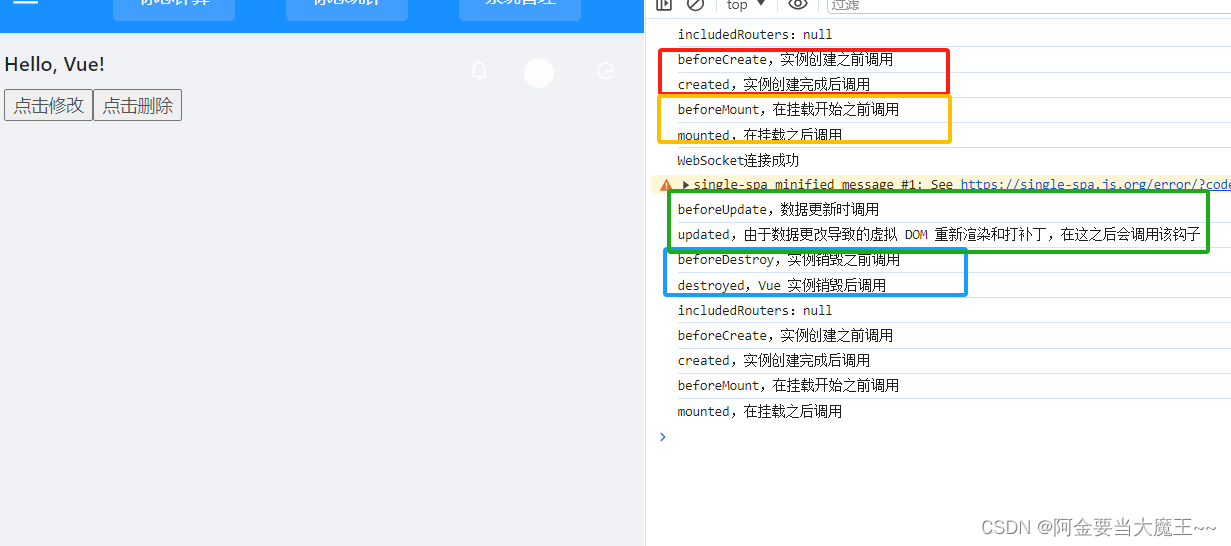
beforeCreate: 在实例创建之前调用,此时还没有调用?data?选项中定义的数据和?methods?方法。created: 实例创建完成后调用,此时已经完成了数据的观测(obervation),但尚未挂载DOM,$el 属性尚不可用。beforeMount: 在挂载开始之前调用,相关的 render 函数首次被调用。这个时候还没有开始挂载节点,$el 属性尚不可用。mounted: el 被新创建的 vm.el替换,并挂载到实例上去之后调用该钩子。如果rootinstance被挂载到一个文档内元素上,当mounted被调用时vm.el 也在文档内。beforeUpdate: 数据更新时调用,发生在虚拟 DOM 打补丁之前。updated: 由于数据更改导致的虚拟 DOM 重新渲染和打补丁,在这之后会调用该钩子。beforeDestroy: 实例销毁之前调用。在这一步,实例仍然完全可用。destroyed: Vue 实例销毁后调用。调用后,所有的事件监听器会被移除,所有的子实例也都会被销毁。这些生命周期钩子为开发者提供了在不同阶段进行操作的机会,例如数据的初始化、DOM 的操作、数据的请求等都可以在这些钩子中进行。
?
效果展示?
 ?
?
代码 效果一
  <template>
    <div>
      <h1>{{ message }}</h1>
      <button @click="changeMessage">点击修改</button>
      <button @click="del">点击删除</button>
    </div>
  </template>

  <script>
  export default {
    data() {
      return {
        message: 'Hello, Vue!'
      };
    },
    beforeCreate() {
      console.log('beforeCreate,实例创建之前调用');
    },
    created() {
      console.log('created,实例创建完成后调用');
    },
    beforeMount() {
      console.log('beforeMount,在挂载开始之前调用');
    },
    mounted() {
      console.log('mounted,在挂载之后调用');
    },
    beforeUpdate() {
      console.log('beforeUpdate,数据更新时调用');
    },
    updated() {
      console.log('updated,由于数据更改导致的虚拟 DOM 重新渲染和打补丁,在这之后会调用该钩子');
    },
    beforeDestroy() {
      console.log('beforeDestroy,实例销毁之前调用');
    },
    destroyed() {
      console.log('destroyed,Vue 实例销毁后调用');
    },
    methods: {
      changeMessage() {
        this.message = 'Y你好!';
      },
      del() {
        delete this.message;
        this.$destroy(); // 手动销毁Vue实例
      }
    }
  };
  </script>
?代码 效果二 (稍微复杂)
  <template>
    <div>
      <h1>{{ message }}</h1>
      <h1>{{ param }}</h1>
      <button @click="changeMessage">点击修改</button>
      <button @click="deleteComponent">点击删除</button>
    </div>
  </template>

  <script>
  export default {
    data() {
      return {
        message: 'Hello, Vue!',
        param: ''
      };
    },

    created() {
      console.log('组件已创建');
    },
      // 如果 在初始的时候一直 初始化 beforeMount   this.param = 'beforeMount';
      //  然后进阶就会出发下边的跟新 就会导致默认循环 浏览器无限循环
      // 所以 初始化 param 就不要马上出发更新
      // 可以尝试解开注释  查看效果
    beforeMount() {
      // this.param = 'beforeMount';
      console.log('挂载开始');
      console.log(this.param,'挂载开始')
    },
    mounted() {
      // this.param = 'mounted';
      console.log('组件已挂载');
      console.log(this.param,'组件已挂载')
    },
    beforeUpdate() {
      // this.param = 'beforeUpdate';
      console.log('数据更新前');
      console.log(this.param,'数据更新前')
    },
    updated() {
      // this.param = 'updated';
      console.log('数据已更新');
      console.log(this.param,'数据已更新')

    },
    beforeDestroy() {
      this.param = 'beforeDestroy';
      console.log('组件销毁前');
      console.log(this.param,'组件销毁前')

    },
    destroyed() {
      this.param = 'destroyed';
      console.log('组件已销毁');
      console.log(this.param,'组件已销毁')
    },
    methods: {
      changeMessage() {
        this.message = 'Y你好!';
        this.param = 'changeMessage';
      },
      deleteComponent() {
        this.$destroy(); // 手动销毁组件实例
        this.param = 'deleteComponent';
      }
    }
  };
  </script>
文章来源:https://blog.csdn.net/weixin_68266812/article/details/135086988
本文来自互联网用户投稿,该文观点仅代表作者本人,不代表本站立场。本站仅提供信息存储空间服务,不拥有所有权,不承担相关法律责任。 如若内容造成侵权/违法违规/事实不符,请联系我的编程经验分享网邮箱:chenni525@qq.com进行投诉反馈,一经查实,立即删除!
本文来自互联网用户投稿,该文观点仅代表作者本人,不代表本站立场。本站仅提供信息存储空间服务,不拥有所有权,不承担相关法律责任。 如若内容造成侵权/违法违规/事实不符,请联系我的编程经验分享网邮箱:chenni525@qq.com进行投诉反馈,一经查实,立即删除!
最新文章
- Python教程
- 深入理解 MySQL 中的 HAVING 关键字和聚合函数
- Qt之QChar编码(1)
- MyBatis入门基础篇
- 用Python脚本实现FFmpeg批量转换
- mysql innodb知识记录
- 第十一章 : Spring Cloud Hystrix 实战运用
- 跨平台设备管理方案Selenium Grid
- 单播、多播、广播、组播、泛播、冲突域、广播域、VLAN概念汇总
- 外包干了5个月,技术退步明显...
- 60V降12V3A降压芯片WT6037
- 下载文件,解决oom问题 springboot
- macbookpro怎么恢复出厂设置2024最新恢复方法汇总
- 21.云原生之ArgoCD CICD实战
- DataGrip之mysql的使用配置