性能优化-HVX 开发环境介绍
本篇以 HVX 的开发环境配置以及应用实例编译测试为主进行讲述。
🎬个人简介:一个全栈工程师的升级之路!
📋个人专栏:高性能(HPC)开发基础教程
🎀CSDN主页?发狂的小花
🌄人生秘诀:学习的本质就是极致重复!
目录
本篇以 HVX 的开发环境配置以及应用实例编译测试为主进行讲述。
一、Hexagon SDK 下载和安装
HVX 开发工具分为 windows 和 Ubuntu环境,本专栏主要以 Ubuntu 环境为主进行介绍。
HVX 的开发工具是 Hexagon SDK(文章基于版本 Ubuntu 20.04 进行演示)。
A. SDK 下载
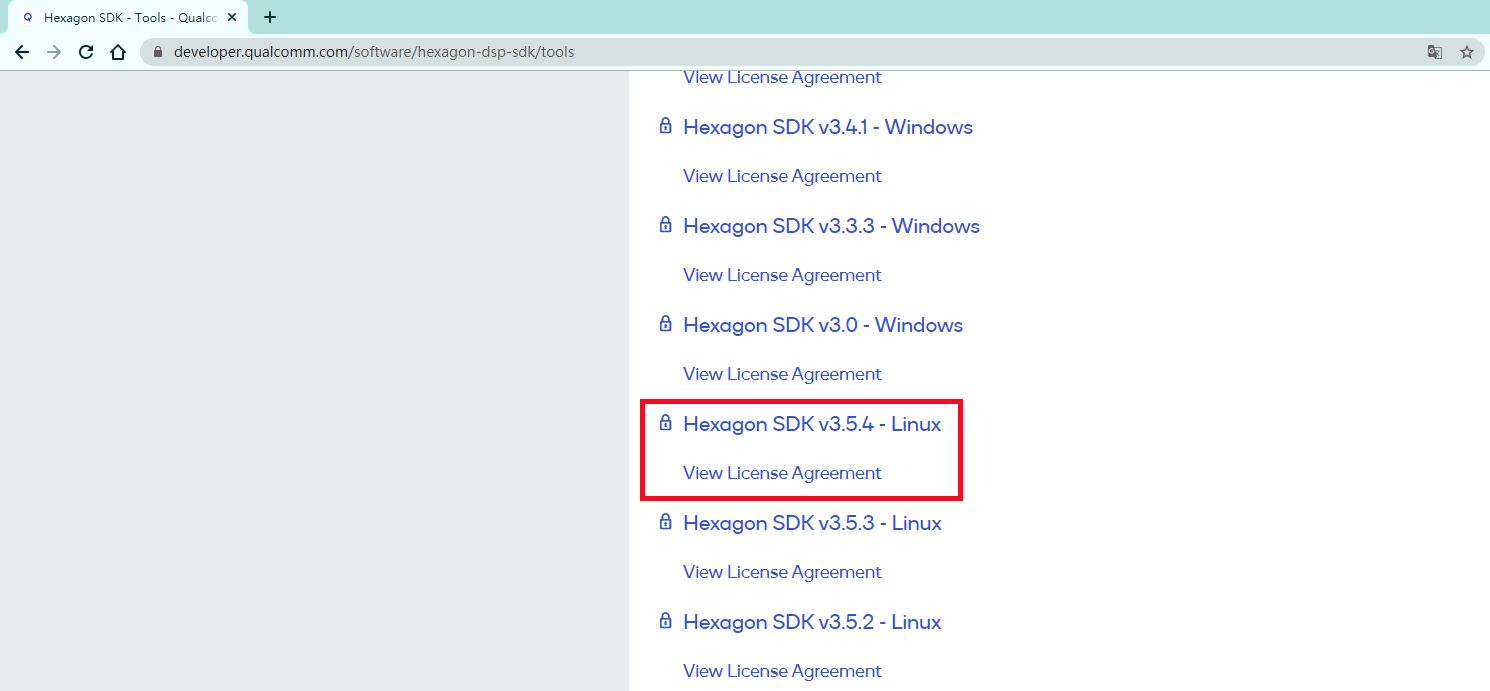
- 高通开发者官网?下载 SDK 安装包(hexagon_sdk_lnx_3_5_installer_00006_1.zip),文章基于 SDK3.5.4 版本进行介绍。
下载官网示意图
B. SDK 安装
# 解压安装包 hexagon_sdk_lnx_3_5_installer_00006_1.zip
# 在解压后的目录下进行如下操作
sudo chmod a+x ./qualcomm_hexagon_sdk_3_5_4_eval.bin
./qualcomm_hexagon_sdk_3_5_4_eval.bin
C. SDK 目录介绍
- SDK 根目录

hexagon_sdk 目录
| 文件夹 | 描述 |
|---|---|
| build | 编译所需的编译脚本文件 |
| docs | HVX 开发相关说明文档 |
| examples | SDK 例子,HVX 样例位于 common 文件夹 |
| incs | SDK 头文件目录,包含 HVX 函数及指令等头文件 |
| libs | SDK 必需库文件目录,包含 HVX 开发运行所涉及的必备库及部分实现代码,例如 dspcv,fastcv,hexagon_nn 等 |
| scripts | 常用脚本目录 |
| setup_sdk_env.source | 环境变量设置脚本 |
| tools | 常用工具集合,包含 ndk,qaic 及签名工具(elfsigner)等 |
- tools 目录

hexagon_sdk tools 目录
- tools/HEXAGON_Tools 目录

hexagon_sdk tools HEXAGON_Tools 目录
| 功能 | 路径 |
|---|---|
| HVX 模拟器仿真样例 | ${HVX_SDK_PATH}\tools\HEXAGON_Tools\8.3.07\Examples\HVX |
| DSP 开发手册文档 | ${HVX_SDK_PATH}\tools\HEXAGON_Tools\8.3.07\Documents\Hexagon_Document_Bundle.pdf |
D. Android NDK
HVX SDK 需要依赖 Andriod NDK 来进行编译测试,NDK 需放置于${HVX_SDK_PATH}/tools 目录,Android NDK 需要开发者下载配置。
Android NDK 下载,文章中使用 Linux 版本 android-ndk-r19c。(3.5.4版本 SDK 使用 android-ndk-r19c 即可。
二、Hexagon SDK 手机端运行
该部分以 ${HVX_SDK_PATH}/examples/common/gaussian7x7 为例进行说明。
A. 工程编译
- 设置环境变量:
cd ${HVX_SDK_PATH}
source setup_sdk_env.source- Andorid 端应用编译:
cd ${HVX_SDK_PATH}/examples/common/gaussian7x7
make tree V=android_Release_aarch64 CDSP_FLAG=1
Android 端可执行程序 位于${HVX_SDK_PATH}/examples/common/gaussian7x7/android_Release_aarch64/ship/ gaussian7x7 目录
- CDSP 端应用编译:
make tree V=hexagon_Release_dynamic_toolv83_v66 VERBOSE=1CDSP 端算法 libgaussian7x7_skel.so 库位于${HVX_SDK_PATH}/examples/common/gaussian7x7/hexagon_Release_dynamic_toolv83_v68/ship/libgaussian7x7_skel.so
相关编译选项解释:
| toolv83 | 表示 tools 版本是 8.3 |
|---|---|
| V66 | 表示 DSP 架构版本是 V66(SM8150, SM8250 使用 V66, SM8350 使用 V68) |
| CDSP_FLAG=1 | 表示引用加载至 CDSP 端运行。SOC 中存在多个 DSP(如 ADSP,CDSP 等),编译时需显式指定 |
B. 签名
手机系统中存在安全及认证机制,CDSP 库文件需要进行签名认证,以确保可以被正确加载运行。
- 签名方法:
签名方法通常有两种:开发签名和量产签名。(sm8150 之后,可以使用 Unsiged PD 方式进行算法验证测试,但部分硬件资源使用受限)
① 开发签名:
应用计算法处在开发阶段(Debug Fuse Enabled on的阶段)时,可以采用开发签名进行调试。
开发签名需要获取 设备端的序列号,然后生成相应的签名库文件 Testsig.so。
- 获取序列号:
adb wait-for-device root
adb remount
adb push ${HVX_SDK_PATH}/3.5.4/tools/elfsigner/getserial/CDSP/android_Release/getserial /data
adb shell chmod 777 /data/getserial
adb shell /data/getserial
如果getserial 失败了, 用下面的指令:
adb shell cat /sys/devices/soc0/serial_number //这里返回的是十进制,需要转化成十六进制- 根据序列号生成 testsig.so 开发签名库
cd ${HVX_SDK_PATH}/tools/elfsigner/
elfsigner.py -t 0xXXXXXXXX
#0xXXXXXXXX为前面获取的序列号转换成十六进制的值。- 将签名库 testsig.so push 至手机端:
adb wait-for-device root
adb remount
adb shell mkdir -p /vendor/lib/rfsa/adsp

#testsig-0x6E07C1CE.so 为根据测试机序列号生成的开发签名库
adb push ${HVX_SDK_PATH}/tools/elfsigner/output/testsig-0x6E07C1CE.so /vendor/lib/rfsa/adsp/
②量产签名:
量产签名主要用于批量生产时签名,需要对 DSP firmware 进行重新编译 。firmware 编译过程中会提取指定目录下算法库文件的哈希信息,然后存储于系统中,运行时会进行检测。(该方法需要针对每次算法调整都做签名)
③Unsiged PD:
从 8150 开始,增加 Unsiged PD feature,即在 host 端进行 CDSP 初始化时开启 unsiged PD 功能。
该方式可除部分硬件资源使用受限外,对于开发者而言更加便利。
// Unsigned PD
if (1 == UNSIGNED_PD)
{
    if (remote_session_control)
    {
        struct remote_rpc_control_unsigned_module data;
        data.enable = 1;
        data.domain = CDSP_DOMAIN_ID;
        retVal = remote_session_control(DSPRPC_CONTROL_UNSIGNED_MODULE, (void*)&data, sizeof(data));
        printf("remote_session_control returned %d for configuring unsigned PD.\n", retVal);
    }
    else
    {
        printf("Unsigned PD not supported on this device.\n");
    }
}
C. 算法实机测试
首先将编译生成的测试程序及库文件 push 至测试机中,该示例的测试应用编译路径为 ${HVX_SDK_PATH}/examples/common/gaussian7x7
- push Android 端测试程序
adb wait-for-device root
adb remount
#进入gaussian7x7例子目录
cd ${HVX_SDK_PATH}/examples/common/gaussian7x7
adb push android_Release_aarch64/ship/gaussian7x7 /vendor/bin/
adb shell chmod +x /vendor/bin/gaussian7x7- push DSP 端算法库文件
adb push hexagon_Release_dynamic_toolv83_v66/ship/libgaussian7x7_skel.so /vendor/lib/rfsa/adsp/- 运行测试
adb shell
cd /vendor/bin
./gaussian7x7
执行输出如下:

运行测试结果
上述为手机端运行测试流程,基于 hexagon-sim模拟器的算法运行测试会在后续章节进行介绍。
三、 算法实例分析
继续 gaussian7x7(${HVX_SDK_PATH}/examples/common/gaussian7x7)为例进行说明。
程序代码、编译文件和运行过程。
A. SDK 工程目录结构

- asm_src:算法 HVX 汇编代码实现
- inc:IDL 文件
- src:CPU 侧代码实现和算法 DSP 侧实现(包含HVX Intrinsic代码)。DSP 侧代码提供了 HVX 汇编及 HVX Intrinsic 两种代码实现)。
- android.min:CPU 侧代码编译的 makefile 配置文件
- hexagon.min:DSP 侧代码编译的 makefile 配置文件
处理器间(CPU,DSP)通信由 Fastrpc 完成。算法调用过程解析通过 idl 编译生成的函数接口映射来处理。
- IDL 映射文件
inc/gaussian7x7.idl 为该例程的映射文件,用来定义 CPU 和 DSP 同步使用的接口,包括函数、结构体等。
RPC 调用过程需要调用反射机制实现,HVX 的调用反射基于 IDL 来实现,使用 IDL 来定义调用接口,以使 CPU 能完成 DSP 的函数调用。

编译器根据 idl 文件编译生成 gaussian7x7.h、gaussian7x7_stub.c 和gaussian7x7_skel.c 三个文件。
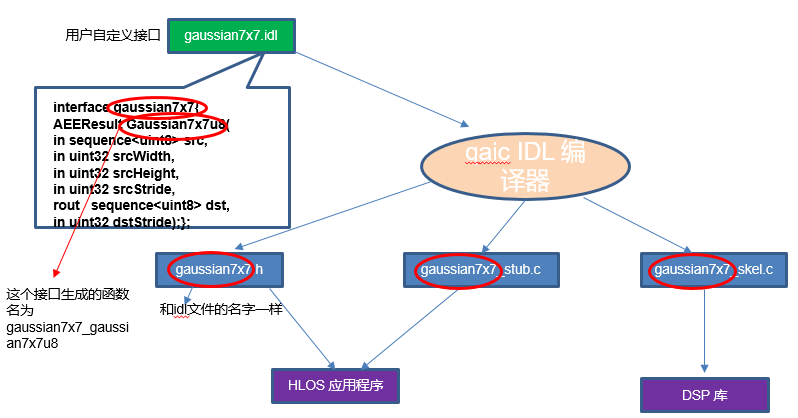
下面介绍一下gaussian7x7的idl定义:
AEEResult Gaussian7x7u8
(
    in sequence<uint8> src, // input buffer of unsigned 8-bit values
    in uint32 srcWidth,  // width of region of interest contained in src image
    in uint32 srcHeight, // height of region of interest contained in src image
    in uint32 srcStride,           // stride of the src image
    rout sequence<uint8> dst,  // output buffer of unsigned 8-bit values
    in uint32 dstStride,           // stride of the dst image
    in int32 LOOPS,                // number of times to iterate
    in int32 wakeupOnly,           // flag to skip processing
    inrout int32 dspUsec,           // profiling result in uSec
    inrout int32 dspCyc             // profiling result in cycles
);
上述代码为 gaussian7x7 的接口定义:
- Sequence为表示数组参数,转义接口为 data 指针及 数组 size;
in 表示为参数为输入属性,生成为 const 类型。
因此 in sequence<uint8> src 对应的接口参数为 const uint8* imgSrc, int srcLen;
- rout sequence<uint8> dst 中 rout 表示输出属性,生成对应的接口参数为 uint8* imgDst, int dstLen。
- in uint32 srcWidth 生成对应的接口参数为 uint32 srcWidth
- rout int32 dspUsec 生成对应的接口参数为 int32* dspUsec
生成三个文件位于 android_Release_aarch64 和 hexagon_Release_dynamic_toolv83_v66 文件夹内,如下图所示


在编程过程中, CPU 端会将 gaussian7x7.h 和 gaussian7x7_stub.c 代码编译后链接至 CPU 端的应用程序,DSP 端会将 gaussian7x7.h 和 gaussian7x7_skel.c 代码编译后链接生成 DSP 端运行库。
基于 IDL 生成函数接口如下,位于 gaussian7x7.h 中
QAIC_HEADER_EXPORT AEEResult __QAIC_HEADER(benchmark_gaussian7x7)(remote_handle64 _h, const uint8* src, int srcLen, uint32 srcWidth, uint32 srcHeight, uint32 srcStride, uint8* dst, int dstLen, uint32 dstStride, int32 LOOPS, int32 wakeupOnly, int32* dspUsec, int32* dspCyc) __QAIC_HEADER_ATTRIBUTE;B. CPU 端算法流程
CPU 端的流程图如下(基于 ${HVX_SDK_PATH}/examples /common /gaussian7x7/gaussian7x7.c):

- 通常在硬件设备和用户空间共享数据时,会基于 ION(后续 DMA BUF Heap)实现共享大尺寸连续物理内存,以减少内存拷贝开销实现 zero copy。该例程中使用 rpcmem_init 函数进行初始化(sm8350不再需要 rpcmem 初始化调用)
rpcmem_init();- 初始化DSP,设置时钟,带宽等参数。
// call dspCV_initQ6_with_attributes() to bump up Q6 clock frequency
// Since this app is not real-time, and can fully load the DSP clock & bus resources
// throughout its lifetime, vote for the maximum available MIPS & BW.
dspCV_Attribute attrib[] =
{
    {DSP_TOTAL_MCPS, 1000},                 // Slightly more MCPS than are available on current targets
    {DSP_MCPS_PER_THREAD, 500},             // drive the clock to MAX on known targets
    {PEAK_BUS_BANDWIDTH_MBPS, 12000},       // 12 GB/sec is slightly higher than the max realistic max BW on existing targets.
    {BUS_USAGE_PERCENT, 100},               // This app is non-real time, and constantly reading/writing memory
};

retVal = dspCV_initQ6_with_attributes(attrib, sizeof(attrib)/sizeof(attrib[0]));
printf("return value from dspCV_initQ6() : %d \n", retVal);
VERIFY(0 == retVal);- 基于 rpcmem 申请 buf,高通内部使用 ION 进行硬件设备内存共享,可以有效江都 Fastrpc 通信时间,基于常规堆内存分配,会引发数据拷贝操作。
// allocate ion buffers on CDSP side
VERIFY(0 != (src = (uint8_t*)rpcmem_alloc(ION_HEAP_ID_SYSTEM, RPCMEM_DEFAULT_FLAGS, srcSize)));
printf("src - allocated %d\n", (int)srcSize);
VERIFY(0 != (dst = (uint8_t*)rpcmem_alloc(ION_HEAP_ID_SYSTEM, RPCMEM_DEFAULT_FLAGS, dstSize)));
printf("dst - allocated %d\n", (int)dstSize);- 生成伪随机图像数据
// populate src buffer (with a simple pattern)
for (j = 0; j < srcHeight; j++)
{
    uint8_t *ptr = &src[j * srcStride];
    for (i = 0; i < srcWidth; i++)
    {
        *ptr++ = i + j;             // some incrementing pattern fill
    }
}- 进行算法调用测试
unsigned long long t1 = GetTime();
for (i = 0; i < LOOPS; i++)
{
    // For HVX case, note that src, srcStride, dst, dstStride all must be multiples of 128 bytes.
    // The HVX code for this example function does not handle unaligned inputs.
    retVal = gaussian7x7_Gaussian7x7u8(src, srcSize, srcWidth, srcHeight, srcStride, dst, dstSize, dstStride);
}

unsigned long long t2 = GetTime();
VERIFY(0 == retVal);
#ifdef __hexagon__
printf("run time of gaussian7x7_Gaussian7x7u8: %llu PCycles (from %llu-%llu) for %d iterations\n", t2-t1, t1, t2, LOOPS);
printf("To apply timefilter to profiling results, add this to simulation cmd line: --dsp_clock 800 --timefilter_ns %d-%d\n", (int)(t1/0.8), (int)(t2/0.8));
#else
printf("run time of gaussian7x7_Gaussian7x7u8: %llu microseconds for %d iterations\n", t2-t1, LOOPS);
#endif
printf("return value from gaussian7x7_Gaussian7x7u8: %d \n", retVal);

// validate results
Gaussian7x7u8_ref(src, srcWidth, srcHeight, srcStride, ref, dstStride);- 运算结果比较
int bitexactErrors = 0;
printf( "Checking for bit-exact errors... \n");
for (j = 3; j < dstHeight-3; j++)
{
    for (i = 3; i < dstWidth-3; i++)
    {
        if (ref[j * dstStride + i] != dst[j * dstStride + i])
        {
            bitexactErrors++;
        }
    }
}
printf( "Number of bit-exact errors: %d \n", bitexactErrors);
VERIFY(0 == bitexactErrors);- 释放资源
if(src)
{
    rpcmem_free(src);
}
if(dst)
{
    rpcmem_free(dst);
}
// free ion buffers
rpcmem_deinit();

if(ref)
{
    free(ref);
}

printf("calling dspCV_deinitQ6()... \n");
retVal = dspCV_deinitQ6();
printf("return value from dspCV_deinitQ6(): %d \n", retVal);

if (0 == (retVal | nErr))
{
    printf("- success\n");
    return 0;
}
else
{
    printf("- failure\n");
    return -1;
}
C. DSP 端算法流程:
DSP 端的流程图如下(基于 ${HVX_SDK_PATH}/examples /common /gaussian7x7/gaussian7x7_imp.c):

- 回调函数的流程图如下
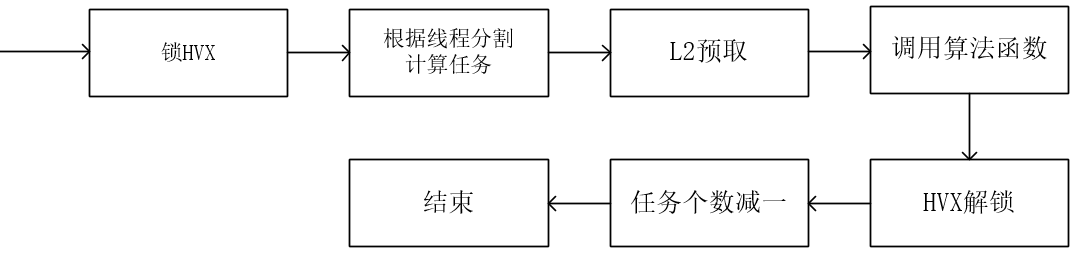
DSP 端函数接口如下:
AEEResult gaussian7x7_Gaussian7x7u8(const uint8* imgSrc, int srcLen,
    uint32 srcWidth, uint32 srcHeight, uint32 srcStride, uint8* imgDst,
int dstLen, uint32 dstStride) - 系统架构及参数有效性检测
// only supporting HVX version in this example.
#if (__HEXAGON_ARCH__ < 60)
return AEE_EUNSUPPORTED;
#endif

// record start time (in both microseconds and pcycles) for profiling
#ifdef PROFILING_ON
uint64 startTime = HAP_perf_get_time_us();
uint64 startCycles = HAP_perf_get_pcycles();
#endif
// Only supporting 128-byte aligned!!
if (!(imgSrc && imgDst && ((((uint32)imgSrc | (uint32)imgDst | srcWidth | srcStride | dstStride) & 127) == 0)
        && (srcHeight >= 7)))
{
    return AEE_EBADPARM;
}
以上是异常检测的代码实现,包括有:
① 如果 DSP 版本小于 60,没有 HVX 硬件,退出。
② 如果 src,dst 地址是NULL,退出。
③ 如果 src,dst 地址不对齐,退出,因为代码实现(Gaussian7x7)只支持128对齐的数据。
④ 如果输入图像高度小于7,退出,Gaussian7x7代码无法正确运行。
- 初始化并发参数
// Determine if it is safe (from an audio/voice/camera concurrency perspective) to run a compute function now
dspCV_ConcurrencyAttribute attrib[1] =
{
    {COMPUTE_RECOMMENDATION, 0},  // query for compute concurrency recommendation
};
dspCV_concurrency_query(attrib, 1);
if (COMPUTE_RECOMMENDATION_NOT_OK == attrib[0].value)
{
    // return error back to application
    return AEE_EBADSTATE;
}

// Determine if HVX is available and in what configuration
dspCV_hvx_config_t hvxInfo = {0};- 设置 HVX 运行模式为 DSPCV_HVX_MODE_128B,早期的 HVX 有 128B 和 64B 两种模式,sm845之后只有 128B 模式
// for sake of example, assume only 128B implementation is available (i.e. intrinsics)
hvxInfo.mode = DSPCV_HVX_MODE_128B;- 进行多线程运行设置
// Call utility function to prepare for a multi-threaded HVX computation sequence.
dspCV_hvx_prepare_mt_job(&hvxInfo);

// Check results and react accordingly. Treat failure to acquire HVX as a failure
if (hvxInfo.numUnits <= 0)
{
    dspCV_hvx_cleanup_mt_job(&hvxInfo);
    return AEE_EFAILED;
}

int numWorkers = hvxInfo.numThreads;
// split src image into horizontal stripes, for multi-threading.
dspCV_worker_job_t   job;
dspCV_synctoken_t    token;

// init the synchronization token for this dispatch.
dspCV_worker_pool_synctoken_init(&token, numWorkers);
创建线程,以 gaussian7x7_callback 为回调函数。主线程使用?worker_pool_synctoken_wait(&token);?进行线程同步,该函数基于下述dspCV_worker_pool_synctoken_jobdone?来同步任务完成状态。
unsigned int i;
for (i = 0; i < numWorkers; i++)
{
    // for multi-threaded impl, use this line.
   (void) dspCV_worker_pool_submit(job);
    // This line can be used instead of the above to directly invoke the
    // callback function without dispatching to the worker pool.
    //job.fptr(job.dptr);
}
dspCV_worker_pool_synctoken_wait(&token);- 回调函数(gaussian7x7_callback), 使用?
dspCV_hvx_lock?锁 HVX 资源;使用?dspCV_worker_pool_synctoken_jobdone?函数结束子线程任务运算。
static void gaussian7x7_callback(void* data)
{
    gaussian7x7_callback_t    *dptr = (gaussian7x7_callback_t*)data;

    // lock HVX, 128B mode preferred. Main thread has already confirmed HVX reservation.
    int lockResult = dspCV_hvx_lock(DSPCV_HVX_MODE_128B, 0);
    // 64B mode is also acceptable
    if (0 > lockResult)
    {
        lockResult = dspCV_hvx_lock(DSPCV_HVX_MODE_64B, 0);
    }

    if (0 > lockResult)
    {
         // this example doesn't handle cases where HVX could not be locked
         FARF(ERROR,"Warning - HVX is reserved but could not be locked. Worker thread bailing!");
         return;
    }
    // ....
    // ....

    // If HVX was locked, unlock it.
    dspCV_hvx_unlock();
    // release multi-threading job token
    dspCV_worker_pool_synctoken_jobdone(dptr->token);
}- 回调函数内部循环体
循环体中通过?unsigned int jobCount = worker_pool_atomic_inc_return(&(dptr->jobCount)) - 1;?通过原子计数来计算当前任务的执行数据地址偏移。
算法实现主要位于 Gaussian7x7u8PerRow 函数中,函数采用逐行实现的思路。
// atomically add 1 to the job count to claim a stripe.
unsigned int jobCount = dspCV_atomic_inc_return(&(dptr->jobCount)) - 1;

// if all horizontal stripes have been claimed for processing, break out and exit the callback
if (jobCount * dptr->rowsPerJob >= dptr->height)
{
    break;
}

// Set pointers to appropriate line of image for this stripe
unsigned char *src = dptr->src + (dptr->srcStride * dptr->rowsPerJob * jobCount);
unsigned char *dst = dptr->dst + (dptr->dstStride * dptr->rowsPerJob * jobCount);
// ...
Gaussian7x7u8PerRow(pSrc, dptr->srcWidth, dst, lockResult);
//....- 其他
DSP 端进行数据处理前,可以通过 L2 预取操作以加速数据的存取。
数据预取操作会使用硬件提前完成数据从 DDR 到 L2 cache 的搬运操作,有效提高数据 load 的效率。
通常会采用 Ping-Pong 的思想进行数据预取,DSP 侧使用 L2fetch 函数在当前循环操作中预取下一次循环的数据,以使得数据搬运和数据运行并行化。
// initiate L2 prefetch (first 7 rows)
long long L2FETCH_PARA = CreateL2pfParam(dptr->srcStride, dptr->srcWidth, 7, 0);
L2fetch( (unsigned int)src, L2FETCH_PARA);
// next prefetches will just add 1 row
L2FETCH_PARA = CreateL2pfParam(dptr->srcStride, dptr->srcWidth, 1, 0);
四、总结
通过前面的介绍我们了解到了高通Hexagon SDK Linux/windows环境下的下载和安装,工程编译,手机签名以及工程在手机上的运行,同时还有实例的分析,这些都是工程的实际运用,需要自己多去试验。hexagon-sim模拟器的使用在后续篇章会详细介绍。
期望大家都能有所收获。
未完待续。。。
🌈我的分享也就到此结束啦🌈
如果我的分享也能对你有帮助,那就太好了!
若有不足,还请大家多多指正,我们一起学习交流!
📢未来的富豪们:点赞👍→收藏?→关注🔍,如果能评论下就太惊喜了!
感谢大家的观看和支持!最后,?祝愿大家每天有钱赚!!!欢迎关注、关注!
本文来自互联网用户投稿,该文观点仅代表作者本人,不代表本站立场。本站仅提供信息存储空间服务,不拥有所有权,不承担相关法律责任。 如若内容造成侵权/违法违规/事实不符,请联系我的编程经验分享网邮箱:chenni525@qq.com进行投诉反馈,一经查实,立即删除!
- Python教程
- 深入理解 MySQL 中的 HAVING 关键字和聚合函数
- Qt之QChar编码(1)
- MyBatis入门基础篇
- 用Python脚本实现FFmpeg批量转换
- 高并发服务器-多进程
- ubuntu 虚拟环境安装,创建python3.5和python3.8虚拟环境
- Axure租房平台用户端APP原型图,房屋租赁高保真模板45页
- 外贸客户开发6个实战案例分享
- 【rf】robotframework自动化测试环境搭建
- laravel 对接支付,本地穿透问题
- MYSQL--count(*) 和 count(1)和count(列名)区别
- Selenium库和ChromeDriver谷歌驱动最新版安装
- 高德地图添加marker、删除marker和点击marker里面的heml按钮
- Vue 3 中的响应式原理