SpringCloud 源码系列之全局 Fegin 日志收集(okHttpClient、httpClient)
SpringCloud 源码系列之全局 Fegin 日志收集(okHttpClient、httpClient)目录
接上文SpringCloud OpenFegin 底层是如何切换HttpClient 说起,今天玩点实际的应用,SpringCloud 全局 Fegin 日志收集。
HttpClient 全局日志收集思路
由于通过编写 yaml配置的方式无法实现HttpClient 全局日志收集的需求,因为他不能配置全局的拦截器。因此我们需要自定义配置
feign:
  compression:
    response:
      enabled: true
  httpclient:
    connection-timeout: 777
    time-to-live: 666
    enabled: true
上文已经说过,当我们的项目中引入了HttpClient 的 maven 依赖后,SpringCloud 默认会加载HttpClient 的配置类,如下图。如果项目中自定义了HttpClient,那么优先加载自定义配置,反之加载Cloud 默认的HttpClient 类。
这里温习一下 LoadBalancerFeignClient 类的作用:Cloud 发起网络请求的入口,真正干活的是里面的 delegate。
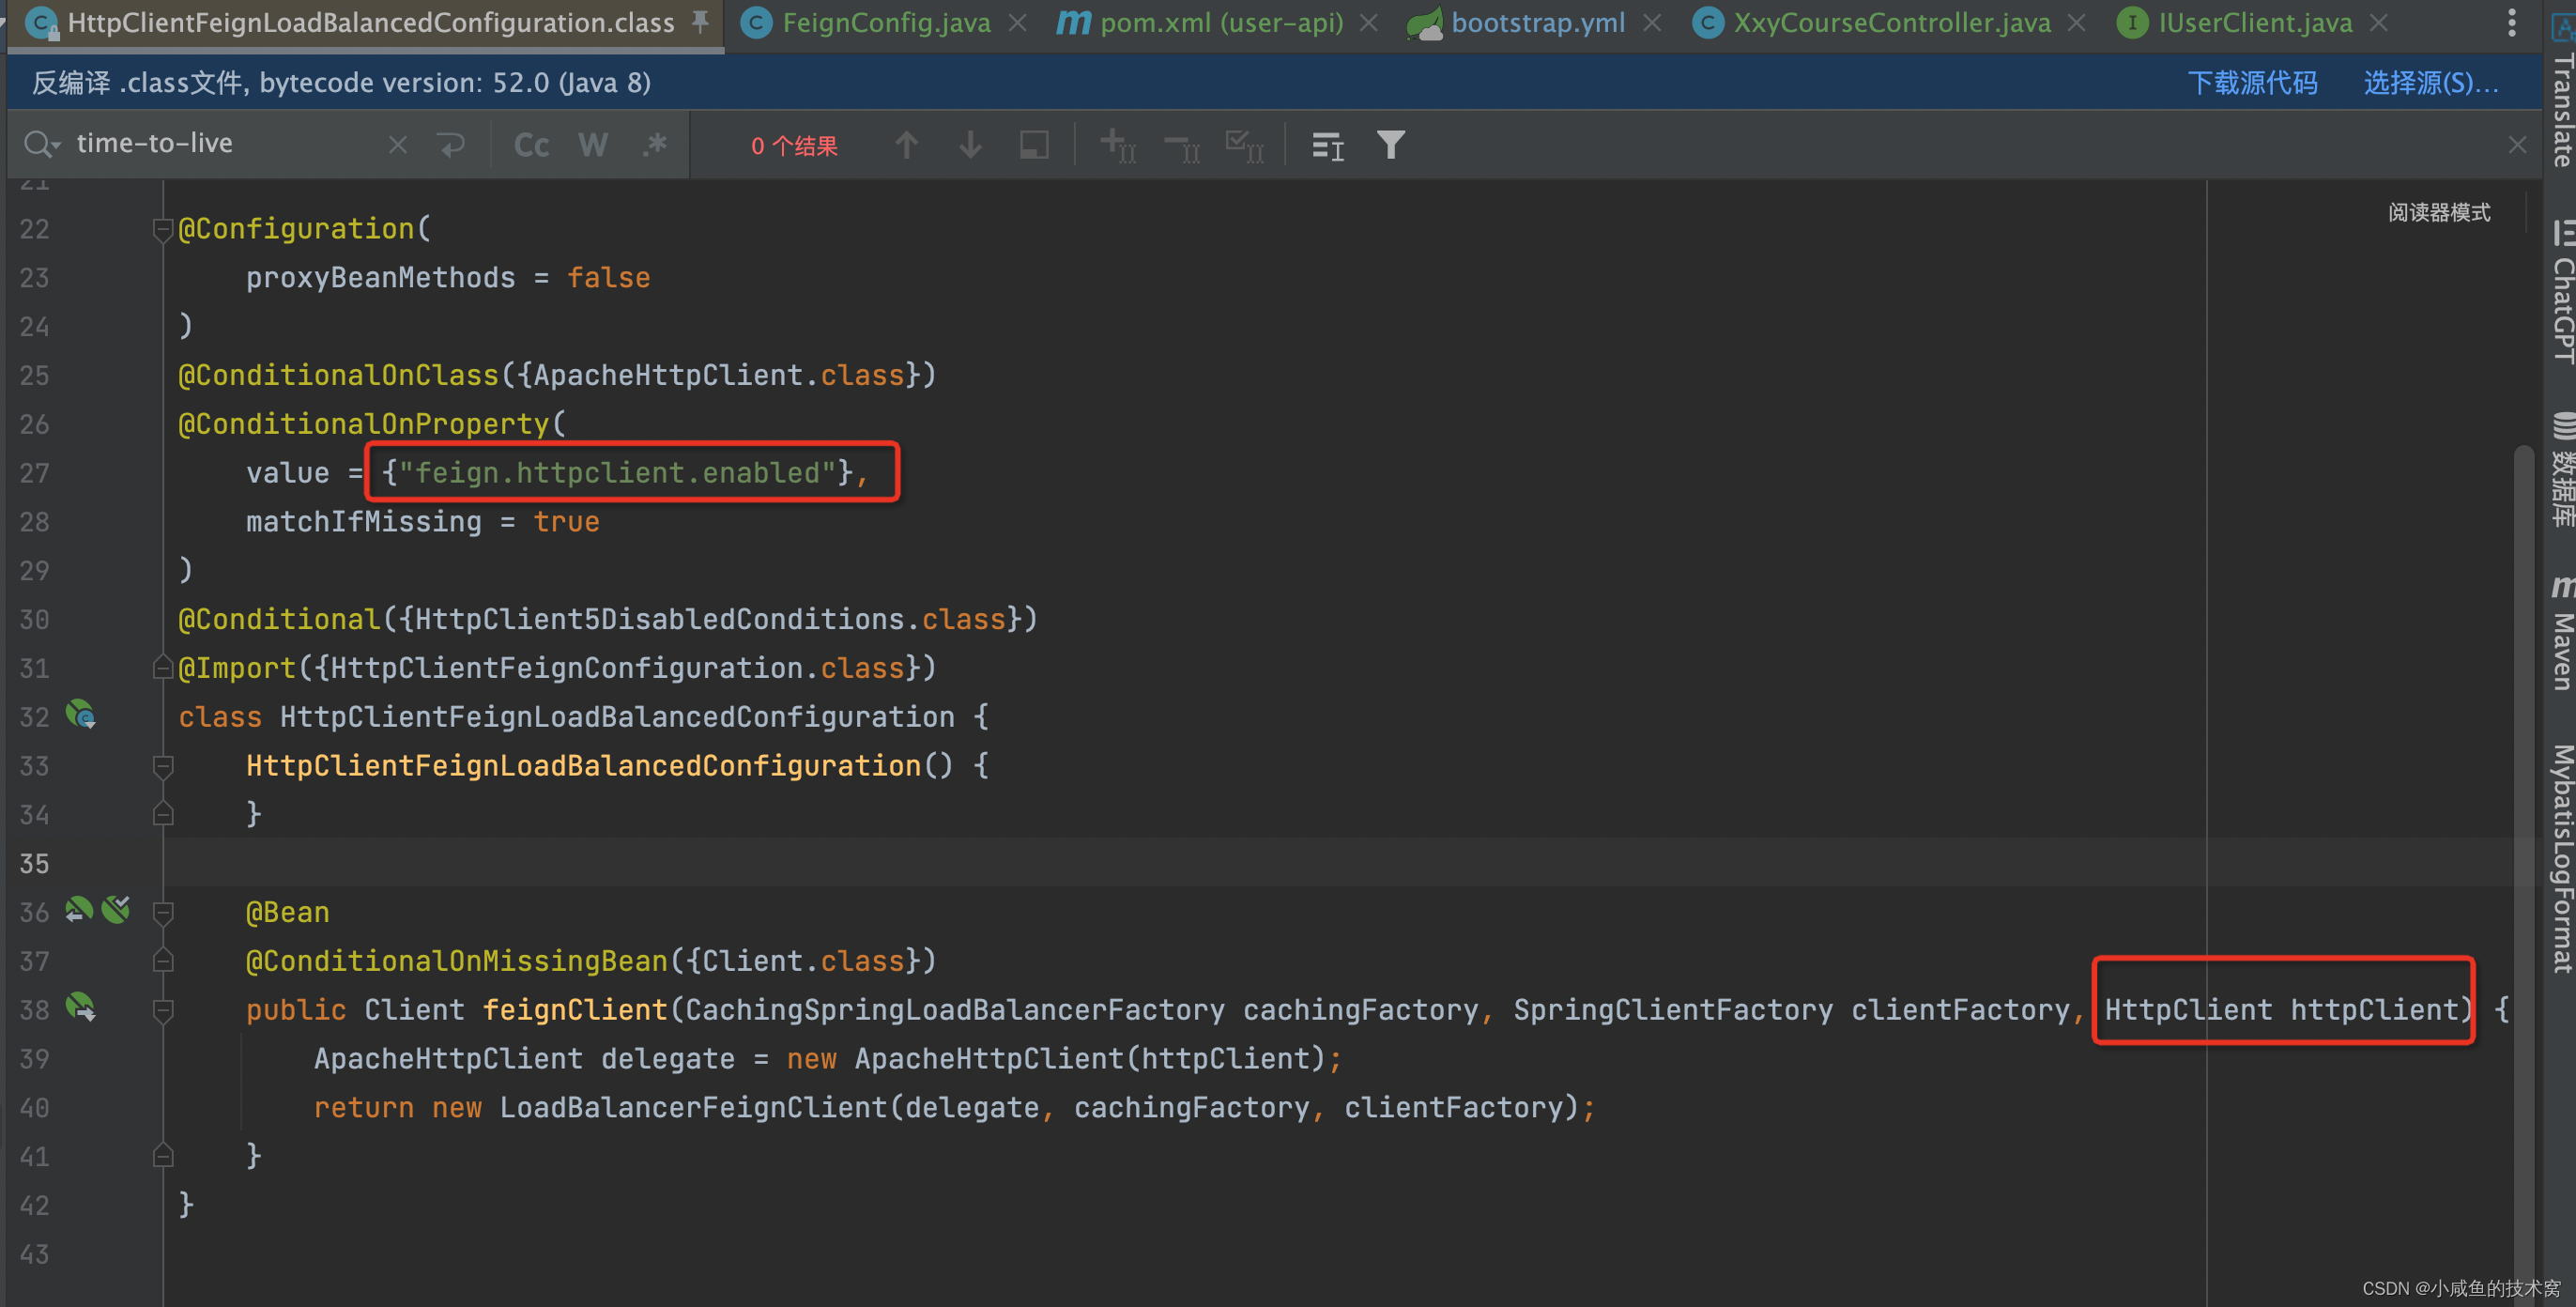
知道了原理后,我们直接在common 模块中加上自定义的HttpClient 的配置就好了,代码如下,里面需要注意的是,打印日志的时候我们需要对InputStream的副本进行操作,不然后续的业务接受方,将结果序列化成 json 返回给前端,这个过程发现IO流关闭了,就会报IO流关闭的错误。
package com.xxy.system.common.config;

import com.xxy.system.common.interceptor.OkHttpCLientInterceptor;
import lombok.extern.slf4j.Slf4j;
import okhttp3.ConnectionPool;
import okhttp3.OkHttpClient;
import org.apache.http.*;
import org.apache.http.client.methods.HttpGet;
import org.apache.http.client.methods.HttpRequestWrapper;
import org.apache.http.entity.BasicHttpEntity;
import org.apache.http.impl.client.CloseableHttpClient;
import org.apache.http.impl.client.HttpClients;
import org.apache.http.protocol.HttpContext;
import org.springframework.beans.BeansException;
import org.springframework.boot.autoconfigure.condition.ConditionalOnMissingBean;
import org.springframework.cloud.commons.httpclient.OkHttpClientConnectionPoolFactory;
import org.springframework.cloud.commons.httpclient.OkHttpClientFactory;
import org.springframework.cloud.openfeign.support.FeignHttpClientProperties;
import org.springframework.context.ApplicationContext;
import org.springframework.context.ApplicationContextAware;
import org.springframework.context.annotation.Bean;
import org.springframework.context.annotation.Configuration;
import org.springframework.util.StreamUtils;

import java.io.ByteArrayInputStream;
import java.io.ByteArrayOutputStream;
import java.io.IOException;
import java.io.InputStream;
import java.net.URI;
import java.net.URISyntaxException;
import java.nio.charset.Charset;
import java.nio.charset.StandardCharsets;
import java.util.concurrent.TimeUnit;

@Configuration
@Slf4j
public class FeignConfig{
    @Bean
    public CloseableHttpClient customHttpClient() {
        HttpRequestInterceptor requestInterceptor = new HttpRequestInterceptor() {
            @Override
            public void process(HttpRequest httpRequest, HttpContext httpContext) throws HttpException, IOException {
                log.info("URL:{},params:{}", ((HttpRequestWrapper) httpRequest).getOriginal(), StreamUtils.copyToString(((HttpEntityEnclosingRequest) httpRequest).getEntity().getContent(), Charset.defaultCharset()));
            }
        };
        HttpResponseInterceptor responseInterceptor = new HttpResponseInterceptor() {
            @Override
            public void process(HttpResponse response, HttpContext httpContext) throws HttpException, IOException {
                InputStream inputStream = response.getEntity().getContent();
                ByteArrayOutputStream baosOutputStream = new ByteArrayOutputStream();
                byte[] buffer = new byte[1024];
                int len;
                while ((len = inputStream.read(buffer)) > -1) {
                    baosOutputStream.write(buffer, 0, len);
                }
                baosOutputStream.flush();
                InputStream body = new ByteArrayInputStream(baosOutputStream.toByteArray());
                log.info(StreamUtils.copyToString(body, StandardCharsets.UTF_8));
                inputStream.close();
                body.close();
                //设置 InputStream 副本,给后续请求
                BasicHttpEntity basicHttpEntity = new BasicHttpEntity();
                basicHttpEntity.setContent(new ByteArrayInputStream(baosOutputStream.toByteArray()));
                response.setEntity(basicHttpEntity);
            }
        };
        CloseableHttpClient build = HttpClients.custom()
                .setMaxConnTotal(666)
                .addInterceptorFirst(requestInterceptor)
                .addInterceptorFirst(responseInterceptor)
                .build();
        return build;
    }

}
对应的 yaml 配置
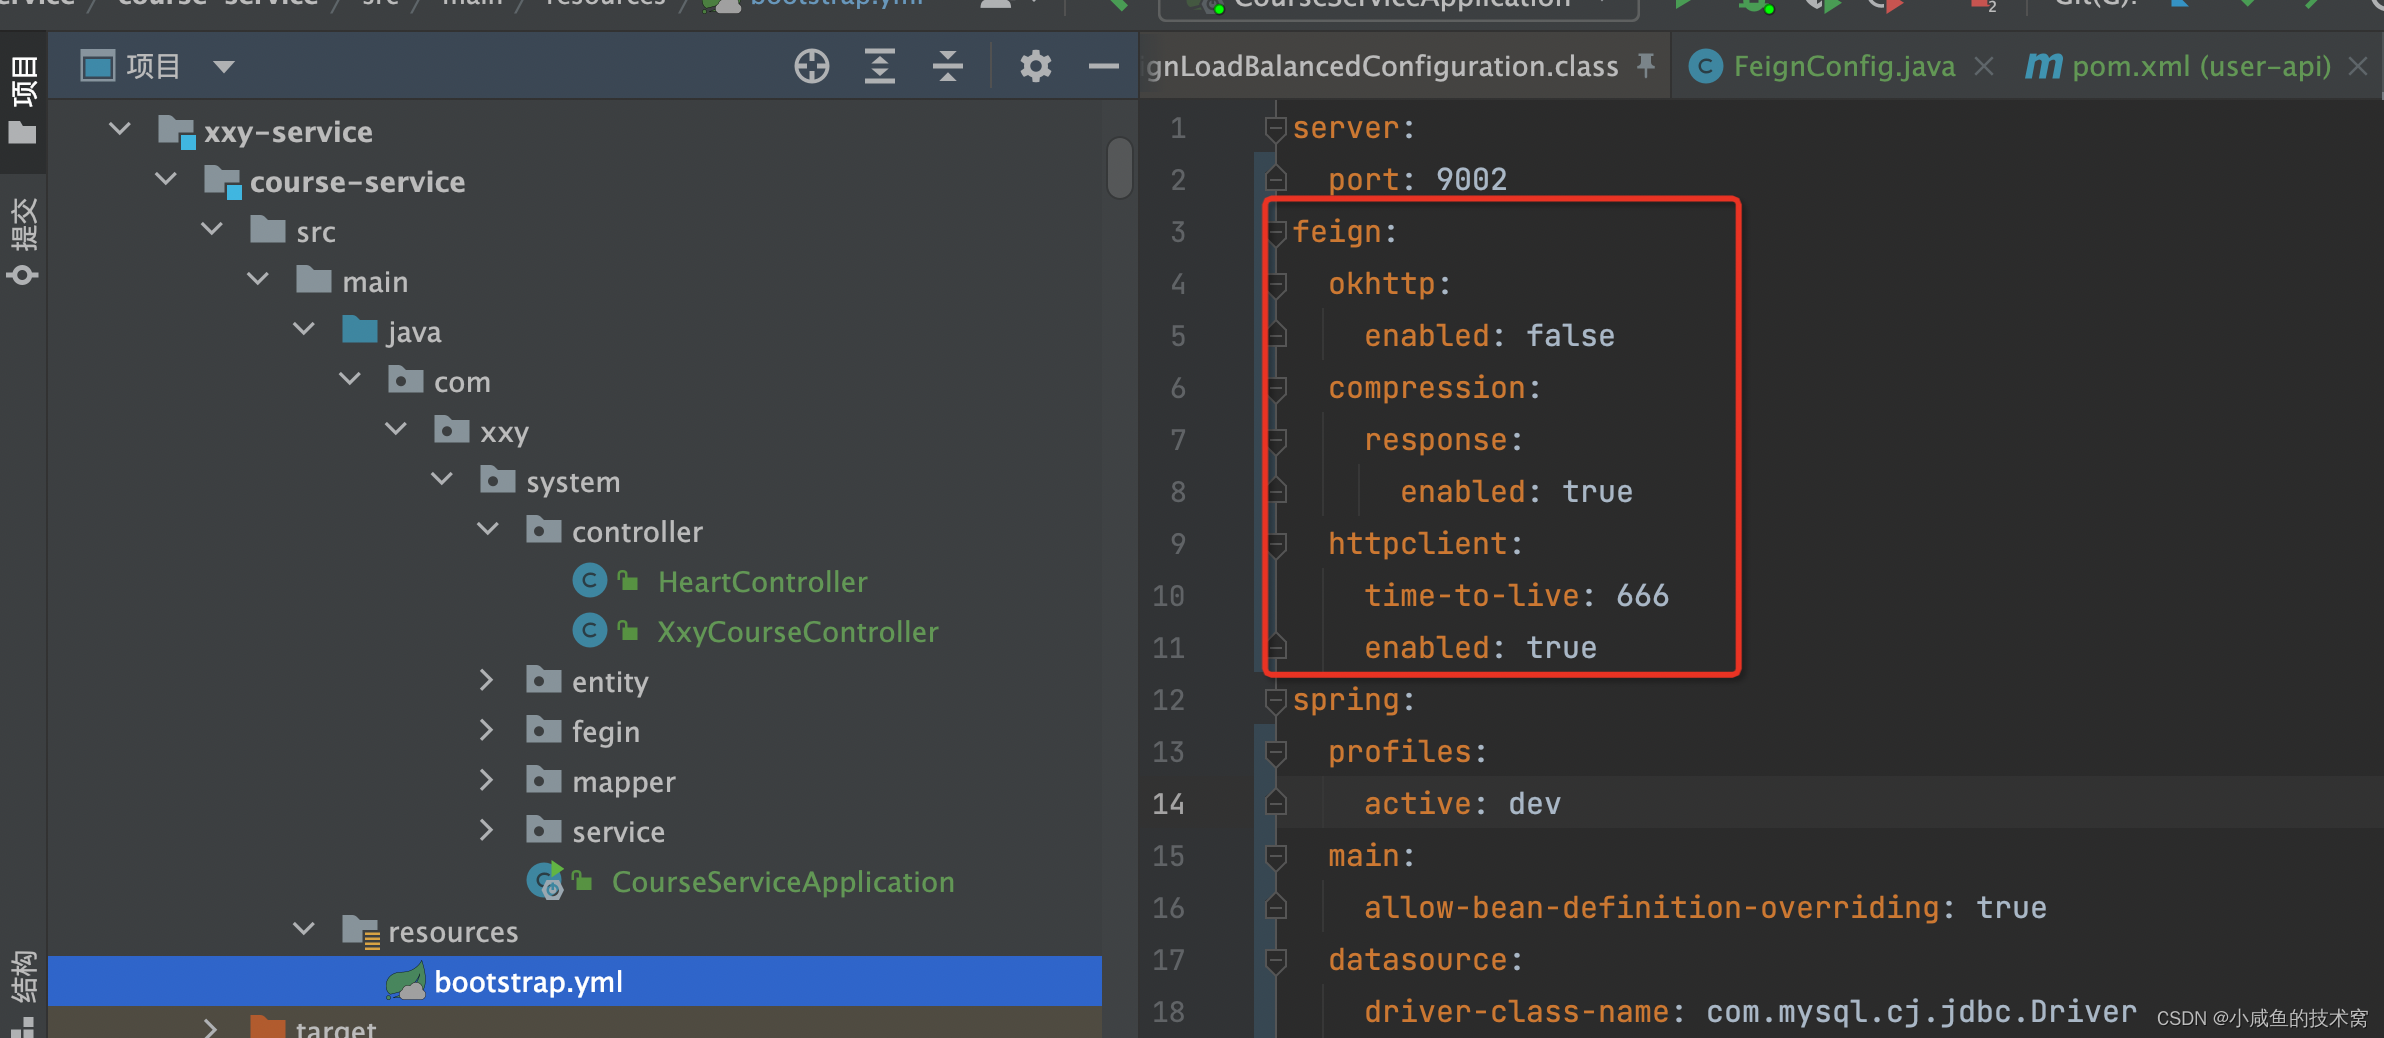
切换成HttpClient验证配置效果
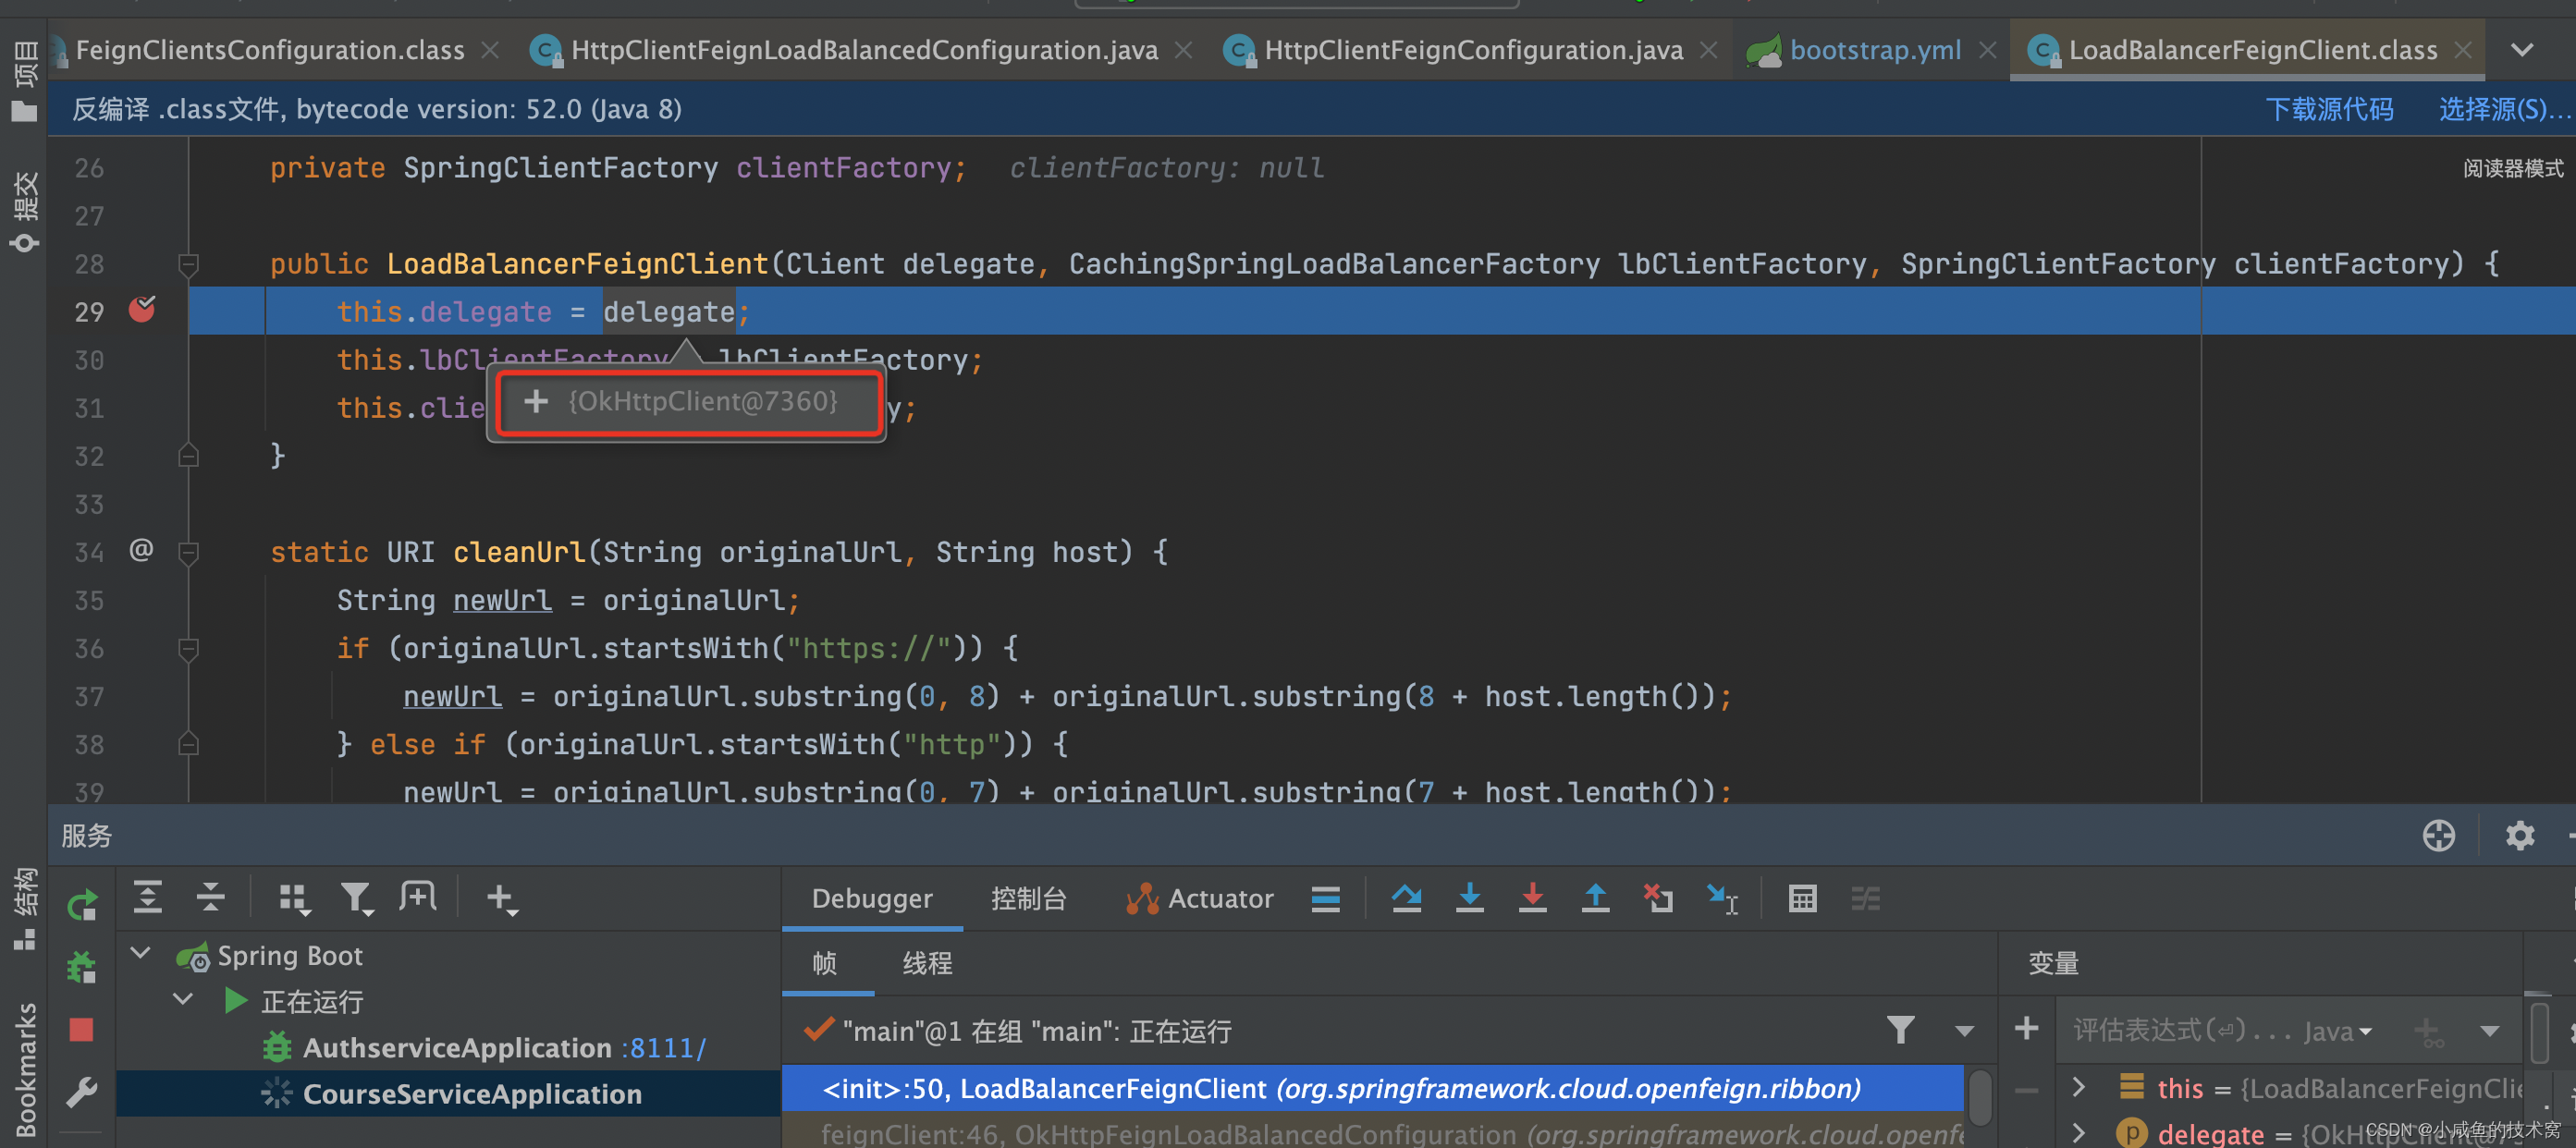
在org.springframework.cloud.openfeign.ribbon.LoadBalancerFeignClient的构造方法中打一个断点,可以看到里面的属性 maxTotal=666,是我们的自定义的HttpClient,说明配置成功了。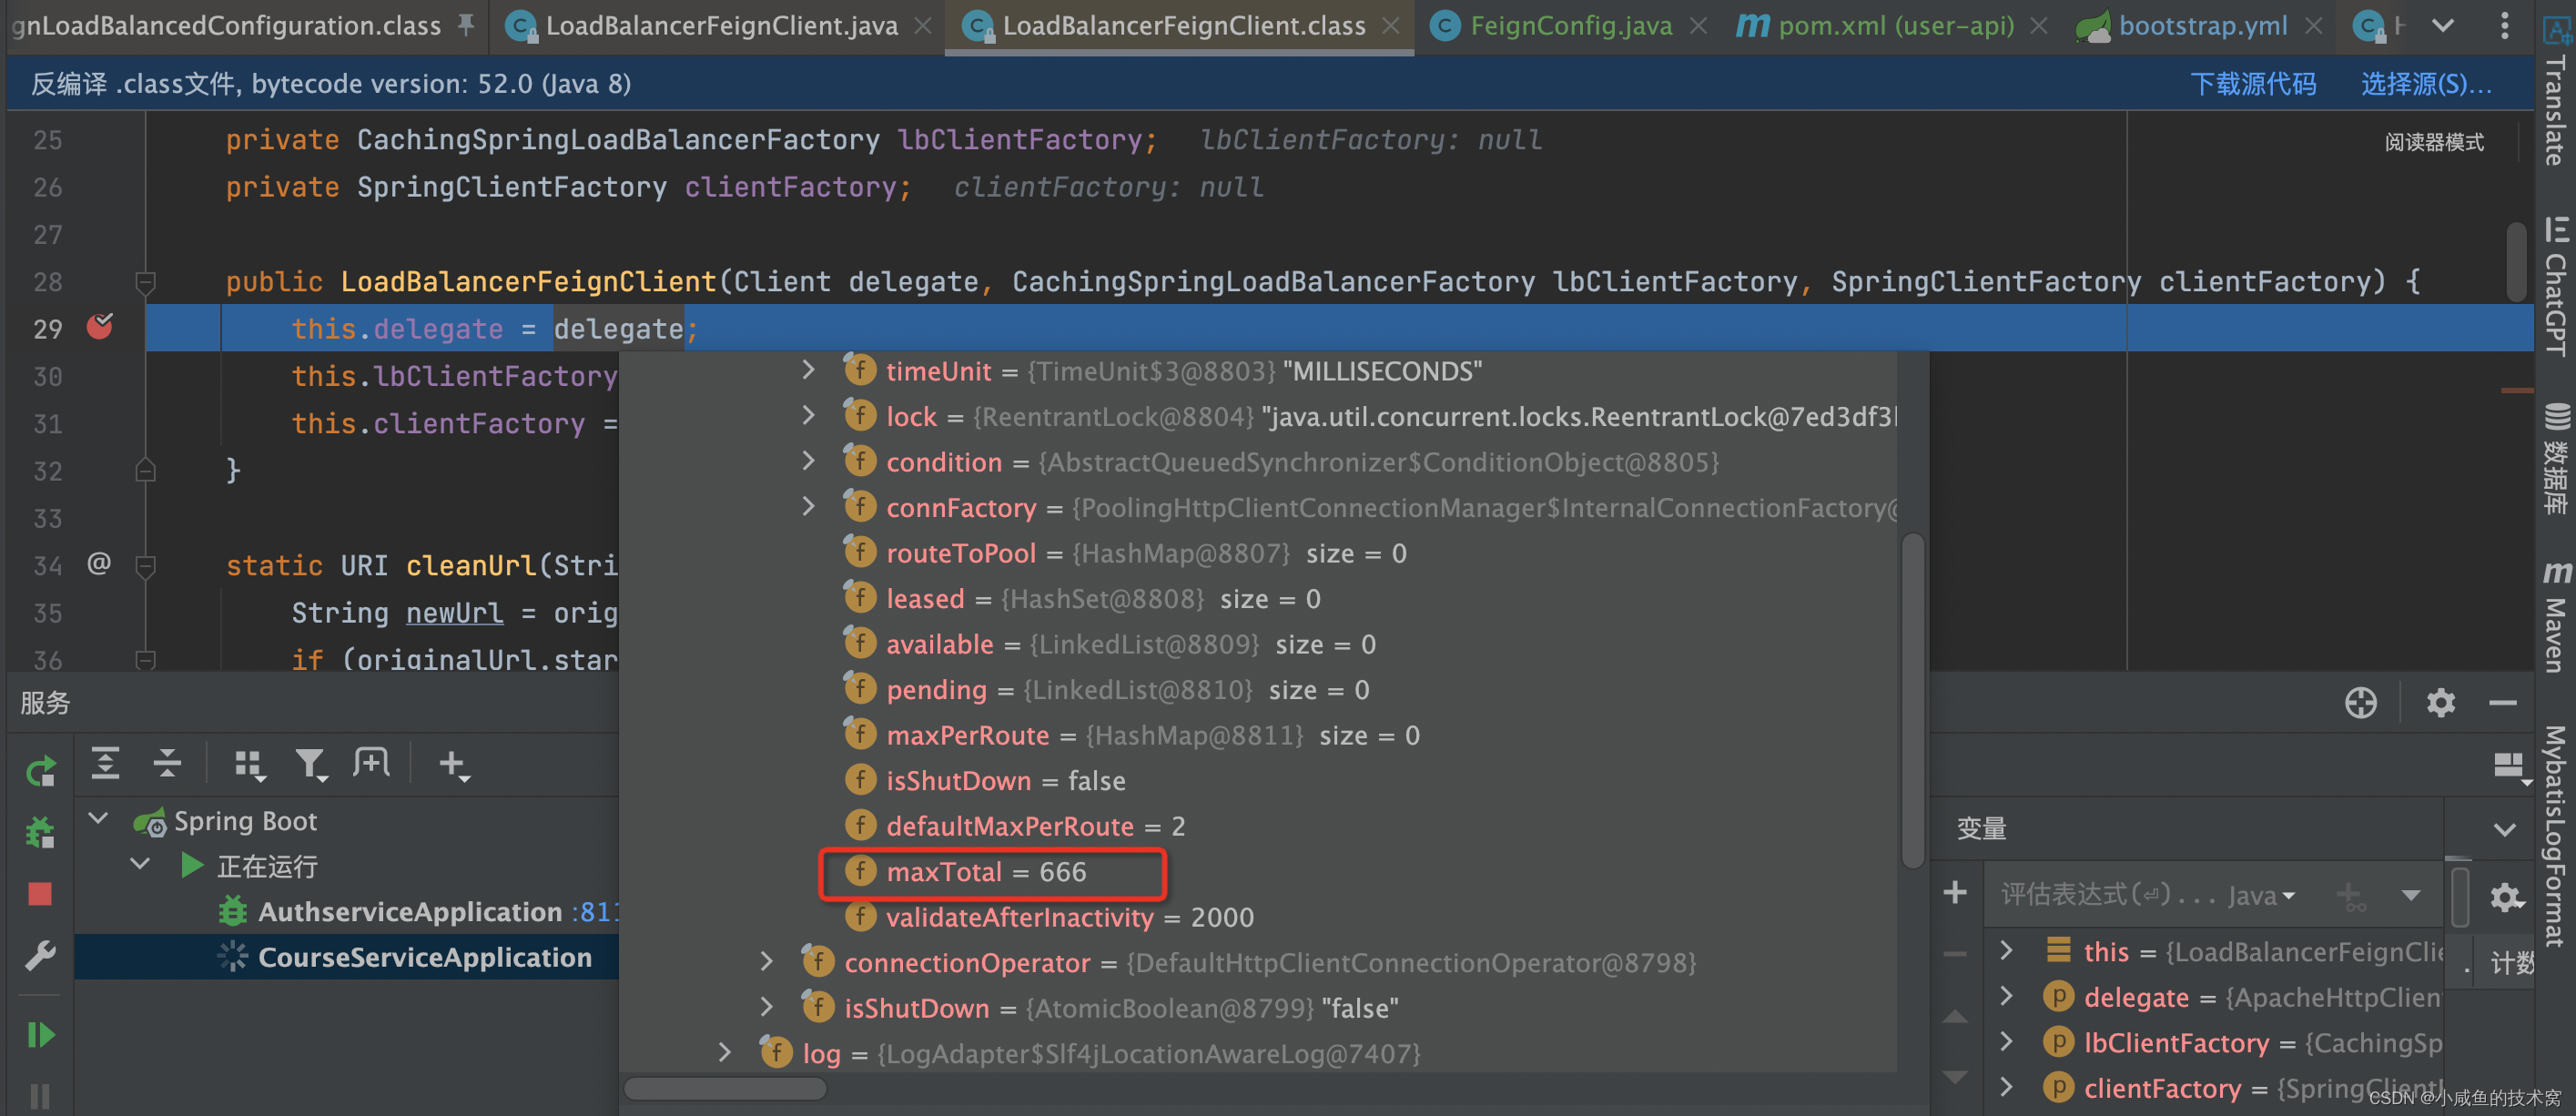
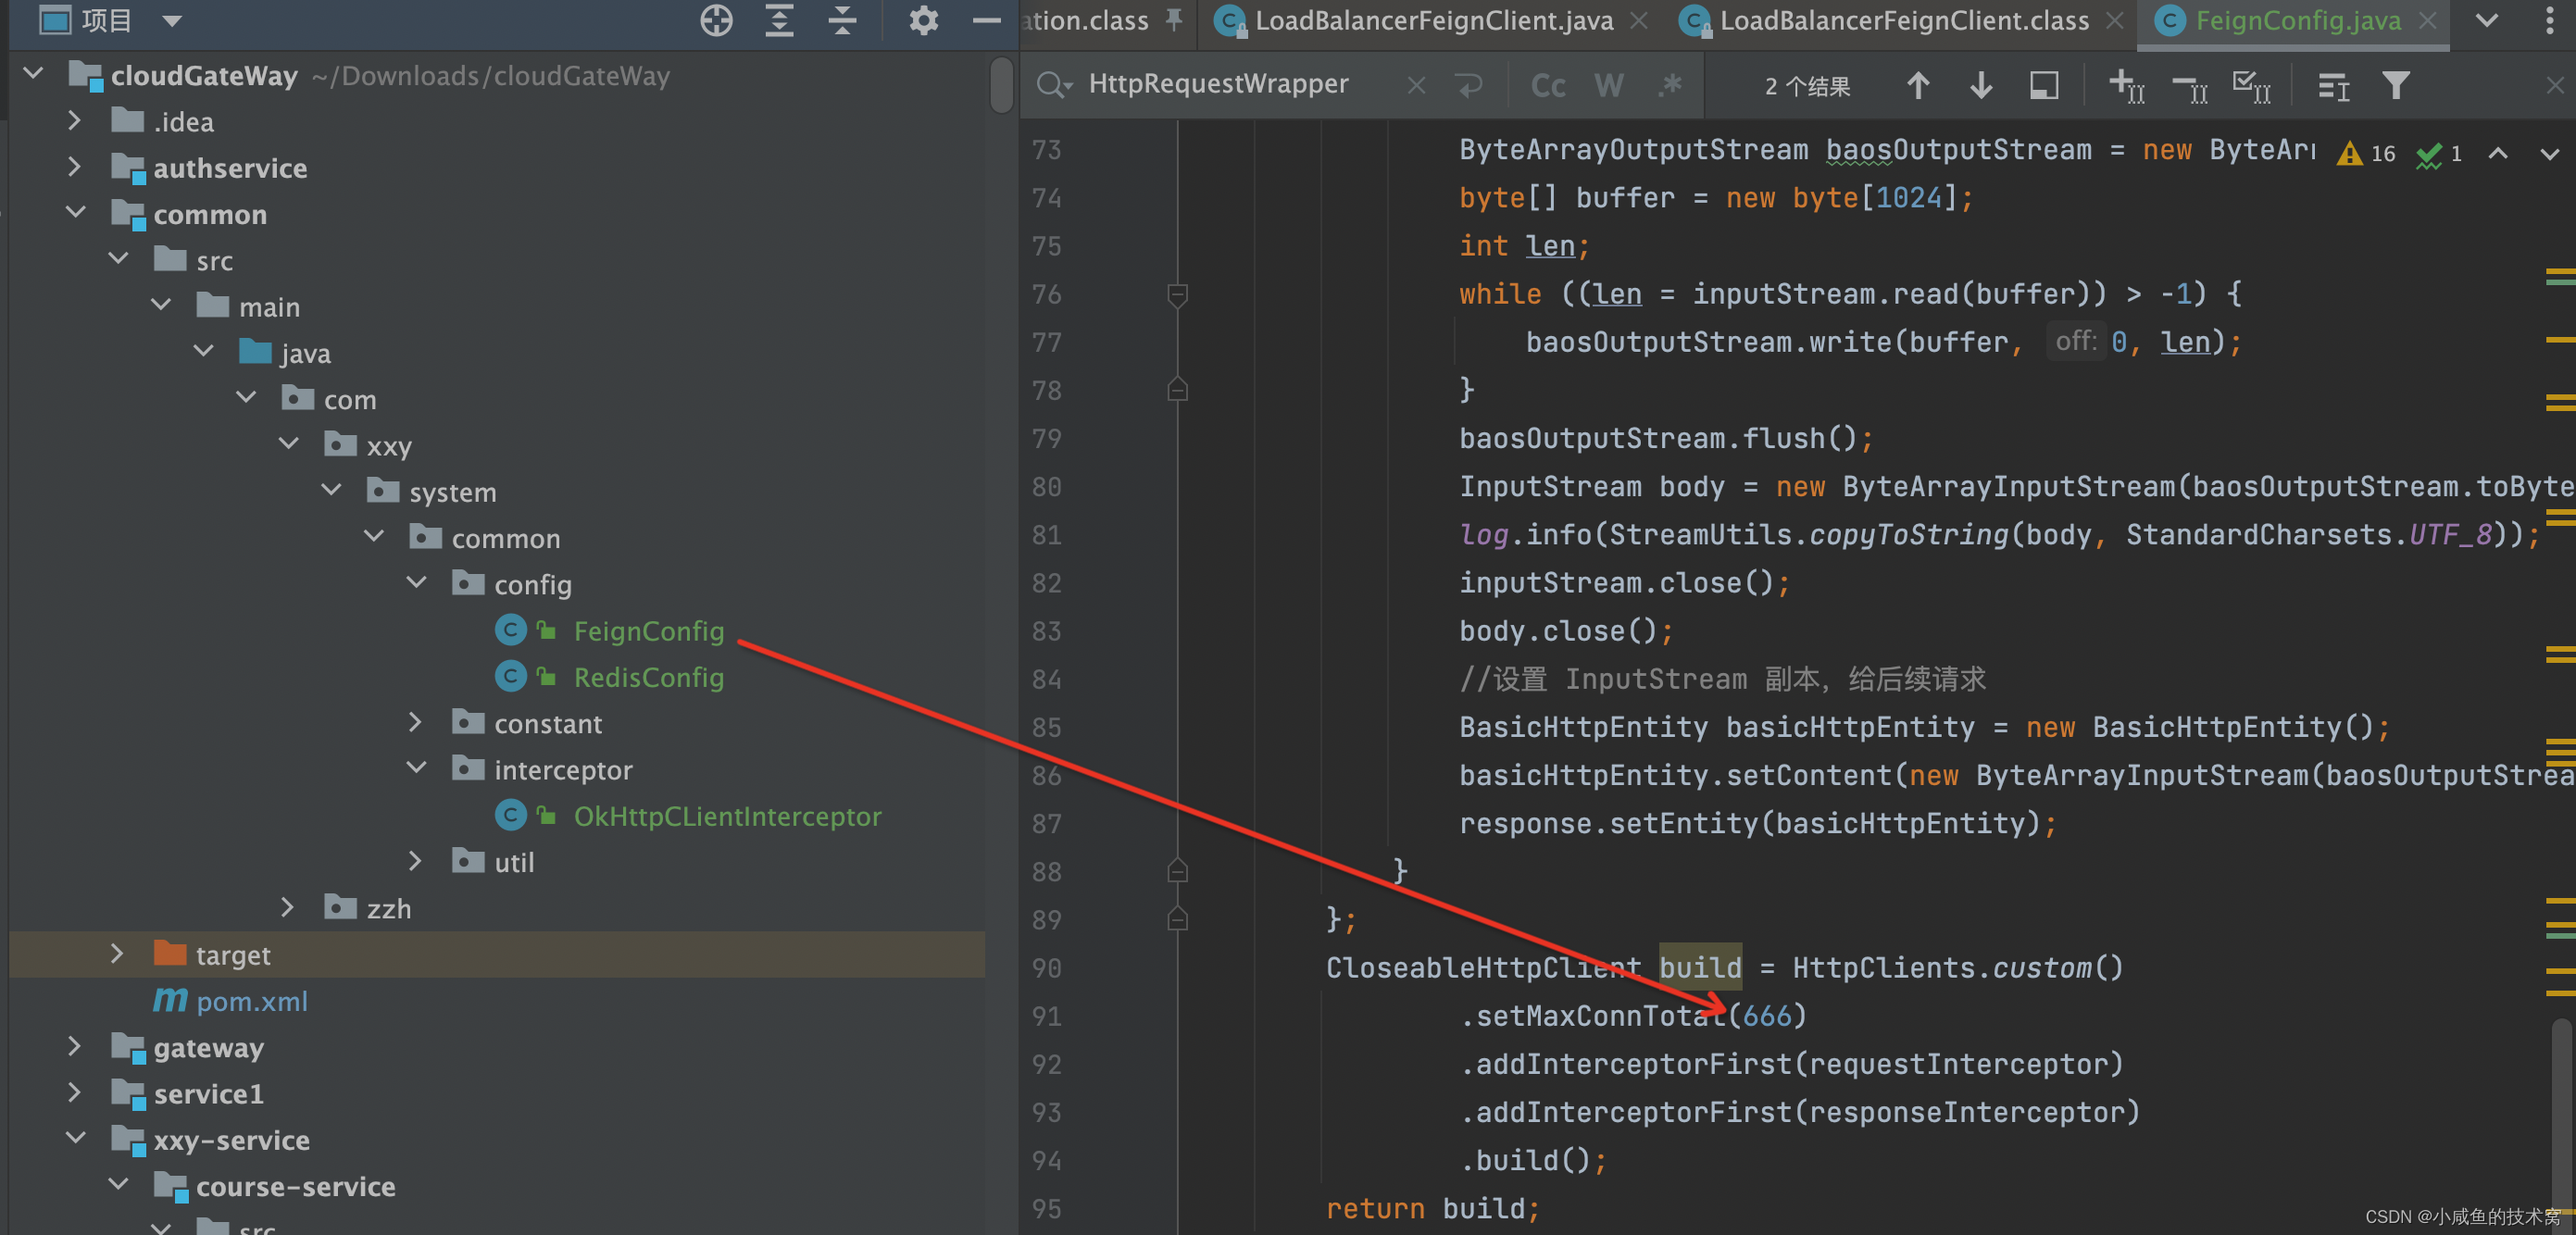
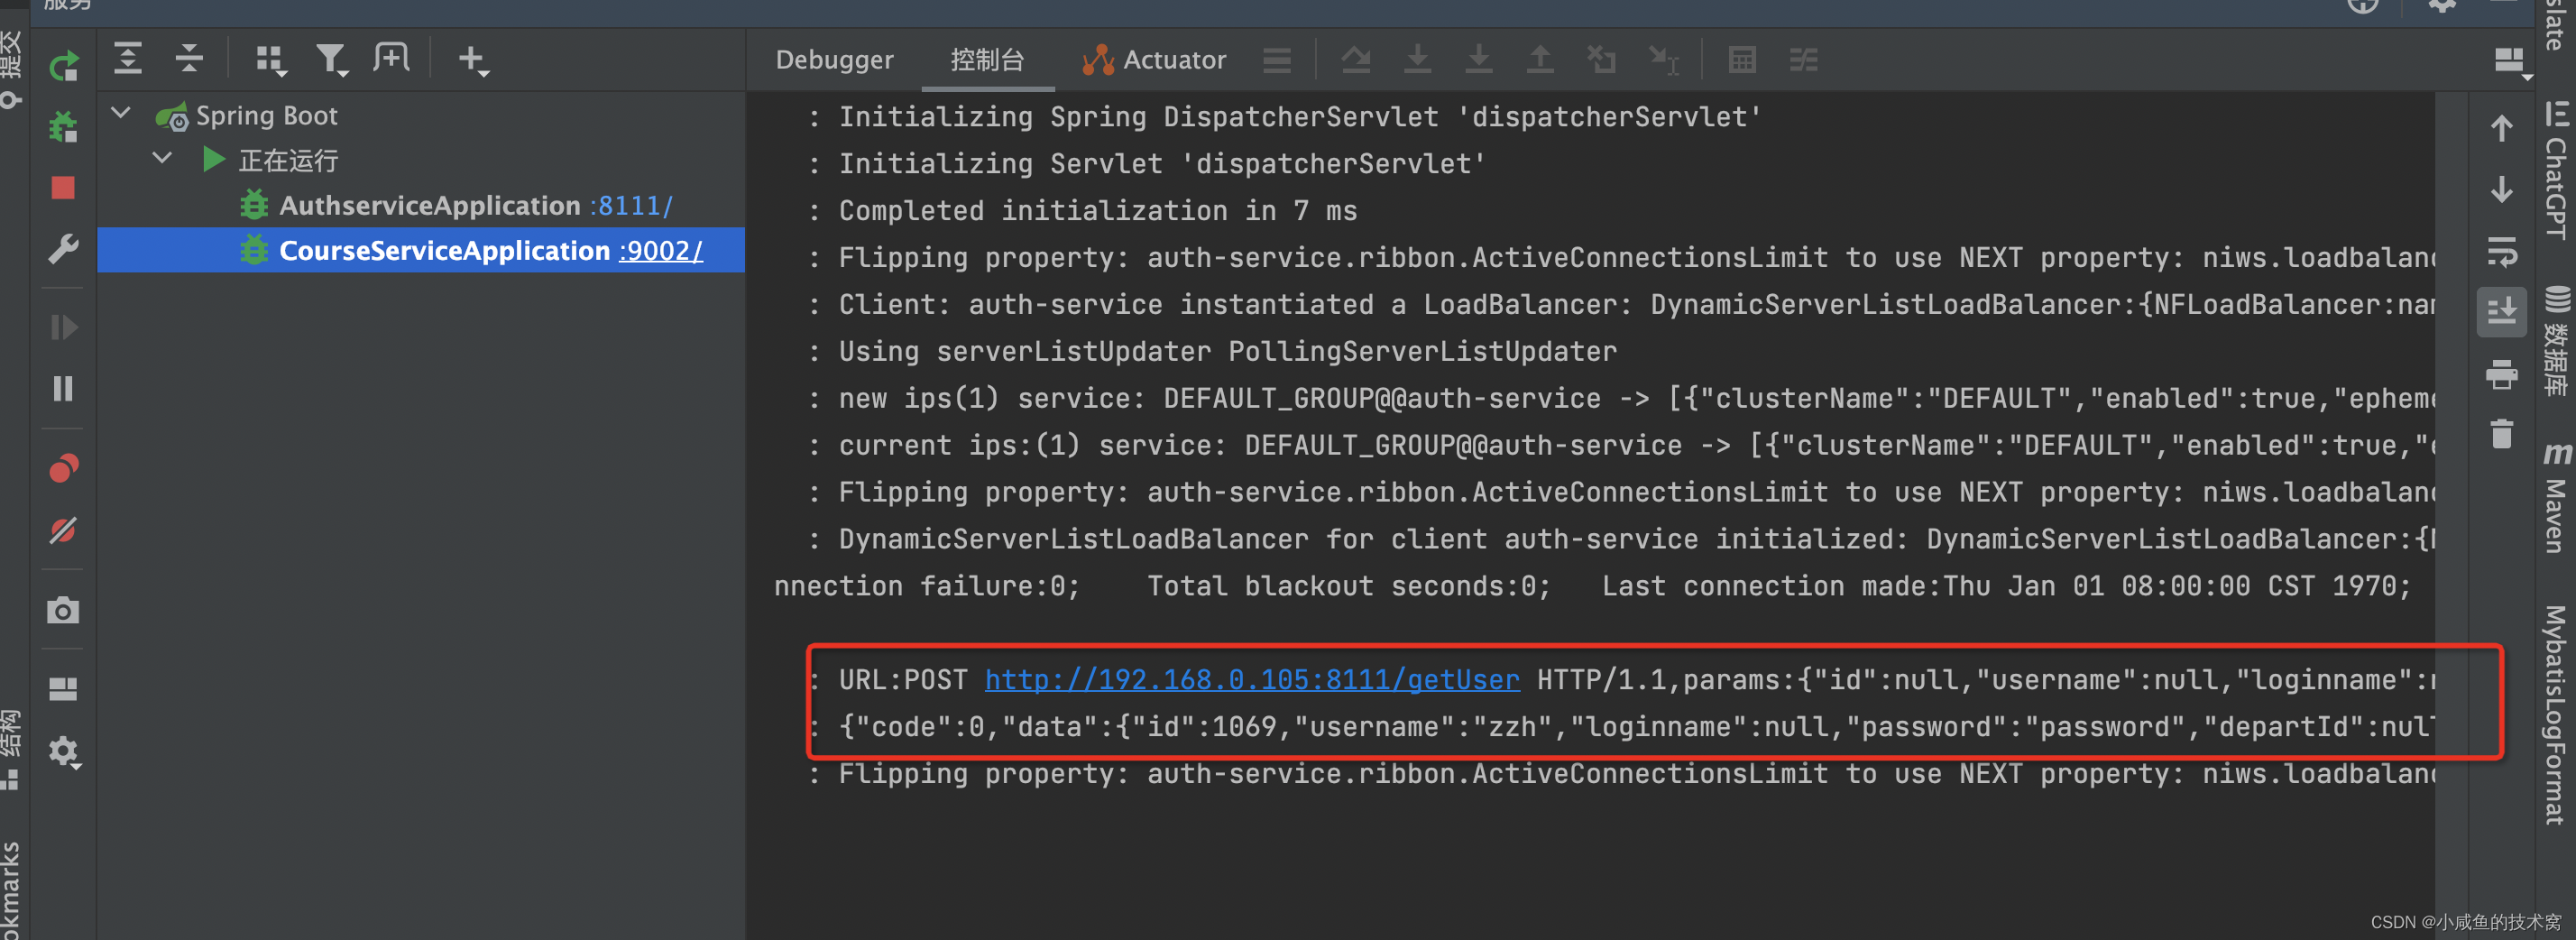
随便发起一个 fegin 请求,入参、请求真实的 url、返回结果通通给打印出来了。
HttpClient 全局日志收集源码分析
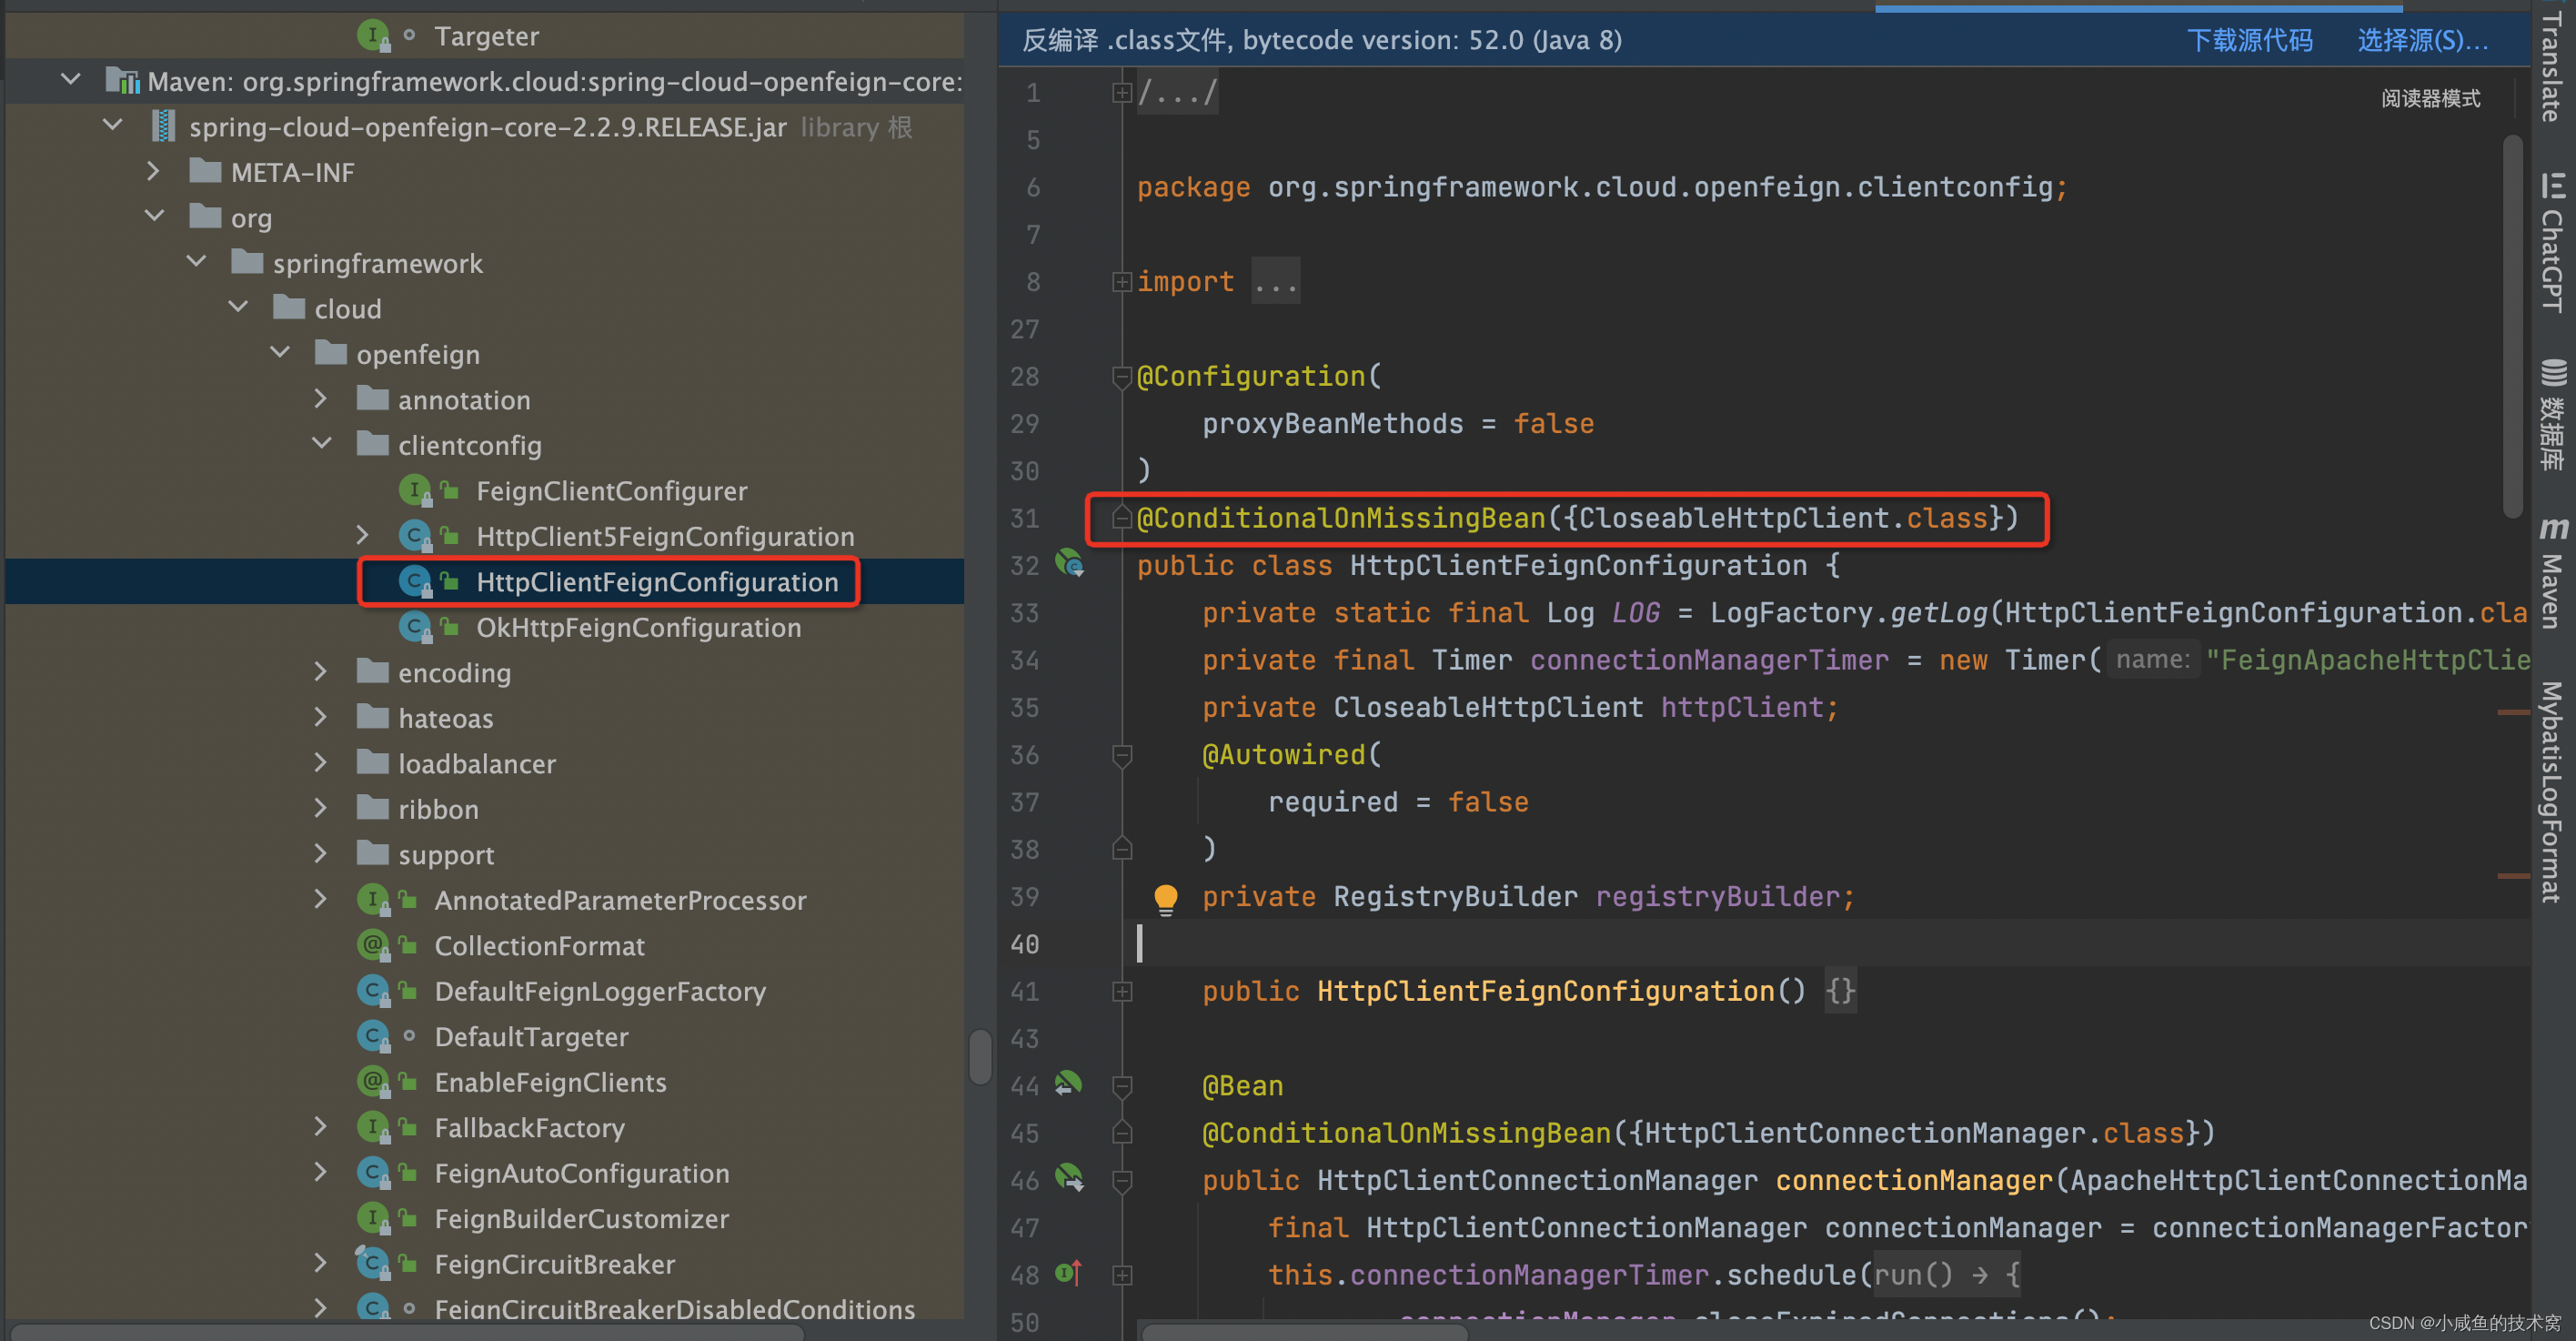
来到org.springframework.cloud.openfeign.clientconfig.HttpClientFeignConfiguration类,HttpClientFeignConfiguration是Cloud 默认的HttpClient 的配置类。查看他上面的条件注解
@ConditionalOnMissingBean({CloseableHttpClient.class}) ,当容器中不存在CloseableHttpClient的BeanDefinition时,那么此配置类生效,反正不生效。所以当我们的项目配置了HttpClient 后,Cloud 默认的HttpClient 配置类就会失效。
这里顺便提一嘴:@ConditionalOnMissingBean 的原理:因为 @ConditionalOnMissingBean 是被自动装配进去的。普通的被@Configuration标注的类,被扫描的时机早于自动装配的类,因此当我们项目中注入自定义的HttpClient 后,@ConditionalOnMissingBean会生效。
看源码顺带产物
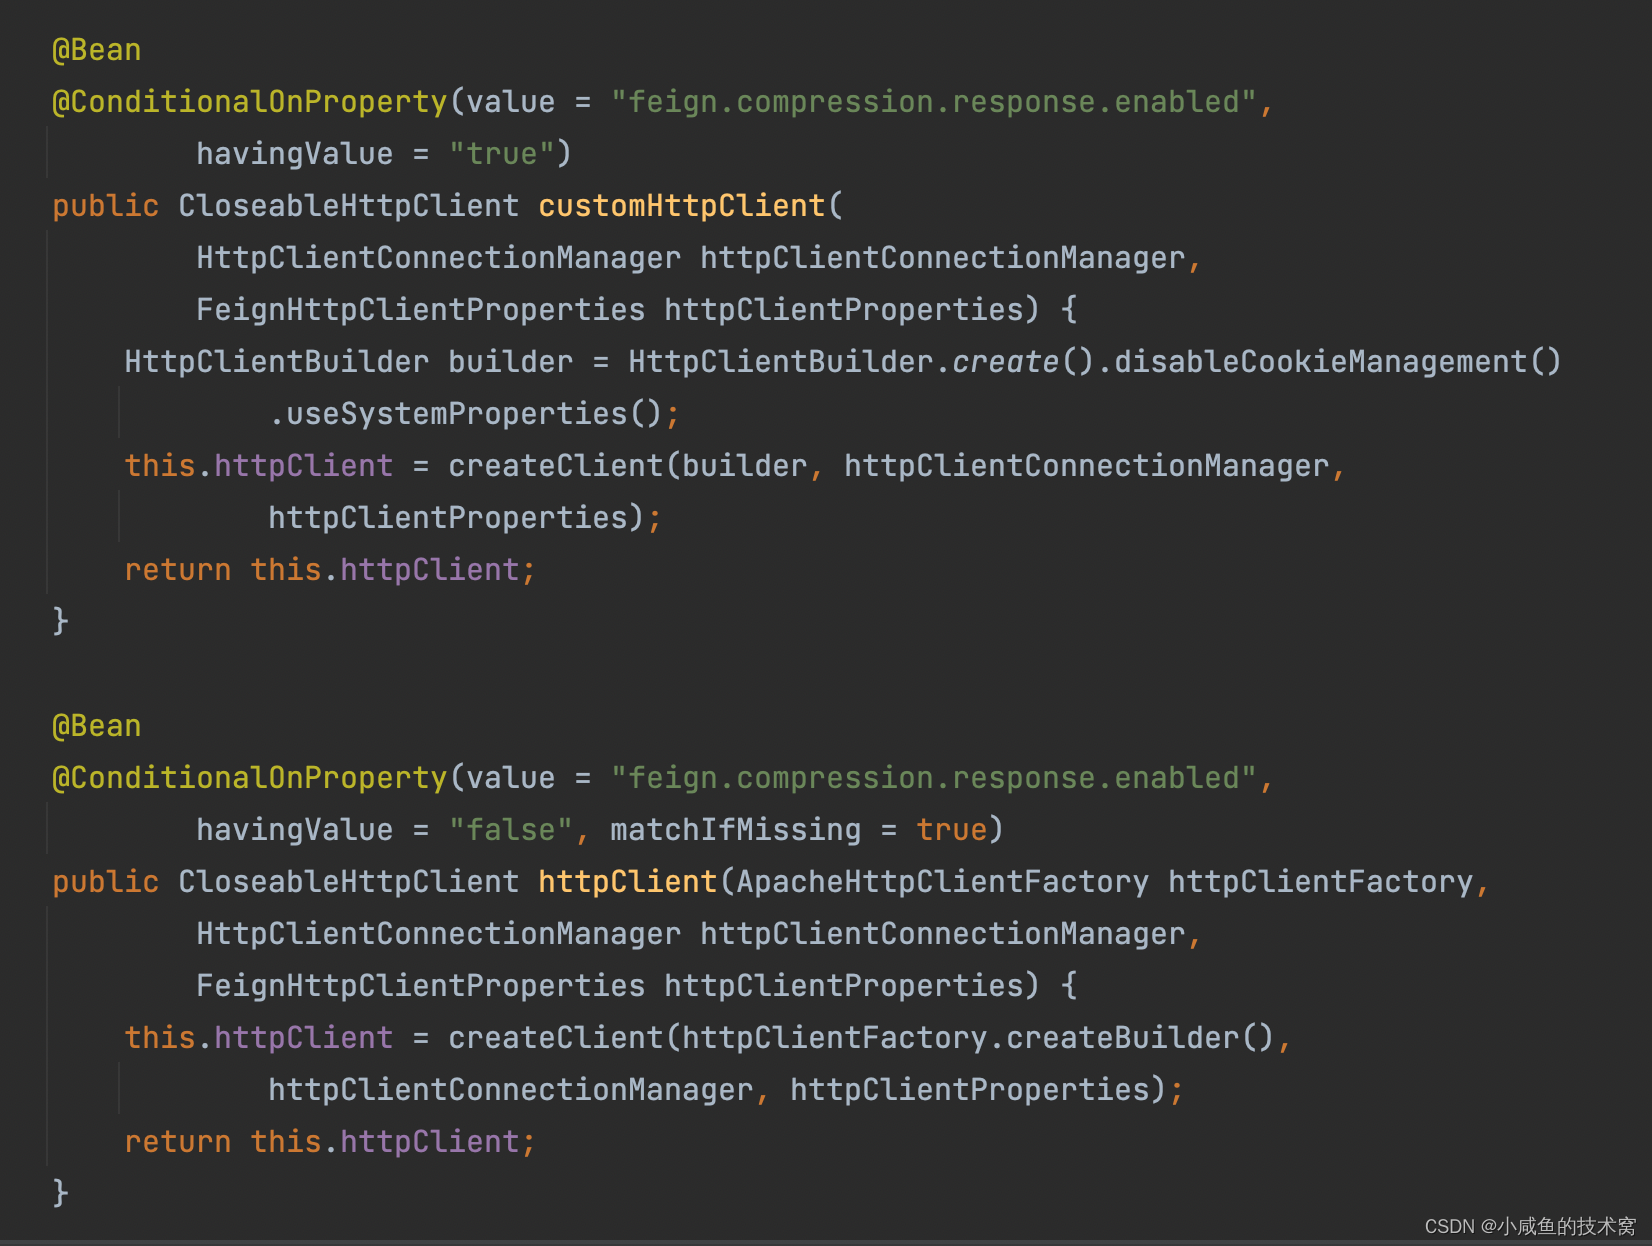
feign.compression.response.enabled配置源码位置org.springframework.cloud.openfeign.clientconfig。HttpClientFeignConfiguration。字面意思理解,Cloud 默认是不压缩返回结果,开启了feign.compression.response.enabled=true 后就开启压缩。源码如下图。
okHttpClient 全局日志收集
过程和如何切换成HttpClient 一样,加入自定义配置即可。
  @Bean
    public ConnectionPool httpClientConnectionPool(FeignHttpClientProperties httpClientProperties, OkHttpClientConnectionPoolFactory connectionPoolFactory) {
        Integer maxTotalConnections = httpClientProperties.getMaxConnections();
        Long timeToLive = httpClientProperties.getTimeToLive();
        TimeUnit ttlUnit = httpClientProperties.getTimeToLiveUnit();
        return connectionPoolFactory.create(maxTotalConnections, timeToLive, ttlUnit);
    }

    @Bean
    public OkHttpClient okClient(OkHttpClientFactory httpClientFactory, ConnectionPool connectionPool, FeignHttpClientProperties httpClientProperties) {
        Boolean followRedirects = httpClientProperties.isFollowRedirects();
        Integer connectTimeout = httpClientProperties.getConnectionTimeout();
        Boolean disableSslValidation = httpClientProperties.isDisableSslValidation();
        return httpClientFactory.createBuilder(disableSslValidation)
                .connectTimeout((long) connectTimeout, TimeUnit.MILLISECONDS)
                .followRedirects(followRedirects)
                .connectionPool(connectionPool)
                .readTimeout(666, TimeUnit.SECONDS)
                .addInterceptor(new OkHttpCLientInterceptor()) // 自定义请求日志拦截器
                .build();
    }
加好后debug 看到配置已经成功了,后续打印日志过程在拦截器中实现
okHttpClient 日志拦截器
/**
 * fegin 日志打印
 */
@Slf4j
public class OkHttpCLientInterceptor implements Interceptor {
    @Override
    public Response intercept(Chain chain) throws IOException {
        log.info("#request#url:{} #body:{}", chain.request().url(), convertRequest(chain.request()));
        Response response = chain.proceed(chain.request());
        BufferedSource source = response.body().source();
        source.request(Long.MAX_VALUE);
        //创建 io 流副本,否则会出现 io 流提前关闭的异常
        log.info("#reponse#url:{} #body:{}", chain.request().url(), source.buffer().clone().readString(Charset.forName("UTF-8")));
        return response;
    }

    private String convertRequest(final Request request) {
        final Request copy = request.newBuilder().build();
        final Buffer buffer = new Buffer();
        try {
            copy.body().writeTo(buffer);
        } catch (IOException e) {
            return "something error,when show requestBody";
        }
        return buffer.readUtf8();
    }
}
总结
通过阅读okHttpClient、httpClient的默认创建源码,了解到,如果需要自定义okHttpClient、httpClient时,项目中注入即可。同时打印日志的时候,注意用流副本操作,否则会出现 io 流异常关闭的问题。
本文来自互联网用户投稿,该文观点仅代表作者本人,不代表本站立场。本站仅提供信息存储空间服务,不拥有所有权,不承担相关法律责任。 如若内容造成侵权/违法违规/事实不符,请联系我的编程经验分享网邮箱:chenni525@qq.com进行投诉反馈,一经查实,立即删除!
- Python教程
- 深入理解 MySQL 中的 HAVING 关键字和聚合函数
- Qt之QChar编码(1)
- MyBatis入门基础篇
- 用Python脚本实现FFmpeg批量转换
- 【Axure高保真原型】移入放大对应区域的饼图
- 分享从零开始学习网络设备配置--任务4.4 使用动态路由OSPFv3实现网络连通
- 文档查找器
- 英语单词学习软件【动态分配空间】
- python:最简单爬虫之使用Scrapy框架爬取小说
- Vue:脚手架Vue-CLI的使用
- Mysql-建表
- .NET 7 WinForms News Crack
- 目标检测YOLO实战应用案例100讲-基于红外图像处理的无人机光伏组件故障检测(续)
- el-input限制输入11位数字,且展示数字位数限制,没有数字大小调整按钮
