Spring Boot之自定义starter
🥳🥳Welcome Huihui's Code World ! !🥳🥳
接下来看看由辉辉所写的关于Spring Boot的相关操作吧?
目录
🥳🥳Welcome Huihui's Code World ! !🥳🥳
三.怎么自定义starter【附自定义starter的案例制作】
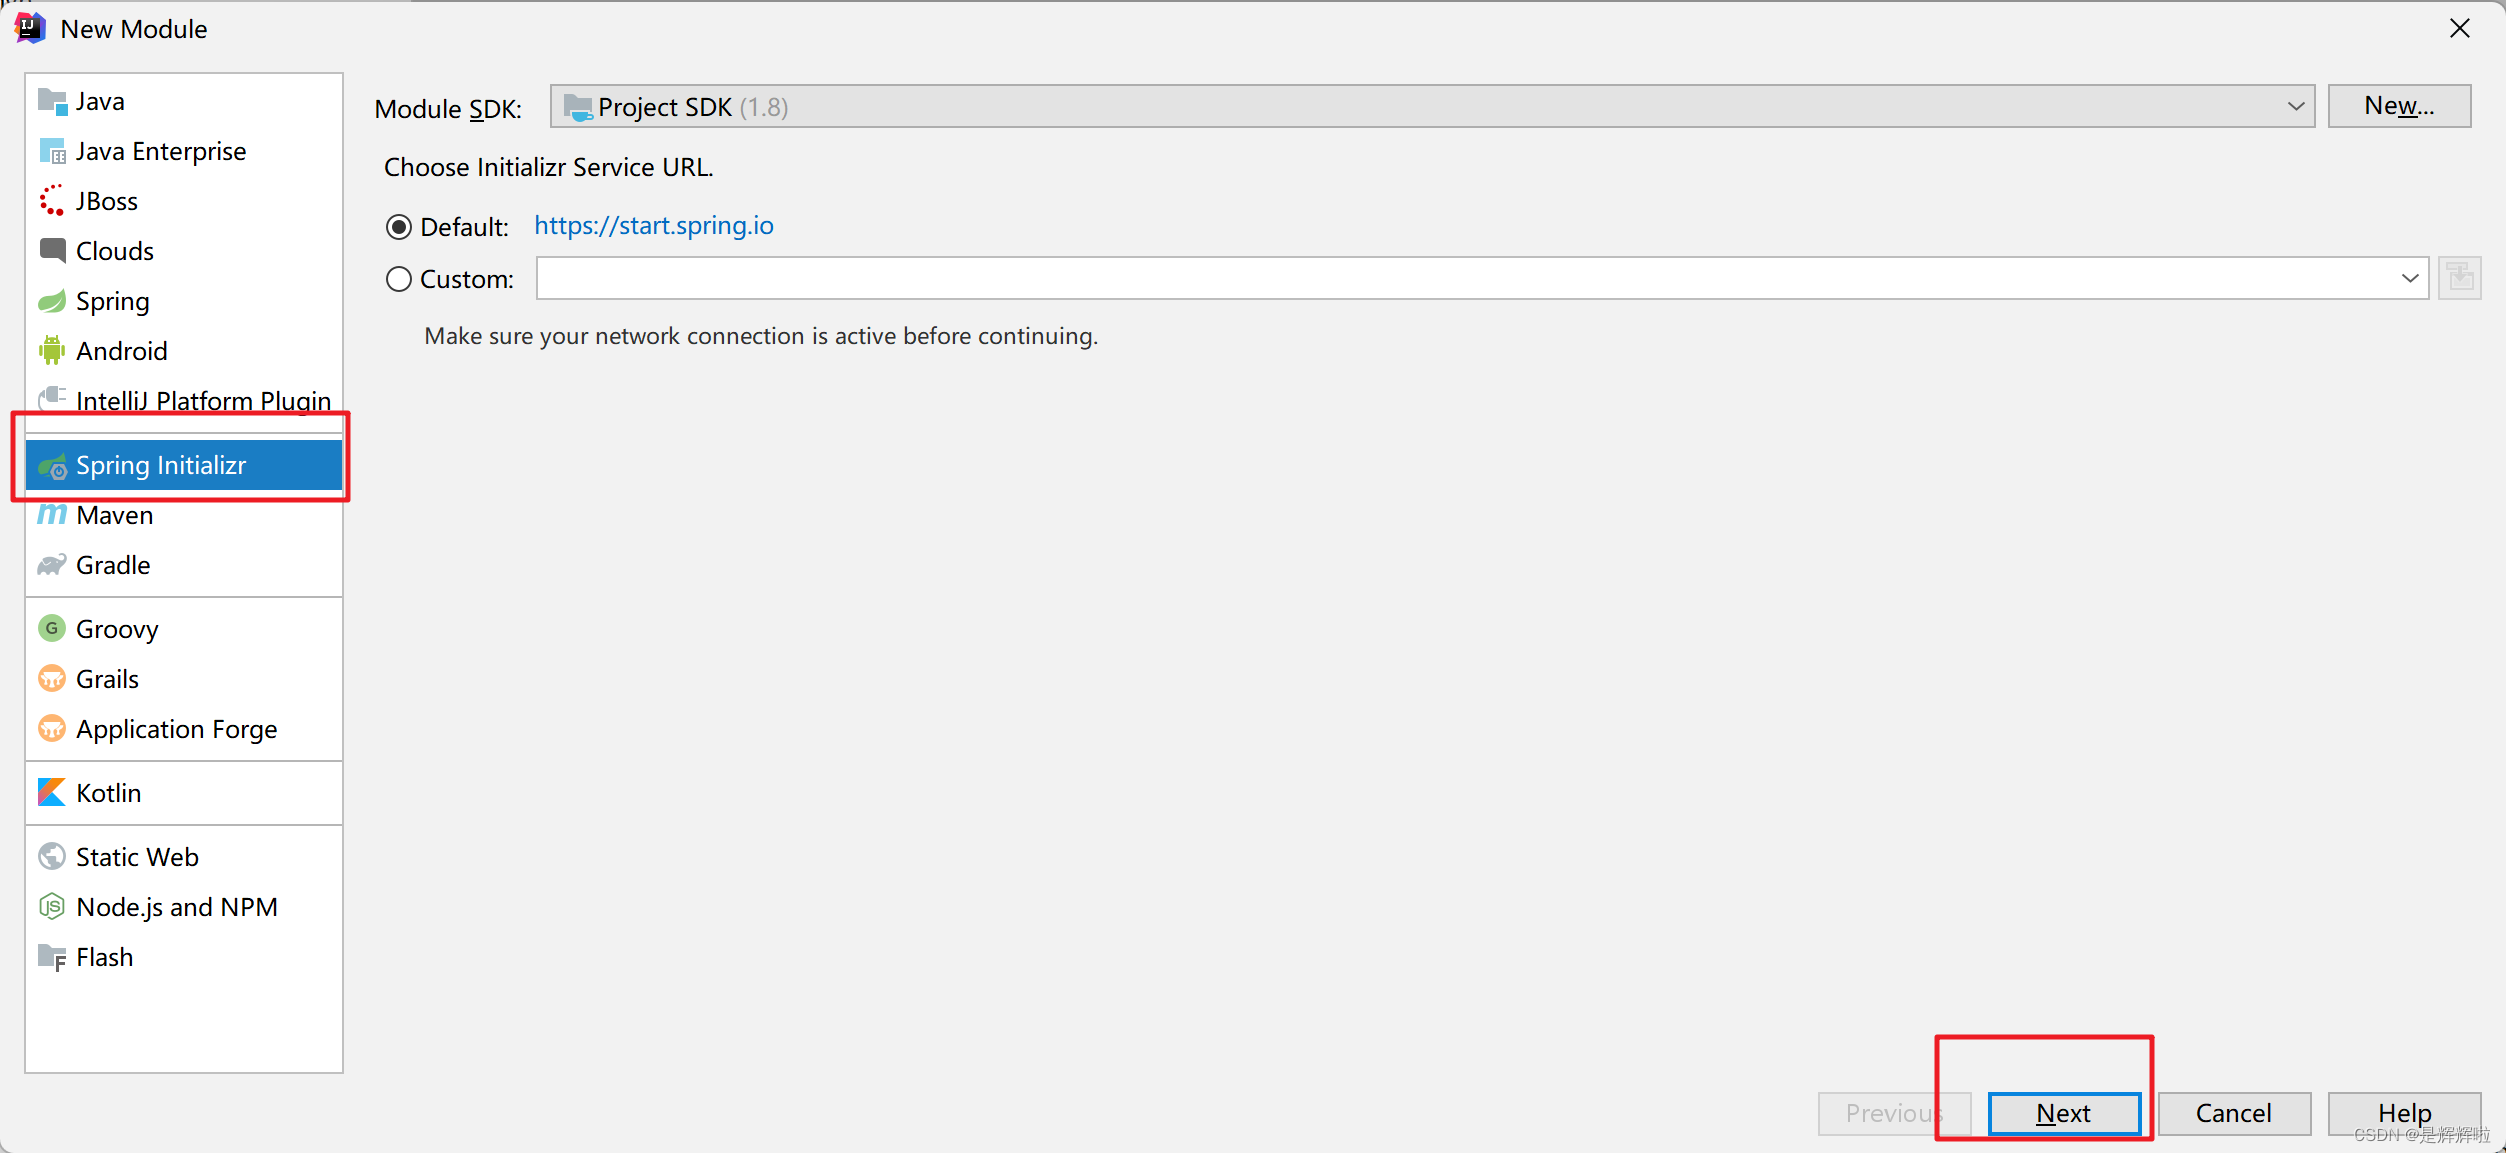
1.创建Starter项目(spring-initializr)
一.?starter是什么
??SpringBoot中的starter是一种非常重要的机制(自动化配置),能够抛弃以前繁杂的配置,将其统一集成进starter,应用者只需要在maven中引入starter依赖,SpringBoot就能自动扫描到要加载的信息并启动相应的默认配置。starter让我们摆脱了各种依赖库的处理,需要配置各种信息的困扰
所有这些依赖模块都遵循着约定成俗的默认配置,并允许我们调整这些配置,即遵循“约定大于配置”的理念
二.为什么要使用starter
?????????使用starter的主要目的是简化应用程序的开发和配置过程。通常,一个应用程序需要包含许多组件和配置,如数据库连接、安全认证、日志记录等。使用starter可以将这些组件和配置预先打包为一个可重用的模块,使得开发者能够更快速地启动一个基本的应用程序???
?????????在我们的日常开发工作中,经常会有一些独立于业务之外的配置模块,我们经常将其放到一个特定的包下,然后如果另一个工程需要复用这块功能的时候,需要将代码硬拷贝到另一个工程,重新集成一遍,麻烦至极。如果我们将这些可独立于业务代码之外的功能配置模块封装成一个个starter,复用的时候只需要将其在pom中引用依赖即可, SpringBoot为我们完成自动装配,简直不要太爽。
三.怎么自定义starter【附自定义starter的案例制作】
1.创建Starter项目(spring-initializr)
???????
2.定义Starter需要的配置类(Properties)
package com.wh.mysmsspringbootstarter.properties;

import lombok.Data;
import org.springframework.beans.factory.annotation.Value;
import org.springframework.boot.context.properties.ConfigurationProperties;
import org.springframework.stereotype.Component;

/**
 * 短信服务配置类
 */

 @Data
 @ConfigurationProperties(prefix="mysms")
public class SmsProperties {

//    @Value("${mysms.keys}")
    private String keys;//访问ID、即帐号
//    @Value("${mysms.secret}")
    private String secret;//访问凭证,即密码

}
3.编写Starter项目的业务功能
package com.wh.mysmsspringbootstarter.service;

public interface ISmsService {

    /**
     * 发送短信
     *
     * @param phone        要发送的手机号
     * @param data         要发送的内容
     */
    void send(String phone, String data);

}
package com.wh.mysmsspringbootstarter.service; import com.wh.mysmsspringbootstarter.properties.SmsProperties; import org.springframework.stereotype.Service; public class SmsServiceImpl implements ISmsService { private SmsProperties smsProperties; //null public SmsServiceImpl(SmsProperties smsProperties) { this.smsProperties=smsProperties; } @Override public void send(String phone, String data) { String key = smsProperties.getKeys(); String secret = smsProperties.getSecret(); //System.out.println("接入短信系统,Keys=" + key + ",Secret=" + secret); System.out.println("短信发送,phone=" + phone + "data=" + data); } }4.编写自动配置类
在此去控制service是否会被加到spring中,所以就不能够使用spring的自动装配了,而是要手动去装配,在这里是先拿到配置类,然后在下面写一个方法去控制service导入spring
并且配置类也不能够交给spring自动装配了
然后需要去将配置类注入到spring,这样子的话,只要配置类和service就是一个捆绑的关系了(配置类注入spring时,service也会注入到spring中)
使用属性去控制是否使用功能(是否注入配置类以及service到spring中)
package com.wh.mysmsspringbootstarter.config;

import com.wh.mysmsspringbootstarter.properties.SmsProperties;
import com.wh.mysmsspringbootstarter.service.ISmsService;
import com.wh.mysmsspringbootstarter.service.SmsServiceImpl;
import org.springframework.beans.factory.annotation.Autowired;
import org.springframework.boot.autoconfigure.condition.ConditionalOnProperty;
import org.springframework.boot.context.properties.EnableConfigurationProperties;
import org.springframework.context.annotation.Bean;
import org.springframework.context.annotation.Configuration;

/**
 * @author是辉辉啦
 * @create 2023-12-14-19:18
 */
@Configuration
//开启配置自动加载
@EnableConfigurationProperties({SmsProperties.class})
//用这个属性去控制是否使用短信验证功能
@ConditionalOnProperty(prefix = "mysms",name = "enable",havingValue = "true")
public class SmsConfig {
    //控制service是否会被加到spring中
    @Autowired
    private SmsProperties smsProperties;
    @Bean
    public ISmsService controlservice(){
        return new SmsServiceImpl(smsProperties);
    }
}
5.编写spring.factories文件加载自动配置类
注意:其中AutoConfig是starter配置文件的类限定名,多个之间逗号分割,还可以\进行转义即相当于去掉后面换行和空格符号
org.springframework.boot.autoconfigure.EnableAutoConfiguration=\
  com.wh.mysmsspringbootstarter.config.SmsConfig
6.打包安装
我们也可以检查一下是否安装完毕
7.其它项目引用
①引入pom依赖
 <!--自定义stater-->
        <dependency>
            <groupId>com.wh</groupId>
            <artifactId>mysms-spring-boot-starter</artifactId>
            <version>0.0.1-SNAPSHOT</version>
        </dependency>
②yml配置
🔺如果在其他项目中引用的时候,出现了下面的这种情况(框住的是当时报红的,也意味着用不了这个启动类),那么就在启动类的pom中引入一个插件
<!--自定义starter-->
            <plugin>
                <groupId>org.springframework.boot</groupId>
                <artifactId>spring-boot-maven-plugin</artifactId>
                <configuration>
                    <classifier>exec</classifier>
                </configuration>
            </plugin>
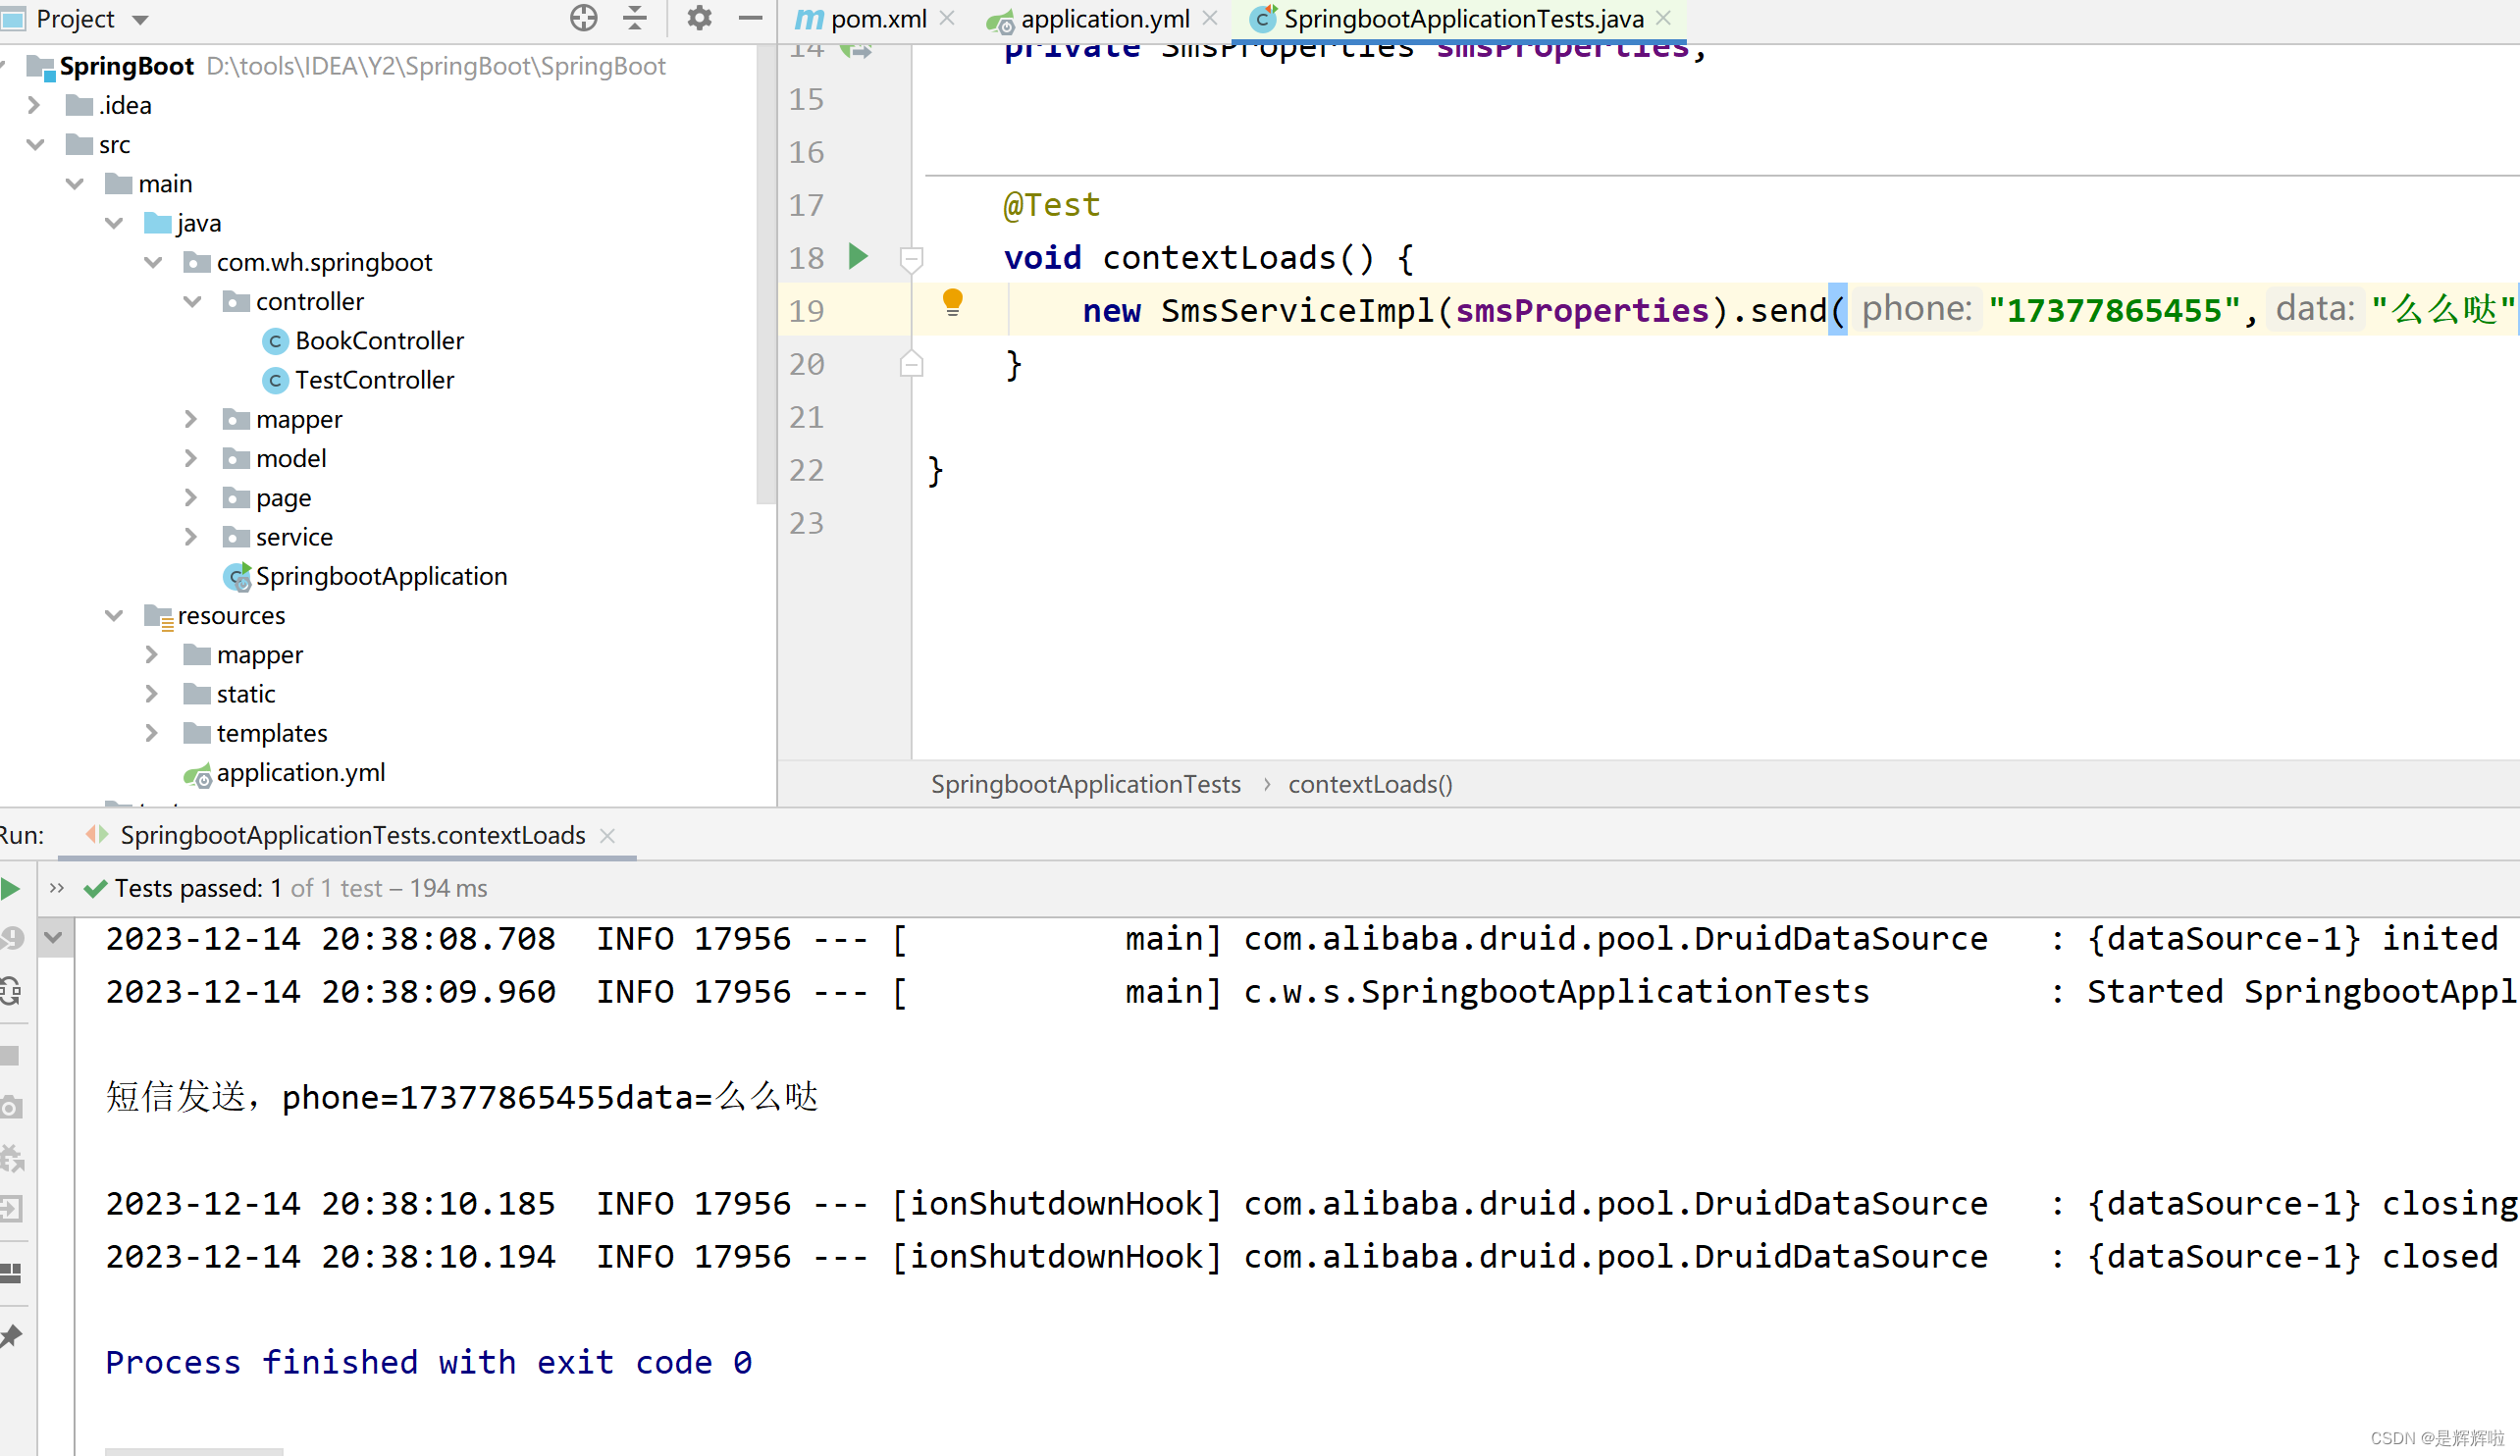
③测试类
package com.wh.springboot;


import com.wh.mysmsspringbootstarter.properties.SmsProperties;
import com.wh.mysmsspringbootstarter.service.SmsServiceImpl;
import org.junit.jupiter.api.Test;
import org.springframework.beans.factory.annotation.Autowired;
import org.springframework.boot.test.context.SpringBootTest;

@SpringBootTest(classes = SpringbootApplication.class)
class SpringbootApplicationTests {

    @Autowired
    private SmsProperties smsProperties;


    @Test
    void contextLoads() {
        new SmsServiceImpl(smsProperties).send("17377865455","么么哒");
    }

}


四.自定义starter的实际运用【切面日志】
0.需要的依赖
①pom
<?xml version="1.0" encoding="UTF-8"?>
<project xmlns="http://maven.apache.org/POM/4.0.0" xmlns:xsi="http://www.w3.org/2001/XMLSchema-instance"
         xsi:schemaLocation="http://maven.apache.org/POM/4.0.0 https://maven.apache.org/xsd/maven-4.0.0.xsd">
    <modelVersion>4.0.0</modelVersion>
    <parent>
        <groupId>org.springframework.boot</groupId>
        <artifactId>spring-boot-starter-parent</artifactId>
        <version>2.7.6</version>
        <relativePath/> <!-- lookup parent from repository -->
    </parent>
    <groupId>com.wh</groupId>
    <artifactId>springboot</artifactId>
    <version>0.0.1-SNAPSHOT</version>
    <name>springboot</name>
    <description>Demo project for Spring Boot</description>
    <properties>
<!--        <java.version>17</java.version>-->
    </properties>
    <!--依赖-->
    <dependencies>
        <dependency>
            <groupId>org.springframework.boot</groupId>
            <artifactId>spring-boot-configuration-processor</artifactId>
            <optional>true</optional>
        </dependency>
        <!--springmvc-->
        <dependency>
            <groupId>org.springframework.boot</groupId>
            <artifactId>spring-boot-starter-web</artifactId>
        </dependency>
        <!--mybatis-->
        <dependency>
            <groupId>org.mybatis.spring.boot</groupId>
            <artifactId>mybatis-spring-boot-starter</artifactId>
            <version>2.3.0</version>
        </dependency>
        <!--JDBC(Java数据库连接)-->
        <dependency>
            <groupId>org.springframework.boot</groupId>
            <artifactId>spring-boot-starter-jdbc</artifactId>
        </dependency>
        <!--mysql-->
        <dependency>
            <groupId>mysql</groupId>
            <artifactId>mysql-connector-java</artifactId>
            <version>5.1.44</version>
        </dependency>
        <!--lombok-->
        <dependency>
            <groupId>org.projectlombok</groupId>
            <artifactId>lombok</artifactId>
            <optional>true</optional>
        </dependency>
        <!--aop-->
        <dependency>
            <groupId>org.springframework.boot</groupId>
            <artifactId>spring-boot-starter-aop</artifactId>
        </dependency>
        <!--freemarker-->
        <dependency>
            <groupId>org.springframework.boot</groupId>
            <artifactId>spring-boot-starter-freemarker</artifactId>
        </dependency>
        <!--druid-->
        <dependency>
            <groupId>com.alibaba</groupId>
            <artifactId>druid-spring-boot-starter</artifactId>
            <version>1.2.15</version>
        </dependency>
        <!--自定义stater需要的依赖(配置提醒)-->
        <dependency>
            <groupId>com.wh</groupId>
            <artifactId>mysms-spring-boot-starter</artifactId>
            <version>0.0.1-SNAPSHOT</version>
        </dependency>
        <!--测试-->
        <dependency>
            <groupId>org.springframework.boot</groupId>
            <artifactId>spring-boot-starter-test</artifactId>
            <scope>test</scope>
        </dependency>

    </dependencies>

    <build>
        <!--插件-->
        <plugins>
            <plugin>
                <groupId>org.springframework.boot</groupId>
                <artifactId>spring-boot-maven-plugin</artifactId>
                <configuration>
                    <excludes>
                        <exclude>
                            <groupId>org.projectlombok</groupId>
                            <artifactId>lombok</artifactId>
                        </exclude>
                    </excludes>
                </configuration>
            </plugin>
        </plugins>
    </build>

</project>
②yml
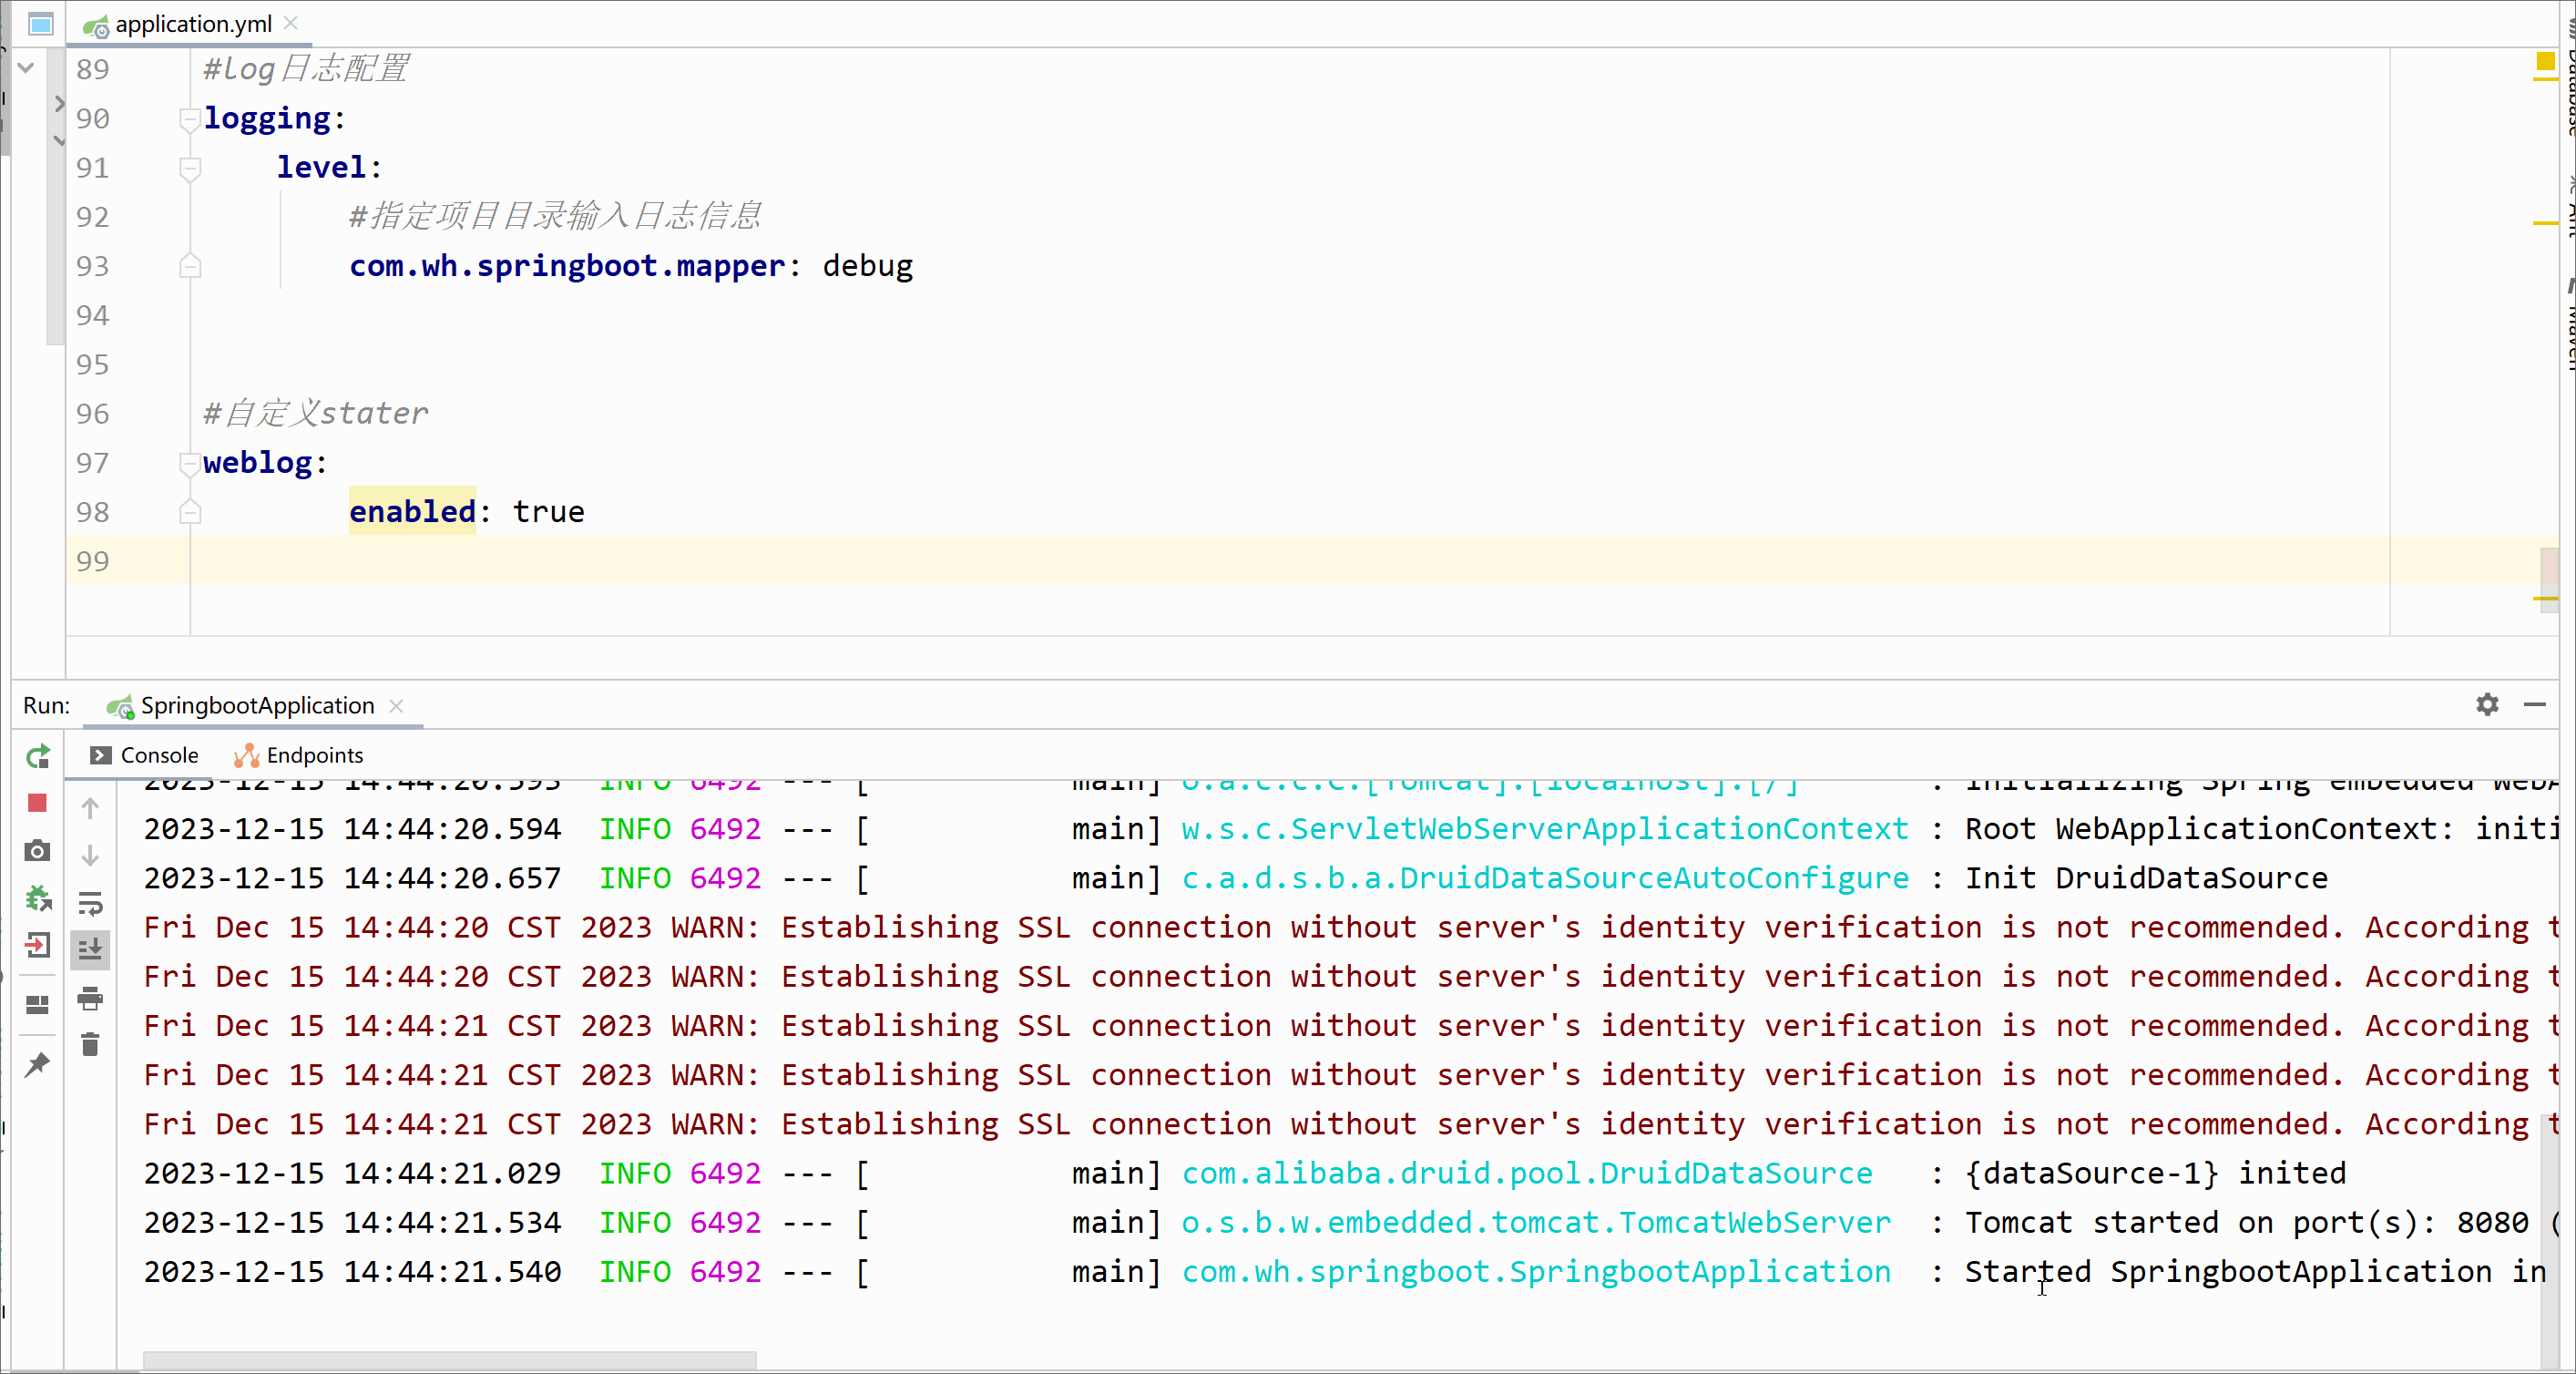
#server相关配置
server:
    # 配置端口
    port: 8080
    # 项目名
    servlet:
        context-path: /
#spring相关配置
spring:
    #freemarker的相关配置
    freemarker:
        # 设置模板后缀名
        suffix: .ftl
        # 设置文档类型
        content-type: text/html
        # 设置页面编码格式
        charset: UTF-8
        # 设置页面缓存
        cache: false
        # 设置ftl文件路径
        template-loader-path: classpath:/templates
        # 设置静态文件路径,js,css等
        mvc:
            static-path-pattern: /static/**
    datasource:
        driver-class-name: com.mysql.jdbc.Driver
        type: com.zaxxer.hikari.HikariDataSource
        url: jdbc:mysql://localhost:3306/bookshop?useUnicode=true&characterEncoding=utf8&serverTimezone=UTC
        username: root
        password: 123456
        druid:
            #2.连接池配置
            #初始化连接池的连接数量 大小,最小,最大
            initial-size: 5
            min-idle: 5
            max-active: 20
            #配置获取连接等待超时的时间
            max-wait: 60000
            #配置间隔多久才进行一次检测,检测需要关闭的空闲连接,单位是毫秒
            time-between-eviction-runs-millis: 60000
            # 配置一个连接在池中最小生存的时间,单位是毫秒
            min-evictable-idle-time-millis: 30000
            validation-query: SELECT 1 FROM DUAL
            test-while-idle: true
            test-on-borrow: true
            test-on-return: false
            # 是否缓存preparedStatement,也就是PSCache  官方建议MySQL下建议关闭   个人建议如果想用SQL防火墙 建议打开
            pool-prepared-statements: true
            max-pool-prepared-statement-per-connection-size: 20
            # 配置监控统计拦截的filters,去掉后监控界面sql无法统计,'wall'用于防火墙
            filter:
                stat:
                    merge-sql: true
                    slow-sql-millis: 5000
            #3.基础监控配置
            web-stat-filter:
                enabled: true
                url-pattern: /*
                #设置不统计哪些URL
                exclusions: "*.js,*.gif,*.jpg,*.png,*.css,*.ico,/druid/*"
                session-stat-enable: true
                session-stat-max-count: 100
            stat-view-servlet:
                enabled: true
                url-pattern: /druid/*
                reset-enable: true
                #设置监控页面的登录名和密码
                login-username: admin
                login-password: admin
                allow: 127.0.0.1
                #deny: 192.168.1.100

#mybatis配置
mybatis:
    #配置SQL映射文件路径
    mapper-locations: classpath:mapper/*.xml
    #配置别名
    type-aliases-package: com.zking.SpringBoot.model
#pagehelper分页插件配置
pagehelper:
    helperDialect: mysql
    reasonable: true
    supportMethodsArguments: true
    params: count=countSql
#log日志配置
logging:
    level:
        #指定项目目录输入日志信息
        com.wh.springboot.mapper: debug


#自定义stater
weblog:
        enabled: false
1.定义Starter需要的配置类
package com.wh.springboot.starteraop;

import org.springframework.boot.context.properties.ConfigurationProperties;

@ConfigurationProperties(prefix = "spcloud.weblog")
public class WebLogProperties {
    private boolean enabled;

    public WebLogProperties() {
    }

    public boolean isEnabled() {
        return enabled;
    }

    public void setEnabled(boolean enabled) {
        this.enabled = enabled;
    }
}
2.编写切面类
package com.wh.springboot.starteraop;

import lombok.extern.slf4j.Slf4j;
import org.aspectj.lang.JoinPoint;
import org.aspectj.lang.annotation.AfterReturning;
import org.aspectj.lang.annotation.Aspect;
import org.aspectj.lang.annotation.Before;
import org.aspectj.lang.annotation.Pointcut;
import org.springframework.boot.autoconfigure.condition.ConditionalOnProperty;
import org.springframework.stereotype.Component;
import org.springframework.web.context.request.RequestContextHolder;
import org.springframework.web.context.request.ServletRequestAttributes;

import javax.servlet.http.HttpServletRequest;
import java.util.Arrays;

@Aspect
@Component
@Slf4j
@ConditionalOnProperty(prefix = "weblog",
        value="enabled",havingValue = "true")
public class WebLogAspect {
    //@Pointcut("execution(public * com.zking..controller.*.*(..))")
    @Pointcut("execution(* *..*Controller.*(..))")
    public void webLog(){}

    @Before("webLog()")
    public void doBefore(JoinPoint joinPoint) throws Throwable {
        // 接收到请求,记录请求内容
        ServletRequestAttributes attributes = (ServletRequestAttributes) RequestContextHolder.getRequestAttributes();
        HttpServletRequest request = attributes.getRequest();

        // 记录下请求内容
        log.info("开始服务:{}", request.getRequestURL().toString());
        log.info("客户端IP :{}" , request.getRemoteAddr());
        log.info("参数值 :{}", Arrays.toString(joinPoint.getArgs()));
    }

    @AfterReturning(returning = "ret", pointcut = "webLog()")
    public void doAfterReturning(Object ret) throws Throwable {
        // 处理完请求,返回内容
        log.info("返回值 : {}" , ret);
    }
}
3.编写自动配置类
package com.wh.springboot.starteraop;

import org.springframework.boot.autoconfigure.condition.ConditionalOnMissingBean;
import org.springframework.boot.autoconfigure.condition.ConditionalOnProperty;
import org.springframework.boot.context.properties.EnableConfigurationProperties;
import org.springframework.context.annotation.Bean;
import org.springframework.context.annotation.Configuration;

/**
 * @ConditionalOnProperty
 * 配置属性a:
 * 1:不配置a        matchifmissing=false 不满足      matchifmissing=true 满足
 * 2:配置a=false    matchifmissing=false 不满足      matchifmissing=true 不满足
 * 3:配置a=true     matchifmissing=false 满足        matchifmissing=true 满足
 */
@Configuration
@EnableConfigurationProperties({WebLogProperties.class})
@ConditionalOnProperty(prefix = "weblog",
        value="enabled",havingValue = "true")
public class WebLogConfig {

    @Bean
    @ConditionalOnMissingBean
    public WebLogAspect webLogAspect(){
        return new WebLogAspect();
    }
}
4.编写spring.factories文件加载自动配置类
注意:其中AutoConfig是starter配置文件的类限定名,多个之间逗号分割,还可以\进行转义即相当于去掉后面换行和空格符号
org.springframework.boot.autoconfigure.EnableAutoConfiguration=\
 写上自动装配类的路径
5.打包安装
6.在其他项目中使用
①引入这个自定义的starter的pom依赖
②在yml/properties的文件中去控制是否使用切面日志
③效果
▲使用
▲不使用

五.自定义starter运用到的注解
@SpringBootApplication:这是一个组合注解,包括了
@Configuration、@EnableAutoConfiguration和@ComponentScan。这个注解通常在引导类(如Application)上使用。@EnableAutoConfiguration:启用自动配置机制。这个注解可以让 Spring Boot 根据项目的依赖和配置来自动配置应用程序。
@ConfigurationProperties:将属性绑定到特定的 Java 类中。这个注解通常用于将应用程序的自定义配置绑定到一个 POJO 中。
@ConditionalOnClass:当给定的类在类路径上存在时,才实例化一个 Bean。这个注解可用于根据特定的条件来控制 Bean 的创建。
@ConditionalOnMissingBean:当给定的 Bean 不存在时,才实例化一个 Bean。这个注解可用于根据特定的条件来控制 Bean 的创建。
@ConditionalOnProperty:当指定的属性存在并且具有指定的值时,才实例化一个 Bean。这个注解可用于根据特定的属性值来控制 Bean 的创建。
@Autowired:自动装配一个 Bean,并将它注入到另一个 Bean 中。
@Component:将一个普通的 Java 类声明为 Spring Bean。
@RestController:将一个 Java 类声明为 Web 控制器,用于处理 HTTP 请求。
- @RequestMapping:将一个方法映射到一个特定的 URL,并指定请求方法(如 GET、POST 等
六.易错总结?
1.不识别yml文件
可以引入这个依赖,就可以解决
 <dependency>
            <groupId>org.springframework.boot</groupId>
            <artifactId>spring-boot-configuration-processor</artifactId>
            <optional>true</optional>
        </dependency>
?好啦,今天的分享就到这了,希望能够帮到你呢!😊😊
本文来自互联网用户投稿,该文观点仅代表作者本人,不代表本站立场。本站仅提供信息存储空间服务,不拥有所有权,不承担相关法律责任。 如若内容造成侵权/违法违规/事实不符,请联系我的编程经验分享网邮箱:chenni525@qq.com进行投诉反馈,一经查实,立即删除!
- Python教程
- 深入理解 MySQL 中的 HAVING 关键字和聚合函数
- Qt之QChar编码(1)
- MyBatis入门基础篇
- 用Python脚本实现FFmpeg批量转换
- leetcode热题100.两数之和
- 用Java编程实现一个矢量绘图软件,该软件可以选择不同的绘制图形(椭圆、矩形、线条),并可以选中图形,修改图形属性(线条粗细与颜色、填充方式与颜色),拖动位置,改变大小。 (一)具体要求: (1)图形
- ICMP隐蔽隧道工具Pingtunnel搭建隧道(附搭建环境避坑超详细)
- 2023-12-18 最大二叉树、合并二叉树、二叉搜索树中的搜索、验证二叉搜索树
- 用Html和js和layui写一个简单猜拳小游戏
- GenerateBlocks Pro插件 构建更好的WordPress网站
- 【模拟电路】非接触测电笔绘制、电子琴NE555
- 嵌入式C语言(7)——江科大指针的详解与应用
- 低功耗全功能蓝牙5.1与2.4GHz私有协议的双模无线连接芯片OM6621FB 无线键鼠应用领域
- 前端基础:回顾es6相关知识