用Pytorch实现线性回归模型
回顾
前面已经学习过线性模型相关的内容,实现线性模型的过程并没有使用到Pytorch。
这节课主要是利用Pytorch实现线性模型。
学习器训练:
- 确定模型(函数)
- 定义损失函数
- 优化器优化(SGD)
之前用过Pytorch的Tensor进行Forward、Backward计算。
现在利用Pytorch框架来实现。
Pytorch实现
步骤
- 准备数据集
- 设计模型(计算预测值y_hat):从nn.Module模块继承
- 构造损失函数和优化器:使用PytorchAPI
- 训练过程:Forward、Backward、update
1. 准备数据
在PyTorch中计算图是通过mini-batch形式进行,所以X、Y都是多维的Tensor。

import torch
x_data = torch.Tensor([[1.0], [2.0], [3.0]])
y_data = torch.Tensor([[2.0], [4.0], [6.0]])
2. 设计模型
在之前讲解梯度下降算法时,我们需要自己计算出梯度,然后更新权重。

而使用Pytorch构造模型,重点时在构建计算图和损失函数上。

class LinearModel
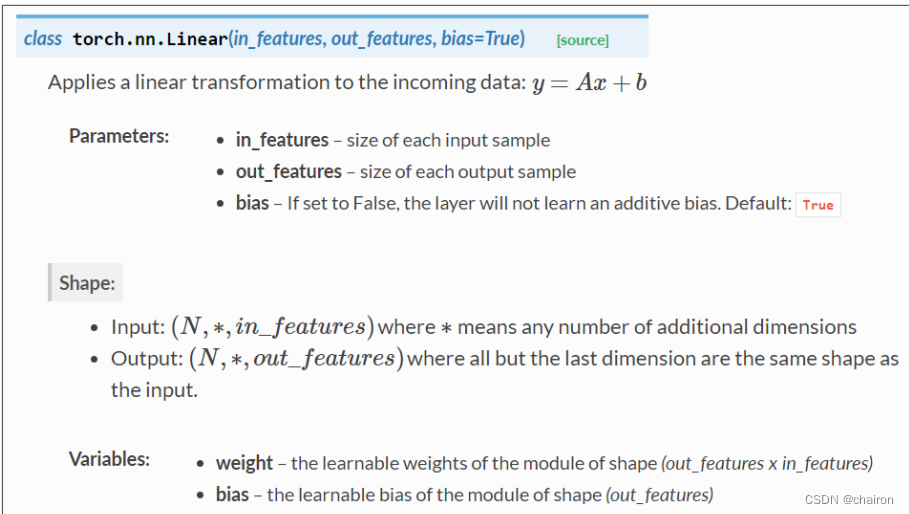
通过构造一个 class LinearModel类来实现,所有的模型类都需要继承nn.Module,这是所有神经忘了模块的基础类。
class LinearModel这种定义的模型类必须包含两个部分:
- init():构造函数,进行初始化。
    def __init__(self):
        super(LinearModel, self).__init__()#调用父类构造函数,不用管,照着写。
        # torch.nn.Linear(in_featuers, in_featuers)构造Linear类的对象,其实就是实现了一个线性单元
        self.linear = torch.nn.Linear(1, 1)

- forward():进行前馈计算
(backward没有被写,是因为在这种模型类里面会自动实现)
Class nn.Linear 实现了magic method call():它使类的实例可以像函数一样被调用。通常会调用forward()。
    def forward(self, x):
        y_pred = self.linear(x)#调用linear对象,输入x进行预测
        return y_pred
代码
class LinearModel(torch.nn.Module):
    def __init__(self):
        super(LinearModel, self).__init__()#调用父类构造函数,不用管,照着写。
        # torch.nn.Linear(in_featuers, in_featuers)构造Linear类的对象,其实就是实现了一个线性单元
        self.linear = torch.nn.Linear(1, 1)
    def forward(self, x):
        y_pred = self.linear(x)#调用linear对象,输入x进行预测
        return y_pred

model = LinearModel()#实例化LinearModel()
3. 构造损失函数和优化器
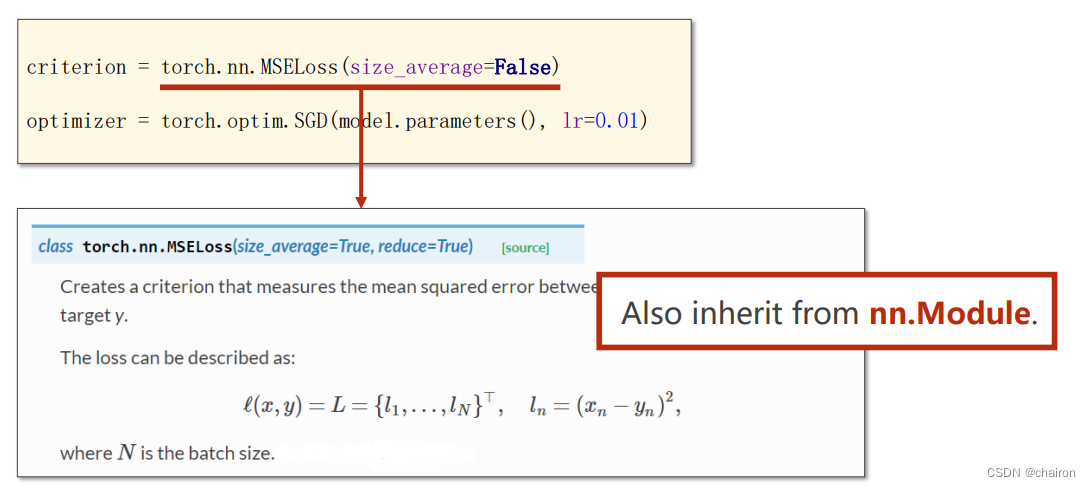
采用MSE作为损失函数
torch.nn.MSELoss(size_average,reduce)
- size_average:是否求mini-batch的平均loss。
- reduce:降维,不用管。
 SGD作为优化器torch.optim.SGD(params, lr):
- params:参数
- lr:学习率

criterion = torch.nn.MSELoss(size_average=False)#size_average:the losses are averaged over each loss element in the batch.
optimizer = torch.optim.SGD(model.parameters(), lr=0.01)#params:model.parameters(): w、b
4. 训练过程
- 预测
- 计算loss
- 梯度清零
- Backward
- 参数更新
简化:Forward–>Backward–>更新
#4. Training Cycle
for epoch in range(100):
    y_pred = model(x_data)#Forward:预测
    loss = criterion(y_pred, y_data)#Forward:计算loss
    print(epoch, loss)
    optimizer.zero_grad()#梯度清零
    loss.backward()#backward:计算梯度
    optimizer.step()#通过step()函数进行参数更新
5. 输出和测试
# Output weight and bias
print('w = ', model.linear.weight.item())
print('b = ', model.linear.bias.item())

# Test Model
x_test = torch.Tensor([[4.0]])
y_test = model(x_test)
print('y_pred = ', y_test.data)
完整代码
import torch
#1. Prepare dataset
x_data = torch.Tensor([[1.0], [2.0], [3.0]])
y_data = torch.Tensor([[2.0], [4.0], [6.0]])

#2. Design Model
class LinearModel(torch.nn.Module):
    def __init__(self):
        super(LinearModel, self).__init__()#调用父类构造函数,不用管,照着写。
        # torch.nn.Linear(in_featuers, in_featuers)构造Linear类的对象,其实就是实现了一个线性单元
        self.linear = torch.nn.Linear(1, 1)
    def forward(self, x):
        y_pred = self.linear(x)#调用linear对象,输入x进行预测
        return y_pred

model = LinearModel()#实例化LinearModel()

# 3. Construct Loss and Optimize
criterion = torch.nn.MSELoss(size_average=False)#size_average:the losses are averaged over each loss element in the batch.
optimizer = torch.optim.SGD(model.parameters(), lr=0.01)#params:model.parameters(): w、b

#4. Training Cycle
for epoch in range(100):
    y_pred = model(x_data)#Forward:预测
    loss = criterion(y_pred, y_data)#Forward:计算loss
    print(epoch, loss)
    optimizer.zero_grad()#梯度清零
    loss.backward()#backward:计算梯度
    optimizer.step()#通过step()函数进行参数更新

# Output weight and bias
print('w = ', model.linear.weight.item())
print('b = ', model.linear.bias.item())

# Test Model
x_test = torch.Tensor([[4.0]])
y_test = model(x_test)
print('y_pred = ', y_test.data)
输出结果:
85 tensor(0.2294, grad_fn=)
86 tensor(0.2261, grad_fn=)
87 tensor(0.2228, grad_fn=)
88 tensor(0.2196, grad_fn=)
89 tensor(0.2165, grad_fn=)
90 tensor(0.2134, grad_fn=)
91 tensor(0.2103, grad_fn=)
92 tensor(0.2073, grad_fn=)
93 tensor(0.2043, grad_fn=)
94 tensor(0.2014, grad_fn=)
95 tensor(0.1985, grad_fn=)
96 tensor(0.1956, grad_fn=)
97 tensor(0.1928, grad_fn=)
98 tensor(0.1900, grad_fn=)
99 tensor(0.1873, grad_fn=)
w = 1.711882472038269
b = 0.654958963394165
y_pred = tensor([[7.5025]])
可以看到误差还比较大,可以增加训练轮次,训练1000次后的结果:
980 tensor(2.1981e-07, grad_fn=)
981 tensor(2.1671e-07, grad_fn=)
982 tensor(2.1329e-07, grad_fn=)
983 tensor(2.1032e-07, grad_fn=)
984 tensor(2.0737e-07, grad_fn=)
985 tensor(2.0420e-07, grad_fn=)
986 tensor(2.0143e-07, grad_fn=)
987 tensor(1.9854e-07, grad_fn=)
988 tensor(1.9565e-07, grad_fn=)
989 tensor(1.9260e-07, grad_fn=)
990 tensor(1.8995e-07, grad_fn=)
991 tensor(1.8728e-07, grad_fn=)
992 tensor(1.8464e-07, grad_fn=)
993 tensor(1.8188e-07, grad_fn=)
994 tensor(1.7924e-07, grad_fn=)
995 tensor(1.7669e-07, grad_fn=)
996 tensor(1.7435e-07, grad_fn=)
997 tensor(1.7181e-07, grad_fn=)
998 tensor(1.6931e-07, grad_fn=)
999 tensor(1.6700e-07, grad_fn=)
w = 1.9997280836105347
b = 0.0006181497010402381
y_pred = tensor([[7.9995]])
练习
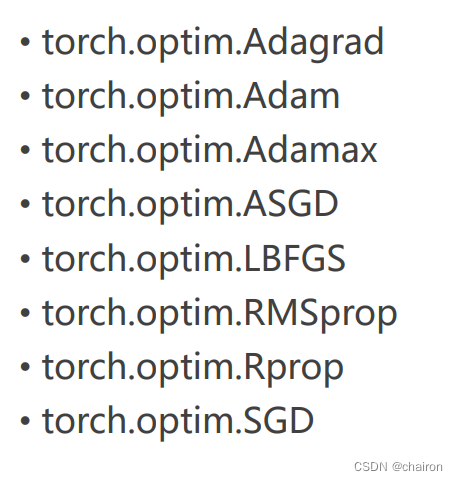
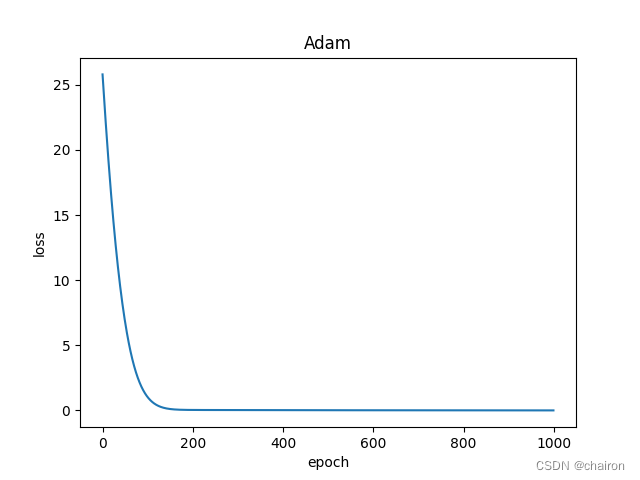
用以下这些优化器替换SGD,得到训练结果并画出损失曲线图。

比如说:Adam的loss图:

本文来自互联网用户投稿,该文观点仅代表作者本人,不代表本站立场。本站仅提供信息存储空间服务,不拥有所有权,不承担相关法律责任。 如若内容造成侵权/违法违规/事实不符,请联系我的编程经验分享网邮箱:chenni525@qq.com进行投诉反馈,一经查实,立即删除!
- Python教程
- 深入理解 MySQL 中的 HAVING 关键字和聚合函数
- Qt之QChar编码(1)
- MyBatis入门基础篇
- 用Python脚本实现FFmpeg批量转换
- 个人信息出境标准合同备案政策解读、案例分析与合规指引
- 阿里云服务器Alibaba Cloud Linux 3镜像版本大全说明
- YOLOv5算法进阶改进(9)— 引入ASPP | 空洞空间金字塔池化
- Mybatis SQL构建器类 - 问题&答案
- NFS的介绍与管理
- 还有人不知道开源知识库吗?低成本搭建就靠它了
- 每日一练【最大连续1的个数 III】
- 微信小程序封装vant 下拉框select 单选组件
- 代码签名证书是什么?
- dcat admin框架开发前台