Flume基础知识(三):Flume 实战监控端口数据官方案例
1. 监控端口数据官方案例
1)案例需求:
使用 Flume 监听一个端口,收集该端口数据,并打印到控制台。
2)需求分析:

3)实现步骤:
(1)安装 netcat 工具
sudo yum install -y nc(2)判断 44444 端口是否被占用
sudo netstat -nlp | grep 44444(3)创建 Flume Agent 配置文件 flume-netcat-logger.conf
(4)在 flume 目录下创建 job 文件夹并进入 job 文件夹。
mkdir job
cd job/
(5)在 job 文件夹下创建 Flume Agent 配置文件 flume-netcat-logger.conf。
touch net-flume-logger.conf(6)在 flume-netcat-logger.conf 文件中添加如下内容。
#添加内容如下:
# Name the components on this agent
a1.sources = r1
a1.sinks = k1
a1.channels = c1
# Describe/configure the source
a1.sources.r1.type = netcat
a1.sources.r1.bind = localhost
a1.sources.r1.port = 44444
# Describe the sink
a1.sinks.k1.type = logger
# Use a channel which buffers events in memory
a1.channels.c1.type = memory
a1.channels.c1.capacity = 1000
a1.channels.c1.transactionCapacity = 100
# Bind the source and sink to the channel
a1.sources.r1.channels = c1
a1.sinks.k1.channel = c1
注:配置文件来源于官方手册 Flume 1.11.0 User Guide — Apache Flume

同一台机器中,不能配置多个相同的a1.事务的容量要比总容量要小,也就是说a1.channels.c1.transactionCapacity < a1.channels.c1.capacity,一个source可以绑定多个channel,一个channel只能发到一个sink。
(7)先开启 flume 监听端口 第一种写法:
bin/flume-ng agent -n a1 -c conf/ -f job/net-flume-logger.conf -Dflume.root.logger=INFO,console第二种写法:
bin/flume-ng agent -c conf/ -n a1 -f job/flume-netcat-logger.conf -Dflume.root.logger=INFO,console参数说明:
--conf/-c:表示配置文件存储在 conf/目录
--name/-n:表示给 agent 起名为 a1
--conf-file/-f:flume 本次启动读取的配置文件是在 job 文件夹下的 flume-telnet.conf 文件。
-Dflume.root.logger=INFO,console :-D 表示 flume 运行时动态修改 flume.root.logger 参数属性值,并将控制台日志打印级别设置为 INFO 级别。日志级别包括:log、info、warn、 error。
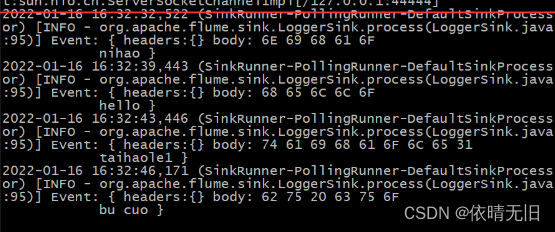
(8)使用 netcat 工具向本机的 44444 端口发送内容
nc localhost 44444(9)在 Flume 监听页面观察接收数据情况

本文来自互联网用户投稿,该文观点仅代表作者本人,不代表本站立场。本站仅提供信息存储空间服务,不拥有所有权,不承担相关法律责任。 如若内容造成侵权/违法违规/事实不符,请联系我的编程经验分享网邮箱:chenni525@qq.com进行投诉反馈,一经查实,立即删除!
- Python教程
- 深入理解 MySQL 中的 HAVING 关键字和聚合函数
- Qt之QChar编码(1)
- MyBatis入门基础篇
- 用Python脚本实现FFmpeg批量转换
- 2019数据结构----单链表真题
- VsCode安装ESLint插件后保存报错---解决方法
- uni-app和Vue.js有什么区别?
- 八股文打卡day16——计算机网络(16)
- 解析消费全返---看如何使用模式探索餐饮业新航标。
- 详解React与Vue的性能对比
- How to disable certificate validations in the Java HTTP Client
- 发布自己的npm包
- SpringBoot从数据库读取数据数据源配置信息,动态切换数据源
- 模拟信号和数字信号的区别