Linux网络引导自动安装centos7
目录
一、部署PXE远程安装服务
1. 系统装机的三种引导方式
- 硬盘
- 光驱(u盘)
- 网络启动 pxe
2. pxe概述
PXE的全称是preboot execute environment它其实是Intel在很久以前提出来的一项用于通过网络来引导系统的标准。允许客户机通过网络从远程服务器上下载引导镜像,并加载安装文件或者整个操作系统。pxe是通过网卡引导启动。
pxe优点:
- 规模化:同时装配多台服务器
- 自动化:安装系统、配置各种服务
- 远程实现:不需要光盘、U盘等安装介质 ?
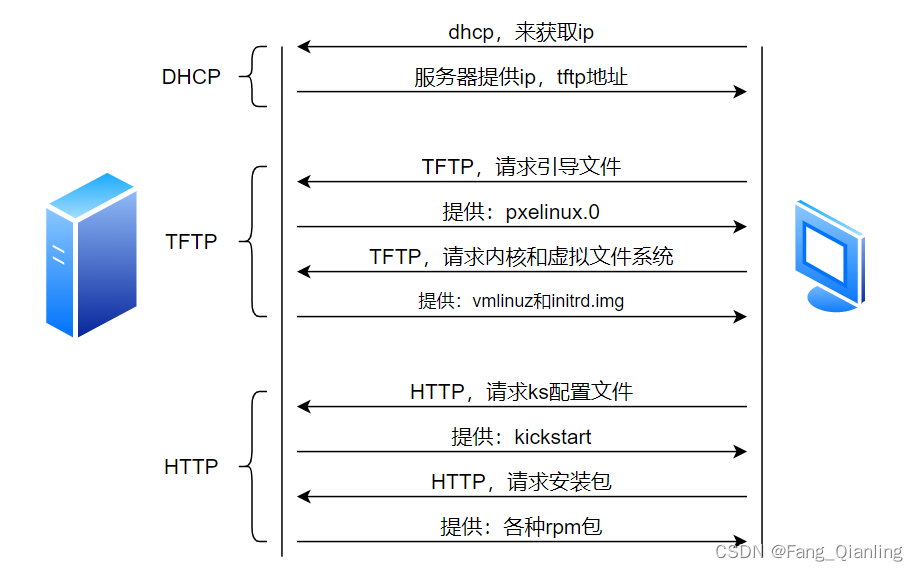
3. 实现过程
① 网卡需要查找相关的dhcp服务器(获取地址时间)
② 找到后dhcp服务器提供ip地址,和引导程序(boot loader)的地址,还提供给客户机TFTPserver地址(dhcp本身不提供tftp服务)
③ 网卡使用tftp客户端吧引导程序加载到内存中来
④ bios执行引导程序
⑤ 引导程序会去TFTP去查找配置文件
⑥ 根据配置文件去引导安装系统
⑦ 系统安装过程
4.?搭建过程中服务介绍
PXE远程安装服务器集成了CentOS 7安装源、TFTP服务、DHCP服务,能够向客户机裸机发送 PXE引导程序、Linux 内核、启动菜单等数据,以及提供安装文件。
4.1?TFTP服务
TFTP(简单文件传输协议):内核和引导文件
是一种基于UDP协议实现的用于在客户机和服务器之间进行简单文件传输的协议,适合于小型文件传输的应用场合。TFTP服务默认由xinetd服务进行管理,使用UDP69端口
4.2?vsftp:安装系统镜像文件获取方式
可以使用http,ftp等方式,ftp文件传输的一种。
4.3?syslinux
syslinux是一个功能强大的引导加载程序,而且兼容各种介质。它的目的是简化首次安装Linux的时间,并建立修护或其它特殊用途的启动盘。它的安装很简单,一旦安装syslinux好之后,sysLinux启动盘就可以引导各种基于DOS的工具,以及MS-DOS/Windows或者任何其它操作系统。pxelinux.0启动pxe
4.4?DHCP服务
DHCP: Dynamic Host Configuration Protocol,动态主机配置协议;UDP协议,C/S模式,dhcp server: 67/udp,dhcpv4 client :68/udp, dhcpv6 client: 546/udp 主要用途:
- 用于内部网络和网络服务供应商自动分配IP地址给用户
- 用于内部网络管理员作为对所有电脑作集中管理的手段
- 自动化安装系统
5.?操作过程
① 分配给同一局域网内新加机器的地址(配置文件)dhcp分配地址指明tftp服务器的地址
② tftp服务端开启udp配置默认关闭
③ 安装syslinux取得pxelinux.0文件
④ 安装vsftpd服务挂载软件安装源(mount /dev/sr0 /var/ftp/centos7)
⑤ 将四大文件拷入(/var/lib/tftpboot )
- initrd.img (光盘内 images):是一个包含根文件系统镜像和内核模块的压缩文件,它可以帮助内核在引导时加载必要的驱动程序和文件系统模块,从而保证系统正常启动。
- pxelinux.0(类似grub,需安装syslinux):pxelinux.0是一个网络引导程序,它可以通过网络从TFTP服务器上下载内核和文件系统镜像,并启动Linux系统。
- pxelinux.cfg/default (手动创建文件夹,手写default):在PXE引导过程中,计算机会首先获取pxelinux.0文件,这是一个PXE引导加载程序,它会负责加载操作系统镜像和启动操作系统;一旦pxelinux.0被加载,它会查找pxelinux.cfg/default文件。这个文件包含了PXE引导菜单的配置信息,可以用来指定要引导的操作系统镜像、内核参数等。
- vmlinuz(光盘内 images):vmlinuz是Linux操作系统中的一个关键文件,负责启动系统、管理硬件设备和提供各种系统服务;它具有压缩格式、高度可配置、支持模块化加载、安全可靠等特点。
⑥ 将服务开启,关闭防火墙,selinux
主要文件:
/etc/xinetd.d/tftp:配置文件
/var/lib/tftpboot:站点?
[root@localhost ~]# yum install tftp-server vsftpd syslinux dhcp -y
root@localhost ~]# cp /usr/share/doc/dhcp-4.2.5/dhcpd.conf.example /etc/dhcp/dhcpd.conf
cp:是否覆盖"/etc/dhcp/dhcpd.conf"? y
#将配置文件模板复制到dhcp目录下,并覆盖
[root@localhost ~]# vim /etc/dhcp/dhcpd.conf
 32 subnet 192.168.190.0 netmask 255.255.255.0 {    #指定网段
 33   range 192.168.190.50 192.168.190.60;          #定义用于分配的IP地址池
 34   option routers 192.168.190.100;               #指定给客户端分配的网关
 35   next-server 192.168.190.100;                  #指定tftp的服务器地址
 36   filename "pxelinux.0";                        #指定启动文件
 37   }
[root@localhost ~]# vim /etc/xinetd.d/tftp          #修改配置文件
 14         disable                 = no            #no表示开启TFTP服务
[root@localhost ~]# cd /var/lib/tftpboot/           #切换到站点目录
[root@localhost tftpboot]# mount /dev/sr0 /mnt
mount: /dev/sr0 写保护,将以只读方式挂载
[root@localhost tftpboot]# cp /mnt/isolinux/initrd.img  .
[root@localhost tftpboot]# cp /mnt/isolinux/vmlinuz  .
[root@localhost tftpboot]# ls
initrd.img  vmlinuz
[root@localhost tftpboot]# rpm -ql syslinux | grep pxelinux.0 #查找引导程序文件路径
/usr/share/syslinux/gpxelinux.0
/usr/share/syslinux/pxelinux.0
[root@localhost tftpboot]# cp /usr/share/syslinux/pxelinux.0  .  #拷贝到站点文件里
[root@localhost tftpboot]# ls
initrd.img  pxelinux.0  vmlinuz
[root@localhost tftpboot]# mkdir pxelinux.cfg
[root@localhost tftpboot]# ls
initrd.img  pxelinux.0  pxelinux.cfg  vmlinuz
[root@localhost tftpboot]# vim pxelinux.cfg/default
  1 default linux
  2 timeout 600
  3
  4 label linux
  5         kernel vmlinuz
  6         append initrd=initrd.img method=ftp://192.168.190.100/centos7
[root@localhost tftpboot]# mkdir /var/ftp/centos7/
[root@localhost tftpboot]# mount /dev/sr0 /var/ftp/centos7/
mount: /dev/sr0 写保护,将以只读方式挂载
[root@localhost tftpboot]# systemctl stop firewalld.service
[root@localhost tftpboot]# setenforce 0
[root@localhost tftpboot]# systemctl start tftp.socket
[root@localhost tftpboot]# systemctl start vsftpd
[root@localhost tftpboot]# systemctl start dhcpd二、实现Kickstart无人值守安装
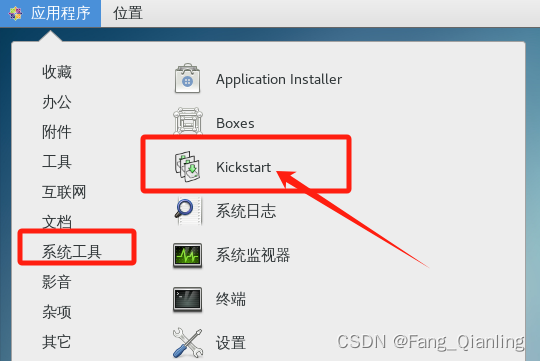
1. 安装Kickstart图形化工具
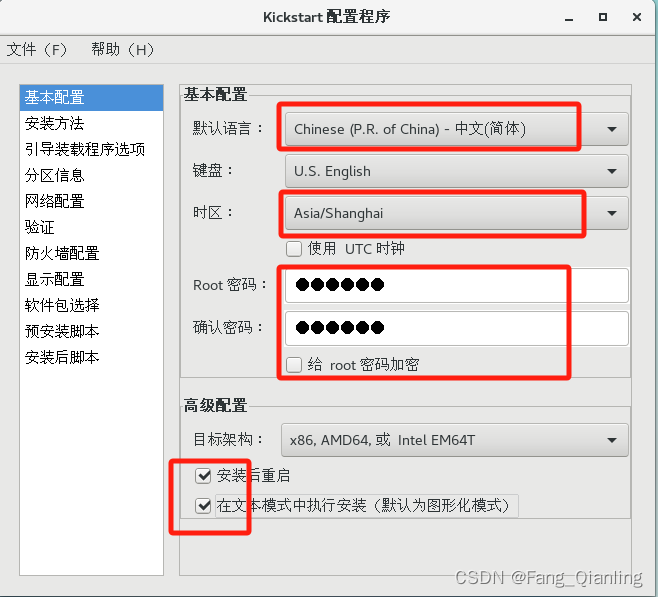
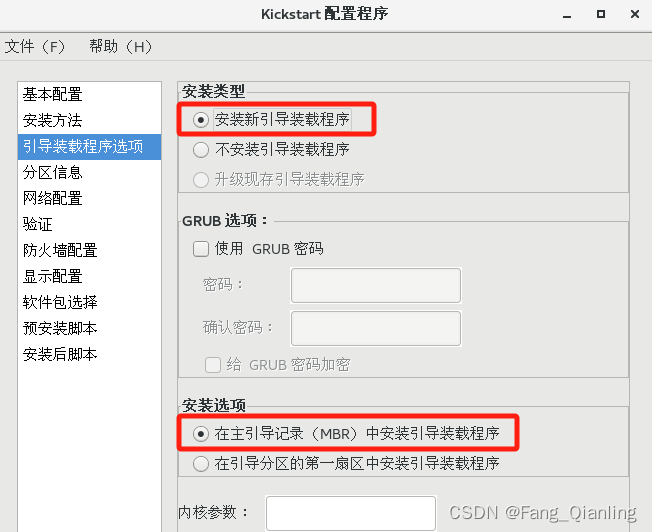
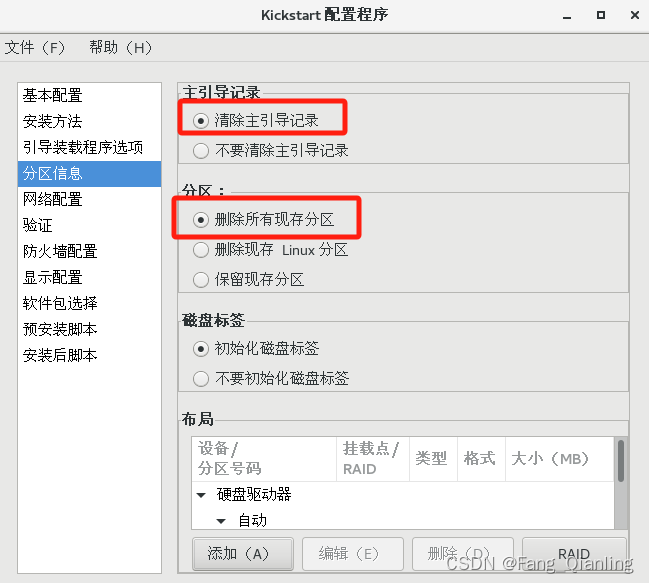
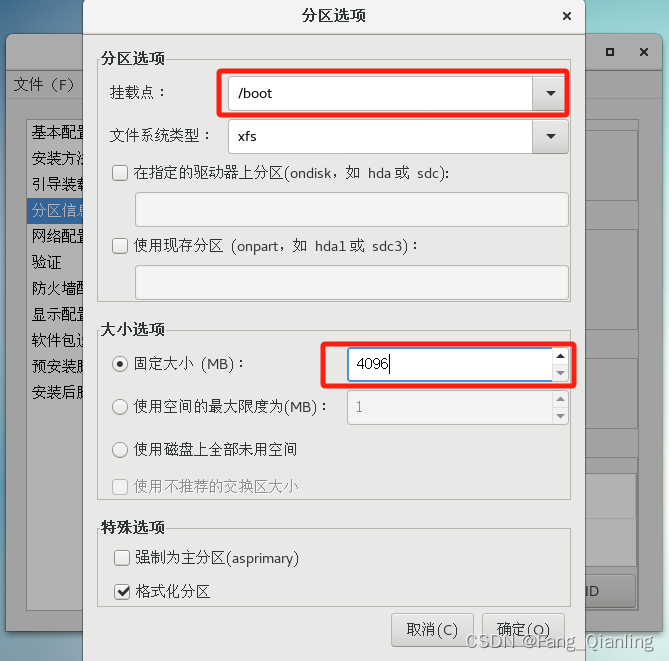
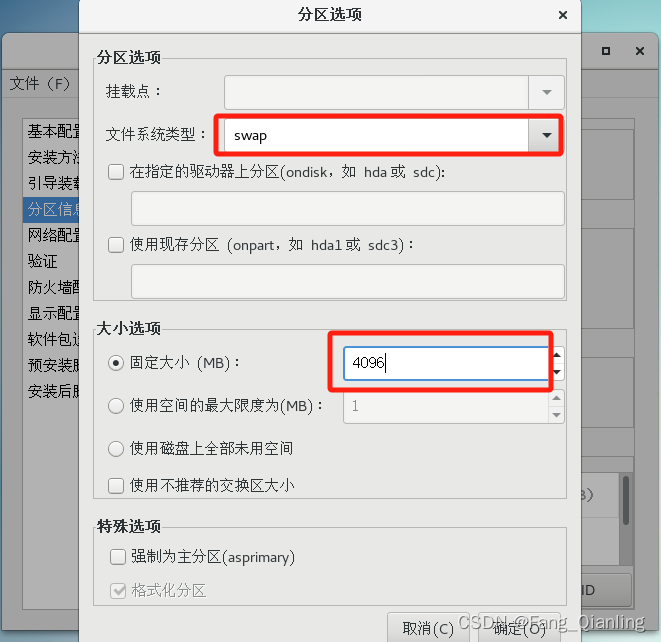
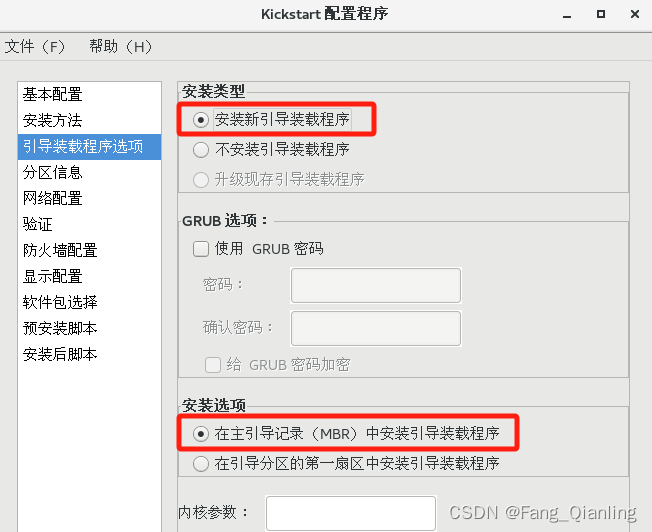
[root@localhost tftpboot]# yum install system-config-kickstart -y2. 图形化配置过程?

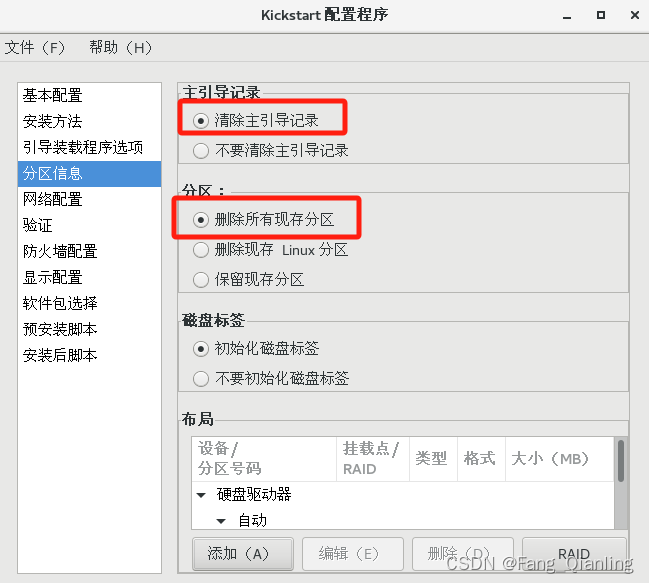


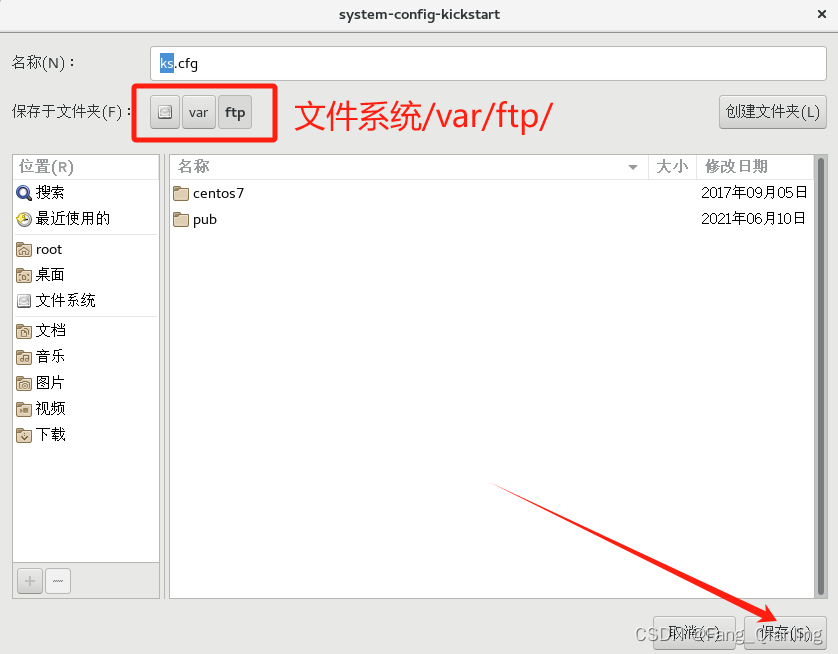
3.?继续添加配置文件 ?
[root@localhost tftpboot]# cd /var/ftp/
[root@localhost ftp]# ls                                #查看应答文件
centos7  ks.cfg  pub
[root@localhost tftpboot]# vim pxelinux.cfg/default
  1 default linux
  2 timeout 600
  3
  4 label linux
  5         kernel vmlinuz
  6         append initrd=initrd.img method=ftp://192.168.190.100/centos7 ks=ftp://192.168.190.100/ks.cfg
#将应答文件位置指明
4. 启动客户端自动安装

三、Cobbler介绍
1. 启动过程
- client裸机配置了从网络启动后,开机后会广播包请求DHCP服务器(cobbler server)发送其分配好的一个IP
- DHCP服务器(cobbler server)收到请求后发送responese,包括其ip地址
- client裸机拿到ip后再向cobbler server发送请求OS引导文件的请求
- cobbler server告诉裸机OS引导文件的名字和TFTP server的ip和port
- client裸机通过上面告知的TFTP server地址通信,下载引导文件
- client裸机执行执行该引导文件,确定加载信息,选择要安装的os,期间会再向cobbler server请求kickstart文件和os image
- cobbler server发送请求的kickstart和os iamge
- client裸机加载kickstart文件
- client裸机接收os image,安装该os image
2. 操作过程
2.1?安装相关包并启动服务 ?
[root@localhost ~]# yum install epel-release.noarch -y
[root@localhost ~]# yum install cobbler dhcp httpd  -y
[root@localhost ~]# systemctl enable --now cobblerd httpd tftp dhcpd
2.2?修改cobbler相关的配置
[root@localhost ~]# cobbler check
#生成新密码,默认安装好的系统root密码为cobbler
[root@localhost ~]# openssl passwd -1 '123123'  #配置root修改密码生成密钥
$1$Mpd6eW5n$r4EVXEzCVUc5.w.Ok77f31
[root@localhost ~]# vim /etc/cobbler/settings
101 default_password_crypted: "$1$fTpFEKwU$pPPBZwUVJuXOcRmmW4JAJ0"
242 manage_dhcp: 1                            #设置为1,表示通过cobbler生成dhcpd.conf配置文件
278 next_server: 192.168.190.101              #tftp服务器的IP地址
298 pxe_just_once: 1                          #设置为1,防止重复安装系统
390 server: 192.168.190.101                   #cobbler服务器的IP地址
[root@localhost ~]# systemctl restart cobblerd
2.3?实现dhcp服务
[root@localhost ~]# vim /etc/cobbler/dhcp.template  #修改模板文件
 21 subnet 192.168.190.0 netmask 255.255.255.0 {
 22      option routers             192.168.190.2;
 23      option domain-name-servers 8.8.8.8;
 24      option subnet-mask         255.255.255.0;
 25      range dynamic-bootp        192.168.190.20 192.168.190.30;
[root@localhost ~]# cobbler sync
……
*** TASK COMPLETE ***
[root@localhost ~]# systemctl restart cobblerd.service
[root@localhost ~]# tree /var/lib/tftpboot
/var/lib/tftpboot                                   #已同步信息
├── boot
│?? └── grub
│??     └── menu.lst
├── etc
├── grub
│?? ├── efidefault
│?? └── images -> ../images
├── images
├── images2
├── memdisk
├── menu.c32
├── ppc
├── pxelinux.0
├── pxelinux.cfg
│?? └── default
└── s390x
    └── profile_list

10 directories, 7 files
2.4 导入CentOS系统的安装文件,生成相应的YUM源
[root@localhost ~]# mount /dev/sr0 /mnt
mount: /dev/sr0 写保护,将以只读方式挂载
[root@localhost ~]# cobbler import --name=centos-7-x86_64 --path=/mnt --arch=x86_64
task started: 2024-01-17_202530_import
task started (id=Media import, time=Wed Jan 17 20:25:30 2024)
……
*** TASK COMPLETE ***
[root@localhost ~]# cd /var/www/cobbler/ks_mirror/
[root@localhost ks_mirror]# ls
centos-7-x86_64  config
[root@localhost ks_mirror]# du -sh /var/www/cobbler/ks_mirror/*
4.3G	/var/www/cobbler/ks_mirror/centos-7-x86_64                 #拷贝的文件
4.0K	/var/www/cobbler/ks_mirror/config
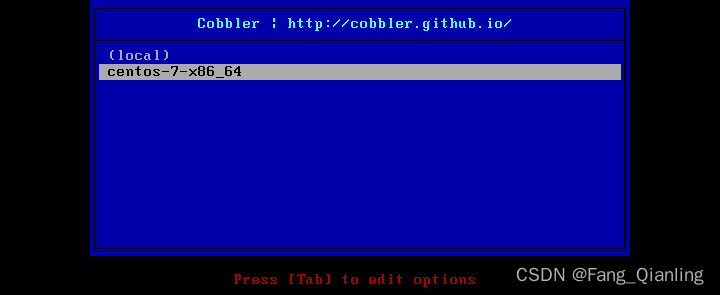
2.5 客户端安装验证?
 ?
?
本文来自互联网用户投稿,该文观点仅代表作者本人,不代表本站立场。本站仅提供信息存储空间服务,不拥有所有权,不承担相关法律责任。 如若内容造成侵权/违法违规/事实不符,请联系我的编程经验分享网邮箱:chenni525@qq.com进行投诉反馈,一经查实,立即删除!
- Python教程
- 深入理解 MySQL 中的 HAVING 关键字和聚合函数
- Qt之QChar编码(1)
- MyBatis入门基础篇
- 用Python脚本实现FFmpeg批量转换
- SpringBoot连接mysql数据库相关配置(druid连接池)
- 【点云、图像】学习中 常见的数学知识及其中的关系与python实操[更新中]
- 用AI拯救生命,深兰科技·科学院黄智生教授荣获“第18届2023·爱心奖”
- Ensp DHCP 接口地址池(配置命令)
- 【Spring内容介绍 | 第一篇】什么是事务管理
- 数据结构与算法—哈希表
- 服务器上配置jupyter,提示Invalid credentials如何解决
- 3-10岁孩子数学发展里程碑
- ffmpeg+x265精简压缩图片
- C方式实现文件保存