VUE项目目录与运行流程(VScode)
发布时间:2024年01月22日
各目录对应名称含义
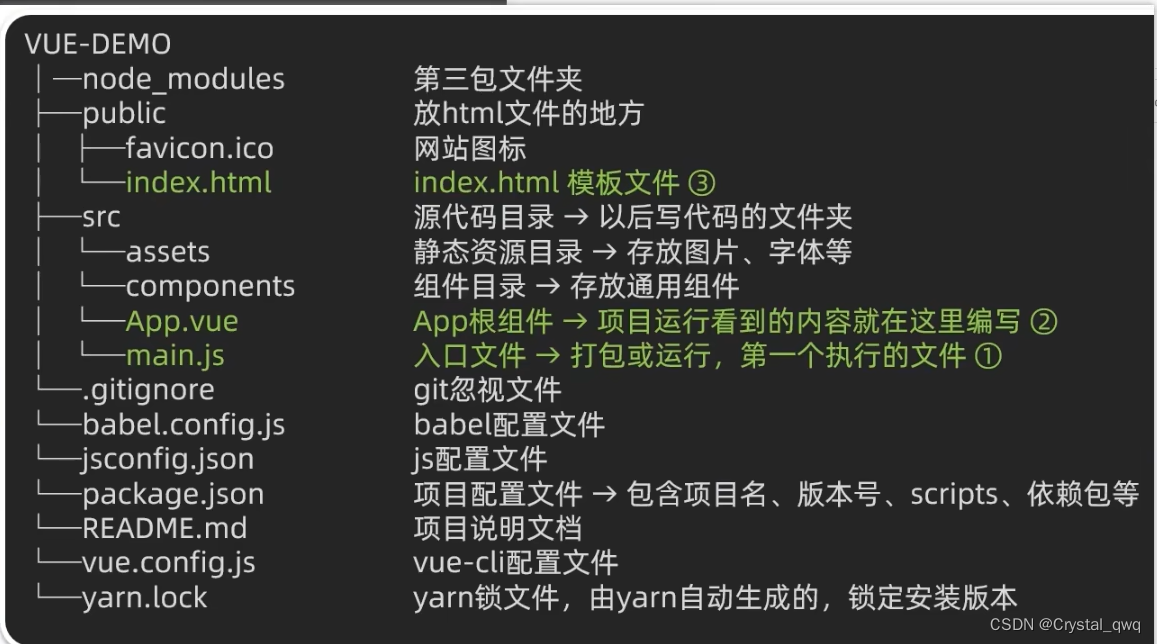
- main.js(导入App.vue,基于App.vue创建结构渲染index.html)
//核心作用:导入App.vue,基于App.vue创建结构渲染index.html //1.导入Vue核心包 import Vue from 'vue' //2.导入App.vue根组件 import App from './App.vue' //提示:当前处于什么环境(生产环境/开发环境) Vue.config.productionTip = false //3.Vue实例化,提供render方法->基于App.vue创建结构渲染index.html new Vue({ render: h => h(App), }).$mount('#app') - App.vue(App根组件:呈现出App里面的内容)
index.html(各个页面文件)
<!DOCTYPE html>
<html lang="">
  <head>
    <meta charset="utf-8">
    <meta http-equiv="X-UA-Compatible" content="IE=edge">
    <meta name="viewport" content="width=device-width,initial-scale=1.0">
    <link rel="icon" href="<%= BASE_URL %>favicon.ico">
    <title><%= htmlWebpackPlugin.options.title %></title>
  </head>
  <body>
    <noscript>
      <strong>We're sorry but <%= htmlWebpackPlugin.options.title %> doesn't work properly without JavaScript enabled. Please enable it to continue.</strong>
    </noscript>

    <!--Vue所管理的容器:将来创建结构动态渲染这个容器-->
    <div id="app">
      <!--工程化开发模式中:这里不在直接编写模板语法,通过App.vue提供结构渲染-->
    </div>
    <!-- built files will be auto injected -->
  </body>
</html>
什么是App.vue?
组件化:
一个页面可以拆分成一个个组件,每个组件有着自己独立的结构,样式,行为。
????????????????好处:便于维护,利于复用->提升开发效率。
? ? ? ? ? ? ? ? 组件分类:普通组件,根组件

根组件:
整个应用最上层的组件,包裹所有普通小组件。
三个组成部分:
? ? ? ? 注*:用npm装less less-loader包命令:npm install less less-loader --save-dev

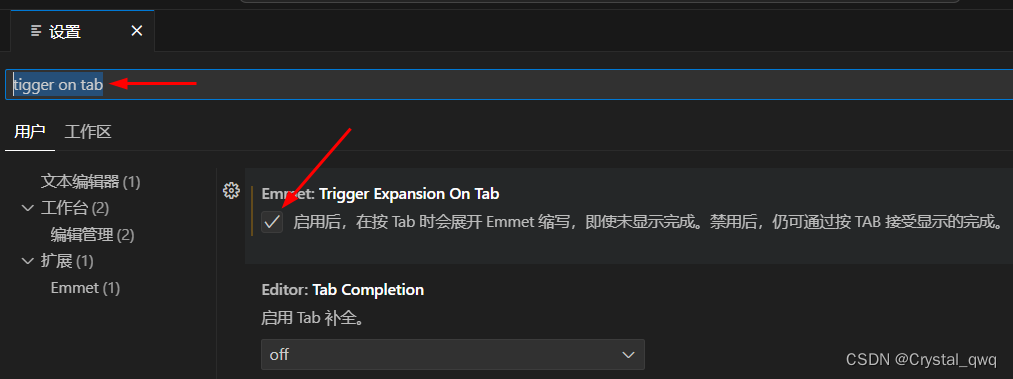
Vue标签补全设置:
打开VScode中的扩展设置-->输入tigger on tab-->勾选启用
Vue使用-->普通组件的注册(局部注册)
- 创建组件
<template> <div class="App"> <!--头部组件--> <appHeader></appHeader> <!--主体组件--> <appMain></appMain> <!--尾部组件--> <appFooter></appFooter> </div> </template> <style> .App{ width: 300px; height: 400px; background-color: aqua; margin: 0 auto; padding: 20px; } </style> - 导入注册使用<组件名></组件名>
<script>
import appHeader from './components/appHeader.vue'
import appMain from './components/appMain.vue'
import appFooter from './components/appFooter.vue'

export default {
  comments: {
    // '组件名': 组件对象
    appHeader: appHeader,
    appMain,  //组件名与组件对象一样,可省略不写
    appFooter
  }
}
</script>
文章来源:https://blog.csdn.net/m0_64498202/article/details/135743082
本文来自互联网用户投稿,该文观点仅代表作者本人,不代表本站立场。本站仅提供信息存储空间服务,不拥有所有权,不承担相关法律责任。 如若内容造成侵权/违法违规/事实不符,请联系我的编程经验分享网邮箱:chenni525@qq.com进行投诉反馈,一经查实,立即删除!
本文来自互联网用户投稿,该文观点仅代表作者本人,不代表本站立场。本站仅提供信息存储空间服务,不拥有所有权,不承担相关法律责任。 如若内容造成侵权/违法违规/事实不符,请联系我的编程经验分享网邮箱:chenni525@qq.com进行投诉反馈,一经查实,立即删除!
最新文章
- Python教程
- 深入理解 MySQL 中的 HAVING 关键字和聚合函数
- Qt之QChar编码(1)
- MyBatis入门基础篇
- 用Python脚本实现FFmpeg批量转换
- Git 的基本概念和使用方式
- 经验分享:知识库系统这样搭建轻松又高效
- 08 桥接模式
- 环保数采仪对实时监测系统的作用
- cjson/cJSON.h: No such file or directory
- 连续时间LQR和离散时间LQR笔记
- Live800:客服售前、售中,售后需要做哪些服务?有哪些区别?
- git回滚后恢复指定之前的提交
- 【C++】new 和 delete
- 基于模拟退火算法TSP问题优化,基于模拟退火算法的函数优化