DrGraph原理示教 - OpenCV 4 功能 - 形态操作
形态类型
从OpenCV图像处理基本知识来看,膨胀腐蚀操作后,还有形态操作,如开运算、闭运算、梯度、礼帽与黑帽,感觉很多,其实,本质上就是批处理操作,如
开运算:先腐蚀,再膨胀
闭运算:先膨胀,再腐蚀
这样,从一个原图,就可以得到4种结果,膨胀、腐蚀、开、闭
这4种结果,主体还是与原图差不多的,区别就在于一些噪声点(小的白点)、比较近的区域合并,有利于后续的图像分析
这些结果可以为主体,但很多地方还想看看边界或轮廓,那就需要在这些主体之间进行差值,或是减法操作,这样,结果就是边缘,就象两个大小不同的同心圆,差值后就得到圆环。
OpenCV作为一个基础的或通用的图像处理,那肯定是需要支持不同的需求,象刚说的这些主体差异,功能也是存在了,只不过采用了相应的所谓专业术语来进行称呼,如梯度、礼帽与黑帽
如,梯度 = 膨胀 - 腐蚀
正常的理解,减法嘛,肯定是大减小,直观感觉,膨胀应该比腐蚀大。但从本质上来说,膨胀与腐蚀的结果都是二值图,它的各像素点取值范围都是BYTE,各BYTE相减,结果都还是BYTE。如2-1=1,1-2=-1=0xFE。从结果来看,前者是黑色,后都是白色,也就是反相效果。
上面把膨胀与腐蚀折腾来折腾去,玩出了花,还能怎么玩?这两个再怎么组合,也不能再花了吧,如果要多来几次,那就增加一个迭代次数
但从主体而言,最原始的主体就是原图,所以可以把原图和膨胀腐蚀结果进行减法操作。直观上来说,膨胀 > 原图 > 腐蚀,所以可以这些减。但OpenCV没有直接支持这种操作的功能,如果自己想,实现一个就行了,名字就自己随便取,不象下面说的这个礼帽与黑帽,还要反应半天。
可能是觉得膨胀、原图、腐蚀相邻的差异太小,减的效果不明显,所以OpenCV支持的就是间隔差,如上面提到的
梯度 = 膨胀 - 腐蚀,而
礼帽 = 原图 - 开运算结果
黑帽 = 闭运算结果 - 原图
没有细究开运算结果、原图、闭运算结果的大小关系,从礼帽与黑帽的定义来看,猜测是闭运算结果 > 原图 > 开运算结果
爱谁谁吧
API
OpenCV中,形态操作的API函数是morphologyEx,正常理解
@param src Source image. The number of channels can be arbitrary. The depth should be one of
CV_8U, CV_16U, CV_16S, CV_32F or CV_64F.
@param dst Destination image of the same size and type as source image.
@param op Type of a morphological operation, see #MorphTypes
@param kernel Structuring element. It can be created using #getStructuringElement.
@param anchor Anchor position with the kernel. Negative values mean that the anchor is at the
kernel center.
@param iterations Number of times erosion and dilation are applied.
@param borderType Pixel extrapolation method, see #BorderTypes. #BORDER_WRAP is not supported.
@param borderValue Border value in case of a constant border. The default value has a special
meaning.
@sa  dilate, erode, getStructuringElement
@note The number of iterations is the number of times erosion or dilatation operation will be applied.
For instance, an opening operation (#MORPH_OPEN) with two iterations is equivalent to apply
successively: erode -> erode -> dilate -> dilate (and not erode -> dilate -> erode -> dilate).
 */
CV_EXPORTS_W void morphologyEx( InputArray src, OutputArray dst,
                                int op, InputArray kernel,
                                Point anchor = Point(-1,-1), int iterations = 1,
                                int borderType = BORDER_CONSTANT,
                                const Scalar& borderValue = morphologyDefaultBorderValue() );
调用实现
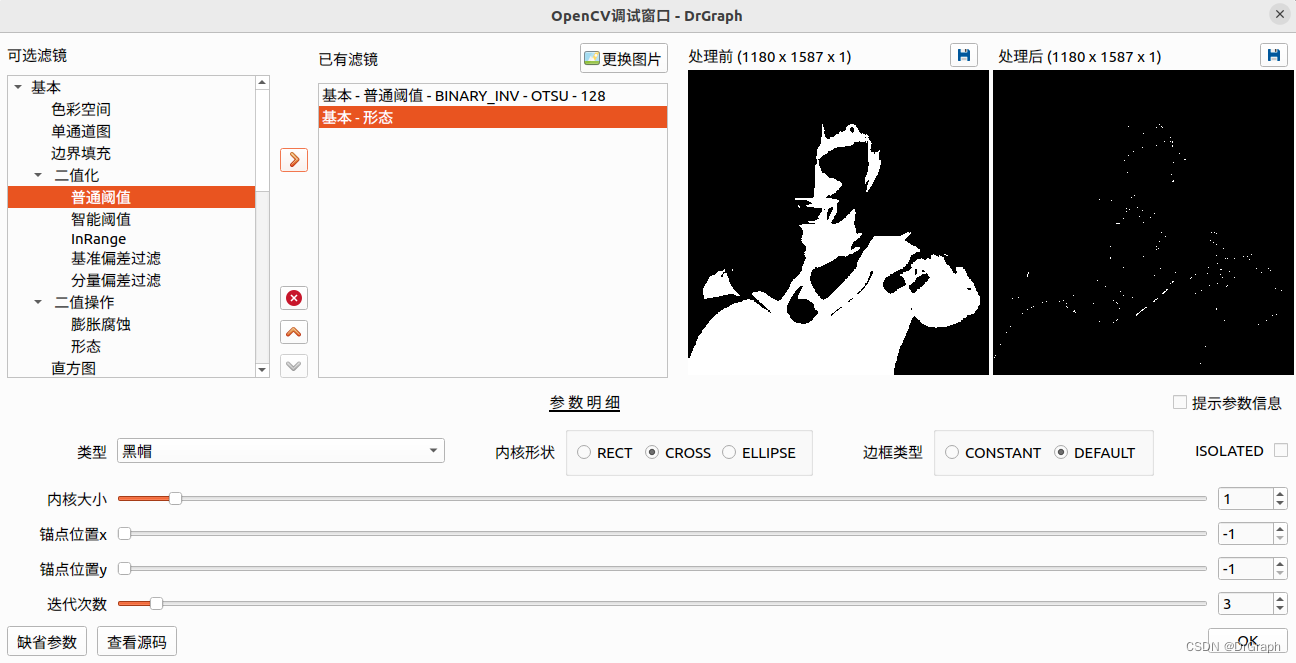
// 基本 - 二值操作 - 形态」类 - 滤镜处理 - 对dstMat进行本滤镜逻辑变换处理
    int paramIndex = 0;
    int method = GetParamValue_Int(paramIndex++);           // 0: 类型 - 开;闭;渐变;Top Hat;黑帽
    int kernelShape = GetParamValue_Int(paramIndex++);     // 1: 内核形状 - RECT;CROSS;ELLIPSE
    int borderType = GetParamValue_Int(paramIndex++);      // 2: 边框类型
    if(borderType == 1)
        borderType = BORDER_DEFAULT;
    bool ISOLATED = GetParamValue_Bool(paramIndex++);        // 3 - 边框类型的 ISOLATED 标志
    if(ISOLATED)
        borderType = borderType | BORDER_ISOLATED;
    int kernelSize = GetParamValue_Int(paramIndex++);      // 4: 内核大小 - 用于确定操作的核
    int anchorX = GetParamValue_Int(paramIndex++);      // 5 - 锚点位置x
    anchorX = CAST_RANGE(anchorX, -2 * kernelSize - 1, 2 * kernelSize + 1);
    int anchorY = GetParamValue_Int(paramIndex++);      // 6 - 锚点位置y
    anchorY = CAST_RANGE(anchorY, -2 * kernelSize - 1, 2 * kernelSize + 1);
    int iterations = GetParamValue_Int(paramIndex++);      // 7 - 迭代次数
    Mat element = getStructuringElement( kernelShape, cv::Size( 2*kernelSize + 1, 2*kernelSize+1 ));
    morphologyEx( dstMat, dstMat, method, element, cv::Point(anchorX, anchorY), iterations, borderType);
演示视频
OpenCV 4 功能 - 形态
从演示视频可看出,差值的效果确实不明显,感觉如果 膨胀 - 原图 - 腐蚀 相邻相减,基本看不到效果


本文来自互联网用户投稿,该文观点仅代表作者本人,不代表本站立场。本站仅提供信息存储空间服务,不拥有所有权,不承担相关法律责任。 如若内容造成侵权/违法违规/事实不符,请联系我的编程经验分享网邮箱:chenni525@qq.com进行投诉反馈,一经查实,立即删除!
- Python教程
- 深入理解 MySQL 中的 HAVING 关键字和聚合函数
- Qt之QChar编码(1)
- MyBatis入门基础篇
- 用Python脚本实现FFmpeg批量转换
- idea快速搭建一个spring-cloud
- K8S学习指南(60)-K8S源代码走读之API-Server
- 前端插件库-VUE3 使用 JSEncrypt 插件
- 【AIGC】AIGC——真正意义的智能,颠覆性的变革
- 基于springboot的电影院购票系统设计与实现
- Chrome 浏览器插件从 Manifest V2 升级到 V3 版本所需要修改的点
- 用Java编程实现一个矢量绘图软件,该软件可以选择不同的绘制图形(椭圆、矩形、线条),并可以选中图形,修改图形属性(线条粗细与颜色、填充方式与颜色),拖动位置,改变大小。 (一)具体要求: (1)图形
- 使 a === 1 && a === 2 && a === 3 为 true 的几种“下毒“方法
- react学习笔记(复习)
- leetcode算法题:岛屿数量