Spring Boot - Application Events 的发布顺序_ApplicationStartedEvent
Pre
Spring Boot - Application Events 的发布顺序_ApplicationEnvironmentPreparedEvent
概述
Spring Boot 的广播机制是基于观察者模式实现的,它允许在 Spring 应用程序中发布和监听事件。这种机制的主要目的是为了实现解耦,使得应用程序中的不同组件可以独立地改变和复用逻辑,而无需直接进行通信。
在 Spring Boot 中,事件发布和监听的机制是通过 ApplicationEvent、ApplicationListener 以及事件发布者(ApplicationEventPublisher)来实现的。其中,ApplicationEvent 是所有自定义事件的基础,自定义事件需要继承自它。
ApplicationListener 是监听特定事件并做出响应的接口,开发者可以通过实现该接口来定义自己的监听器。事件发布者(通常由 Spring 的 ApplicationContext 担任)负责发布事件。
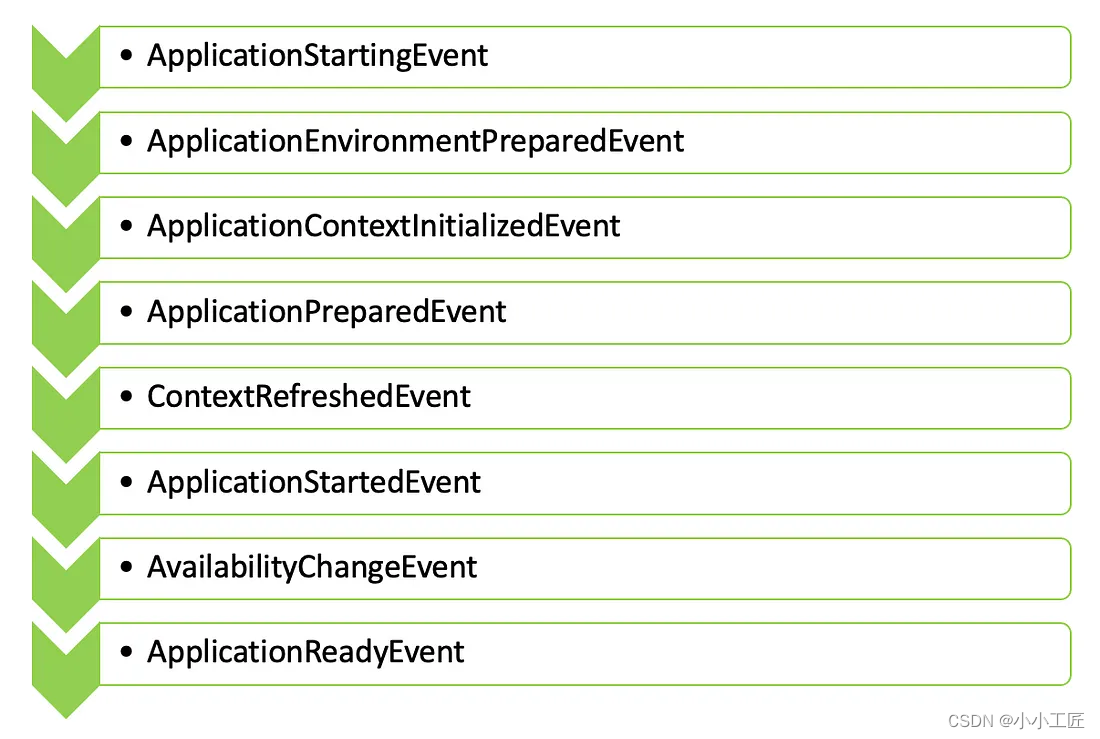
ApplicationStartedEvent 是Spring Boot中一个重要的应用程序事件,该事件在应用程序的Spring容器刷新之后,但在调用任何应用程序和命令行运行程序之前发布。这个事件的目的是为了允许开发者能够在应用程序启动的过程中执行一些特定的逻辑。
当Spring Boot应用程序启动时,它会经历多个阶段,包括初始化SpringApplicationRunListeners,创建和配置Spring环境,以及刷新ApplicationContext。在ApplicationContext被刷新之后,但尚未调用任何CommandLineRunner或ApplicationRunner之前,ApplicationStartedEvent事件被发布。
开发者可以通过实现ApplicationListener接口来监听这个事件。具体来说,他们需要创建一个类,该类实现ApplicationListener接口,并重写onApplicationEvent方法。在这个方法中,开发者可以定义当ApplicationStartedEvent事件被发布时应该执行的逻辑。
此外,Spring Boot还提供了其他几种方式在应用程序启动时执行自定义代码,例如使用CommandLineRunner接口或ApplicationRunner接口。这些接口在ApplicationStartedEvent事件之后被调用,因此也可以用于启动时的逻辑。
总之,ApplicationStartedEvent是Spring Boot中一个关键的应用程序事件,它允许开发者在应用程序启动过程中执行特定的逻辑,从而实现对应用程序启动过程的精细控制。
Code
package com.artisan.event;

import org.springframework.boot.context.event.ApplicationStartedEvent;
import org.springframework.context.ApplicationListener;

/**
 * @author 小工匠
 * @version 1.0
 * @mark: show me the code , change the world
 */
public class ApplicationStartedListener implements ApplicationListener<ApplicationStartedEvent> {
    /**
     * ApplicationStartedEvent 在应用程序启动并执行 main 方法时触发。
     * 它发生在创建和准备应用程序上下文之后,但在实际执行应用程序 run() 方法之前。
     * <p>
     * <p>
     * 此事件提供了在应用程序启动时执行其他任务或执行自定义逻辑的机会,包括初始化其他组件、设置日志记录、配置动态属性等。
     * <p>
     * <p>
     * 为了处理 ApplicationStartedEvent ,我们可以通过实现 ApplicationStartedEvent 作为泛型类型的 ApplicationListener 接口来创建一个自定义事件侦听器。
     * 此侦听器可以在主应用程序类中手动注册
     *
     * @param event the event to respond to
     */
    @Override
    public void onApplicationEvent(ApplicationStartedEvent event) {
        System.out.println("--------------------> Handling ApplicationStartedEvent here!");
    }
}
如何使用呢?
方式一:
@SpringBootApplication
public class LifeCycleApplication {

    /**
     * 除了手工add , 在 META-INF下面 的 spring.factories 里增加
     * org.springframework.context.ApplicationListener=自定义的listener 也可以
     *
     * @param args
     */
    public static void main(String[] args) {

        SpringApplication springApplication = new SpringApplication(LifeCycleApplication.class);

       // 在执行 Spring Boot 应用程序时,会调用 的方法 ApplicationStartedListener , onApplicationEvent() 使我们能够在应用程序开始时执行任何必要的附加设置或初始化任务
       springApplication.addListeners(new ApplicationStartedListener());

       springApplication.run(args);
    }


}
方式二: 通过spring.factories 配置
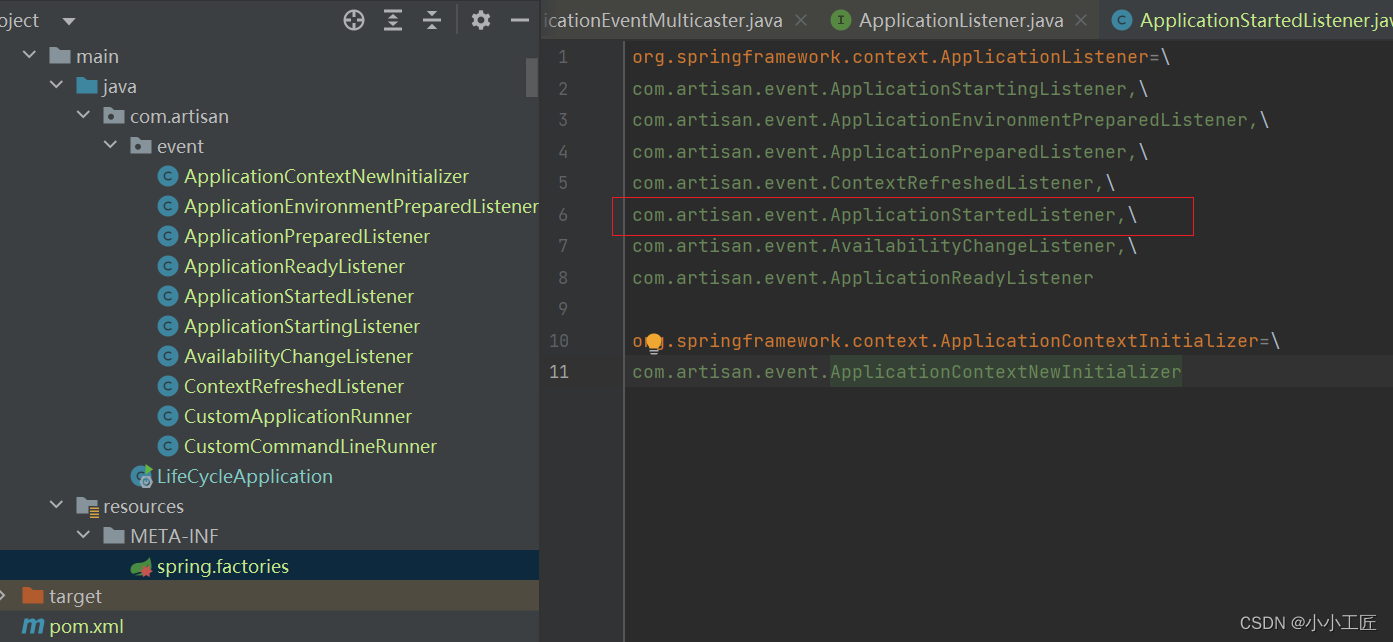
org.springframework.context.ApplicationListener=\
com.artisan.event.ApplicationStartedListener
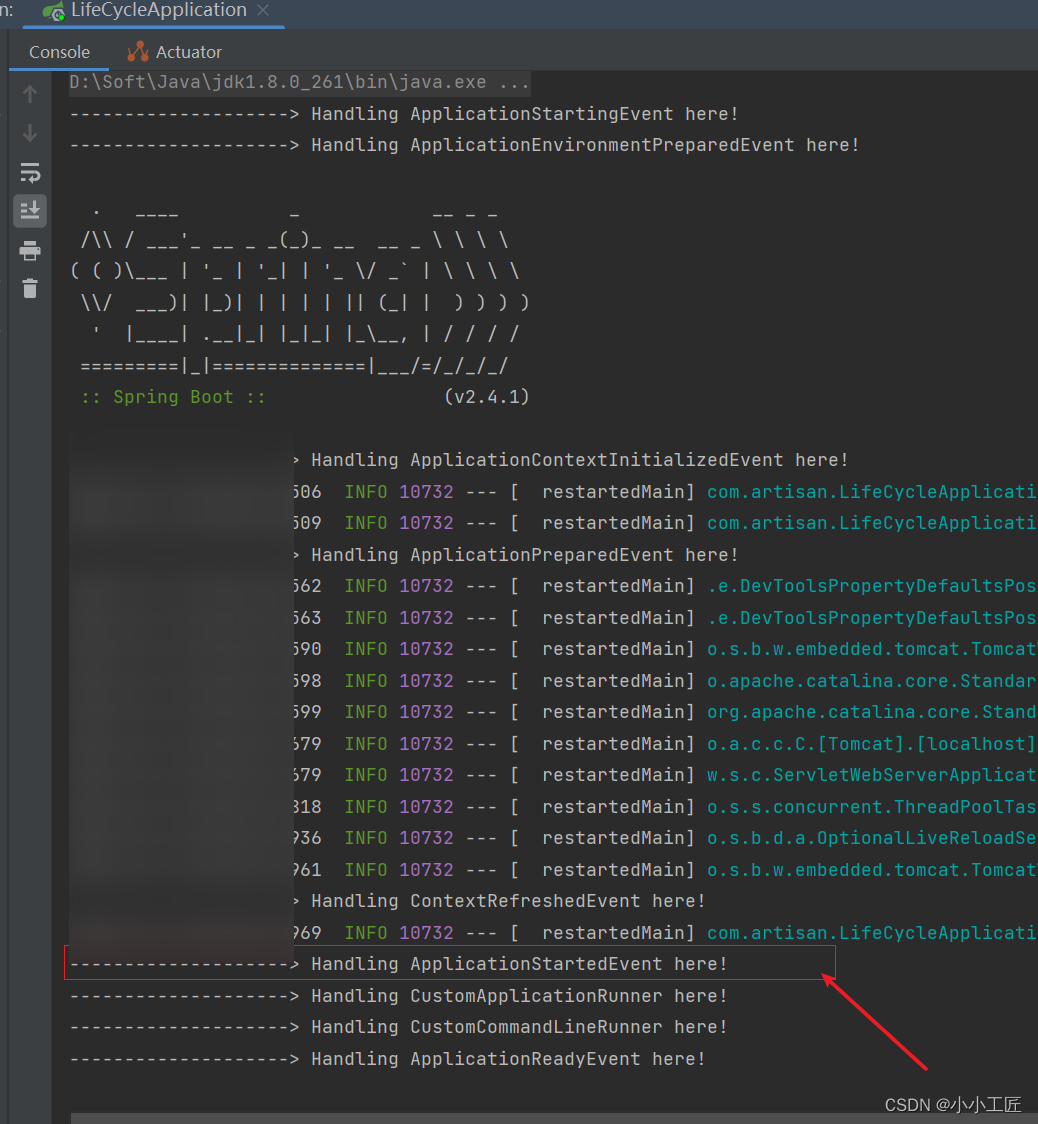
运行日志
源码分析
首先main方法启动入口
SpringApplication.run(LifeCycleApplication.class, args);
跟进去
public static ConfigurableApplicationContext run(Class<?> primarySource, String... args) {
		return run(new Class<?>[] { primarySource }, args);
	}
继续
public static ConfigurableApplicationContext run(Class<?>[] primarySources, String[] args) {
		return new SpringApplication(primarySources).run(args);
	}
这里首先关注 new SpringApplication(primarySources)
new SpringApplication(primarySources)
	/**
	 * Create a new {@link SpringApplication} instance. The application context will load
	 * beans from the specified primary sources (see {@link SpringApplication class-level}
	 * documentation for details. The instance can be customized before calling
	 * {@link #run(String...)}.
	 * @param resourceLoader the resource loader to use
	 * @param primarySources the primary bean sources
	 * @see #run(Class, String[])
	 * @see #setSources(Set)
	 */
	@SuppressWarnings({ "unchecked", "rawtypes" })
	public SpringApplication(ResourceLoader resourceLoader, Class<?>... primarySources) {
		this.resourceLoader = resourceLoader;
		Assert.notNull(primarySources, "PrimarySources must not be null");
		this.primarySources = new LinkedHashSet<>(Arrays.asList(primarySources));
		this.webApplicationType = WebApplicationType.deduceFromClasspath();
		this.bootstrappers = new ArrayList<>(getSpringFactoriesInstances(Bootstrapper.class));
		setInitializers((Collection) getSpringFactoriesInstances(ApplicationContextInitializer.class));
		setListeners((Collection) getSpringFactoriesInstances(ApplicationListener.class));
		this.mainApplicationClass = deduceMainApplicationClass();
	}
聚焦 setListeners((Collection) getSpringFactoriesInstances(ApplicationListener.class));
run
继续run
// 开始启动Spring应用程序
public ConfigurableApplicationContext run(String... args) {
    StopWatch stopWatch = new StopWatch(); // 创建一个计时器
    stopWatch.start(); // 开始计时

    DefaultBootstrapContext bootstrapContext = createBootstrapContext(); // 创建引导上下文
    ConfigurableApplicationContext context = null; // Spring应用上下文,初始化为null

    configureHeadlessProperty(); // 配置无头属性(如:是否在浏览器中运行)

    SpringApplicationRunListeners listeners = getRunListeners(args); // 获取运行监听器
    listeners.starting(bootstrapContext, this.mainApplicationClass); // 通知监听器启动过程开始

    try {
        ApplicationArguments applicationArguments = new DefaultApplicationArguments(args); // 创建应用参数
        ConfigurableEnvironment environment = prepareEnvironment(listeners, bootstrapContext, applicationArguments); // 预备环境
        configureIgnoreBeanInfo(environment); // 配置忽略BeanInfo

        Banner printedBanner = printBanner(environment); // 打印Banner
        context = createApplicationContext(); // 创建应用上下文
        context.setApplicationStartup(this.applicationStartup); // 设置应用启动状态

        prepareContext(bootstrapContext, context, environment, listeners, applicationArguments, printedBanner); // 准备上下文
        refreshContext(context); // 刷新上下文,执行Bean的生命周期
        afterRefresh(context, applicationArguments); // 刷新后的操作

        stopWatch.stop(); // 停止计时
        if (this.logStartupInfo) { // 如果需要记录启动信息
            new StartupInfoLogger(this.mainApplicationClass).logStarted(getApplicationLog(), stopWatch); // 记录启动信息
        }
        listeners.started(context); // 通知监听器启动完成

        callRunners(context, applicationArguments); // 调用Runner
    }
    catch (Throwable ex) {
        handleRunFailure(context, ex, listeners); // 处理运行失败
        throw new IllegalStateException(ex); // 抛出异常
    }

    try {
        listeners.running(context); // 通知监听器运行中
    }
    catch (Throwable ex) {
        handleRunFailure(context, ex, null); // 处理运行失败
        throw new IllegalStateException(ex); // 抛出异常
    }
    return context; // 返回应用上下文
}
我们重点看
listeners.started(context);
继续
void started(ConfigurableApplicationContext context) {
		doWithListeners("spring.boot.application.started", (listener) -> listener.started(context));
	}
继续 listener.started(context)
 	@Override
	public void started(ConfigurableApplicationContext context) {
		context.publishEvent(new ApplicationStartedEvent(this.application, this.args, context));
		AvailabilityChangeEvent.publish(context, LivenessState.CORRECT);
	}
继续 context.publishEvent(new ApplicationStartedEvent(this.application, this.args, context));
/**
 * 发布一个事件,这个事件可以被订阅者处理。
 *
 * @param event 事件对象,不能为null
 * @param eventType 事件类型,用于类型匹配和事件处理器的选择
 */
protected void publishEvent(Object event, @Nullable ResolvableType eventType) {
    // 断言事件对象不能为null
    Assert.notNull(event, "Event must not be null");

    // 如果事件本身就是ApplicationEvent的实例,直接使用
    ApplicationEvent applicationEvent;
    if (event instanceof ApplicationEvent) {
        applicationEvent = (ApplicationEvent) event;
    }
    // 否则,使用PayloadApplicationEvent进行包装
    else {
        applicationEvent = new PayloadApplicationEvent<>(this, event);
        // 如果事件类型为null,从PayloadApplicationEvent中获取
        if (eventType == null) {
            eventType = ((PayloadApplicationEvent<?>) applicationEvent).getResolvableType();
        }
    }

    // 如果有提前注册的事件,直接添加到列表中
    if (this.earlyApplicationEvents != null) {
        this.earlyApplicationEvents.add(applicationEvent);
    }
    // 否则,使用ApplicationEventMulticaster进行广播
    else {
        getApplicationEventMulticaster().multicastEvent(applicationEvent, eventType);
    }

    // 如果有父上下文,也发布事件
    if (this.parent != null) {
        if (this.parent instanceof AbstractApplicationContext) {
            ((AbstractApplicationContext) this.parent).publishEvent(event, eventType);
        } else {
            this.parent.publishEvent(event);
        }
    }
}
请关注: getApplicationEventMulticaster().multicastEvent(applicationEvent, eventType);
继续
@Override
public void multicastEvent(final ApplicationEvent event, @Nullable ResolvableType eventType) {
    // 如果eventType不为null,则直接使用它;否则,使用resolveDefaultEventType方法来解析事件的默认类型。
    ResolvableType type = (eventType != null ? eventType : resolveDefaultEventType(event));

    // 获取一个线程池执行器,它用于异步执行监听器调用。
    Executor executor = getTaskExecutor();

    // 获取所有对应该事件类型的监听器。
    for (ApplicationListener<?> listener : getApplicationListeners(event, type)) {
        // 如果执行器不为null,则使用它来异步执行监听器调用;
        // 否则,直接同步调用监听器。
        if (executor != null) {
            executor.execute(() -> invokeListener(listener, event));
        }
        else {
            invokeListener(listener, event);
        }
    }
}
继续
/**
 * 调用一个事件监听器的方法。
 *
 * @param listener 要调用的监听器
 * @param event 要处理的事件
 */
private void doInvokeListener(ApplicationListener listener, ApplicationEvent event) {
    try {
        // 直接调用监听器的onApplicationEvent方法
        listener.onApplicationEvent(event);
    }
    catch (ClassCastException ex) {
        String msg = ex.getMessage();
        // 如果消息为null或者消息匹配事件类的预期类型,则忽略异常并记录debug日志
        if (msg == null || matchesClassCastMessage(msg, event.getClass())) {
            Log logger = LogFactory.getLog(getClass());
            if (logger.isTraceEnabled()) {
                logger.trace("Non-matching event type for listener: " + listener, ex);
            }
        }
        // 否则,抛出异常
        else {
            throw ex;
        }
    }
}
继续 就会调到我们自己的业务逻辑了
   @Override
    public void onApplicationEvent(ApplicationStartedEvent event) {
        System.out.println("--------------------> Handling ApplicationStartedEvent here!");
    }

本文来自互联网用户投稿,该文观点仅代表作者本人,不代表本站立场。本站仅提供信息存储空间服务,不拥有所有权,不承担相关法律责任。 如若内容造成侵权/违法违规/事实不符,请联系我的编程经验分享网邮箱:chenni525@qq.com进行投诉反馈,一经查实,立即删除!
- Python教程
- 深入理解 MySQL 中的 HAVING 关键字和聚合函数
- Qt之QChar编码(1)
- MyBatis入门基础篇
- 用Python脚本实现FFmpeg批量转换
- Vue3中直接修改reactive定义的数据本身
- 设计模式:简单工厂模式、工厂方法模式、抽象工厂模式
- git将一个远程分支的部分修改提交到另一个远程分支
- Java实现归并排序
- vue2使用文件上传读取本地照片并转化base64格式进行展示
- 【已解决】c++如何打印变量的类型
- React快速入门
- 微信小程序使用canvas制作海报并保存到本地相册(超级详细)
- ssm班级疫情管理系统(开题+源码)
- 黑客技术(网络安全)自学1.0