vue3 + TypeScript使用国际化
发布时间:2023年12月22日
vue3 + TypeScript使用国际化
- 本文使用了
Vite构建工具创建的vue3项目 Vite支持使用特殊的 import.meta.glob 函数从文件系统导入多个模块Vite 官方中文文档- 当然如果你的vue3项目未使用vite,你也可以为你的旧项目提提速,安装
vite,安装方法在上一个博客 - 本文使用了
element-plusui库 所以需要引入element plus 自带国际化 安装element-plus - 安装 vue-i18n
npm install vue-i18n - 废话不多说 直接上代码


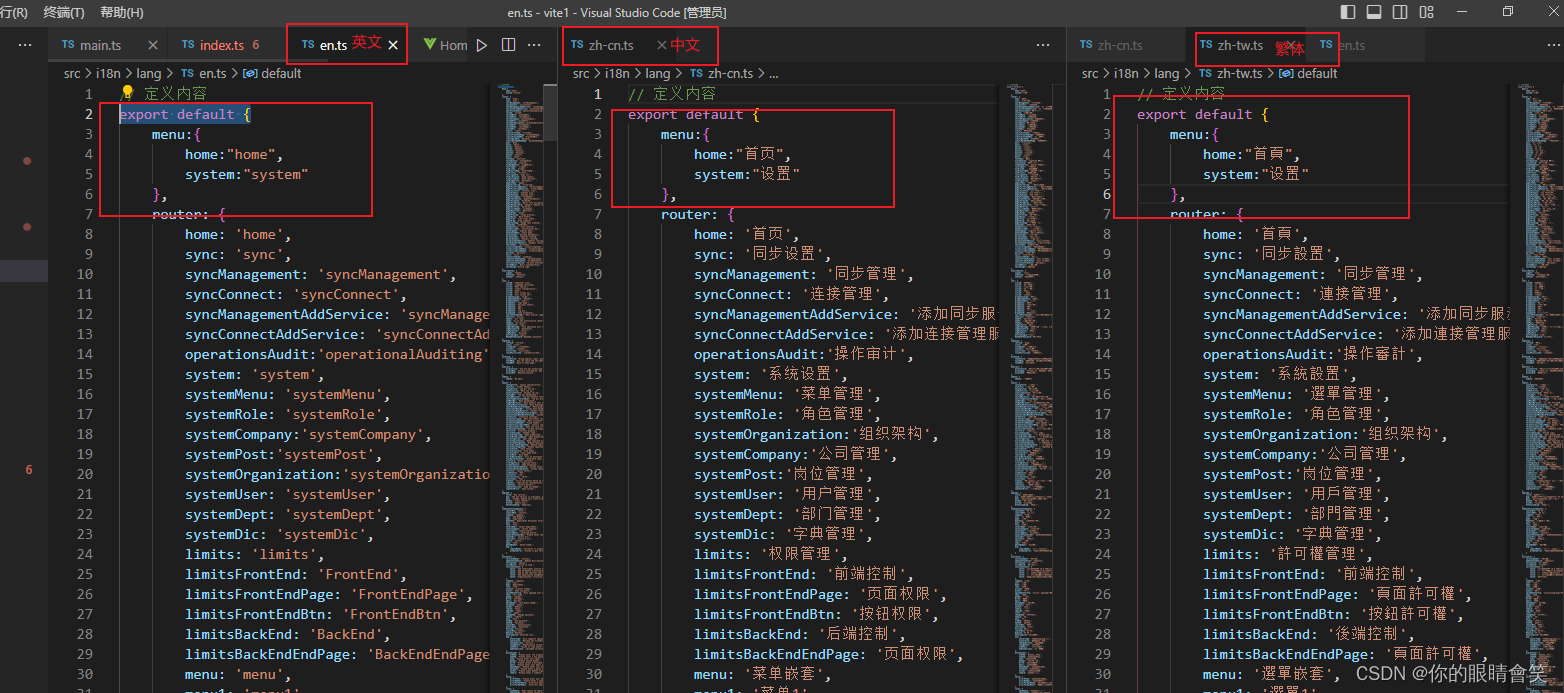
// lang下面的en.ts

export default {
	menu:{
		home:"home",
		system:"system"
	},
},
// lang下面的zh-cn.ts
export default {
	menu:{
		home:"首页",
		system:"设置"
	},
},
// lang下面的zh-tw.ts
export default {
	menu:{
		home:"首頁",
		system:"設定"
	},
},
index.ts
import { createI18n } from 'vue-i18n';

// 定义语言国际化内容

/**
 * 说明:
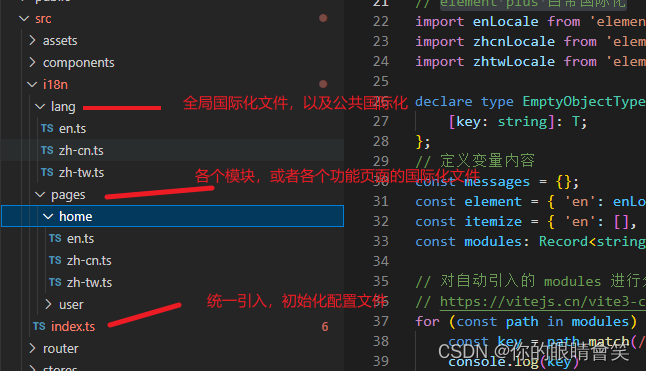
 * 须在 pages 下新建文件夹(建议 `要国际化界面目录` 与 `i18n 目录` 相同,方便查找),
 * 注意国际化定义的字段,不要与原有的定义字段相同。
 * 1、/src/i18n/lang 下的 ts 为框架的国际化内容
 * 2、/src/i18n/pages 下的 ts 为各界面的国际化内容
 */

// element plus 自带国际化
import enLocale from 'element-plus/es/locale/lang/en';
import zhcnLocale from 'element-plus/es/locale/lang/zh-cn';
import zhtwLocale from 'element-plus/es/locale/lang/zh-tw';

declare type EmptyObjectType<T = any> = {
	[key: string]: T;
};
// 定义变量内容
const messages = {};
const element = { 'en': enLocale, 'zh-cn': zhcnLocale, 'zh-tw': zhtwLocale };
const itemize = { 'en': [], 'zh-cn': [], 'zh-tw': [] };
const modules: Record<string, any> = import.meta.glob("./**/*.ts",{ eager: true });

// 对自动引入的 modules 进行分类 en、zh-cn、zh-tw
// https://vitejs.cn/vite3-cn/guide/features.html#glob-import
for (const path in modules) {
	const key = path.match(/(\S+)\/(\S+).ts/);
	console.log(key)
	if (itemize[key![2]]) itemize[key![2]].push(modules[path].default);
	else itemize[key![2]] = modules[path];
}

// 合并数组对象(非标准数组对象,数组中对象的每项 key、value 都不同)
function mergeArrObj<T>(list: T, key: string) {
	let obj = {};
	list[key].forEach((i: EmptyObjectType) => {
		obj = Object.assign({}, obj, i);
	});
	return obj;
}

// 处理最终格式
for (const key in itemize) {
	console.log(itemize)
	console.log(key)
	messages[key] = {
		name: key,
		el: element[key].el,
		message: mergeArrObj(itemize, key),
	};
}

// 导出语言国际化
export const i18n = createI18n({
	legacy: false,
	silentTranslationWarn: true,
	missingWarn: false,
	silentFallbackWarn: true,
	fallbackWarn: false,
	locale: 'zh-cn',
	fallbackLocale: zhcnLocale.name,
	messages,
});
- main.ts 中引入
import ElementPlus from "element-plus";
import "element-plus/dist/index.css";
import { i18n } from "@/i18n/index";

const app = createApp(App);

app.use(i18n);
app.use(ElementPlus);
app.mount("#app");
- 页面中使用
<script setup lang="ts">
import { onMounted, reactive, ref } from "vue";
import { useI18n } from "vue-i18n";
import { ElMessage } from "element-plus";
const { locale, t } = useI18n();
const state1 = reactive({
  disabledI18n: "zh-cn",
});
const onLanguageChange = (val: string) => {
  locale.value = val;
};

const btn = () => {
  ElMessage({
    message: t("message.home.hello"),
    type: "success",
  });
};
</script>

<template>
  <main>
    <el-select
      v-model="state1.disabledI18n"
      popper-class="mp-props_i18n"
      class="m-2 mp-selectUser-i18n"
      placeholder="Select"
      @change="onLanguageChange"
    >
      <el-option label="简体中文" value="zh-cn" />
      <el-option label="English" value="en" />
      <el-option label="繁體中文" value="zh-tw" />
    </el-select>
    <el-button type="primary" @click="btn" style="margin-left:14px;">{{ $t('message.userCenter.confirmbtn') }}</el-button>
    <div>{{ $t("message.router.home") }}</div>
    <div>{{ $t("message.router.home") }}</div>
    <div>{{ $t("message.router.home") }}</div>
    <div>{{ $t("message.router.home") }}</div>
    <div>{{ $t("message.router.home") }}</div>
    <div>{{ $t("message.router.home") }}</div>
  </main>
</template>
- 效果展示

20231222-150258
当然你可能需要将当前的语言类型进行存储,以便刷新页面或者 重新打开页面时 依然展示之前的选择。- 以上为i18n的简单使用!
文章来源:https://blog.csdn.net/weixin_45563734/article/details/135149083
本文来自互联网用户投稿,该文观点仅代表作者本人,不代表本站立场。本站仅提供信息存储空间服务,不拥有所有权,不承担相关法律责任。 如若内容造成侵权/违法违规/事实不符,请联系我的编程经验分享网邮箱:chenni525@qq.com进行投诉反馈,一经查实,立即删除!
本文来自互联网用户投稿,该文观点仅代表作者本人,不代表本站立场。本站仅提供信息存储空间服务,不拥有所有权,不承担相关法律责任。 如若内容造成侵权/违法违规/事实不符,请联系我的编程经验分享网邮箱:chenni525@qq.com进行投诉反馈,一经查实,立即删除!
最新文章