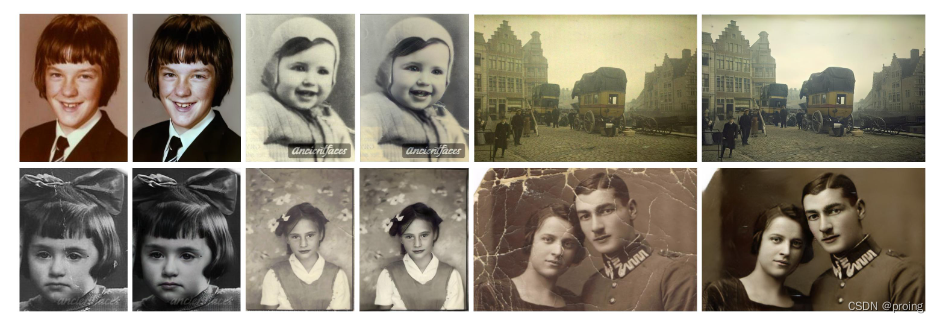
ubuntu20部署Bringing-Old-Photos-Back-to-Life
? ? ? ? ? ? ? ? ? ? ? ? ? ? ? ? ? ? ? ? ? ? ? ? ? ? ? ? ? ??
环境准备:
ubuntu20.04?
Python 3.8.10

首先将微软的「Bringing-Old-Photos-Back-to-Life」库 clone 到本地:
git clone https://github.com/microsoft/Bringing-Old-Photos-Back-to-Life.git
cd Face_Enhancement/models/networks/
git clone https://github.com/vacancy/Synchronized-BatchNorm-PyTorch
cp -rf Synchronized-BatchNorm-PyTorch/sync_batchnorm .
cd ../../../
Global 权重配置?
cd Global/detection_models
git clone https://github.com/vacancy/Synchronized-BatchNorm-PyTorch
cp -rf Synchronized-BatchNorm-PyTorch/sync_batchnorm .
cd ../../
Face_Detection 权重??
人脸识别预训练模型:
cd Face_Detection/
wget http://dlib.net/files/shape_predictor_68_face_landmarks.dat.bz2
bzip2 -d shape_predictor_68_face_landmarks.dat.bz2
cd ../
Face_Enhancement 权重
Face_Enhancement 权重用于人脸部位增强,下载后权重文件解压至?./Face_Enhancement?
cd Face_Enhancement/
wget https://github.com/microsoft/Bringing-Old-Photos-Back-to-Life/releases/download/v1.0/face_checkpoints.zip
unzip face_checkpoints.zip
cd ../
cd Global/
wget https://github.com/microsoft/Bringing-Old-Photos-Back-to-Life/releases/download/v1.0/global_checkpoints.zip
unzip global_checkpoints.zip
cd ../
?创建 python3 虚拟环境
python3 -m venv .venv
source .venv/bin/activate
安装项目依赖库
pip3 install -r requirements.txt
出现的问题:
Running Stage 4: Blending
Traceback (most recent call last):
File “align_warp_back_multiple_dlib.py”, line 428, in
blended = blur_blending_cv2(warped_back, blended, backward_mask)
File “align_warp_back_multiple_dlib.py”, line 219, in blur_blending_cv2
mask *= 255.0
numpy.core._exceptions.UFuncTypeError: Cannot cast ufunc ‘multiply’ output from dtype(‘float64’) to dtype(‘uint8’) with casting rule ‘same_kind’
找到文件align_warp_back_multiple_dlib.py的219行,将代码 mask *= 255.0 改为:mask = mask * 255.0,再次运行。
?
修复不带折痕的照片
对于不带折痕的照片,终端输入时需要三个参数,
--input_folder?,存放需要修复图片的文件路径,不指定时默认为?./test_images/old;--output_folder,存放修复后图片的文件路径,不指定时默认为?./output/--GPU,指定用到的 GPU 编号,可设定为?0?、?0,1或0,1,2?,没有 GPU 配置时 设为?-1?表示运行时只用 CPU ;?设定 GPU 时需要确保配置的 Pytorch 是 GPU 版本,相对 CPU 的话,GPU 测试时间会更短;
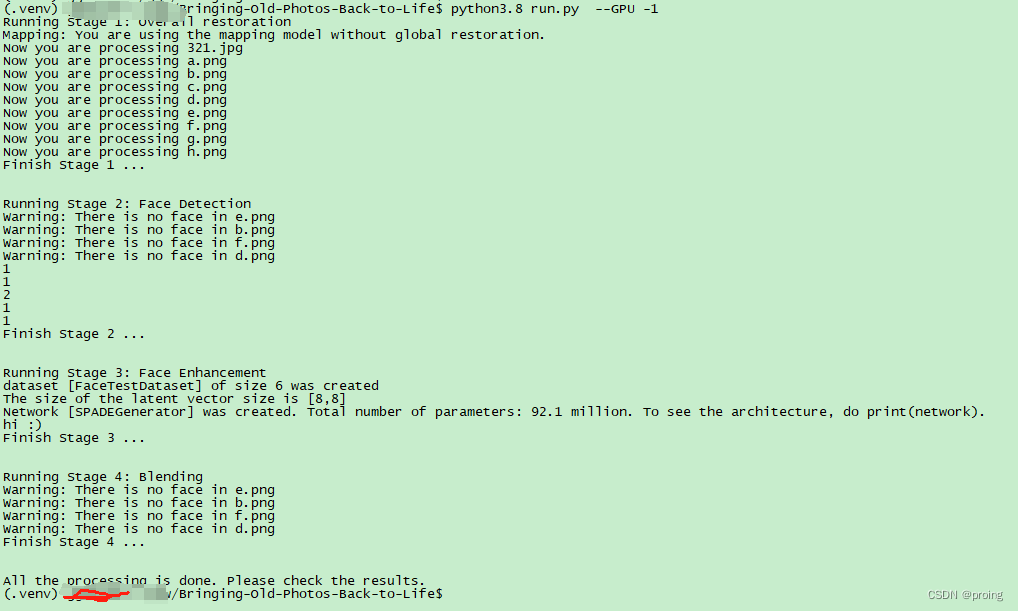
测试时,启动命令如下,这里?--input_folder、--output_folder参数都为默认,所以命令中加这两个参数,电脑比较渣没有 GPU 所以设为 -1;
python3 run.py --GPU -1?修复带折痕的照片
与不带折痕相比,修复带折痕照片要多加入一个参数?--with_scratch,还有一点不同的是存放原照片默认路径更改为为?./test_images/old_w_scratch?,其它参数设置见 3.1
终端中输入的测试命令如下:
python3 run.py --GPU -1 --with_scratch最终的运行结果
export PYTHONPATH=/home/xxx/.local/lib/python3.8/site-packages/

文末福利
整个打包版下载地址,联系我要提取码
百度网盘 请输入提取码百度网盘为您提供文件的网络备份、同步和分享服务。空间大、速度快、安全稳固,支持教育网加速,支持手机端。注册使用百度网盘即可享受免费存储空间![]() https://pan.baidu.com/s/1oKgBB0gkRIGjwzeTtFYWFw百度网盘 请输入提取码
https://pan.baidu.com/s/1oKgBB0gkRIGjwzeTtFYWFw百度网盘 请输入提取码
本文来自互联网用户投稿,该文观点仅代表作者本人,不代表本站立场。本站仅提供信息存储空间服务,不拥有所有权,不承担相关法律责任。 如若内容造成侵权/违法违规/事实不符,请联系我的编程经验分享网邮箱:chenni525@qq.com进行投诉反馈,一经查实,立即删除!
- Python教程
- 深入理解 MySQL 中的 HAVING 关键字和聚合函数
- Qt之QChar编码(1)
- MyBatis入门基础篇
- 用Python脚本实现FFmpeg批量转换
- 数字IC后端设计实现 | PR工具中到底应该如何控制density和congestion?(ICC2&Innovus)
- Linux_Docker图形化工具Portainer如何安装并结合内网穿透实现远程访问
- 轻量应用服务器简介_轻量应用服务器购买指南——腾讯云
- R语言——R函数、选项参数、数学统计函数(六)
- vivado 创建工程
- 三天吃透MySQL面试八股文
- Git | tag相关命令
- 找不到xinput1_3.dll怎么办呢?找不到xinput1_3.dll的5种不同修复方法
- SpringBoot 中 @Transactional 注解的使用
- 数字化时代的探索:学生为何对数据可视化趋之若鹜?