LVS+keepalived 高可用负载均衡
目录
工具:? keepalived? (专为LVS和HA设计的一款健康检查工具)
打开浏览器访问:http://192.168.17.101/index.html
工具:? keepalived? (专为LVS和HA设计的一款健康检查工具)
协议:VRRP协议? ?
一个合格的集群,应该具备哪些特性:?
1.负载均衡 Nginx LVS? HAProxy? F5
2.健康检查(探针)
3.故障转移主备之间的切换(通过VIP漂移实现)
? ?通过接收VRRP消息来确定主还活着
健康检查(探针)的方式:
1.发送心跳消息 ?ping/pong
2.TCP端口检查 ? 向目标主机的 IP:PORT 发起TCP连接请求,如果TCP连接三次握手成功则认为健康检查探测成功,否则认为健康检查探测失败
3.HTTP URL检查 ?向目标主机的 http://IP:PORT/URL路径 发送 HTTP GET 请求方法,
? ? ? ? ? ? ? ? ? ? ? ? ? ? ? ? ? ? ? ? ? ? ? ? ? ? ? ? ? ? ? ? ?如果响应消息是2XX 3XX状态码则认为健康检查探测成功
? ? ? ? ? ? ? ? ? ? ? ? ? ? ? ? ? ? ? ? ? ? ? ? ? ? ? ? ? ? ? ? ?如果响应消息是4XX 5XX状态码则认为健康检查探测失败
主备切换:怎么确定主备
根据state状态? ? master为主? ?backup为备
根据优先级? ? 优先级高的为主
优先级一样根据ip地址,数字越大的为主
故障案例
脑裂故障
现象:主服务器和备服务器同时拥有VIP
原因:因为主服务器和备服务器之间的通信链路中断,导致备服务器无法收到主服务器发送的VRRP通告消息,备服务器误认为主服务器故障了并通过IP命令生成VIP
解决:关闭主服务器或备服务器其中一个的keepalived服务
预防:(1)主服务器和备服务器之间添加双链路通信
? ? ? ? ? ?(2)在主服务器上添加脚本进行判断与备服务器通信链路是否中断,如果确实是链路中断则自行关闭keepalived服务
? ? ? ? ? (3)利用第三方应用或监控系统检测是否发送脑裂故障,如果发送脑裂故障则通过第三方应用或监控系统来关闭主服务器或备服务器上的keepalived服务
?
实操:keeplived主备切换
主:192.168.17.27
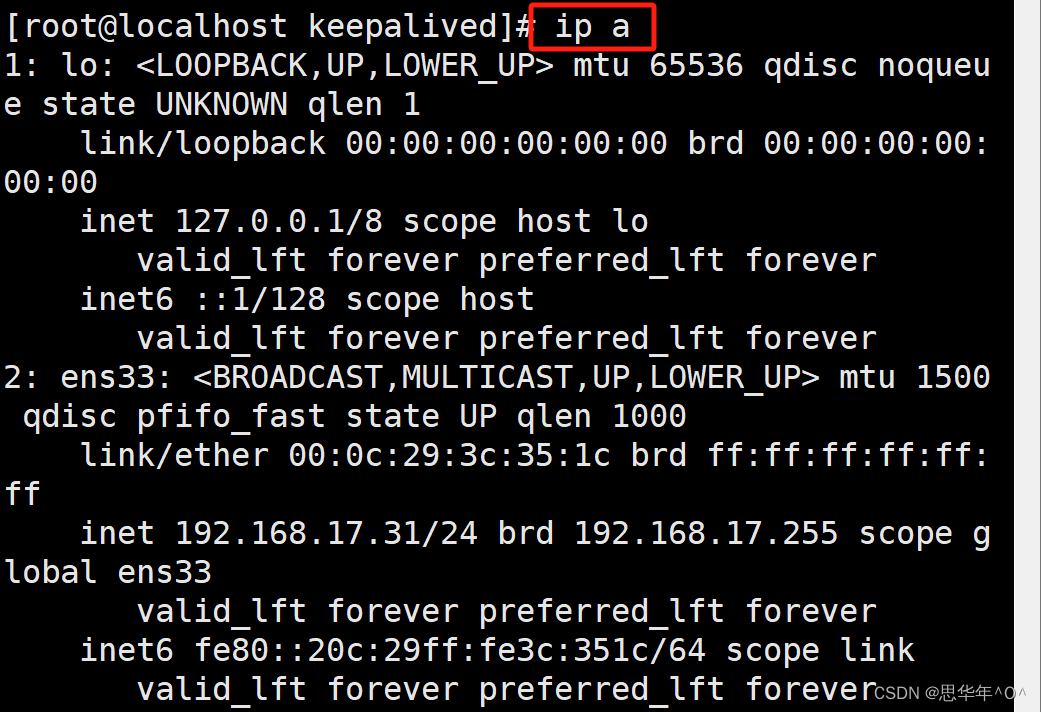
备:192.168.17.31
安装软件? ?keepalived
yum install keepalive -y
更改配置
主:
cd /etc/keepalived/

cp keepalived.conf{,.bak} #改配置文件前先备份

vim keepalived.conf  #修改配置文件

#配置如下
! Configuration File for keepalived

global_defs {
   notification_email {
     acassen@firewall.loc
     failover@firewall.loc
     sysadmin@firewall.loc
   }
   notification_email_from Alexandre.Cassen@firewall.loc
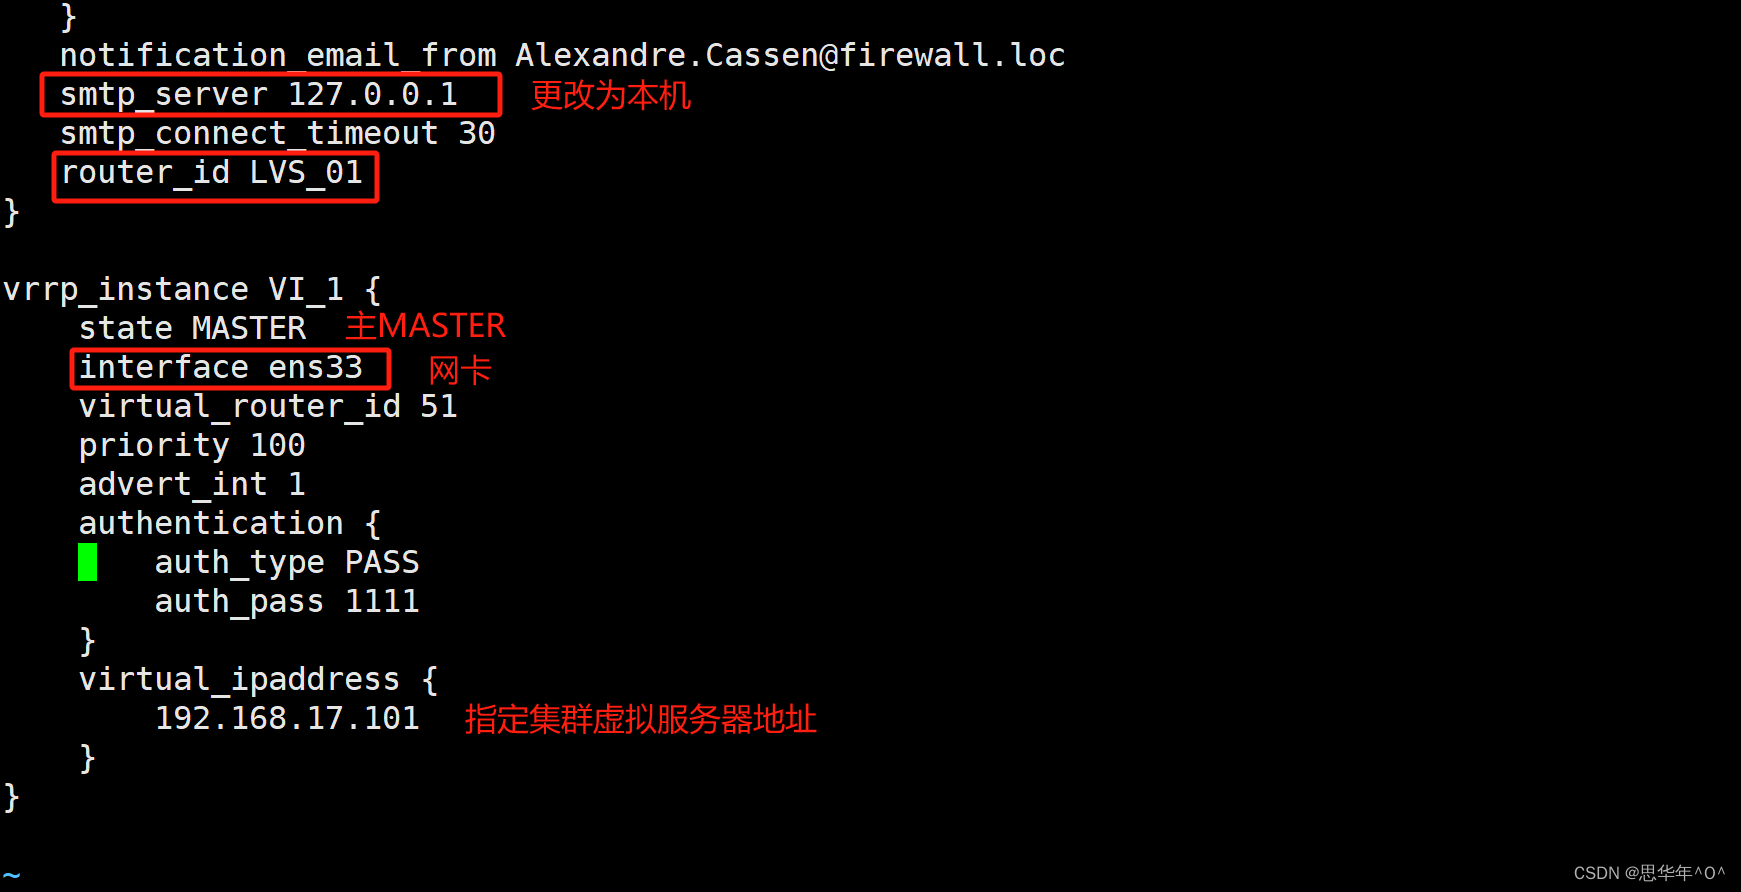
   smtp_server 127.0.0.1
   smtp_connect_timeout 30
   router_id LVS_01
}

vrrp_instance VI_1 {
    state MASTER
    interface ens33
    virtual_router_id 51
    priority 100
    advert_int 1
    authentication {
        auth_type PASS
        auth_pass 1111
    }
    virtual_ipaddress {
        192.168.17.101
    }
}
备:
! Configuration File for keepalived

global_defs {
   notification_email {
     acassen@firewall.loc
     failover@firewall.loc
     sysadmin@firewall.loc
   }
   notification_email_from Alexandre.Cassen@firewall.loc
   smtp_server 127.0.0.1
   smtp_connect_timeout 30
   router_id LVS_02
}

vrrp_instance VI_1 {
    state BACKUP
    interface ens33
    virtual_router_id 51
    priority 90
    advert_int 1
    authentication {
        auth_type PASS
        auth_pass 1111
    }
    virtual_ipaddress {
        192.168.17.101
    }
}

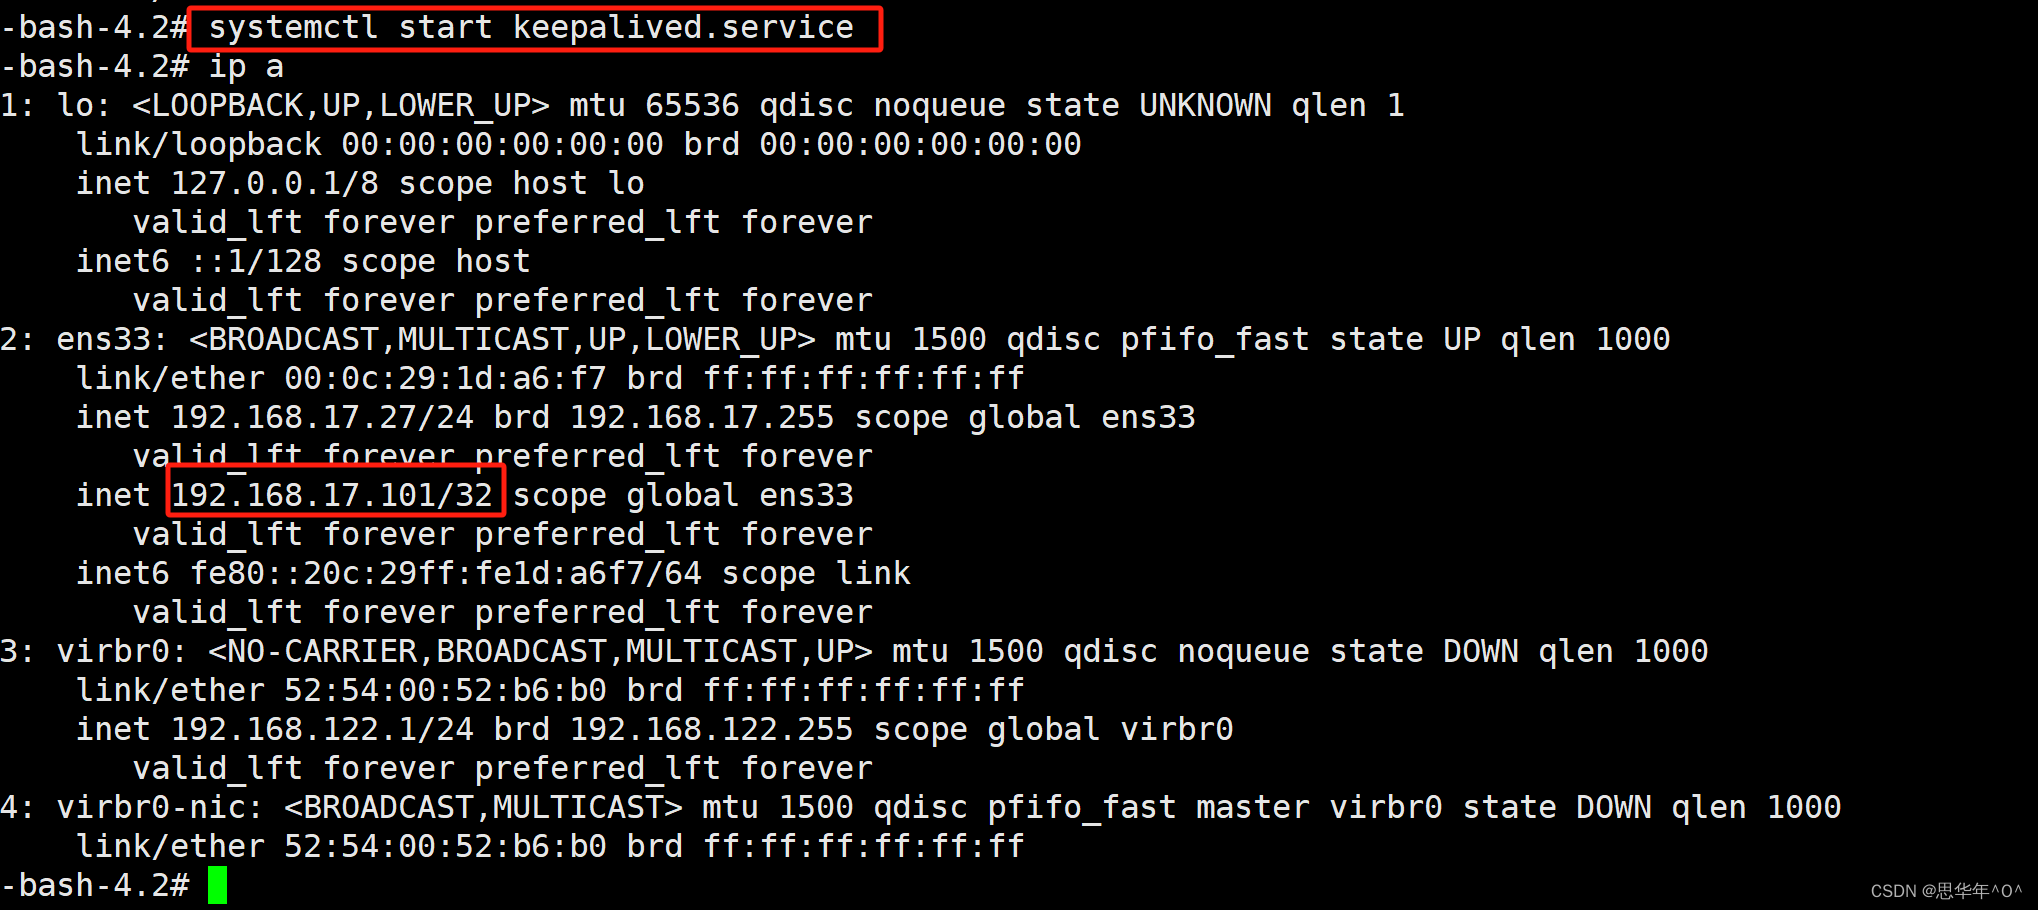
测试:
systemctl restart keepalived.service #启动

ip a #查看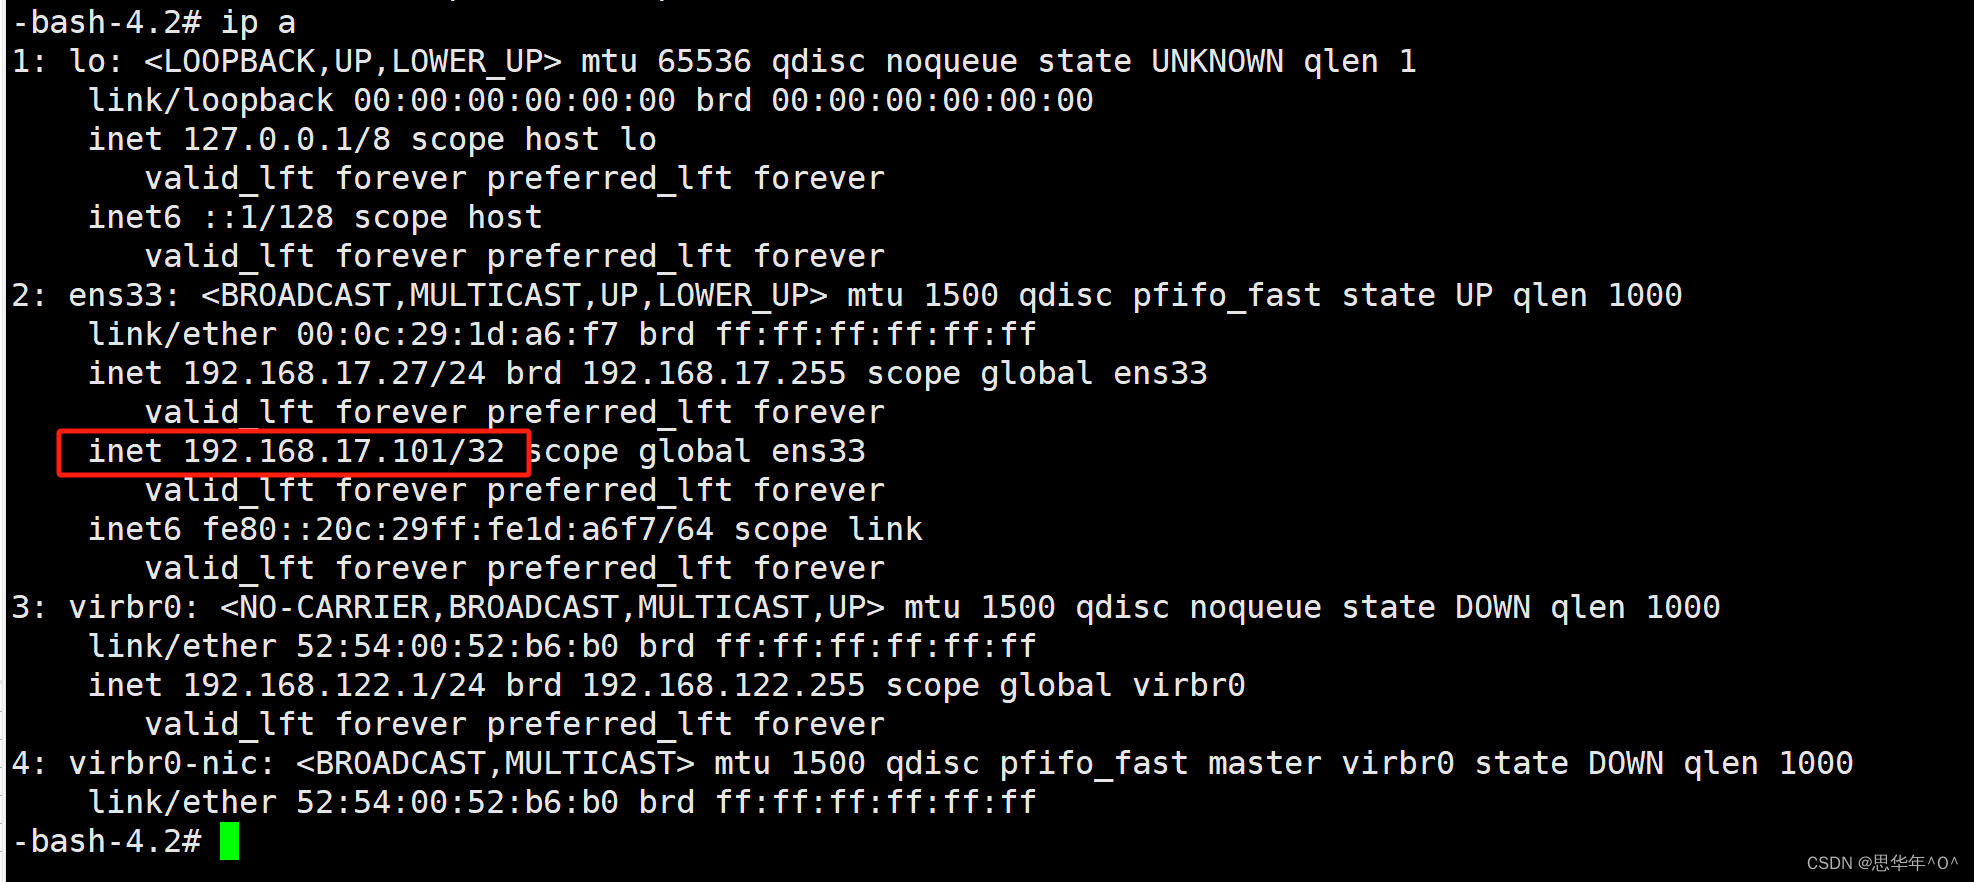
备:
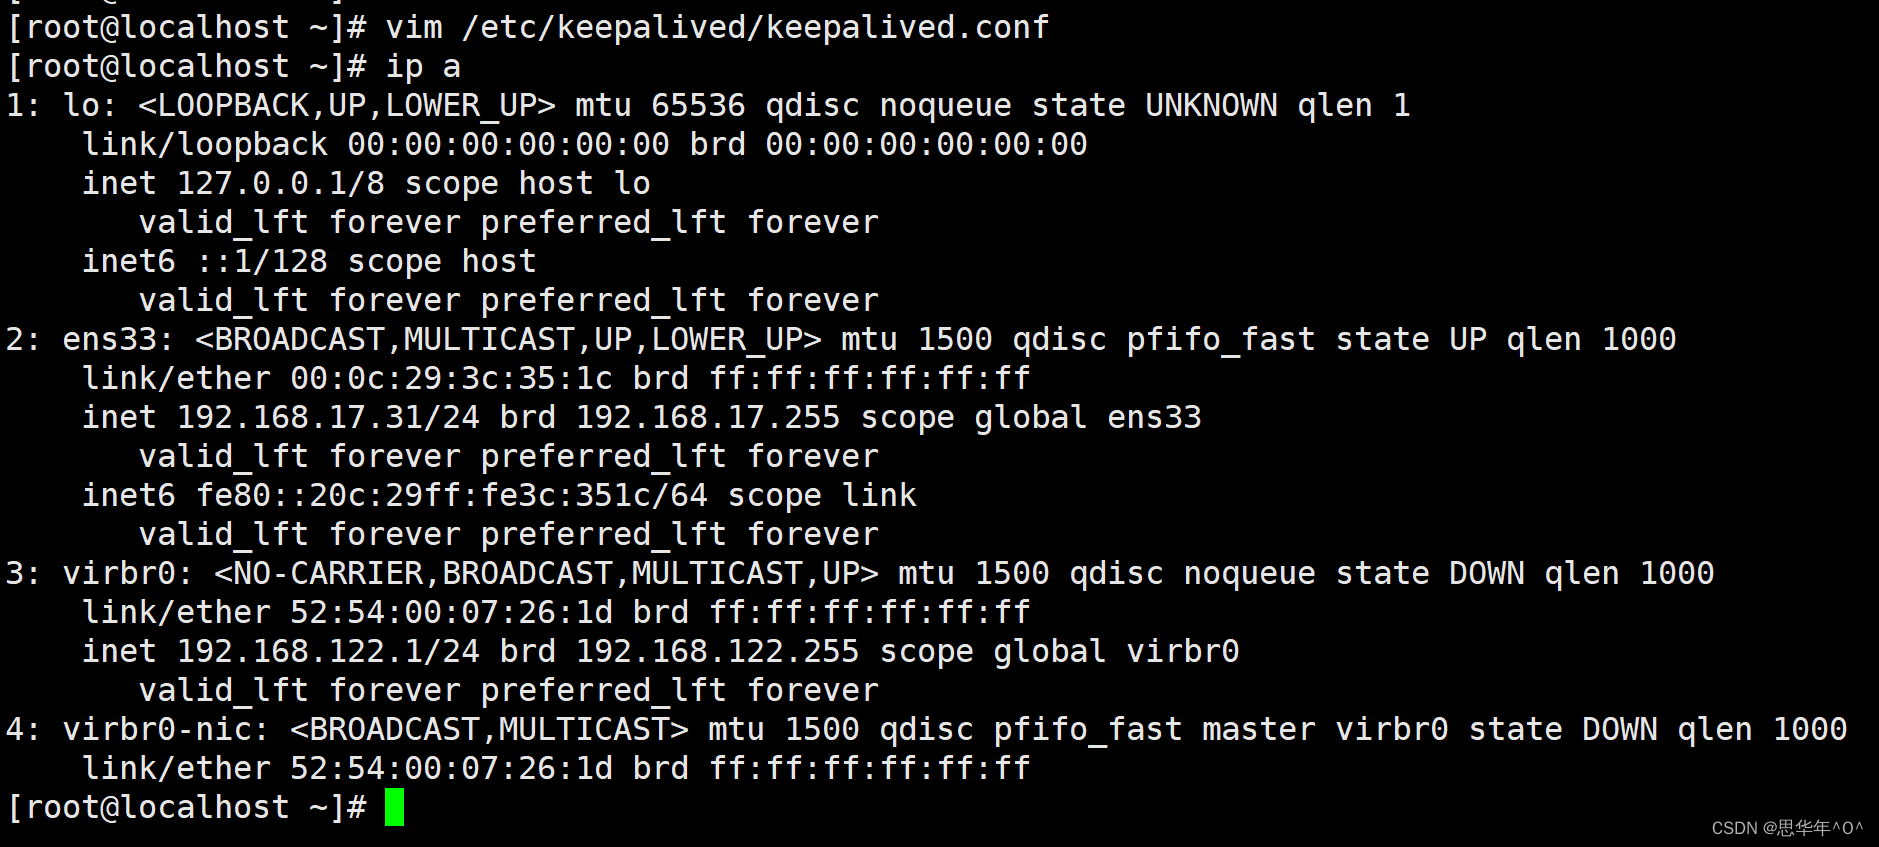
将主的keepalived的服务关闭
systemctl stop keepalived  #关闭服务

ip a
备:
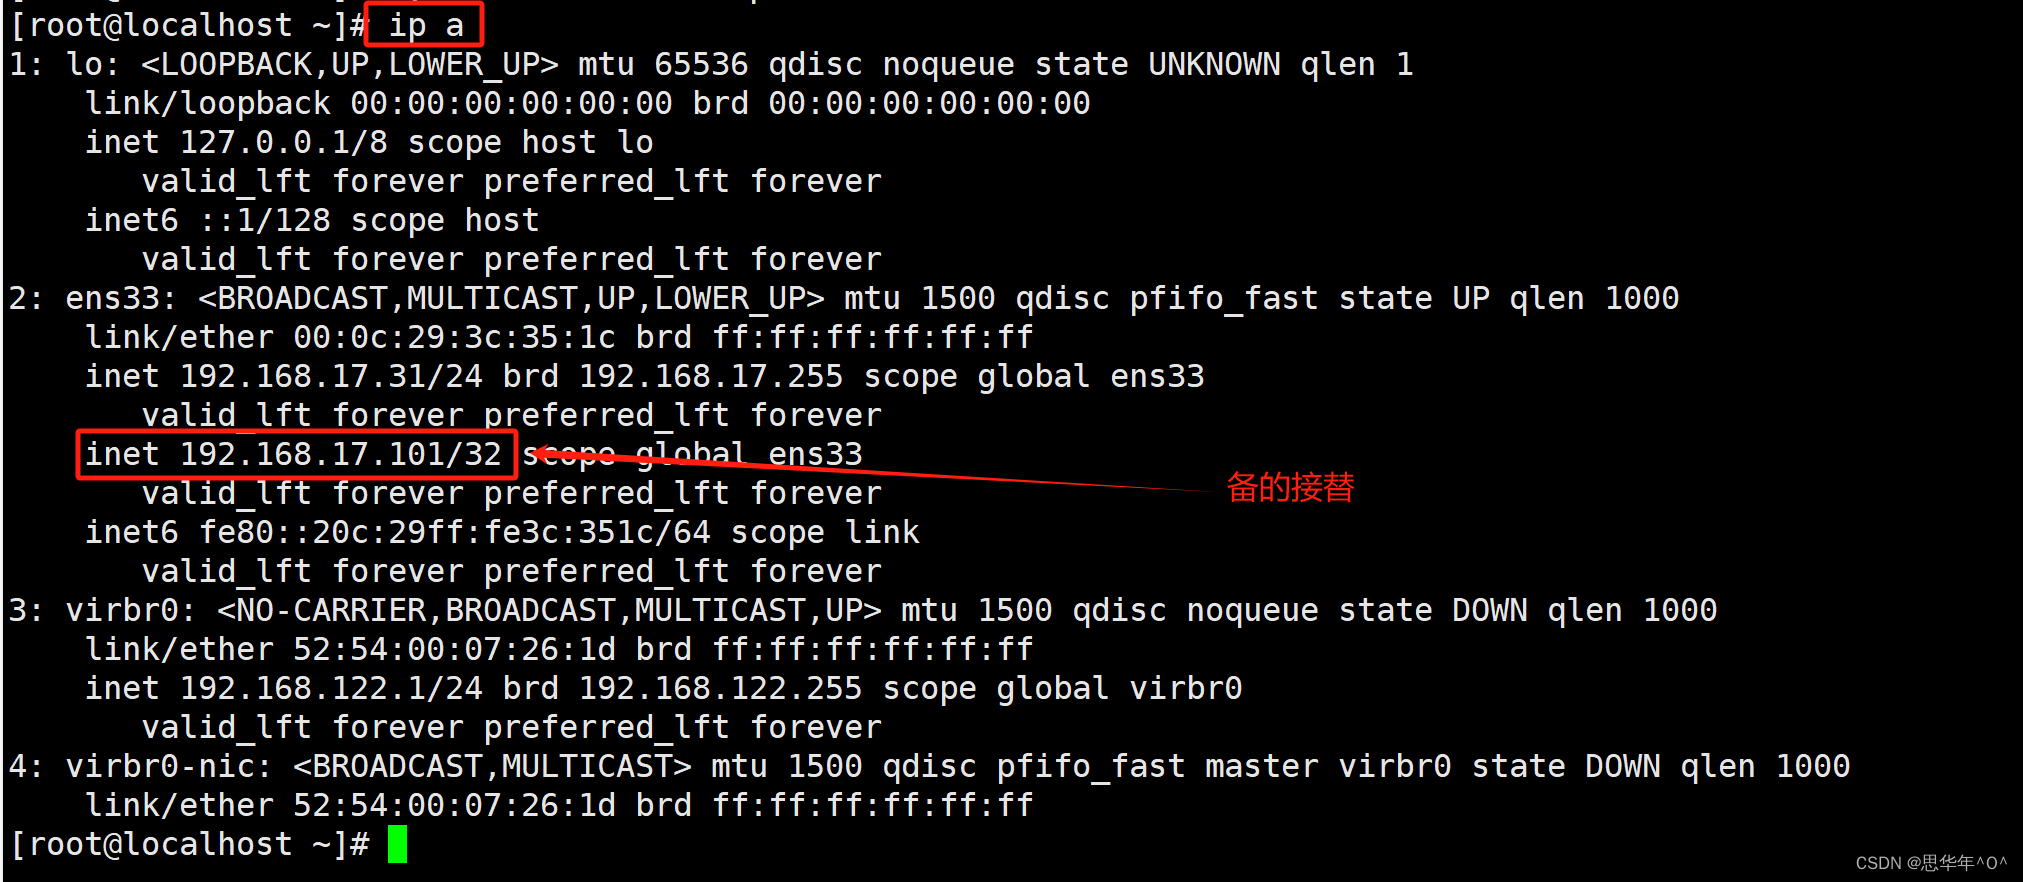
将主在重新开启 (再次回到主)
备:

实操:LVS+keepalived的高可用
节点服务器:? ? ? ? ? ? ? ? ? ? ? ? ? ? ? ? ? ? ? ?keepalived:
1:192.168.17.13? ? ? ? ? ? ? ? ? ? ? ? ? ? ? ? ?主:192.168.17.27
2:192.168.17.25? ? ? ? ? ? ? ? ? ? ? ? ? ? ? ? ?备:192.168.17.31
分别建立网页
1:
systemctl stop firewalld
setenforce 0

echo 'this is web1'>index.html    #设置网页

vim /etc/sysctl.conf  #添加配置
  #配置如下
net.ipv4.conf.lo.arp_ignore = 1
net.ipv4.conf.lo.arp_announce = 2
net.ipv4.conf.all.arp_ignore = 1
net.ipv4.conf.all.arp_announce = 2

sysctl -p   #加载
net.ipv4.conf.lo.arp_ignore = 1
net.ipv4.conf.lo.arp_announce = 2
net.ipv4.conf.all.arp_ignore = 1
net.ipv4.conf.all.arp_announce = 2


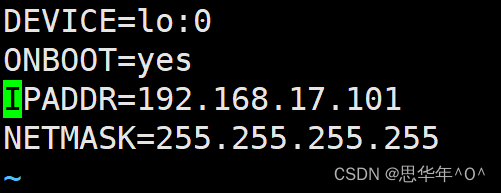
vim /etc/sysconfig/network-scripts/ifcfg-lo:0  #更改配置文件
      #配置如下
DEVICE=lo:0
ONBOOT=yes
IPADDR=192.168.17.101
NETMASK=255.255.255.255

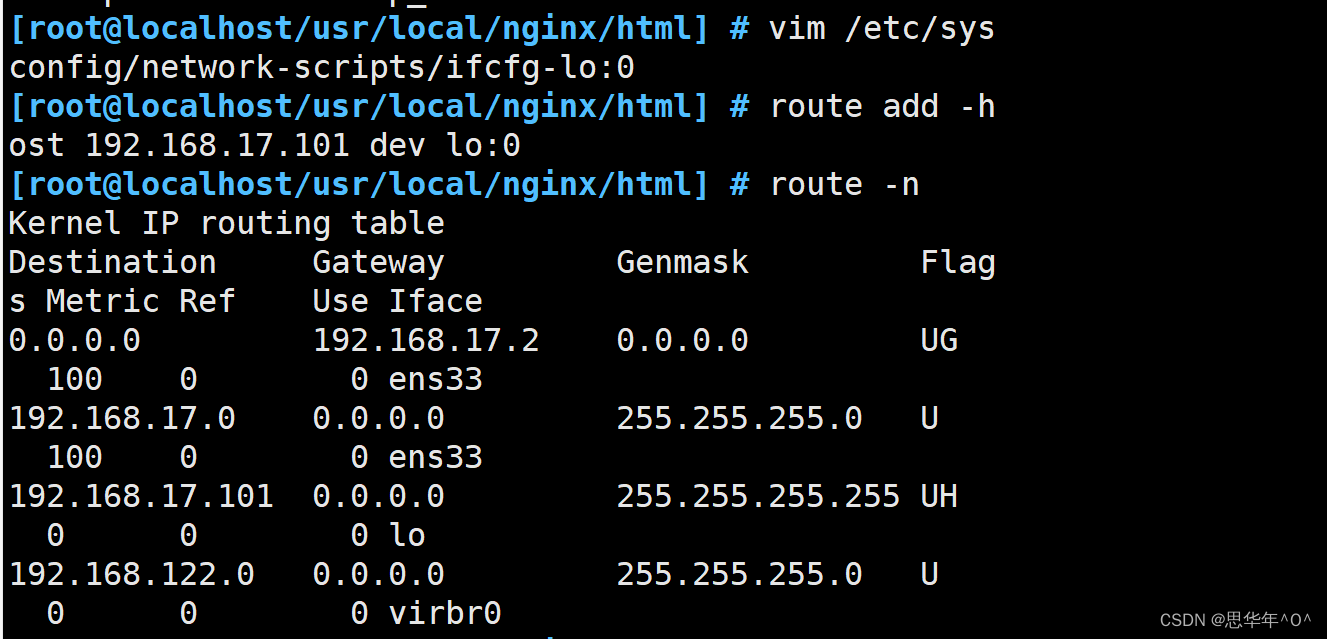
route add -host 192.168.17.101 dev lo:0  #设置回环地址

route -n                                #查看是否设置成功
Kernel IP routing table
Destination     Gateway         Genmask         Flags Metric Ref    Use Iface
0.0.0.0         192.168.17.2    0.0.0.0         UG    100    0        0 ens33
192.168.17.0    0.0.0.0         255.255.255.0   U     100    0        0 ens33
192.168.17.101  0.0.0.0         255.255.255.255 UH    0      0        0 lo
192.168.122.0   0.0.0.0         255.255.255.0   U     0      0        0 virbr0

2:
systemctl stop firewalld
setenforce 0

echo 'this is web2'>index.html    #设置网页

vim /etc/sysctl.conf  #添加配置
  #配置如下
net.ipv4.conf.lo.arp_ignore = 1
net.ipv4.conf.lo.arp_announce = 2
net.ipv4.conf.all.arp_ignore = 1
net.ipv4.conf.all.arp_announce = 2

sysctl -p   #加载
net.ipv4.conf.lo.arp_ignore = 1
net.ipv4.conf.lo.arp_announce = 2
net.ipv4.conf.all.arp_ignore = 1
net.ipv4.conf.all.arp_announce = 2


vim /etc/sysconfig/network-scripts/ifcfg-lo:0  #更改配置文件
      #配置如下
DEVICE=lo:0
ONBOOT=yes
IPADDR=192.168.17.101
NETMASK=255.255.255.255

route add -host 192.168.17.101 dev lo:0  #设置回环地址

systemctl restart network   #重启服务

route -n                                #查看是否设置成功
Kernel IP routing table
Destination     Gateway         Genmask         Flags Metric Ref    Use Iface
0.0.0.0         192.168.17.2    0.0.0.0         UG    100    0        0 ens33
192.168.17.0    0.0.0.0         255.255.255.0   U     100    0        0 ens33
192.168.17.101  0.0.0.0         255.255.255.255 UH    0      0        0 lo
192.168.122.0   0.0.0.0         255.255.255.0   U     0      0        0 virbr0
更改keepalived配置
主:192.168.17.27
备:192.168.17.31
主:
systemctl stop keepalived.service

\cp -f keepalived.conf.bak keepalived.conf  #还原配置文件


vim keepalived.conf  #更改配置文件

! Configuration File for keepalived

global_defs {
   notification_email {
     acassen@firewall.loc
     failover@firewall.loc
     sysadmin@firewall.loc
   }
   notification_email_from Alexandre.Cassen@firewall.loc
   smtp_server 127.0.0.1
   smtp_connect_timeout 30
   router_id LVS_01
}

vrrp_instance VI_1 {
    state MASTER
    interface ens33
    virtual_router_id 51
    priority 100
    advert_int 1
    authentication {
        auth_type PASS
        auth_pass 1111
    }
    virtual_ipaddress {
        192.168.17.101
    }
}

virtual_server 192.168.17.101 80 {
    delay_loop 6
    lb_algo rr
    lb_kind DR
    persistence_timeout 0
    protocol TCP

    real_server 192.168.17.13 80 {
        weight 1
        TCP_GET {
            connect_timeout 3
            nb_get_retry 3
            delay_before_retry 3
        }
    }
}

virtual_server 192.168.17.101 80 {
    delay_loop 6
    lb_algo rr
    lb_kind DR
    persistence_timeout 0
    protocol TCP

    real_server 192.168.17.25 80 {
        weight 1
        TCP_GET {
            connect_timeout 3
            nb_get_retry 3
            delay_before_retry 3
        }
    }
}
yum install -y ipvsadm

ipvsadm-save > /etc/sysconfig/ipvsadm
systemctl start ipvsadm
systemctl enable ipvsadm

systemctl start keepalived.service
-bash-4.2# systemctl enable keepalived.service
-bash-4.2# systemctl status keepalived.service

ipvsadm -ln    #自动加载
IP Virtual Server version 1.2.1 (size=4096)
Prot LocalAddress:Port Scheduler Flags
  -> RemoteAddress:Port           Forward Weight ActiveConn InActConn
TCP  192.168.17.101:80 rr
  -> 192.168.17.13:80             Route   1      0          0
  -> 192.168.17.25:80             Route   1      0          0


scp keepalived.conf 192.168.17.31:`pwd` #将配置文件传给另一台keepalived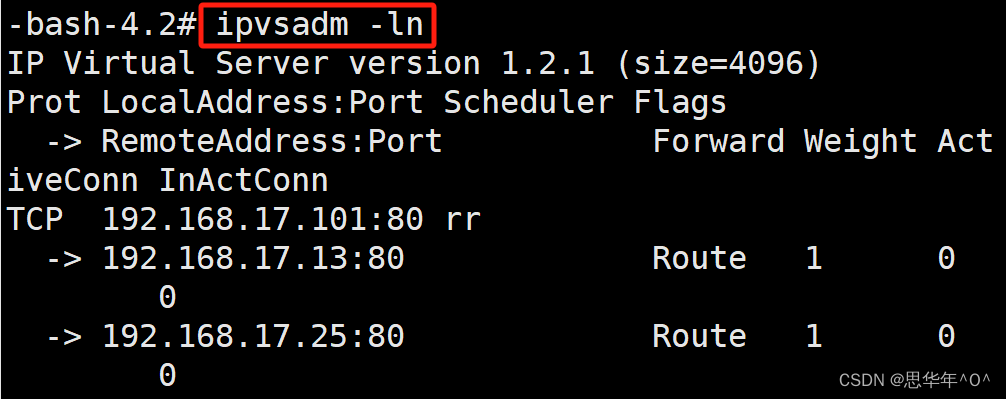

备:
! Configuration File for keepalived

global_defs {
   notification_email {
     acassen@firewall.loc
     failover@firewall.loc
     sysadmin@firewall.loc
   }
   smtp_server 127.0.0.1
   smtp_connect_timeout 30
   router_id LVS_01
}

vrrp_instance VI_1 {
    state BACKUP
    interface ens33
    virtual_router_id 51
    priority 90
    advert_int 1
    authentication {
        auth_type PASS
        auth_pass 1111
    }
    virtual_ipaddress {
        192.168.17.101
    }
}

virtual_server 192.168.17.101 80 {
    delay_loop 6
! Configuration File for keepalived

global_defs {
   notification_email {
     acassen@firewall.loc
     failover@firewall.loc
     sysadmin@firewall.loc
   }
   notification_email_from Alexandre.Cassen@firewall.loc
   smtp_server 127.0.0.1
   smtp_connect_timeout 30
   router_id LVS_01
}

vrrp_instance VI_1 {
    state BACKUP
    interface ens33
    virtual_router_id 51
    priority 90
    advert_int 1
    authentication {
        auth_type PASS
        auth_pass 1111
    }
    virtual_ipaddress {
        192.168.17.101
    }
}

virtual_server 192.168.17.101 80 {
    delay_loop 6
    lb_algo rr
    lb_kind DR
    persistence_timeout 0
    protocol TCP

    real_server 192.168.17.13 80 {
        weight 1
        TCP_GET {
            connect_timeout 3
            nb_get_retry 3
            delay_before_retry 3
        }
    }
}

virtual_server 192.168.17.101 80 {
    delay_loop 6
    lb_algo rr
    lb_kind DR
    persistence_timeout 0
    protocol TCP

    real_server 192.168.17.25 80 {
        weight 1
        TCP_GET {
            connect_timeout 3
            nb_get_retry 3
            delay_before_retry 3
        }
    }
}
yum install -y ipvsadm

ipvsadm-save > /etc/sysconfig/ipvsadm  #清空文件
systemctl start ipvsadm  #启动ipvsadm
systemctl enable ipvsadm   #开机自启

systemctl start keepalived.service
systemctl enable keepalived.service
systemctl status keepalived.service

ipvsadm -ln    #自动加载
IP Virtual Server version 1.2.1 (size=4096)
Prot LocalAddress:Port Scheduler Flags
  -> RemoteAddress:Port           Forward Weight ActiveConn InActConn
TCP  192.168.17.101:80 rr
  -> 192.168.17.13:80             Route   1      0          0
  -> 192.168.17.25:80             Route   1      0          0

验证:
主:

备:
打开浏览器访问:http://192.168.17.101/index.html
发现页面刷新不会进行跳转
打开nginx的节点服务器修改配置
vim /usr/local/nginx/conf/nginx.conf
        #修改内容如下

keepalive_timeout  0;   #关闭会话保持
再次打开浏览器测试


本文来自互联网用户投稿,该文观点仅代表作者本人,不代表本站立场。本站仅提供信息存储空间服务,不拥有所有权,不承担相关法律责任。 如若内容造成侵权/违法违规/事实不符,请联系我的编程经验分享网邮箱:chenni525@qq.com进行投诉反馈,一经查实,立即删除!
- Python教程
- 深入理解 MySQL 中的 HAVING 关键字和聚合函数
- Qt之QChar编码(1)
- MyBatis入门基础篇
- 用Python脚本实现FFmpeg批量转换
- 服务器量化训练操作说明
- Jmeter自动化测试工具从入门到进阶6小时搞定.黑马跟学(三).实战篇
- 话不多说,在Linux上完成Python从源码编译安装全流程
- 千万GMV直播间运营训练营
- Java LeetCode刷题 单调栈
- 【Linux系统基础】(1)Linux基础命令全面详解
- ElementUI中修改el-table的滚动条样式
- [反转链表] [合并两个有序链表][分割链表]
- 解决:AttributeError: module ‘scipy.misc’ has no attribute ‘imresize’
- 动态画出300以内的质数曲线图