Python cv-profileface和dlib-mmod_human_face_detector两种方法实现侧脸识别,并用dlib-mmod_human_face_detector实现分割
发布时间:2023年12月27日
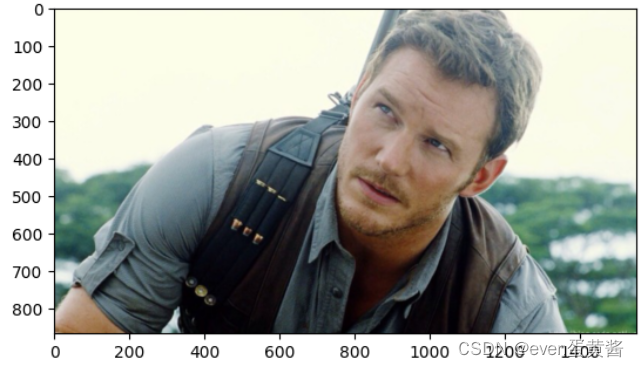
效果
 →
→
上一篇文章无法做到侧脸的识别
cv-profileface可以识别侧脸
# 法1 opencv profileface 准确率不高 参考https://github.com/jb892/FaceDetection-HaarCascade
import cv2
import matplotlib.pyplot as plt
face_detector = cv2.CascadeClassifier('haarcascade_profileface.xml')
img = cv2.imread('2.jpg')
wid = 10
pts = 400
img=cv2.resize(img,(pts,pts))
img1 = cv2.cvtColor(img, cv2.COLOR_BGR2RGB)
face1 = face_detector.detectMultiScale(img1, scaleFactor=1.15,minNeighbors=5,minSize=(34, 35), flags=cv2.CASCADE_SCALE_IMAGE)
print(face1)
for (x, y, w, h) in face1: # 在img1上绘制一个矩形框
    cv2.rectangle(img1, (x-wid, y-wid), (x+w + wid, y+h + wid), (255, 0, 0), 2)
plt.imshow(img1)
dlib-mmod_human_face_detector?侧脸识别准确率更高
# 法2 dlib mmod_human_face_detector
#参考https://blog.csdn.net/hongbin_xu/article/details/78359520
#参考https://blog.csdn.net/LJX_ahut/article/details/124969818
import dlib
import matplotlib.pyplot as plt
# step 1. make sure you have downloaded the correct model file
face_detector_model_path = './mmod_human_face_detector.dat'
# step 2. load this model and create a cnn face detector
face_detector = dlib.cnn_face_detection_model_v1(face_detector_model_path)  # dlib.cnn_face_detection_model_v1
# step 3. read an image using dlib or cv2
# note that the difference between the image data formated as numpy.ndarray read by dlib and cv2 is that dlib read it channels as *R G B* order while cv2 read as *B G R*,so you should do one more step to convert the image if using cv2
image_path = '1.jpg'
img = dlib.load_rgb_image(image_path)
pts = 300
wid = 10
img = cv2.resize(img,(pts,pts))
# img = cv2.imread(image_path)
# img = cv2.cvtColor(img, cv2.COLOR_BGR2RGB)

# step 4. predict and detect
detections = face_detector(img, 1)  # dlib.mmod_rectangles

# step 5. get just one of the rectangle instead all of them ,the type is mmod_rectangle
detection = detections[0]  # dlib.mmod_rectangle
# the mmod_rectangle contains two parts : confidence and rect
print(detection.confidence, detection.rect)

# step 6.get face coordinates for just one as sample
l, t, r, b = detection.rect.left(),detection.rect.top(),detection.rect.right(),detection.rect.bottom()
cv2.rectangle(img, (l-wid, t-wid), (r+wid, b+wid), (255, 0, 0), 2)
plt.imshow(img)
分割
# %%
import cv2
import dlib
import numpy as np
import matplotlib.pyplot as plt
wid = 10
imgname='2'
in_path = imgname+".jpg"
out_path = imgname+'-face.jpg'
face_detector_model_path = './mmod_human_face_detector.dat'
face_detector = dlib.cnn_face_detection_model_v1(face_detector_model_path)  # dlib.cnn_face_detection_model_v1
img = dlib.load_rgb_image(in_path)
plt.imshow(img);

img = cv2.resize(img,dsize=None,fx=2,fy=2)
detections = face_detector(img, 1)  # dlib.mmod_rectangles
detection = detections[0]  # dlib.mmod_rectangle
# print(detection.confidence, detection.rect)
l, t, r, b = detection.rect.left(),detection.rect.top(),detection.rect.right(),detection.rect.bottom()
#获取宽度和高度
height=len(img)
width=len(img[0])
img1=img[t-wid:b+wid,l-wid:r+wid]
height=len(img1)
width=len(img1[0])
print('图片大小%d X %d'%(width,height))
plt.imshow(img1);
cv2.imwrite(out_path, cv2.cvtColor(img1, cv2.COLOR_BGR2RGB))

# %%
文章来源:https://blog.csdn.net/qq_29487479/article/details/135247098
本文来自互联网用户投稿,该文观点仅代表作者本人,不代表本站立场。本站仅提供信息存储空间服务,不拥有所有权,不承担相关法律责任。 如若内容造成侵权/违法违规/事实不符,请联系我的编程经验分享网邮箱:chenni525@qq.com进行投诉反馈,一经查实,立即删除!
本文来自互联网用户投稿,该文观点仅代表作者本人,不代表本站立场。本站仅提供信息存储空间服务,不拥有所有权,不承担相关法律责任。 如若内容造成侵权/违法违规/事实不符,请联系我的编程经验分享网邮箱:chenni525@qq.com进行投诉反馈,一经查实,立即删除!
最新文章
- Python教程
- 深入理解 MySQL 中的 HAVING 关键字和聚合函数
- Qt之QChar编码(1)
- MyBatis入门基础篇
- 用Python脚本实现FFmpeg批量转换
- vue3 setup语法糖写法基本教程
- ChatGPT五大教育潜能与四大教育风险
- 利用Mindspore实现Word2Vec的连续词袋模型(CBOW)和跳词模型(Skip-gram)
- 想在IDEA中调试API?试试这款,堪比postman
- 什么是超融合?
- 探寻爬虫世界01:HTML页面结构
- error: ./build.sh: 行 397: python: 未找到命令
- 如何看待PMP的2024年新考纲?
- 8、优化服务器设置
- 2023年12月青少年机器人技术等级考试(一级)理论综合试卷