UIAlertController简单使用-swift
发布时间:2024年01月15日
UIAlertControlle时IOS的对话框控制器(警报控制器),简单使用方法如下:
步骤都一样,先是创建UIAlertController,然后创建UIAlertAction,再将UIAlertAction添加到UIAlertController中,最后显示对话框。
文本对话框:
		//创建控制器
        let alertController = UIAlertController(title: "Title", message: "Message", preferredStyle: .alert)
        //设置action
        let okAction = UIAlertAction(title: "OK", style: .default){
            (action) in
            print("click OK")
        }
        let cancelAction = UIAlertAction(title: "Cancel", style: .cancel, handler: nil)
        //添加action
        alertController.addAction(okAction)
        alertController.addAction(cancelAction)
        //显示对话框
        present(alertController, animated: true, completion: nil)
效果如图:

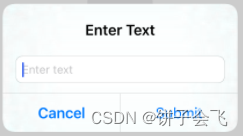
带输入框的对话框
		//创建控制器
        let alertController = UIAlertController(title: "Enter Text", message: nil, preferredStyle: .alert)
        //设置输入框
        alertController.addTextField { (textField) in
            textField.placeholder = "Enter text"
        }
        //设置action
        let cancelAction = UIAlertAction(title: "Cancel", style: .cancel, handler: nil)
        let submitAction = UIAlertAction(title: "Submit", style: .default) { (action) in
            if let text = alertController.textFields?.first?.text {
                print("Entered text: \(text)")
            }
        }
        //添加action
        alertController.addAction(cancelAction)
        alertController.addAction(submitAction)
        //显示对话框
        present(alertController, animated: true, completion: nil)
效果如图:

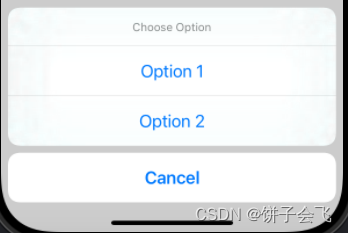
底部选择对话框
注意preferredStyle为.actionSheet
		//创建控制器
        let alertController = UIAlertController(title: "Choose Option", message: nil, preferredStyle: .actionSheet)
        //设置action
        let option1Action = UIAlertAction(title: "Option 1", style: .default) { (action) in
            print("Option 1 selected")
        }
        let option2Action = UIAlertAction(title: "Option 2", style: .default) { (action) in
            print("Option 2 selected")
        }
        let cancelAction = UIAlertAction(title: "Cancel", style: .cancel, handler: nil)
        //添加action
        alertController.addAction(option1Action)
        alertController.addAction(option2Action)
        alertController.addAction(cancelAction)
        //显示对话框
        present(alertController, animated: true, completion: nil)
效果如图:

文章来源:https://blog.csdn.net/butterfly_new/article/details/135594259
本文来自互联网用户投稿,该文观点仅代表作者本人,不代表本站立场。本站仅提供信息存储空间服务,不拥有所有权,不承担相关法律责任。 如若内容造成侵权/违法违规/事实不符,请联系我的编程经验分享网邮箱:chenni525@qq.com进行投诉反馈,一经查实,立即删除!
本文来自互联网用户投稿,该文观点仅代表作者本人,不代表本站立场。本站仅提供信息存储空间服务,不拥有所有权,不承担相关法律责任。 如若内容造成侵权/违法违规/事实不符,请联系我的编程经验分享网邮箱:chenni525@qq.com进行投诉反馈,一经查实,立即删除!
最新文章
- Python教程
- 深入理解 MySQL 中的 HAVING 关键字和聚合函数
- Qt之QChar编码(1)
- MyBatis入门基础篇
- 用Python脚本实现FFmpeg批量转换
- 配置基于数据库的认证信息和角色授权(SpringBoot整合SpringSecurity)
- 20231225使用亿佰特的蓝牙模块dongle协议分析仪E104-2G4U04A抓取BLE广播数据
- pytorch集智-5手写数字识别器-卷积神经网络
- 经典目标检测YOLO系列(一)复现YOLOV1(5)模型的训练及验证
- 浅谈缓存最终一致性的解决方案
- 宝宝洗衣机买几公斤?婴儿专用洗衣机测评
- 链上数据分析:解读加密生态的秘密武器
- RK3568驱动指南|第九篇 设备模型-第101章 总线注册流程理论分析实验
- mp4文件可以转成mp3音频吗
- Java项目:115SSM宿舍管理系统