Linux网络文件共享服务
前言
先前有介绍显示文件前后内容相关内容Linux文件查看编辑与压缩-CSDN博客,这里补充部分命令介绍。
目录
一、显示文件前后内容(补充)
1. tr
1.1 基本功能转换
格式:tr [选项]... SET1 [SET2]
SET 是一组字符串,一般都可按照字面含义理解
[root@localhost ~]# tr 1 a           #出现1转换成a
111
aaa
[root@localhost ~]# tr [a-z] [A-Z]   #出现小写字母转换成大写字母
aaa
AAA
[root@localhost ~]# tr 123456 abc
123456789
abcccc789                            #最后一个一直用
1.2 压缩
格式:tr -s SET,将连续的字符压缩
[root@localhost ~]# tr -s a.txt
aaa                               #连续的字符
a                                 #压缩后的结果
1.3 删除
格式:tr -d SET,遇到字符删除
[root@localhost ~]# tr -d abc
12a34bc
1234
2. cut
提取文本文件数据的指定列
格式:cut [选项]... [文件]...
选项:
-d:DELIMITER: 指明分隔符,默认tab
-f:想要获取的字段
? ? ?#: 第#个字段,例如 3
?????#,#[,#]:离散的多个字段,例如 1,3,6
?????#-#:连续的多个字段, 例如 1-6
?????混合使用:1-3,7
-c:取字符
[root@localhost ~]# cut -d: -f1,3 /etc/passwd | head -3
#以冒号作为分隔的条件,取文件的第一列和第三列
root:0
bin:1
daemon:2

[root@localhost ~]# df
文件系统                   1K-块    已用     可用 已用% 挂载点
/dev/mapper/centos-root 52403200 3399128 49004072    7% /
devtmpfs                  917604       0   917604    0% /dev
tmpfs                     933524       0   933524    0% /dev/shm
tmpfs                     933524    9216   924308    1% /run
tmpfs                     933524       0   933524    0% /sys/fs/cgroup
/dev/sda1                5232640  182372  5050268    4% /boot
tmpfs                     186708      12   186696    1% /run/user/42
tmpfs                     186708       0   186708    0% /run/user/0
[root@localhost ~]# df | tr -s " " | grep sda | cut -d" " -f5 | tr -d %
4
#查看磁盘剩余量 | 遇到空格压缩 | 筛选含sda行 | 指定空格为分隔符,取文件第五列 | 遇到%删除

[root@localhost ~]# df | tail -n +2 | cut -c54 #使用字符取字段,-c 取当前字符的字段
7
0
0
……
3. sort
默认不是以数字排序,以第一个字符排序
选项:
-r:执行反方向(由上至下)整理
-R:随机排序
-n:执行按数字大小整理
-h:人类可读排序,如: 2K 1G?
-f:选项忽略(fold)字符串中的字符大小写
-u:选项(独特,unique),合并重复项,即去重
-t:指定分隔符
-k:指定列
[root@localhost ~]# cat a.txt
192.168.190.100
192.168.190.100
192.168.190.101
172.19.8.100
172.19.8.100
192.168.190.100
[root@localhost ~]# sort -nr a.txt   #以数字大小倒叙排列
192.168.190.101
192.168.190.100
192.168.190.100
192.168.190.100
172.19.8.100
172.19.8.100
4. uniq
去重,压缩连续字符
选项:
-c: 显示每行重复出现的次数
-d: 仅显示重复过的行
-u: 仅显示不曾重复的行
uniq常和sort 命令一起配合使用
[root@localhost ~]# cat a.txt
192.168.190.100
192.168.190.100
192.168.190.101
172.19.8.100
172.19.8.100
192.168.190.100
[root@localhost ~]# sort -n a.txt | uniq -c | sort -r  #倒序排列出现相同ip的次数
      3 192.168.190.100
      2 172.19.8.100
      1 192.168.190.101
二、网络文件共享
1. 存储类型
- 直连式存储:Direct-Attached Storage,简称DAS
- 存储区域网络:Storage Area Network,简称SAN(可以使用空间,管理也是你来管理)
- 网络附加存储:Network-Attached Storage,简称NAS(存储和管理空间都在远程)
区别:
| DAS | NAS | SAN | |
| 传输类型 | SCSI、FC | IP | IP、FC、SAS |
| 数据类型 | 数据块 | 文件 | 数据块 |
| 典型应用 | 任何 | 文件服务器 | 数据库应用 |
| 优点 | 磁盘与服务器分离,便于统一管理 | 不占用应用服务器资源 广泛支持报作系统 扩展较容易 即插即用,安装简单方便 | 高扩展性 高可用性 数据集中,易管理 |
| 缺点 | 连接距离短 数据分散,共享困难存储间利用率不高扩展性有限 | 不适合存储量大的块级应用数据备份及恢复占用网络带宽 | 相比NAS成本较高安装和升级比NAS复杂 |
应用场景:
- DAS虽然比较古老了,但是还是很适用于那些数据量不大,对磁盘访问速度要求较高的中小企业
- NAS多适用于文件服务器,用来存储非结构化数据,虽然受限于以太网的速度,但是部署灵活,成本低
- SAN则适用于大型应用或数据库系统,缺点是成本高、较为复杂
2.?FTP 文件传输协议
2.1 工作原理
FTP(File Transfer Protocol)是一种用于在网络上进行文件传输的协议。它是一个客户端-服务器协议,客户端通过FTP客户端软件连接到FTP服务器,然后通过FTP协议进行文件传输。
FTP工作原理如下:?
- 客户端向FTP服务器发送连接请求。
- 服务器接受连接请求,并向客户端发送连接成功的响应。
- 客户端通过FTP命令向服务器发送请求,比如列出目录、上传文件、下载文件等。
- 服务器接收到请求后,执行相应的操作,并返回响应给客户端。
- 客户端接收到响应后,根据响应执行相应的操作,比如显示目录列表、下载文件等。
- 当传输文件时,客户端和服务器之间通过FTP协议建立数据连接,进行文件传输。
- 文件传输完成后,关闭数据连接,终止FTP会话。
FTP使用两个端口进行通信,一个是控制端口(默认端口号为21),用于建立FTP连接、发送FTP命令和接收FTP响应;另一个是数据端口,用于传输文件。数据端口可以是FTP服务器的任意端口,也可以是客户端的任意端口,具体取决于FTP服务器和客户端的配置。需要注意的是,FTP协议是明文传输,不安全,容易被窃听和篡改。因此,在传输敏感信息时,建议使用加密的FTP协议,比如SFTP(Secure File Transfer Protocol)或FTP over SSL/TLS 。
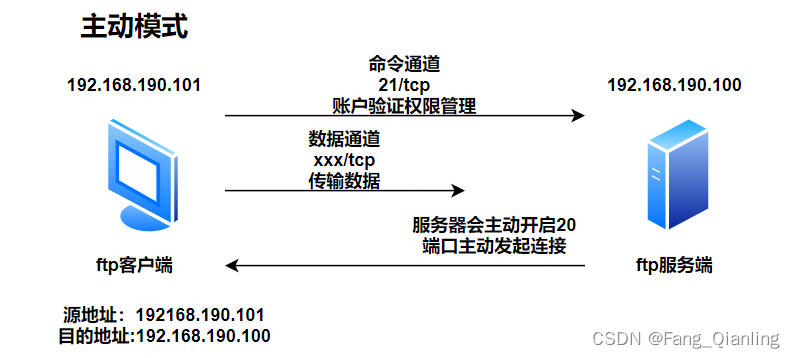
两种模式:从服务器角度
-
主动(PORT style):服务器主动连接客户端
命令(控制):客户端:随机port ---> 服务器:21/tcp
数据:客户端:随机port <---服务器:20/tcp
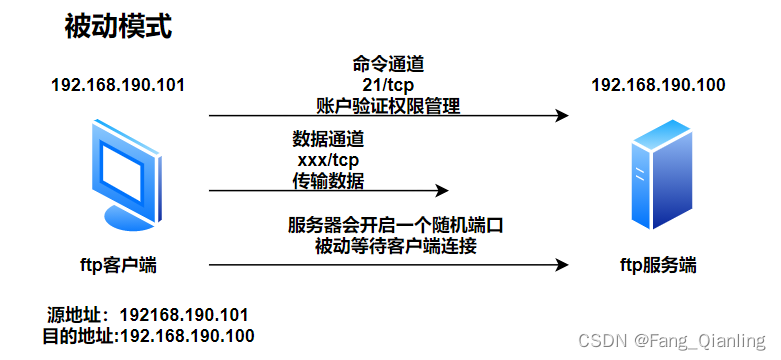
-
被动(PASV style):服务器被动等待客户端连接
命令(控制):客户端:随机port ---> 服务器:21/tcp
数据:客户端:随机port ---> 服务器:随机port /tcp
图示:
用户认证:
- 匿名用户:ftp,anonymous,对应Linux用户ftp root
- 系统用户:Linux用户,用户/etc/passwd,密码/etc/shadow
- 虚拟用户:特定服务的专用用户,独立的用户/密码文件
FTP服务状态码:
- 1XX:信息 125:数据连接打开
- 2XX:成功类状态 200:命令OK ????230:登录成功
- 3XX:补充类 ????331:用户名OK
- 4XX:客户端错误 425:不能打开数据连接
- 5XX:服务器错误 530:不能登录
2.2?vsftpd 软件介绍
vsftpd(Very Secure FTP Daemon)是一个开源的FTP服务器软件,被广泛用于Linux和Unix系统中。它以安全性和性能为重点设计,是一个轻量级、稳定可靠的FTP服务器软件。
用户认证配置文件:/etc/pam.d/vsftpd ;配置文件:/etc/vsftpd/vsftpd.conf?
2.2.1?服务端修改默认命令端口号 ?
服务端:?
[root@localhost ~]# systemctl stop firewalld.service
[root@localhost ~]# setenforce 0
[root@localhost ~]# yum install -y vsftpd
[root@localhost ~]# rpm -qc vsftpd
/etc/logrotate.d/vsftpd
/etc/pam.d/vsftpd
/etc/vsftpd/ftpusers
/etc/vsftpd/user_list
/etc/vsftpd/vsftpd.conf
[root@localhost ~]# vim /etc/vsftpd/vsftpd.conf
129 listen_port=888              #默认命令端口号为21,随便一行插入自定义端口号
[root@localhost ~]# systemctl restart vsftp
[root@localhost ~]# ss  -ntl | grep 888
LISTEN     0      32          :::888                     :::*
客户端:?
[root@localhost ~]# systemctl stop firewalld.service
[root@localhost ~]# setenforce 0
[root@localhost ~]# yum install -y ftp
[root@localhost ~]# ftp 192.168.190.100 888           #连接时需要指明端口号
Connected to 192.168.190.100 (192.168.190.100).
220 (vsFTPd 3.0.2)
Name (192.168.190.100:root): ftp
331 Please specify the password.
Password:
230 Login successful.
Remote system type is UNIX.
Using binary mode to transfer files.
ftp> quit                                             #退出,或者ctrl+d
221 Goodbye.
[root@localhost ~]# ss -nt
State       Recv-Q Send-Q           Local Address:Port                          Peer Address:Port
ESTAB       0      0              192.168.190.101:37842                      192.168.190.100:888
ESTAB       0      36             192.168.190.101:22                           192.168.190.1:8642
2.2.2 主动模式端口
[root@localhost ~]# vim /etc/vsftpd/vsftpd.conf
43 connect_from_port_20=YES
ftp_data_port=20 (默认)指定主动模式的端口,随便插入一行
2.2.3 被动模式端口
pasv_min_port=6000 ? 0为随机分配,端口范围会影响客户端的并发数
pasv_max_port=6010
2.2.4?使用当地时间
use_localtime=YES 使用当地时间(默认为NO,使用GMT)
格林威治比我们慢8小时
2.2.5?匿名用户登录
anonymous_enable=YES 支持匿名用户,CentOS8 默认不允许匿名
no_anon_password=YES 匿名用户略过口令检查,默认NO
服务端:
[root@localhost ~]# vim /etc/vsftpd/vsftpd.conf
129 no_anon_password=YES
[root@localhost ~]# systemctl restart vsftpd

客户端:
[root@localhost ~]# ftp 192.168.190.100
Connected to 192.168.190.100 (192.168.190.100).
220 (vsFTPd 3.0.2)
Name (192.168.190.100:root): ftp
230 Login successful.                     #无需输入密码
Remote system type is UNIX.
Using binary mode to transfer files.
ftp> 221 Goodbye.
2.2.6?匿名用户上传
服务端:?
[root@localhost ~]# vim /etc/vsftpd/vsftpd.conf
29 anon_upload_enable=YES
33 anon_mkdir_write_enable=YES
[root@localhost ~]# cd /var/ftp
[root@localhost ftp]# ls
pub
[root@localhost ftp]# setfacl -m u:ftp:rwx /var/ftp/pub/
[root@localhost ftp]# getfacl pub/
# file: pub/
# owner: root
# group: root
user::rwx
user:ftp:rwx
group::r-x
mask::rwx
other::r-x
[root@localhost ftp]# systemctl restart vsftpd
客户端:
[root@localhost ~]# ftp 192.168.190.100
Connected to 192.168.190.100 (192.168.190.100).
220 (vsFTPd 3.0.2)
Name (192.168.190.100:root): ftp
331 Please specify the password.
Password:
230 Login successful.
Remote system type is UNIX.
Using binary mode to transfer files.
ftp> cd pub
250 Directory successfully changed.
ftp> mkdir test
257 "/pub/test" created
ftp> ls
227 Entering Passive Mode (192,168,190,100,145,76).
150 Here comes the directory listing.
drwx------    2 14       50              6 Jan 15 10:42 test
226 Directory send OK.
ftp> put anaconda-ks.cfg
local: anaconda-ks.cfg remote: anaconda-ks.cfg
227 Entering Passive Mode (192,168,190,100,52,138).
150 Ok to send data.
226 Transfer complete.
2037 bytes sent in 0.00101 secs (2014.84 Kbytes/sec)
ftp> ls
227 Entering Passive Mode (192,168,190,100,216,232).
150 Here comes the directory listing.
-rw-------    1 14       50           2037 Jan 15 10:42 anaconda-ks.cfg
drwx------    2 14       50              6 Jan 15 10:42 test
2.2.7?匿名用户下载删除文件
服务端:?
[root@localhost ~]# vim /etc/vsftpd/vsftpd.conf
129 anon_world_readable_only=NO     #只能下载全部读的文件, 默认YES
130 anon_umask=0333                 #指定匿名上传文件的umask,默认0077,注意:0333中的0不能省略
131 anon_other_write_enable=YES     #可删除和修改上传的文件,默认NO
[root@localhost ~]# systemctl restart vsftpd
[root@localhost ftp]# cd /var/ftp/pub/
[root@localhost pub]# touch 2.txt
?客户端:
[root@localhost ~]# touch 1.txt
[root@localhost ~]# ftp 192.168.190.100
Connected to 192.168.190.100 (192.168.190.100).
220 (vsFTPd 3.0.2)
Name (192.168.190.100:root): ftp
331 Please specify the password.
Password:
230 Login successful.
Remote system type is UNIX.
Using binary mode to transfer files.
ftp> cd pub
250 Directory successfully changed.
ftp> ls
227 Entering Passive Mode (192,168,190,100,88,124).
150 Here comes the directory listing.
-rw-r--r--    1 0        0               0 Jan 15 11:19 2.txt
226 Directory send OK.
ftp> put 1.txt
local: 1.txt remote: 1.txt
227 Entering Passive Mode (192,168,190,100,122,255).
150 Ok to send data.
226 Transfer complete.
ftp> ls
227 Entering Passive Mode (192,168,190,100,229,60).
150 Here comes the directory listing.
-r--r--r--    1 14       50              0 Jan 15 11:24 1.txt
-rw-r--r--    1 0        0               0 Jan 15 11:19 2.txt
226 Directory send OK.
ftp> delete 1.txt                          #删除1.txt
250 Delete operation successful.
ftp> get 2.txt                             #下载2.txt
local: 2.txt remote: 2.txt
227 Entering Passive Mode (192,168,190,100,170,233).
150 Opening BINARY mode data connection for 2.txt (0 bytes).
226 Transfer complete.
ftp> 221 Goodbye.
[root@localhost ~]# ls
1.txt  2.txt                               #获得下载文件2.txt
2.2.8 指定匿名用户的上传文件的默认的所有者和权限
匿名用户上传文件默认的所有者是ftp用户是可以修改的
客户端:
[root@localhost pub]# ll
总用量 0
-r--r--r--. 1 ftp  ftp  0 1月  15 19:28 1.txt  #默认上传的匿名用户为ftp
[root@localhost pub]# vim /etc/vsftpd/vsftpd.conf
48 chown_uploads=YES
50 chown_username=fql
133 chown_upload_mode=0644
[root@localhost pub]# systemctl restart vsftpd

服务端:
ftp> put 1.txt                                 #匿名用户上传1.txt
local: 1.txt remote: 1.txt
227 Entering Passive Mode (192,168,190,100,109,47).
150 Ok to send data.
226 Transfer complete.

客户端:
[root@localhost pub]# ll
总用量 0
-rw-r--r--. 1 fql  ftp  0 1月  15 19:34 1.txt  #匿名用户上传文件默认的所有者已改为fql用户
2.2.9?Linux系统用户
系统用户登录:使用普通用户登录默认是在系统用户的家目录
服务端:
[root@localhost pub]# vim /etc/vsftpd/vsftpd.conf
16 local_enable=YES         #否允许linux用户登录
19 write_enable=YES         #允许linux用户上传文件
23 local_umask=022          #指定系统用户上传文件的默认权限对应umask
以上均为默认配置

客户端:
[root@localhost ~]# ftp 192.168.190.100
Connected to 192.168.190.100 (192.168.190.100).
220 (vsFTPd 3.0.2)
Name (192.168.190.100:root): fql
331 Please specify the password.
Password:
230 Login successful.
Remote system type is UNIX.
Using binary mode to transfer files.
ftp> pwd
257 "/home/fql"
2.2.10 将所有系统用户映射为指定的guest用户
控制系统用户等信息:
服务端:
[root@localhost ~]# vim /etc/vsftpd/vsftpd.conf
135 guest_enable=YES
136 guest_username=ftp
[root@localhost ~]# systemctl restart vsftpd

客户端:
[root@localhost ~]# ftp 192.168.190.100
Connected to 192.168.190.100 (192.168.190.100).
220 (vsFTPd 3.0.2)
Name (192.168.190.100:root): fql
331 Please specify the password.
Password:
230 Login successful.
Remote system type is UNIX.
Using binary mode to transfer files.
ftp> pwd
257 "/"                                    #系统用户映射成guest用户
ftp> ls
227 Entering Passive Mode (192,168,190,100,93,190).
150 Here comes the directory listing.
drwxrwxr-x    2 0        0              32 Jan 15 11:34 pub
226 Directory send OK.
让每个用户拥有独有配置:
服务端:
root@localhost ~]# vim /etc/vsftpd/vsftpd.conf
137 user_config_dir=/etc/vsftpd/conf.d/             #可以自由指定
[root@localhost ~]# mkdir -p /etc/vsftpd/conf.d     #针对fql用户建立好配置文件夹
[root@localhost ~]# vim /etc/vsftpd/conf.d/fql      #编写子配置文件
[root@localhost ~]# mkdir -p /data/fql
[root@localhost ~]# #touch  /data/fql/f.txt
[root@localhost ~]# systemctl restart vsftpd

客户端:
[root@localhost ~]# ftp 192.168.190.100
Connected to 192.168.190.100 (192.168.190.100).
220 (vsFTPd 3.0.2)
Name (192.168.190.100:root): fql
331 Please specify the password.
Password:
230 Login successful.
Remote system type is UNIX.
Using binary mode to transfer files.
ftp> pwd
257 "/data/fql"                                     #再次登录就存放固定路径
2.2.11?禁锢系统用户
[root@localhost ~]# vim /etc/vsftpd/vsftpd.conf
103 chroot_local_user=YES
104 chroot_list_enable=YES
#当chroot_local_user=YES和chroot_list_enable=YES时,则chroot_list中用户不禁锢,即白名单,在文件里的不禁锢
#当chroot_local_user=NO和chroot_list_enable=YES时, 则chroot_list中用户禁锢,即黑名单,在文件里的禁锢
106 chroot_list_file=/etc/vsftpd/chroot_list
[root@localhost ~]# vim /etc/vsftpd/chroot_list
#fql                                               #如果添加了即为白名单,这个不添加
[root@localhost home]# chmod 555 fql
[root@localhost home]# ll
总用量 0
dr-xr-xr-x. 3 fql fql 78 1月   9 21:31 fql         #给文件夹添加执行权限


客户端:
[root@localhost ~]# ftp 192.168.190.100
Connected to 192.168.190.100 (192.168.190.100).
220 (vsFTPd 3.0.2)
Name (192.168.190.100:root): fql
331 Please specify the password.
Password:
230 Login successful.
Remote system type is UNIX.
Using binary mode to transfer files.
ftp> pwd
257 "/"                  #禁锢后会将fql用户的家目录作为根,默认ftp服务的加目录是不能有写权限
2.2.12 pam模块实现用户访问
[root@localhost ~]# vim /etc/pam.d/vsftpd
#将sense=deny默认是deny 修改为 sense=allow
auth ? ? ? required ? ? pam_listfile.so item=user sense=allow  file=/etc/vsftpd/ftpusers
#allow代表白名单,deny代表黑名单
服务端:
[root@localhost ~]# cat /etc/vsftpd/ftpusers
# Users that are not allowed to login via ftp
root                                              #sense=allow,已允许
[root@localhost ~]# vim /etc/vsftpd/user_list
7 #root                                           #注释掉否则无法登录
[root@localhost ~]# systemctl restart vsftpd

客户端:
[root@localhost ~]# ftp 192.168.190.100
Connected to 192.168.190.100 (192.168.190.100).
220 (vsFTPd 3.0.2)
Name (192.168.190.100:root): fql
331 Please specify the password.
Password:
530 Login incorrect.                              #不在白名单中,拒绝登录
Login failed.
ftp> 221 Goodbye.
[root@localhost ~]# ftp 192.168.190.100
Connected to 192.168.190.100 (192.168.190.100).
220 (vsFTPd 3.0.2)
Name (192.168.190.100:root): root
331 Please specify the password.
Password:
230 Login successful.                             #在白名单中,可以登录
Remote system type is UNIX.
Using binary mode to transfer files.
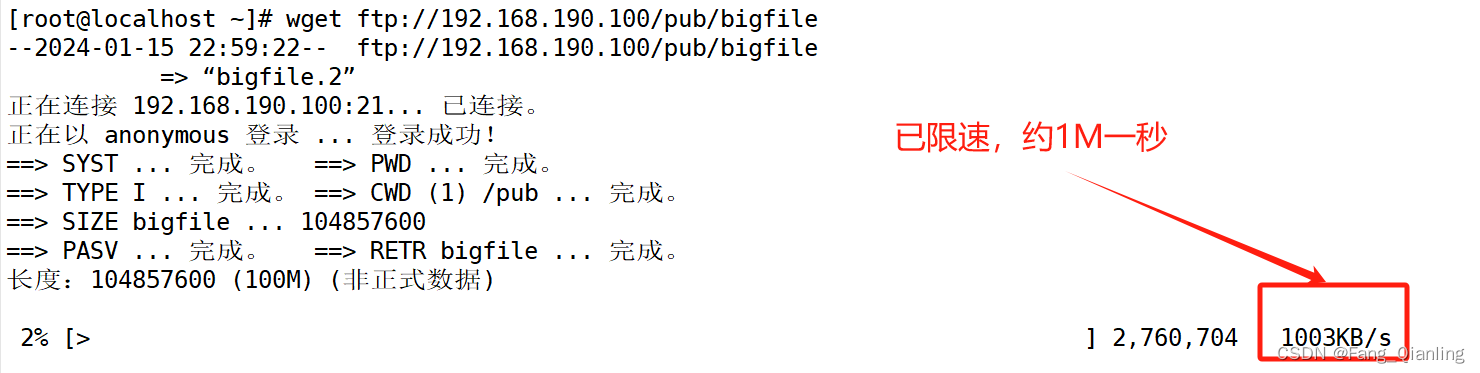
2.2.13?匿名用户的最大传输速率限制
服务器:?
[root@localhost ~]# vim /etc/vsftpd/vsftpd.conf
129 anon_max_rate=1024000
130 local_max_rate=102400                         #限速
[root@localhost ~]# systemctl restart vsftpd
[root@localhost ~]# dd if=/dev/zero of=/var/ftp/pub/bigfile bs=1M count=100
记录了100+0 的读入
记录了100+0 的写出
104857600字节(105 MB)已复制,0.144648 秒,725 MB/秒
客户端测试下载:?
3. 通过ftp服务搭建内网yum仓库?
服务端:
[root@localhost ~]# systemctl stop firewalld.service
[root@localhost ~]# setenforce 0
[root@localhost ~]# yum install -y vsftpd
[root@localhost ~]# systemctl start vsftpd
[root@localhost ~]# mkdir /var/ftp/centos7
[root@localhost ~]# mount /dev/sr0 /var/ftp/centos7
mount: /dev/sr0 写保护,将以只读方式挂载

客户端:
[root@localhost ~]# systemctl stop firewalld.service
[root@localhost ~]# setenforce 0
[root@localhost ~]# cd /etc/yum.repos.d/
[root@localhost yum.repos.d]# mkdir bak
[root@localhost yum.repos.d]# mv *.repo bak
[root@localhost yum.repos.d]# vim ftp.repo
[ftp]
name=ftp
baseurl=ftp://192.168.190.100/centos7
gpgcheck=0
[root@localhost yum.repos.d]# yum clean all
[root@localhost yum.repos.d]# yum makecache
[root@localhost yum.repos.d]# yum install -y tree
[root@localhost yum.repos.d]# yum repolist
已加载插件:fastestmirror, langpacks
Loading mirror speeds from cached hostfile
源标识                                                 源名称                                               状态
ftp                                                    ftp                                                  3,894
repolist: 3,894
4. 通过http协议搭建内网yum仓库?
服务端:
[root@localhost ~]# systemctl stop firewalld.service
[root@localhost ~]# setenforce 0
[root@localhost ~]# yum install -y httpd
[root@localhost ~]# systemctl start httpd
[root@localhost ~]# ss -natp | grep 80
LISTEN     0      128         :::80                      :::*                   users:(("httpd",pid=2324,fd=4),("httpd",pid=2323,fd=4),("httpd",pid=2322,fd=4),("httpd",pid=2321,fd=4),("httpd",pid=2320,fd=4),("httpd",pid=2317,fd=4))
[root@localhost ~]# cd /var/www/html
[root@localhost html]# mkdir centos7
[root@localhost html]# mount /dev/sr0 /var/www/html/centos7
mount: /dev/sr0 写保护,将以只读方式挂载

客户端:
客户端:
[root@localhost ~]# systemctl stop firewalld.service
[root@localhost ~]# setenforce 0
[root@localhost ~]# cd /etc/yum.repos.d/
[root@localhost yum.repos.d]# mv ftp.repo http.repo
[root@localhost yum.repos.d]# vim http.repo
[http]
name=http
baseurl=http://192.168.190.100/centos7
gpgcheck=0
[root@localhost yum.repos.d]# yum clean all
[root@localhost yum.repos.d]# yum makecache
[root@localhost yum.repos.d]# yum install -y tree
已加载插件:fastestmirror, langpacks
Loading mirror speeds from cached hostfile
源标识                                                 源名称                                               状态
http                                                   http                                                 3,894
repolist: 3,894

本文来自互联网用户投稿,该文观点仅代表作者本人,不代表本站立场。本站仅提供信息存储空间服务,不拥有所有权,不承担相关法律责任。 如若内容造成侵权/违法违规/事实不符,请联系我的编程经验分享网邮箱:chenni525@qq.com进行投诉反馈,一经查实,立即删除!
- Python教程
- 深入理解 MySQL 中的 HAVING 关键字和聚合函数
- Qt之QChar编码(1)
- MyBatis入门基础篇
- 用Python脚本实现FFmpeg批量转换
- Glide加载不出图片与请求浏览器资源时中文转码问题
- 众和策略证券开户首选:交易规则和开通条件解析!
- 面试题总结-分布式总结
- 容器化奇迹:打开创新之门,加速业务发展的秘密武器
- 第二百一十六回 分享一种更新页面数据的方法
- Qt 国产嵌入式操作系统实现文字转语音功能(TTS)
- 管道应力分析时,弯头上如何模拟支吊架?
- maven 配置http私服Since Maven 3.8.1 http repositories are blocked. 报错处理
- Redis雪崩效应是什么?
- CSS复合选择器(在基础选择器上元素选择的方式不同)