ArgoCD
发布时间:2023年12月26日

一. ArgoCD
- UI界面还不是很完善, 很多依赖于命令行, 都是无状态应用
argocd多集群部署不能在一个Application内选择多个部署集群,只能通过建立多个相同Application对应不同部署目的集群方式- 支持
kustomize, helm, yaml, 一定要部署企业版(ha版)
(一). 概述
1. 组件介绍
-
Argo CD 主要有三个组件:
API Server、Repository Server和Application Controller -
applicationset-controller
- 持续监听应用的实时运行状态并与Git仓库中声明的期望状态进行对比,如果有不一致的状态,会根据用户设置的同步策略决定是否自动修复应用,它检测
OutOfSync应用程序状态并有选择地采取纠正措施。它负责为生命周期事件(PreSync、Sync、PostSync)调用任何用户定义的 hooks
- 持续监听应用的实时运行状态并与Git仓库中声明的期望状态进行对比,如果有不一致的状态,会根据用户设置的同步策略决定是否自动修复应用,它检测
-
repo-server
- 负责维护从Git仓库中拉取的应用编排文件的本地缓存
-
Repository Server
- 是一个内部服务,它负责保存应用程序 Git 仓库的本地缓存,并负责生成和返回可供 Kubernetes 使用的
manifests
- 是一个内部服务,它负责保存应用程序 Git 仓库的本地缓存,并负责生成和返回可供 Kubernetes 使用的
-
dex-server
[bash-4.2] # kubectl  -n argocd get deploy
NAME                               READY   UP-TO-DATE   AVAILABLE   AGE
argocd-applicationset-controller   1/1     1            1           17d
argocd-dex-server                  1/1     1            1           17d
argocd-notifications-controller    1/1     1            1           17d
argocd-redis                       1/1     1            1           17d
argocd-repo-server                 1/1     1            1           17d
argocd-server                      1/1     1            1           17d
gitlab                             1/1     1            1           14d
jenkins-master                     1/1     1            1           4d3h
postgresql                         1/1     1            1           14d
redis                              1/1     1            1           14d
(二). 部署和使用
1. 部署及使用
- Kubernetes 1.24 上的 Argo CD 2.4.3
- Kubernetes 1.23 上的 Argo CD 2.4.3
- Kubernetes 1.22 上的 Argo CD 2.4.3
- Kubernetes 1.24 上的 Argo CD 2.3.5
- Kubernetes 1.23 上的 Argo CD 2.3.5
- Kubernetes 1.22 上的 Argo CD 2.3.5
- 默认比 k8s 高一个版本 更合适
### 这个是集群版本, 至少需要2个节点
# 提前准备镜像,deploy会更快
kubectl create namespace argocd
kubectl apply -n argocd -f https://github.com/argoproj/argo-cd/blob/master/manifests/ha/install.yaml

# 选择版本安装
kubectl create namespace argocd
kubectl apply -n argocd -f https://raw.githubusercontent.com/argoproj/argo-cd/v2.4.14/manifests/ha/install.yaml

# 修改后浏览器访问
kubectl patch svc argocd-server -n argocd -p '{"spec": {"type": "NodePort"}}'

# 默认账号是admin,初始密码查看
kubectl -n argocd get secret argocd-initial-admin-secret -o jsonpath="{.data.password}" | base64 -d; echo

#
[root@master-1 ~]# kubectl  -n argocd get svc argocd-server
NAME            TYPE       CLUSTER-IP     EXTERNAL-IP   PORT(S)                      AGE
argocd-server   NodePort   10.104.81.83   <none>        80:31556/TCP,443:32680/TCP   16h

# 浏览器登录,可以搞个ingres来域名登录
{master ip}:31556
ArgoCD单机版, 其他一样
kubectl apply -n argocd -f https://github.com/argoproj/argo-cd/blob/v2.4.14/manifests/install.yaml

- 使用
yaml的形式来进行CD操作, 回滚,日志, yaml编辑, event等等
# 可以从在集群中查到我们页面上创建的app,简写为app
kubectl  -n argocd get applications
NAME         SYNC STATUS   HEALTH STATUS
nginx-demo   Synced        Healthy

# 最简单Application yaml
apiVersion: argoproj.io/v1alpha1
kind: Application
metadata:
  name: nginx										# deployment名字
  namespace: argocd
spec:
  destination:
    namespace: sopkl								# 部署到哪个namespace
    server: https://kubernetes.default.svc			# 集群apiserver
  project: nginx-demo								# 项目名
  source:
    path: nginx-demo								# yaml所在的相对目录
    repoURL: http://192.168.100.12/root/sokpl.git	# 仓库地址
    targetRevision: HEAD							# 分支信息
# Application其他配置
apiVersion: argoproj.io/v1alpha1
kind: Application
metadata:
  name: guestbook
  namespace: argocd
  finalizers:
    - resources-finalizer.argocd.argoproj.io
  labels:
    name: guestbook
spec:
  project: default
  source:
    helm:
      parameters:
      - name: "nginx-ingress.controller.service.annotations.external-dns\\.alpha\\.kubernetes\\.io/hostname"
        value: mydomain.example.com
      - name: "ingress.annotations.kubernetes\\.io/tls-acme"
        value: "true"
      fileParameters:
      - name: config
        path: files/config.json
      releaseName: guestbook
      valueFiles:
      - values-prod.yaml
      values: |
        ingress:
          enabled: true
          path: /
          hosts:
            - mydomain.example.com
          annotations:
            kubernetes.io/ingress.class: nginx
            kubernetes.io/tls-acme: "true"
          labels: {}
          tls:
            - secretName: mydomain-tls
              hosts:
                - mydomain.example.com
      version: v2
    kustomize:
      version: v3.5.4
      namePrefix: prod-
      images:
      - gcr.io/heptio-images/ks-guestbook-demo:0.2
    directory:
      recurse: true
      jsonnet:
        extVars:
        - name: foo
          value: bar
        - code: true
          name: baz
          value: "true"
        tlas:
        - code: false
          name: foo
          value: bar
      exclude: string
      include: string
    plugin:
      name: mypluginname
      env:
        - name: FOO
          value: bar
  destination:
    server: https://kubernetes.default.svc
    namespace: guestbook
  syncPolicy:
    retry:
      backoff:
  ignoreDifferences:
  - group: apps
    kind: Deployment
    jsonPointers:
    - /spec/replicas
  - group: "*"
    kind: "*"
    managedFieldsManagers:
    - kube-controller-manager
2. ArgoCD CLI
VERSION=$(curl --silent "https://api.github.com/repos/argoproj/argo-cd/releases/latest" | grep '"tag_name"' | sed -E 's/.*"([^"]+)".*/\1/')
curl -sSL -o /usr/local/bin/argocd https://github.com/argoproj/argo-cd/releases/download/$VERSION/argocd-linux-amd64
chmod +x /usr/local/bin/argocd

# 或者在部署完argoCD后,点击页面本地下载
wget --no-check-certificate https://192.168.100.55:31556/download/argocd-linux-amd64

# 登录
argocd login 192.168.100.55:31556

# 修改admin用户密码
argocd account update-password

# 查看用户列表,需要登录才能查看到
argocd account list

# 存储库
argocd repocreds list

# 证书 ssh
argocd cert list

# 列出app
argocd app list
argocd app get ${app_name}

# 查看版本
argocd version

# argocd 默认是关闭了进入终端的设置,进入终端, 加入权限,然后configmap中开启
# 第一步, 配置clusterrole权限
kubectl edit clusterrole argocd-server

- apiGroups:
  resources:
  - pods/exec
  verbs:
  - create

# 第二步 configmap中设置开启
kubectl -n argocd edit cm argocd-cm

data:
  exec.enabled: "true"
3. Role + RBAC
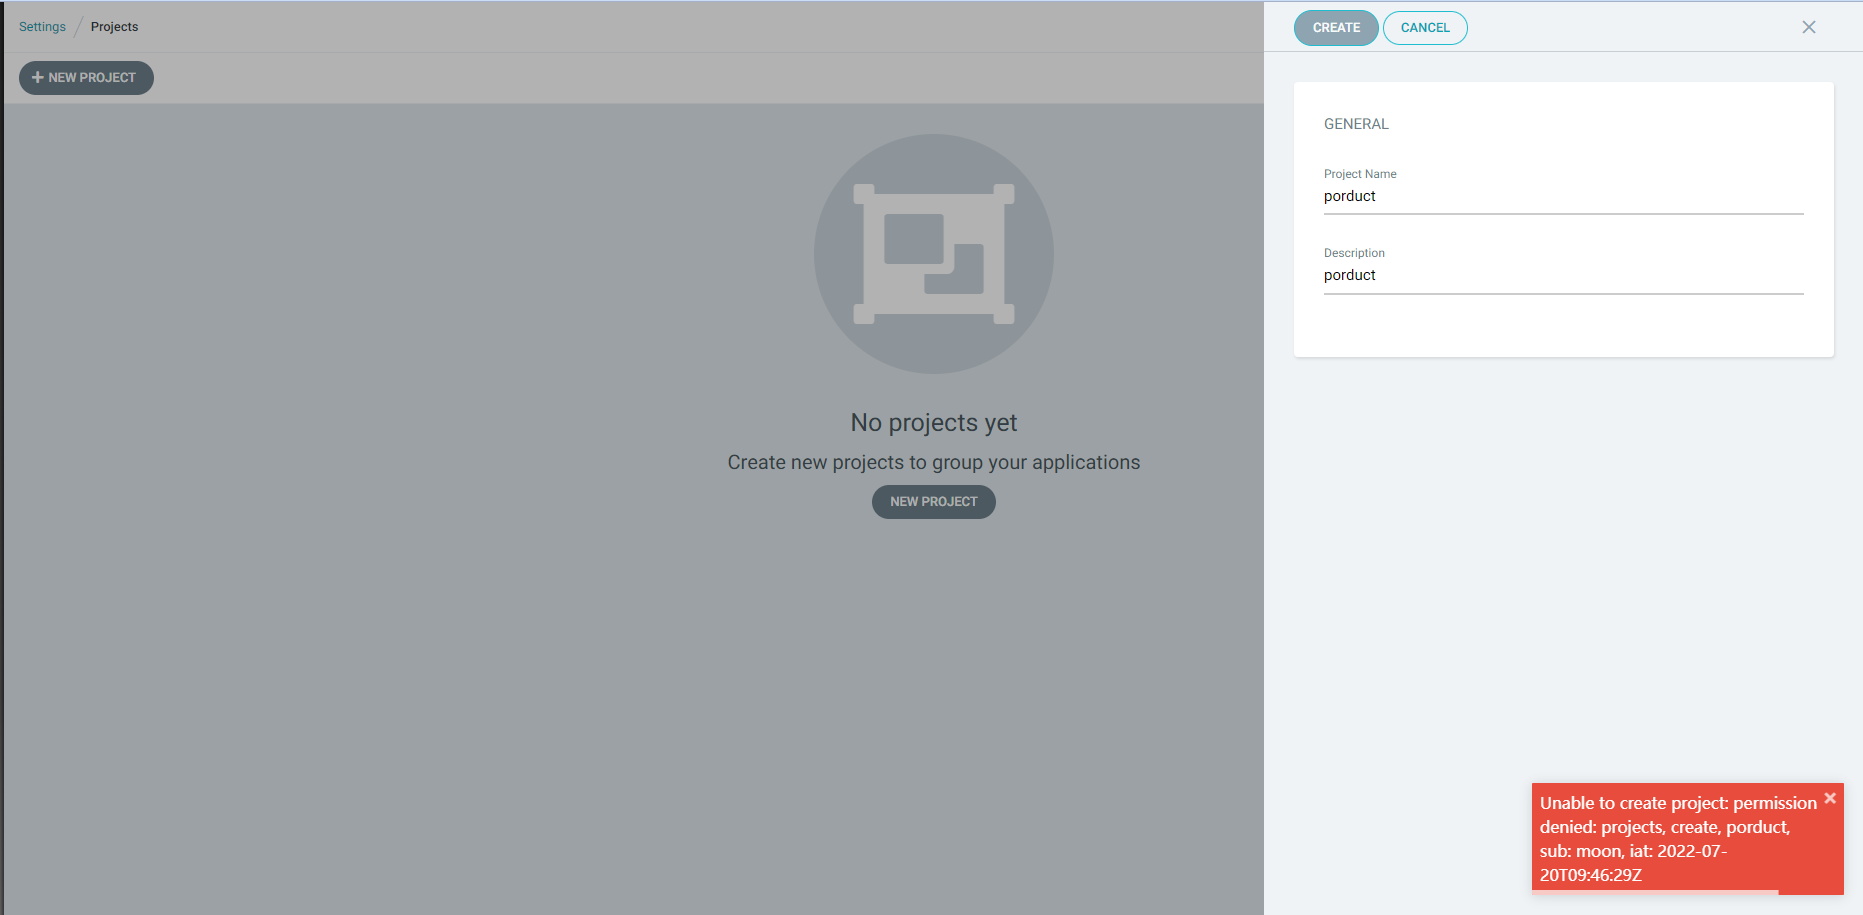
- 新建用户目前UI界面上没找到接口, 只能通过修改
configmap来添加用户 - 用户可以创建多个, 但是配置用户需要使用admin用户
Argo CD没有自己的用户管理系统, 是通过RBAC来限制对Argo CD资源的访问
| 功能 | 描述 |
|---|---|
| apiKey | 允许为API访问生成身份验证令牌, 默认admin用户不支持 |
| login | 允许使用UI界面登录 |
# 创建三个新用户,sit-8800,sopkl,lookonly
apiVersion: v1
kind: ConfigMap
metadata:
  name: argocd-cm
  namespace: argocd
  labels:
    app.kubernetes.io/name: argocd-cm
    app.kubernetes.io/part-of: argocd
data:
  accounts.lookonly: apiKey, login
  accounts.sopkl: apiKey, login
  accounts.dev: apiKey, login
  accounts.sit-8800: apiKey, login
  # admin.enabled: "false"		# 禁用管理员用户
  exec.enabled: "true"			# 开启进入容器终端的功能,prod环境不要给这个配置


# 查看用户
argocd account list
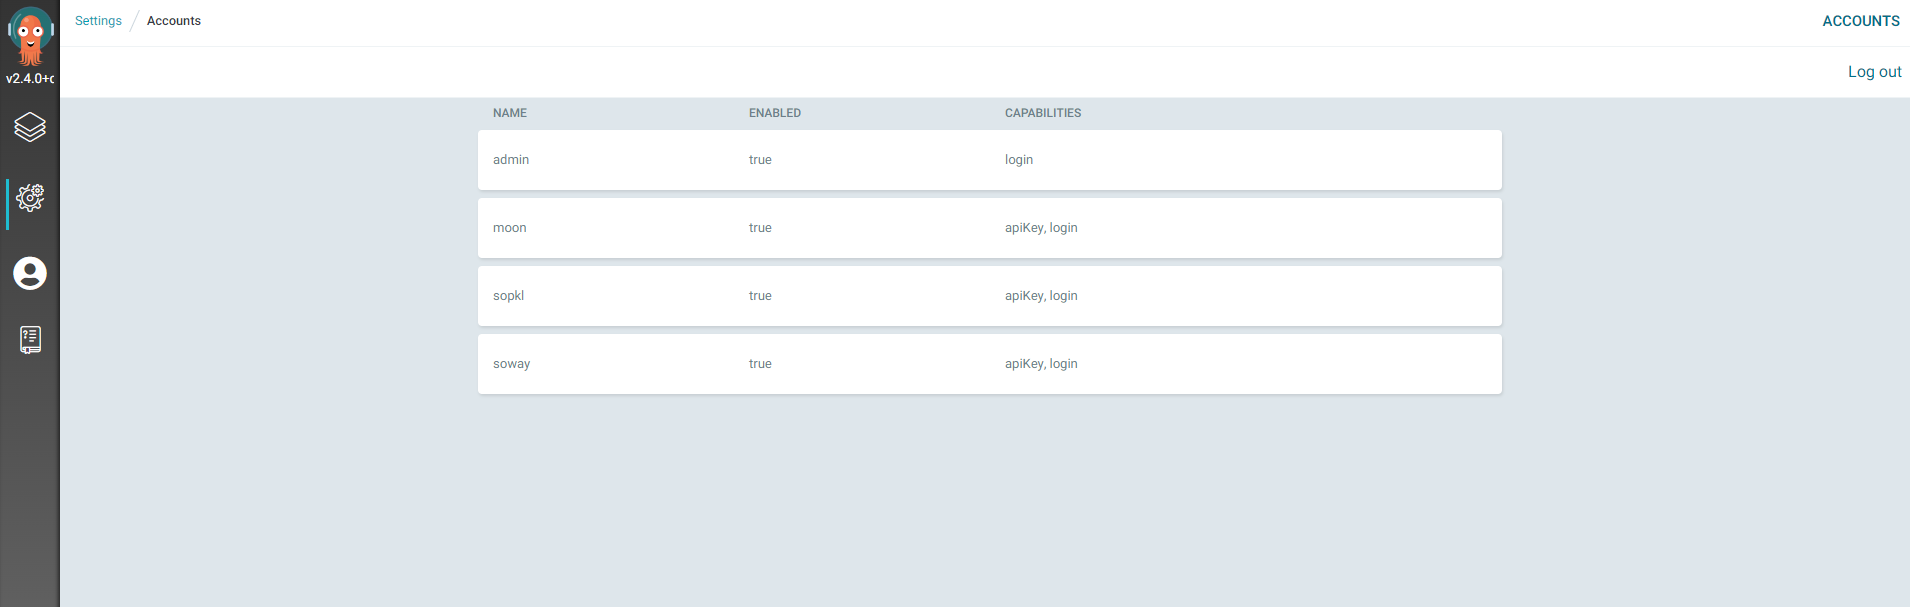
- 新创建的用户密码和admin密码一致, 但是不能登录, 所以必须修改后才能登录
# 其他用户设置密码, 其他2个用户同样方式, 新建的用户默认和admin用户密码一致,且必须得改
argocd account update-password --account moon --current-password Moon!=yi991 --new-password Moon!=yi991
- 当创建用户时,这些用户中的每一个都需要配置额外的 RBAC 规则是不能正常投入使用的,不能创建project
Argo CD具有两个预定义的角色- readonly
- 只能查看所有资源
- admin
- 所有资源满权限
- readonly
# Built-in policy which defines two roles: role:readonly and role:admin,
# and additionally assigns the admin user to the role:admin role.
# There are two policy formats:
# 1. Applications, logs, and exec (which belong to a project):
# p, <user/group>, <resource>, <action>, <project>/<object>
# 2. All other resources:
# p, <user/group>, <resource>, <action>, <object>

p, role:readonly, applications, get, */*, allow
p, role:readonly, certificates, get, *, allow
p, role:readonly, clusters, get, *, allow
p, role:readonly, repositories, get, *, allow
p, role:readonly, projects, get, *, allow
p, role:readonly, accounts, get, *, allow
p, role:readonly, gpgkeys, get, *, allow
p, role:readonly, logs, get, */*, allow

p, role:admin, applications, create, */*, allow
p, role:admin, applications, update, */*, allow
p, role:admin, applications, delete, */*, allow
p, role:admin, applications, sync, */*, allow
p, role:admin, applications, override, */*, allow
p, role:admin, applications, action/*, */*, allow
p, role:admin, certificates, create, *, allow
p, role:admin, certificates, update, *, allow
p, role:admin, certificates, delete, *, allow
p, role:admin, clusters, create, *, allow
p, role:admin, clusters, update, *, allow
p, role:admin, clusters, delete, *, allow
p, role:admin, repositories, create, *, allow
p, role:admin, repositories, update, *, allow
p, role:admin, repositories, delete, *, allow
p, role:admin, projects, create, *, allow
p, role:admin, projects, update, *, allow
p, role:admin, projects, delete, *, allow
p, role:admin, accounts, update, *, allow
p, role:admin, gpgkeys, create, *, allow
p, role:admin, gpgkeys, delete, *, allow
p, role:admin, exec, create, */*, allow

g, role:admin, role:readonly
g, admin, role:admin
# rbac信息在argocd-rbac-cm中加
kubectl -n argocd get cm argocd-rbac-cm

# 修改argocd-server 和 argocd-application-controller集群角色来实现权限的控制
[root@master-1 ~]# kubectl get clusterrole argocd-server argocd-application-controller
NAME                            CREATED AT
argocd-server                   2022-07-20T07:45:39Z
argocd-application-controller   2022-07-20T07:45:39Z
| resources | 描述 |
|---|---|
| applications | 应用 |
| clusters | k8s集群 |
| repositories | 代码库 |
| logs | 日志 |
| exec | 可进入容器 |
| projects | 项目类 |
| certificates | 证书 |
| action == 动作 | 描述 |
|---|---|
| get | 查看 |
| create | 创建 |
| update | 更新 |
| delete | 删除 |
| sync | 同步, 部署 |
| override | 覆盖 |
(1). 案例一
# 配置的规则,p是policy, applications的行配置 :<project-name>/<application-name>
p,${role-name},${resources-name},${action},${project}/${某个app},allow or deny


https://rtfm.co.ua/en/argocd-users-access-and-rbac/

# vim role-moon.yaml
apiVersion: v1
kind: ConfigMap
metadata:
  name: argocd-rbac-cm
  namespace: argocd
data:
  policy.default: role:readonly		# 直接使用内置角色权限,所有资源只能看
# 简单验证配置
argocd admin settings rbac validate --policy-file role-moon.yaml

# 验证某一权限
argocd admin settings rbac can role:moon get applications --policy-file role-moon.yaml
Yes

# apply之后立即就生效,直接UI界面验证
kubectl apply -f role-moon.yaml
(2). 案例二
- 多个role配置, 设置某个用户只能看到和管理自己所维护的项目或者app
apiVersion: v1
kind: ConfigMap
metadata:
  name: argocd-rbac-cm
  namespace: argocd
data:
  policy.default: role:''
  policy.csv: |
    p, role:for-soway, applications, *, th000/*, allow
    p, role:for-dev, applications, *, in-cluster/rbac-dev, allow
    p, role:for-sit, applications, *, *-sit/*, allow
    p, role:for-prod, applications, get, *-prod/*, allow
    p, role:for-dev, exec, create, */*, allow
    p, role:for-sit, exec, create, */*, allow
    p, role:for-dev, logs, get, */*, allow
    p, role:for-sit, logs, get, */*, allow

    g, soway, role:for-soway
    g, dev, role:for-dev
    g, sit, role:for-sit
    g, prod, role:for-prod
4. argocd ingress
- win上本地解析,访问
apiVersion: networking.k8s.io/v1
kind: Ingress
metadata:
  name: argocd-server-ingress
  namespace: argocd
  annotations:
    cert-manager.io/cluster-issuer: letsencrypt-prod
    kubernetes.io/ingress.class: nginx
    kubernetes.io/tls-acme: "true"
    nginx.ingress.kubernetes.io/ssl-passthrough: "true"
    # If you encounter a redirect loop or are getting a 307 response code
    # then you need to force the nginx ingress to connect to the backend using HTTPS.
    #
    nginx.ingress.kubernetes.io/backend-protocol: "HTTPS"
spec:
  ingressClassName: nginx
  rules:
  - host: argocd.yeemiao.com
    http:
      paths:
      - backend:
          service:
            name: argocd-server
            port:
              number: 443
        path: /
        pathType: Prefix

  tls:
  - hosts:
    - argocd.yeemiao.com
    secretName: argocd-secret # do not change, this is provided by Argo CD
老版本的Ingress
apiVersion: extensions/v1beta1
kind: Ingress
metadata:
  name: argocd-server-ingress
  namespace: argocd
  annotations:
    cert-manager.io/cluster-issuer: letsencrypt-prod
    kubernetes.io/ingress.class: nginx
    kubernetes.io/tls-acme: "true"
    nginx.ingress.kubernetes.io/ssl-passthrough: "true"
    # If you encounter a redirect loop or are getting a 307 response code
    # then you need to force the nginx ingress to connect to the backend using HTTPS.
    #
    nginx.ingress.kubernetes.io/backend-protocol: "HTTPS"
spec:
  rules:
  - host: argocd.local
    http:
      paths:
      - backend:
          serviceName: argocd-server
          servicePort: https
  tls:
  - hosts:
    - argocd.for17.com
    secretName: argocd-secret # do not change, this is provided by Argo CD
5. Config
argocd-server、argocd-repo-server、argocd-application-controller三者通过TLS通信, 与redis是纯粹的http通信, redis的作用为缓存- Git 和 helm 存储库由称为 repo-server 的独立服务管理, repo-server 不携带任何 Kubernetes 权限,也不存储任何服务的凭据, repo-server 负责 clone
Argo CD允许和信任的代码存储库 argocd-cmd-params-cm记录着ArgoCD的一些配置, 默认是什么配置都没有配, 需要根据自己的情况配置, 具体如下
1). argocd-cmd-params-cm
apiVersion: v1
kind: ConfigMap
metadata:
  name: argocd-cmd-params-cm
  labels:
    app.kubernetes.io/name: argocd-cmd-params-cm
    app.kubernetes.io/part-of: argocd
data:
  # Repo server address. (default "argocd-repo-server:8081")
  repo.server: "argocd-repo-server:8081"

  # Dex server address (default "http://argocd-dex-server:5556")
  dex.server: "http://argocd-dex-server:5556"

  # Redis server hostname and port (e.g. argocd-redis:6379)
  redis.server: "argocd-redis:6379"
  # Redis database
  redis.db:

  # Open-Telemetry collector address: (e.g. "otel-collector:4317")
  otlp.address:

  ## 控制器属性配置
  # Repo server RPC call timeout seconds.
  controller.repo.server.timeout.seconds: "60"
  # Disable TLS on connections to repo server
  controller.repo.server.plaintext: "false"
  # Whether to use strict validation of the TLS cert presented by the repo server
  controller.repo.server.strict.tls: "false"
  # Number of application status processors (default 20)
  controller.status.processors: "20"
  # Number of application operation processors (default 10)
  controller.operation.processors: "10"
  # Set the logging format. One of: text|json (default "text")
  controller.log.format: "text"
  # Set the logging level. One of: debug|info|warn|error (default "info")
  controller.log.level: "info"
  # Prometheus metrics cache expiration (disabled  by default. e.g. 24h0m0s)
  controller.metrics.cache.expiration: "24h0m0s"
  # Specifies timeout between application self heal attempts (default 5)
  controller.self.heal.timeout.seconds: "5"
  # Cache expiration for app state (default 1h0m0s)
  controller.app.state.cache.expiration: "1h0m0s"
  # Cache expiration default (default 24h0m0s)
  controller.default.cache.expiration: "24h0m0s"

  ## Server properties
  # Run server without TLS
  server.insecure: "false"
  # Value for base href in index.html. Used if Argo CD is running behind reverse proxy under subpath different from / (default "/")
  server.basehref: "/"
  # Used if Argo CD is running behind reverse proxy under subpath different from /
  server.rootpath: "/"
  # Directory path that contains additional static assets
  server.staticassets: "/shared/app"

  # Set the logging format. One of: text|json (default "text")
  server.log.format: "text"
  # Set the logging level. One of: debug|info|warn|error (default "info")
  server.log.level: "info"
  # Repo server RPC call timeout seconds. (default 60)
  server.repo.server.timeout.seconds: "60"
  # Use a plaintext client (non-TLS) to connect to repository server
  server.repo.server.plaintext: "false"
  # Perform strict validation of TLS certificates when connecting to repo server
  server.repo.server.strict.tls: "false"
  # Disable client authentication
  server.disable.auth: "false"
  # Enable GZIP compression
  server.enable.gzip: "false"
  # Set X-Frame-Options header in HTTP responses to value. To disable, set to "". (default "sameorigin")
  server.x.frame.options: "sameorigin"
  # The minimum SSL/TLS version that is acceptable (one of: 1.0|1.1|1.2|1.3) (default "1.2")
  server.tls.minversion: "1.2"
  # The maximum SSL/TLS version that is acceptable (one of: 1.0|1.1|1.2|1.3) (default "1.3")
  server.tls.maxversion: "1.3"
  # The list of acceptable ciphers to be used when establishing TLS connections. Use 'list' to list available ciphers. (default "TLS_ECDHE_RSA_WITH_AES_256_GCM_SHA384:TLS_RSA_WITH_AES_256_GCM_SHA384")
  server.tls.ciphers: "TLS_ECDHE_RSA_WITH_AES_256_GCM_SHA384:TLS_RSA_WITH_AES_256_GCM_SHA384"
  # Cache expiration for cluster/repo connection status (default 1h0m0s)
  server.connection.status.cache.expiration: "1h0m0s"
  # Cache expiration for OIDC state (default 3m0s)
  server.oidc.cache.expiration: "3m0s"
  # Cache expiration for failed login attempts (default 24h0m0s)
  server.login.attempts.expiration: "24h0m0s"
  # Cache expiration for app state (default 1h0m0s)
  server.app.state.cache.expiration: "1h0m0s"
  # Cache expiration default (default 24h0m0s)
  server.default.cache.expiration: "24h0m0s"

  ## Repo-server properties
  # Set the logging format. One of: text|json (default "text")
  reposerver.log.format: "text"
  # Set the logging level. One of: debug|info|warn|error (default "info")
  reposerver.log.level: "info"
  # Limit on number of concurrent manifests generate requests. Any value less the 1 means no limit.
  reposerver.parallelism.limit: "1"
  # Disable TLS on the gRPC endpoint
  reposerver.disable.tls: "false"
  # The minimum SSL/TLS version that is acceptable (one of: 1.0|1.1|1.2|1.3) (default "1.2")
  reposerver.tls.minversion: "1.2"
  # The maximum SSL/TLS version that is acceptable (one of: 1.0|1.1|1.2|1.3) (default "1.3")
  reposerver.tls.maxversion: "1.3"
  # The list of acceptable ciphers to be used when establishing TLS connections. Use 'list' to list available ciphers. (default "TLS_ECDHE_RSA_WITH_AES_256_GCM_SHA384:TLS_RSA_WITH_AES_256_GCM_SHA384")
  reposerver.tls.ciphers: "TLS_ECDHE_RSA_WITH_AES_256_GCM_SHA384:TLS_RSA_WITH_AES_256_GCM_SHA384"
  # Cache expiration for repo state, incl. app lists, app details, manifest generation, revision meta-data (default 24h0m0s)
  reposerver.repo.cache.expiration: "24h0m0s"
  # Cache expiration default (default 24h0m0s)
  reposerver.default.cache.expiration: "24h0m0s"
  # Max combined manifest file size for a single directory-type Application. In-memory manifest representation may be as
  # much as 300x the manifest file size. Limit this to stay within the memory limits of the repo-server while allowing
  # for 300x memory expansion and N Applications running at the same time.
  # (example 10M max * 300 expansion * 10 Apps = 30G max theoretical memory usage).
  reposerver.max.combined.directory.manifests.size: '10M'
  # Paths to be excluded from the tarball streamed to plugins. Separate with ;
  reposerver.plugin.tar.exclusions: ""
2). argocd-cm
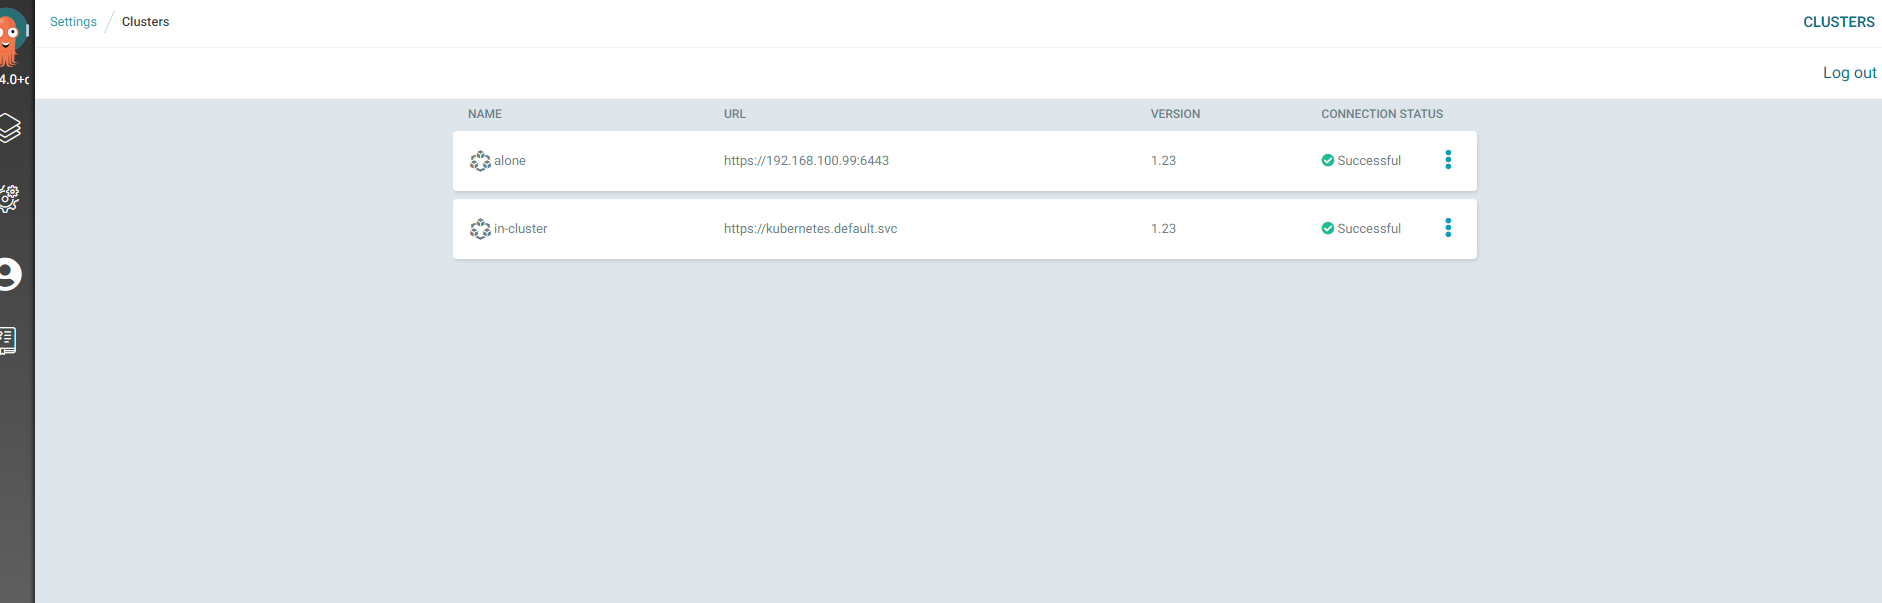
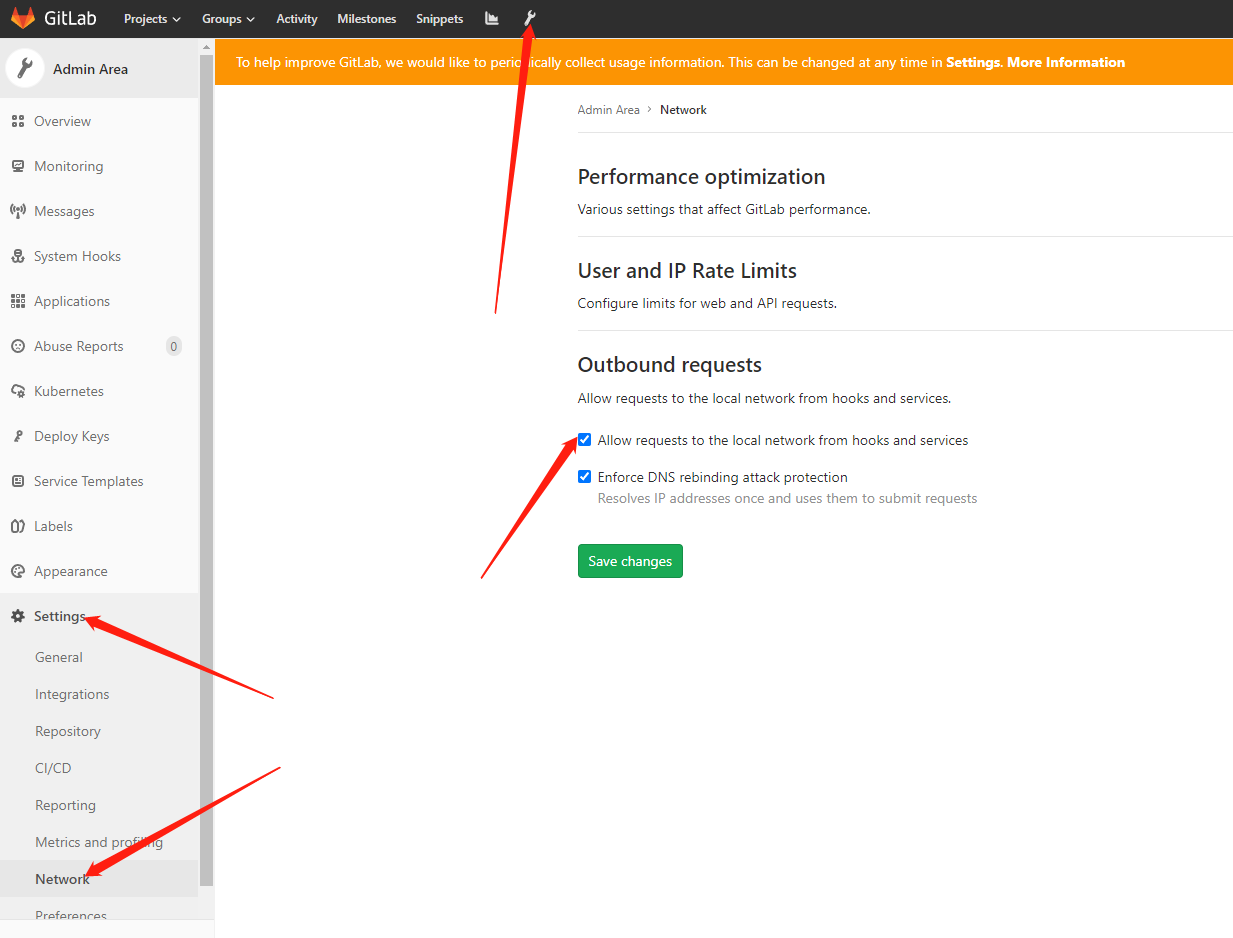
6. 多集群管理
- UI界面不支持添加多集群
- Kubernetes 1.24停止为 Service Accounts 自动创建令牌, 从 Argo CD 2.4 开始,在添加 1.24 集群时
argocd cluster add创建一个 ServiceAccount和一个不会过期的服务帐户令牌 Secret, 以后,Argo CD 将添加对 Kubernetes TokenRequest API 的支持,以避免使用长寿命令牌
# 首先先scp /etc/kubernetes/admin.conf文件到argocd所在的集群上,找到context name,然后添加集群,但是这个kubeconfig文件权限太大,整个集群都有权限
kubectl config get-contexts -o name

# 通过config文件查看
grep "current-context:" cmdb-config

# 要处于login状态,kubernetes-admin@kubernetes是context中的名字 --name 别名
argocd cluster add kubernetes-admin@kubernetes --kubeconfig ${kubeconfig-name} --name alone

# 集群列表,添加集群后,会在目标集群的kube-system创建一个名为argocd-manager的sa
[root@master-1 ~]# argocd cluster list
SERVER                                         NAME        VERSION  STATUS      MESSAGE  PROJECT
https://kubernetes.default.svc (1 namespaces)  in-cluster  1.23     Successful
https://192.168.100.99:6443                    alone       1.23     Successful


# 删除集群
argocd cluster rm

# argocd将集群的信息以secret保存在在argocd namespace中
kubectl  -n argocd get secrets
7. auto-SYNC
- 当app开启了
AUTO-SYNC, argocd每5分钟自动触发一次 SYNC(官网说是每三分钟,实测是5分钟), 为了消除这种轮询延迟,可以将 API 服务器配置为接收 webhook 事件, 我使用的是 Gitlab, 配置如下 - 如果开启
AUTO-SYNC你在使用kubectl apply部署就会不生效,也会自动等到SYNC
1). webhook
kubectl edit secret argocd-secret -n argocd

# 自动同步间隔由 argocd-cm 的 ConfigMap 中的值决定 timeout.reconciliation ,默认为180s(3 分钟)
| Provider | K8s Secret Key |
|---|---|
| GitHub | webhook.github.secret |
| GitLab | webhook.gitlab.secret |
| BitBucket | webhook.bitbucket.uuid |
| BitBucketServer | webhook.bitbucketserver.secret |
| Gogs | webhook.gogs.secret |
apiVersion: v1
kind: Secret
metadata:
  name: argocd-secret
  namespace: argocd
type: Opaque
data:
...

stringData:
  # gitlab webhook secret
  webhook.gitlab.secret: coolops
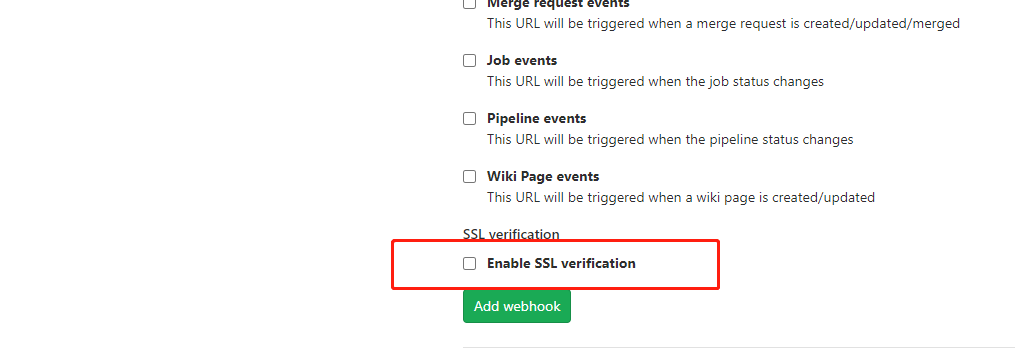
- 进入 Gitlab ,创建 webhook
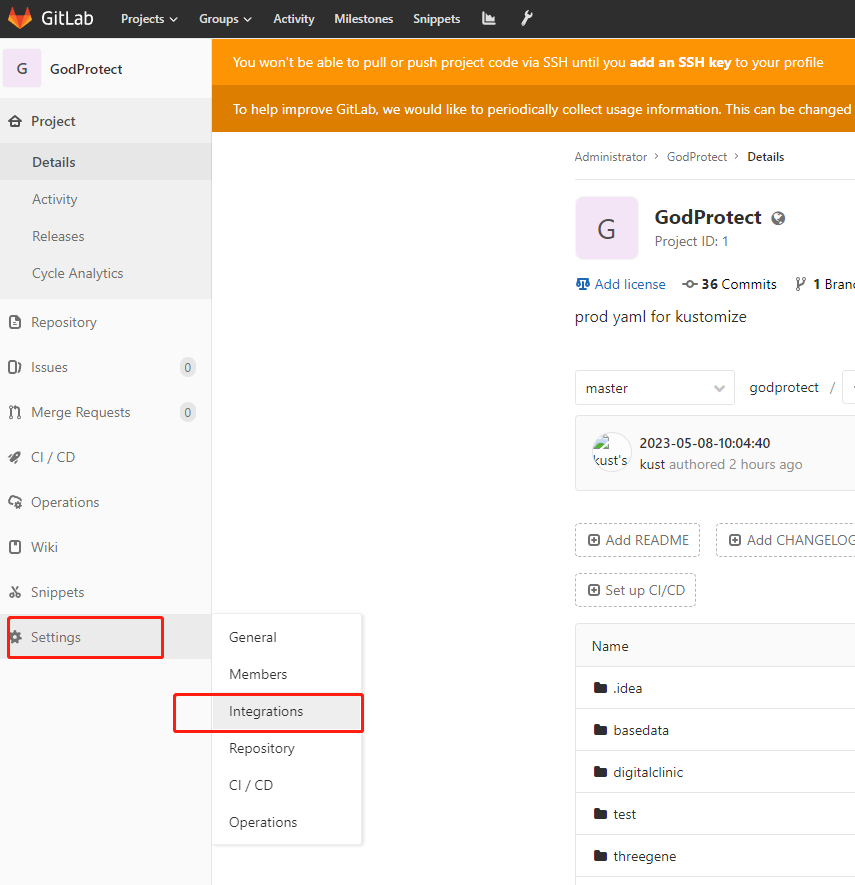
添加
Gitlab如果是k8s中部署的, 需要在容器中添加host解析, 不支持用
service拼接的地址,默认Gitlab禁用了从内部调用, 需要修改
# 地址可以写内部的 service
http://argocd-server:80/api/webhook
- 在 GitHub 中创建 webhook 时,需要将
Content type设置为application/json

- 证书自己签发的需要关闭SSL
- 添加完毕后, 可以点击测试一下是否是通的
- 问题
- 如下, 当您从 GitLab 收到 webhook 时,
level=info msg="Requested app 'appname' refresh"的日志是不会输出, 也就是说明他收到了Gitlab的 信息, 但是没有触发 SYNC, 直到下一次轮询运行才生效,默认为 3 分钟
time="2021-07-08T07:15:37Z" level=info msg="Received push event repo: http://git.k8s.local/course/devops-demo-deploy, revision: master, touchedHead: true"
time="2021-07-08T07:15:37Z" level=info msg="Requested app 'devops-demo' refresh"
2). 配置告警信息
# 在 annotations 添加 prometheus.io/scrape: "true" 的字段提供给 Prometheus 监控
kubectl edit svc argocd-metrics -n argocd
kubectl edit svc argocd-server-metrics -n argocd
kubectl edit svc argocd-repo-server -n argocd
# argocd-metrics
apiVersion: v1
kind: Service
metadata:
  annotations:
    prometheus.io/scrape: "true"
# argocd-server-metrics
    prometheus.io/scrape: "true"
    prometheus.io/port: "8083"  # 指定8084端口为指标端口
argocd-repo-server
    prometheus.io/scrape: "true"
    prometheus.io/port: "8084"  # 指定8084端口为指标端口
(三). ApplicationSet
- 从 Argo CD v2.3 开始,ApplicationSet 控制器与 Argo CD 捆绑在一起。不再需要从 Argo CD 中单独安装 ApplicationSet 控制器
- ApplicationSet 控制器必须安装在与其目标的 Argo CD 相同的名称空间中
# v2.3 版本之前 部署
kubectl apply -n argocd -f https://raw.githubusercontent.com/argoproj/applicationset/v0.4.0/manifests/install.yaml
文章来源:https://blog.csdn.net/moon_naxx/article/details/135220797
本文来自互联网用户投稿,该文观点仅代表作者本人,不代表本站立场。本站仅提供信息存储空间服务,不拥有所有权,不承担相关法律责任。 如若内容造成侵权/违法违规/事实不符,请联系我的编程经验分享网邮箱:chenni525@qq.com进行投诉反馈,一经查实,立即删除!
本文来自互联网用户投稿,该文观点仅代表作者本人,不代表本站立场。本站仅提供信息存储空间服务,不拥有所有权,不承担相关法律责任。 如若内容造成侵权/违法违规/事实不符,请联系我的编程经验分享网邮箱:chenni525@qq.com进行投诉反馈,一经查实,立即删除!
最新文章
- Python教程
- 深入理解 MySQL 中的 HAVING 关键字和聚合函数
- Qt之QChar编码(1)
- MyBatis入门基础篇
- 用Python脚本实现FFmpeg批量转换
- Altium Designer 23全新功能-使用Section View功能查看剖视图
- LeetCode 84. 柱状图中最大的矩形
- 用rpm管理软件
- Transformer简略了解
- 【小沐学NLP】Python实现TF-IDF算法(nltk、sklearn、jieba)
- MyBatis笔记
- 几个Python小案例,爱上Python编程!
- 深入理解 PyTorch 激活函数:从基础到高效实用技巧(1)
- Realm Management Extension领域管理扩展之调试跟踪分析
- 【代码随想录】刷题笔记Day53