Android studio 学习笔记
View(视图)
此类代表用户界面组件的基本构建块。视图占据屏幕上的一个矩形区域,负责绘图和事件处理。View 是widgets的基类,用于创建交互式 UI 组件(按钮、文本字段等)。
子类是布局ViewGroup的基类,布局是容纳其他视图(或其他视图组)并定义其布局属性的不可见容器。
Android Studio中所说的“视图”通常指的是UI界面上的各种元素,比如按钮、文本框、图像等。在Android开发中,这些UI元素通常被称为"View",它们用于构建用户界面,并且可以通过代码进行操作和控制。
使用视图
窗口中的所有视图都排列在一棵树中。您可以通过代码或通过在一个或多个 XML 布局文件中指定视图树来添加视图。有许多专门的视图子类,它们充当控件或能够显示文本、图像或其他内容。
1.在XML布局文件中定义视图:您可以在XML布局文件中使用标记来定义各种视图,比如TextView(文本视图)、Button(按钮)、ImageView(图像视图)等。您可以设置视图的属性,如大小、位置、颜色等。
2.通过Java代码操作视图:在Java代码中,您可以通过findViewById()方法找到XML布局文件中定义的视图,并对其进行操作。例如,您可以设置文本视图的文本内容,为按钮添加点击事件监听器等。
设置内容布局(视图)
setContentView(布局id)? 要求传入 布局id
setContentView(R.layout.chatting_layout);
用代码定义布局
1.定义布局
2.设置宽高
3.设置背景颜色
4.设置内容布局
// 1.定义布局
LinearLayout linearLayout = new LinearLayout(this);

// 2.设置宽高
linearLayout.setLayoutParams(newViewGroup.LayoutParams(ViewGroup.LayoutParams.MATCH_PARENT,ViewGroup.LayoutParams.MATCH_PARENT));

// 3.设置背景颜色
linearLayout.setBackgroundColor(Color.GREEN);

setContentView(linearLayout);*/
共有属性
margin: 外边距,控件的外部边缘距离其父容器边缘的距离
padding: 内边距,控件内部的控件距离它边缘的边距
gravity:控件内部的控件相对于它的位置
layout_gravity:控件本身相对于父容器的位置
visibility: 可见状态 gone(不可见也不保留位置) visible(可见) invisible(不可见但保留位置)
…………
Activity
AppCompatActivity
AppCompatActivity 继承了 Activity 类,拥有了窗口的特性,是一个可视化界面,MainActivity是一个可视化界面正是由于它继承了 AppCompatActivity。
activity 页面跳转
Intent intent = new Intent(ButtonActivity.this,MainActivity.class);
startActivity(intent);
activity 之间的信息传递
传递简单内容
A的activity(传递)
  Intent intent = new Intent(this,ActivityLife.class);
  //添加参数
  intent.putExtra("传递的String类型参数","这是上一个页面传递过来的String类型参数");
  intent.putExtra("传递的double类型参数",24.99);
  intent.putExtra("传递的int类型参数",24);
  intent.putExtra("传递的bool类型参数",false);
  startActivity(intent);
B的activity(接收)
// 获取上一个页面传递过来的数据,获取数据时有些需要给出默认值
Intent getIntent = getIntent();
String dataString = getIntent.getStringExtra("传递的String类型参数");
int dataInt = getIntent.getIntExtra("传递的int类型参数",1);
double dataDouble = getIntent.getDoubleExtra("传递的double类型参数",2.1);
boolean dataBool = getIntent.getBooleanExtra("传递的bool类型参数",true);

TextView textView = findViewById(R.id.show);
textView.setText("上一个页面传递是数据"+dataString+dataInt+dataDouble+dataBool);
传递对象内容?
新建一个Student对象类
package com.example.androidstudiostudy.data;

import java.io.Serializable;

// 将对象序列化,序列化的作用
/* 1.想把内存中的对象保存到一个文件活数据库中时
 * 2.想利用套接字Socket在网络中传递对象*/
public class Student implements Serializable {
    private String name;
    private  int age;
    private  double money;
    private  boolean check;

    public String getName() {
        return name;
    }

    public void setName(String name) {
        this.name = name;
    }

    public int getAge() {
        return age;
    }

    public void setAge(int age) {
        this.age = age;
    }

    public double getMoney() {
        return money;
    }

    public void setMoney(double money) {
        this.money = money;
    }

    public boolean isCheck() {
        return check;
    }

    public void setCheck(boolean check) {
        this.check = check;
    }

    public Student(String name, int age, double money, boolean check) {
        this.name = name;
        this.age = age;
        this.money = money;
        this.check = check;
    }
}
A页面传递:
// 实例化一个新建的 Student 对象
Student student1 = new Student("沈成林",23,200000.999,true);
// 参数1:String name - 本次数据的名称
// 参数2:@Nullable Serializable value - 序列化数据对象
intentC.putExtra("data_object",student1);
startActivity(intentC);
B页面接收:?
Intent getIntent = getIntent();
// 获取对象数据 - 强转成 Student 对象
Student student = (Student) getIntent.getSerializableExtra("data_object");
if (student != null) {
  TextView textView2 = findViewById(R.id.show2);
  textView2.setText("上一个页面传递是数据"+student.getName()+student.getAge()+student.getMoney()+student.isCheck());
else {
 // 处理student对象为空的情况,比如给出一个默认值或者显示错误信息
   TextView textView2 = findViewById(R.id.show2);
   textView2.setText("上一个页面未传递有效的Student对象");
        }
activity 的四种启动模式
?Standard(系统默认)
不管栈内是否存在该实例,打开就会放入,返回时依次从后退栈

在清单文件中设置启动模式:
android:launchMode="standard"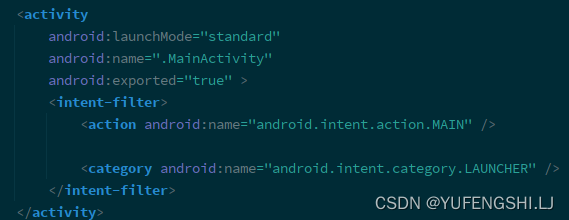
SingleTop 顶部复用
顶部是你正想要打开的activity,直接复用,不会新建,如果没有,会放入栈中。
?在清单文件中设置启动模式:
android:launchMode="singleTop"从MainActivity -> MainActivity->MainActivity->?MainActivity
此时顶部就是要打开的activity,直接复用,所以只返回一次就到了主页

SingleTask 栈内复用模式
想打开已经打开过的activity B,此模式会保证栈中只有一个,会弹出B之后的所有activity,保证它重回栈顶
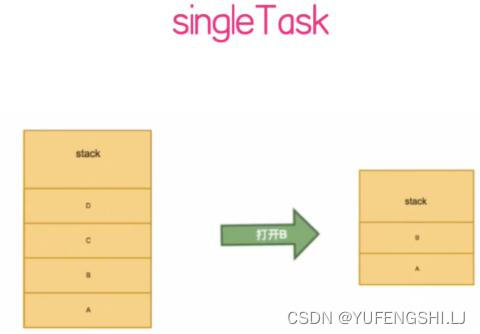
android:launchMode="singleTask"MainActivity ->ButtonActivity ->ConstraintActivity ->MainActivity
只返回一次就回到主页,因为此时会退出MainActivity后的所有activity
SingleInstance 全局唯一模式
想要打开新activity,会放在一个新的任务栈中且该Task有且只有一个activity实例,如果已经创建过该activity实例,则不会再创建新的任务栈,只会将之前的唤醒

android:launchMode="singleInstance"MainActivity ->ButtonActivity ->ConstraintActivity ->MainActivity
返回到ButtonActivity后再返回就直接回到了主页,MainActivity在一个单独的任务栈中,返回的时候已经被撤销了
activity 的启动
隐式启动
在运行时才知道能打开哪一个界面
隐式启动的两种构造方法
* public Intent(String action, Uri uri)
* public Intent(String action)
* action:Activity的别名 ,编译阶段无论写什么的都不会报错
* uri: Uri对象,打开的路径
// 打开百度?
Intent intentS = new Intent(Intent.ACTION_VIEW, Uri.parse("http://www.baidu.com"));
startActivity(intentS);
显示启动
在运行前知道到底要启动哪一个界面-使用意图
Intent(Context packageContext, Class<?> cls)获取第二个页面的返回结果?startActivityForResult
?跳转到第二个页面,设置请求码为1000
Intent intent = new Intent(this,ActivityLife.class);
// 参数2:请求码
startActivityForResult(intent,1000);
第二个页面返回数据:
 // 通过startActivityForResult启动activity-返回结果
    public void backRes(View view) {
        // 设置结果
        Intent intent = new Intent();  //此时intent不作为跳转使用,而是用来传递返回的数据
        intent.putExtra("返回的数据","第二个界面返回的是10000000");
        /*参数1:请求码 参数2:返回的数据*/
        setResult(RESULT_OK,intent);
        finish();
    }
?在第一个页面调用 onActivityResult 处理返回的数据:
如果通过 startActivityForResult 启动了第二个activity,当第二个activity处理结束后,再回到当前activity时,一定会自动回调 onActivityResult 方法 。在 onActivityResult 方法中我们可以处理第二个activity返回的结果。(如。拍照后得到的照片,从图库中选取的图片)
- 参数1 requestCode:请求码。当有多个 startActivityForResult 时,可以用来判断该结果来自于哪个activity,从而进行什么操作
- 参数2 resultCode:结果码 0 = RESULT_CANCEL->取消 | -1 = RESULT_OK 正确处理后返回。判断它是为了判断新开的activity有没有处理完这些事
- 参数3 Intent (可以为空):返回的结果存放在这里。通过 getStringExtra() 获取数据(此时已经知道结果是String类型的数据)
    @Override
    protected void onActivityResult(int requestCode, int resultCode, @Nullable Intent data) {
        super.onActivityResult(requestCode, resultCode, data);
        // 判断新开的activity返回的结果
        /* 当返回结果都是成功时,请求码==1000则进行操作 */
        if(resultCode == -1){
            if(requestCode == 1000){
                assert data != null;
                Log.e("ActivityWithResults","自动进入onActivityResult requestCode:"+requestCode+",resultCode:"+resultCode+",返回的数据"+data.getStringExtra("返回的数据"));
            }
        }
activity 的生命周期
- onStart() 可以理解为启动状态,此时的界面还没能完全的展示出来, 还在准备中
- onResume() 说明activity已经完全进入到了前台准备完成,可以和用户进行交互了
- onPause() 当activity进入到不可操作的状态时,会回调该方法。何时会进入到不可操作的状态?有另一个activity进入到了前台(本activity被部分挡住了)。此时虽然不可操作,但是部分可见的
- onStop() 当activity完全看不到了,就会回调该方法
- onDestory() 当要退出activity的时候,就会执行这个方法
当有一个活动A来到前台完全启动后,有一个活动B也来到前台,慢慢启动时,A就会进入到onPause()方法,暂停活动,当B完全准备好后,A就会彻底的停止,进入onStop()方法
Fragment
静态加载
直接在布局文件中完成配置,通过android:name属性指定 Fragement 的路径
?1.在需要的布局(activity_fragment.xml)中添加fragment的控件
<?xml version="1.0" encoding="utf-8"?>
<LinearLayout xmlns:android="http://schemas.android.com/apk/res/android"
    xmlns:app="http://schemas.android.com/apk/res-auto"
    xmlns:tools="http://schemas.android.com/tools"
    android:layout_width="match_parent"
    android:layout_height="match_parent"
    android:orientation="vertical"
    android:gravity="center_horizontal"
    tools:context=".FragmentActivity">
    <fragment
        android:id="@+id/fragment1"
        android:name="com.example.androidstudiostudy.Fragment1"
        android:layout_width="200dp"
        android:layout_height="200dp"/>
</LinearLayout>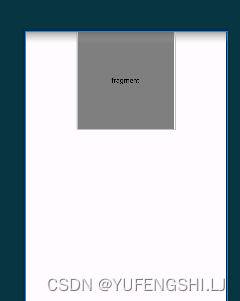
此时的添加的fragment控件没有样式
2.创建一个空的Fragment类,并删除这个新Fragment类中的多余代码只留 onCreateView(),Fragment创建视图时会调用这个方法
@Override
    // onCreateView -> Fragment 创建视图时调用的方法
    public View onCreateView(LayoutInflater inflater, ViewGroup container, Bundle savedInstanceState) {
        // Inflate the layout for this fragment
        // 将指定的布局文件填充到该Fragment的视图中,并返回该视图
        // 使用LayoutInflater将布局文件转换为View对象,并将该View对象添加到指定的ViewGroup中。最后,它返回该View对象作为Fragment的视图
        /* 注意!!
         * LayoutInflater 的 inflate() 方法,它的作用是把xml 布局转换为对应的 View 对象
         * findViewById则是从布局文件中查找一个控件*/
        return inflater.inflate(R.layout.fragment_1, container, false);
    }
注意!LayoutInflater和findViewById的不同
LayoutInflater 的 inflate() 方法,它的作用是把 xml 布局转换为对应的 View 对象 ,而findViewById则是从布局文件中查找一个控件
3.在fragment类中绑定的布局文件中设置fragment样式(fragment_1.xml)
<?xml version="1.0" encoding="utf-8"?>
<FrameLayout xmlns:android="http://schemas.android.com/apk/res/android"
    xmlns:tools="http://schemas.android.com/tools"
    android:layout_width="match_parent"
    android:layout_height="match_parent"
    android:background="#00ffff"
    tools:context=".Fragment1">

    <!-- TODO: Update blank fragment layout -->
    <TextView
        android:layout_width="match_parent"
        android:layout_height="match_parent"
        android:text="@string/hello_blank_fragment" />

</FrameLayout>
4.静态加载
利用fragment控件中的android:name=“……”属性指定fragment的路径。
<!-- fragement 的静态加载
         通过android:name属性指定 Fragement 的路径
    -->
    <fragment
        android:id="@+id/fragment1"
        android:name="com.example.androidstudiostudy.Fragment1"
        android:layout_marginTop="20dp"
        android:layout_width="200dp"
        android:layout_height="200dp"/>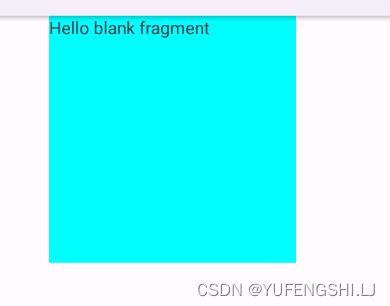
动态加载
1.在布局文件中添加存放fragment的container,有一个专门的container:androidx.fragment.app.FragmentContainerView
<?xml version="1.0" encoding="utf-8"?>
<!-- 这是一个添加了 Fragment 的xml布局文件-->
<LinearLayout xmlns:android="http://schemas.android.com/apk/res/android"
    xmlns:app="http://schemas.android.com/apk/res-auto"
    xmlns:tools="http://schemas.android.com/tools"
    android:layout_width="match_parent"
    android:layout_height="match_parent"
    android:layout_marginRight="10dp"
    android:gravity="center_horizontal"
    android:orientation="vertical"
    tools:context=".FragmentActivity">

    <androidx.fragment.app.FragmentContainerView
        android:id="@+id/fragment2"
        android:layout_width="200dp"
        android:layout_height="200dp"
        android:layout_marginTop="20dp" />

</LinearLayout>
2.在需要添加Fragment的布局文件对应的activity文件中添加以下代码:
- FragmentManager:用来管理Activity中的fragment
- FragmentTransaction:事务,用来添加,移除,替换fragment,
FragmentManager fragmentManager = getSupportFragmentManager();
FragmentTransaction fragmentTransaction = fragmentManager.beginTransaction();//开启事务
fragmentTransaction.add(参数1,参数2);
参数1:ViewGroup,即应放置片段的位置,由资源 ID 指定
参数2:要添加的片段(Fragment实例)
fragmentTransaction .add() ://往Activity中添加一个Fragment

fragmentTransaction .remove() ://从Activity中移除一个Fragment,如果被移除的Fragment没有添加到回退栈,
//这个Fragment实例将会被销毁。

fragmentTransaction .replace()://使用另一个Fragment替换当前的,实际上就是remove()然后add()的合体~

fragmentTransaction .hide()://隐藏当前的Fragment,仅仅是设为不可见,并不会销毁

fragmentTransaction .show()://显示之前隐藏的Fragment

fragmentTransaction .commit()://提交一个事务
一旦通过 FragmentTransaction 做出了更改,就必须调用 commit() 以使更改生效。
package com.example.androidstudiostudy;

import androidx.appcompat.app.AppCompatActivity;
import androidx.fragment.app.FragmentManager;
import androidx.fragment.app.FragmentTransaction;
import android.os.Bundle;

// 创建一个新的activity 绑定布局 R.layout.activity_fragment ,在该布局里添加 fragment 控件,进行展示
public class FragmentActivity extends AppCompatActivity {

    @Override
    protected void onCreate(Bundle savedInstanceState) {

        // 用Java代码添加fragment
        FragmentManager fragmentManager = getSupportFragmentManager();
        FragmentTransaction fragmentTransaction = fragmentManager.beginTransaction();
        // 使用add()方法添加一个fragment片段
        Fragment2 fragment2 = Fragment2.newInstance(null,null);
        fragmentTransaction.add(R.id.fragment2,fragment2);
        fragmentTransaction.commit();
    }
}
?动态加载 - 替换Fragment
使用?FragmentTransaction.replace() 方法替换 Fragment
- 参数1:containerViewId 应放置片段的位置
- 参数2:要替换的片段
// FragmentTransaction.replace() 方法替换 Fragment
    public void replaceFragment(View view) {
        FragmentManager fragmentManager = getSupportFragmentManager();
        FragmentTransaction fragmentTransaction = fragmentManager.beginTransaction();
        Fragment1 newFragment = new Fragment1(); // 创建一个新的Fragment实例
        fragmentTransaction.replace(R.id.fragment2,newFragment);
        fragmentTransaction.commit();
    }
?Activity向Fragment传值
利用Bundle来传递参数
1.实例化一个 fragment 对象
2.实例化一个Bundle对象
3.存入数据到Bundle对象中
4.调用Fragment 的 setArgument方法,传入 Bundle 对象
5.添加或者替换显示的Fragment
 // 法一.通过Bundle来传递参数
    public void commit(View view) {
        /* 注意!! FragmentManager 和 FragmentTransaction 不能变成全局变量,会报错 */
        FragmentManager fragmentManager = getSupportFragmentManager();
        FragmentTransaction fragmentTransaction = fragmentManager.beginTransaction();
        // 1.实例化一个 fragment 对象,注意这里实例化的不是
        Fragment2 f2 = new Fragment2();
        // 2.实例化一个Bundle对象
        Bundle bundle = new Bundle();
        // 3.存入数据到Bundle对象中
        bundle.putString("AtoF1","这是activity向fragment传递的第一个消息");
        // 4.调用Fragment 的 setArgument方法,传入 Bundle 对象
        f2.setArguments(bundle);
        // 5.添加或者替换显示的Fragment
        fragmentTransaction.replace(R.id.fragment2,f2);
        fragmentTransaction.commit();
    }
在fragment类获取数据
 @Override
    public View onCreateView(LayoutInflater inflater, ViewGroup container, Bundle savedInstanceState) {
        // Activity 向 Fragment 传值 - getArguments() 得到传回来的值,返回的实际是一个 Bundle
        Bundle bundle = getArguments();
        // 和Activity之间传值一样,是什么类型就get什么类型
        String msg1 = bundle.getString("AtoF1");
        // 根据布局id得到视图
        View v = inflater.inflate(R.layout.fragment_2, container, false);
        // 设置视图
        TextView textView = v.findViewById(R.id.textView2);
        textView.setText(msg1);
        // 返回设置好的视图
        return v ;
    }
利用环境上下文
利用Activity 和 Fragment二者相互关联,可以相互获取对方的对象这一特性。利用环境上下文可以访问到对方的方法
在宿主activity中定义方法,定义要传递的值
   // 法二.利用context环境上下文 和 onAttach ,在 Fragment1中获取数据
    /* 在 Activity 和 Fragment 建立关系的时候,onAttach 方法会得到环境上下文 context,根据这个context可以获取宿主activity的方法和变量*/
    public String getTitles(){
        return "这是通过环境上下文 和 onAttach 进行传值的";
    }
在对应Fragment的onAttach方法中,将当前环境变量强转成宿主Activity,从而访问到刚刚宿主activity定义的方法,获取数据
 @Override
    public void onAttach(@NonNull Context context) {
        Log.d("FragmentLife","onAttach-----Fragment与activity关联");
        // 强转成宿主activity
        String msg = ((FragmentActivity)context).getTitles();
        Toast.makeText(context,msg,Toast.LENGTH_SHORT).show();
        super.onAttach(context);
    }
Fragment向activity传值 - 利用接口
- 定义一个接口,在这个接口中声明一个用于传递数据的方法
- 让 接收数据的activity实现该接口,然后重写回调方法,目的:获取传入的值并做处理
- 在自定义fragment中,声明一个回调接口的引用
- 在onAttach()方法中,为第三步的引用赋值(可以把activity的对象赋值给它)
- 用引用调用传递数据的方法,本质上调用的是activity中的那个方法,此时就可以把数据传递进去
本质是:在 Fragment 中定义接口和传递参数的方法,在activity中实现接口并重写接口中的方法
在 Fragment 中的声明一个回调接口的引用,因为 Activity 实现了 CommitData 接口的,所以可以将 Activity 转换为 CommitData 类型的对象
在 onAttach 方法中获取这个对象,并调用其中的方法并传入数据
Fragment类
// 1.定义一个接口,在这个接口中声明一个用于传递数据的方法
    public interface CommitData{
        public void sedMSG(String msg);
    }
    // 3.在自定义fragment中,声明一个回调接口的引用
    private CommitData commitData;

    @Override
    // 4.在onAttach()方法中,为第三步的引用赋值(可以把activity的对象赋值给它)
    public void onAttach(@NonNull Context context) {
        super.onAttach(context);
        // 获取到的 Activity 对象强制转换为 CommitData 接口类型的对象,
        // 因为 Activity 实现了 CommitData 接口的,所以可以将其转换为 CommitData 类型的对象
        commitData = (CommitData) getActivity(); // 注意强转
        commitData.sedMSG("传递的");
    }
?接收数据的activity类
实现接口重写回调方法
public class FragmentActivity extends AppCompatActivity implements Fragment2.CommitData{
    @Override
    // 2.让 接收数据的activity实现该接口,然后重写回调方法,目的:获取传入的值并做处理
    public void sedMSG(String msg) {
        TextView textView = findViewById(R.id.showData);
        textView.setText("传回的数据:"+msg);
}本文来自互联网用户投稿,该文观点仅代表作者本人,不代表本站立场。本站仅提供信息存储空间服务,不拥有所有权,不承担相关法律责任。 如若内容造成侵权/违法违规/事实不符,请联系我的编程经验分享网邮箱:chenni525@qq.com进行投诉反馈,一经查实,立即删除!
- Python教程
- 深入理解 MySQL 中的 HAVING 关键字和聚合函数
- Qt之QChar编码(1)
- MyBatis入门基础篇
- 用Python脚本实现FFmpeg批量转换
- 详解FreeRTOS:FreeRTOSConfig.h系统配置文件(拓展篇—1)
- 01 数据结构前言
- 安卓13上手势导航失效、手机卡死问题
- 技术面没过,居然是因为没用过Pytest框架
- 12- Knative Eventing 与 Kafka
- OPC UA 与PROFINET比较
- 计算机组成原理——中央处理器cpu21-40
- gratisography图片接口
- 3个重构技巧,改进你的代码
- 作为CIO,你了解老板们最关注哪些IT指标吗?