前端带你学后端系列 ⑥【安全框架Spring Security篇二】
前端带你学后端系列 ⑥【安全框架Spring Security篇二】
- Ⅰ Spring Security实战一
- ① Spring Security中的密码加密
- ② Spring Security四种权限控制方式
- ③ 关于JWT,以及Spring Security 结合JWT实现登陆验证
- ① jwt 的组成
- ② Spring Security 结合JWT登陆验证的流程
- ① 提前准备,写一个Result返回结果集
- ② 提前准备,写一个JWT工具类
- ③ 写LoginSuccessHandler、LoginFailureHandler
- ④ 验证码相关的配置
- ⑤ 继承BasicAuthenticationFilter,实现用户验证
- ⑥ 认证失败的JwtAuthenticationEntryPoint(用户未登录处理类)
- ⑦ 暂无权限处理类(AccessDeniedHandler,状态码403)
- ⑧ 登出处理器LogoutSuccessHandler
- ⑨ 自定义AccountUser类实现UserDetails(拓展原有的UserDetails)
- ⑩ 实现UserDetailsService,用于和数据库比对
- ⑩① 密码的加密解密
- ⑩② SecurityConfig配置类
- ④ 回顾一下Security的登陆流程
Ⅰ Spring Security实战一
① Spring Security中的密码加密
Spring Security处理密码加密的几种方式
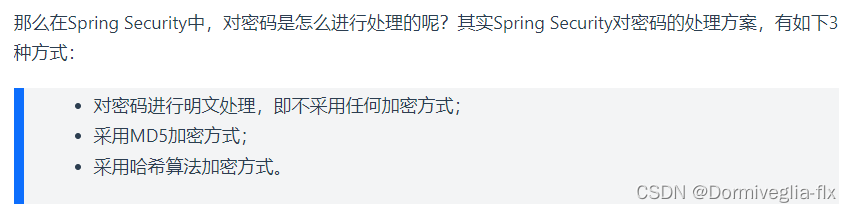
官方推荐使用
BCryptPasswordEncoder
使用方法:
- 配置密码加密的方式
@EnableWebSecurity(debug = true)
public class SecurityConfig extends WebSecurityConfigurerAdapter {

    @Override
    protected void configure(HttpSecurity http) throws Exception {
        http.authorizeRequests()
                //对跨域请求伪造进行防护---->csrf:利用用户带有登录状态的cookie进行攻击的手段
                .csrf()
                .disable();
    }

    //配置采用哪种密码加密算法
    @Bean
    public PasswordEncoder passwordEncoder() {
        //不使用密码加密
        //return NoOpPasswordEncoder.getInstance();

        //使用默认的BCryptPasswordEncoder加密方案
        return new BCryptPasswordEncoder();

        //strength=10,即密钥的迭代次数(strength取值在4~31之间,默认为10)
        //return new BCryptPasswordEncoder(10);

        //利用工厂类PasswordEncoderFactories实现,工厂类内部采用的是委派密码编码方案.
        //return PasswordEncoderFactories.createDelegatingPasswordEncoder();
    }

}
- 使用
    //对密码进行加密
    user.setPassword(passwordEncoder.encode(user.getPassword()));
② Spring Security四种权限控制方式
Spring Security 的认证方式有 认证+授权。我们授权的时候,不仅可以使用默认的授权,还可以自定义授权。
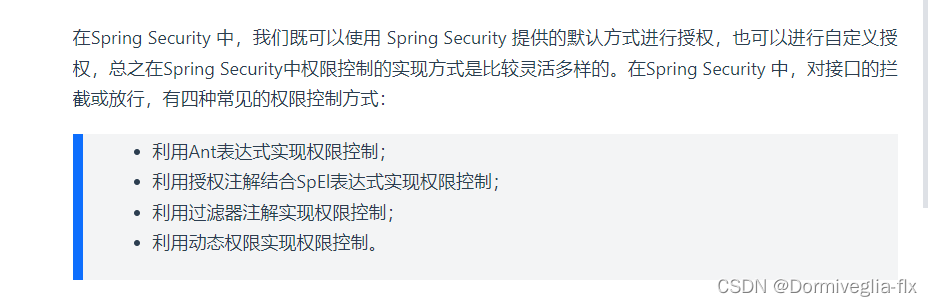
使用说明:
- 利用Ant表达式(主要是在配置类中SecurityConfig中使用)

@Override
protected void configure(HttpSecurity http) throws Exception {
http.authorizeRequests()
        .antMatchers("/admin/**")
        .hasRole("ADMIN")
        .antMatchers("/user/**")
        .hasRole("USER")
        .antMatchers("/visitor/**")
        .permitAll()
        .anyRequest()
        .authenticated()
        .and()
        .formLogin()
        .permitAll()
        .and()
        //对跨域请求伪造进行防护---->csrf:利用用户带有登录状态的cookie进行攻击的手段
        .csrf()
        .disable();
}
- 利用
授权注解结合SpEl表达式实现权限控制

@RestController
public class UserController {

    @Secured({"ROLE_USER"})
    //@PreAuthorize("principal.username.equals('user')")
    @GetMapping("/user/hello")
    public String helloUser() {

        return "hello, user";
    }

    @PreAuthorize("hasRole('ADMIN')")
    @GetMapping("/admin/hello")
    public String helloAdmin() {

        return "hello, admin";
    }

    @PreAuthorize("#age>100")
    @GetMapping("/age")
    public String getAge(@RequestParam("age") Integer age) {

        return String.valueOf(age);
    }

    @GetMapping("/visitor/hello")
    public String helloVisitor() {

        return "hello, visitor";
    }

}
- 利用
过滤器注解实现权限控制

@RestController
public class FilterController {

    /**
     * 只返回结果中id为偶数的user元素。
     * filterObject是@PreFilter和@PostFilter中的一个内置表达式,表示集合中的当前对象。
     */
    @PostFilter("filterObject.id%2==0")
    @GetMapping("/users")
    public List<User> getAllUser() {
        List<User> users = new ArrayList<>();
        for (int i = 0; i < 10; i++) {
            users.add(new User(i, "yyg-" + i));
        }
        return users;
    }

}
- 利用
动态权限实现权限控制
我们一般会使用标准的
RABC进行权限控制,Spring Security中的动态权限,主要是通过重写拦截器和决策器来进行实现,一般满足不了我们的需求。
③ 关于JWT,以及Spring Security 结合JWT实现登陆验证
① jwt 的组成

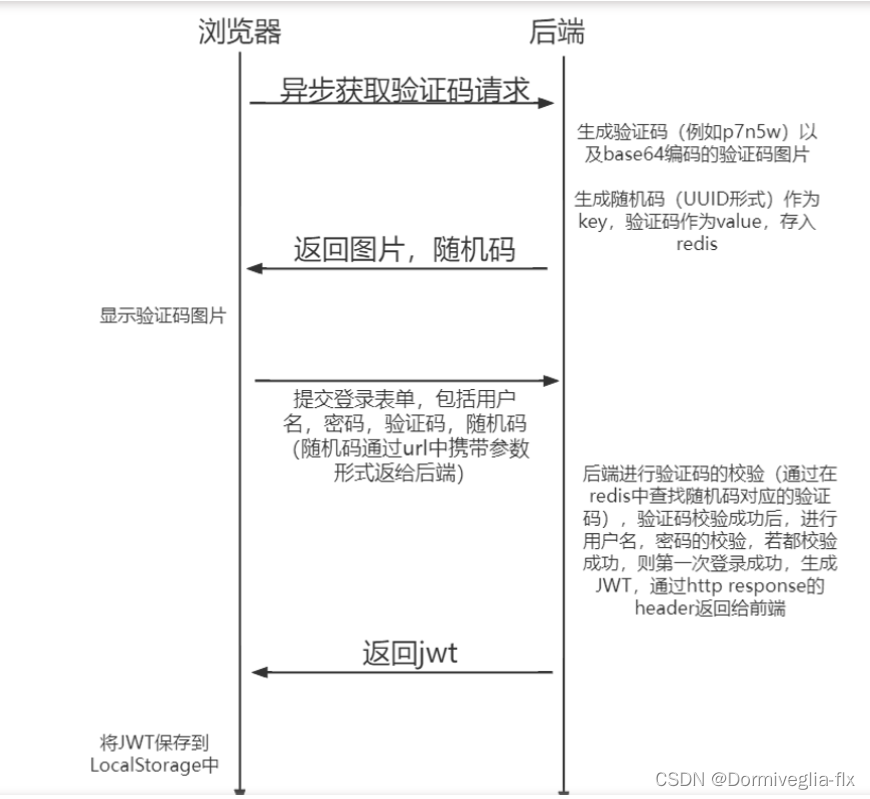
② Spring Security 结合JWT登陆验证的流程
① 提前准备,写一个Result返回结果集
@Data
public class Result implements Serializable {

    private int code;
    private String msg;
    private Object data;


    public static Result succ(Object data) {
        return succ(200, "操作成功", data);
    }


    public static Result fail(String msg) {
        return fail(400, msg, null);
    }


    public static Result succ (int code, String msg, Object data) {
        Result result = new Result();
        result.setCode(code);
        result.setMsg(msg);
        result.setData(data);
        return result;
    }


    public static Result fail (int code, String msg, Object data) {
        Result result = new Result();
        result.setCode(code);
        result.setMsg(msg);
        result.setData(data);
        return result;
    }
}
② 提前准备,写一个JWT工具类
该工具类需要有3个功能:
生成JWT、解析JWT、判断JWT是否过期。
@Data
@Component
@ConfigurationProperties(prefix = "test.jwt")
public class JwtUtils {

    private long expire;
    private String secret;
    private String header;


    // 生成JWT
    public String generateToken(String username) {
        Date nowDate = new Date();
        Date expireDate = new Date(nowDate.getTime() + 1000 * expire);

        return Jwts.builder()
                .setHeaderParam("type", "JWT")
                .setSubject(username)
                .setIssuedAt(nowDate)
                .setExpiration(expireDate)    // 7天过期
                .signWith(SignatureAlgorithm.HS512, secret)
                .compact();
    }


    // 解析JWT
    public Claims getClaimsByToken(String jwt) {
        try {
            return Jwts.parser()
                    .setSigningKey(secret)
                    .parseClaimsJws(jwt)
                    .getBody();
        } catch (Exception e) {
            return null;
        }
    }


    // 判断JWT是否过期
    public boolean isTokenExpired(Claims claims) {
        return claims.getExpiration().before(new Date());
    }

}
我们可以配置JWT的有效时间和加密算法所需使用的秘钥,以及返回给前端时在Http response的Header中所叫的名字。这种配置项我们需写入application.yml中,然后使用@ConfigurationProperties注解接收,这样能便于我们日后修改配置。
使用@ConfigurationProperties注解可以读取配置文件中的信息,只要在 Bean 上添加上了这个注解,指定好配置文件中的前缀,那么对应的配置文件数据就会自动填充到 Bean 的属性中
application.yml中的配置如下:
test:
  jwt:
    header: Authorization
    expire: 604800 # 7天,s为单位
    secret: test
③ 写LoginSuccessHandler、LoginFailureHandler
因为我们是
前后端分离模式,当成功或者失败以后,需要返回JSON 所以需要写这两个handler。用于成功或者失败的返回
@Component
public class LoginSuccessHandler implements AuthenticationSuccessHandler {

    @Autowired
    JwtUtils jwtUtils;

    @Override
    public void onAuthenticationSuccess(HttpServletRequest httpServletRequest, HttpServletResponse httpServletResponse, Authentication authentication) throws IOException, ServletException {


        httpServletResponse.setContentType("application/json;charset=UTF-8");
        ServletOutputStream outputStream = httpServletResponse.getOutputStream();

        // 生成JWT,并放置到请求头中
        String jwt = jwtUtils.generateToken(authentication.getName());
        httpServletResponse.setHeader(jwtUtils.getHeader(), jwt);

        Result result = Result.succ("SuccessLogin");

        outputStream.write(JSONUtil.toJsonStr(result).getBytes(StandardCharsets.UTF_8));
        outputStream.flush();
        outputStream.close();
    }
}
@Component
public class LoginFailureHandler implements AuthenticationFailureHandler {

    @Override
    public void onAuthenticationFailure(HttpServletRequest httpServletRequest, HttpServletResponse httpServletResponse, AuthenticationException e) throws IOException, ServletException {


        httpServletResponse.setContentType("application/json;charset=UTF-8");
        ServletOutputStream outputStream = httpServletResponse.getOutputStream();

        String errorMessage = "用户名或密码错误";
        Result result;
        if (e instanceof CaptchaException) {


            errorMessage = "验证码错误";
            result = Result.fail(errorMessage);
        } else {


            result = Result.fail(errorMessage);
        }
        outputStream.write(JSONUtil.toJsonStr(result).getBytes(StandardCharsets.UTF_8));
        outputStream.flush();
        outputStream.close();
    }
}
④ 验证码相关的配置
① 验证码配置类
/*
	配置验证码的大小,宽度等等
*/
@Configuration
public class KaptchaConfig {

    @Bean
    DefaultKaptcha producer() {
        Properties properties = new Properties();
        properties.put("kaptcha.border", "no");
        properties.put("kaptcha.textproducer.font.color", "black");
        properties.put("kaptcha.textproducer.char.space", "4");
        properties.put("kaptcha.image.height", "40");
        properties.put("kaptcha.image.width", "120");
        properties.put("kaptcha.textproducer.font.size", "30");
        Config config = new Config(properties);
        DefaultKaptcha defaultKaptcha = new DefaultKaptcha();
        defaultKaptcha.setConfig(config);
        return defaultKaptcha;
    }

}
② 验证码的controller,返回给前端验证码图片
@GetMapping("/captcha")
public Result Captcha() throws IOException {

    String key = UUID.randomUUID().toString();
    String code = producer.createText();

    BufferedImage image = producer.createImage(code);
    ByteArrayOutputStream outputStream = new ByteArrayOutputStream();
    ImageIO.write(image, "jpg", outputStream);

    BASE64Encoder encoder = new BASE64Encoder();
    String str = "data:image/jpeg;base64,";

    String base64Img = str + encoder.encode(outputStream.toByteArray());

    redisUtil.hset(Const.CAPTCHA_KEY, key, code, 120);

    return Result.succ(
            MapUtil.builder()
            .put("userKey", key)
            .put("captcherImg", base64Img)
            .build()
    );
}
③ 验证码的filter
- 过滤器将来放到验证用户名密码过滤器前端
- 需要先判断请求是否是登录请求,若是登录请求,则进行验证码校验。若不是,则直接跳过这个过滤器。
- CaptchaFilter继承了
OncePerRequestFilter抽象类,该抽象类在每次请求时只执行一次过滤,即它的作用就是保证一次请求只通过一次filter,而不需要重复执行。
@Component
public class CaptchaFilter extends OncePerRequestFilter {

    @Autowired
    RedisUtil redisUtil;

    @Autowired
    LoginFailureHandler loginFailureHandler;

    @Override
    protected void doFilterInternal(HttpServletRequest httpServletRequest, HttpServletResponse httpServletResponse, FilterChain filterChain) throws ServletException, IOException {

        String url = httpServletRequest.getRequestURI();

        if ("/login".equals(url) && httpServletRequest.getMethod().equals("POST")) {
            // 校验验证码
            try {
                validate(httpServletRequest);
            } catch (CaptchaException e) {
                // 交给认证失败处理器
                loginFailureHandler.onAuthenticationFailure(httpServletRequest, httpServletResponse, e);
            }
        }
        filterChain.doFilter(httpServletRequest, httpServletResponse);
    }


    // 校验验证码逻辑
    private void validate(HttpServletRequest httpServletRequest) {
        String code = httpServletRequest.getParameter("code");
        String key = httpServletRequest.getParameter("userKey");

        if (StringUtils.isBlank(code) || StringUtils.isBlank(key)) {
            throw new CaptchaException("验证码错误");
        }

        if (!code.equals(redisUtil.hget(Const.CAPTCHA_KEY, key))) {
            throw new CaptchaException("验证码错误");
        }

        // 若验证码正确,执行以下语句
        // 一次性使用
        redisUtil.hdel(Const.CAPTCHA_KEY, key);
    }
}
⑤ 继承BasicAuthenticationFilter,实现用户验证
- login-form(登录表单认证):使用基于表单的
用户界面进行认证。用户在登录页面中输入用户名和密码,提交表单后,Spring Security会验证用户凭据并完成认证过程。- httpBasic(基本身份验证):在HTTP请求头中发送用户名和密码进行认证。
客户端会在每个请求中添加Authorization头,其中包含Basic认证信息。
- UsernamePasswordAuthenticationFilter过滤器用于处理基于表单方式的登录验证。
- BasicAuthenticationFilter用于处理基于HTTP Basic方式的登录验证
JwtAuthenticationFilter继承了BasicAuthenticationFilter,该类用于普通http请求进行身份认证,该类有一个重要属性:AuthenticationManager,表示认证管理器,它是一个接口,它的默认实现类是ProviderManager
public class JwtAuthenticationFilter extends BasicAuthenticationFilter {

    @Autowired
    JwtUtils jwtUtils;

    @Autowired
    UserDetailServiceImpl userDetailService;

    @Autowired
    SysUserService sysUserService;

    public JwtAuthenticationFilter(AuthenticationManager authenticationManager) {
        super(authenticationManager);
    }

    @Override
    protected void doFilterInternal(HttpServletRequest request, HttpServletResponse response, FilterChain chain) throws IOException, ServletException {


        String jwt = request.getHeader(jwtUtils.getHeader());
        // 这里如果没有jwt,继续往后走,因为后面还有鉴权管理器等去判断是否拥有身份凭证,所以是可以放行的
        // 没有jwt相当于匿名访问,若有一些接口是需要权限的,则不能访问这些接口
        if (StrUtil.isBlankOrUndefined(jwt)) {
            chain.doFilter(request, response);
            return;
        }

        Claims claim = jwtUtils.getClaimsByToken(jwt);

        if (claim == null) {
            throw new JwtException("token 异常");
        }

        if (jwtUtils.isTokenExpired(claim)) {
            throw new JwtException("token 已过期");
        }

        String username = claim.getSubject();
        // 获取用户的权限等信息

        SysUser sysUser = sysUserService.getByUsername(username);
        // 构建UsernamePasswordAuthenticationToken,这里密码为null,是因为提供了正确的JWT,实现自动登录
        UsernamePasswordAuthenticationToken token = new UsernamePasswordAuthenticationToken(username, null, userDetailService.getUserAuthority(sysUser.getId()));
        SecurityContextHolder.getContext().setAuthentication(token);

        chain.doFilter(request, response);

    }
}
⑥ 认证失败的JwtAuthenticationEntryPoint(用户未登录处理类)
当BasicAuthenticationFilter认证失败的时候会进入AuthenticationEntryPoint,我们定义JWT认证失败处理器JwtAuthenticationEntryPoint,使其实现AuthenticationEntryPoint接口
@Component
public class JwtAuthenticationEntryPoint implements AuthenticationEntryPoint {


    @Override
    public void commence(HttpServletRequest httpServletRequest, HttpServletResponse httpServletResponse, AuthenticationException e) throws IOException, ServletException {

        httpServletResponse.setContentType("application/json;charset=UTF-8");
        httpServletResponse.setStatus(HttpServletResponse.SC_UNAUTHORIZED);
        ServletOutputStream outputStream = httpServletResponse.getOutputStream();

        Result result = Result.fail("请先登录");

        outputStream.write(JSONUtil.toJsonStr(result).getBytes(StandardCharsets.UTF_8));
        outputStream.flush();
        outputStream.close();
    }
}
⑦ 暂无权限处理类(AccessDeniedHandler,状态码403)
@Component
public class JwtAccessDeniedHandler implements AccessDeniedHandler {

    @Override
    public void handle(HttpServletRequest httpServletRequest, HttpServletResponse httpServletResponse, AccessDeniedException e) throws IOException, ServletException {
           httpServletResponse.setContentType("application/json;charset=UTF-8");
        httpServletResponse.setStatus(HttpServletResponse.SC_FORBIDDEN);
        ServletOutputStream outputStream = httpServletResponse.getOutputStream();

        Result result = Result.fail(e.getMessage());

        outputStream.write(JSONUtil.toJsonStr(result).getBytes(StandardCharsets.UTF_8));
        outputStream.flush();
        outputStream.close();
    }
}
⑧ 登出处理器LogoutSuccessHandler
@Component
public class JWTLogoutSuccessHandler implements LogoutSuccessHandler {

    @Autowired
    JwtUtils jwtUtils;

    @Override
    public void onLogoutSuccess(HttpServletRequest httpServletRequest, HttpServletResponse httpServletResponse, Authentication authentication) throws IOException, ServletException {

        if (authentication != null) {
            new SecurityContextLogoutHandler().logout(httpServletRequest, httpServletResponse, authentication);
        }

        httpServletResponse.setContentType("application/json;charset=UTF-8");
        ServletOutputStream outputStream = httpServletResponse.getOutputStream();

        httpServletResponse.setHeader(jwtUtils.getHeader(), "");

        Result result = Result.succ("SuccessLogout");

        outputStream.write(JSONUtil.toJsonStr(result).getBytes(StandardCharsets.UTF_8));
        outputStream.flush();
        outputStream.close();
    }
}
⑨ 自定义AccountUser类实现UserDetails(拓展原有的UserDetails)
public class AccountUser implements UserDetails {

    private Long userId;

    private static final long serialVersionUID = 540L;
    private static final Log logger = LogFactory.getLog(User.class);
    private String password;
    private final String username;
    private final Collection<? extends GrantedAuthority> authorities;
    private final boolean accountNonExpired;
    private final boolean accountNonLocked;
    private final boolean credentialsNonExpired;
    private final boolean enabled;

    public AccountUser(Long userId, String username, String password, Collection<? extends GrantedAuthority> authorities) {
        this(userId, username, password, true, true, true, true, authorities);
    }

    public AccountUser(Long userId, String username, String password, boolean enabled, boolean accountNonExpired, boolean credentialsNonExpired, boolean accountNonLocked, Collection<? extends GrantedAuthority> authorities) {
        Assert.isTrue(username != null && !"".equals(username) && password != null, "Cannot pass null or empty values to constructor");
        this.userId = userId;
        this.username = username;
        this.password = password;
        this.enabled = enabled;
        this.accountNonExpired = accountNonExpired;
        this.credentialsNonExpired = credentialsNonExpired;
        this.accountNonLocked = accountNonLocked;
        this.authorities = authorities;
    }

    @Override
    public Collection<? extends GrantedAuthority> getAuthorities() {
        return this.authorities;
    }

    @Override
    public String getPassword() {
        return this.password;
    }

    @Override
    public String getUsername() {
        return this.username;
    }

    @Override
    public boolean isAccountNonExpired() {
        return this.accountNonExpired;
    }

    @Override
    public boolean isAccountNonLocked() {
        return this.accountNonLocked;
    }

    @Override
    public boolean isCredentialsNonExpired() {
        return this.credentialsNonExpired;
    }

    @Override
    public boolean isEnabled() {
        return this.enabled;
    }
}
⑩ 实现UserDetailsService,用于和数据库比对
@Service
public class UserDetailServiceImpl implements UserDetailsService {

    @Autowired
    SysUserService sysUserService;

    @Override
    public UserDetails loadUserByUsername(String username) throws UsernameNotFoundException {

        SysUser sysUser = sysUserService.getByUsername(username);

        if (sysUser == null) {
            throw new UsernameNotFoundException("用户名或密码错误");
        }

        return new AccountUser(sysUser.getId(), sysUser.getUsername(), sysUser.getPassword(), getUserAuthority(sysUser.getId()));

    }
}
⑩① 密码的加密解密
@NoArgsConstructor
public class PasswordEncoder extends BCryptPasswordEncoder {

    @Override
    public boolean matches(CharSequence rawPassword, String encodedPassword) {
        // 接收到的前端的密码
        String pwd = rawPassword.toString();
        // 进行rsa解密
        try {
            pwd = RsaUtils.decryptByPrivateKey(RsaProperties.privateKey, pwd);
        } catch (Exception e) {
            throw new BadCredentialsException(e.getMessage());
        }
        if (encodedPassword != null && encodedPassword.length() != 0) {
            return BCrypt.checkpw(pwd, encodedPassword);
        } else {
            return false;
        }
    }
}
⑩② SecurityConfig配置类
@Configuration
@EnableWebSecurity
@RequiredArgsConstructor
@EnableGlobalMethodSecurity(prePostEnabled = true)
public class SecurityConfig extends WebSecurityConfigurerAdapter {

    @Autowired
    LoginFailureHandler loginFailureHandler;

    @Autowired
    LoginSuccessHandler loginSuccessHandler;

    @Autowired
    CaptchaFilter captchaFilter;

    @Autowired
    JwtAuthenticationEntryPoint jwtAuthenticationEntryPoint;

    @Autowired
    JwtAccessDeniedHandler jwtAccessDeniedHandler;

    @Autowired
    UserDetailServiceImpl userDetailService;

    @Autowired
    JWTLogoutSuccessHandler jwtLogoutSuccessHandler;

    @Bean
    JwtAuthenticationFilter jwtAuthenticationFilter() throws Exception {


        JwtAuthenticationFilter jwtAuthenticationFilter = new JwtAuthenticationFilter(authenticationManager());
        return jwtAuthenticationFilter;
    }
    private static final String[] URL_WHITELIST = {


      "/login",
      "/logout",
      "/captcha",
      "/favicon.ico"
    };

    @Bean
    PasswordEncoder PasswordEncoder() {


        return new PasswordEncoder();
    }

    @Override
    protected void configure(HttpSecurity http) throws Exception {


        http.cors().and().csrf().disable()
                // 登录配置
                .httpBasic()
                .successHandler(loginSuccessHandler)
                .failureHandler(loginFailureHandler)

                .and()
                .logout()
                .logoutSuccessHandler(jwtLogoutSuccessHandler)

                // 禁用session
                .and()
                .sessionManagement()
                .sessionCreationPolicy(SessionCreationPolicy.STATELESS)

                // 配置拦截规则
                .and()
                .authorizeRequests()
                .antMatchers(URL_WHITELIST).permitAll()
                .anyRequest().authenticated()

                // 异常处理器
                .and()
                .exceptionHandling()
                .authenticationEntryPoint(jwtAuthenticationEntryPoint)
                .accessDeniedHandler(jwtAccessDeniedHandler)

                // 配置自定义的过滤器
                .and()
                .addFilter(jwtAuthenticationFilter())

                // 验证码过滤器放在UsernamePassword过滤器之前
                .addFilterBefore(captchaFilter, UsernamePasswordAuthenticationFilter.class)
                ;
    }

    @Override
    protected void configure(AuthenticationManagerBuilder auth) throws Exception {
        auth.userDetailsService(userDetailService);
    }
}
比较好的代码推荐
https://zhuanlan.zhihu.com/p/585835490
④ 回顾一下Security的登陆流程

本文来自互联网用户投稿,该文观点仅代表作者本人,不代表本站立场。本站仅提供信息存储空间服务,不拥有所有权,不承担相关法律责任。 如若内容造成侵权/违法违规/事实不符,请联系我的编程经验分享网邮箱:chenni525@qq.com进行投诉反馈,一经查实,立即删除!
- Python教程
- 深入理解 MySQL 中的 HAVING 关键字和聚合函数
- Qt之QChar编码(1)
- MyBatis入门基础篇
- 用Python脚本实现FFmpeg批量转换
- 上海AI实验室等开源,音频、音乐统一开发工具包Amphion
- 多线程面试题目(1)
- Javaweb见解2
- 186.【2023年华为OD机试真题(C卷)】整数编码(Java&Python&C++&JS实现)
- HttpServletRequest getRemoteHost()、getServerName()、getLocalName()区别
- 如何在几分钟内创建AI工具
- 统信UOS操作系统上扩容数据盘
- S32K312软件看门狗之Software Watchdog Timer (SWT)
- 等价类划分法
- canvas绘制旋转的椭圆花