stm32F4——BEEP与按键的实例使用
发布时间:2023年12月17日
stm32F4——BEEP与按键的实例使用
蜂鸣器和按键的实质都是GPIO的使用,所以基本原理就不介绍啦,基本寄存器其实都是GPIO的高低电平的赋值,可以参考stm32——LEDGPIO的详细介绍
一、BEEP
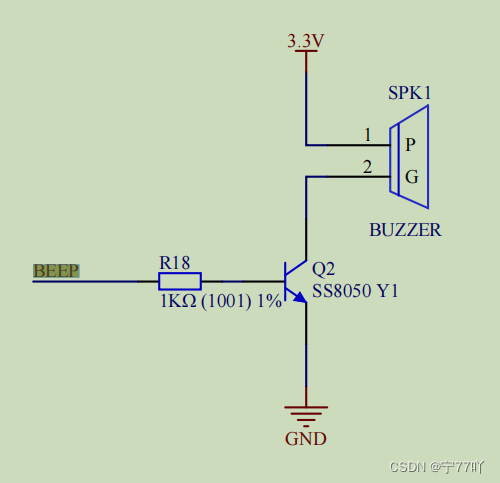
原理图:


beep.c。
void BEEP_Init(void)//使能PORTB的时钟,配置相关内容
{

 GPIO_InitTypeDef GPIO_InitStructure;
 RCC_AHB1PeriphClockCmd(RCC_AHB1Periph_GPIOB,ENABLE);
 //F8
 GPIO_InitStructure.GPIO_Pin=GPIO_Pin_10;
 GPIO_InitStructure.GPIO_Mode=GPIO_Mode_OUT;//
 GPIO_InitStructure.GPIO_Speed=GPIO_Speed_100MHz;//速度为50HHZ
 GPIO_InitStructure.GPIO_OType=GPIO_OType_PP;//推挽输出
 GPIO_InitStructure.GPIO_PuPd=GPIO_PuPd_DOWN;//下拉
 GPIO_Init(GPIOB,&GPIO_InitStructure);
 //GPIO_SetBits(GPIOB,GPIO_Pin_10);  //输出为1
 GPIO_ResetBits(GPIOB,GPIO_Pin_10);  //输出为0
}
beep.h
#ifndef __BEEP_H
#define __BEEP_H
//#include "sys.h"

//#define BEEP PGout(7);
void BEEP_Init(void);
#endif
二、 KEY

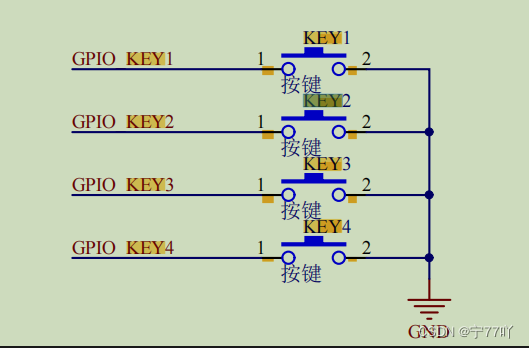
按键的公共端是GND,所以在设置按键的电阻的时候只能设置为上拉电阻,当按键按下的时候,就可以检测到该引脚口的电平为低电平。


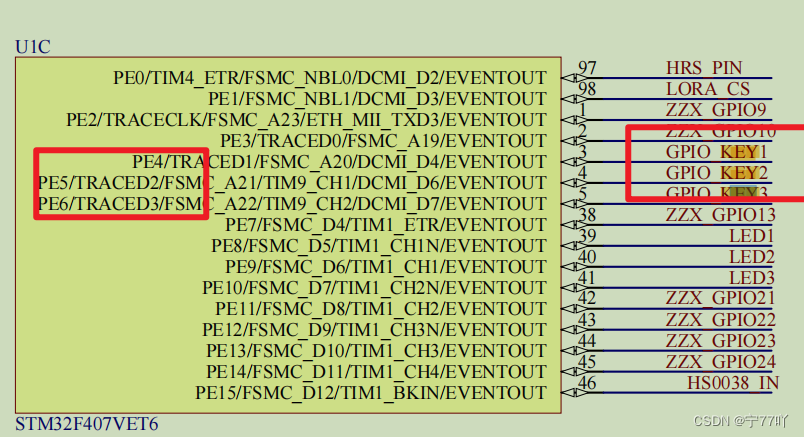
按键所连接的引脚是PE4-6,还有一个KEY4是PC13
key.c

#include "delay.h"
#include "key.h"
#include "stm32f4xx.h"
//PE4-6,还有一个KEY4是PC13
void KEY_Init(void)
{
 GPIO_InitTypeDef  GPIO_InitStructure;

  RCC_AHB1PeriphClockCmd(RCC_AHB1Periph_GPIOE, ENABLE);//使能GPIOC,GPIOE时钟


  GPIO_InitStructure.GPIO_Pin = GPIO_Pin_4|GPIO_Pin_5|GPIO_Pin_6; //KEY0 KEY1 KEY2对应引脚
  GPIO_InitStructure.GPIO_Mode = GPIO_Mode_IN;//普通输入模式
  GPIO_InitStructure.GPIO_Speed = GPIO_Speed_100MHz;//100M
  GPIO_InitStructure.GPIO_PuPd = GPIO_PuPd_UP;//上拉-只能
  GPIO_Init(GPIOE, &GPIO_InitStructure);//初始化

 RCC_AHB1PeriphClockCmd(RCC_AHB1Periph_GPIOC, ENABLE);//使能GPIOC,GPIOE时钟

  GPIO_InitStructure.GPIO_Pin = GPIO_Pin_13; //KEY4对应引脚
  GPIO_InitStructure.GPIO_Mode = GPIO_Mode_IN;//普通输入模式
  GPIO_InitStructure.GPIO_Speed = GPIO_Speed_100MHz;//100M
  GPIO_InitStructure.GPIO_PuPd = GPIO_PuPd_UP;//上拉-只能
  GPIO_Init(GPIOC, &GPIO_InitStructure);//初始化

}

/*
 u8 KEY_Scan(u8 mode)
{
 static u8 key_up=1;//按键按松开标志
 if(mode)key_up=1;  //支持连按
 if(key_up&&(KEY0==0||KEY1==0||KEY2==0||KEY3==0))
 {
  delay_ms(10);//去抖动
  key_up=0;
  if(KEY0==0) return 1;
  else if(KEY1==0)return 2;
  else if(KEY2==0)return 3;
  else if(KEY3==0)return 4;
 }else if(KEY0==1&&KEY1==1&&KEY2==1&&KEY3==1)key_up=1;
  return 0;// 无按键按下
}

*/
u8 key_san(void)
{
 static unsigned char keyvalue=0,flag=0;
 if(KEY1 ==0){delay_ms(10);keyvalue=1;flag=1;while(KEY1==0);}
 else if (KEY2 == 0){delay_ms(10);keyvalue=2;flag=1;while(KEY2==0);}
 else if(KEY3 ==0){delay_ms(10);keyvalue =3;flag=1;while(KEY3==0);}
 else if (KEY4 ==0){delay_ms(10);keyvalue =4;flag=1;while(KEY4==0);}
 else if(KEY1==1&&KEY2==1&&KEY3==1&&KEY4==1&& flag==0)
 {keyvalue=0;}
 //else keyvalue=0;
 return keyvalue;

}
三、通过KEY1控制LED闪烁,KEY2控制BEEP响
其中使用的delay可以是自己设置的软件延迟,也可以是使用系统延迟,如果是系统延迟需要添加相关文件在SYSTEM中。
#include "stm32f4xx.h"
#include "LED.h"
#include "beep.h"
#include "key.h"
#include "delay.h"
u8 keynum=0;
//reset是0
int main(void)
{
 LED_Init();
 BEEP_Init();
 KEY_Init();
 delay_init(168);
 while(1)
 {
  keynum=key_san();
  if(keynum==1)
  {
   delay_ms(100);
  //GPIO_ResetBits(GPIOE,GPIO_Pin_8|GPIO_Pin_9|GPIO_Pin_10);//输出为0,点亮LED
  GPIO_ToggleBits(GPIOE,GPIO_Pin_8|GPIO_Pin_9|GPIO_Pin_10);

  }
  else if(keynum==2)
  {
   GPIO_SetBits(GPIOB,GPIO_Pin_10);  //输出为1 蜂鸣器
  }
 }
}
文章来源:https://blog.csdn.net/qq_63831368/article/details/135049672
本文来自互联网用户投稿,该文观点仅代表作者本人,不代表本站立场。本站仅提供信息存储空间服务,不拥有所有权,不承担相关法律责任。 如若内容造成侵权/违法违规/事实不符,请联系我的编程经验分享网邮箱:chenni525@qq.com进行投诉反馈,一经查实,立即删除!
本文来自互联网用户投稿,该文观点仅代表作者本人,不代表本站立场。本站仅提供信息存储空间服务,不拥有所有权,不承担相关法律责任。 如若内容造成侵权/违法违规/事实不符,请联系我的编程经验分享网邮箱:chenni525@qq.com进行投诉反馈,一经查实,立即删除!
最新文章
- Python教程
- 深入理解 MySQL 中的 HAVING 关键字和聚合函数
- Qt之QChar编码(1)
- MyBatis入门基础篇
- 用Python脚本实现FFmpeg批量转换
- 【linux】线程互斥
- 人工智能技术的应用
- 深度学习(3)--递归神经网络(RNN)和词向量模型Word2Vec
- ssm420基于JavaEE的企业人事管理信息系统的设计与实现论文
- 【方案】如何利用大数据+云计算技术打造智能环境监控系统?
- Mybatis如何兼容各类日志?
- 树莓派Ubuntu系统安装OpenCV教程
- MATLAB | 一起来绘制一款元旦特别款烟花叭~
- 鸿蒙HarmonyOS开发用什么语言
- MyBatis源码分析(一):搭建调试环境