Spring AOP 总结四
Spring AOP这个点从开始写到现在已经持续很长时间了。这个系列我们从一个示例开始,然后逐渐深入,触达Spring AOP之灵魂。通过这个系列,我们不仅捋顺了AOP的定义,也知晓了Spring中AOP的基本概念,更弄清了Spring中AOP的实现细节。虽然自我感觉良好的我还想继续深入,但是毕竟物有本末,事有终始,我们不能因为一个点而错过整个世界。曾经的我因为不懂多线程而放弃对xml配置式Spring的学习,也是曾经的我因为无法捋顺xml配置式Spring的源码而放弃对Spring Boot的学习,又是曾经我因为不懂Spring Boot的原理而拒绝与Spring Cloud的暧昧,最后还是曾经的我因为不会Spring Cloud而错过了当年如日中天的大数据。为了避免重蹈覆辙,今天的我想以此篇来结束Spring AOP这个系列,从而为其他系列腾出时间和空间。在本篇文章中,我将以debug方式来追踪代码,以便将前几篇中见到的东西串起来,同也会补充一些新的梳理点。好了,现在让我们开始吧!
本节debug将围绕第一篇文章中的示例展开,首先启动Spring SpringTransactionApplication类,我们会进入下面图所示的断点处:

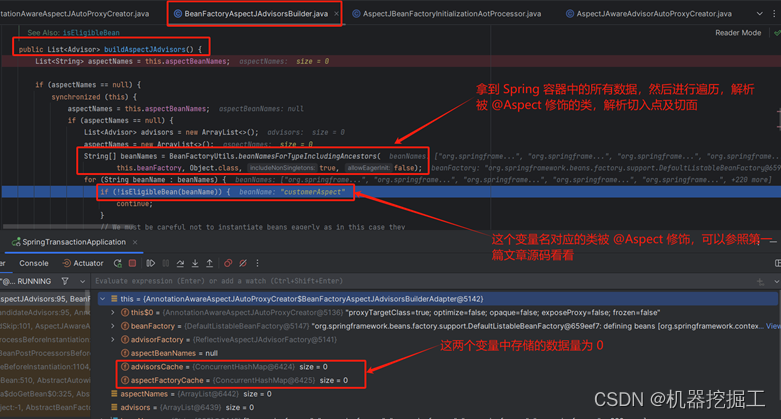
接下来继续debug下去,然后一路就到下面这幅图所示的代码处(注意:advisorsCache和aspectFactoryCache中存储的数据量为0):
继续debug,直到List<Advisor> classAdvisors = this.advisorFactory.getAdvisors(factory)这行代码执行完,会看到下面这幅图(注意:advisorsCache的数据量变为1,具体见下图):
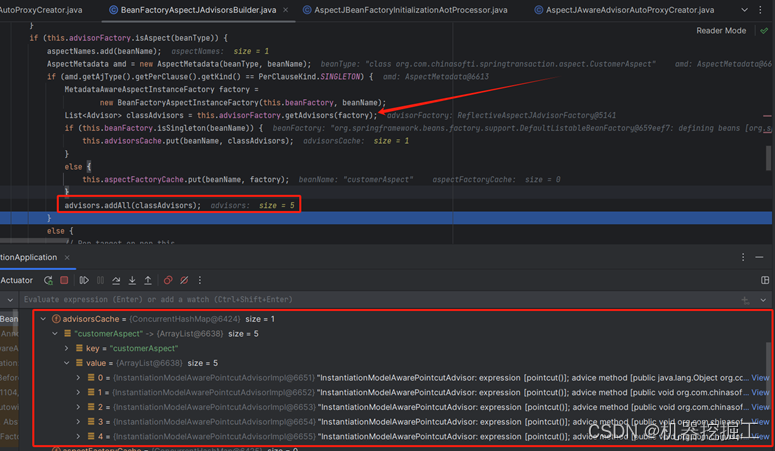
从这幅图不难发现advisorsCache中存储的key为customerAspect,value是一个长度为5的数组,其中的数据都是InstantiationModelAwarePointcutAdvisor类型(关于这个类型的类图可以参见《Spring AOP总结二》),下面来看一下下标为0的数据的详细信息,具体参考下图:

从图中可以发现其中包含的通知的实际类型为AspectJAroundAdvice(关于该类型的类结构可以参见《Spring AOP总结二》),其他几个类似,这里不再一一罗列了。下面我们再来看看图中的pointcut属性,具体如下图所示:

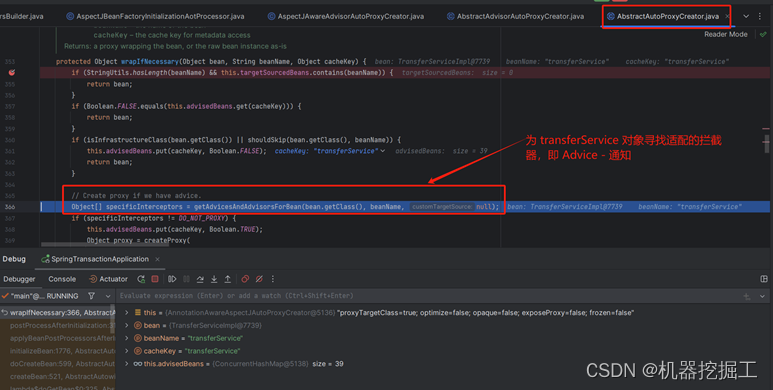
继续回到AbstractAutoProxyCreator#postProcessBeforeInstantiation()方法处,经过多轮的断点,我们会看到自己定义的切面类——CustomerAspect,继续debug,该对象会被存储到该类的key-value属性advisedBeans中,关于该属性的作用暂时未知?接下来删掉该断点,在本类的postProcessAfterInitialization()方法中新增断点,继续debug,会看到下面这幅图:

继续debug,进入到下图所示的代码处(图中的getAdvicesAndAdvisorsForBean()方法的作用是寻找适配当前对象的通知,即Advice):
接下来我们重点debug一下这段逻辑,首先进入AbstractAdvisorAutoProxyCreator# getAdvicesAndAdvisorsForBean(Class<?> beanClass, String beanName, @Nullable TargetSource targetSource)方法中,然后在进入AbstractAdvisorAutoProxyCreator#findEligibleAdvisors(Class<?> beanClass, String beanName),具体如下图所示:

接下来继续debug,我们进入到AnnotationAwareAspectJAutoProxyCreator类的findCandidateAdvisors()方法中,该方法的源码如下所示:
protected List<Advisor> findCandidateAdvisors() {
    // Add all the Spring advisors found according to superclass rules.
    List<Advisor> advisors = super.findCandidateAdvisors();
    // Build Advisors for all AspectJ aspects in the bean factory.
    if (this.aspectJAdvisorsBuilder != null) {
       advisors.addAll(this.aspectJAdvisorsBuilder.buildAspectJAdvisors());
    }
    return advisors;
}
这个方法会继续调用父类AbstractAdvisorAutoProxyCreator的findCandidateAdvisors()方法,该方法的源码如下所示:
protected List<Advisor> findCandidateAdvisors() {
    Assert.state(this.advisorRetrievalHelper != null, "No BeanFactoryAdvisorRetrievalHelper available");
    return this.advisorRetrievalHelper.findAdvisorBeans();
}
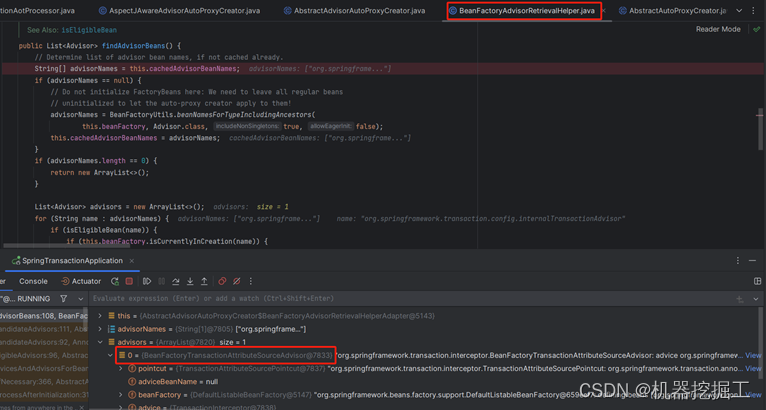
这个方法会调BeanFactoryAdvisorRetrievalHelper对象的findAdvisorBeans()去查找相关的Advisor对象,这里查到的是BeanFactoryTransactionAttributeSourceAdvisor,也就是后面要梳理的与事务有关的Advisor。具体执行结果如下图所示(个人理解BeanFactoryAdvisorRetrievalHelper这个类就是用于查找Spring自己定义的Advisor):
我们继续回到AbstractAdvisorAutoProxyCreator的findCandidateAdvisors()方法处,该段代码此时的调用结果如下图所示:
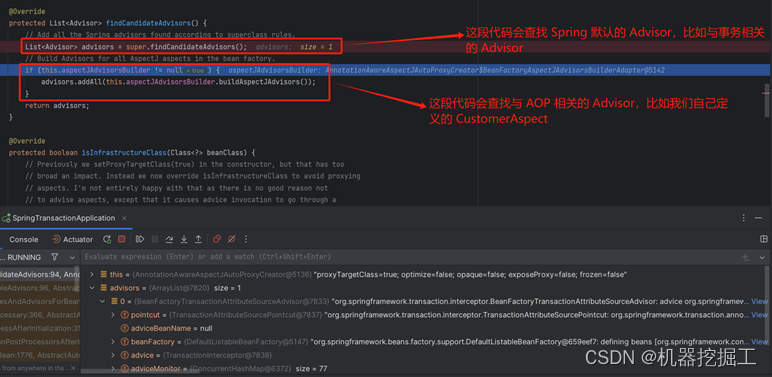
继续看AbstractAdvisorAutoProxyCreator的findCandidateAdvisors()方法中这样一行代码this.aspectJAdvisorsBuilder.buildAspectJAdvisors(),它会调用BeanFactoryAspectJAdvisorsBuilder对象的buildAspectJAdvisors()方法(看到这里我们可以回想一下前面梳理的解析自定义AOP的地方,有没有很像?答案是的,不过这一次不会走if (aspectNames == null){}分支),看一下源码吧:
public List<Advisor> buildAspectJAdvisors() {
    List<String> aspectNames = this.aspectBeanNames;

    if (aspectNames == null) {
       synchronized (this) {
          aspectNames = this.aspectBeanNames;
          if (aspectNames == null) {
             List<Advisor> advisors = new ArrayList<>();
             aspectNames = new ArrayList<>();
             String[] beanNames = BeanFactoryUtils.beanNamesForTypeIncludingAncestors(
                   this.beanFactory, Object.class, true, false);
             for (String beanName : beanNames) {
                if (!isEligibleBean(beanName)) {
                   continue;
                }
                // We must be careful not to instantiate beans eagerly as in this case they
                // would be cached by the Spring container but would not have been weaved.
                Class<?> beanType = this.beanFactory.getType(beanName, false);
                if (beanType == null) {
                   continue;
                }
                if (this.advisorFactory.isAspect(beanType)) {
                   aspectNames.add(beanName);
                   AspectMetadata amd = new AspectMetadata(beanType, beanName);
                   if (amd.getAjType().getPerClause().getKind() == PerClauseKind.SINGLETON) {
                      MetadataAwareAspectInstanceFactory factory =
                            new BeanFactoryAspectInstanceFactory(this.beanFactory, beanName);
                      List<Advisor> classAdvisors = this.advisorFactory.getAdvisors(factory);
                      if (this.beanFactory.isSingleton(beanName)) {
                         this.advisorsCache.put(beanName, classAdvisors);
                      }
                      else {
                         this.aspectFactoryCache.put(beanName, factory);
                      }
                      advisors.addAll(classAdvisors);
                   }
                   else {
                      // Per target or per this.
                      if (this.beanFactory.isSingleton(beanName)) {
                         throw new IllegalArgumentException("Bean with name '" + beanName +
                               "' is a singleton, but aspect instantiation model is not singleton");
                      }
                      MetadataAwareAspectInstanceFactory factory =
                            new PrototypeAspectInstanceFactory(this.beanFactory, beanName);
                      this.aspectFactoryCache.put(beanName, factory);
                      advisors.addAll(this.advisorFactory.getAdvisors(factory));
                   }
                }
             }
             this.aspectBeanNames = aspectNames;
             return advisors;
          }
       }
    }

    if (aspectNames.isEmpty()) {
       return Collections.emptyList();
    }
    List<Advisor> advisors = new ArrayList<>();
    for (String aspectName : aspectNames) {
       List<Advisor> cachedAdvisors = this.advisorsCache.get(aspectName);
       if (cachedAdvisors != null) {
          advisors.addAll(cachedAdvisors);
       }
       else {
          MetadataAwareAspectInstanceFactory factory = this.aspectFactoryCache.get(aspectName);
          advisors.addAll(this.advisorFactory.getAdvisors(factory));
       }
    }
    return advisors;
}
这段逻辑的执行结果可以参见下图:

这段逻辑执行完后会返回自定义的CustomerAspect中的五个通知,它们均被包装在类型为InstantiationModelAwarePointcutAdvisor的对象中,继续返回到AnnotationAwareAspectJAutoProxyCreator类的findCandidateAdvisors()方法中,将查找到的所有Advisor整合到一个集合中,具体执行情况如下图所示:

接下来将查找到的所有Advisor返回给上级调用者,即AbstractAdvisorAutoProxyCreator的findCandidateAdvisors()方法中(这一步的主要目的是查找候选Advisor),接下来继续看该方法中的findAdvisorsThatCanApply(candidateAdvisors, beanClass, beanName)代码,该方法的代码为:
protected List<Advisor> findAdvisorsThatCanApply(
       List<Advisor> candidateAdvisors, Class<?> beanClass, String beanName) {

    ProxyCreationContext.setCurrentProxiedBeanName(beanName);
    try { // 下面这段代码的作用就是过滤对当前对象无效的 Advisor
       return AopUtils.findAdvisorsThatCanApply(candidateAdvisors, beanClass);
    }
    finally {
       ProxyCreationContext.setCurrentProxiedBeanName(null);
    }
}
接下来我们一起看一下AopUtils类中的findAdvisorsThatCanApply()方法中的代码,详细如下图所示:
public static List<Advisor> findAdvisorsThatCanApply(List<Advisor> candidateAdvisors, Class<?> clazz) {
    if (candidateAdvisors.isEmpty()) {
       return candidateAdvisors;
    }
    List<Advisor> eligibleAdvisors = new ArrayList<>();
    for (Advisor candidate : candidateAdvisors) {
       if (candidate instanceof IntroductionAdvisor && canApply(candidate, clazz)) {
          eligibleAdvisors.add(candidate);
       }
    }
    boolean hasIntroductions = !eligibleAdvisors.isEmpty();
    for (Advisor candidate : candidateAdvisors) {
       if (candidate instanceof IntroductionAdvisor) {
          // already processed
          continue;
       }
       if (canApply(candidate, clazz, hasIntroductions)) {
          eligibleAdvisors.add(candidate);
       }
    }
    return eligibleAdvisors;
}
这段代码的主要逻辑有:判断候选的Advisor集合是否为空;遍历所有候选Advisor,看看其是否是IntroductionAdvisor类型,如果是还要判断其是否可以应用到目标类对象上,即本示例的TransferServiceImpl(经过遍历,示例中的所有Advisor均不符合要求);接着继续遍历所有的候选Advisor,判断其是否是IntroductionAdvisor类型,如果是则继续遍历,如果不是则判断当前的Advisor对象是否可以应用到目标类对象上(调用本类上的canApply()方法做判断,该方法很简单,首先判断当前Advisor是否是IntroductionAdvisor类型,如果不是继续判断当前的Advisor是否是PointcutAdvisor类型,如果是则继续调用canApply()的重载方法进行判断,这里会接收一个AspectJExpressionPointcut类型的pointcut对象,接下来会首先调用该对象上的getClassFilter()方法获取一个ClassFilter对象然后调用其上的matches()方法对targetClass,本示例中的TransferSerfviceImpl,进行匹配,然后调用该对象上的getMethodMatcher ()方法获取一个MethodMatcher对象并将其赋值给IntroductionAwareMethodMatcher,接着获取目标类对象字节和其父类的字节码,然后遍历这两个字节码中的所有方法进行匹配,看当前的通知是否和这两个类中的方法匹配得上,如果符合就返回true,否则返回false),这里还有个hasIntroductions(示例中第一步的遍历结果是空,所以这个值是false)。说了这么多,还是看一下canApply()方法的源码吧,如下所示:
public static boolean canApply(Advisor advisor, Class<?> targetClass, boolean hasIntroductions) {
    if (advisor instanceof IntroductionAdvisor ia) {
       return ia.getClassFilter().matches(targetClass);
    }
    else if (advisor instanceof PointcutAdvisor pca) {
       return canApply(pca.getPointcut(), targetClass, hasIntroductions);
    }
    else {
       // It doesn't have a pointcut so we assume it applies.
       return true;
    }
}
// 下面这个canApply()方法会被上面的canApply()方法调用
public static boolean canApply(Pointcut pc, Class<?> targetClass, boolean hasIntroductions) {
    Assert.notNull(pc, "Pointcut must not be null");
    if (!pc.getClassFilter().matches(targetClass)) {
       return false;
    }

    MethodMatcher methodMatcher = pc.getMethodMatcher();
    if (methodMatcher == MethodMatcher.TRUE) {
       // No need to iterate the methods if we're matching any method anyway...
       return true;
    }

    IntroductionAwareMethodMatcher introductionAwareMethodMatcher = null;
    if (methodMatcher instanceof IntroductionAwareMethodMatcher iamm) {
       introductionAwareMethodMatcher = iamm;
    }

    Set<Class<?>> classes = new LinkedHashSet<>();
    if (!Proxy.isProxyClass(targetClass)) {
       classes.add(ClassUtils.getUserClass(targetClass));
    }
    classes.addAll(ClassUtils.getAllInterfacesForClassAsSet(targetClass));

    for (Class<?> clazz : classes) {
       Method[] methods = ReflectionUtils.getAllDeclaredMethods(clazz);
       for (Method method : methods) {
          if (introductionAwareMethodMatcher != null ?
                introductionAwareMethodMatcher.matches(method, targetClass, hasIntroductions) :
                methodMatcher.matches(method, targetClass)) {
             return true;
          }
       }
    }

    return false;
}
这段逻辑就先到这里吧!通过循环处理,我们可以发现最终能够匹配上TransferServiceImpl类中相关方法的Advisor就是我们自定义的CustomerAspect类中的那些切面方法。现在回到AbstractAdvisorAutoProxyCreator的findCandidateAdvisors(Class<?> beanClass, String beanName)方法中,最终该方法返回了一个包含CustomerAspect类中的那些切面方法的集合给上级调用者,即AbstractAdvisorAutoProxyCreator的getAdvicesAndAdvisorsForBean(Class<?> beanClass, String beanName, @Nullable TargetSource targetSource)中,该方法会继续向上级返回,最终将结果返回给了AbstractAutoProxyCreator类中的wrapIfNecessary(Object bean, String beanName, Object cacheKey)方法,接下来就是创建代理的过程了,这个过程可以参考《Spring AOP总结三》一文。
梳理到这里,我们还是先来总结一下吧:
- BeanFactoryAdvisorRetrievalHelper,该类上面有这样一段注释:Helper for retrieving standard Spring Advisors from a BeanFactory, for use with auto-proxying。其大意就是从Spring容器中收集标准的Spring Advisor,以便后边可以自动创建相关代理。该类是一个单独定义的工具类
- BeanFactoryTransactionAttributeSourceAdvisor,这是一个标准的Spring Advisor,其与Spring事务有关(这个后面会深入梳理)
- BeanFactoryAspectJAdvisorsBuilder,这个类也是一个单独定义的工具类,其上的注释是这样写的:Helper for retrieving @AspectJ beans from a BeanFactory and building Spring Advisors based on them, for use with auto-proxying。其大意就是搜集用于自己通过@AspectJ注解定义的切面,并将其包装为一个标准的Spring Advisor,以便后面创建代理时使用。该类中有一个AspectJAdvisorFactory类型的对象属性,其实际类型为ReflectiveAspectJAdvisorFactory(该类的文档注释为Factory that can create Spring AOP Advisors given AspectJ classes from classes honoring AspectJ's annotation syntax, using reflection to invoke the corresponding advice methods,我们可以根据这个结合debug的结果来理解这个类的作用。个人理解这个类是一个工厂类,其作用就是根据@AspectJ注解修饰的类创建一个标准的Spring AOP Advisors——这里面会包含一些解析动作)
- AopUtils,根据debug结果,个人推断这个类的主要作用就是查找符合目标类的标准的Spring Advisor
接下来我们看一下这里涉及到的几个重要的类的结构图,由于其他几个都是独立类,所以这里看的类有是ReflectiveAspectJAdvisorFactory,其类结构图如下图所示:
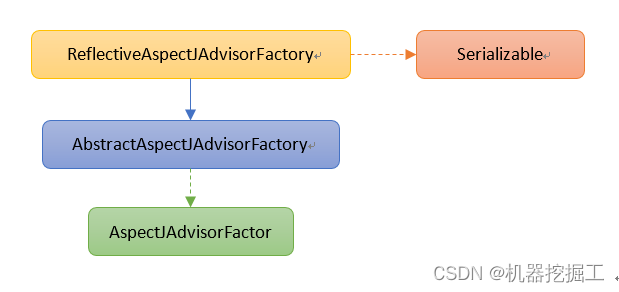
看到想必大家已经清楚了前面只是将切面的解析及后面创建代理前查找符合目标类的切面的过程串了起来。本篇文章将不会对代理创建的过程进行曝光,如果想了解代理的创建过程可以参考《Spring AOP总结三》。下面将从代理使用的角度,讲解代理的执行过程。首先看下面这样一幅图:
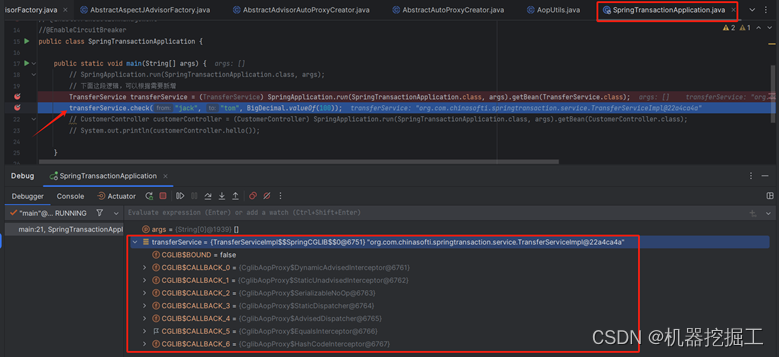
从这幅图可以看出,从Spring容器中拿出的TransferService是一个代理对象,见图中最下方的红框,这个代理对象就是一组Callback集合——HashCodeInterceptor|EqualsInterceptor|AdvisedDispatcher|StaticDispatcher|SerializableNoOp|StaticUnadvisedInterceptor|DynamicAdvisedInterceptor。由图可知这些类都是CglibAopProxy的内部类。关于这些类的基本结构可以参见《Spring AOP总结三》这篇文章。同时这篇文章中也提到过DynamicAdvisedInterceptor是串起切面逻辑和实际业务执行方法的关键,而这个类中的intercept(Object proxy, Method method, Object[] args, MethodProxy methodProxy) throws Throwable方法是关键中的关键。接下来我们看一下这个方法的源码吧:
public Object intercept(Object proxy, Method method, Object[] args, MethodProxy methodProxy) throws Throwable {
    Object oldProxy = null;
    boolean setProxyContext = false;
    Object target = null;
    TargetSource targetSource = this.advised.getTargetSource();
    try {
       if (this.advised.exposeProxy) {
          // Make invocation available if necessary.
          oldProxy = AopContext.setCurrentProxy(proxy);
          setProxyContext = true;
       }
       // Get as late as possible to minimize the time we "own" the target, in case it comes from a pool...
       target = targetSource.getTarget();
       Class<?> targetClass = (target != null ? target.getClass() : null);
       List<Object> chain = this.advised.getInterceptorsAndDynamicInterceptionAdvice(method, targetClass);
       Object retVal;
       // Check whether we only have one InvokerInterceptor: that is,
       // no real advice, but just reflective invocation of the target.
       if (chain.isEmpty()) {
          // We can skip creating a MethodInvocation: just invoke the target directly.
          // Note that the final invoker must be an InvokerInterceptor, so we know
          // it does nothing but a reflective operation on the target, and no hot
          // swapping or fancy proxying.
          Object[] argsToUse = AopProxyUtils.adaptArgumentsIfNecessary(method, args);
          retVal = AopUtils.invokeJoinpointUsingReflection(target, method, argsToUse);
       }
       else {
          // We need to create a method invocation...
          retVal = new CglibMethodInvocation(proxy, target, method, args, targetClass, chain, methodProxy).proceed();
       }
       return processReturnType(proxy, target, method, args, retVal);
    }
    finally {
       if (target != null && !targetSource.isStatic()) {
          targetSource.releaseTarget(target);
       }
       if (setProxyContext) {
          // Restore old proxy.
          AopContext.setCurrentProxy(oldProxy);
       }
    }
}
这个方法的前半部分的主要作用就是准备物料,具体详情可以看一下下面这张图片:
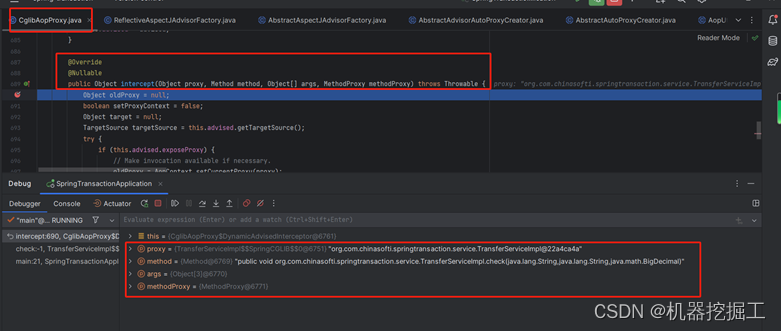
由图可以知道下面这些信息:
- Object proxy:TransferServiceImpl的代理对象
- Method method:TransferServiceImpl中的check()方法
- Object[] args:TransferServiceImpl中check()方法需要的参数,这里是transferService.check("jack", "tom", BigDecimal.valueOf(100));这一句代码传过去的三个参数值
- MethodProxy methodProxy:这个需要注意,可以将其理解为check()方法的代理,最终执行目标方法就要靠它了
继续debug,直到执行到下面这段代码所示的地方暂停(这段代码的主要作用就是获取Advice集合),之后会看到下面这幅图所示的结果:
List<Object> chain = this.advised.getInterceptorsAndDynamicInterceptionAdvice(method, targetClass);
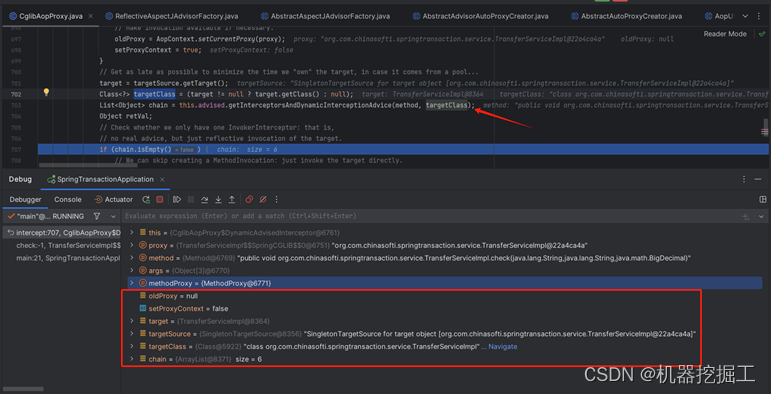
图中红框圈住的变量就是后面正式执行时要用到的物料,继续debug直到执行到下面这段代码处(这段代码的主要作用就是创建CglibMethodInvocation对象,将上述物料整合到一起,然后调用该对象上的proceed()方法开始执行):
retVal = new CglibMethodInvocation(proxy, target, method, args, targetClass, chain, methodProxy).proceed();
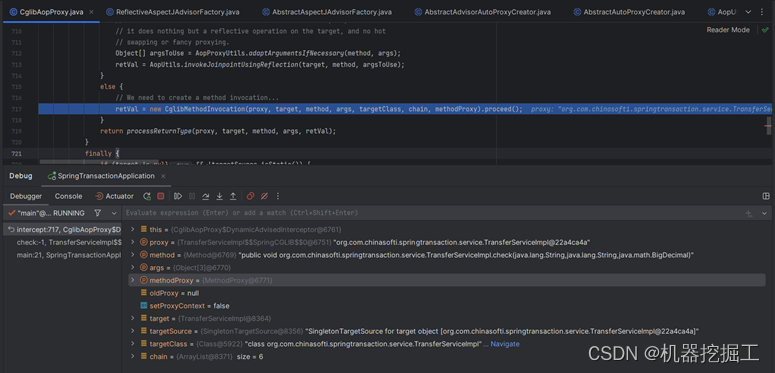
这里我们看一下CglibMethodInvocation的类结构图:
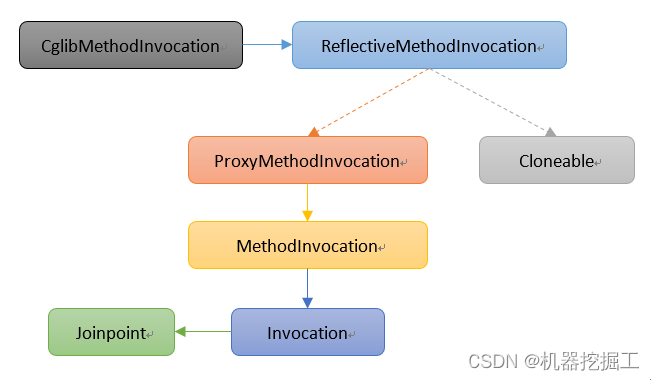
下面看一下CglibMethodInvocation类的proceed()方法的代码逻辑吧,其具体代码如下所示:
public Object proceed() throws Throwable {
    try {
       return super.proceed();
    }
    catch (RuntimeException ex) {
       throw ex;
    }
    catch (Exception ex) {
       if (ReflectionUtils.declaresException(getMethod(), ex.getClass()) ||
             KotlinDetector.isKotlinType(getMethod().getDeclaringClass())) {
          // Propagate original exception if declared on the target method
          // (with callers expecting it). Always propagate it for Kotlin code
          // since checked exceptions do not have to be explicitly declared there.
          throw ex;
       }
       else {
          // Checked exception thrown in the interceptor but not declared on the
          // target method signature -> apply an UndeclaredThrowableException,
          // aligned with standard JDK dynamic proxy behavior.
          throw new UndeclaredThrowableException(ex);
       }
    }
}
这段代码的有效部分只有一句,即super.proceed(),表示调用父类的同名方法,父类中该方法的具体代码如下所示:
public Object proceed() throws Throwable {
    // We start with an index of -1 and increment early.
    if (this.currentInterceptorIndex == this.interceptorsAndDynamicMethodMatchers.size() - 1) {
       return invokeJoinpoint();
    }

    Object interceptorOrInterceptionAdvice =
          this.interceptorsAndDynamicMethodMatchers.get(++this.currentInterceptorIndex);
    if (interceptorOrInterceptionAdvice instanceof InterceptorAndDynamicMethodMatcher dm) {
       // Evaluate dynamic method matcher here: static part will already have
       // been evaluated and found to match.
       Class<?> targetClass = (this.targetClass != null ? this.targetClass : this.method.getDeclaringClass());
       if (dm.matcher().matches(this.method, targetClass, this.arguments)) {
          return dm.interceptor().invoke(this);
       }
       else {
          // Dynamic matching failed.
          // Skip this interceptor and invoke the next in the chain.
          return proceed();
       }
    }
    else {
       // It's an interceptor, so we just invoke it: The pointcut will have
       // been evaluated statically before this object was constructed.
       return ((MethodInterceptor) interceptorOrInterceptionAdvice).invoke(this);
    }
}
这段代码的主要作用就是循环调用MethodInterceptor的子类的invoke()方法【每次调用invoke()方法时都会将CglibMethodInvocation对象传递给MehdoInterceptor对象,而invoke()方法又会回调CglibMethodInvocation对象的proceed()方法。如此这样就将切面和业务处理逻辑整合到了一起】。再来看张图吧:

集合中的对象类型分别为:ExposeInvocationInterceptor、AspectJAroundAdvice、MethodBeforeAdviceInterceptor、AspectJAfterAdvice、AfterReturningAdviceInterceptor、AspectJAfterThrowingAdvice。其中AspectJAfterAdvice、AspectJAroundAdvice、AspectJAfterThrowingAdvice这三个类是MethodInterceptor接口的实现类,该接口的代码如下所示:
@FunctionalInterface
public interface MethodInterceptor extends Interceptor {

    /**
     * Implement this method to perform extra treatments before and
     * after the invocation. Polite implementations would certainly
     * like to invoke {@link Joinpoint#proceed()}.
     * @param invocation the method invocation joinpoint
     * @return the result of the call to {@link Joinpoint#proceed()};
     * might be intercepted by the interceptor
     * @throws Throwable if the interceptors or the target object
     * throws an exception
     */
    @Nullable
    Object invoke(@Nonnull MethodInvocation invocation) throws Throwable;

}
所以前面说的三个类均实现了invoke()方法,其中AspectJAfterAdvice类中的invoke()方法的源码为:
@Override
@Nullable
public Object invoke(MethodInvocation mi) throws Throwable {
    try {
       return mi.proceed();
    }
    finally {
       invokeAdviceMethod(getJoinPointMatch(), null, null);
    }
}
AspectJAroundAdvice类中的invoke()方法的的源码为:
@Override
@Nullable
public Object invoke(MethodInvocation mi) throws Throwable {
    if (!(mi instanceof ProxyMethodInvocation pmi)) {
       throw new IllegalStateException("MethodInvocation is not a Spring ProxyMethodInvocation: " + mi);
    }
    ProceedingJoinPoint pjp = lazyGetProceedingJoinPoint(pmi);
    JoinPointMatch jpm = getJoinPointMatch(pmi);
    return invokeAdviceMethod(pjp, jpm, null, null);
}
AspectJAfterThrowingAdvice类中的invoke()方法的的源码为:
public Object invoke(MethodInvocation mi) throws Throwable {
    try {
       return mi.proceed();
    }
    catch (Throwable ex) {
       if (shouldInvokeOnThrowing(ex)) {
          invokeAdviceMethod(getJoinPointMatch(), null, ex);
       }
       throw ex;
    }
}
现在就剩ExposeInvocationInterceptor、MethodBeforeAdviceInterceptor、AfterReturningAdviceInterceptor三个了,从命名可以猜测出它们三个也实现了MethodInterceptor接口,其中MethodBeforeAdviceInterceptor的源码为:?
public class MethodBeforeAdviceInterceptor implements MethodInterceptor, BeforeAdvice, Serializable {

    private final MethodBeforeAdvice advice;


    /**
     * Create a new MethodBeforeAdviceInterceptor for the given advice.
     * @param advice the MethodBeforeAdvice to wrap
     */
    public MethodBeforeAdviceInterceptor(MethodBeforeAdvice advice) {
       Assert.notNull(advice, "Advice must not be null");
       this.advice = advice;
    }


    @Override
    @Nullable
    public Object invoke(MethodInvocation mi) throws Throwable {
       this.advice.before(mi.getMethod(), mi.getArguments(), mi.getThis());
       return mi.proceed();
    }

}
该类持有一个MethodBeforeAdvice对象。invoke()方法会线调用MethodBeforeAdvice对象的before()方法,然后在回调MethodInvocation对象的proceed()方法。再看看AfterReturningAdviceInterceptor这个类的源码:
public class AfterReturningAdviceInterceptor implements MethodInterceptor, AfterAdvice, Serializable {

    private final AfterReturningAdvice advice;


    /**
     * Create a new AfterReturningAdviceInterceptor for the given advice.
     * @param advice the AfterReturningAdvice to wrap
     */
    public AfterReturningAdviceInterceptor(AfterReturningAdvice advice) {
       Assert.notNull(advice, "Advice must not be null");
       this.advice = advice;
    }


    @Override
    @Nullable
    public Object invoke(MethodInvocation mi) throws Throwable {
       Object retVal = mi.proceed();
       this.advice.afterReturning(retVal, mi.getMethod(), mi.getArguments(), mi.getThis());
       return retVal;
    }

}
从代码层面看,这个类的代码逻辑和MethodBeforeAdviceInterceptor类的一致。另外一个类的源码这里就不再罗列了,有兴趣的可以直接查看源码。从这里不难看出Spring将切面和目标方法整合成了一条链,进而完成对目标方法的增强。链中的每个类都接收一个MethodInvocation类型的对象,然后通过它回调MethodInvocation类中的proceed()方法,进而执行链上的下一个Interceptor对象,这不就是责任链设计模式嘛!哈哈!今天这个梳理太令人兴奋了。那就继续开始下个系列吧!
本文来自互联网用户投稿,该文观点仅代表作者本人,不代表本站立场。本站仅提供信息存储空间服务,不拥有所有权,不承担相关法律责任。 如若内容造成侵权/违法违规/事实不符,请联系我的编程经验分享网邮箱:chenni525@qq.com进行投诉反馈,一经查实,立即删除!
- Python教程
- 深入理解 MySQL 中的 HAVING 关键字和聚合函数
- Qt之QChar编码(1)
- MyBatis入门基础篇
- 用Python脚本实现FFmpeg批量转换
- 双向长短期记忆网络(Bi-LSTM)-多输入回归预测
- 并发编程:线程同步基础:6 、在一个锁中使用2种条件
- 第01章_C语言入门
- (2021|CoRR,AugCLIP,优化)FuseDream:通过改进的 CLIP+GAN 空间优化实现免训练文本到图像生成
- Linux一条命令换阿里源
- 第27节: Vue3 多重价值
- 【GitHub项目推荐--GitHub 上的考研神器】【转载】
- java 兆转kb 例子
- 芜湖数字孪生元宇宙赋能工业智能制造,助力传统制造业数字化转型
- python找.exe进程基地址的方法(以微信为例子)