Vue 3 系统性学习看这一篇就够了
前阵子,公司决定把前端技术栈升级下,将Vue2的体系全部改成 Vue3, 所以针对Vue3系统性的学习了下, 后续这块业务迭代由我这边来负责,
整理记录一些笔记方便,在若干年后,在不使用Vue的情况下,看到这篇文章能够达到快速记忆的目的,记录遗漏的点,大家也可在评论区提出来进行修正

文章目录
Vue3简介

- 2020年9月18日,Vue.js发布3.0版本,代号:One Piece(海贼王)
- github上的tags地址:https://github.com/vuejs/vue-next/releases/tag/v3.0.0
Vue3带来了什么
- 性能的提升
- 打包大小减少41%
- 初次渲染快55%, 更新渲染快133%
- 内存减少54%
…
- 源码的升级
- 使用Proxy代替defineProperty实现响应式
- 重写虚拟DOM的实现和Tree-Shaking
…
- 拥抱TypeScript
- Vue3可以更好的支持TypeScript
- 新的特性
- Composition API(组合API)
- setup配置
- ref与reactive
- watch与watchEffect
- provide与inject
- …
- 新的内置组件
- Fragment
- Teleport
- Suspense
- 其他改变
- 新的生命周期钩子
- data 选项应始终被声明为一个函数
- 移除keyCode支持作为 v-on 的修饰符
- …
创建Vue3.0工程
使用 vue-cli 创建
官方文档:https://cli.vuejs.org/zh/guide/creating-a-project.html#vue-create
## 查看@vue/cli版本,确保@vue/cli版本在4.5.0以上
vue --version
## 安装或者升级你的@vue/cli
npm install -g @vue/cli
## 创建
vue create vue_test
## 启动
cd vue_test
npm run serve
使用 vite 创建
官方文档:https://v3.cn.vuejs.org/guide/installation.html#vite
vite官网:https://vitejs.cn
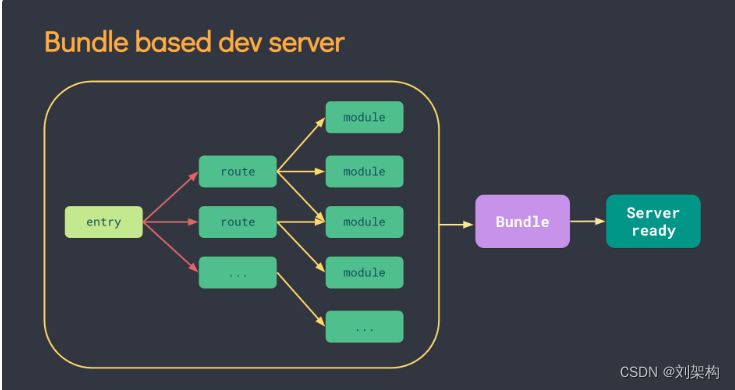
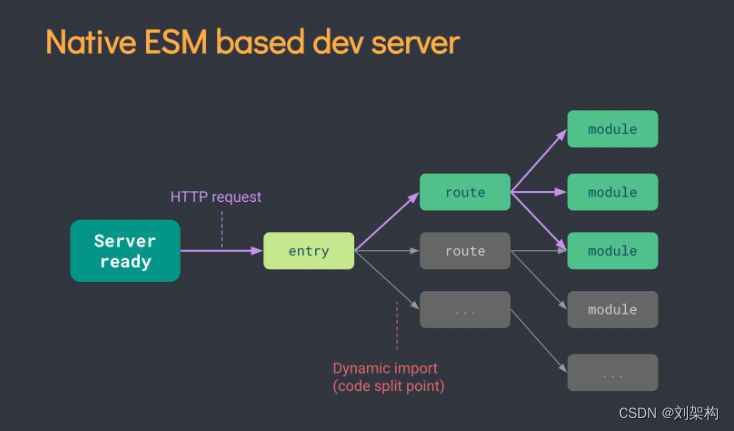
- 什么是vite?—— 新一代前端构建工具。
- 优势如下:
- 开发环境中,无需打包操作,可快速的冷启动。
- 轻量快速的热重载(HMR)。
- 真正的按需编译,不再等待整个应用编译完成。
- 传统构建 与 vite构建对比图
## 创建工程
npm init vite-app <project-name>
## 进入工程目录
cd <project-name>
## 安装依赖
npm install
## 运行
npm run dev
常用 Composition API
官方文档: https://v3.cn.vuejs.org/guide/composition-api-introduction.html
拉开序幕的setup
- 理解:Vue3.0中一个新的配置项,值为一个函数。
- setup是所有Composition API(组合API)“ 表演的舞台 ”。
- 组件中所用到的:数据、方法等等,均要配置在setup中。
- setup函数的两种返回值:
- 若返回一个对象,则对象中的属性、方法, 在模板中均可以直接使用。(重点关注!)
- 若返回一个渲染函数:则可以自定义渲染内容。(了解)
- 注意点:
- 尽量不要与Vue2.x配置混用
- Vue2.x配置(data、methos、computed…)中可以访问到setup中的属性、方法。
- 但在setup中不能访问到Vue2.x配置(data、methos、computed…)。
- 如果有重名, setup优先。
- setup不能是一个async函数,因为返回值不再是return的对象, 而是promise, 模板看不到return对象中的属性。(后期也可以返回一个Promise实例,但需要Suspense和异步组件的配合)
- 尽量不要与Vue2.x配置混用
ref函数
- 作用: 定义一个响应式的数据
- 语法:
const xxx = ref(initValue)- 创建一个包含响应式数据的引用对象(reference对象,简称ref对象)。
- JS中操作数据:
xxx.value - 模板中读取数据: 不需要.value,直接:
<div>{{xxx}}</div>
- 备注:
- 接收的数据可以是:基本类型、也可以是对象类型。
- 基本类型的数据:响应式依然是靠
Object.defineProperty()的get与set完成的。 - 对象类型的数据:内部 “ 求助 ” 了Vue3.0中的一个新函数——
reactive函数。
reactive函数
- 作用: 定义一个对象类型的响应式数据(基本类型不要用它,要用
ref函数) - 语法:
const 代理对象= reactive(源对象)接收一个对象(或数组),返回一个代理对象(Proxy的实例对象,简称proxy对象) - reactive定义的响应式数据是“深层次的”。
- 内部基于 ES6 的 Proxy 实现,通过代理对象操作源对象内部数据进行操作。
Vue3.0中的响应式原理
vue2.x的响应式
- 实现原理:
- 对象类型:通过
Object.defineProperty()对属性的读取、修改进行拦截(数据劫持)。 - 数组类型:通过重写更新数组的一系列方法来实现拦截。(对数组的变更方法进行了包裹)。
- 对象类型:通过
Object.defineProperty(data, 'count', {
    get () {},
    set () {}
})
- 存在问题:
- 新增属性、删除属性, 界面不会更新。
- 直接通过下标修改数组, 界面不会自动更新。
Vue3.0的响应式
- 实现原理:
- 通过Proxy(代理): 拦截对象中任意属性的变化, 包括:属性值的读写、属性的添加、属性的删除等。
- 通过Reflect(反射): 对源对象的属性进行操作。
- MDN文档中描述的Proxy与Reflect:
new Proxy(data, {
    // 拦截读取属性值
    get (target, prop) {
        return Reflect.get(target, prop)
    },
    // 拦截设置属性值或添加新属性
    set (target, prop, value) {
        return Reflect.set(target, prop, value)
    },
    // 拦截删除属性
    deleteProperty (target, prop) {
        return Reflect.deleteProperty(target, prop)
    }
})

proxy.name = 'tom'
reactive对比ref
- 从定义数据角度对比:
- ref用来定义:基本类型数据。
- reactive用来定义:对象(或数组)类型数据。
- 备注:ref也可以用来定义对象(或数组)类型数据, 它内部会自动通过
reactive转为代理对象。
- 从原理角度对比:
- ref通过
Object.defineProperty()的get与set来实现响应式(数据劫持)。 - reactive通过使用Proxy来实现响应式(数据劫持), 并通过Reflect操作源对象内部的数据。
- ref通过
- 从使用角度对比:
- ref定义的数据:操作数据需要
.value,读取数据时模板中直接读取不需要.value。 - reactive定义的数据:操作数据与读取数据:均不需要
.value。
- ref定义的数据:操作数据需要
setup的两个注意点
- setup执行的时机
- 在beforeCreate之前执行一次,this是undefined。
- setup的参数
- props:值为对象,包含:组件外部传递过来,且组件内部声明接收了的属性。
- context:上下文对象
- attrs: 值为对象,包含:组件外部传递过来,但没有在props配置中声明的属性, 相当于
this.$attrs。 - slots: 收到的插槽内容, 相当于
this.$slots。 - emit: 分发自定义事件的函数, 相当于
this.$emit。
- attrs: 值为对象,包含:组件外部传递过来,但没有在props配置中声明的属性, 相当于
计算属性与监视
computed函数
- 与Vue2.x中computed配置功能一致
- 写法
import {computed} from 'vue'

setup(){
    ...
	//计算属性——简写
    let fullName = computed(()=>{
        return person.firstName + '-' + person.lastName
    })
    //计算属性——完整
    let fullName = computed({
        get(){
            return person.firstName + '-' + person.lastName
        },
        set(value){
            const nameArr = value.split('-')
            person.firstName = nameArr[0]
            person.lastName = nameArr[1]
        }
    })
}
watch函数
- 与Vue2.x中watch配置功能一致
- 两个小“坑”:
- 监视reactive定义的响应式数据时:oldValue无法正确获取、强制开启了深度监视(deep配置失效)。
- 监视reactive定义的响应式数据中某个属性时:deep配置有效。
//情况一:监视ref定义的响应式数据
watch(sum,(newValue,oldValue)=>{
	console.log('sum变化了',newValue,oldValue)
},{immediate:true})

//情况二:监视多个ref定义的响应式数据
watch([sum,msg],(newValue,oldValue)=>{
	console.log('sum或msg变化了',newValue,oldValue)
})

/* 情况三:监视reactive定义的响应式数据
			若watch监视的是reactive定义的响应式数据,则无法正确获得oldValue!!
			若watch监视的是reactive定义的响应式数据,则强制开启了深度监视
*/
watch(person,(newValue,oldValue)=>{
	console.log('person变化了',newValue,oldValue)
},{immediate:true,deep:false}) //此处的deep配置不再奏效

//情况四:监视reactive定义的响应式数据中的某个属性
watch(()=>person.job,(newValue,oldValue)=>{
	console.log('person的job变化了',newValue,oldValue)
},{immediate:true,deep:true})

//情况五:监视reactive定义的响应式数据中的某些属性
watch([()=>person.job,()=>person.name],(newValue,oldValue)=>{
	console.log('person的job变化了',newValue,oldValue)
},{immediate:true,deep:true})

//特殊情况
watch(()=>person.job,(newValue,oldValue)=>{
    console.log('person的job变化了',newValue,oldValue)
},{deep:true}) //此处由于监视的是reactive素定义的对象中的某个属性,所以deep配置有效
watchEffect函数
- watch的套路是:既要指明监视的属性,也要指明监视的回调。
- watchEffect的套路是:不用指明监视哪个属性,监视的回调中用到哪个属性,那就监视哪个属性。
- watchEffect有点像computed:
- 但computed注重的计算出来的值(回调函数的返回值),所以必须要写返回值。
- 而watchEffect更注重的是过程(回调函数的函数体),所以不用写返回值。
//watchEffect所指定的回调中用到的数据只要发生变化,则直接重新执行回调。
watchEffect(()=>{
    const x1 = sum.value
    const x2 = person.age
    console.log('watchEffect配置的回调执行了')
})
生命周期
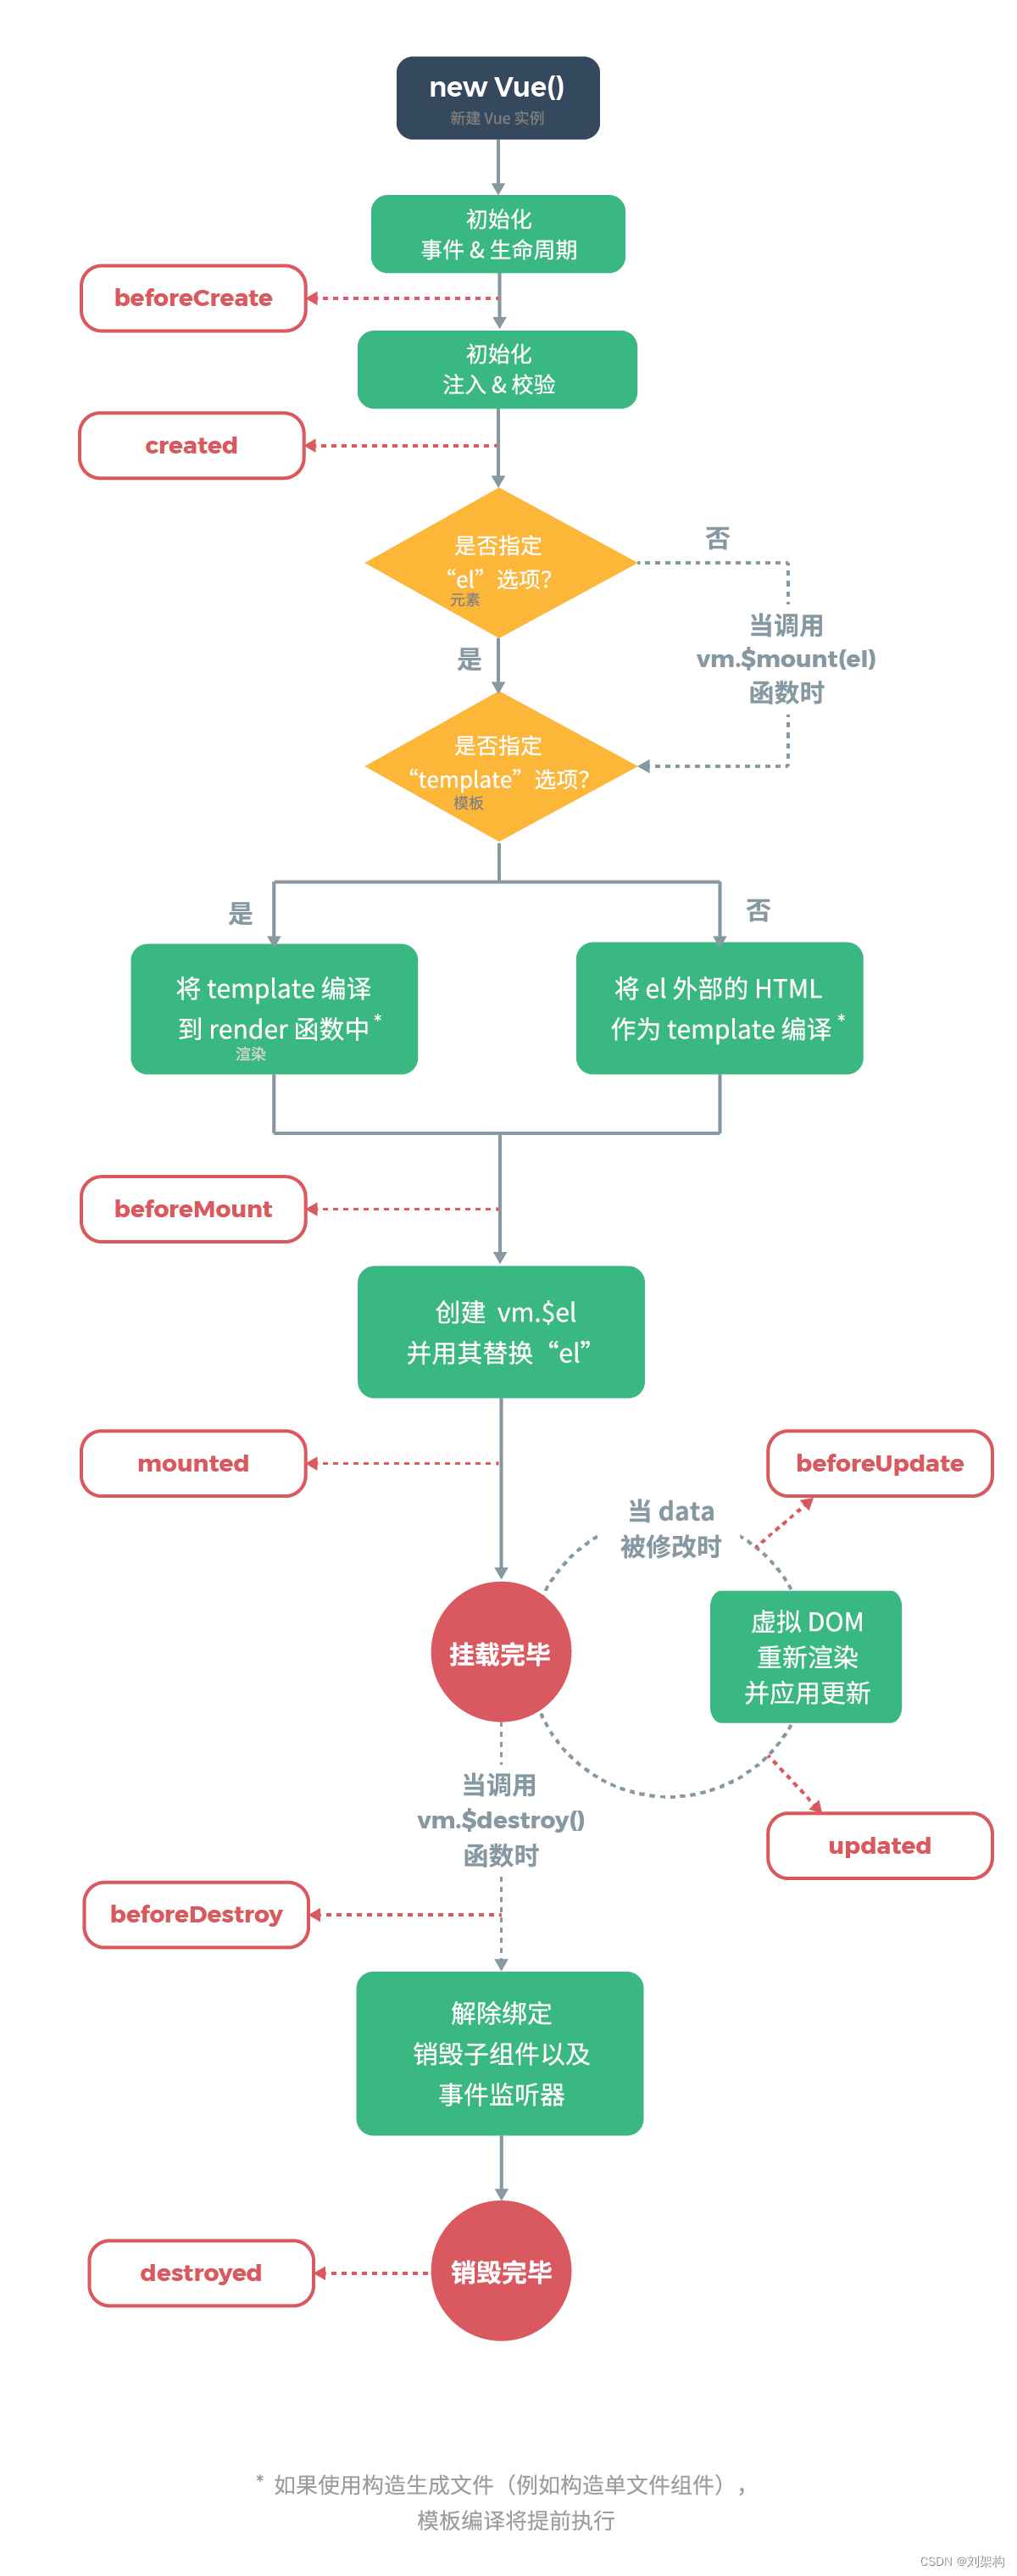
vue2.x的生命周期
vue3.0的生命周期
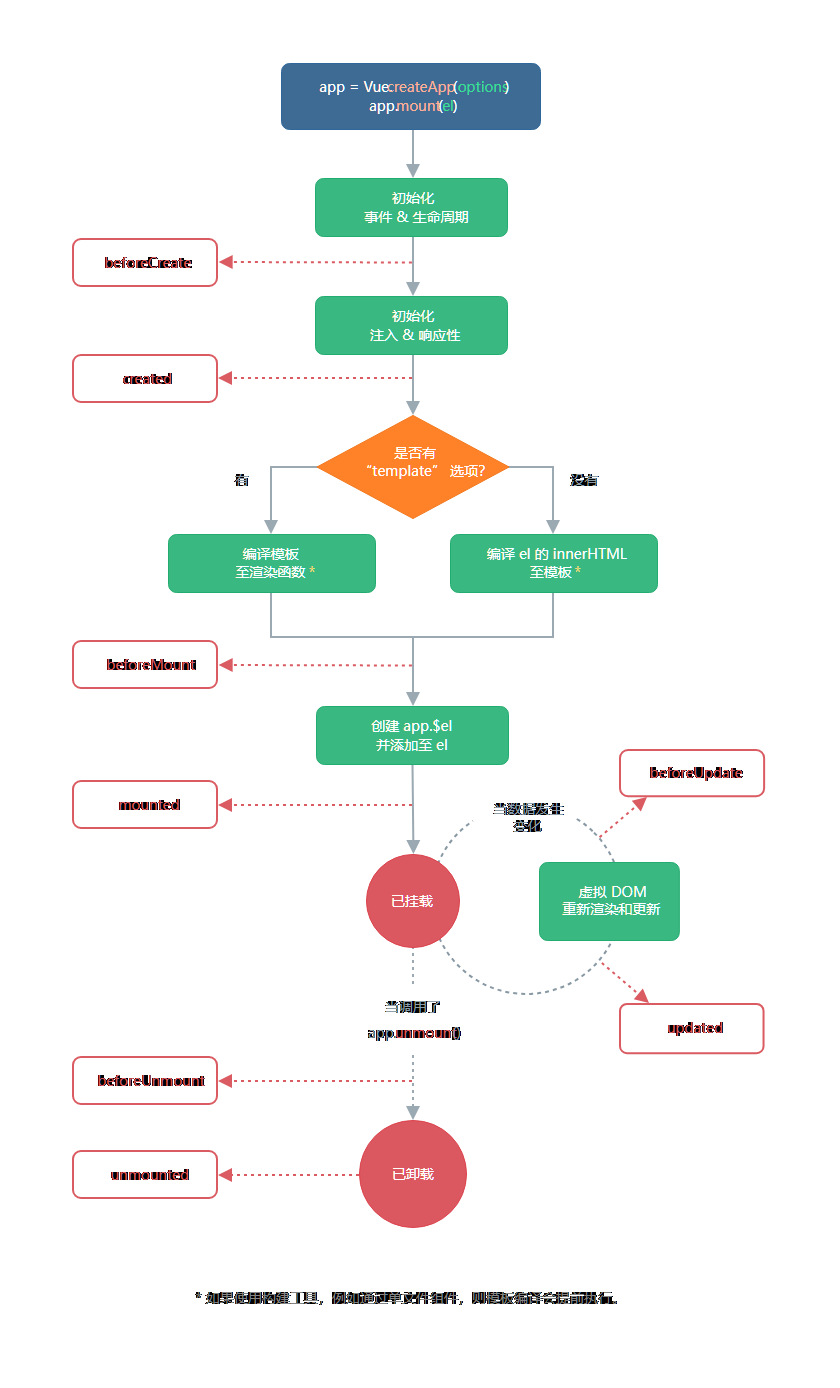
- Vue3.0中可以继续使用Vue2.x中的生命周期钩子,但有有两个被更名:
beforeDestroy改名为beforeUnmountdestroyed改名为unmounted
- Vue3.0也提供了 Composition API 形式的生命周期钩子,与Vue2.x中钩子对应关系如下:
beforeCreate===>setup()created=======>setup()beforeMount===>onBeforeMountmounted=======>onMountedbeforeUpdate===>onBeforeUpdateupdated=======>onUpdatedbeforeUnmount==>onBeforeUnmountunmounted=====>onUnmounted
自定义hook函数
- 什么是hook?—— 本质是一个函数,把setup函数中使用的Composition API进行了封装。
- 类似于vue2.x中的mixin。
- 自定义hook的优势: 复用代码, 让setup中的逻辑更清楚易懂。
toRef
- 作用:创建一个 ref 对象,其value值指向另一个对象中的某个属性。
- 语法:
const name = toRef(person,'name') - 应用: 要将响应式对象中的某个属性单独提供给外部使用时。
- 扩展:
toRefs与toRef功能一致,但可以批量创建多个 ref 对象,语法:toRefs(person)
其它 Composition API
shallowReactive 与 shallowRef
- shallowReactive:只处理对象最外层属性的响应式(浅响应式)。
- shallowRef:只处理基本数据类型的响应式, 不进行对象的响应式处理。
- 什么时候使用?
- 如果有一个对象数据,结构比较深, 但变化时只是外层属性变化 ===> shallowReactive。
- 如果有一个对象数据,后续功能不会修改该对象中的属性,而是生新的对象来替换 ===> shallowRef。
readonly 与 shallowReadonly
- readonly: 让一个响应式数据变为只读的(深只读)。
- shallowReadonly:让一个响应式数据变为只读的(浅只读)。
- 应用场景: 不希望数据(尤其是这个数据是来自与其他组件时)被修改时。
toRaw 与 markRaw
- toRaw:
- 作用:将一个由
reactive生成的响应式对象转为普通对象。 - 使用场景:用于读取响应式对象对应的普通对象,对这个普通对象的所有操作,不会引起页面更新。
- 作用:将一个由
- markRaw:
- 作用:标记一个对象,使其永远不会再成为响应式对象。
- 应用场景:
- 有些值不应被设置为响应式的,例如复杂的第三方类库等。
- 当渲染具有不可变数据源的大列表时,跳过响应式转换可以提高性能。
customRef
- 作用:创建一个自定义的 ref,并对其依赖项跟踪和更新触发进行显式控制。
- 实现防抖效果:
<template>
	<input type="text" v-model="keyword">
	<h3>{{keyword}}</h3>
</template>

<script>
	import {ref,customRef} from 'vue'
	export default {
		name:'Demo',
		setup(){
			// let keyword = ref('hello') //使用Vue准备好的内置ref
			//自定义一个myRef
			function myRef(value,delay){
				let timer
				//通过customRef去实现自定义
				return customRef((track,trigger)=>{
					return{
						get(){
							track() //告诉Vue这个value值是需要被“追踪”的
							return value
						},
						set(newValue){
							clearTimeout(timer)
							timer = setTimeout(()=>{
								value = newValue
								trigger() //告诉Vue去更新界面
							},delay)
						}
					}
				})
			}
			let keyword = myRef('hello',500) //使用程序员自定义的ref
			return {
				keyword
			}
		}
	}
</script>
provide 与 inject
provide 与 inject

- 作用:实现祖与后代组件间通信
- 套路:父组件有一个
provide选项来提供数据,后代组件有一个inject选项来开始使用这些数据 - 具体写法:
- 祖组件中:
setup(){
    ......
    let car = reactive({name:'奔驰',price:'40万'})
    provide('car',car)
    ......
}
- 后代组件中:
setup(props,context){
    ......
    const car = inject('car')
    return {car}
    ......
}
响应式数据的判断
- isRef: 检查一个值是否为一个 ref 对象
- isReactive: 检查一个对象是否是由
reactive创建的响应式代理 - isReadonly: 检查一个对象是否是由
readonly创建的只读代理 - isProxy: 检查一个对象是否是由
reactive或者readonly方法创建的代理
Composition API 的优势
Options API 存在的问题
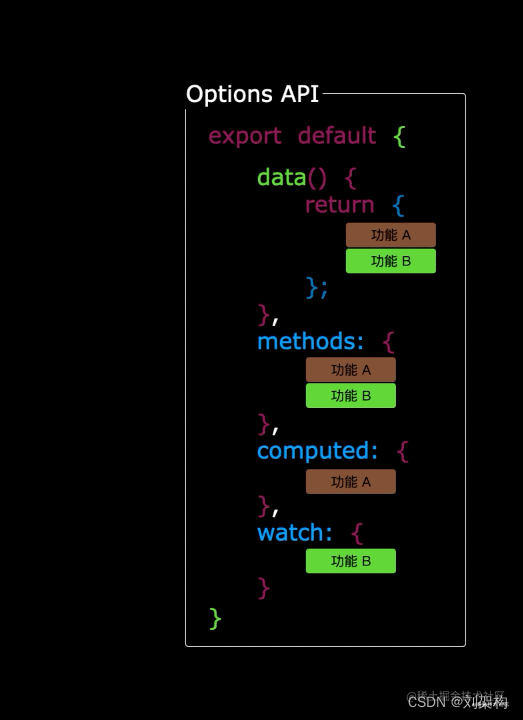
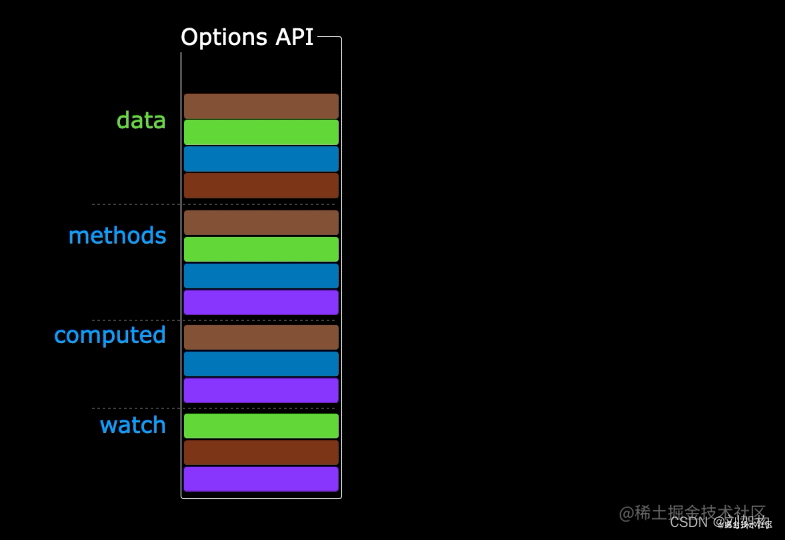
使用传统OptionsAPI中,新增或者修改一个需求,就需要分别在data,methods,computed里修改 。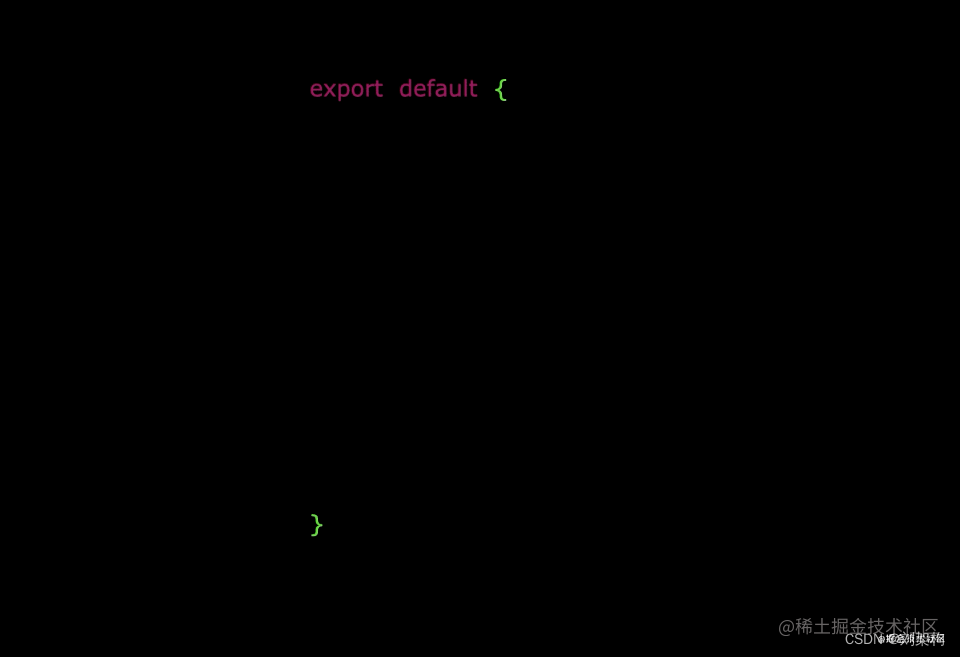
Composition API 的优势
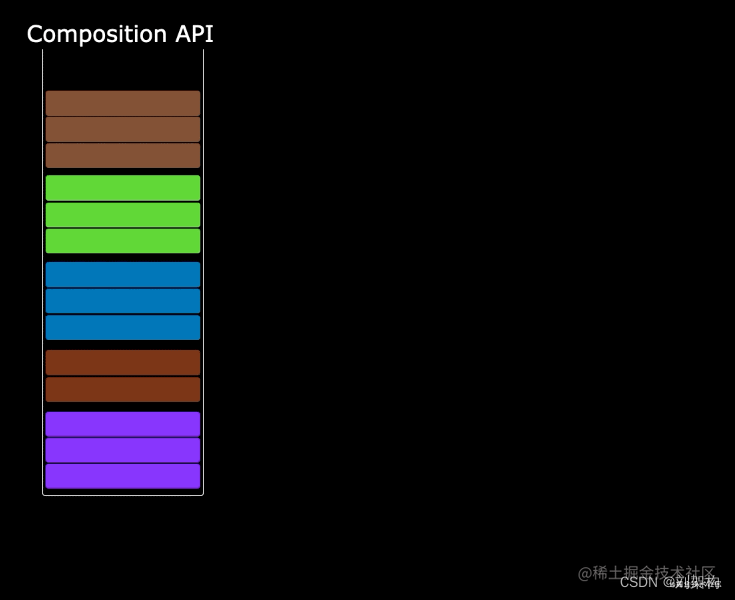
我们可以更加优雅的组织我们的代码,函数。让相关功能的代码更加有序的组织在一起。
新的组件
Fragment
- 在Vue2中: 组件必须有一个根标签
- 在Vue3中: 组件可以没有根标签, 内部会将多个标签包含在一个Fragment虚拟元素中
- 好处: 减少标签层级, 减小内存占用
Teleport
- 什么是Teleport?——
Teleport是一种能够将我们的组件html结构移动到指定位置的技术。
<teleport to="移动位置">
	<div v-if="isShow" class="mask">
		<div class="dialog">
			<h3>我是一个弹窗</h3>
			<button @click="isShow = false">关闭弹窗</button>
		</div>
	</div>
</teleport>
Suspense
- 等待异步组件时渲染一些额外内容,让应用有更好的用户体验
- 使用步骤:
- 异步引入组件
import {defineAsyncComponent} from 'vue'
const Child = defineAsyncComponent(()=>import('./components/Child.vue'))
- 使用
Suspense包裹组件,并配置好default与fallback
<template>
    <div class="app">
        <h3>我是App组件</h3>
        <Suspense>
            <template v-slot:default>
                <Child/>
            </template>
            <template v-slot:fallback>
                <h3>加载中.....</h3>
            </template>
        </Suspense>
    </div>
</template>
其他
全局API的转移
- Vue 2.x 有许多全局 API 和配置。
- 例如:注册全局组件、注册全局指令等。
//注册全局组件
Vue.component('MyButton', {
  data: () => ({
    count: 0
  }),
  template: '<button @click="count++">Clicked {{ count }} times.</button>'
})

//注册全局指令
Vue.directive('focus', {
  inserted: el => el.focus()
}
- Vue3.0中对这些API做出了调整:
- 将全局的API,即:
Vue.xxx调整到应用实例(app)上
| 2.x 全局 API(**Vue**) | 3.x 实例 API (**app****) ** |
| --------------------------------- | --------------------------------- |
| Vue.config.xxxx | app.config.xxxx |
| Vue.config.productionTip | 移除 |
| Vue.component | app.component |
| Vue.directive | app.directive |
| Vue.mixin | app.mixin |
| Vue.use | app.use |
| Vue.prototype | app.config.globalProperties |
- 将全局的API,即:
其他改变
- data选项应始终被声明为一个函数。
- 过度类名的更改:
- Vue2.x写法
.v-enter,
.v-leave-to {
  opacity: 0;
}
.v-leave,
.v-enter-to {
  opacity: 1;
}
- Vue3.x写法
.v-enter-from,
.v-leave-to {
  opacity: 0;
}

.v-leave-from,
.v-enter-to {
  opacity: 1;
}
- 移除keyCode作为 v-on 的修饰符,同时也不再支持
config.keyCodes - 移除
v-on.native修饰符- 父组件中绑定事件
<my-component
  v-on:close="handleComponentEvent"
  v-on:click="handleNativeClickEvent"
/>
- 子组件中声明自定义事件
<script>
  export default {
    emits: ['close']
  }
</script>
- 移除过滤器(filter)
过滤器虽然这看起来很方便,但它需要一个自定义语法,打破大括号内表达式是 “只是 JavaScript” 的假设,这不仅有学习成本,而且有实现成本!建议用方法调用或计算属性去替换过滤器。
- …
Pinia

介绍
Pinia 最初是在 2019 年 11 月左右重新设计使用 Composition API 。
Pinia 是 Vue 的存储库,它允许您跨组件/页面共享状态。类似vuex
Vuex 3.x 是 Vuex 的 Vue 2 而 Vuex 4.x 是 Vue 3
Pinia API 与 Vuex ≤4 有很大不同,即:
- mutations 不再存在
- 无需创建自定义复杂包装器来支持 TypeScript,所有内容都是类型化的,并且 API 的设计方式尽可能利用 TS 类型推断。
- 不再需要注入、导入函数、调用函数、享受自动完成功能!
- 无需动态添加 Store,默认情况下它们都是动态的
- 不再有 modules 的嵌套结构
- 没有 命名空间模块
搭建项目
- 新建一个新的vite项目
yarn create vite
按提示选择vue、typscript
- 安装依赖
yarn
- 安装pinia
yarn add pinia
pinia基本使用
- src/main.ts中创建pinia实例并且挂在vue实例上
import { createApp } from 'vue'
import App from './App.vue'
import { createPinia } from 'pinia'

//创建pinia实例
const pinia = createPinia()

const app = createApp(App)

//挂载pinia实例
app.use(pinia)

app.mount('#app')
- src/store/index.ts 主要是定义容器
import { defineStore } from 'pinia'
//定义容器
export const useMainStore = defineStore('main',{
  /**
   * 类似与组件的data, 用来存储全局状态
   * 1.必须是函数:这样是为了在服务端渲染的时候避免交叉请求导致的数据状态污染(客户端其实无所谓)
   * 2.必须是箭头函数:为了更好的ts类型推导
   * 返回值:一个函数,调用该函数即可得到容器实例
   */
  state: () => ({
    count: 666,
    name: 'tom',
    arr: [1,2,3]
  }),
  /**
   * 类似于组件的computed,用来封装计算属性,有【缓存】功能
   */
  getters: {

  },
  /**
   * 完全类比于Vue2组件中的methods(可以直接用this),用来【封装业务逻辑】,修改state
   */
  actions: {

  }
})
- src/components/HelloWorld.vue
<template>
  {{ mainStore.count }}
</template>


<script setup lang="ts">
  //导入上面定义的store
  import { useMainStore } from '../store'
  //获取容器中的state
  const mainStore = useMainStore()
  //从store中取值
  console.log(mainStore.count)
</script>
- src/App.vue删除不必要的内容,保留HelloWorld组件
<script setup lang="ts">
  import HelloWorld from './components/HelloWorld.vue'
</script>

<template>
  <HelloWorld />
</template>
解构访问pinia数据
不能直接使用解构,这样会丢失响应式,因为pinia在底层将state用reactive做了处理
src/components/HelloWorld.vue
<template>
  {{ count }}-{{ name }}-{{ arr }}
  <div><button @click="addOne">count+1</button></div>
</template>

<script setup lang="ts">
import { useMainStore } from '../store'
import { storeToRefs } from 'pinia'
//获取容器中的state
const mainStore = useMainStore()
//修改容器中的state
const addOne = () => {
  mainStore.count += 1
}
//不能直接使用解构,这样会丢失响应式,因为pinia在底层将state用reactive做了处理
// const {count,name} = mainStore

//若想使用解构,则需要用storeToRefs将结构出的数据做ref响应式代理
const {count,name} = storeToRefs(mainStore)
</script>
状态更新和Actions
状态更新的四种方式
src/components/HelloWorld.vue
<template>
  {{ count }}-{{ name }}-{{ arr }}
  <div><button @click="addOne">count+1</button></div>
</template>

<script setup lang="ts">
import { useMainStore } from '../store'
import { storeToRefs } from 'pinia'
//获取容器中的state
const mainStore = useMainStore()
//修改容器中的state
const addOne = () => {
  //方式一:直接修改
  //mainStore.count += 1

  //方式二:使用 $patch(对象) 批量修改,建议使用,底层做了性能优化
  // mainStore.$patch({
  //   count: mainStore.count + 1,
  //   name: 'jerry',
  //   arr: [...mainStore.arr,4]
  // })

  //方式三:使用 $patch(回调函数)  【推荐】
  //回调函数中的state参数,就是Store定义时里面的state!
  // mainStore.$patch(state => {
  //   state.count ++
  //   state.name = 'lucy'
  //   state.arr.push(5)
  // })

  // 方式四:逻辑较为复杂时,应封装到Store的actions中,并对外暴露接口
  mainStore.addN(10)
}
const {count,name,arr} = storeToRefs(mainStore)
</script>
src/store/index.ts
import { defineStore } from 'pinia'
//定义容器
export const useMainStore = defineStore('main',{
  state: () => ({
    count: 666,
    name: 'tom',
    arr: [1, 2, 3]
  }),
  getters: {

  },
  //注意:不能使用箭头函数定义actions!因为箭头函数绑定了外部this
  actions: {
    addN(num: number){
      //单个修改--->直接使用this,类似vue2
      // this.count += num
      // this.name = 'linda'
      // this.arr.push(6)

      //批量修改--->建议使用patch做优化
      this.$patch(state => {
        state.count += num
        state.name = 'jack'
        state.arr.push(8)
      })
    }
  }
})
Getters的使用
和计算属性类似,带有缓存功能
src/components/HelloWorld.vue
<template>
  {{ count }}-{{ name }}-{{ arr }}-{{ count10 }}-{{ count20 }}
  <div><button @click="addOne">count+1</button></div>
</template>

<script setup lang="ts">
  import { useMainStore } from '../store'
  import { storeToRefs } from 'pinia'
  //获取容器中的state
  const mainStore = useMainStore()
  //修改容器中的state
  const addOne = () => {
    mainStore.addN(10)
  }
  const {count,name,arr,count10,count20} = storeToRefs(mainStore)
</script>
src/store/index.ts
import { defineStore } from 'pinia'
//定义容器
export const useMainStore = defineStore('main',{
  state: () => ({
    count: 666,
    name: 'tom',
    arr: [1, 2, 3]
  }),
  //类似于组件的computed,用来封装计算属性,有【缓存】功能
  getters: {
    //不带state参数:此时就不能对返回值类型做自动推导了,必须手动指定
    count10(): number{
      console.log('count10')
      return this.count + 10
    },
    //带state参数:对返回值类型做自动推导 【推荐这种】
    count20(state){
      return state.count + 20
    }
  },
  //注意:不能使用箭头函数定义actions!因为箭头函数绑定了外部this
  actions: {
    addN(num: number){
      this.$patch(state => {
        state.count += num
        state.name = 'jack'
        state.arr.push(8)
      })
    }
  }
})
本文来自互联网用户投稿,该文观点仅代表作者本人,不代表本站立场。本站仅提供信息存储空间服务,不拥有所有权,不承担相关法律责任。 如若内容造成侵权/违法违规/事实不符,请联系我的编程经验分享网邮箱:chenni525@qq.com进行投诉反馈,一经查实,立即删除!
- Python教程
- 深入理解 MySQL 中的 HAVING 关键字和聚合函数
- Qt之QChar编码(1)
- MyBatis入门基础篇
- 用Python脚本实现FFmpeg批量转换
- 2.CentOS7修改网卡名称
- 2023年12 月电子学会Python等级考试试卷(六级)答案解析
- 电脑忘记密码无法登录解决方案
- selenium3.0+python之环境搭建的方法步骤
- EasyRecovery2024个人版电脑数据恢复软件终身免费更新
- 物联网网关与plc怎么连接?
- 如何清理磁盘空间
- 自动化测试po模式是什么?自动化测试po分层如何实现?
- 【开源】基于JAVA语言的创意工坊双创管理系统
- 鸿蒙(HarmonyOS)项目方舟框架(ArkUI)更改应用图标