【江科大STM32单片机】day1点亮LED灯流水灯蜂鸣器
发布时间:2024年01月11日
知识点
推挽模式:高-》低、低-》高电平都能驱动
开漏模式:只能低-》高电平能驱动,高电平相当于高阻态
GPIO_WriteBit 操作单个
GPIO_ResetBits 操作同组
3-2 led闪烁
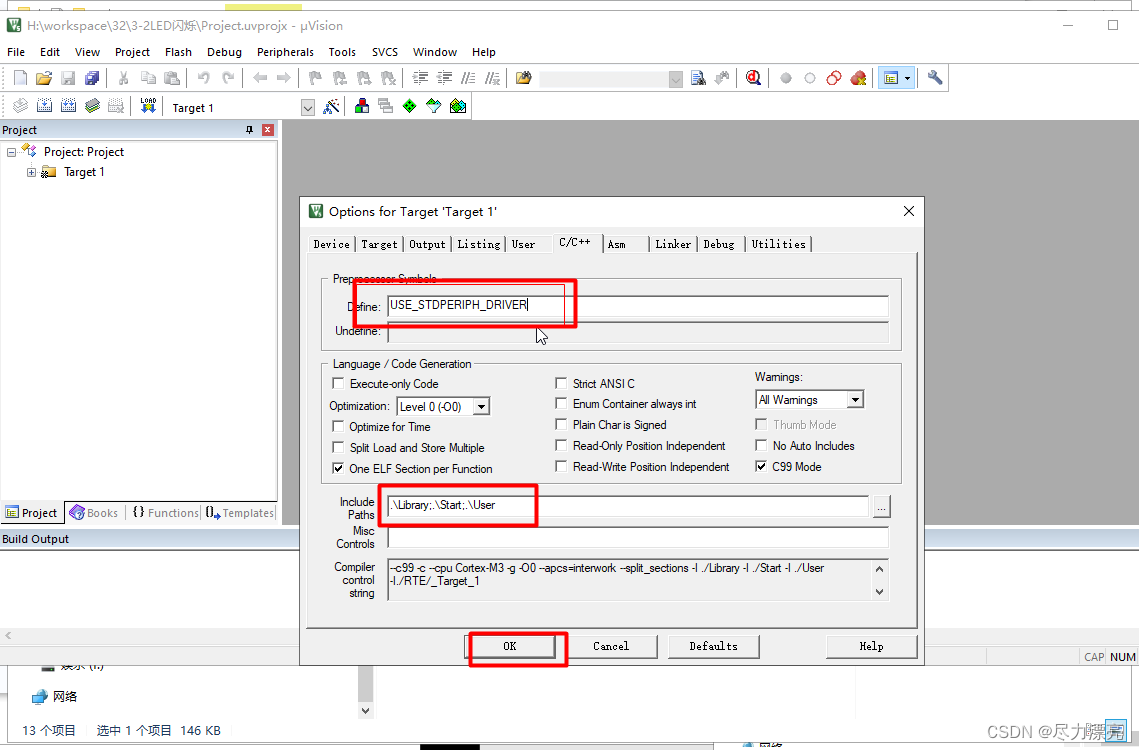
配置相关驱动
USE_STDPERIPH_DRIVER
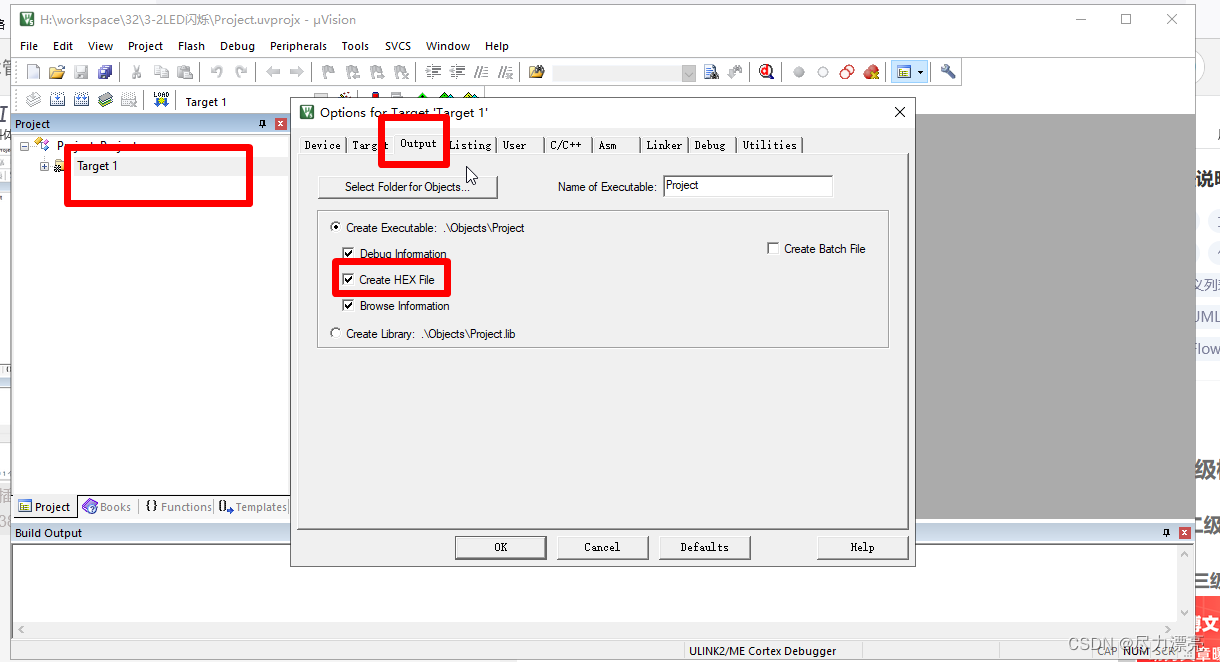
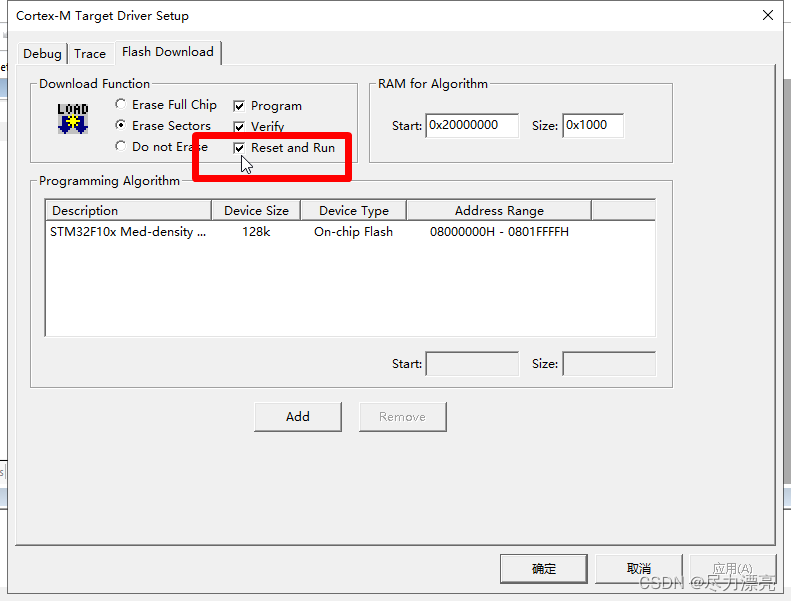
配置输出文件格式+debug配置slink+勾选闪存自动复位
添加批处理
点灯三个步骤
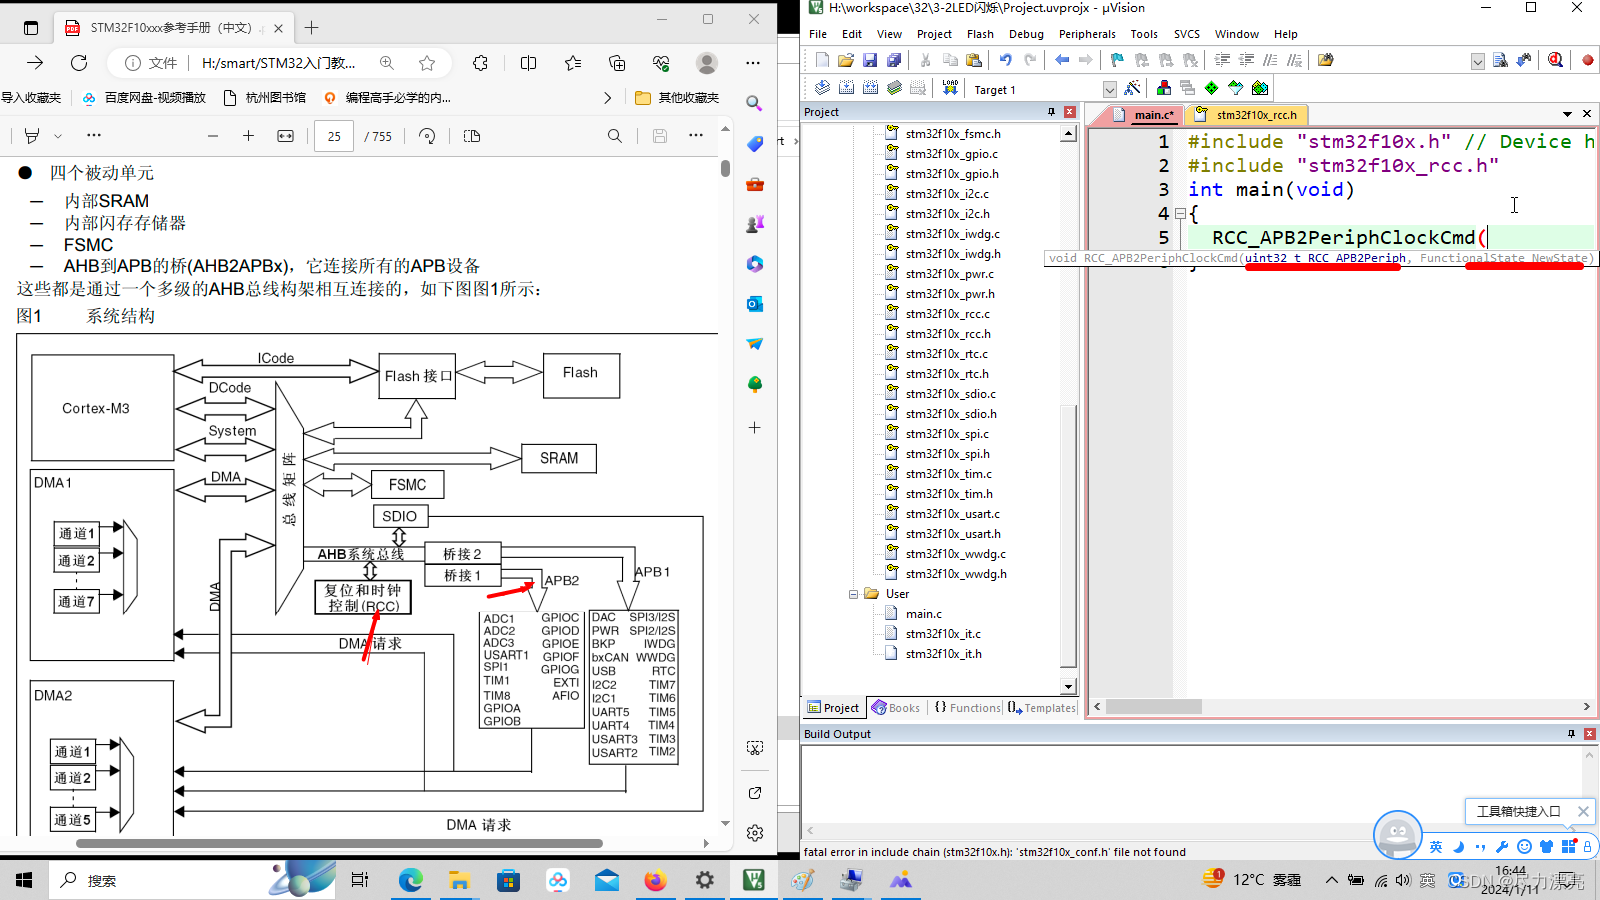
第一步使用RCC开启 GPIO的时钟
第二步使用GPIO_init函数初始化GPIO
第三步使用输入或者输出的函数控制GPIO口
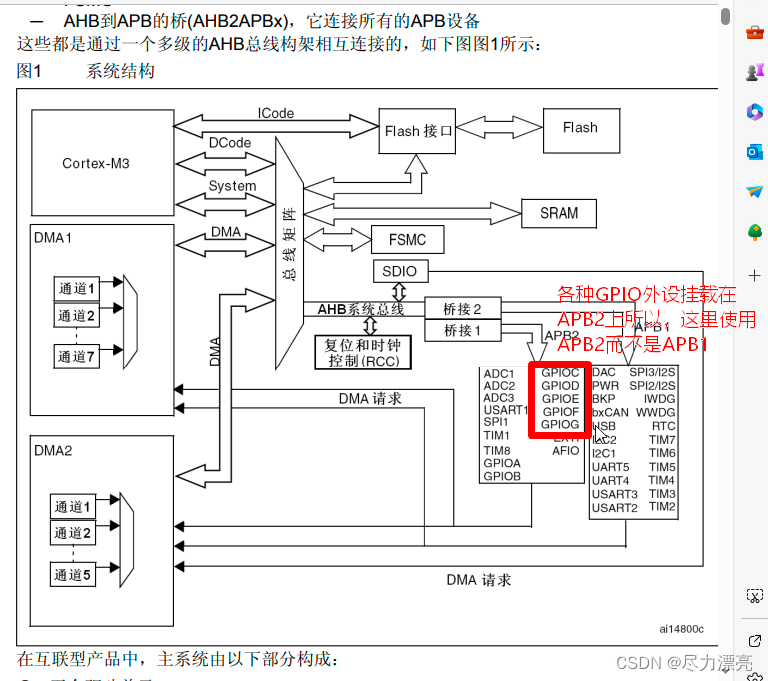
使用APB2设备2控制各种GPIO外设
实验结果
| 运行 | 备注 | 灯泡结果 |
|---|---|---|
| GPIO_InitStructure.GPIO_Mode = GPIO_Mode_Out_PP;开启推挽模式 | 低-》高 | 正常 |
| GPIO_InitStructure.GPIO_Mode = GPIO_Mode_Out_PP;开启推挽模式 | 小灯泡改为高电平转低电平 | 不亮 |
| GPIO_InitStructure.GPIO_Mode = GPIO_Mode_Out_OD;开启开漏模式 | 小灯泡改为高电平转低电平 | 不亮 |
| GPIO_InitStructure.GPIO_Mode = GPIO_Mode_Out_OD;开启开漏模式 | 低-》高 | 正常 |
#include "stm32f10x.h" // Device header
#include "delay.h"
int main(void)
{
	GPIO_InitTypeDef GPIO_InitStructure;
	RCC_APB2PeriphClockCmd(RCC_APB2Periph_GPIOA,ENABLE);
	GPIO_InitStructure.GPIO_Mode = GPIO_Mode_Out_PP;  //推挽模式 0x10,最大输出速度为2MHz
	GPIO_InitStructure.GPIO_Pin = GPIO_Pin_0;         //使用GPIOA外设0号引脚 ((uint16_t)0x0001)
	GPIO_InitStructure.GPIO_Speed = GPIO_Speed_50MHz; //速度为50MHz
/**
*
*给GPIO配置结构体,初始化GPIO对象 给
*&GPIO_InitStructure 取地址
*
*/
	GPIO_Init(GPIOA,&GPIO_InitStructure); //给GPIO配置结构体,初始化GPIO对象 给


	while(1)
	{
		GPIO_ResetBits(GPIOA,GPIO_Pin_0);

		Delay_ms(500);
		GPIO_ResetBits(GPIOA,GPIO_Pin_0);
		Delay_ms(500);

		GPIO_WriteBit(GPIOA,GPIO_Pin_0,Bit_RESET);

		Delay_ms(500);
		GPIO_WriteBit(GPIOA,GPIO_Pin_0,Bit_SET);
		Delay_ms(500);

		GPIO_WriteBit(GPIOA,GPIO_Pin_0, (BitAction)0);
		Delay_ms(500);

		GPIO_WriteBit(GPIOA,GPIO_Pin_0, (BitAction)1);
		Delay_ms(500);

	}

}
3-3流水灯
#include "stm32f10x.h" // Device header
#include "delay.h"
int main(void)
{
	GPIO_InitTypeDef GPIO_InitStructure;
	RCC_APB2PeriphClockCmd(RCC_APB2Periph_GPIOA,ENABLE);
	GPIO_InitStructure.GPIO_Mode = GPIO_Mode_Out_PP;  //推挽模式 0x10,最大输出速度为2MHz
	GPIO_InitStructure.GPIO_Pin = GPIO_Pin_All;         //使用GPIOA所有引脚
	GPIO_InitStructure.GPIO_Speed = GPIO_Speed_50MHz; //速度为50MHz
/**
*
*给GPIO配置结构体,初始化GPIO对象 给
*&GPIO_InitStructure 取地址
*
*/
	GPIO_Init(GPIOA,&GPIO_InitStructure); //给GPIO配置结构体,初始化GPIO对象 给


	while(1)
	{


		GPIO_Write(GPIOA,~0x0001);//0000 0000 0000 0001
		Delay_ms(500);
		GPIO_Write(GPIOA,~0x0002);//0000 0000 0000 0010
		Delay_ms(500);
		GPIO_Write(GPIOA,~0x0004);//0000 0000 0000 0100
		Delay_ms(500);
		GPIO_Write(GPIOA,~0x0008);//0000 0000 0000 1000
		Delay_ms(500);


		GPIO_Write(GPIOA,~0x0010);//0000 0000 0001 0000
		Delay_ms(500);
		GPIO_Write(GPIOA,~0x0020);//0000 0000 0010 0000
		Delay_ms(500);
		GPIO_Write(GPIOA,~0x0040);//0000 0000 0100 0000
		Delay_ms(500);
		GPIO_Write(GPIOA,~0x0080);//0000 0000 1000 0000
		Delay_ms(500);


	}

}
3-3蜂鸣器
#include "stm32f10x.h" // Device header
#include "delay.h"
int main(void)
{
	GPIO_InitTypeDef GPIO_InitStructure;
	RCC_APB2PeriphClockCmd(RCC_APB2Periph_GPIOB,ENABLE);//RCC_APB2Periph_GPIOB
	GPIO_InitStructure.GPIO_Mode = GPIO_Mode_Out_PP;  //推挽模式 0x10,最大输出速度为2MHz
	GPIO_InitStructure.GPIO_Pin = GPIO_Pin_12;         //使用GPIOA12引脚
	GPIO_InitStructure.GPIO_Speed = GPIO_Speed_50MHz; //速度为50MHz
/**
*
*给GPIOB配置结构体,初始化GPIO对象 给
*&GPIO_InitStructure 取地址
*
*/
	GPIO_Init(GPIOB,&GPIO_InitStructure); //给GPIOB配置结构体,初始化GPIO对象 给


	while(1)
	{


		GPIO_ResetBits(GPIOB,GPIO_Pin_12);//
		Delay_ms(100);
		GPIO_SetBits(GPIOB,GPIO_Pin_12);//
		Delay_ms(100);
	}

}
文章来源:https://blog.csdn.net/weixin_44106334/article/details/135532372
本文来自互联网用户投稿,该文观点仅代表作者本人,不代表本站立场。本站仅提供信息存储空间服务,不拥有所有权,不承担相关法律责任。 如若内容造成侵权/违法违规/事实不符,请联系我的编程经验分享网邮箱:chenni525@qq.com进行投诉反馈,一经查实,立即删除!
本文来自互联网用户投稿,该文观点仅代表作者本人,不代表本站立场。本站仅提供信息存储空间服务,不拥有所有权,不承担相关法律责任。 如若内容造成侵权/违法违规/事实不符,请联系我的编程经验分享网邮箱:chenni525@qq.com进行投诉反馈,一经查实,立即删除!
最新文章
- Python教程
- 深入理解 MySQL 中的 HAVING 关键字和聚合函数
- Qt之QChar编码(1)
- MyBatis入门基础篇
- 用Python脚本实现FFmpeg批量转换
- [Angular] 笔记 22:ElementRef
- ?半个多世纪了,东方红一号还在天上飞!
- 【新版HI3559AV100开发注意事项(二)】
- 库克透露苹果已有接班人计划,或从这四人中诞生;谷歌创始人亲自给 Gemini 写代码丨 RTE 开发者日报 Vol.114
- ERP系统的优缺点有哪些?
- Git - 命令别名
- Nacos身份认证权限绕过+漏洞利用工具分享
- 探究Java循环中条件语句排列对程序逻辑的重大BUG影响与比较
- MySQL重装记录
- 空气净化器or宠物空气净化器?五款猫用空气净化器优质推荐!
