一起学docker(六)| docker网络
Docker网络
不启动docker,网络情况:

启动docker,网络情况:

作用
- 容器间的互联和通信以及端口映射
- 容器IP变动时候可以通过服务名直接网络通信而不受影响
常用命令
docker network --help查看docker网络相关命令docker network ls查看所有网络docker network inspect 网络名字查看网络信息docker network rm 网络名字删除网络
网络模式
| 网络模式 | 简介 | 命令 |
|---|---|---|
| bridge模式 | 为每个容器分配、设置IP等,将容器连接到一个docker0 虚拟网桥,默认为该模式 | 使用--network bridge指定,默认使用docker0 |
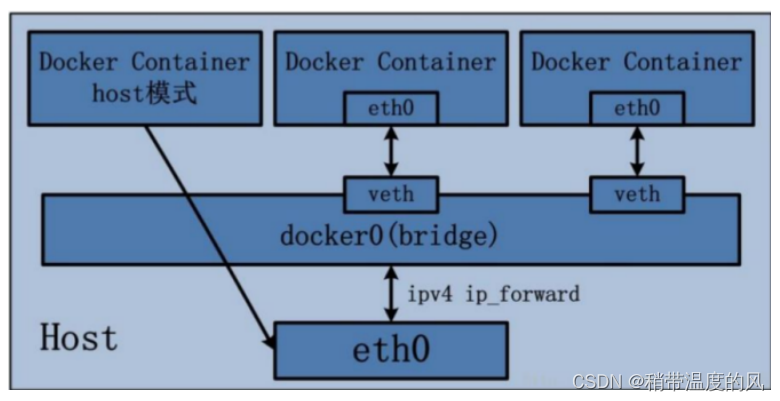
| host模式 | 容器不会虚拟出自己的网卡、配置自己的IP等,而是使用宿主机的IP和端口 | 使用--network host指定 |
| none模式 | 容器有独立的Network namespace,但没有对其进行任何网络设置,如分配 veth pair 和网桥连接、IP等 | 使用--network none指定 |
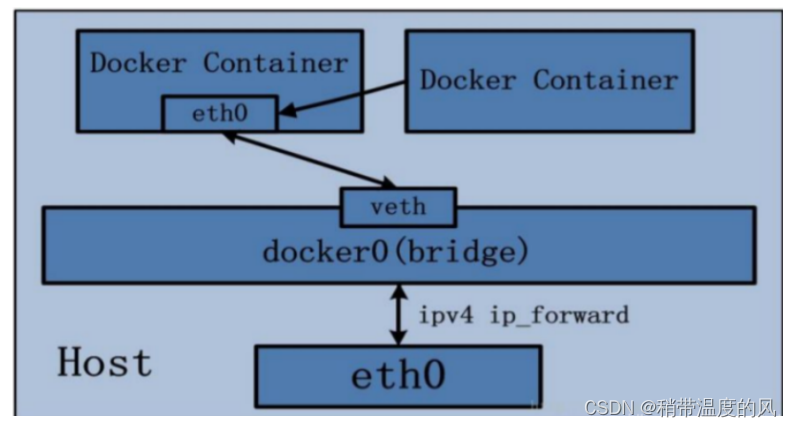
| container模式 | 新建的容器会创建自己的网卡、配置自己的IP,而是和一个指定的容器共享IP、端口范围等 | 使用--network container:容器名或容器ID指定 |
注意:
容器内部IP是有可能发生变化的
-
birdge
-
是什么
-
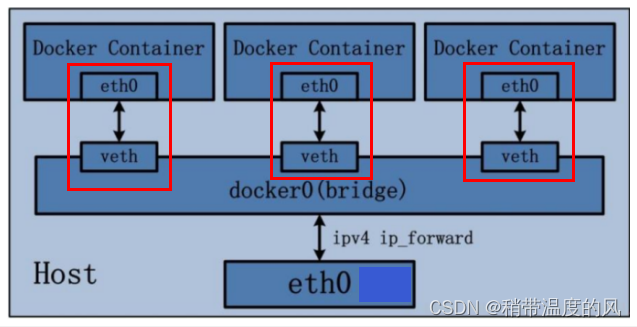
Docker 服务默认会创建一个 docker0 网桥(其上有一个 docker0 内部接口),该桥接网络的名称为docker0,它在内核层连通了其他的物理或虚拟网卡,这就将所有容器和本地主机都放到同一个物理网络。Docker 默认指定了 docker0 接口的 IP 地址和子网掩码,让主机和容器之间可以通过网桥相互通信。
-
# 查看 bridge 网络的详细信息,并通过 grep 获取名称项
[root@VM-4-9-centos ~]# docker network inspect bridge | grep name
            "com.docker.network.bridge.name": "docker0",
[root@VM-4-9-centos ~]# ifconfig | grep docker
docker0: flags=4163<UP,BROADCAST,RUNNING,MULTICAST>  mtu 1500
[root@VM-4-9-centos ~]#
-
-
案例
-
说明
-
Docker使用Linux桥接,在宿主机虚拟一个Docker容器网桥(docker0),Docker启动一个容器时会根据Docker网桥的网段分配给容器一个IP地址,称为Container-IP,同时Docker网桥是每个容器的默认网关。因为在同一宿主机内的容器都接入同一个网桥,这样容器之间就能够通过容器的Container-IP直接通信。
-
docker run 的时候,没有指定network的话默认使用的网桥模式就是bridge,使用的就是docker0。在宿主机ifconfig,就可以看到docker0和自己create的network eth0,eth1,eth2……代表网卡一,网卡二,网卡三……,lo代表127.0.0.1,即localhost,inet addr用来表示网卡的IP地址
-
网桥docker0创建一对对等虚拟设备接口一个叫veth,另一个叫eth0,成对匹配
- 整个宿主机的网桥模式都是docker0,类似一个交换机有一堆接口,每个接口叫veth,在本地主机和容器内分别创建一个虚拟接口,并让他们彼此联通(这样一对接口叫veth pair)
- 每个容器实例内部也有一块网卡,每个接口叫eth0
- docker0上面的每个veth匹配某个容器实例内部的eth0,两两配对,一一匹配
-
将宿主机上的所有容器都连接到这个内部网络上,两个容器在同一个网络下,会从这个网关下各自拿到分配的ip,此时两个容器的网络是互通的

-
-
测试
-
[root@VM-4-9-centos ~]# docker run -d -p 8081:8080 --name tomcat81 tomcat-jiang:1.0 c4b19ba89e41c0cfe862bbbde1e90204dea06a870c1f4aeeddad029c63fcc651 [root@VM-4-9-centos ~]# docker run -d -p 8082:8080 --name tomcat82 tomcat-jiang:1.0 b874a4a76fb1f7871aae93828f851473e7911dbdb2de0c8433d8833d7f73f3cb [root@VM-4-9-centos ~]# -

-
-
-
-
host
-
是什么
- 直接使用宿主机的 IP 地址与外界进行通信,不再需要额外进行NAT 转换
-
案例
-
说明
-
容器将不会获得一个独立的Network Namespace, 而是和宿主机共用一个Network Namespace;容器将不会虚拟出自己的网卡而是使用宿主机的IP和端口

-
-
测试
-
# 出现警告 # 原因:docker启动时指定--network=host或-net=host,如果还指定了-p映射端口,那这个时候就会有此警告,并且通过-p设置的参数将不会起到任何作用,端口号会以主机端口号为主,重复时则递增。 [root@VM-4-9-centos ~]# docker run -d -p 8083:8080 --network host --name tomcat83 tomcat-jiang:1.0 WARNING: Published ports are discarded when using host network mode b045e6dbc6a0e3e049c768e7fa4804bd4859fea3f28206aa3ea358897469fd68 ############################### [root@VM-4-9-centos ~]# docker run -d --network host --name tomcat83 tomcat-jiang:1.0 4a4e63cebb2e160ab3910f1c106076a4ea0eba04fb8fb11418890eaa025420da [root@VM-4-9-centos ~]# docker inspect tomcat83 |tail -n 20 "Networks": { "host": { "IPAMConfig": null, "Links": null, "Aliases": null, "NetworkID": "d66c4330633205197b0c7dcbd548170ff47106bc8f10d4326540025b42efb0d7", "EndpointID": "9f577cb2e3c77d4efc71ca9791d23fdd65e5de8f750db52663614021ba9e840a", "Gateway": "", "IPAddress": "", "IPPrefixLen": 0, "IPv6Gateway": "", "GlobalIPv6Address": "", "GlobalIPv6PrefixLen": 0, "MacAddress": "", "DriverOpts": null } } } } ] [root@VM-4-9-centos ~]# -
可以看到tomcat83实例没有设置IP和网关,因为此时容器共享宿主机网络IP,直接访问http:宿主机IP:8080即可,外部主机与容器可以直接通信
-
-
-
-
none
-
是什么
-
禁用网络功能,只有lo标识(就是127.0.0.1表示本地回环)
在none模式下,并不为Docker容器进行任何网络配置。 也就是说,这个Docker容器没有网卡、IP、路由等信息,只有一个lo,需要我们自己为Docker容器添加网卡、配置IP等。
-
-
测试
-
[root@VM-4-9-centos ~]# docker run -d -p 8084:8080 --network none --name tomcat84 tomcat-jiang:1.0
ec290a99e3b554ea578728efdfceee4d5d7fe2df78ec7883184daa5e812bc0d6
[root@VM-4-9-centos ~]# docker inspect tomcat84 |tail -n 20
            "Networks": {
                "none": {
                    "IPAMConfig": null,
                    "Links": null,
                    "Aliases": null,
                    "NetworkID": "e6c1d2f9509172bd9e4933fd4247d9faa87a0f4a4ea7198a74ce4f9a9fd5cdc7",
                    "EndpointID": "2e3843bbab5070569a84d85725de6e091514274d2424da1598eacc771ca57e58",
                    "Gateway": "",
                    "IPAddress": "",
                    "IPPrefixLen": 0,
                    "IPv6Gateway": "",
                    "GlobalIPv6Address": "",
                    "GlobalIPv6PrefixLen": 0,
                    "MacAddress": "",
                    "DriverOpts": null
                }
            }
        }
    }
]
[root@VM-4-9-centos ~]#
-
-
-
container
-
是什么
-
新建的容器和已经存在的一个容器共享一个网络ip配置而不是和宿主机共享。新创建的容器不会创建自己的网卡,配置自己的IP,而是和一个指定的容器共享IP、端口范围等。同样,两个容器除了网络方面,其他的如文件系统、进程列表等还是隔离的。

-
-
测试
-
Alpine Linux 是一款独立的、非商业的通用 Linux 发行版,专为追求安全性、简单性和资源效率的用户而设计。可谓是麻雀虽小但五脏俱全,镜像非常小巧,不到 6M的大小,所以特别适合容器打包。
-
[root@VM-4-9-centos ~]# docker run -it --name alpine1 alpine /bin/sh / # ip addr 1: lo: <LOOPBACK,UP,LOWER_UP> mtu 65536 qdisc noqueue state UNKNOWN qlen 1000 link/loopback 00:00:00:00:00:00 brd 00:00:00:00:00:00 inet 127.0.0.1/8 scope host lo valid_lft forever preferred_lft forever 190: eth0@if191: <BROADCAST,MULTICAST,UP,LOWER_UP,M-DOWN> mtu 1500 qdisc noqueue state UP link/ether 02:42:ac:11:00:08 brd ff:ff:ff:ff:ff:ff inet 172.17.0.8/16 brd 172.17.255.255 scope global eth0 valid_lft forever preferred_lft forever / # -
[root@VM-4-9-centos ~]# docker run -it --network container:alpine1 --name alpine2 alpine /bin/sh / # ip addr 1: lo: <LOOPBACK,UP,LOWER_UP> mtu 65536 qdisc noqueue state UNKNOWN qlen 1000 link/loopback 00:00:00:00:00:00 brd 00:00:00:00:00:00 inet 127.0.0.1/8 scope host lo valid_lft forever preferred_lft forever 190: eth0@if191: <BROADCAST,MULTICAST,UP,LOWER_UP,M-DOWN> mtu 1500 qdisc noqueue state UP link/ether 02:42:ac:11:00:08 brd ff:ff:ff:ff:ff:ff inet 172.17.0.8/16 brd 172.17.255.255 scope global eth0 valid_lft forever preferred_lft forever / # -
可以看到alpine2共享alpine1的网络IP配置
-
-
此时关闭alpine1再次查看alpine2的网络情况,发现190: eth0@if191没有了,只有一个回环地址。
1: lo: <LOOPBACK,UP,LOWER_UP> mtu 65536 qdisc noqueue state UNKNOWN qlen 1000
    link/loopback 00:00:00:00:00:00 brd 00:00:00:00:00:00
    inet 127.0.0.1/8 scope host lo
       valid_lft forever preferred_lft forever
/ #
-
-
link
目前已经过时,将来可能会被移除!
容器ip可能会变动,或者说一个微服务在不重启服务的情况下,数据库ip有了变动。我们可以通过link来解决网络问题,实现直接通过服务名访问容器。
默认情况下不支持服务名进行访问:
[root@VM-4-9-centos ~]# docker exec -it tomcat81 /bin/bash
[root@c4b19ba89e41 local]# ping tomcat82
ping: tomcat82: Name or service not known
[root@c4b19ba89e41 local]#
使用--link 容器名/容器ID连接到另外一个容器,即可实现通过服务名访问
[root@VM-4-9-centos ~]# docker run -d -p 8081:8080 --name tomcat81  --link tomcat82 tomcat-jiang:1.0
7bf87cf909eda09c90a0b49a9ab7b177e60be1119b946de8367152dc1bd5f612
[root@VM-4-9-centos ~]# docker exec -it tomcat81 /bin/bash
[root@7bf87cf909ed local]# ping tomcat82
PING tomcat82 (172.17.0.7) 56(84) bytes of data.
64 bytes from tomcat82 (172.17.0.7): icmp_seq=1 ttl=64 time=0.097 ms
64 bytes from tomcat82 (172.17.0.7): icmp_seq=2 ttl=64 time=0.057 ms
64 bytes from tomcat82 (172.17.0.7): icmp_seq=3 ttl=64 time=0.057 ms
64 bytes from tomcat82 (172.17.0.7): icmp_seq=4 ttl=64 time=0.079 ms
但是不可反向ping通
[root@VM-4-9-centos ~]# docker exec -it tomcat82 /bin/bash
[root@b874a4a76fb1 local]# ping tomcat81
ping: tomcat81: Name or service not known
[root@b874a4a76fb1 local]#
查看网络情况
[root@VM-4-9-centos ~]# docker network inspect bridge
        ......
        ......
        "Containers": {
            "7bf87cf909eda09c90a0b49a9ab7b177e60be1119b946de8367152dc1bd5f612": {
                "Name": "tomcat81",
                "EndpointID": "c19458e6626087c3bed7de9971869fe6f22d778df9ac476fb2987d8e38157ba6",
                "MacAddress": "02:42:ac:11:00:06",
                "IPv4Address": "172.17.0.6/16",
                "IPv6Address": ""
            },
            "b874a4a76fb1f7871aae93828f851473e7911dbdb2de0c8433d8833d7f73f3cb": {
                "Name": "tomcat82",
                "EndpointID": "476ceb1795f1a7df1f3e4fc3f4bec845efa62a9e543ce409cf4597278ea924df",
                "MacAddress": "02:42:ac:11:00:07",
                "IPv4Address": "172.17.0.7/16",
                "IPv6Address": ""
            },
        }
        ......
        ......
]
[root@VM-4-9-centos ~]#
进入tomcat81查看
[root@VM-4-9-centos ~]# docker exec -it tomcat81 cat /etc/hosts
127.0.0.1	localhost
::1	localhost ip6-localhost ip6-loopback
fe00::0	ip6-localnet
ff00::0	ip6-mcastprefix
ff02::1	ip6-allnodes
ff02::2	ip6-allrouters
172.17.0.7	tomcat82 b874a4a76fb1
172.17.0.6	7bf87cf909ed
[root@VM-4-9-centos ~]#
可以看到是将tomcat82的ip地址(172.17.0.7 tomcat82 b874a4a76fb1)放到了tomcat81的下面,才能实现通过服务名访问。
自定义网络
自定义网络默认使用的是桥接网络bridge
自定义网络本身就维护好了主机名和ip的对应关系(ip和实例名都能通)
-
新建网络
docker network create mynet[root@VM-4-9-centos ~]# docker network create mynet f25b4a600cc2d713d8a9797ccf3733e856c9dcc2a2ba7e516d61a7ea296b9bc8 [root@VM-4-9-centos ~]# docker network ls NETWORK ID NAME DRIVER SCOPE 8d406e5365cf bridge bridge local d66c43306332 host host local f25b4a600cc2 mynet bridge local e6c1d2f95091 none null local [root@VM-4-9-centos ~]# -
新建容器加上自定义网络 (可以看到可以通过服务名互ping通)
[root@VM-4-9-centos ~]# docker run -d -p 8085:8080 --network mynet --name tomcat85 tomcat-jiang:1.0 a5f0e1fd07486b89c6210f3c44b9822aa059f83475e7c40d7a572fb5a227aff4 [root@VM-4-9-centos ~]# docker run -d -p 8086:8080 --network mynet --name tomcat86 tomcat-jiang:1.0 3801116fd41cbe3bb6e8daf85d1c59456566da6e3790f23edc3ea7710cabec7a [root@VM-4-9-centos ~]# docker exec -it tomcat85 ping tomcat86 PING tomcat86 (172.18.0.3) 56(84) bytes of data. 64 bytes from tomcat86.mynet (172.18.0.3): icmp_seq=1 ttl=64 time=0.070 ms 64 bytes from tomcat86.mynet (172.18.0.3): icmp_seq=2 ttl=64 time=0.068 ms 64 bytes from tomcat86.mynet (172.18.0.3): icmp_seq=3 ttl=64 time=0.057 ms 64 bytes from tomcat86.mynet (172.18.0.3): icmp_seq=4 ttl=64 time=0.063 ms 64 bytes from tomcat86.mynet (172.18.0.3): icmp_seq=5 ttl=64 time=0.057 ms 64 bytes from tomcat86.mynet (172.18.0.3): icmp_seq=6 ttl=64 time=0.060 ms ^C --- tomcat86 ping statistics --- 6 packets transmitted, 6 received, 0% packet loss, time 4999ms rtt min/avg/max/mdev = 0.057/0.062/0.070/0.009 ms [root@VM-4-9-centos ~]# docker exec -it tomcat86 ping tomcat85 PING tomcat85 (172.18.0.2) 56(84) bytes of data. 64 bytes from tomcat85.mynet (172.18.0.2): icmp_seq=1 ttl=64 time=0.049 ms 64 bytes from tomcat85.mynet (172.18.0.2): icmp_seq=2 ttl=64 time=0.059 ms 64 bytes from tomcat85.mynet (172.18.0.2): icmp_seq=3 ttl=64 time=0.065 ms 64 bytes from tomcat85.mynet (172.18.0.2): icmp_seq=4 ttl=64 time=0.061 ms ^C --- tomcat85 ping statistics --- 4 packets transmitted, 4 received, 0% packet loss, time 3000ms rtt min/avg/max/mdev = 0.049/0.058/0.065/0.009 ms [root@VM-4-9-centos ~]# -
查看新建网络
[root@VM-4-9-centos ~]# docker network inspect mynet
[
    {
        "Name": "mynet",
        "Id": "f25b4a600cc2d713d8a9797ccf3733e856c9dcc2a2ba7e516d61a7ea296b9bc8",
        "Created": "2023-08-16T14:55:01.653344711+08:00",
        "Scope": "local",
        "Driver": "bridge",
        "EnableIPv6": false,
        "IPAM": {
            "Driver": "default",
            "Options": {},
            "Config": [
                {
                    "Subnet": "172.18.0.0/16",
                    "Gateway": "172.18.0.1"
                }
            ]
        },
        "Internal": false,
        "Attachable": false,
        "Ingress": false,
        "ConfigFrom": {
            "Network": ""
        },
        "ConfigOnly": false,
        "Containers": {
            "3801116fd41cbe3bb6e8daf85d1c59456566da6e3790f23edc3ea7710cabec7a": {
                "Name": "tomcat86",
                "EndpointID": "6d95a1406d1b19ed1814f69710da58695444d81b479dba789ec0a3c4feb51d98",
                "MacAddress": "02:42:ac:12:00:03",
                "IPv4Address": "172.18.0.3/16",
                "IPv6Address": ""
            },
            "a5f0e1fd07486b89c6210f3c44b9822aa059f83475e7c40d7a572fb5a227aff4": {
                "Name": "tomcat85",
                "EndpointID": "1d824badf6adea2880cc3ecf3df88833c0ee3b24e90ec7f16d02f6386f53828d",
                "MacAddress": "02:42:ac:12:00:02",
                "IPv4Address": "172.18.0.2/16",
                "IPv6Address": ""
            }
        },
        "Options": {},
        "Labels": {}
    }
]
[root@VM-4-9-centos ~]#
自定义网络可以对网络进行规划
docker network create --driver bridge --subnet 192.168.0.0/16 --gateway 192.168.0.1 mynet2
网络联通
由自定义网络可知,可以对docker进行规划,那不同网段的容器可以通信吗???
-
新建网络
docker network create --driver bridge --subnet 192.168.0.0/16 --gateway 192.168.0.1 mynet2 -
新建tomcat87实例 (加上网络mynet2)
[root@VM-4-9-centos ~]# docker run -d -p 8087:8080 --network mynet2 --name tomcat87 tomcat-jiang:1.0 3e6862803af066910012e8df8ce1deb0f4746e6fffe98aa403424ee3bf1171df -
测试
-
[root@VM-4-9-centos ~]# docker exec -it tomcat87 ping tomcat85 ping: tomcat85: Name or service not known [root@VM-4-9-centos ~]# docker exec -it tomcat86 ping tomcat87 ping: tomcat87: Name or service not known [root@VM-4-9-centos ~]# -
发现不同网段不能通信
-
-
docker network connect [options] network container
[root@VM-4-9-centos ~]# docker network connect --help Usage: docker network connect [OPTIONS] NETWORK CONTAINER Connect a container to a network Options: --alias strings Add network-scoped alias for the container --driver-opt strings driver options for the network --ip string IPv4 address (e.g., "172.30.100.104") --ip6 string IPv6 address (e.g., "2001:db8::33") --link list Add link to another container --link-local-ip strings Add a link-local address for the container [root@VM-4-9-centos ~]# -
通过
docker network connect mynet2 tomcat85将网络mynet2和容器tomcat85联通[root@VM-4-9-centos ~]# docker network connect mynet2 tomcat85 [root@VM-4-9-centos ~]#-
测试
[root@VM-4-9-centos ~]# docker exec -it tomcat87 ping tomcat85 PING tomcat85 (192.168.0.3) 56(84) bytes of data. 64 bytes from tomcat85.mynet2 (192.168.0.3): icmp_seq=1 ttl=64 time=0.073 ms 64 bytes from tomcat85.mynet2 (192.168.0.3): icmp_seq=2 ttl=64 time=0.067 ms 64 bytes from tomcat85.mynet2 (192.168.0.3): icmp_seq=3 ttl=64 time=0.063 ms ^C --- tomcat85 ping statistics --- 3 packets transmitted, 3 received, 0% packet loss, time 1999ms rtt min/avg/max/mdev = 0.063/0.067/0.073/0.010 ms [root@VM-4-9-centos ~]# docker exec -it tomcat85 ping tomcat87 PING tomcat87 (192.168.0.2) 56(84) bytes of data. 64 bytes from tomcat87.mynet2 (192.168.0.2): icmp_seq=1 ttl=64 time=0.052 ms 64 bytes from tomcat87.mynet2 (192.168.0.2): icmp_seq=2 ttl=64 time=0.060 ms 64 bytes from tomcat87.mynet2 (192.168.0.2): icmp_seq=3 ttl=64 time=0.057 ms ^C --- tomcat87 ping statistics --- 3 packets transmitted, 3 received, 0% packet loss, time 2000ms rtt min/avg/max/mdev = 0.052/0.056/0.060/0.007 ms [root@VM-4-9-centos ~]# -
可以看到85和87实例可以互相ping通
-
-
查看mynet2 (可知,连通其实就是将85实例放到了mynet2网络下)
[root@VM-4-9-centos ~]# docker network inspect mynet2
[
    {
        "Name": "mynet2",
        "Id": "e23746d705390717417eba3fbe86914b2aad9117ace97d6cf0dce13f4eda1aef",
        "Created": "2023-08-16T15:11:41.879678181+08:00",
        "Scope": "local",
        "Driver": "bridge",
        "EnableIPv6": false,
        "IPAM": {
            "Driver": "default",
            "Options": {},
            "Config": [
                {
                    "Subnet": "192.168.0.0/16",
                    "Gateway": "192.168.0.1"
                }
            ]
        },
        "Internal": false,
        "Attachable": false,
        "Ingress": false,
        "ConfigFrom": {
            "Network": ""
        },
        "ConfigOnly": false,
        "Containers": {
            "3e6862803af066910012e8df8ce1deb0f4746e6fffe98aa403424ee3bf1171df": {
                "Name": "tomcat87",
                "EndpointID": "8a8fdd31c09938eb4e7f3ffc7fb6dde5b1136c42c45b917e15e8d316f54d5876",
                "MacAddress": "02:42:c0:a8:00:02",
                "IPv4Address": "192.168.0.2/16",
                "IPv6Address": ""
            },
            "a5f0e1fd07486b89c6210f3c44b9822aa059f83475e7c40d7a572fb5a227aff4": {
                "Name": "tomcat85",
                "EndpointID": "653b67b9f45de6e9e91c121a21961ad5270cf82c6501e4a4672864f311f88eb9",
                "MacAddress": "02:42:c0:a8:00:03",
                "IPv4Address": "192.168.0.3/16",
                "IPv6Address": ""
            }
        },
        "Options": {},
        "Labels": {}
    }
]
[root@VM-4-9-centos ~]#
本文来自互联网用户投稿,该文观点仅代表作者本人,不代表本站立场。本站仅提供信息存储空间服务,不拥有所有权,不承担相关法律责任。 如若内容造成侵权/违法违规/事实不符,请联系我的编程经验分享网邮箱:chenni525@qq.com进行投诉反馈,一经查实,立即删除!
- Python教程
- 深入理解 MySQL 中的 HAVING 关键字和聚合函数
- Qt之QChar编码(1)
- MyBatis入门基础篇
- 用Python脚本实现FFmpeg批量转换
- 威胁检测与分析是什么,为什么这么重要
- 阿齐沙坦,2026年市场预计将以3.5%的复合年增长率增长
- QString 转AZStd::string
- 【无标题】
- 基于SSM的家居商城系统
- 用友ERP软件-各个模块单据含义整理
- 如何在simulink中怎么获取足端轨迹代码解释?
- vcruntime140.dll怎么安装,详细解析vcruntime140.dll安装详情与解决方法
- 一文看懂四大汽车总线:LIN、CAN、FlexRay、MOST
- java之word文件上传及下载功能