基础篇_面向对象(什么是对象,对象演化,继承,多态,封装,接口,Service,核心类库,异常处理)
一. 什么是对象
什么是对象?之前我们讲过,对象就是计算机中的虚拟物体。例如 System.out,System.in 等等。然而,要开发自己的应用程序,只有这些现成的对象还远远不够。需要我们自己来创建新的对象。
例如,我想开发一个电商应用,在网上卖手机,打算使用对象来代表这些手机。怎么做呢?首先要对现实世界的手机进行抽象,抽取它属性、抽取它的行为
1. 抽取属性
抽取时要抓取本质属性,在真实物体上做简化,并不是所有的属性都要抽象
-
例如对于手机来说,分析最终的展示效果可以得知,需要品牌、内存、大小、颜色、价格,其它页面展示用不上的属性,就不必抽取了
-
这些属性信息在 java 里称为对象的字段,根据它们,我们就能确定这个对象将来长什么样,相当于给对象定义了模板,模板一旦确定,再创建的对象就不能跳出模板的范围。
-
模板有了,就可以根据它创建各种各样的手机对象,比如
-
手机1,品牌苹果、内存128G、大小6.1英寸、颜色星光色、价格5799
- 可以看到,对象的字段要和模板定义的是一模一样的,不能多也不能少
-
手机2,品牌红米、内存4G、大小6.53英寸、颜色金色、价格1249
-
手机3,品牌华为、内存4G、大小6.3英寸、颜色幻夜黑、价格999
-
-
这个模板,以后在 java 里称之为类,英文 class,这些对象呢,英文也要知道:object
代码里怎么表示类呢,看一下类的语法
class 类 {
    字段;

    构造方法(参数) {

    }

    返回值类型 方法名(参数) {
        代码
    }
}
-
字段定义与之前学过的局部变量、方法参数的定义类似,它们本质都是变量
-
构造方法也是一种方法,在将来创建对象时被使用,作用是为对象字段赋初始值
- 构造方法与类同名,不用加返回值类型声明
-
从属于对象的方法不用 static 修饰,它就代表对象的行为,这里先放一下
就以刚才的手机为例,按照语法写一下
public class Phone {
    // 类型 名字
    String brand; // 品牌
    String memory; // 内存
    String size; // 大小
    String color; // 颜色
    double price; // 价格

    public Phone(String b, String m, String s, String c, double p) {
        brand = b;
        memory = m;
        size = s;
        color = c;
        price = p;
    }
}
有了类,才能创建对象,创建对象的语法
new 类构造方法(参数)
例如
public class TestPhone {
    public static void main(String[] args) {
        Phone p1 = new Phone("苹果", "128G", "6.1寸", "星光色", 5799.0);
        Phone p2 = new Phone("红米", "4G", "6.53寸", "金色", 1249.0);
        Phone p3 = new Phone("华为", "4G", "6.3寸", "幻夜黑", 999.0);

        System.out.println(p1.color); // 获取p1的颜色
		System.out.println(p1.price); // 获取p1的价格

        p1.price = 3000.0;			  // 修改p1的价格
		System.out.println(p1.price); // 获取p1的价格
    }
}
- 前面的变量 p1、p2、p3 分别代表了这三个手机对象(也可以理解为给对象起了个名字)
- 想知道第一个手机的颜色和价格,就使用 p1.color 和 p1.price 来获取
- 想把第一个手机的价格做出优惠,就给 p1.price 赋个新值
总结一下:
- 类是对象的模板,用字段描述对象将来长什么样,用构造给字段变量赋值
- 对象说白了,就是一组数据的集合,但这些数据不是乱写的,有什么,不该有什么,得按类的规则来
2. 字段默认值
如果字段没有通过构造方法赋值,那么字段也会有个默认值
| 类型 | 默认值 | 说明 |
|---|---|---|
| byte short int long char | 0 | |
| float double | 0.0 | |
| boolean | false | |
| 其它 | null |
比如说,想加一个字段 available 表示手机上架还是下架,这时就可以使用默认值统一设置
public class Phone {
    // 类型 名字
    String brand; // 品牌
    String memory; // 内存
    String size; // 大小
    String color; // 颜色
    double price; // 价格
    boolean available; // 是否上架

    public Phone(String b, String m, String s, String c, double p) {
        brand = b;
        memory = m;
        size = s;
        color = c;
        price = p;
    }
}
- 构造方法里不对 available 字符赋值,默认为下架(false)
- 要设置为默认上架(true)可以给字段直接赋值为 true 或在构造方法里给它赋值为 true
3. this
对于变量的命名,包括方法参数的命名,最好做到见文知义,也就是起名的时候起的更有意义,最好能一眼看出来这个变量它代表什么,你来看手机构造方法这些参数的名字起的好不好?不好吧,这样改行不行(先只改一个 brand):
public class Phone {
    // 类型 名字
    String brand; // 品牌
    String memory; // 内存
    String size; // 大小
    String color; // 颜色
    double price; // 价格
    boolean available; // 是否上架

    public Phone(String brand, String m, String s, String c, double p) {
        brand = brand;
        memory = m;
        size = s;
        color = c;
        price = p;
    }
}
- 等号右侧的 brand,对应的是方法参数中的 brand 的吧
- 等号左侧的 brand 呢,它对应的也是方法参数中的 brand,并非对象的 brand 字段
当方法参数与字段重名时,需要用在字段前面加 this 来区分
public class Phone {
    // 类型 名字
    String brand; // 品牌
    String memory; // 内存
    String size; // 大小
    String color; // 颜色
    double price; // 价格
    boolean available; // 是否上架

    public Phone(String brand, String memory, String size, String color, double price) {
        this.brand = brand;
        this.memory = memory;
        this.size = size;
        this.color = color;
        this.price = price;
        this.available = true;
    }
}
- 前面有 this 的 brand 对应的是字段的 brand,前面没有 this 的 brand 对应的是方法参数中的 brand
- this 代表对象自己,但只能在构造方法、对象方法中使用
- 没有重名的情况下可以省略 this
提示
- 如果觉得自己写 this 比较麻烦,可以使用 IDEA 的快捷键 ALT + Insert 来生成构造方法
- 用 IDEA 生成的构造方法字段和方法参数都是用 this 区分好的
4. 无参构造
带参数的构造并不是必须的,也可以使用无参构造,例如
public class Student {
    String name;    // 姓名   null
    int age;        // 年龄   0

    Student() {

    }
}
使用无参构造创建对象示例如下
public class TestStudent {
    public static void main(String[] args) {
        Student s1 = new Student();
        s1.name = "张三";
        s1.age = 18;

        System.out.println(s1.name);
        System.out.println(s1.age);
    }
}
- 字段赋值现在不是构造方法内完成了,而是先创建了对象
- 再通过【对象.字段】来赋值,最终赋值效果是一样的
无参构造有个特性:
- 当 Java 在编译这个类时,发现你没有提供任何构造方法,它就会给你提供一个无参构造
- 如果你已经提供了带参构造方法,Java 就不会主动提供无参构造了
5. 抽取行为
前面我们讲了,面向对象编程,就是抽象现实世界的物体把它表示为计算机中的对象,手机的例子中,我们定义了类,抽取了字段来描述对象长什么样,这节课我们继续来抽取方法描述这个对象的行为,方法决定了这个对象能干什么
手机的例子不需要方法,计算机中的手机是假的,没法打电话,下面举一个有方法的例子
这里使用了 javascript 语言来举这个例子,虽然大家没有学过这门语言,但它的语法与 java 非常类似,相信我解释一下大家就能理解,另外,我待会讲解时,咱们把注意力集中的类和方法这部分代码上,其它一些 javascript 语言的细节也不用去关注
class Car {
    constructor(color, speed, x, y) {
        this.color = color;  // 颜色
        this.speed = speed;  // 速度
        this.stopped = true;  // 是否停止
        this.x = x;
        this.y = y;
    }
    run() {
        this.stopped = false;
    }
    // 更新坐标
    update() {

    }
    // 省略其它无需关注的代码
}
- class 也是定义一个类,这里是一个汽车类
- 页面上能看到根据这个类创建出的一个个汽车对象,白的汽车、灰的汽车、黑的汽车
- constructor 是 js 中的构造方法,也是用来给 js 对象的字段赋初值
- this.color 是汽车对象的颜色字段
- this.speed 是汽车对象的速度字段
- this.stopped 是汽车是否停止
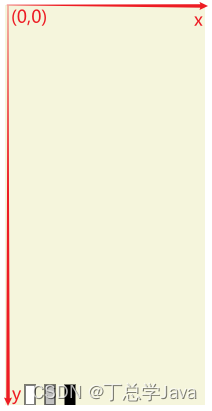
- this.x 和 this.y 是控制汽车在屏幕上的坐标
- 坐标以画布的左上角为原点,向右是 x 轴正向,向下是 y 轴正向
- x, y 的初始值怎么来的,这个我隐藏了,大家不用关注
创建汽车对象的语法与 java 几乎是一样的:
new Car("red", 5); // 这是创建一个红色的,速度为 5 的汽车
new Car("blue", 4); // 这是创建一个蓝色的,速度为 4 的汽车
执行完上两行创建汽车对象,页面效果如下所示

网页上的汽车不能动啊,方法要登场了!方法就是用来控制对象的行为
主要来看这个 update 方法,update 方法的作用,被我设计为控制汽车的坐标,你只需要把坐标如何变化通过代码在update里写出来,就能看到效果
update() {
    if(this.stopped) {
        return;
    }
    this.y -= this.speed;
    if (this.y <= 20) {
        this.y = 20;
    }
}
-
假设只能向上跑,每次调用方法时让 this.y 减少,减少多少呢?
-
固定成 3,但这样大家速度都一样了
-
改为根据 this.speed 减少
-
假设顶端是终点,this.y 不能超过终点,因此加一个 if 判断,如果小于 0 则固定为 0
-
因为汽车的 y 坐标是以矩形底部开始算的,0 会导致汽车跑出了画面,所以汽车跑到终点时 y 坐标应改为20,也就是汽车长度
-
-
汽车没有听我命令就一开始就跑了,this.stopped 控制这个汽车是停还是移动
- 在更新坐标里加个判断 this.stopped 为 false 才跑
通过这个例子,我们应当知道,方法的作用是控制对象的行为
二. 对象演化
更专业的说
- 对象由数据(data)和代码(code)组成
- data 有很多称呼:fields(字段),attributes(属性),properties(属性),
- 很多的资料都称为属性,但 properties 后面在学 java bean 时会有额外的意义,因此我这儿还是称之为字段吧,以便后面区分
- code 也有多种称呼:procedures(过程),methods(方法),functions(函数),我们称之为方法吧
- data 有很多称呼:fields(字段),attributes(属性),properties(属性),
例如
我的需求是,对比相同本金,不同利率和贷款月份,计算总还款额,看哪个更划算一些
- 4.5% 利率借2年
- 6.0% 利率借1年
不用面向对象方式,写出来的代码长这样
public class TestCal {
    public static void main(String[] args) {
        // 对比相同本金,不同利率和贷款月份,计算总还款额(等额本息),看哪个更划算一些
		double p1 = 100000.0;
		int m1 = 24;
		double yr1 = 4.5;
		double r1 = cal(p1, m1, yr1);
        System.out.println("4.5% 利率借 2 年:" + r1);

		double p2 = 100000.0;
		int m2 = 12;    // 1 年
		double yr2 = 6.0;
		double r2 = cal(p2, m2, yr2);
        System.out.println("6.0% 利率借 1 年:" + r2);
    }

    static double cal(double p, int m, double yr) {
        double mr = yr / 100.0 / 12;
        double pow = Math.pow(1 + mr, m);
        return m * p * mr * pow / (pow - 1);
    }
}
1. 对象字段演化
那么将来对象从何而来呢?很简单,找关系!把一组相关的数据作为一个整体,就形成了对象。
我们现有的数据中,哪些是相关的?
- 4.5、24、100000.0 这些数据为一组,封装成 Calculator c1 对象
- 6.0、12、100000.0 这些数据为一组,封装成 Calculator c2 对象
代码变成了下面的样子
public class Cal {
    double p;
    int m;
    double yr;

    public Cal(double p, int m, double yr) {
        this.p = p;
        this.m = m;
        this.yr = yr;
    }
}

public class TestCal {
    public static void main(String[] args) {
        // 对比相同本金,不同利率和贷款月份,计算总还款额(等额本息),看哪个更划算一些
		Cal c1 = new Cal(100000.0, 24, 4.5);
		double r1 = cal(c1);
        System.out.println("4.5% 利率借 2 年:" + r1);

		Cal c2 = new Cal(100000.0, 12, 6.0);
		double r2 = cal(c2);
        System.out.println("6.0% 利率借 1 年:" + r2);
    }

    static double cal(Cal c) {
        double mr = c.yr / 100.0 / 12;
        double pow = Math.pow(1 + mr, c.m);
        return c.m * c.p * mr * pow / (pow - 1);
    }
}
- 计算时,把这里的 c1, c2 传递过去。方法也变成了只需要一个 Calculator 参数,因为它一个参数,能顶原来三个参数,方法内部需要的数据来自于对象的字段。
- 注意方法此时还是用的 static 方法,方法这别着急,马上讲
总结:把相关的数据作为一个整体,就形成了对象,对象的字段演化完毕
2. 对象方法演化
方法执行总得需要一些数据,以前我们学习的主要是这种 static 方法,它的数据全部来自于方法参数。
今天开始,要学习对象方法,顾名思义,它是从属于对象的方法,语法上要去掉 static,变成这个样子
public class Cal {

    double p;
    int m;
    double yr;

    public Cal(double p, int m, double yr) {
        this.p = p;
        this.m = m;
        this.yr = yr;
    }

    double cal() {
        double mr = yr / 100.0 / 12;
        double pow = Math.pow(1 + mr, m);
        return m * p * mr * pow / (pow - 1);
    }
}
看看改动成对象方法后,都有哪些代码发生了变化?为啥不需要参数了呢?
这种对象方法执行需要的数据:
- 一部分来自于方法参数
- 另一部分来自于方法从属的对象
既然我们讲的这种对象方法都从属于 Calculator 对象了,那么方法参数这里是不是就没必要再加一个 Calculator 对象了啊
方法体内这些本金、月份、利率,都来自于方法所从属的对象的字段。不用写前面的 c. 了
- 当然,我们这个例子中,本金、月份、利率,在方法所从属的那个 Calculator 对象中已全部包含,因此方法上也无需更多其它参数。如果方法执行的有些数据,对象未包含,那你还是得添加方法参数
最后,方法调用时,为了表达与对象的这种从属关系,格式也应变化为:对象.方法()
public class TestCal {
    public static void main(String[] args) {
        // 对比相同本金,不同利率和贷款月份,计算总还款额(等额本息),看哪个更划算一些
        Cal c1 = new Cal(100000.0, 24, 4.5);
        double r1 = c1.cal();
        System.out.println("4.5% 利率借 2 年:" + r1);

        Cal c2 = new Cal(100000.0, 12, 6.0);
        double r2 = c2.cal();
        System.out.println("6.0% 利率借 1 年:" + r2);
    }
}
例如:
- c1.cal() 执行时,cal 方法就知道,我执行需要的 y,m,yr 这些数据来自于 c1 对象
- c2.cal() 执行时,cal 方法就知道,我执行需要的 y,m,yr 这些数据来自于 c2 对象
对象的方法演化完毕
静态方法 vs 对象方法
- 而 static 方法需要的数据,全都来自于方法参数,它没有关联对象,没有对象的那一部分数据
- 对象方法执行的数据,一部分数据从方法参数转移至对象内部
3. 贷款计算器 - 对象改造
用面向对象思想设计等额本息和等额本金两个类
class Calculator0 {
    Calculator0(double p, int m, double yr) {
        this.p = p;
        this.m = m;
        this.yr = yr;
    }

    double p;
    int m;
    double yr;

    String[] cal0() {
        double mr = yr / 12 / 100.0;
        double pow = Math.pow(1 + mr, m);
        double payment = p * mr * pow / (pow - 1);
        return new String[]{
                NumberFormat.getCurrencyInstance().format(payment * m),
                NumberFormat.getCurrencyInstance().format(payment * m - p)
        };
    }

    String[][] details0() {
        String[][] a2 = new String[m][];
        double mr = yr / 12 / 100.0;
        double pow = Math.pow(1 + mr, m);
        double payment = p * mr * pow / (pow - 1);              // 月供
        for (int i = 0; i < m; i++) {
            double payInterest = p * mr;                        // 偿还利息
            double payPrincipal = payment - payInterest;        // 偿还本金
            p -= payPrincipal;                                  // 剩余本金
            String[] row = new String[]{                       // 一行的数据
                    (i + 1) + "",
                    NumberFormat.getCurrencyInstance().format(payment),
                    NumberFormat.getCurrencyInstance().format(payPrincipal),
                    NumberFormat.getCurrencyInstance().format(payInterest),
                    NumberFormat.getCurrencyInstance().format(p)
            };
            a2[i] = row;
        }
        return a2;
    }
}
class Calculator1 {

    Calculator1(double p, int m, double yr) {
        this.p = p;
        this.m = m;
        this.yr = yr;
    }

    double p;
    int m;
    double yr;

    String[] cal1() {
        double payPrincipal = p / m;        // 偿还本金
        double backup = p;                  // 备份本金
        double mr = yr / 12 / 100.0;
        double payInterestTotal = 0.0;      // 总利息
        for (int i = 0; i < m; i++) {
            double payInterest = p * mr;    // 偿还利息
            p -= payPrincipal;              // 剩余本金
            payInterestTotal += payInterest;
        }
        // [0]还款总额   [1]总利息
        return new String[]{
                NumberFormat.getCurrencyInstance().format(backup + payInterestTotal),
                NumberFormat.getCurrencyInstance().format(payInterestTotal)
        };
    }

    String[][] details1() {
        double payPrincipal = p / m;                        // 偿还本金
        double mr = yr / 12 / 100.0;
        String[][] a2 = new String[m][];
        for (int i = 0; i < m; i++) {
            double payInterest = p * mr;                    // 偿还利息
            p -= payPrincipal;                              // 剩余本金
            double payment = payPrincipal + payInterest;    // 月供
            String[] row = new String[]{
                    (i + 1) + "",
                    NumberFormat.getCurrencyInstance().format(payment),
                    NumberFormat.getCurrencyInstance().format(payPrincipal),
                    NumberFormat.getCurrencyInstance().format(payInterest),
                    NumberFormat.getCurrencyInstance().format(p)
            };
            a2[i] = row;
        }
        return a2;
    }
}
控制器代码则变为,比以前看着也简洁了不少
- 对象封装了数据,方法封装了计算逻辑,封装,这是面向对象的好处之一
- 面向对象编程,并不能做出更强大的功能,只是改变的代码的结构
@Controller
public class CalController {

    @RequestMapping("/cal")
    @ResponseBody
    String[] cal(double p, int m, double yr, int type) {
        if (type == 0) { // 等额本息
            return new Calculator0(p, m, yr).cal0();
        } else {    // 等额本金
            return new Calculator1(p, m, yr).cal1();
        }
    }

    @RequestMapping("/details")
    @ResponseBody
    String[][] details(double p, int m, double yr, int type) {
        if (type == 0) {
            return new Calculator0(p, m, yr).details0();
        } else {
            return new Calculator1(p, m, yr).details1();
        }
    }
}
4. 静态变量
下面是对圆、计算圆面积进行了面向对象设计
public class Circle {

    double r; // 半径
    double pi = 3.14;

    public Circle(double r) {
        this.r = r;
    }

    double area() {
        return pi * r * r;
    }
}
测试代码如下
public class TestCircle {
    public static void main(String[] args) {
        Circle c1 = new Circle(1.0);
        c1.pi = 3.14;
        Circle c2 = new Circle(1.0);
        c2.pi = 3;

        System.out.println(c1.area()); // 圆的面积计算结果为 3.14
        System.out.println(c2.area()); // 圆的面积计算结果为 3

    }
}
这显然不合理,不能一个圆计算时 π \pi π 值是 3.14,换成另一个圆计算时 π \pi π 值就变成了 3,对于 π \pi π 值来讲,应该是所有圆共享一个值
- 你看,对于将来千千万万个圆对象来说,它们各有各的半径
- 但无论圆有多少个,3.14 这个数,只需要有一个就足够了
改进如下
public class Circle {

    double r; // 半径
    static double pi = 3.14; // 静态变量, 所有圆对象共享它

    public Circle(double r) {
        this.r = r;
    }

    double area() {
        return pi * r * r;
    }
}
回到测试代码
public class TestCircle {
    public static void main(String[] args) {
        Circle c1 = new Circle(1.0);
        c1.pi = 3.14;
        Circle c2 = new Circle(1.0);
        c2.pi = 3;

        System.out.println(c1.area()); // 圆的面积计算结果为 3
        System.out.println(c2.area()); // 圆的面积计算结果为 3

    }
}
两次计算结果相同,因为 c1.pi 和 c2.pi 都是修改的同一个变量。注意几点
- 静态变量虽然也能通过对象来使用,但建议通过类名类使用,例如上例中,应该这么写:
Circle.pi = 3 - 如果不希望 pi 的值改来改去,可以再加一个 final 修饰符:
static final pi = 3.14- final 加在变量上,表示该变量只能赋值一次,之后就不能修改了
- 最后要知道,计算如果需要更为精确的 pi 值,可以用
Math.PI,上面我们自己写的 pi 只是为了举例需要
5. 四种变量
至今为止,一共学习了四种变量,下面就对它们做一个简单对比
public class TestVariable {
    public static void main(String[] args) {
        m(10);
        if (true) {
            C c1 = new C(30); // 出了if语句块,c1 对象就无法使用了,随带的它内部的对象变量也失效
        }
    }

    static void m(int a) {  // 1. 参数变量, 作用范围是从方法调用开始,直到方法调用结束
        for (int i = 0; i < 10; i++) {
            int b = 20; // 2. 局部变量, 作用范围从定义开始,到包围它的 } 为止, 必须赋初值才能使用
			System.out.println(b);
        }
    }
}

class C {
    int c;  // 3. 对象变量(成员变量)  从对象创建开始, 到对象不能使用为止

    public C(int c) {
        this.c = c;
    }

    static int d = 40; // 4. 静态变量, 从类加载开始, 到类卸载为止
}
- 方法参数的作用范围就是从方法调用开始,直到这个方法结束为止,这是参数变量的作用范围
- 局部变量的作用范围要更小一些,它是从局部变量定义开始,到包围它的 } 为止
- 局部变量跟其它几个变量有个不一样的地方,它需要先赋值,再使用,否则会报错
- 对象变量(其实就是对象中的字段)的作用范围是从对象创建开始,到对象不能使用为止,它的作用范围和对象是一样的
- 对象变量是每个对象私有的
- 静态变量,它的作用范围从类加载开始,到类卸载为止
- 第一次用到这个类时,会把类的字节码加载到虚拟机里,这称之为类加载
- 某个类以后不会再用到,类就会从虚拟机中卸载
- 静态变量是所有对象共享的
三. 继承
1. 继承语法
阅读代码发现,这两个类中有一些相同的对象变量和方法代码,能否减少这两个类的重复代码,答案是继承
继承的语法
class 父类 {
    字段;
    方法() {}
}

class 子类 extends 父类 {

}
可以用父子类继承的方式减少重复声明,例如 A 是父类,B,C 类是子类,那么
class A {
    String name;
    void test() {}
}

class B extends A {
}

class C extends A {
}
- 子类能从父类中继承它所声明的字段、方法
但注意,构造方法不能继承
- 给父类加一个带参构造,发现子类都报错了,为什么呢?一方面构造方法不能继承
- 另一方面对子类来说,你得调用父类的带参构造给父类的 name 字段赋值吧
- 子类得先创建自己的构造方法,然后用 super 调用父类的带参构造
class A {
    String name;
    A(String name) {
        this.name = name;
    }
    void test() {}
}

class B extends A {
    B(String name) {
        super(name);
    }
}

class C extends A {
    C(String name) {
        super(name);
    }
}
2. 贷款计算器 - 继承改造
回到我们的例子
第一步,减少重复的字段声明,定义一个父类型,里面放 p、m、yr 这三个字段
public class Calculator {
    double p;
    int m;
    double yr;

    Calculator(double p, int m, double yr) {
        this.p = p;
        this.m = m;
        this.yr = yr;
    }
}
然后子类中不必再写这三个字段
class Calculator0 extends Calculator{

    Calculator0(double p, int m, double yr) {
        super(p, m, yr);
    }

    // ...
}

class Calculator1 extends Calculator{

    Calculator1(double p, int m, double yr) {
        super(p, m, yr);
    }

    // ...
}
第二步,分析哪些代码重复:
可以看到详情中生成一行数据的代码重复了,抽取为父类的方法,然后子类可以重用
public class Calculator {
    // ...

    String[] createRow(double payment, int i, double payInterest, double payPrincipal) {
        return new String[]{                       // 一行的数据
                (i + 1) + "",
                NumberFormat.getCurrencyInstance().format(payment),
                NumberFormat.getCurrencyInstance().format(payPrincipal),
                NumberFormat.getCurrencyInstance().format(payInterest),
                NumberFormat.getCurrencyInstance().format(p)
        };
    }
}
例如
public class Calculator0 extends Calculator {

    // ...

    @Override
    String[][] details() {
        String[][] a2 = new String[m][];
        double mr = yr / 12 / 100.0;
        double pow = Math.pow(1 + mr, m);
        double payment = p * mr * pow / (pow - 1);              // 月供
        for (int i = 0; i < m; i++) {
            double payInterest = p * mr;                        // 偿还利息
            double payPrincipal = payment - payInterest;        // 偿还本金
            p -= payPrincipal;                                  // 剩余本金

            // 这里重用了从父类继承的方法
            a2[i] = createRow(i, payment, payPrincipal, payInterest);
        }
        return a2;
    }
}
继承能够减少字段定义和方法定义的重复代码
- 不重复意味着代码的可维护性提高
- 重复意味着一处修改,凡是重复的地方都要跟着修改
3. java 类型系统
java 中的类型分成了两大类
-
基本类型 primitive type
- 整数 byte short int long
- 小数 float double
- 字符 char
- 布尔 boolean
-
引用类型 reference type
- 除了基本类型以外的其它类型都属于引用类型,引用类型可以看成是由基本类型组成的复杂类型,例如
- String 内部由 byte[] 组成,而 byte[] 又是由 byte 组成
- Phone 内部价格是 double,品牌等都是 String
- 包装类型
- 每个基本类型都有与之对应的包装类型,见下表
- 包装类型是对象,既然是对象,就可以有对象的特征,如字段、方法、继承 …
- null 值,不能对 null 值进一步使用(使用字段、调用方法),例如
- String str = null;
- str.length() 求字符串长度时,就会出现 NullPointerException 空指针异常
- 使用引用类型之前,最好做非空判断,例如:if(str != null) 再做进一步操作
- 除了基本类型以外的其它类型都属于引用类型,引用类型可以看成是由基本类型组成的复杂类型,例如
| 包装类型 | 基本类型 | 备注 |
|---|---|---|
| Byte | byte | |
| Short | short | |
| Integer | int | |
| Long | long | |
| Float | float | |
| Double | double | |
| Character | char | |
| Boolean | boolean |
4. 类型转换
1) 基本类型转换
- 整数和 char 7种类型
- 顺箭头方向隐式转换
- 逆箭头方向需要显式强制转换,可能会损失精度
- boolean 类型无法与其它基本类型转换
- short 与 char 也不能转换
隐式转换
byte a = 10;
int b = a; // 自动从 byte 转换为 int
强制转换
int c = 20;
byte d = (byte) c; // 在圆括号内加上要转换的目标类型
强制转换可能损失精度
int c = 1000;
byte d = (byte) c; // byte 的数字范围就是在 -128 ~ 127,存不下 1000,最后结果是 -24
2) 包装类型转换
- 包装类型和它对应的基本类型之间可以自动转换,如
int a = 20;
Integer b = a;

Integer c = new Integer(30);
int d = c;
3) 引用类型转换
Java 继承的特点
- 单继承,子类只能继承一个父类
- Object 是所有其它类型直接或间接的父类型,定义 class 时,不写 extends 这个类也是继承自 Object
- 子类与父类、祖先类之间,可以用【是一个 is a】的关系来表达
向上向下转型
-
顺箭头方向(向上)隐式转换,即子类可以用它的更高层的类型代表,表达一种是一个的关系
-
例如一个猫对象,可以隐式转换为动物
Animal a = new Cat(); // 用父类型的变量 a 代表了一只猫对象
Object b = new Cat(); // 用祖先类型的变量 b 代表了一只猫对象
-
-
逆箭头方向(向下)首先要符合是一个规则,然后用显式强制转换
-
如果一个动物变量,它代表的是一个猫对象,可以通过强制转换还原成猫
Animal a = new Cat(); Cat c = (Cat) a; -
如果一个动物变量,它代表的是一个猫对象,即使强制转换,也不能变成狗,编译不报错,但运行就会出现 ClassCastException
Animal a = new Cat();
Dog d = (Dog) a;
-
为什么需要向上转型?主要是为了使用父类统一处理子类型
例1:
static void test(Animal a) {

}
这时,此方法既可以处理猫对象,也可以处理狗对象
test(new Cat());
test(new Dog());
例2:用父类型的数组,可以既装猫对象,也装狗对象
Animal[] as = new Animal[]{ new Cat(), new Dog() };
类型判断
Animal a = new Cat();
如果想知道变量 a 代表对象的实际类型,可以使用
System.out.println(a.getClass()); // 输出结果 class com.itheima.Cat
- getClass() 是对象从 Object 类中继承的方法
如果想检查某个对象和类型之间是否符合【是一个】的关系,可以使用
Animals a = new Cat();
Object b = new Cat();

System.out.println(a instanceof Cat);   // true
System.out.println(a instanceof Dog);   // false
System.out.println(b instanceof Animal);// true
经常用在向下转型之前,符合是一个的关系,再做强制类型转换
4) 其它类型转换
除了以上转换规则,在赋值、方法调用时,一旦发现类型不一致,都会提示编译错误,需要使用一些转换方法才行
例如:两个字符串对象要转成整数做加法
String a = "1";
String b = "2";

System.out.println(a + b); // 这样不行,字符串相加结果会拼接为 12
System.out.println(Integer.parseInt(a) + Integer.parseInt(b)); // 转换后再相加,结果是 3
四. 多态
1. 何为多态
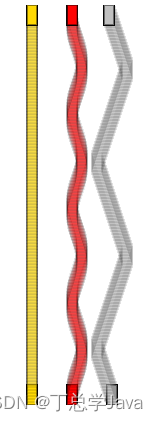
例如,我这里有多个汽车对象,调用这些汽车对象的 update 方法修改坐标,表面调用的方法都一样,但实际的效果是,它们各自的运动轨迹不同
function draw() {
    for (let i = 0; i < cars.length; i++) {
        let c = cars[i];
        c.update();  // update 方法用来修改坐标
        c.display();
    }
}
- cars 是个汽车数组,里面放了3个汽车对象
再比如,我有一个 getAnimals() 方法,会传递过来 Animal 动物数组,但遍历执行 Animal 的方法 say,行为不同
public class TestAnimal {
    public static void main(String[] args) {
        Animal[] animals = getAnimals();
        for (int i = 0; i < animals.length; i++) {
            Animal a = animals[i];
            a.say();
        }
    }
}
会输出
喵~
汪汪汪
哼哧哼哧
如果像上两个例子中体现的:同一个方法在执行时,表现出了不同的行为,称这个方法有多态的特性。
2. 多态前提
不是所有方法都有多态,像之前写过的静态方法,不管怎么调用,表现出的行为都是一样的。那么要成为这种多态方法要满足哪些条件呢?先来看看多态这个词是怎么来的
多态,英文 polymorphism 本意是多种形态,是指执行一个相同的方法,最终效果不同。为什么会有这种效果?
方法虽然都是同一个,但调用它们的对象相同吗?看起来都是 Animal 啊,其实不是
- 之前讲向上转型时讲过,子类对象可以向上转型,用父类型代表它
- 这里的每个 Animal a 只是代表右侧对象,右侧的实际对象,是一些子类对象,大家应该都猜出来了,分别是猫、狗、猪
- 这种有多态特性的方法在调用时,会根据实际的对象类型不同而行为不同
- 而正是每个子类对象中的 say 方法写的不一样,从而表现出不同的叫声
方法具备多态性的两个条件:
条件1
用父类型代表子类对象,有了父类型才能代表多种子类型,只有子类型自己,那将来有多种可能吗,不行吧?
- 比如说无论获取数组还是遍历,都使用猪类型,那最终也只能发出猪叫声,这是第一个前提条件
条件2
第二个条件,是子类和父类得有一个相同的 say 方法。如果子类存在与父类相同的方法,称发生了方法重写。重写方法要满足:
- 方法名和参数都完全相同
- 对象方法才能重写
- 检查是否发生了重写可以用 @Override 注解,它可以帮我们检查子类方法是否符合重写规则
只有重写了,才能表现出多种形态,如果没有重写,调用的都是父类方法,最终的效果是相同的,没有多态了
3. 多态执行流程
表面上调用的是 Animal 父类的 say 方法,实际内部会执行下面的逻辑判断
- 循环第一次的 Animal a 代表的是一只猫对象,就会走第三个分支
- 继续去看,看看猫里面有没有 @Override say() 方法
- 因为我们重写了 say() 方法,最终就执行的是 Cat.say() 方法
- 那如果啊我的猫里面没有重写这个方法。最终执行的就是 Animal.say() 方法
- 继续去看,看看猫里面有没有 @Override say() 方法
- 循环第二次的 Animal a 代表的是一只狗对象,就会走第二个分支
- 继续去看,看看狗里面有没有 @Override say() 方法
- 因为我们重写了 say() 方法,最终就执行的是 Dog.say() 方法
- 继续去看,看看狗里面有没有 @Override say() 方法
- 循环第三次的 Animal a 代表的是一只猪对象,就会走第四个分支
- 继续去看,看看猪里面有没有 @Override say() 方法
- 因为我们重写了 say() 方法,最终就执行的是 Pig.say() 方法
- 继续去看,看看猪里面有没有 @Override say() 方法
总结一下,具有这种多态特性的方法,调用内部就会走这样很多的判断逻辑,当然这些判断是 JVM 虚拟机帮我们判断的,不需要我们自己判断。简单的说,多态方法调用时,得先看变量所代表的对象真正类型是什么。是狗走狗的逻辑,是猫走猫的逻辑。然后呢,优先执行真正类型中的重写方法。如果没有重写方法呢?才执行父类中的方法。这就是这种多态方法执行的流程。
伪代码如下:
Animal a = ...
Class c = a.getClass() // 获得对象实际类型
if(c == Animal.class) {
    执行 Animal.say()
} else if(c == Dog.class && Dog 重写了 say 方法) {
    执行 Dog.say()
} else if(c == Cat.class && Cat 重写了 say 方法) {
    执行 Cat.say()
} else if(c == Pig.class && Pig 重写了 say 方法) {
    执行 Pig.say()
} else {
    执行 Animal.say()
}
4. 贷款计算器 - 多态改造
在控制器代码中,需要用 if else 来判断使用哪个 Calculator 对象完成计算,Calculator0 还是 Calculator1,将来如果贷款类型越来越多,就要写好多 if else,如何避免呢?利用多态的原理,让 jvm 帮我们做判断
- Animal a = … 利用多态,a 如果代表的是狗对象,走狗的逻辑,代表的是猫对象,走猫的逻辑
- Calculator c = … 利用多态,c 如果代表的是等额本息对象,走等额本息逻辑,代表的是等额本金对象,走等额本金的计算逻辑
1) 产生方法重写
原来的
- Calculator0 的方法叫 cal0 和 details0
- Calculator1 的方法叫 cal1 和 details1
- Calculator 父类中没有这俩方法
显然不行
改写如下:
class Calculator {
    // ...

    String[] cal() {
        return null;
    }

    String[][] details() {
        return null;
    }
}

class Calculator0 extends Calculator {
    Calculator0(double p, int m, double yr) {
        super(p, m, yr);
    }
	@Override
    String[] cal() {
        // ...
    }
	@Override
    String[][] details() {
        // ...
    }

}

class Calculator1 extends Calculator {
    Calculator1(double p, int m, double yr) {
        super(p, m, yr);
    }
	@Override
    String[] cal() {
        // ...
    }
	@Override
    String[][] details() {
        // ...
    }

}
2) 父类型代表子类对象
根据类型创建不同 Calculator 对象有点小技巧(避免了创建对象时的 if else),如下:
Calculator[] getCalculator(double p, int m, double yr) {
    return new Calculator[] {
        new Calculator0(p, m, yr),
        new Calculator1(p, m, yr)
    };
}
最后通过父类型来执行,表面上是调用 Calculator 父类的 cal() 和 details() 方法,但实际执行的是某个子类的 cal() 和 details() 方法,通过多态,避免了方法调用时的 if else 判断
@Controller
public class CalController {

    Calculator[] getCalculator(double p, int m, double yr) {
        return new Calculator[] {
            new Calculator0(p, m, yr),
            new Calculator1(p, m, yr)
        };
    }

    @RequestMapping("/cal")
    @ResponseBody
    String[] cal(double p, int m, double yr, int type) {
        Calculator[] cs = getCalculator(p, m, yr);
        return cs[type].cal();
    }

    @RequestMapping("/details")
    @ResponseBody
    String[][] details(double p, int m, double yr, int type) {
        Calculator[] cs = getCalculator(p, m, yr);
        return cs[type].details();
    }

}
cs[type] 是根据类型找到对应的子类对象,例如
- type = 0 时,其实是获取了数组中索引 0 的对象,即 new Calculator0(p, m, yr)
- type = 1 时,其实是获取了数组中索引 1 的对象,即 new Calculator1(p, m, yr)
3) 多态好处
多态有什么好处呢?
- 比如现在想再加一种贷款计算方式,type = 2
- 无论借多少钱,多少个月,利息总为 0
新增一个 Calculator 子类
public class Calculator2 extends Calculator{
    Calculator2(double p, int m, double yr) {
        super(p, m, yr);
    }

    @Override
    String[] cal() {
        return new String[]{
                NumberFormat.getCurrencyInstance().format(p),
                NumberFormat.getCurrencyInstance().format(0)
        };
    }

    @Override
    String[][] details() {
        String[][] a2 = new String[m][];
        double payment = p / m;
        for (int i = 0; i < m; i++) {
            p -= payment;
            a2[i] = createRow(payment, i, 0, payment);
        }
        return a2;
    }
}
原有代码只需很少改动(扩展性高了)
对于原有的这两个方法来讲,它需要关心你到底是哪个子类对象吗?它不需要关心,因为对于它来讲,它都是统一按照父类型来处理的,通过父类型多态调用方法,具体该调哪个子类方法,多态内部就处理好了
@Controller
public class CalController {

    Calculator[] getCalculator(double p, int m, double yr) {
        return new Calculator[] {
                new Calculator0(p, m, yr),
                new Calculator1(p, m, yr),
            	new Calculator2(p, m, yr)
        };
    }


    @RequestMapping("/cal")
    @ResponseBody
    String[] cal(double p, int m, double yr, int type) {
        Calculator[] cs = getCalculator(p, m, yr);
        return cs[type].cal();
    }

    @RequestMapping("/details")
    @ResponseBody
    String[][] details(double p, int m, double yr, int type) {
        Calculator[] cs = getCalculator(p, m, yr);
        return cs[type].cal();
    }

}
可以尝试用原来 if else 的办法自己实现一遍,对比一下代码量。
4) 小结
关于多态的应用的例子讲完了,总结一下
前提
- java 中的类型系统允许用父类型代表子类型对象,这是多态前提之一
- 子类和父类之间发生了方法重写,这是多态前提之二
效果
- 调用父类型的方法,可能会有不同的行为,取决于该方法是否发生了重写
什么时候使用多态
- 多态能够用一个父类型,统一操作子类对象
- 原本要根据类型做判断,写很多 if else 的地方,都可以考虑使用多态来消除 if else,提高扩展性
五. 封装
1. 封装差导致的问题
封装的例子我们前面已经见过一些了:
- 对象字段封装了数据,
- 方法封装了计算逻辑,对外隐藏了实现细节
- 但看看下面的 js 例子,直接修改对象的字段会产生不合理的效果
- cars[0].y = 20 就会导致汽车瞬移
- 本来我的规则是,通过 update 方法一次按 speed 速度移动一点,现在直接修改字段,突破了方法的限制
class Car {
    constructor(color, speed, x, y) {
        this.color = color;  // 颜色
        this.speed = speed;  // 速度
        this.stopped = true;  // 是否停止
        this.x = x;
        this.y = y;
    }
    run() {
        this.stopped = false;
    }
    update() {
        if(this.stopped) {
            return;
        }

        this.y -= this.speed;
        if( this.y <= 20) {
            this.y = 20;
        }
    }
    display() {
        fill(this.color);
        rect(this.x, this.y, 10, -20);
    }
}
其根本问题在于,使用者直接使用了字段,绕过了 update 方法对 y 值的处理,解决方法也很简单,就是将字段的访问权限设置为私有,字段定义时前面加 # 即可,其它用 x,y 的地方也替换为 #x 和 #y
class Car {
    #x; // 设置为私有
    #y; // 设置为私有
    constructor(color, speed, x, y) {
        this.color = color;  // 颜色
        this.speed = speed;  // 速度
        this.stopped = true;  // 是否停止
        this.#x = x;
        this.#y = y;
    }
    update() {
        if(this.stopped) {
            return;
        }

        this.#y -= this.speed;
        if( this.#y <= 20) {
            this.#y = 20;
        }
    }
    // ...
}
这回再执行 cars[0].#y = 20 就会告诉你私有字段不能访问了,这样字段只能在类的内部可以访问,出了类的范围就不能使用了,将来 Java 中会有类似的控制手段。
2. 加强封装
Java 中可以用访问修饰符来对字段或方法进行访问权限控制,一共有四种
| 名称 | 访问权限 | 说明 |
|---|---|---|
| public | 标识的【字段】及【方法】及【类】,谁都能使用 | |
| protected | 标识的【字段】及【方法】,只有同包类、或是子类内才能使用 | |
| 标识的【字段】及【方法】及【类】,只有同包类才能使用 | 默认访问修饰符 | |
| private | 标识的【字段】及【方法】只有本类才能使用(或内部类) |
- 类上能使用的访问修饰符,只有 public 和默认两种
private
package com.itheima.encapsulation;
public class Car {
	private int y; // 私有的
    private void test() { } // 私有的

    void update() {
        // 本类内可以使用
        System.out.println(this.y);
        this.test();
    }

}

package com.itheima.encapsulation; // 同包测试类
public class Test1 {
    public static void main(String[] args) {
        Car car = new Car();
        System.out.println(car.y);  // 错误,不能访问 private 字段
        car.test();					// 错误,不能访问 private 方法
    }
}
默认
package com.itheima.encapsulation;
public class Car {
	int y; // 默认的
	void test() {} // 默认的

    void update() {
        // 本类内可以使用
        System.out.println(this.y);
        this.test();
    }

}

package com.itheima.encapsulation; // 同包测试类
public class Test2 {
    public static void main(String[] args) {
        Car car = new Car();
        System.out.println(car.y);  // 同包可以使用
        car.test();					// 同包可以使用
    }
}

package com.itheima; // 不同包测试类
import com.itheima.encapsulation.Car;
public class Test3 {
    public static void main(String[] args) {
        Car car = new Car();
        System.out.println(car.y);  // 错误,不同包不能访问 默认 字段
        car.test();					// 错误,不同包不能访问 默认 方法
    }
}
protected
package com.itheima.encapsulation;
public class Car {
	protected int y; // 受保护的
	protected void test() {} // 受保护的

    // 本类内可以使用
    void update() {
        System.out.println(this.y);
        this.test();
    }

}

package com.itheima; // 不同包子类
import com.itheima.encapsulation.Car;
public class SubCar extends Car {

    void display() {
        System.out.println(this.y); // 不同包子类内可以使用
        this.test();				// 不同包子类内可以使用
    }
}
尽可能让访问范围更小
- private < 默认 < protected < public
- 尤其是字段,建议设置为 private
- 想让子类用 考虑设置为 protected
3. JavaBean
JavaBean 规范
- 字段私有, 提供公共 get、set、is 方法来访问私有字段
- 获取字段值用 get 方法
- 获取 boolean 类型字段值用 is 方法
- 修改字段值用 set 方法
- get、set、is 方法的命名必须是:getXXX,setXXX,isXXX
- 其中 XXX 是字段名(首字母变大写)
- 这些方法可以用 idea 的 ALT + Insert 快捷键生成
- 最好提供一个无参的构造
- 最好实现一个接口 Serializable
例子
class Teacher implements Serializable {
    private String name; // 小写
    private boolean married; // 已婚
    private int age;

    public boolean isMarried() { // 对 boolean 类型,用这种 isXXX
        return this.married;
    }

    public void setMarried(boolean married) {
        this.married = married;
    }

    // get 方法 用来获取私有字段值
    public String getName() { // get 后面单词首字母要大写
        return this.name;
    }

    // set 方法 用来修改私有字段值
    public void setName(String name) {
        this.name = name;
    }

    public Teacher(String name, boolean married) {
        this.name = name;
        this.married = married;
    }

    public Teacher() {
    }
}
测试类
public class TestJavaBean {
    public static void main(String[] args) {
        Teacher t = new Teacher("张老师", false);

        // 全部改用公共方法来间接读写字段值
        System.out.println(t.getName());
        System.out.println(t.isMarried());
        t.setMarried(true);
        System.out.println(t.isMarried());
    }
}
Java Bean 主要用来封装数据,不会提供哪些包含业务逻辑的方法
最后要区分两个名词:字段和属性
- 有 getXXX、setXXX、isXXX 方法的,可以称该对象有 XXX 属性(首字母变小写)
- 例如,上面的 Teacher 类有 name 属性和 married 属性
- 没有对应 get、set、is 方法的,不能说有属性
- 例如,上面的 Teacher 类没有 age 属性
六. 接口
特性1 - 解决单继承
这节课来学习单继承的问题
咱们都知道,java 中只支持单继承,也就是对于子类来讲,只能继承一个父类,但这样会出现代码重用方面的问题。看这个例子
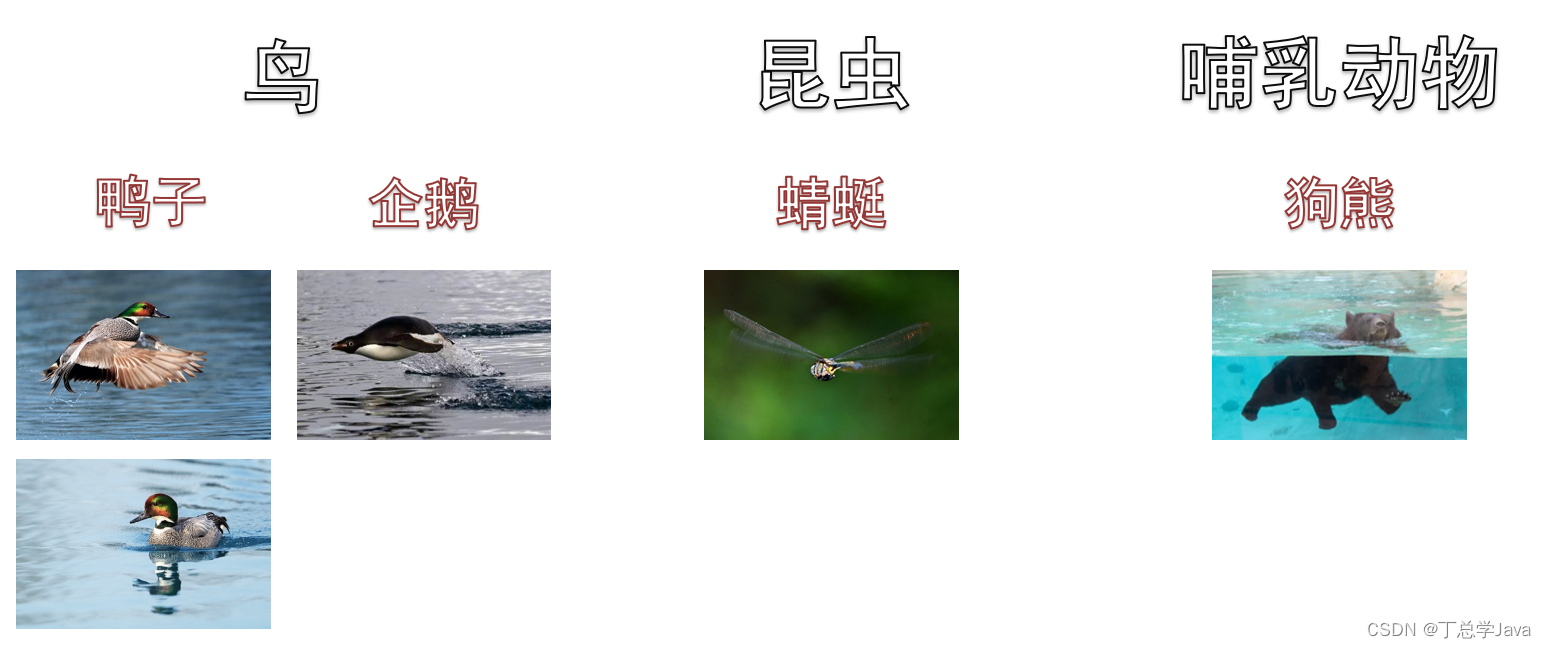
- 如果设计一个父类,鸟,现在要写一个飞这个方法,而且代码实现都一样,因此我把这个飞方法,放在了父类当中,让子类继承,然后新写了一个鸭子子类,还用写飞这个方法吗?不必了,继承父类中的飞就可以了。
- 接着来看,鸭子还能游泳,那么游泳应该放在鸭子中还是鸟中,好像应该放在子类鸭子中吧,因为如果把游泳放在父类鸟中,这样会被所有的子类继承,那些原本不会游泳的鸟继承了游泳方法,不合理吧
- 但是!如果再写一个子类企鹅呢?企鹅是鸟吧,会游泳吧,它和鸭子会都会游泳。但按刚才的讨论,游泳方法不能放在父类中,因此存在了两份重复的游泳代码。
- 而且不合理又出现了,企鹅不会飞!照这么说飞放在父类中也不合理,也得放到子类中,这样一来,飞方法也不能重用了
- 就算把飞留在父类中,蜻蜓会飞吧,但它的父类是昆虫,单继承决定了它不能再继承鸟了,也就不能重用鸟中的飞方法,飞方法又重复了
- 类似的例子还有很多,狗熊会游泳吧,它的父类是哺乳动物,不能和鸭子、企鹅重用游泳方法
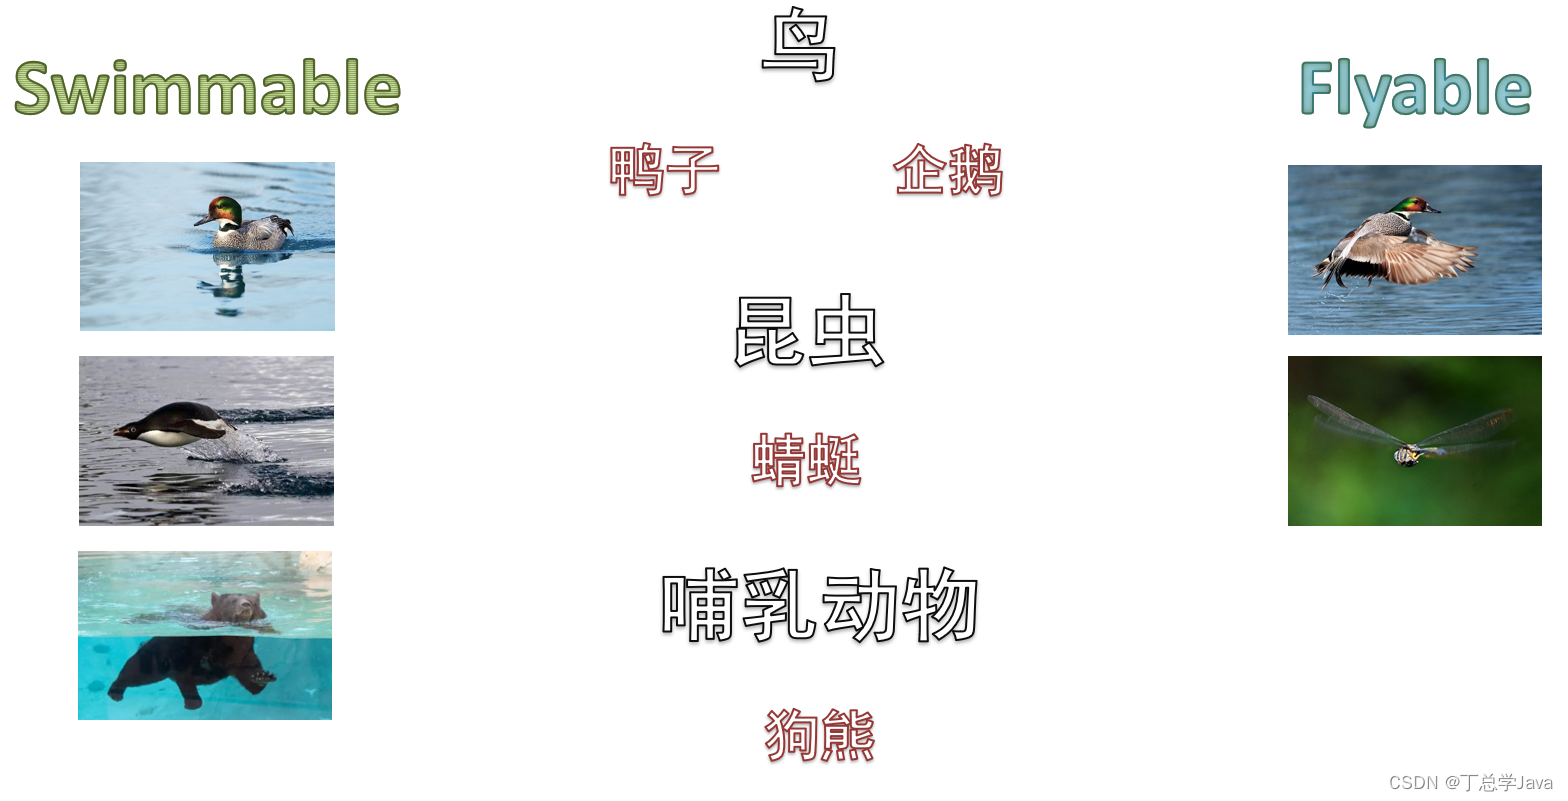
上面的问题,究其本质,是因为 Java 只支持单继承,若想补足这方面的短板,需要用到接口,看这张图:
-
这些继承关系不变,但把重复的代码放在接口当中, swimmable 里放游泳方法,flyable 里放飞翔方法,然后要重用方法的类实现它们。
-
一个类只能继承一个父类,但一个类可以实现多个接口,使用接口就解决了刚才的问题
-
接口里主要提供给的都是方法,代表的是具备某方面的能力,能游泳,能飞翔,因此命名上常用 able
它的语法如下
interface A {
    public default void a() {}
}

interface B {
    public default void b() {}
}

// C 从 A, B 两个接口重用方法 a() 和 b()
class C implements A, B {

}
解决之前的问题
public class TestInterface1 {
    public static void main(String[] args) {
        Duck d = new Duck();
        d.swim();
        d.fly();
    }
}

interface Swimmable {
    default void swim() {
        System.out.println("游泳");
    }
}

interface Flyable {
    default void fly() {
        System.out.println("飞翔");
    }
}

class Duck implements Swimmable, Flyable {

}
- 需要放入接口的方法, 必须加 default 关键字(默认方法)
- default 方法只能是 public, public 可以省略
特性2 - 接口多态
刚才我们学习了接口的第一个特性,解决单继承的问题,接下来看看接口的第二个特性,接口方法也支持多态。
方法多态的两个条件需要进一步完善
- 用父类型代表子类对象,或者用接口类型来代表实现类对象
- 必须发生方法重写
看这张图,上面这是接口E,下面这俩类 F、G 实现了接口,他俩以后可以叫做实现类,看一下这种上下级关系就可以知道,它们之间符合向上转型,F,G能够沿箭头向上转换为接口类型,因此能用接口类型代表实现类对象
先来看第一条,接口类型可以代表实现类对象
public class TestInterface2 {
    public static void main(String[] args) {
        E[] array = new E[] {
                new F(),
                new G()
        };
    }
}
interface E {
}
class F implements E {
}
class G implements E {
}
再看第二条,方法重写
public class TestInterface2 {
    public static void main(String[] args) {
        E[] array = new E[] {
                new F(),
                new G()
        };
        for (int i = 0; i < array.length; i++) {
            E e = array[i];
            e.e(); // 多态
        }
    }
}
interface E {
    default void e() {
        System.out.println("e");
    }
}
class F implements E {
    @Override
    public void e() {
        System.out.println("f");
    }
}
class G implements E {
    @Override
    public void e() {
        System.out.println("g");
    }
}
- 要注意:方法重写时,要求:子类和实现类 方法访问修饰符 >= 父类和接口 方法访问修饰符
- default 方法的访问修饰符其实是省略了 public,实现类中方法的访问修饰符要 >= public 才不会出错
- 多态性:
- 表面调用的是接口的 E.e() 方法
- 实际会根据 e 的实际类型调用重写方法,即 F.e() 和 G.e() 方法
抽象方法
其实要使用接口多态,更多地是使用一种抽象方法,而非默认方法,所谓抽象方法仅有方法声明,没有方法体代码。
你看我用抽象方法代替掉这里的默认方法,它包含 abstract 关键字,而且也只能是 public 的,平时这俩关键字都可以省略不写
public class TestInterface2 {
    public static void main(String[] args) {
        E[] array = new E[] {
                new F(),
                new G()
        };
        for (int i = 0; i < array.length; i++) {
            E e = array[i];
            e.e(); // 多态
        }
    }
}
interface E {
    void e(); // 抽象方法,没有方法体,只能是 public 的,省略了 public abstract
}
class F implements E {
    @Override
    public void e() { // 默认
        System.out.println("f");
    }
}
class G implements E {
    @Override
    public void e() {
        System.out.println("g");
    }
}
为啥抽象方法设计为不需要方法体呢?因为你看:
- 反正多态要求实现类发生方法重写,既然方法重写了,就调用不到接口方法的代码了
- 既然多态发生时,用不到接口中可能的代码,还不如让方法体空着
另外,抽象方法有个好处:它强制了实现类要实施方法重写,如果实现类没有重写,语法上会报错
特性3 - 接口封装
接口封装的更为彻底
public class TestInterface3 {
    public static void main(String[] args) {
        M m = new N(); // 用接口类型代表了实现类对象
        m.m(); // 只能调用接口中定义的方法
    }
}

interface M {
    void m(); // public abstract
}

class N implements M {
    public String name;

    @Override
    public void m() {
        System.out.println("m");
    }

    public void n() {
        System.out.println("n");
    }
}
- 只能调用到接口中的方法,对实现类中的其它方法,一无所知
- 接口限制了只能通过方法来使用对象,不能直接访问对象的字段
封装的关键在于,对外隐藏实现细节,接口完美地做到了这一点
经验
- 在声明方法的参数、返回值,定义变量时,能用接口类型,就用接口类型,有更好的扩展性
七. Service
1. 数据与逻辑分离
之前我们讲面向对象设计,都是把数据和逻辑放在一起,这是理想情况。
现实情况是,把对象分为两类,一类专门存数据,一类专门执行逻辑,如下
混在一起有什么缺点呢
- 数据是方法调用时才能确定的,只有请求来了,才知道数据(p,m, yr)是什么,才能根据它们创建这个既包含数据,也包含逻辑的对象,而对象的逻辑部分是一样的,重复创建感觉有点浪费
- 如果把数据和逻辑分离开
- 数据对象才需要每次请求来了创建
- 逻辑对象只需一开始创建一次就足够了
因此把数据和逻辑分成 java bean 和 service 能让你的代码更灵活,这也是这么做的目的
存数据的就是一个 Java Bean
public class Calculator {
    private double p;
    private int m;
    private double yr;

    public Calculator(double p, int m, double yr) {
        this.p = p;
        this.m = m;
        this.yr = yr;
    }

    // 省略 get set 方法
}
存逻辑的叫做 XxxService,例如
class CalculatorService0 {
    public String[] cal(Calculator c) {
        double p = c.getP();
        int m = c.getM();
        double mr = c.getYr() / 12 / 100.0;
        double pow = Math.pow(1 + mr, m);
        double payment = p * mr * pow / (pow - 1);
        return new String[]{
                NumberFormat.getCurrencyInstance().format(payment * m),
                NumberFormat.getCurrencyInstance().format(payment * m - p)
        };
    }

    public String[][] details(Calculator c) {
        double p = c.getP();
        int m = c.getM();
        String[][] a2 = new String[m][];
        double mr = c.getYr() / 12 / 100.0;
        double pow = Math.pow(1 + mr, m);
        double payment = p * mr * pow / (pow - 1);              // 月供
        for (int i = 0; i < m; i++) {
            double payInterest = c.getP() * mr;                        // 偿还利息
            double payPrincipal = payment - payInterest;        // 偿还本金
            p -= payPrincipal;                                  // 剩余本金
            a2[i] = createRow(payment, i, payInterest, payPrincipal, p);
        }
        return a2;
    }

    private String[] createRow(double payment, int i, double payInterest, double payPrincipal, double p) {
        return new String[]{                       // 一行的数据
                (i + 1) + "",
                NumberFormat.getCurrencyInstance().format(payment),
                NumberFormat.getCurrencyInstance().format(payPrincipal),
                NumberFormat.getCurrencyInstance().format(payInterest),
                NumberFormat.getCurrencyInstance().format(p)
        };
    }

}
显然,Service 根据计算方式不同,有多个
- 要使用多态来避免根据类型的 if else 判断,这回可以使用接口,接口中添加两个抽象方法 cal 和 details,让这几个 Service 都实现它,并完成方法重写
- 至于那个重复的 createRow 方法,可以作为接口中的 default 方法被实现类重用
public interface Cal {

    String[] cal(Calculator c);

    String[][] details(Calculator c);

    default String[] createRow(double payment, int i, double payInterest, double payPrincipal, double p) {
        return new String[]{                       // 一行的数据
                (i + 1) + "",
                NumberFormat.getCurrencyInstance().format(payment),
                NumberFormat.getCurrencyInstance().format(payPrincipal),
                NumberFormat.getCurrencyInstance().format(payInterest),
                NumberFormat.getCurrencyInstance().format(p)
        };
    }
}

class CalculatorService0 implements Cal {
    public String[] cal(Calculator c) {
        // ...
    }
    public String[][] details(Calculator c) {
        // ...
    }
}

class CalculatorService1 implements Cal {
    public String[] cal(Calculator c) {
        // ...
    }
    public String[][] details(Calculator c) {
        // ...
    }
}

class CalculatorService2 implements Cal {
    public String[] cal(Calculator c) {
        // ...
    }
    public String[][] details(Calculator c) {
        // ...
    }
}
Controller 的代码变成了
@Controller
public class CalController {

	// ...

    private Cal[] calArray = new Cal[]{
            new CalculatorService0(),
            new CalculatorService1(),
            new CalculatorService2()
    };


    @RequestMapping("/cal")
    @ResponseBody
    String[] cal(double p, int m, double yr, int type) {
        System.out.println(calArray[type]);
        return calArray[type].cal(new Calculator(p, m, yr));
    }

    @RequestMapping("/details")
    @ResponseBody
    String[][] details(double p, int m, double yr, int type) {
        return calArray[type].details(new Calculator(p, m, yr));
    }

}
2. 控制反转
一直以来,都是我们自己用 new 关键字配合构造方法来创建对象,但我们现在用的是 Spring 框架,可以把一些创建对象的活交给 Spring 框架去做。
那么 Spring 框架怎么创建对象呢?它主要是配合一些注解来完成对象的创建,例如,我们一直在用的 @Controller 注解,当 Spring 程序运行时,它会检查这些类上有没有加一些特殊注解,例如它发现这个类上加了 @Controller 注解,框架就知道,该由框架来创建这个 CalculatorController 对象,默认只会创建一个。
这样的注解还有不少,我们现在需要掌握的有 @Controller 算一个,还有一个是 @Service,试试把这些 Service 类的创建交给 Spring 吧:
@Service
class CalculatorService0 implements Cal {
    public String[] cal(Calculator c) {
    }
    public String[][] details(Calculator c) {
    }
}

@Service
class CalculatorService1 implements Cal {
    public String[] cal(Calculator c) {
    }
    public String[][] details(Calculator c) {
    }
}

@Service
class CalculatorService2 implements Cal {
    public String[] cal(Calculator c) {
    }
    public String[][] details(Calculator c) {
    }
}
- @Service 的作用就是告诉 Spring,这个类以后要创建对象的话,不归程序员管了啊,归 Spring 管
- 其实 @Controller 的作用也是类似的,控制器对象虽然我们没 new,实际由 Spring 来创建了
把对象的创建权交给 Spring 来完成,对象的创建权被交出去,这称之为控制反转
3. 依赖注入
那么我们的代码里怎么拿到 Spring 创建的对象呢?
@Controller
public class CalController {

	// ...

    @Autowired
    private Cal[] calArray;

    // ...

}
这儿又要引入一个相关的名词:依赖注入
比如说,这里的 控制器 需要 service 才能工作,就可以说控制器对象依赖于 service 对象,缺了这些依赖对象行吗?不行吧。怎么找到这些依赖对象呢?如果是框架帮你找到这些依赖对象,按一定规则提供给你,就称之为依赖注入
怎么让框架帮你找到这些依赖对象呢?答案是 @Autowired
在 Cal[] 数组上添加 @Autowired 即可,它是根据类型去问 Spring 要对象,Spring 中有很多对象,具体要哪个对象呢?答案是根据类型要
- Cal 表示,只要 Spring 创建的对象实现了 Cal 接口,就符合条件
- Cal[] 表示,要多个
- 最终的结果是找到 Spring 管理的 CalculatorService0、CalculatorService1、CalculatorService2 三个对象,并放入了 Cal[] 数组
4. 由Spring创建JavaBean
Spring 还可以根据请求中的多个查询参数,帮我们创建 JavaBean 数据对象
@Controller
public class CalController {

    // ...

    @Autowired
    private Cal[] calArray;


    @RequestMapping("/cal")
    @ResponseBody
    String[] cal(Calculator c, int type) {
        return calArray[type].cal(c);
    }

    @RequestMapping("/details")
    @ResponseBody
    String[][] details(Calculator c, int type) {
        return calArray[type].details(c);
    }

}
- 如果提供了无参构造,Spring 会优先用它来创建对象,并调用 setXXX 方法,对属性进行赋值
- 查询参数有 p,那么 Spring 会找一个名为 setP 的方法完成赋值
- 查询参数有 m,那么 Spring 会找一个名为 setM 的方法完成赋值
- 查询参数有 yr,那么 Spring 会找一个名为 setYr 的方法完成赋值
- 查询参数有 type,但 Calculator 对象没有 setType 方法,所以 type 并不会存入对象
- 如果没有无参构造,但提供了有参构造,Spring 会拿构造方法参数名与查询参数相对应,并完成赋值
- 我们的例子中,查询参数有 p,m,yr,构造方法参数名也叫 p,m,yr,根据对应关系完成赋值
注意
- 不是所有 JavaBean 对象都应该交给 Spring 创建,一般只有请求中的数据,才会这么做
5. 包结构约定
这节课讲讲包结构约定,之前我们也讲过当类的数目比较多时,要根据它们的功能,进一步划分 package,以便更好的管理。 目前可以划分 3 个包
- controller 包,用来存放控制器类
- service 包,用来存放业务逻辑类
- dto 包,用来存放存数据的 JavaBean 类,dto 是 Data Transfer Object(数据传输对象)的缩写
最后要注意一下入口类的位置,必须放在 service, controller 这几个包的上一层,为什么呢?
这个入口类,它还肩负了一个职责,查找 @Service, @Controller 等注解的类,然后创建对象。它查找的范围是在这个类的当前 package 之内,因此如果 service,controller 等包如果不在这个 package 内,那么会查找不到
八. 核心类库
1. ArrayList
数组缺点
接下来需要讲解的是 ArrayList,它常常被用来替代数组
数组的缺点:不能自动扩容,比如已经创建了大小为 5 的数组,再想放入一个元素,就放不下了,需要创建更大的数组,还得把旧数组的元素迁移过去。
自己来做比较麻烦
public class TestArray {
    public static void main(String[] args) {
        String[] arr0 = new String[]{"a", "b", "c", "d", "e"};
        String[] arr1 = new String[6];
        for (int i = 0; i < arr0.length; i++) {
            arr1[i] = arr0[i];
        }
        arr1[5] = "f";
        System.out.println(Arrays.toString(arr0));
        System.out.println(Arrays.toString(arr1));
    }
}
- 想看数组内所有元素,循环遍历,依次打印是一个办法
- 用 Arrays.toString 方法是更简单的办法
ArrayList 自动扩容
这时可以使用 ArrayList 来替代 String[],它的内部仍然是数组,只是封装了更多实用的逻辑
ArrayList list = new ArrayList(5); // 指定初始容量为 5, 如果不指定默认是 10
list.add("a");
list.add("b");
list.add("c");
list.add("d");
list.add("e");

// 不用担心容量不够, 它内部封装了扩容的逻辑, 每次按原来容量的 1.5 扩容, 向下取整, 如 5->7->10
list.add("f");
System.out.println(list);
- ArrayList 每次扩容后,会预留一些空位,避免了频繁扩容
- 封装带来的问题是看不到内部的结构,没关系,可以使用 debug 工具来调试
Debug 调试
前面说了,ArrayList 封装了扩容逻辑,这对使用者当然是一件好事,就像我们平时使用家用电器似的,不需要知道这些电器内部如何工作,只需要会按它们对外的几个开关、按钮就足够了。像这个 ArrayList,我们只需要会创建对象,调用它的add方法就够用了,不需要看它内部结构
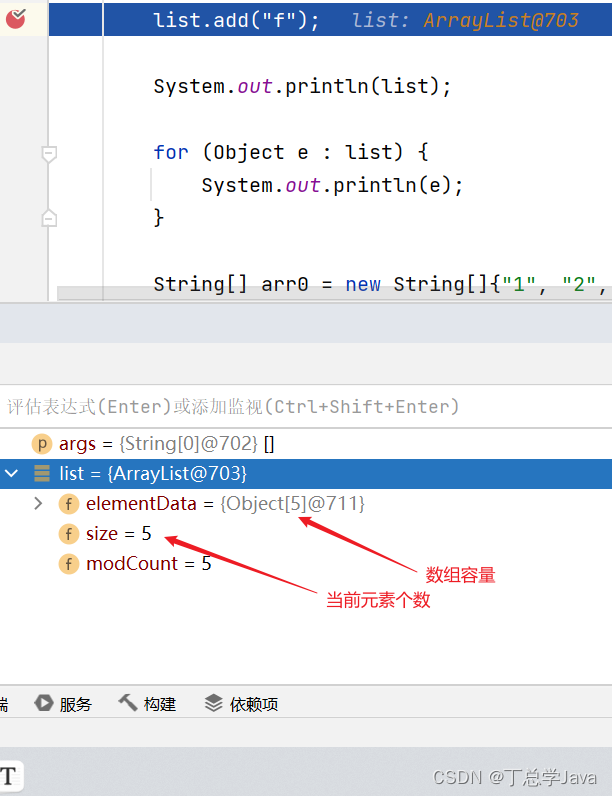
不过呢,有利必然有弊,比如你想观察验证它的扩容规则是不是真的是如我所说的 1.5 倍,封装就会带来障碍。这里交给大家一招深入对象内部,探究它组成结构的好办法,debug 调试。
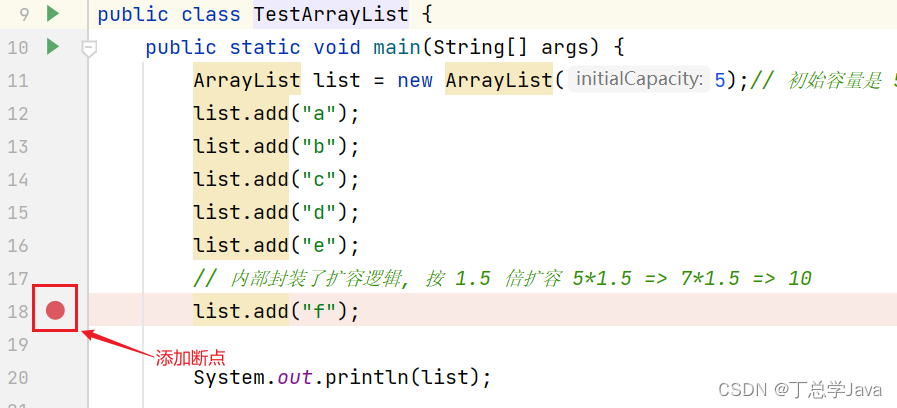
debug 的第一步要添加断点,所谓断点就是让代码运行到断点处先停下来,不要向下走了,这样就能方便我们观察对象状态。在 18 行加一个断点,然后记得用调试模式运行代码
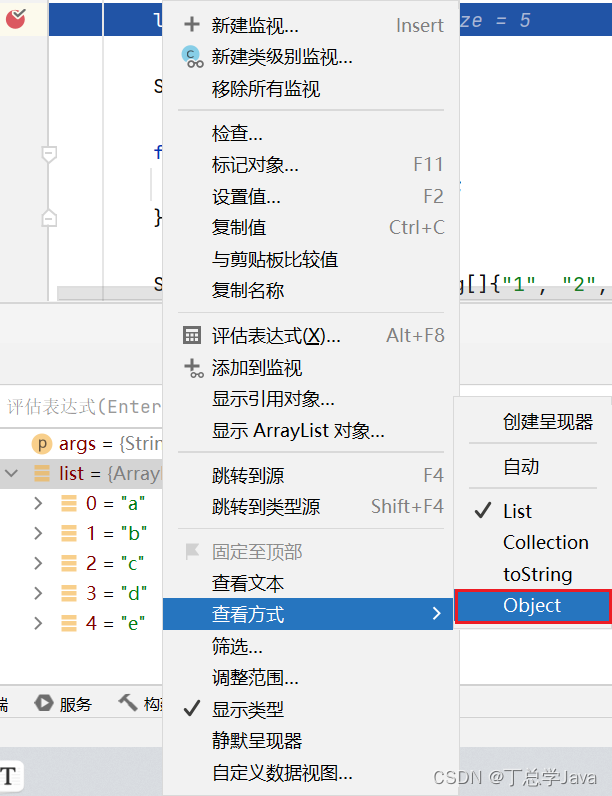
要查看 list 的详情,先按照下图进行选择查看方式
这样就可以观察 list 的内部结构了
以上介绍了一些基本的调试方法,更多的调试方法请关注笑傲篇的高级内容
ArrayList 遍历与泛型
List 的遍历有多种办法,这里只介绍最简单的一种
for (Object e : list) {
    System.out.println(e);
}

// 与之对比, 数组也能类似方式进行遍历
for (String s : arr0) {
    System.out.println(s);
}
- 这种遍历称之为增强 for 循环
上例中的 list 是把元素当作 Object 加入到它的内部,再取出来也会当作 Object,有时候,就会不方便
- 例如 list 里放的都是整数,想做个累加
可以用泛型来限制元素的存取类型,例如
ArrayList<String>专门存取字符串类型元素ArrayList<Integer>专门存取整数类型元素- List 中只能存引用类型,不能直接存基本类型
例如
ArrayList<Integer> list = new ArrayList<Integer>(5);
list.add(1);
list.add(2);
list.add(3);
list.add(4); // 按 Integer 存

int sum = 0;
for (Integer i : list) { // 按 Integer 取
    sum += i;
}

System.out.println(sum);
其中等式右边的 <String> 可以简化为 <>
List 接口
- ArrayList 是 List 接口的一个实现类
- 除它以外,还有 List12 和 ListN 等实现类
- 他俩的特点是一旦 list 中元素确定,就不能再向 list 添加、移除元素
List<Integer> list2 = List.of(1, 2, 3, 4);
System.out.println(list2.getClass()); // class java.util.ImmutableCollections$ListN


List<Integer> list3 = List.of(1, 2);
System.out.println(list3.getClass()); // class java.util.ImmutableCollections$List12
-
of 方法隐藏了内部实现细节,对于使用者不需要关心对象的实际类型。
-
要是真想知道这个对象的类型是什么可以不?可以用继承自 Object 的 getClass 方法获得对象的真正类型
2. HashMap
String[] 和 ArrayList<String> 都有一个缺点:查找其中某个元素不高效,例如:
public static String find1(String value) {
    String[] array = new String[]{"小明", "小白", "小黑"};
    for (String s : array) {
        if (s.equals(value)) {
            return s;
        }
    }
    return null;
}

public static String find2(String value) {
    List<String> list = List.of("小明", "小白", "小黑");
    for (String s : list) {
        if (s.equals(value)) {
            return s;
        }
    }
    return null;
}
可以想象,如果集合大小为 n,而要查找的元素是最后一个,需要比较 n 次才能找到元素
解决思路,人为建立一种【映射】关系,比如:
- 0、1、2,是小明、小白、小黑的代号
public static String find1(int key) {
    String[] array = new String[]{"小明", "小白", "小黑"};
    if (key < 0 || key >= array.length) {
        return null;
    }
    return array[key];
}

public static String find2(int key) {
    List<String> list = List.of("小明", "小白", "小黑");
    if (key < 0 || key >= list.size()) {
        return null;
    }
    return list.get(key);
}
- 可以看到,不用逐一比较了,当前前提是要知道这个对应关系
- 前面选择 CalculatorService 对象时,也用了这个技巧
但 0、1、2 意思不是很直白,如果元素数量较多,容易弄混,如果能起个更有意义的名字是不是更好?这就是下面要讲的 Map
什么是 Map 呢,很简单,它就是一组映射关系。
你看刚才的例子中,是建立了数组索引和数据元素之间的映射关系,根据索引快速找到元素。现在 map 也是一组映射关系,只是把索引变得更有意义而已。用 bright 映射小明,white 映射小白,black 映射小黑,前面的 bright、white、black 称之为 key ,key 需要唯一 , 后面这些称之为 value
代码如下:
public static String find3(String key) {
    Map<String, String> map = Map.of(
        "bright", "小明",
        "white", "小白",
        "black", "小黑"
    );
    return map.get(key);
}
Map 需要掌握的点:
- 可以用泛型限制 Map 中 key 和 value 的类型
- Map.of 用来创建不可变的 Map,即初始时确定了有哪些 key 和 value,之后就不能新增或删除了
- 根据 key 获取 value,用 get(key) 方法
- 如果想创建可变的 Map,用 new HashMap()
- 存入新的 key,value,用 put(key, value) 方法
- 遍历 Map 也有多种方法,这里介绍一种相对好用的:
for (Map.Entry<String, String> e : map.entrySet()) {
    // e.getKey()    获取 key
    // e.getValue()  获取 value
}
- 其中 Map.Entry 代表一对儿 key,value
- map.entrySet() 方法来获取所有的 entry
九. 异常处理
1. try - catch
回忆之前我们对异常的使用,我们用异常改变了方法执行流程
public class TestTry {

    public static void main(String[] args) {
        System.out.println(1);
        test(0.0);
        System.out.println(3);
    }

    public static void test(double p) {
        if(p <= 0.0) {
            // 异常也是一个对象, 包含的是错误描述
            throw new IllegalArgumentException("本金必须大于 0"); // 1 处
        }
        System.out.println(2);
    }
}
输出
1
Exception in thread "main" java.lang.IllegalArgumentException: 本金必须大于 0
	at com.itheima.module3.TestTry.test(TestTry.java:13)
	at com.itheima.module3.TestTry.main(TestTry.java:7)
这个例子中,执行到 1 处出现了异常,后续的输出 2、3 的代码都不会执行了
但如果希望,一个方法出现异常后,不要影响其它方法继续运行,可以用下面的语法来处理
public class TestTry {

    public static void main(String[] args) {
        System.out.println(1);
        try {
            test(0.0);
        } catch (IllegalArgumentException e) {
            System.out.println(e);
        }
        System.out.println(3);
    }

    public static void test(double p) {
        if (p <= 0.0) {
            throw new IllegalArgumentException("本金必须大于 0");
        }
        System.out.println(2);
    }
}
输出
1
java.lang.IllegalArgumentException: 本金必须大于 0
3
执行流程为
- 试着执行 try 块中的代码,如果没异常,一切照旧
- 现在 try 块内的代码出现了异常:test 方法抛出 IllegalArgumentException 异常对象,异常抛给 test 方法的上一层:main 方法,test 的剩余代码不会执行
- main 方法中的 catch 能够捕捉 IllegalArgumentException 异常对象,代码进入 catch 块
- 执行 catch 块内的代码
- 继续运行后续代码 System.out.println(3)
如果把 catch 的异常类型改为 NullPointerException
- 那么 catch 捉不住 IllegalArgumentException 异常对象,这个异常对象会继续向上抛,抛给 main 方法的上一层
- main 方法的上一次是 jvm,当 jvm 收到异常,就会终止整个程序执行
如果不加 try - catch 块,异常对象也会继续从 main 方法抛给 jvm,jvm 收到异常终止程序执行
如果把 catch 的异常类型改为 Exception
- 那么 catch 也能捉住 IllegalArgumentException 异常对象
- catch 能不能捉异常,是看实际异常对象和 catch 所声明的异常类型是否满足是一个的关系,即
- 能够向上转型,就能捉
- 不能向上转型,就捉不住
- 异常的继承关系见下一节的图,通常会在 catch 处声明 Exception 类型,这样就能统一捕获它的所有子类异常对象
2. 继承体系
- Throwable 是异常中最顶层的父类
- getMessage() 提供获取异常信息的功能
- printStackTrace() 会在【标准错误】输出方法的调用链,用于定位错误位置
- Error 代表无药可救的异常,通常这种异常就算 catch 也救不了
- Exception 代表还可以救一救的异常,catch 后可以让程序恢复运行
- 我们见过的异常有
- IllegalArgumentException 非法参数异常
- ArrayIndexOutOfBoundsException 数组越界异常
- ArithmeticException 算术异常
- NullPointerException 空指针异常
3. Spring 处理异常
问题:为何之前我们控制器中出现的异常不用 try - catch 处理?
- 控制器方法是由 Spring 的方法来调用的,因此控制器方法中出现异常,会抛给 Spring 方法
- Spring 的方法内部用了 try - catch 来捕捉异常,并在 catch 块中会把异常信息作为响应返回
我们当然也能自己 catch 异常,但可悲的是,你就算 catch 住异常又能干什么呢?还得考虑自己如何把异常信息转换为响应,还不如不 catch,交给 Spring 去处理
4. 编译异常与运行时异常
异常按语法可以分成两类
- 运行时异常(也称未检查异常)
- Error 以及它的子类
- RuntimeException 以及它的子类
- 编译异常(也称检查异常)
- 除掉运行时以外的所有异常,都属于编译异常
分别举一个例子:throw 一个运行时异常,没有额外语法,此异常抛给上一层方法来处理
public static void test(double p) {
    if (p <= 0.0) {
        throw new IllegalArgumentException("本金必须大于 0");
    }
    System.out.println(2);
}
如果 throw 一个编译异常
public static void test(double p) {
    if (p <= 0.0) {
        throw new Exception("本金必须大于 0"); // 语法报错了!
    }
    System.out.println(2);
}
- 编译异常要求在语法上对异常的处理做出选择,而且选择是强制的,只能下面两个选择二选一
- 选择1,自己处理:加 try catch 语句
- 选择2,抛给上一层方法做处理:用 throws 声明
public static void test(double p) throws Exception {
    if (p <= 0.0) {
        throw new Exception("本金必须大于 0");
    }
    System.out.println(2);
}
但编译时异常的烦人之处在于,当编译时异常抛给上一层方法后,上一层方法也被迫做出类似的选择
5. finally
如果无论是否出现异常,都一定要执行的代码,可以用 finally 语法
try {

} catch (Exception e) {

} finally {

}
其中 catch 不是必须的,可以 try 与 finally 一起用
那这个 finally 的使用场景是什么呢?
以后我们的代码常常需要与一些外部资源打交道,外部资源有文件、数据库等等。这些外部资源使用时都有个注意事项,就是用完后得把资源及时释放关闭,资源都是有限的,如果用完不关,最终会导致资源耗尽,程序也无法继续运行了。将来这边代表资源的对象一般都会提供一个名为 close 的方法,用来释放资源。显然在 finally 中调用资源的 close 方法最为科学
public class TestFinally {
    public static void main(String[] args) {
		Resource r = new Resource();
        try {
            System.out.println("使用资源");
            int i = 1 / 0;
        } catch (Exception e) {
            System.out.println(e);
        } finally {
            r.close();
        }
    }
}

class Resource implements Closeable {
    @Override
    public void close() {
        System.out.println("释放资源");
    }
}
如果资源实现了 Closeable 接口,那么可以用 try-with-resource 语法来省略 finally
public class TestFinally {
    public static void main(String[] args) {
        // try - with - resource
        try (Resource r = new Resource()) {
            System.out.println("使用资源");
			int i = 1 / 0;
        } catch (Exception e) {
            System.out.println(e);
        }
    }
}

class Resource implements Closeable {
    @Override
    public void close() {
        System.out.println("释放资源");
    }
}
eException <|-- ArithmeticException
RuntimeException <|-- NullPointerException
* Throwable 是异常中最顶层的父类
  * getMessage() 提供获取异常信息的功能
  * printStackTrace() 会在【标准错误】输出方法的调用链,用于定位错误位置
* Error 代表无药可救的异常,通常这种异常就算 catch 也救不了
* Exception 代表还可以救一救的异常,catch 后可以让程序恢复运行
* 我们见过的异常有
  * IllegalArgumentException 非法参数异常
  * ArrayIndexOutOfBoundsException 数组越界异常
  * ArithmeticException 算术异常
  * NullPointerException 空指针异常


## 3. Spring 处理异常

问题:为何之前我们控制器中出现的异常不用 try - catch 处理?

* 控制器方法是由 Spring 的方法来调用的,因此控制器方法中出现异常,会抛给 Spring 方法
* Spring 的方法内部用了 try - catch 来捕捉异常,并在 catch 块中会把异常信息作为响应返回

我们当然也能自己 catch 异常,但可悲的是,你就算 catch 住异常又能干什么呢?还得考虑自己如何把异常信息转换为响应,还不如不 catch,交给 Spring 去处理


## 4. 编译异常与运行时异常

异常按语法可以分成两类

* 运行时异常(也称未检查异常)
  * Error 以及它的子类
  * RuntimeException 以及它的子类
* 编译异常(也称检查异常)
  * 除掉运行时以外的所有异常,都属于编译异常

分别举一个例子:throw 一个运行时异常,没有额外语法,此异常抛给上一层方法来处理

```java
public static void test(double p) {
    if (p <= 0.0) {
        throw new IllegalArgumentException("本金必须大于 0");
    }
    System.out.println(2);
}
如果 throw 一个编译异常
public static void test(double p) {
    if (p <= 0.0) {
        throw new Exception("本金必须大于 0"); // 语法报错了!
    }
    System.out.println(2);
}
- 编译异常要求在语法上对异常的处理做出选择,而且选择是强制的,只能下面两个选择二选一
- 选择1,自己处理:加 try catch 语句
- 选择2,抛给上一层方法做处理:用 throws 声明
public static void test(double p) throws Exception {
    if (p <= 0.0) {
        throw new Exception("本金必须大于 0");
    }
    System.out.println(2);
}
但编译时异常的烦人之处在于,当编译时异常抛给上一层方法后,上一层方法也被迫做出类似的选择
5. finally
如果无论是否出现异常,都一定要执行的代码,可以用 finally 语法
try {

} catch (Exception e) {

} finally {

}
其中 catch 不是必须的,可以 try 与 finally 一起用
那这个 finally 的使用场景是什么呢?
以后我们的代码常常需要与一些外部资源打交道,外部资源有文件、数据库等等。这些外部资源使用时都有个注意事项,就是用完后得把资源及时释放关闭,资源都是有限的,如果用完不关,最终会导致资源耗尽,程序也无法继续运行了。将来这边代表资源的对象一般都会提供一个名为 close 的方法,用来释放资源。显然在 finally 中调用资源的 close 方法最为科学
public class TestFinally {
    public static void main(String[] args) {
		Resource r = new Resource();
        try {
            System.out.println("使用资源");
            int i = 1 / 0;
        } catch (Exception e) {
            System.out.println(e);
        } finally {
            r.close();
        }
    }
}

class Resource implements Closeable {
    @Override
    public void close() {
        System.out.println("释放资源");
    }
}
如果资源实现了 Closeable 接口,那么可以用 try-with-resource 语法来省略 finally
public class TestFinally {
    public static void main(String[] args) {
        // try - with - resource
        try (Resource r = new Resource()) {
            System.out.println("使用资源");
			int i = 1 / 0;
        } catch (Exception e) {
            System.out.println(e);
        }
    }
}

class Resource implements Closeable {
    @Override
    public void close() {
        System.out.println("释放资源");
    }
}
本文来自互联网用户投稿,该文观点仅代表作者本人,不代表本站立场。本站仅提供信息存储空间服务,不拥有所有权,不承担相关法律责任。 如若内容造成侵权/违法违规/事实不符,请联系我的编程经验分享网邮箱:chenni525@qq.com进行投诉反馈,一经查实,立即删除!
- Python教程
- 深入理解 MySQL 中的 HAVING 关键字和聚合函数
- Qt之QChar编码(1)
- MyBatis入门基础篇
- 用Python脚本实现FFmpeg批量转换
- C++ //习题13.6 在例13.17的基础上,修改程序,将存放在c数组中的数据读入并显示出来。
- AI赋能精益生产:一场科技与工业的完美融合!
- Vue 中 watch监听器的使用
- 【axios】简化前端网络请求流程,提升开发效率!
- 解决docker部署mysql连接无权限问题
- GoZero微服务个人探索之路(三)Go-Zero官方rpc demo示例探究
- Flink自定义函数UDF
- python sqlserver 数据表转储和恢复
- mysql修改密码
- Mybatis入门