使用C语言实现模型的推理(一)
使用C语言实现模型的推理(一)
WHY?
现在推理框架其实已经有很多了,比如 tensorflow、pytorch、onnxruntime,作为一名搞边缘计算的嵌入式工程师,会更喜欢tflite micro、mnn、ncnn这样的用于移动端的推理引擎。因为这可以将 AI 应用于千家万户。然而,在实际应用中会发现,在微控制处理器上部署神经,即使推理引擎使用tflite micro,也不可避免的会占用过多的内存体积,无论是从模型上还是从推理框架上。
比如,只包含几个简单算子,使用-os来编译tflite micro,库体积也要占用几十KB的内存。
因此,我打算用low-level的C语言来实现一套推理引擎,目标是:
- 【避繁就简】面向微控制处理器,相对简单的神经网络任务
- 【寸土寸金】占用内存资源最小( Flash 的 text 段和 data 段)实测比
tflite micro要小很多 - 【大道至简】全部聚焦于模型推理计算,不做一丝丝多余的操作
我没有系统的写过推理框架,相当于是从零开始。这一系列博客我会比较详细的记录我的想法、思路和尝试过程,希望对大家有所帮助。
我在整个过程中大量使用了chatGPT来梳理思路和编写代码,向chatGPT致敬
思路整理
从怎么把大象放到冰箱里开始
这是一个经典的幽默悖论问题,一般的回答是分三步:
1. 打开冰箱门。
2. 把大象放进去。
3. 关上冰箱门。
这个问题的幽默之处在于它看似是一个复杂的问题,但实际上的解决方案却非常简单。
在我看来,比较关键的分两个部分,一个是动作的顺序,一个是动作本身。
怎么让模型推理跑起来
思路就很简单了:要想跑一个模型,首先要理清楚算子之间的依赖关系,其次要有各个算子的实现。
本文先整理前者的内容。
生成一个模型
考虑到实际应用中tflite模型用的比较多,我们先生成一个 tflite 模型。
import tensorflow as tf
from tensorflow.keras import layers

# 定义模型输入
input1 = layers.Input(shape=(4,), name='input1')
input2 = layers.Input(shape=(4,), name='input2')

# 分别经过全连接层和激活层
x1 = layers.Dense(8, activation='relu', use_bias=True, bias_initializer='ones')(input1)
x2 = layers.Dense(8, activation='relu')(input2)

# 二者结果相加
x = layers.Add()([x1, x2])

# 最后经过softmax层得到结果
output = layers.Dense(2, activation='softmax', name='output')(x)

# 创建模型
model = tf.keras.Model(inputs=[input1, input2], outputs=output)

# 编译模型
model.compile(optimizer='adam', loss='categorical_crossentropy', metrics=['accuracy'])

# 打印模型的结构
model.summary()

# 转换模型为TFLite格式
converter = tf.lite.TFLiteConverter.from_keras_model(model)
converter.target_spec.supported_ops = [tf.lite.OpsSet.TFLITE_BUILTINS] # 不希望看到DELEGATE操作,在转换和运行模型时不使用硬件加速。只使用TensorFlow Lite内建的操作
tflite_model = converter.convert()

# 保存TFLite模型
with open('model_test.tflite', 'wb') as f:
f.write(tflite_model)
其中,model.summary()打印出的模型信息如下:
Model: "model"
__________________________________________________________________________________________________
 Layer (type)                Output Shape                 Param #   Connected to
==================================================================================================
 input1 (InputLayer)         [(None, 4)]                  0         []

 input2 (InputLayer)         [(None, 4)]                  0         []

 dense (Dense)               (None, 8)                    40        ['input1[0][0]']

 dense_1 (Dense)             (None, 8)                    40        ['input2[0][0]']

 add (Add)                   (None, 8)                    0         ['dense[0][0]',
                                                                     'dense_1[0][0]']

 output (Dense)              (None, 2)                    18        ['add[0][0]']

==================================================================================================
Total params: 98 (392.00 Byte)
Trainable params: 98 (392.00 Byte)
Non-trainable params: 0 (0.00 Byte)
__________________________________________________________________________________________________
这样,就得到了一个model_test.tflite文件。

理清楚算子之间的依赖关系
解析tflite模型,我之前都是通过解析模型的FlatBuffers格式来实现。
FlatBuffers:这个开源库最开始是由Google研发的,专注于提供更优秀的性能。
性能更好的原因是:
1.序列化数据访问不经过转换,即使用了分层数据。这样我们就不需要初始化解析器(没有复杂的字段映射)并且转换这些数据仍然需要时间。
2.flatbuffers不需要申请更多的空间,不需要分配额外的对象。
这一次就不打算用这个东东了,简单粗暴一点,写个python脚本实现,顺便还能理解学习一下tflite相关知识。
获取tensor信息
在Python中,可以使用TensorFlow Lite的Interpreter类来获取TFLite模型的各种信息
import tensorflow as tf

# 加载TFLite模型
interpreter = tf.lite.Interpreter(model_path="your_model.tflite")
interpreter.allocate_tensors()

# 获取模型的详细信息
graph = interpreter.get_tensor_details()

# 打印算子信息
for detail in graph:
    print(f"Name: {detail['name']}")
    print(f"Shape: {detail['shape']}")
    print(f"Type: {detail['dtype']}")
    print(f"Index: {detail['index']}")
    print("\n")
在上述代码中,get_tensor_details()方法返回一个字典列表,每个字典对应模型中的一个算子。字典中包含了算子的名称、形状、数据类型和索引等信息。
比如,其中一个detail如下
{'name': 'serving_default_input1:0', 'index': 0, 'shape': array([1, 4], dtype=int32), 'shape_signature': array([-1, 4], dtype=int32), 'dtype': <class 'numpy.float32'>, 'quantization': (0.0, 0), 'quantization_parameters': {'scales': array([], dtype=float32), 'zero_points': array([], dtype=int32), 'quantized_dimension': 0}, 'sparsity_parameters': {}}
比较遗憾的是,这里的detail里面并没有任何算子之间的依赖信息。不过也并不是一无所获,我们至少可以通过len(graph)知道了一共有多少个tensor。
获取依赖信息
那么,怎么看依赖信息呢?这就需要遍历所有的运算节点,对于每个运算节点,遍历它的所有输入和输出,构建了一个邻接表表示的图。
这个图的每个节点对应一个Tensor,每个边对应一个运算节点。
代码如下:
import tensorflow as tf

# 加载TFLite模型
interpreter = tf.lite.Interpreter(model_path="your_model.tflite")
interpreter.allocate_tensors()

# 获取运算图
graph = interpreter.get_tensor_details()

for op in interpreter._get_ops_details():
	print(op)
比如其中一个op的信息是
{'index': 0, 'op_name': 'FULLY_CONNECTED', 'inputs': array([ 1, 3, -1], dtype=int32), 'outputs': array([6], dtype=int32)}
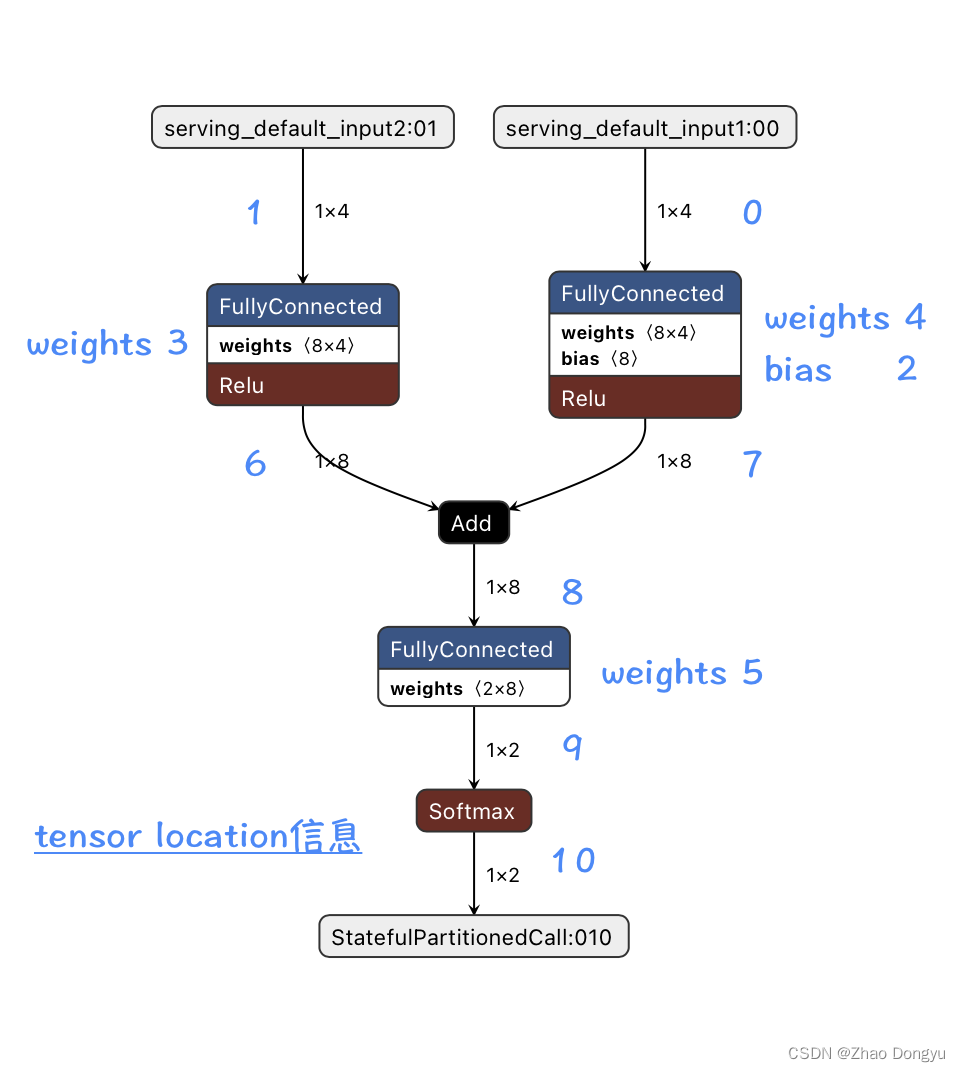
它的inputs的1,3,2分别是这个全连接的输入、权重、偏置的location,由于这个算子没有偏置,所以它的location为-1。
这个测试模型的op信息如下:
{'index': 0, 'op_name': 'FULLY_CONNECTED', 'inputs': array([ 1,  3, -1], dtype=int32), 'outputs': array([6], dtype=int32)}
{'index': 1, 'op_name': 'FULLY_CONNECTED', 'inputs': array([0, 4, 2], dtype=int32), 'outputs': array([7], dtype=int32)}
{'index': 2, 'op_name': 'ADD', 'inputs': array([7, 6], dtype=int32), 'outputs': array([8], dtype=int32)}
{'index': 3, 'op_name': 'FULLY_CONNECTED', 'inputs': array([ 8,  5, -1], dtype=int32), 'outputs': array([9], dtype=int32)}
{'index': 4, 'op_name': 'SOFTMAX', 'inputs': array([9], dtype=int32), 'outputs': array([10], dtype=int32)}
然而,需要注意的是,这段代码并不能直接显示算子之间的依赖关系。
TFLite模型的算子之间的依赖关系是通过模型的拓扑排序来表示的,也就是说,一个算子的输出可能会成为后续算子的输入。要获取这种依赖关系,需要解析模型的FlatBuffers格式。目前,TensorFlow Lite的Python API并没有提供直接获取算子依赖关系的功能。
要对TFLite模型中的算子进行拓扑排序,首先需要获取模型的运算图。
获取模型的运算图
# 构建邻接表表示的图
adjacency_list = {i: [] for i in range(len(graph))}
for op in interpreter._get_ops_details():
    if op['op_name'] != 'DELEGATE':
        for output_tensor_index in op['outputs']:
            if op['op_name'] == 'FULLY_CONNECTED':
                adjacency_list[op['inputs'][0]].append(output_tensor_index)
                del adjacency_list[op['inputs'][1]]
                if op['inputs'][2] >=0: # 有可能是-1的情况,如偏置不存在
                    del adjacency_list[op['inputs'][2]]
            else:
                for input_tensor_index in op['inputs']:
                    if input_tensor_index >=0: # 有可能是-1的情况,如偏置不存在
                        adjacency_list[input_tensor_index].append(output_tensor_index)

# 打印邻接表
for k, v in adjacency_list.items():
    print(f"Tensor {k} is connected to tensors {v}")
输出结果:
Tensor 0 is connected to tensors [7]
Tensor 1 is connected to tensors [6]
Tensor 6 is connected to tensors [8]
Tensor 7 is connected to tensors [8]
Tensor 8 is connected to tensors [9]
Tensor 9 is connected to tensors [10]
Tensor 10 is connected to tensors []
在这个例子中,首先使用Interpreter类加载了TFLite模型,并获取了模型的运算图。然后,遍历了所有的运算节点,对于每个运算节点,遍历了它的所有输入和输出,构建了一个邻接表表示的图。这个图的每个节点对应一个Tensor,每个边对应一个运算节点。
需要注意的是,权重和偏执之类的参数就不参与临接表了,我只需要输入和输出。
拓扑排序
使用拓扑排序算法对这个图进行排序。
def topological_sort(graph):
    # 拓扑排序
    visited = {node: False for node in graph}
    stack = []

    for node in graph:
        if not visited[node]:
            dfs(graph, node, visited, stack)

    return stack[::-1]  # 返回反向的栈,以得到正确的顺序

def dfs(graph, node, visited, stack):
    # 深度优先搜索
    visited[node] = True
    for neighbor in graph[node]:
        if not visited[neighbor]:
            dfs(graph, neighbor, visited, stack)
    stack.append(node)
写了几行代码来可视化了这个过程:

得到算子的计算结果:[1, 6, 0, 7, 8, 9, 10]
与下图对应着看,这个计算顺序没有什么问题。

至此,第一步,算子之间的依赖关系已经完成了。
TO DO
接下来就是怎么把大象放到冰箱里了。具体涉及到:
- 参数提取
- 内存复用
- 算子编写与优化
- 模型量化
这些内容会在接下来几篇博客展开来讲。
其他
bias
我用keras生成tflite的时候,模型里面的bias没有参数,这是因为偏置是0的缘故,bias的location是-1。
解决办法:
x1 = layers.Dense(8, activation='relu', use_bias=True, bias_initializer='ones')(input1)
DELEGATE
在interpreter._get_ops_details()读op的时候,读到了
{'index': 5, 'op_name': 'DELEGATE', 'inputs': array([0, 1, 2, 3, 4, 5], dtype=int32), 'outputs': array([10], dtype=int32)}
在TensorFlow Lite中,DELEGATE操作并不是一个真正的操作,而是一个标记,用来表示一部分计算被委托给了其他的硬件加速器,例如GPU或者Neural Networks API(Android的神经网络API)。
DELEGATE操作的出现通常是因为你在转换模型或者运行模型时使用了硬件加速。如果你不希望看到DELEGATE操作,你可以在转换和运行模型时不使用硬件加速。
在转换模型时,你可以通过设置target_spec.supported_ops为tf.lite.OpsSet.TFLITE_BUILTINS来只使用TensorFlow Lite内建的操作:
converter = tf.lite.TFLiteConverter.from_saved_model(saved_model_dir) converter.target_spec.supported_ops = [tf.lite.OpsSet.TFLITE_BUILTINS] tflite_model = converter.convert()
在运行模型时,可以通过创建一个没有任何委托的解释器来避免使用硬件加速:
interpreter = tf.lite.Interpreter(model_content=tflite_model)
这样,模型就只会使用TensorFlow Lite内建的操作,不会出现DELEGATE操作。
本文来自互联网用户投稿,该文观点仅代表作者本人,不代表本站立场。本站仅提供信息存储空间服务,不拥有所有权,不承担相关法律责任。 如若内容造成侵权/违法违规/事实不符,请联系我的编程经验分享网邮箱:chenni525@qq.com进行投诉反馈,一经查实,立即删除!
- Python教程
- 深入理解 MySQL 中的 HAVING 关键字和聚合函数
- Qt之QChar编码(1)
- MyBatis入门基础篇
- 用Python脚本实现FFmpeg批量转换
- zookeeper CuratorFramework实现服务发现
- 重生奇迹MU游戏中勇者大陆
- 嵌入式软件工程师面试题——2025校招社招通用(计算机网络篇)(三十二)
- 嵌入式实战(一)| GPIO实验 跑马灯效果实现 寄存器及其代码全解析
- 【C++】string的基本使用二
- Python 手搓神经网络——BP反向传播
- 学会一些品酒词汇显得有文化
- MyBatis的工作流程
- Redis实现滚动周榜|滚动榜单|直播间榜单|排行榜|Redis实现日榜04
- [stm32f103]DMA