基于docker容器化部署微服务
前言
在笔者系列文章中微服务配置隔离已经完成服务之间的配置隔离,服务整体来说是已经通了。
为了方便后续测试已经环境统一,笔者本章节会对服务进行容器化部署。由于服务器性能问题,本次部署采用maven完成镜像构建,结合docker-compose完成容器的创建。
容器化创建步骤
服务器放开2376 端口
我们后续的镜像创建需要基于2376端口,所以我们需要执行下面这段命令,对docker.service进行编辑
vim /lib/systemd/system/docker.service
可以看到笔者在截图位置处增加了一行-H tcp://0.0.0.0:2376 -H unix:///var/run/docker.sock
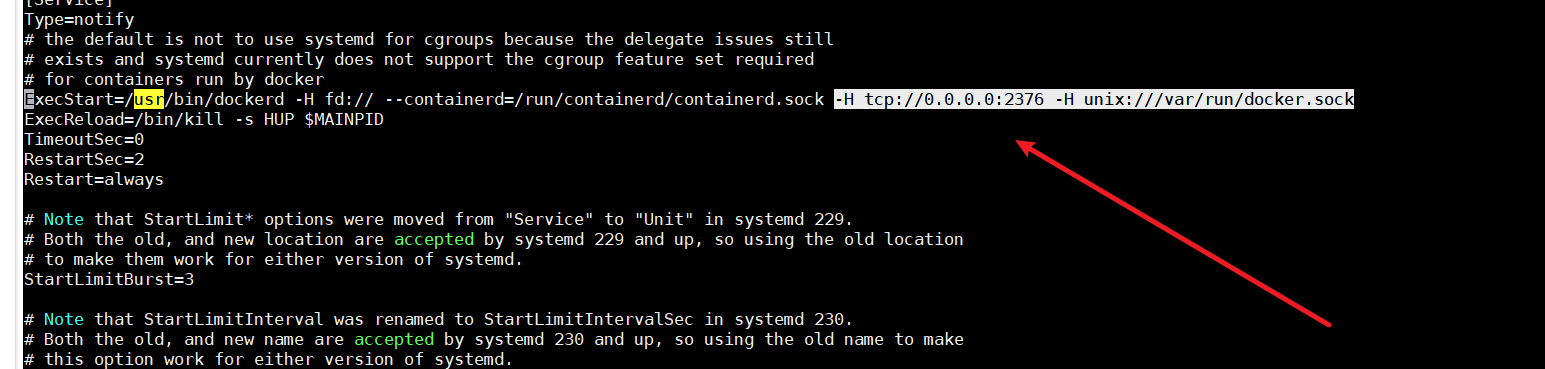
完成后重启docker服务并开放2376端口(因为笔者服务器是阿里云服务器所以这一步相对方便一些,就不多做介绍了)
systemctl daemon-reload
systemctl restart docker.service
为了测试连通性,我们在本地键入
curl http://ip:2376/info
若输出下面这样一段文字,则说明当前设置生效了
{"ID":"IIPN:J265:YCRR:EQVR:FTPY:GBUK:VWES:MWJU:6TBH:NSFP:L7BU:K3RJ","Containers":6,"ContainersRunning":6,"ContainersPaused":0,"ContainersStopped":0,"Images":56,"Driver":"overlay2","DriverStatus":[["Backing Filesystem","extfs"],["Supports d_
type","true"],["Native Overlay Diff","false"],["userxattr","false"]],"Plugins":{"Volume":["local"],"Network":["bridge","host","ipvlan","macvlan","null","overlay"],"Authorization":null,"Log":["awslogs","fluentd","gcplogs","gelf","journald","
json-file","local","logentries","splunk","syslog"]},"MemoryLimit":true,"SwapLimit":true,"KernelMemory":true,"KernelMemoryTCP":true,"CpuCfsPeriod":true,"CpuCfsQuota":true,"CPUShares":true,"CPUSet":true,"PidsLimit":true,"IPv4Forwarding":true,
"BridgeNfIptables":true,"BridgeNfIp6tables":true,"Debug":false,"NFd":74,"OomKillDisable":true,"NGoroutines":72,"SystemTime":"2023-02-05T17:56:16.36473356+08:00","LoggingDriver":"json-file","CgroupDriver":"cgroupfs","CgroupVersion":"1","NEve
ntsListener":0,"KernelVersion":"4.19.91-24.1.al7.x86_64","OperatingSystem":"Alibaba Cloud Linux (Aliyun Linux) 2.1903 LTS (Hunting Beagle)","OSVersion":"2.1903","OSType":"linux","Architecture":"x86_64","IndexServerAddress":"https://index.do
cker.io/v1/","RegistryConfig":{"AllowNondistributableArtifactsCIDRs":[],"AllowNondistributableArtifactsHostnames":[],"InsecureRegistryCIDRs":["127.0.0.0/8"],"IndexConfigs":{"docker.io":{"Name":"docker.io","Mirrors":["https://fy707np5.mirror
.aliyuncs.com/"],"Secure":true,"Official":true}},"Mirrors":["https://fy707np5.mirror.aliyuncs.com/"]},"NCPU":1,"MemTotal":2043502592,"GenericResources":null,"DockerRootDir":"/var/lib/docker","HttpProxy":"","HttpsProxy":"","NoProxy":"","Name
":"iZ8vb7bhe4b8nhhhpavhwpZ","Labels":[],"ExperimentalBuild":false,"ServerVersion":"20.10.23","Runtimes":{"io.containerd.runc.v2":{"path":"runc"},"io.containerd.runtime.v1.linux":{"path":"runc"},"runc":{"path":"runc"}},"DefaultRuntime":"runc
","Swarm":{"NodeID":"","NodeAddr":"","LocalNodeState":"inactive","ControlAvailable":false,"Error":"","RemoteManagers":null},"LiveRestoreEnabled":false,"Isolation":"","InitBinary":"docker-init","ContainerdCommit":{"ID":"5b842e528e99d4d4c1686
467debf2bd4b88ecd86","Expected":"5b842e528e99d4d4c1686467debf2bd4b88ecd86"},"RuncCommit":{"ID":"v1.1.4-0-g5fd4c4d","Expected":"v1.1.4-0-g5fd4c4d"},"InitCommit":{"ID":"de40ad0","Expected":"de40ad0"},"SecurityOptions":["name=seccomp,profile=d
efault"],"Warnings":["WARNING: API is accessible on http://0.0.0.0:2376 without encryption.\n         Access to the remote API is equivalent to root access on the host. Refer\n         to the 'Docker daemon attack surface' section in the do
cumentation for\n         more information: https://docs.docker.com/go/attack-surface/"]}
引入插件
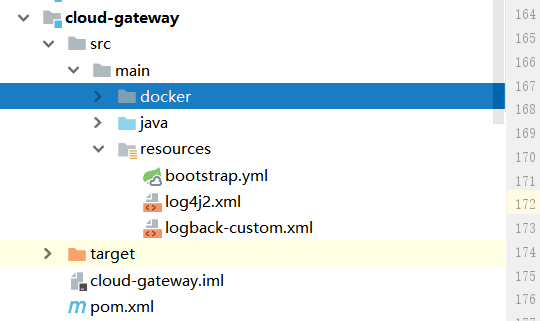
接下来我们就可以对自己的服务进行配置,就以笔者的cloud-gateway为例,模块截图如下所示:
从而完成基于maven打包生成镜像并上传到服务器了,首先在maven插件中引入下面这段依赖,读者只需按需修改下面的dockerHost即可,别的配置若无非必须则可以不动。
<plugin>
                <groupId>org.springframework.boot</groupId>
                <artifactId>spring-boot-maven-plugin</artifactId>
                <executions>
                    <execution>
                        <goals>
                            <goal>repackage</goal>
                        </goals>
                    </execution>
                </executions>
            </plugin>

            <plugin>
                <groupId>com.spotify</groupId>
                <artifactId>docker-maven-plugin</artifactId>
                <version>1.2.2</version>
                <configuration>
                    <imageName>${project.artifactId}</imageName>
                    <imageTags>
                        <imageTag>latest</imageTag>
                    </imageTags>
                    <!--指定Dockerfile路径-->
                    <dockerDirectory>${project.basedir}/src/main/docker</dockerDirectory>
                    <dockerHost>http://ip:2376</dockerHost>
                    <resources>
                        <resource>
                            <targetPath>/</targetPath>
                            <!--${project.basedir}/target-->
                            <directory>${project.build.directory}</directory>
                            <!--${project.artifactId}-${project.version}-->
                            <include>${project.build.finalName}.jar</include>
                        </resource>
                    </resources>
                </configuration>
            </plugin>
编写Dockerfile
我们上面的配置指明Dockerfile的路径为${project.basedir}/src/main/docker,所以我们要在main目录下创建一个docker文件夹。
在该文件夹下创建Dockerfile文件,以笔者为例笔者的cloud-gateway打包命令,就如下图所示(注意ENTRYPOINT 指定jvm参数笔者采用exec格式的,原本采用数组格式的会报错,笔者也没有去纠结原因):
FROM openjdk:8-jdk-alpine
VOLUME /tmp
ADD cloud-gateway-0.0.1-SNAPSHOT.jar app.jar
RUN sh -c 'touch /app.jar'
# 调整JVM参数堆区空间大小,节省服务内存空间。
ENTRYPOINT exec java -Xmx32m -Xms32m  -Djava.security.egd=file:/dev/./urandom  -jar /app.jar
基于maven远程完成maven镜像的构建
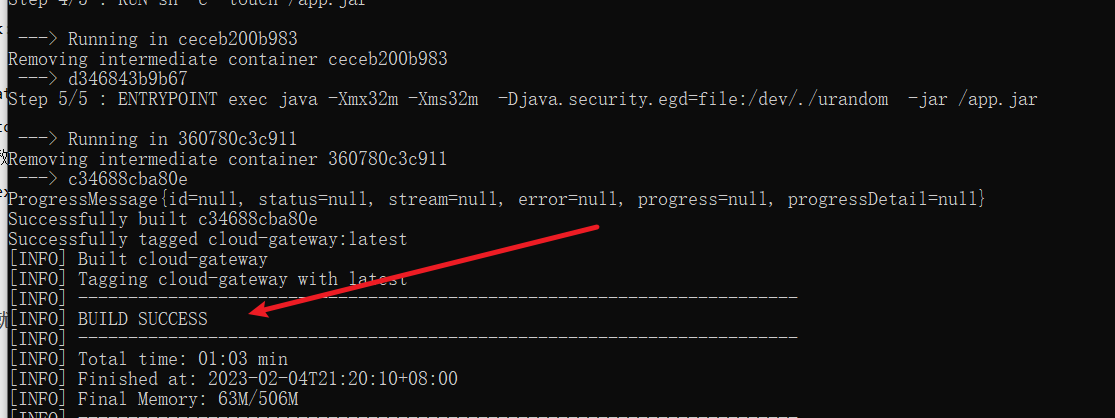
完成后我们就可以到当前模块的pom文件的目录使用cmd键入下面这条命令,完成镜像构建
mvn clean package docker:build -DskipTests
如下图所示,一旦出现BUILD SUCCESS就说明镜像构建成功了
注意笔者在打包过程中遇到了一个报错:Execution repackage of goal org.springframework.boot:spring-boot-maven-plugin。查阅网上资料得知,不是spring boot引用不可添加下面这个插件,去掉后即可解决。
            <plugin>
                <groupId>org.springframework.boot</groupId>
                <artifactId>spring-boot-maven-plugin</artifactId>
            </plugin>
查看镜像是否成功到达服务器
我们到服务器键入
docker images
可以看到若出现我们打包的镜像名称说明打包成功了。同理我们完成其他服务器的插件引入和dockerfile编写。
启动测试
笔者为了启动方便这里也编写了一个docker-compose文件,文件名为cloud-service.yml内容如下:
version: "3"
services:
  cloud-gateway:
    container_name: cloud-gateway
    image: cloud-gateway:latest
    ports:
    - "8090:8090"
    restart: always

  account-service:
    container_name: account-service
    image: account-service:latest
    ports:
    - "9000:9000"
    restart: always
到文件cloud-service.yml下键入命令
docker-compose -f cloud-service.yml up -d
本地键入curl 命令,可以看到请求成功,说明本次服务器部署成功了。
curl ip:8090/account/getByCode/zsy
{"status":100,"message":"操作成功","data":{"id":1,"accountCode":"zsy","accountName":"zsy","amount":10000.00},"success":true,"timestamp":1675592778302}
参考文献
本文来自互联网用户投稿,该文观点仅代表作者本人,不代表本站立场。本站仅提供信息存储空间服务,不拥有所有权,不承担相关法律责任。 如若内容造成侵权/违法违规/事实不符,请联系我的编程经验分享网邮箱:chenni525@qq.com进行投诉反馈,一经查实,立即删除!
- Python教程
- 深入理解 MySQL 中的 HAVING 关键字和聚合函数
- Qt之QChar编码(1)
- MyBatis入门基础篇
- 用Python脚本实现FFmpeg批量转换
- openEuler操作系统的安装及免密远程连接(超详细版)
- 【华为OD题库-104】猴子吃桃-java
- ROS2 LifecycleNode讲解及实例
- docker compose部署wordpress
- 企业一体化管理建设:制造业如何应对信息孤岛和流程断点?-亿发
- Java01 169-184
- 掌握 Go:Map 类型的全面指南 第一部分 基础
- 大物②小练——判断题题解2
- 操作系统-操作系统引导(磁盘 操作系统引导过程)
- ubuntu18.04 安装升级cmake