AI问答系统与对话机器人服务(一)
知识要点
-
微软认知服务中知识库服务的申请与搭建
-
如何用REST API访问知识库数据
-
微软认知服务中机器人服务的申请与搭建
-
如何无缝集成知识库服务与机器人服务
建立知识库
什么叫QnA Maker?
知识库,就是人们总结出的一些历史知识的集合,存储、索引以后,可以被方便的检索出来供后人查询/学习。QnA Maker是用于建立知识库的工具,使用 QnA Maker,可以根据 FAQ(常见问题解答)文档或者 URL 和产品手册等半结构化内容打造一项问题与解答服务。 可以生成一个问题与解答模型,以便灵活地应对用户查询,即用户不必输入精确的查询条件,而是提供以自然对话方式受训的机器人来响应。
下图中是知识库与Bot Service的结合使用架构图:

与“半结构化数据”并列的是“结构化数据”和“非结构化数据”,其中结构化数据可以用关系式数据库来解决,非结构化数据用搜索引擎技术来解决。实际上搜索引擎就是把散落在互联网各个角落的非结构信息变成半结构化或结构化信息。
不同于搜索引擎,本文介绍的基于半结构化数据的QnA系统实现方式,是基于小规模数据量的,比如Million级别,而搜索引擎的技术要高级很多,因为要面对Billion级别的数据。但是从原理上讲,大家可以管中窥豹可见一斑。
在Azure中申请QnA Maker服务
用MSA登录Azure门户,点击“创建资源”,然后点击“AI + Machine Learning”:
在下图中点击“查看全部”:

在下图中点击“更多:”

在下图中点击“QnA Maker”:

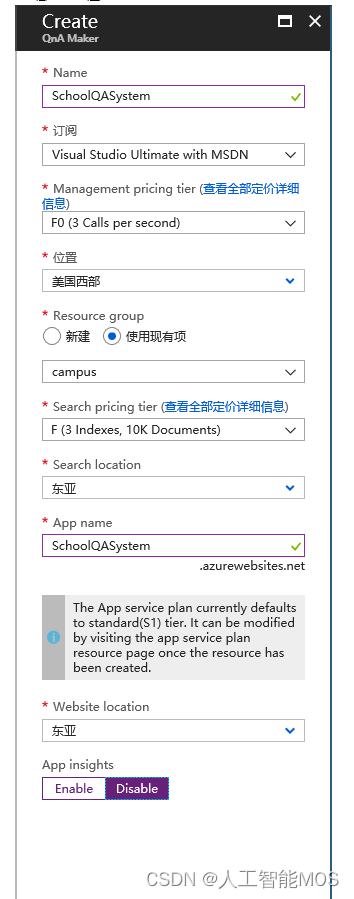
在下图中的有红色*的输入框中,输入必要的信息,比如在Name中输入“ SchoolQASystem”:
点击“创建”后,稍等一会儿,会得到以下通知消息:

小提示:可以点击“固定到仪表板”,方便后续查找。
至此,我们的QnA服务已经申请好了,下一步是建立知识库,填写数据。
在QnA Maker网站上建立知识库
用Edge浏览器打开https://www.qnamaker.ai,登录自己的MSA账号。如果是第一进入该网站,你的My knowledge bases将会是空白页,点击Create a knowledge base来建立自己的第一个知识库:

小提示:这里用的MSA账号应该与申请认知服务的MSA账号相同。
STEP 1我们已经做过了,现在在STEP 2中从下拉列表中选择自己的相关信息:
在STEP 3中填写一个知识库的名字,比如SchoolQASystemKB:

在STEP 5中点击“Create your KB”来建立知识库:

小提示:STEP 4可以运行用户通过提供一个静态网页或者一个固定格式的文件,来自动提取问题和答案。
稍等一会儿,进入如下页面: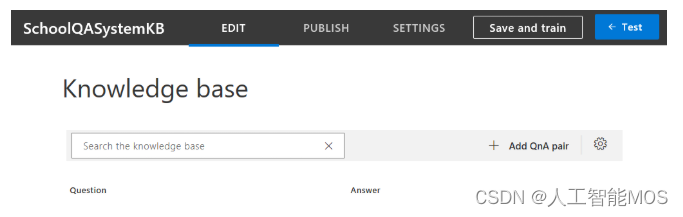
我们以学校中常用的一些问答信息为例,点击“+ Add QnA pair”填写如下数据:

当然可以根据实际情况,填写其它一些信息。需要注意的是,每个Question需要有唯一的一个Answer来对应,而每个Answer可以有很多个Question,是N:1的关系。
小提示:以上数据均为虚构,请填写符合自己学校实际情况的数据。
数据填写的差不多了(一次填写不完没关系,可以以后修改),点击“Save and train”按钮,稍等一会儿,点击那个“Test”按钮,进行在线测试。在问题框中输入“报销”,可以很快得到系统的回复,如下图就是测试结果:
此时也可以点击”Inspect”来看细节,比如Confidence score的值是79.75分,也可以在左侧填写更多的问题来对应这个答案,比如“看病报销”: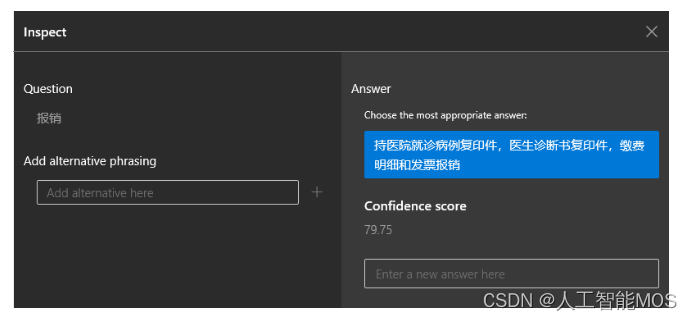
觉得满意后,点击“PUBLISH”按钮来发布这个知识库:

稍等一会儿,得到如下信息: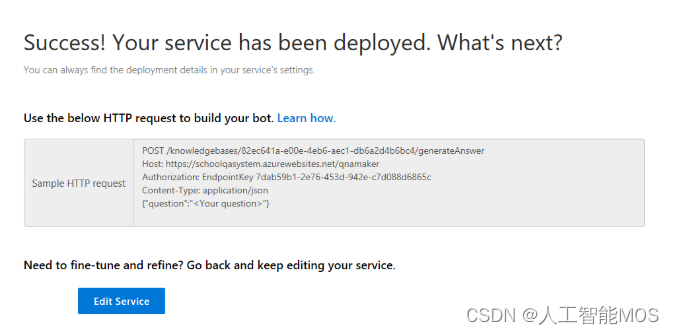
好啦!到目前位置,我们已经成功建立了第一个知识库。
小提示:保留这个网页或者请记住上图中的信息,一会儿我们还会用到它。上图中的Key/Endpoint等是经过修改不可用的,请用自己申请的服务数据代替。
下面我们有两个选择:
1)写代码来访问这个知识库,提供界面供他人使用。
2)用微软的另外一项技术 – 聊天机器人技术,以问答方式来提供访问该知识库的界面。这个内容我们在下一个大章节讲述。
用代码访问QnA知识库
打开利器VS2017,新建一个Windows Desktop WPF项目,给个名字叫QAClient:

在MainWindow.xaml中填写如下XAML界面设计代码:
<Window x:Class="QAClient.MainWindow"
 ? ? ?  xmlns="http://schemas.microsoft.com/winfx/2006/xaml/presentation"
 ? ? ?  xmlns:x="http://schemas.microsoft.com/winfx/2006/xaml"
 ? ? ?  xmlns:d="http://schemas.microsoft.com/expression/blend/2008"
 ? ? ?  xmlns:mc="http://schemas.openxmlformats.org/markup-compatibility/2006"
 ? ? ?  xmlns:local="clr-namespace:QAClient"
 ? ? ?  mc:Ignorable="d"
 ? ? ?  Title="MainWindow" Height="450" Width="800">
 ?  <Grid>
 ? ? ?  <Grid.RowDefinitions>
 ? ? ? ? ?  <RowDefinition Height="*"/>
 ? ? ? ? ?  <RowDefinition Height="40"/>
 ? ? ?  </Grid.RowDefinitions>
 ? ? ?  <TextBox Name="tb_Dialog" Grid.Row="0"/>
 ? ? ?  <Grid Grid.Row="1">
 ? ? ? ? ?  <Grid.ColumnDefinitions>
 ? ? ? ? ? ? ?  <ColumnDefinition Width="*"/>
 ? ? ? ? ? ? ?  <ColumnDefinition Width="80"/>
 ? ? ? ? ?  </Grid.ColumnDefinitions>
 ? ? ? ? ?  <TextBox Name="tb_Question" MaxLines="1" Grid.Column="0"/>
 ? ? ? ? ?  <Button Name="btn_Send" Content="Send" Grid.Column="1" Click="btn_Send_Click"/>
 ? ? ?  </Grid>
 ?  </Grid>
</Window>
在MainWindow.xaml.cs中添加按钮事件处理函数:
public partial class MainWindow : Window
{
 ?  public MainWindow()
 ?  {
 ? ? ?  InitializeComponent();
 ?  }
 ?  private async void btn_Send_Click(object sender, RoutedEventArgs e)
 ?  {
 ? ? ?  // send http post request to qa service
 ? ? ?  Answers results = await QAServiceAgent.DoQuery(this.tb_Question.Text);
 ? ? ?  if (results.answers != null && results.answers.Length > 0)
 ? ? ?  {
 ? ? ? ? ?  this.tb_Dialog.Text += "问:" + this.tb_Question.Text + "\r\n";
 ? ? ? ? ?  this.tb_Dialog.Text += results.answers[0].ToString() + "\r\n";
 ? ? ?  }
 ?  }
}
在工程中添加QAServiceAgent.cs文件,填写以下内容:
using System;
using System.Diagnostics;
using System.Net.Http;
using System.Text;
using System.Threading.Tasks;
?
namespace QAClient
{
 ?  class QAServiceAgent
 ?  {
 ? ? ?  const string Endpoint = "/knowledgebases/90690b7-dae-4e0d-bda9-16c05e0f163/generateAnswer";
 ? ? ?  const string Host = "https://openmindqnamaker.azurewebsites.net/qnamaker";
 ? ? ?  const string Key = "e7e3c51-dc5-4d65-aa3-8da1024c3e13";
 ? ? ?  const string ContentType = "application/json";
 ? ? ?  // {"question":"<Your question>"}
?
 ? ? ?  public static async Task<Answers> DoQuery(string question)
 ? ? ?  {
 ? ? ? ? ?  try
 ? ? ? ? ?  {
 ? ? ? ? ? ? ?  using (HttpClient hc = new HttpClient())
 ? ? ? ? ? ? ?  {
 ? ? ? ? ? ? ? ? ?  hc.DefaultRequestHeaders.Add("authorization", "EndpointKey " + Key);
 ? ? ? ? ? ? ? ? ?  string jsonBody = CreateJsonBodyElement(question);
 ? ? ? ? ? ? ? ? ?  StringContent content = new StringContent(jsonBody, Encoding.UTF8, ContentType);
 ? ? ? ? ? ? ? ? ?  string uri = Host + Endpoint;
 ? ? ? ? ? ? ? ? ?  HttpResponseMessage resp = await hc.PostAsync(uri, content);
 ? ? ? ? ? ? ? ? ?  string json = await resp.Content.ReadAsStringAsync();
 ? ? ? ? ? ? ? ? ?  var ro = Newtonsoft.Json.JsonConvert.DeserializeObject<Answers>(json);
 ? ? ? ? ? ? ? ? ?  return ro;
 ? ? ? ? ? ? ?  }
 ? ? ? ? ?  }
 ? ? ? ? ?  catch (Exception ex)
 ? ? ? ? ?  {
 ? ? ? ? ? ? ?  Debug.WriteLine(ex.Message);
 ? ? ? ? ? ? ?  return null;
 ? ? ? ? ?  }
 ? ? ?  }
?
 ? ? ?  private static string CreateJsonBodyElement(string question)
 ? ? ?  {
 ? ? ? ? ?  string a = "{\"question\":\"" + question + "\"}";
 ? ? ? ? ?  return a;
 ? ? ?  }
 ?  }
}
小提示:上面代码中的Endpoint和Key是不可用的,请用你自己申请的数据来代替。
在工程中添加另外一个文件Result.cs,用于反序列化JSON数据:
namespace QAClient
{
 ?  public class Answers
 ?  {
 ? ? ?  public Answer[] answers { get; set; }
 ?  }
?
 ?  public class Answer
 ?  {
 ? ? ?  public string[] questions { get; set; }
 ? ? ?  public string answer { get; set; }
 ? ? ?  public float score { get; set; }
 ? ? ?  public int id { get; set; }
 ? ? ?  public string source { get; set; }
 ? ? ?  public object[] metadata { get; set; }
?
 ? ? ?  public override string ToString()
 ? ? ?  {
 ? ? ? ? ?  return string.Format("Answer: {0}, Score:{1}", answer, score);
 ? ? ?  }
 ?  }
}
代码完成!搓搓双手,按Ctrl+F5走起一波!哇哦!好俊的界面:

在下方的输入框中输入“报销”、“开学日期”、“补考”等问题,都会得到预定的答案。输入“校长是谁”就没有match到任何答案,因为我们没有在数据中准备这个问题。
我们是用客户端形式做了一个问答界面,当然也可以在网站上用REST API实现同样的功能。同时,微软提供了Bot Service,下一章我们看看如何在不写任何代码的情况下,完成机器人与QnA服务的集成。
本文来自互联网用户投稿,该文观点仅代表作者本人,不代表本站立场。本站仅提供信息存储空间服务,不拥有所有权,不承担相关法律责任。 如若内容造成侵权/违法违规/事实不符,请联系我的编程经验分享网邮箱:chenni525@qq.com进行投诉反馈,一经查实,立即删除!
- Python教程
- 深入理解 MySQL 中的 HAVING 关键字和聚合函数
- Qt之QChar编码(1)
- MyBatis入门基础篇
- 用Python脚本实现FFmpeg批量转换
- 数据结构初探:揭开数据结构奥秘
- 环境变量详细说明
- Leetcode的AC指南 —— 字符串/卡码网:55. 右旋字符串
- pyshp+shapely,两个分析地理空间数据的Python库
- 牛客-python题库
- 最好的 6 个华为/小米/OPPO/VIVO手机数据恢复软件评测
- 相机解析驱动小记
- 聚焦 | 2023世界中文大会倡导开创智慧语言学堂,助力教育全球化
- 亲测可用,解决PowerPoint无法从所选的文件中插入视频和HEVC扩展问题。
- 笔记-孙子兵法-第一篇-计-五事七计,十二诡道