Java-Security-1
JWT详解???????
1、SpringSecurity
1.1 简介
-
Spring Security 是 Spring 家族中的一个安全管理框架。相比与另外一个安全框架 Shiro ,它提供了更丰富的功能,社区资源也比 Shiro 丰富。
-
一般来说中大型的项目都是使用 SpringSecurity 来做安全框架。小项目有 Shiro 的比较多,因为相比与SpringSecurity ,Shiro 的上手更加的简单。
1.2 作用
-
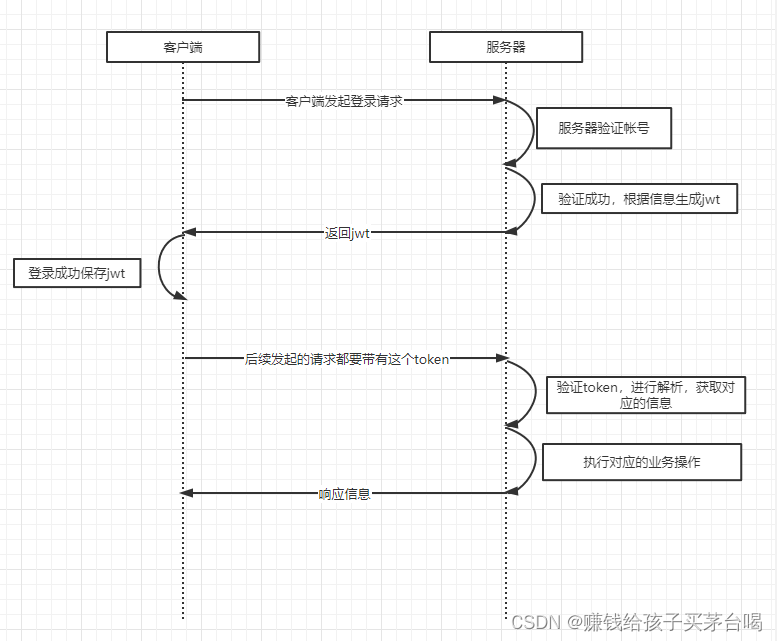
认证:验证当前访问系统的是不是本系统的用户,并且要确认具体是哪个用户 -
授权:经过认证后判断当前用户是否有权限进行某个操作 -
jwt只能验证是否有登入,无法验证是否有权限访问某个接口
2、认证
 mage-20221102141344515.png)
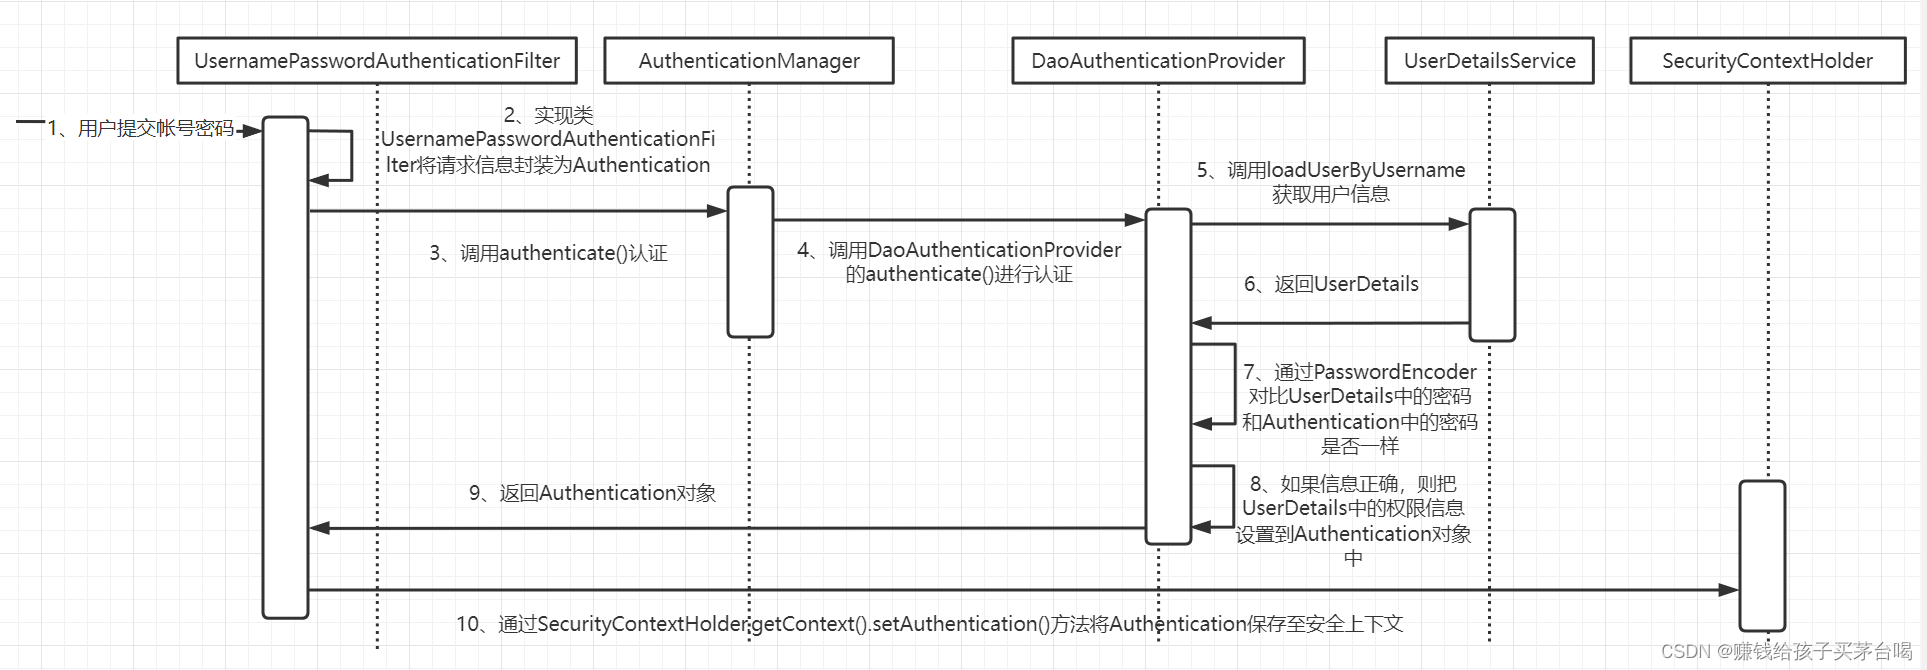
2.2 SpringSecurity认证流程
3、SpringSecurity的使用
3.1 环境搭建
-
依赖导入
本次用到的依赖
<dependency> ? ?<groupId>org.springframework.boot</groupId> ? ?<artifactId>spring-boot-starter-security</artifactId> </dependency> <dependency> ? ?<groupId>org.springframework.boot</groupId> ? ?<artifactId>spring-boot-starter-web</artifactId> </dependency> <!-- jwt依赖--> <dependency> ? ?<groupId>com.auth0</groupId> ? ?<artifactId>java-jwt</artifactId> ? ?<version>3.10.3</version> </dependency> <!--redis依赖--> <dependency> ? ?<groupId>org.springframework.boot</groupId> ? ?<artifactId>spring-boot-starter-data-redis</artifactId> </dependency> <!--mybatisplus依赖--> <dependency> ? ?<groupId>com.baomidou</groupId> ? ?<artifactId>mybatis-plus-boot-starter</artifactId> ? ?<version>3.5.1</version> </dependency> <!--mysql依赖--> <dependency> ? ?<groupId>mysql</groupId> ? ?<artifactId>mysql-connector-java</artifactId> ? ?<version>8.0.29</version> </dependency> <dependency> ? ?<groupId>org.projectlombok</groupId> ? ?<artifactId>lombok</artifactId> ? ?<optional>true</optional> </dependency> <dependency> ? ?<groupId>org.springframework.boot</groupId> ? ?<artifactId>spring-boot-starter-test</artifactId> ? ?<scope>test</scope> </dependency> <dependency> ? ?<groupId>org.springframework.security</groupId> ? ?<artifactId>spring-security-test</artifactId> ? ?<scope>test</scope> </dependency> -
yml配置修改
spring: redis: ? host: 127.0.0.1 ? port: 6379 datasource: ? driver-class-name: com.mysql.cj.jdbc.Driver 这里写上自己的数据库 ? url: jdbc:mysql://localhost:3306/springboot-mysql?userSSL=false;serverTimezone=Asia/Shanghai ? username: root ? password: 123456 mybatis-plus: config-locations: classpath:mapper/*.xml configuration: ? log-impl: org.apache.ibatis.logging.stdout.StdOutImpl -
启动类修改
@MapperScan("com.example.demo.mapper") -
实体类
-
jwt工具类
-
Redis配置类
-
Redis工具类
-
返回类
这几个工具类都可以从以前的代码中获取,这里就不一一显示了
3.2 项目使用测试
这些配置好,security就可以直接使用了
但直接访问自己的接口,会被重定向到登入页的位置
打开项目地址会跳转到自带的登录页面
?
-
接口不能直接使用
-
需要先使用页面打开进行一个登录(用户名:user,密码会在控制台自动生成
-
每次重启密码都不一样)
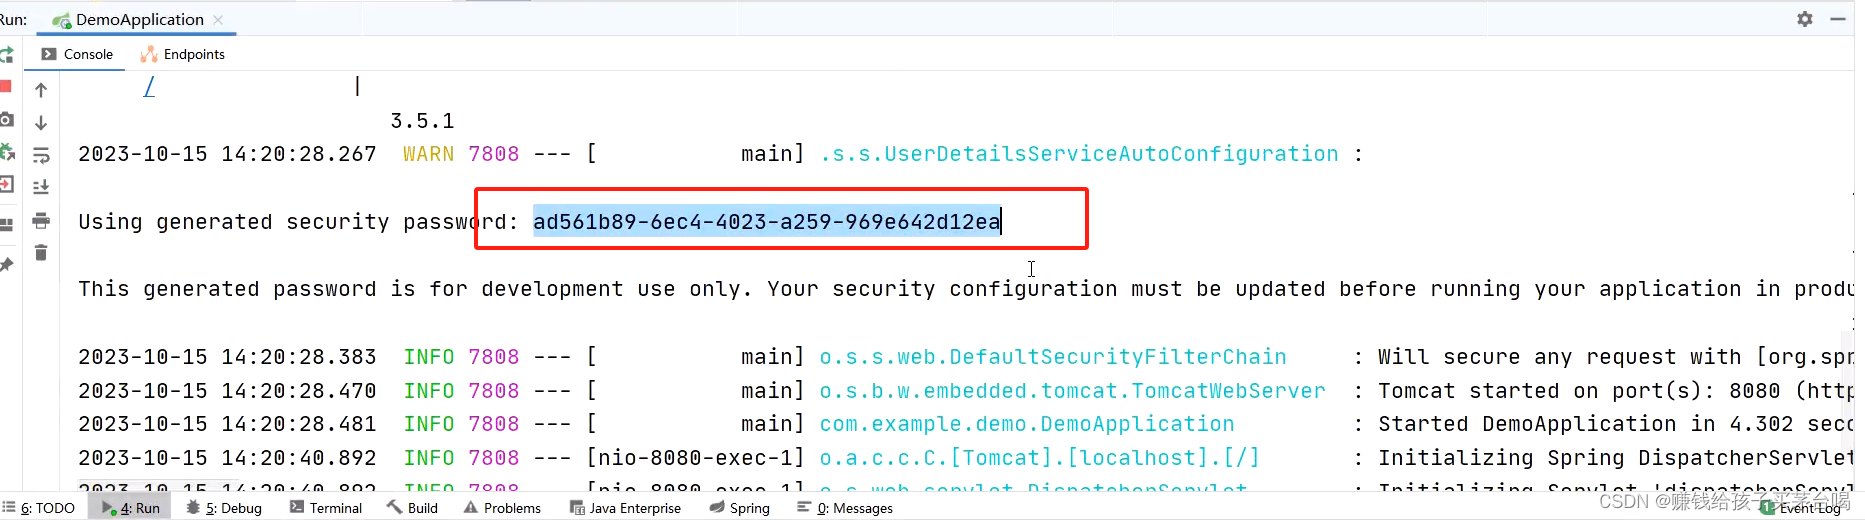
-
登录之后才能够请求接口
- 登入后可以发现请求头里会有JSESSIONID

-
这就是默认的一个认证流程
测试成功则表示我们的项目创建成功
4、自定义登录
结合完整流程可以知道整个流程中从第5、6之间进行用户查询,所以我们只需要去重写一下这一部分就可以了
-
创建 sys_user 表的Mapper和Service、entity、并集合plus
- 实体类如果名字与数据库不一样,要用注解@TableName指定实体类名称
-
新建实现类UserDetailsServiceImpl
-
package com.example.demo.service.impl;

import com.baomidou.mybatisplus.core.conditions.query.LambdaQueryWrapper;
import com.example.demo.entity.LoginUser;
import com.example.demo.entity.MsUser;
import com.example.demo.service.IUserService;
import org.springframework.beans.factory.annotation.Autowired;
import org.springframework.security.core.userdetails.UserDetails;
import org.springframework.security.core.userdetails.UserDetailsService;
import org.springframework.security.core.userdetails.UsernameNotFoundException;
import org.springframework.stereotype.Service;

// 实现UserDetailsService,重写loadUserByUsername
// 重写了UserDetailsService,控制台就没有打印生成的密码。因为我们自定义了登录流程

@Service
public class UserDetailsServiceImpl implements UserDetailsService {

    @Autowired
    private IUserService userService;

    // UserDetails: security存放登录用户信息
    //loadUserByUsername是secruity对外开放的接口,让我们来实现(每个系统获取账号的逻辑不一样)
    @Override
    public UserDetails loadUserByUsername(String username) throws UsernameNotFoundException {
        System.out.println("loadUserByUsername");
        LambdaQueryWrapper<MsUser> qw = new LambdaQueryWrapper<>();
        qw.eq(MsUser::getUsername, username);
        // 根据账号查询用户信息
        MsUser msUser = userService.getOne(qw);

        // TODO: 统一处理异常
        if(msUser == null) {
            throw new RuntimeException("账号不存在");
        }

        //要返回UserDetails对象,它是一个接口,不能直接new
        //所以可以创建一个类实现UserDetails,然后再创建这个类的对象返回

        LoginUser loginUser = new LoginUser();
        loginUser.setMsUser(msUser);

        //返回一个用户对象
        return loginUser;
    }

}
package com.example.demo.entity; import com.fasterxml.jackson.annotation.JsonIgnoreProperties; import lombok.Data; import org.springframework.security.core.GrantedAuthority; import org.springframework.security.core.userdetails.UserDetails; import java.util.Collection; // UserDetails:后续security用于用户验证使用的 @Data // 解决后续redis读取数据时反序列化报错 @JsonIgnoreProperties(ignoreUnknown = true) public class LoginUser implements UserDetails { //引入我们要返回的实体类 private MsUser msUser; //重写底下这些方法 @Override //这是用户的权限接口 public Collection<? extends GrantedAuthority> getAuthorities() { return null; } @Override //账号接口 public String getPassword() { return msUser.getPassword(); } @Override //密码接口 public String getUsername() { return msUser.getUsername(); } @Override //是否过期接口 public boolean isAccountNonExpired() { return true; } @Override //是否被锁定接口 public boolean isAccountNonLocked() { return true; } @Override //用于判断用户凭证是否过期 public boolean isCredentialsNonExpired() { return true; } @Override //用户判断用户是否可用 public boolean isEnabled() { return true; } } -
重新登录,发现后台报错了

-
默认要求密码前面加{noop}

-
再次登录成功,一定一定一定要记得上面的两个get要重写
4.1 密码加密
第7步通过PasswordEncoder对比UserDetails中的密码和Authentication中的密码是否一样
但是开真实开发中我们的密码不可能以明文的形式保存在数据库中,会对其进行加密
-
默认使用的PasswordEncoder要求数据库中的密码格式为:
{id}password。它会根据id去判断密码的加密方式。但是我们一般不会采用这种方式。所以就需要替换PasswordEncoder。 -
我们一般使用SpringSecurity为我们提供的
BCryptPasswordEncoder。
创建配置类(替换加密方式)
/**
 * SpringSecurity的配置类要求继承WebSecurityConfigurerAdapter
 */
@Configuration
public class SecurityConfig extends WebSecurityConfigurerAdapter {
    @Bean
    public PasswordEncoder passwordEncoder(){
        return new BCryptPasswordEncoder();
    }
}
测试类加密密码(生成BCryptPasswordEncoder加密的密码)
package com.example.demo;

import org.junit.jupiter.api.Test;
import org.springframework.boot.test.context.SpringBootTest;
import org.springframework.security.crypto.bcrypt.BCryptPasswordEncoder;

@SpringBootTest
class DemoApplicationTests {

    @Test
    void contextLoads() {
        // 生成加密的密码
        BCryptPasswordEncoder bCryptPasswordEncoder = new BCryptPasswordEncoder();
        String encode = bCryptPasswordEncoder.encode("需要加密的密码");
        System.out.println(encode);
    }

}
?![]()
启动后将控制台生成的加密后的密码,把数据库里要加密的密码替换掉,重新启动后就可以正常登入了
4.4 自定义登录接口
SpringSecurity会默认把接口进行一个认证,但是很多时候我们需要自己编写登录接口,但是这个时候登录接口就会被默认的配置拦截,所以需要放行登录接口
由于第3步,会在接口中通过AuthenticationManager的authenticate方法来进行用户认证,所以需要在上面的SecurityConfig中配置把AuthenticationManager注入容器。
认证成功的话要生成一个jwt,放入响应中返回。并且为了让用户下回请求时能通过jwt识别出具体的是哪个用户,我们需要把用户信息存入redis,可以把用户id作为key。
配置类
package com.example.demo.config;

import com.example.demo.filter.JWTFilter;
import org.springframework.beans.factory.annotation.Autowired;
import org.springframework.context.annotation.Bean;
import org.springframework.context.annotation.Configuration;
import org.springframework.security.authentication.AuthenticationManager;
import org.springframework.security.config.annotation.web.builders.HttpSecurity;
import org.springframework.security.config.annotation.web.configuration.WebSecurityConfigurerAdapter;
import org.springframework.security.config.http.SessionCreationPolicy;
import org.springframework.security.crypto.bcrypt.BCryptPasswordEncoder;
import org.springframework.security.crypto.password.PasswordEncoder;
import org.springframework.security.web.authentication.UsernamePasswordAuthenticationFilter;

@Configuration
public class SecurityConfig extends WebSecurityConfigurerAdapter {

    @Autowired
    private JWTFilter jwtFilter;

    @Bean
    public PasswordEncoder passwordEncoder(){
        return new BCryptPasswordEncoder();
    }

    @Override
    protected void configure(HttpSecurity http) throws Exception {
        http
            //关闭csrf
            .csrf().disable()
            //不通过Session获取SecurityContext,这里写了之和就不会跳到登入系统自带那个页面
            .sessionManagement().sessionCreationPolicy(SessionCreationPolicy.STATELESS)
            .and()
            .authorizeRequests()
            // 对于登录接口 允许匿名访问
            .antMatchers("/login").anonymous()
            // 除上面外的所有请求全部需要鉴权认证
            .anyRequest().authenticated();

        http.addFilterBefore(jwtFilter, UsernamePasswordAuthenticationFilter.class);
    }

    //将权限管理器注入(默认没有注入),后面会使用到
    @Override
    @Bean
    public AuthenticationManager authenticationManagerBean() throws Exception {
        return super.authenticationManagerBean();
    }
}
?Service
public interface IUserService extends IService<MsUser> {

    String createToken(String username, String password);

}
ServiceImpl?
package com.example.demo.service.impl;

import com.auth0.jwt.JWT;
import com.auth0.jwt.algorithms.Algorithm;
import com.baomidou.mybatisplus.extension.service.impl.ServiceImpl;
import com.example.demo.entity.LoginUser;
import com.example.demo.entity.MsUser;
import com.example.demo.mapper.UserMapper;
import com.example.demo.service.IUserService;
import com.example.demo.utils.RedisUtils;
import org.springframework.beans.factory.annotation.Autowired;
import org.springframework.security.authentication.AuthenticationManager;
import org.springframework.security.authentication.UsernamePasswordAuthenticationToken;
import org.springframework.security.core.Authentication;
import org.springframework.stereotype.Service;

@Service
public class UserServiceImpl extends ServiceImpl<UserMapper, MsUser>
    implements IUserService {

    //将SecruityConfig的权限管理器注入
    @Autowired
    private AuthenticationManager authenticationManager;

    //将Redis的配置类也注入
    @Autowired
    private RedisUtils redisUtils;

    //账号密码在UserDetailsServiceImpl已经查过了,心啊在只需要验证有没有token就行
    @Override
    public String createToken(String username, String password) {

        // 封装账号密码
        UsernamePasswordAuthenticationToken authenticationToken
                = new UsernamePasswordAuthenticationToken(username, password);

        // 调用UserServiceImpl里面的loadUserByUsername方法
        Authentication authenticate = authenticationManager.authenticate(authenticationToken);

        if(authenticate == null) {
            throw new RuntimeException("认证失败");
        }

        // getPrincipal()返回登录对象
        LoginUser loginUser = (LoginUser) authenticate.getPrincipal();

        //将用户名加密并生成token
        String token = JWT.create().withClaim("userId", loginUser.getMsUser().getId())
                .sign(Algorithm.HMAC256("asdghfgagdsfgds"));

        // user:2
        // 将用户信息存入redis,方便后期校验使用
        System.out.println("user:" + loginUser.getMsUser().getId().toString());
        redisUtils.setCacheObject("user:" + loginUser.getMsUser().getId().toString(), loginUser);

        return token;
    }
}
?controller
package com.example.demo.controller;

import com.example.demo.service.IUserService;
import org.springframework.beans.factory.annotation.Autowired;
import org.springframework.web.bind.annotation.PostMapping;
import org.springframework.web.bind.annotation.RequestMapping;
import org.springframework.web.bind.annotation.RestController;

import java.util.HashMap;
import java.util.Map;

@RestController
@RequestMapping("/login")
public class LoginController {

    @Autowired
    private IUserService userService;

    @PostMapping
    public Map<String, Object> login(String username, String password) {
        String token = userService.createToken(username, password);

        Map<String, Object> map = new HashMap<>();
        map.put("code", 200);
        map.put("msg", "操作成功");
        map.put("data", token);

        return map;
    }

}
5.JWT验证
现在只有登入接口可以正常使用,要弄一个携带token可以访问其他接口的方法
继承OncePerRequestFilter过滤器,重写它的方法doFilterInternal
package com.example.demo.filter;

import com.auth0.jwt.JWT;
import com.auth0.jwt.algorithms.Algorithm;
import com.example.demo.entity.LoginUser;
import com.example.demo.utils.RedisUtils;
import org.springframework.beans.factory.annotation.Autowired;
import org.springframework.security.authentication.UsernamePasswordAuthenticationToken;
import org.springframework.security.core.context.SecurityContextHolder;
import org.springframework.stereotype.Component;
import org.springframework.web.filter.OncePerRequestFilter;

import javax.servlet.Filter;
import javax.servlet.FilterChain;
import javax.servlet.ServletException;
import javax.servlet.http.HttpServletRequest;
import javax.servlet.http.HttpServletResponse;
import java.io.IOException;

/*
实现,除了登入接口,其他接口要有token才能访问
 */

@Component
public class JWTFilter extends OncePerRequestFilter {

    @Autowired
    private RedisUtils redisUtils;

    @Override
    protected void doFilterInternal(HttpServletRequest request, HttpServletResponse response, FilterChain filterChain) throws ServletException, IOException {
        System.out.println("jwtFilter");
        String token = request.getHeader("token");

          // 如果没有token进入下一个过滤器
          if(token == null) {
              //后面的过滤器也需要用到用户信息,这边先暂时放行
              filterChain.doFilter(request, response);
              //放行后,后面的内容就不能在执行了,需要return掉
              return;
          }

          //有token的话,要验证token的合法性
          try {
              JWT.require(Algorithm.HMAC256("asdghfgagdsfgds"))
                      .build().verify(token);
          } catch (Exception e) {
              e.printStackTrace();
              // todo: 异常捕捉
              throw new RuntimeException("token不合法");
          }

          //token合法的话,就把用户信息存起来然后放行
          // 获取用户ID
         //每个接口都会经过这里,如果每次都通过userId去数据库查用户信息的话,会对数据库的压力很大
         Long userId = JWT.decode(token).getClaim("userId").asLong();

        //所以建议放在缓存中拿,所以需要导入RedisUtils和RedisConfig
         LoginUser loginUser = redisUtils.getCacheObject("user:" + userId);

         //验证token没问题的话,要把用户信息存入到Secuirity的容器里,后面的过滤器还会用到
        UsernamePasswordAuthenticationToken authenticationToken =
                new UsernamePasswordAuthenticationToken(loginUser, null, null);

        //把当前用户信息放入security容器里
        SecurityContextHolder.getContext().setAuthentication(authenticationToken);

        filterChain.doFilter(request, response);
    }
}
添加到整个过滤器链中
? ? ? ? 在SecurityConfig重写的configure方法里加上我们的过滤器
@Autowired
private JWTFilter jwtFilter;

@Override
protected void configure(HttpSecurity http) throws Exception {
    http// 将自己定义的过滤器加到UsernamePasswordAuthenticationFilter之前
        .addFilterBefore(jwtFilter, UsernamePasswordAuthenticationFilter.class);
}本文来自互联网用户投稿,该文观点仅代表作者本人,不代表本站立场。本站仅提供信息存储空间服务,不拥有所有权,不承担相关法律责任。 如若内容造成侵权/违法违规/事实不符,请联系我的编程经验分享网邮箱:chenni525@qq.com进行投诉反馈,一经查实,立即删除!
- Python教程
- 深入理解 MySQL 中的 HAVING 关键字和聚合函数
- Qt之QChar编码(1)
- MyBatis入门基础篇
- 用Python脚本实现FFmpeg批量转换
- 两个图片完美融合 泊松编辑
- 第八章[字符串]:8.7:字符串的查找
- 如何在TypeScript中定义未知结构的对象类型?
- Treemap layout;squarified treemap layout
- Java Spring Boot与Vue.js:图书管理系统开发的最佳实践
- java.lang.NullPointerException出现的原因及解决方案
- UE5.1保存资源报错
- 瑞幸对联营商补贴升级,现金流吃紧的库迪如何应对?
- LeetCode hot100 240 搜索二维矩阵
- 最近很火的一款的低代码开发平台