【web服务搭建实验】之nginx基础学习
一、nginx的简介
Nginx是一款轻量级HTTP服务器,同时也是代理邮箱服务器,具备反向代理,通用代理的功能。支持多个系统,和不同操作系统。一般用来搭建web服务器和ftp服务器。
特点:
- 支持高并发,优化后最高可支持百万并发连接
- 内存资源消耗低
- 高扩展性,采用模块化设计,并支持第三方模块
- 高可靠性,采用master—woker模式工作,woker出现故障,master有可以开一个新woker来提供服务。
二、nginx安装实验
nginx安装 :yum install nginx
常用的nginx命令:
检查nginx配置文件 :nginx -t
查看nginx版本:nginx -v
查看nginx版本,编译器版本,配置参数等:nginx -V
启动niginx  :systemctl start nginx.service
在这里我启动不了,一看是我的apache服务也开着的,就需要把服务关了,不然端口占用
netstat -anp | grep 80 查看端口
/etc/nginx/conf.d/ -------子配置文件目录
/etc/nginx/nginx.conf-----主配置文件
/usr/share/nginx/html/----为默认的nginx网址根目录
/var/log/nginx/  ---------为默认日志目录
实验我采用的阿里云服务器搭建,因为我是大学生,有阿里云的免费服务器
[root@gang ~]# yum install nginx -y
[root@gang ~]# systemctl start nginx.service
[root@gang ~]# cd /usr/share/nginx/html/
[root@gang html]# echo xixi > index.html
一般来说,云上是没有防火墙,selinux的,但是需要在云上加安全组,去阿里云把80端口放行,然后通过在浏览器输入公网ip地址,能看到xixi哟。
在这里我们需要注意的是目录的权限问题,有时候我们在其他系统中创建一个目录是,发现权限不是755,这个时候会发现访问不了,报403的错误
虚拟主机的配置
在nginx服务器中,通过不同的端口号,完成虚拟主机的配置。
在/data目录创建3个不同的目录,nginx1,nginx2,nginx3。
[root@gang data]# mkdir nginx{1..3}
[root@gang data]# echo hello,nginx1 > nginx1/index.html
[root@gang data]# echo hello,nginx2 > nginx2/index.html
[root@gang data]# echo hello,nginx3 > nginx3/index.html
/etc/nginx/conf.d/       写子配置文件,注意以。conf结尾
[root@gang data]# vim /etc/nginx/conf.d/vhost.conf
[root@gang data]# systemctl reload nginx.service
[root@gang data]# curl localhost:81
hello,nginx1
[root@gang data]# curl localhost:82
hello,nginx2
[root@gang data]# curl localhost:83
hello,nginx3
nginx的子配置文件:
server{
	listen 81;
	server_name localhost;
	location / {
		root /data/nginx1;
		index index.html;
	}
}
server{
        listen 82;
        server_name localhost;
        location / {
                root /data/nginx2;
                index index.html;
        }
}
server{
        listen 83;
        server_name localhost;
        location / {
                root /data/nginx3;
                index index.html;
        }
}
基于ip的不同虚拟主机也是一样的,只需要在listen 8.123.234.1:80就行。修改监听的参数就行,后期最好给每个虚拟主机做一个日志文件。
基于名称的虚拟主机,也只需要修改server_name的参数就行,还要写一个hosts。
nginx的主配置文件中的location参数有几个优先级 (location =)>(^~)>(*)>(location部分起始路径) > (/)
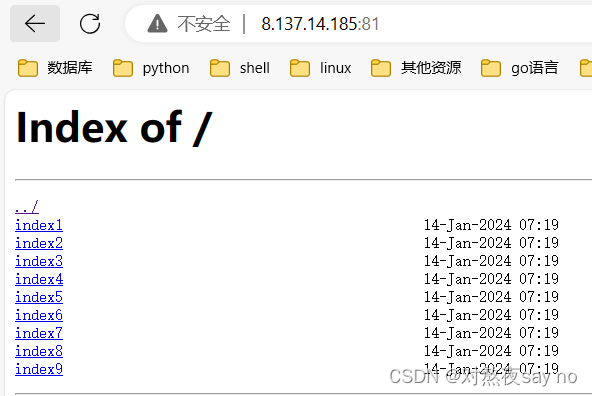
location模块中可开启autoindex功能,表示对访问目录进行索引
注意:这个目录没有index.html才行 参数 autoindex on;
达到下面这种效果。
如果location=是一个目录的话,后面是需要跟/的。
web服务器的主流实现方式-LAMP和LNMP
L:web服务器所依赖的操作系统
A和N:表示Apache和Nginx,来实现web服务器
M:表示mysql,用来存储数据的
P:php,以及其他编程语言
安装mysql5.7,在清华镜像中下载。
wget https://mirrors.tuna.tsinghua.edu.cn/mysql/yum/mysql-5.7-community-el7-x86_64/mysql-community-common-5.7.28-1.el7.x86_64.rpm
wget https://mirrors.tuna.tsinghua.edu.cn/mysql/yum/mysql-5.7-community-el7-x86_64/mysql-community-libs-5.7.28-1.el7.x86_64.rpm
wget https://mirrors.tuna.tsinghua.edu.cn/mysql/yum/mysql-5.7-community-el7-x86_64/mysql-community-client-5.7.28-1.el7.x86_64.rpm
wget https://mirrors.tuna.tsinghua.edu.cn/mysql/yum/mysql-5.7-community-el7-x86_64/mysql-community-server-5.7.28-1.el7.x86_64.rpm
[root@manged mysql]# yum install *.rpm 安装
本文来自互联网用户投稿,该文观点仅代表作者本人,不代表本站立场。本站仅提供信息存储空间服务,不拥有所有权,不承担相关法律责任。 如若内容造成侵权/违法违规/事实不符,请联系我的编程经验分享网邮箱:chenni525@qq.com进行投诉反馈,一经查实,立即删除!
- Python教程
- 深入理解 MySQL 中的 HAVING 关键字和聚合函数
- Qt之QChar编码(1)
- MyBatis入门基础篇
- 用Python脚本实现FFmpeg批量转换
- 服务器的丢包率高怎么办
- 【无标题】
- vue3-elementPlus部分组件样式修改
- 学会Requests库,就学会了Python接口自动化!
- 【HuggingFace Transformer库学习笔记】基础组件学习:Trainer
- Web自动化测试 —— cookie复用
- java的参数传递机制概述,方法重载概述,以及相关案例
- 深入了解JSON:轻量级数据交换的利器
- 自己写几个字符串函数
- 【LV12 DAY10 伪操作与混合编程】
