Docker入门教程(详解)
Docker容器化
一 入门
1. 引言
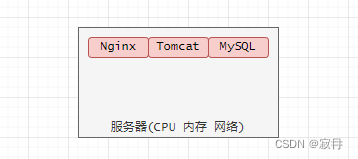
(1)单机部署
- 场景:
- 将多个应用部署一台服务器上。
- 问题
- 每个应用软件,都会消耗物理资源,共用计算机资源,彼此之间会形成竞争关系。
(2)多机部署
-
场景
- 将不同服务软件,部署在不同的服务器上。
-
解决
- 软件之间资源竞争,形成了资源隔离。
-
问题
- 每个软件占用部分服务器资源,剩余资源无法利用,资源使用率不高,造成资源浪费

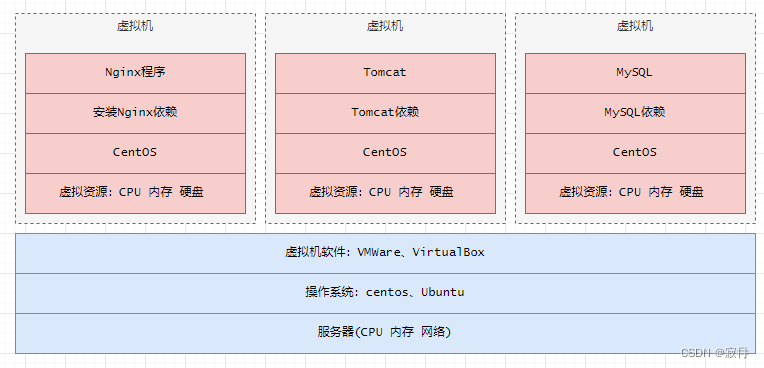
(3)虚拟机部署
-
场景
- 在一台服务器,通过虚拟机技术,虚拟机多个虚拟服务器,限定分配每个服务器硬件资源,多个虚拟机之间资源隔离。
-
解决
- 共用服务器资源,资源不浪费。 2. 资源隔离,彼此之间不影响,不竞争。
-
问题
-
每个虚拟机,都是完整服务器包含完整操作系统资源,重量级,启动运行,比较耗费时间。
-
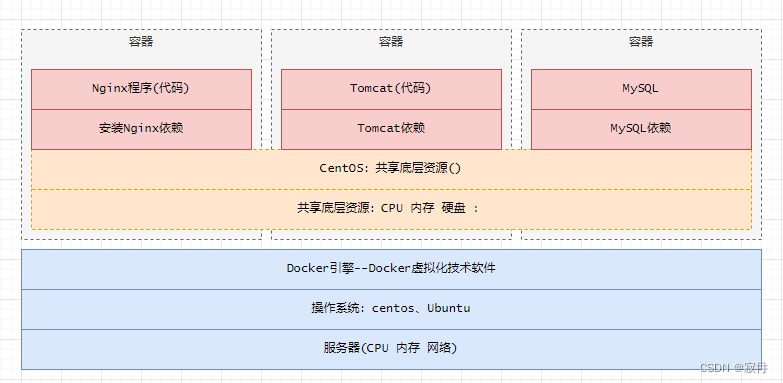
(4)容器化部署
-
总结
-
创建多个虚拟机,实现资源隔离。
-
资源共享物理服务器资源,利用率高。
-
每个虚拟机,只包含:nginx、依赖、操作系统(共享)、硬件资源(共享)
-
2. 简介
Docker(类似VMware) 是一套完整的
容器管理系统,类似一种轻量级的虚拟机技术。

3. 版本
- 社区版:免费。名称:docker-ce-xxx
- 商业版:收费。名称:docker-xxx。
4. docker和vmware对比

5. tar安装
-
准备docker安装包,放在/opt/modules
链接:https://pan.baidu.com/s/121P5iuabdIr50K1ZFLB9Og
提取码:s13g -
解压
tar xvf docker-18.06.3-ce.tar -
注册docker服务
1. 将命令拷贝linux的shell默认目录bin cp docker/* /usr/bin/ 2. 将docker.service文件拷贝到服务默认目录中 /etc/systemd/system/docker.service 3. docker.service添加x执行权限 chmod +x docker.service 4. systemctl重新加载服务service systemctl daemon-reload 5. 设置docker开机自启动 systemctl enable docker 6. 开启docker systemctl start docker -
更换docker镜像仓库
1. 查看docker信息
	docker info
2. 创建一个docker的配置文件:/etc/docker/daemon.json
3. 将下面的阿里云的docker仓库添加
{
	"registry-mirrors": ["https://cr.console.aliyun.com"]
}

4. 重启docker程序
	systemctl restart docker
5. 查看docker信息
	docker info
6. yum安装
-
1 卸载旧版本docker
yum remove docker-ce docker-ce-cli containerd.io docker-buildx-plugin docker-compose-plugin docker-ce-rootless-extras rm -rf /var/lib/docker rm -rf /var/lib/containerd -
2 安装依赖
sudo yum install -y yum-utils device-mapper-persistent-data lvm2 -
3 设置yum仓库
yum-config-manager --add-repo http://mirrors.aliyun.com/docker-ce/linux/centos/docker-ce.repo && yum makecache fast && yum list docker-ce -
4 设置开机启动
yum install -y docker-ce && systemctl enable docker && systemctl start docker -
5 镜像加速
1. 添加镜像地址
cat << EOF > /etc/docker/daemon.json
{
  "registry-mirrors": ["https://docker.mirrors.ustc.edu.cn"]
}
EOF

2. 重启docker
systemctl restart docker
3. 查看
docker info
二 基本使用
1. 核心概念
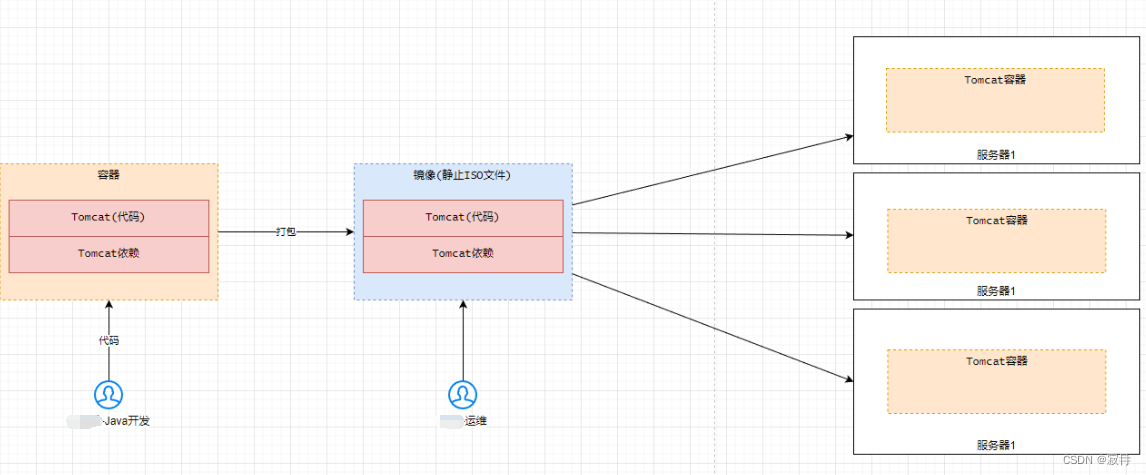
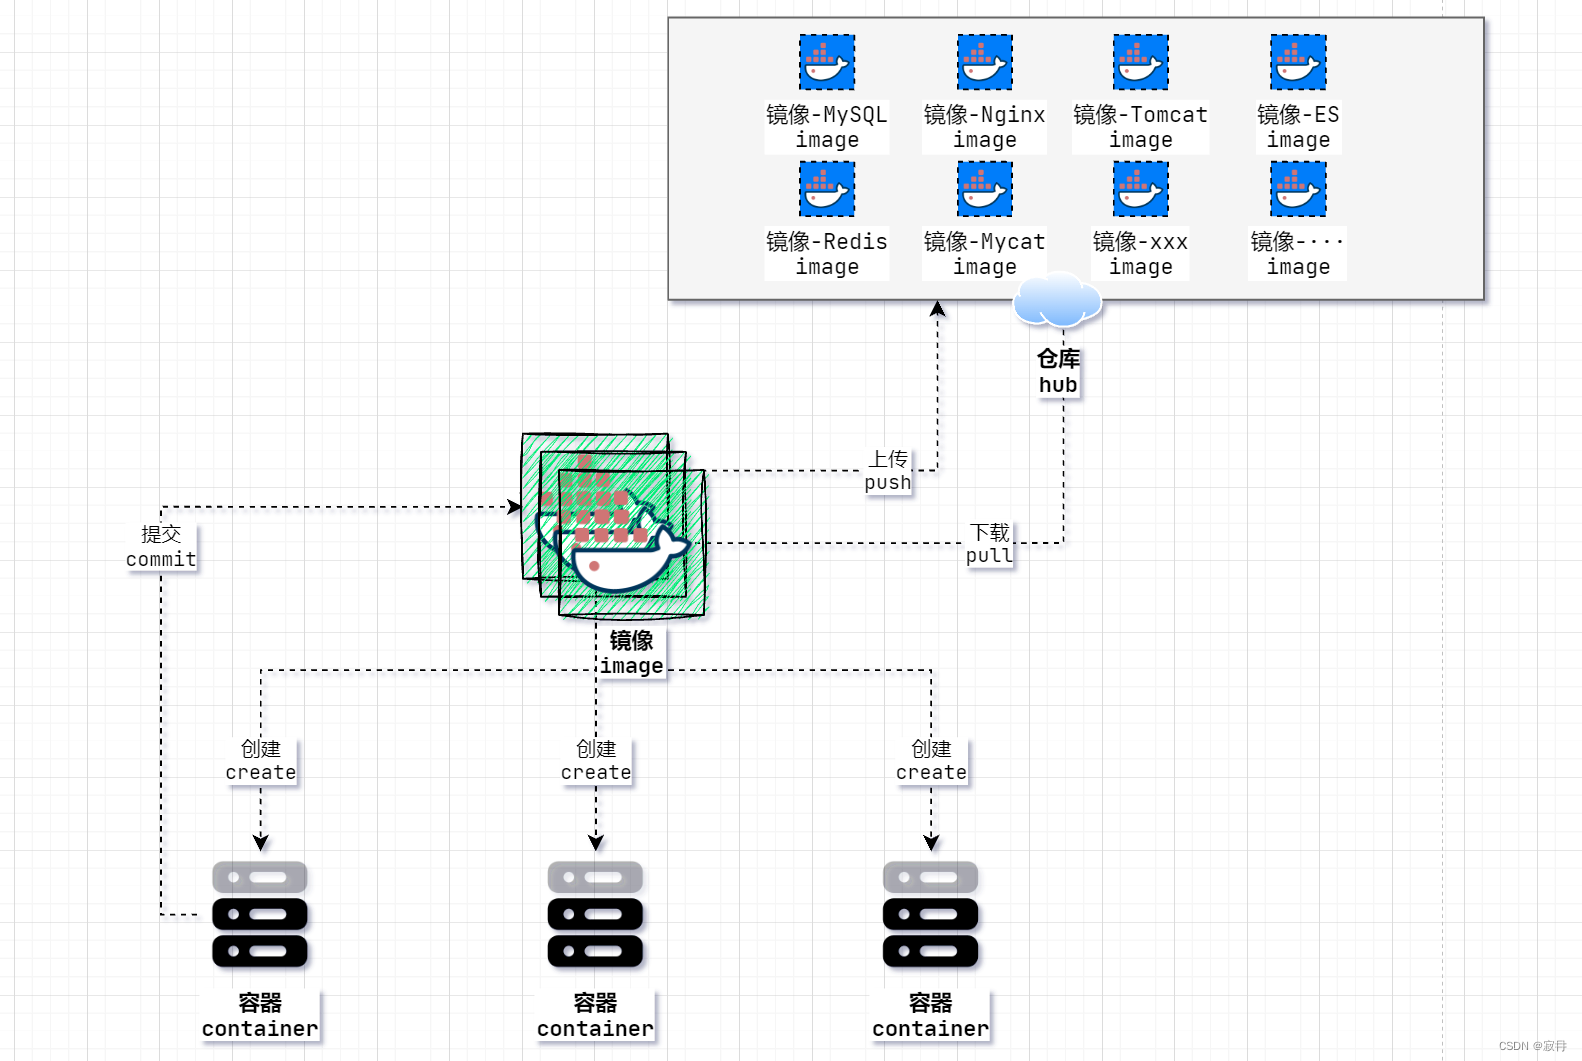
容器:
虚拟可以启动运行关闭电脑,里面可以安装 MySQL、Nginx,(通常获得容器,内置MySQL、Nginx)以及部署项目代码和数据管理,并可以对容器进行开机和关机。
镜像:
创建容器的模具(模板)文件,一个镜像可以创建多个容器,由同一个镜像创建多个容器,内部文件、资源、环境一样的。
例如:MySQL的docker镜像文件,创建多个MySQL容器(配置相同、数据相同、依赖环境相同)
仓库
集中管理存储和共享镜像的一个仓库。
2. 基本命令
- (1)docker info
- 作用:查看docker软件引擎的相关信息。
- (2)docker version
- 作用:查看docker版本。
- (3)docker 命令 --help
- 查看命令的帮助文档
3. 镜像简介
-
(1)概念
-
镜像是启动容器的核心,包含了项目代码、项目依赖环境等文件系统。(类似美元的模板)
例如:Tomcat镜像:包含tomcat软件、依赖jdk、运行代码、(最小化)底层操作文件。
-
-
(2) 特点
- ① 镜像是一个特殊的文件,内容不可修改,类似于系统盘文件。XXX.iso
- ② docker 镜像采用分层技术,用户使用镜像启动容器时,会生成一个独立于镜像的容器层,并不会对镜像层产生任何影响。
- ③ 分层镜像做好以后,用户可以选择使用那一层(那一版本)的镜像启动容器。

3. 镜像Image命令
(1) 查看镜像
- 概念:
- 查看本地有哪些镜像 image
- 命令:
docker images [参数]
- 参数:
| 参数 | 描述 | 默认 |
|---|---|---|
-a | 显示所有镜像 | |
--no-trunc | 不要截断 ID 输出,显示完整 id | |
-q | 仅显示镜像 ID |
- 案例:
1. 命令
docker images --no-trunc

2. 结果
REPOSITORY          TAG                 IMAGE ID                                                                  CREATED             SIZE
nginx               latest              sha256:a6bd71f48f6839d9faae1f29d3babef831e76bc213107682c5cc80f0cbb30866   7 days ago          187MB
busybox             latest              sha256:a416a98b71e224a31ee99cff8e16063554498227d2b696152a9c3e0aa65e5824   4 months ago        4.26MB
busybox_v1.0        test                sha256:a416a98b71e224a31ee99cff8e16063554498227d2b696152a9c3e0aa65e5824   4 months ago        4.26MB

3. 说明
#REPOSITORY  镜像名称
#TAG         镜像标签或者版本
#IMAGE ID    镜像ID号
#CREATED     镜像文件创建时间
#SIZE        镜像大小
(2) 搜索镜像
- 概念:
- 搜索 docker 仓库 Hub 中的镜像。
- 命令:
docker search [参数] 镜像关键词
- 参数:
| 参数 | 描述 | 默认 |
|---|---|---|
-f stars=10 | -f(filter) 是过滤,收藏数 stars 超过(大于等于) 10 的 |
- 案例:
1. 命令
docker search -f stars=10 mysql
2. 结果
NAME                          DESCRIPTION                                     STARS               OFFICIAL            AUTOMATED
mysql                         MySQL is a widely used, open-source relation…   14653               [OK]
mariadb                       MariaDB Server is a high performing open sou…   5589                [OK]
phpmyadmin                    phpMyAdmin - A web interface for MySQL and M…   902                 [OK]
percona                       Percona Server is a fork of the MySQL relati…   622                 [OK]
bitnami/mysql                 Bitnami MySQL Docker Image                      104                                     [OK]
databack/mysql-backup         Back up mysql databases to... anywhere!         104
ubuntu/mysql                  MySQL open source fast, stable, multi-thread…   54
linuxserver/mysql-workbench                                                   52
linuxserver/mysql             A Mysql container, brought to you by LinuxSe…   41
circleci/mysql                MySQL is a widely used, open-source relation…   29
rapidfort/mysql               RapidFort optimized, hardened image for MySQL   25
google/mysql                  MySQL server for Google Compute Engine          25                                      [OK]


3. 说明
NAME:	镜像名
DESRIPTION:描述信息
STARS:收藏数
OFFICIAL:是否是官方
(3) 拉取镜像
- 概念:
- 从远程Docker镜像仓库Hub,拉取下载镜像文件。
- 命令:
docker pull 镜像名:标签名- 说明:
docker pull 镜像名,拉取镜像最新版本(默认:latest)
- 案例:
1. 命令
docker pull nginx

2. 结果
Using default tag: latest # 默认使用latest标签版本。
latest: Pulling from library/nginx
Digest: sha256:10d1f5b58f74683ad34eb29287e07dab1e90f10af243f151bb50aa5dbb4d62ee
Status: Image is up to date for nginx:latest


3. 说明
Using default tag: latest # 默认使用latest标签版本。
(4) 备份镜像
- 概念:
- 将镜像保存成 tar.gz 压缩文件,便于传输拷贝管理。
- 命令:
docker save 被打包镜像名:标签名 -o 备份文件.tar.gz
- 案例:
1. 命令
docker save busybox:latest -o busybox_v1.0.tar.gz

2. 说明
打包镜像文件的格式建议是:tar.gz
(5) 删除镜像
- 概念:
- 删除本地镜像
- 命令:
docker rmi [参数] 镜像名:标签名docker rmi [参数] 镜像id
- 参数:
| 参数 | 描述 | 默认 |
|---|---|---|
| –force | -f | 强制删除镜像,即使镜像已经创建过容器。 |
- 案例:
1. 命令1:删除mysql镜像,tag标签为5
[root@localhost imgs]# docker rmi mysql:5

2. 命令2:根据nginx镜像id删除·
[root@localhost imgs]# docker rmi a6bd71f48f68

3. 命令3:删除所有镜像
[root@localhost imgs]# docker rmi -f $(docker images -qa)
(6) 恢复镜像
- 概念:
- 通过镜像文件 tar.gz 恢复 image 镜像
- 命令:
docker load -i 备份文件.tar.gz
- 案例:
1. 命令:
	 docker load -i busybox_v1.0.tar
4. 容器Container命令
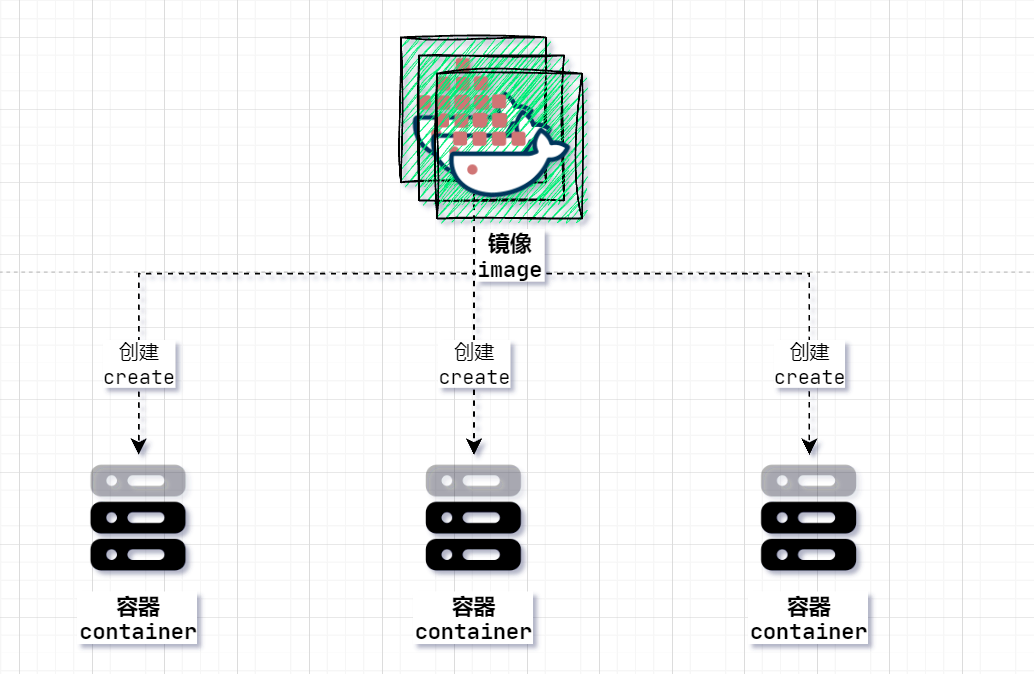
轻量级虚拟机,可读可写"镜像"文件。
虚拟电脑,可以启动、可以关闭、可以暂停,进入容器文件修改添加。动态可使用可操作。注意:可以通过一个镜像,创建启动多个容器,多个容器初始化环境(配置文件、底层文件、依赖、内容)都是一样。
(1) 启动容器
-
概念:从镜像启动一个容器
-
命令:
docker run [参数] 镜像名:标签名 -
参数
| 参数 | 描述 |
|---|---|
| –name | 为容器分配一个名称 |
| -d | 在后台运行容器并打印容器ID |
| -t | 分配伪TTY |
| -i | 即使未连接STDIN,也应使其保持打开状态,-it 使用交互方式运行,进入容器,执行命令。 |
| -p 主机端口:容器端口 | 将容器的网络映射到宿主机上,同时将容器的端口映射到宿主机端口上。使得外部可以通过宿主机ip+映射主机端口访问容器。 |
- 案例:
1. 根据nginx:1.21镜像启动2个ngixn容器:nginx-1,nginx-2.
docker run --name nginx-1 -d -p 81:80 nginx:1.21
docker run --name nginx-2 -d -p 82:80 nginx:1.21

2. 根据nginx:1.21镜像启动ngixn容器:nginx-3,同时进入到容器内部。
docker run --name nginx-3 -it nginx:1.21 /bin/bash

说明:
1. 正确退出命令行:
	容器退出  ctrl+p  ctrl+q
2. 退出容器,结束容器
	exit
3. 如果docker run执行时,本地没有对应镜像,会自动从docker-hub仓库中拉取对应的镜像。

3. 根据busybox镜像创建一个容器。
	简介(了解):busybox最精简的linux镜像,4M,常用在嵌入式设备上。
	docker run --name bzbox-1 -d busybox
	注意:容器内(虚拟机),前台有进程在运行,容器才会处于运行状态,如果前台没有进程运行,则容器自动停止。
	总结:容器会随着内部的前台进程关闭而关闭。
(2) 查看容器
- 概念:
- 查看本地有哪些容器信息
- 命令:
- 查看容器信息:
docker ps [参数] - 查看主机中容器的资源占用情况:
docker stats
- 查看容器信息:
- 参数
| 参数 | 描述 |
|---|---|
| -a | 列出当前正在运行的容器+历史运行的容器,如果不添加参数则只显示正在运行的容器 |
| -n=? | 显示最近创建的容器,后面跟个数 |
| -q| -qa | 只显示容器的编号,-qa可以显示所有容器,包含没有运行容器ID。 |
- 案例:
1. 查看所有容器-正在运行
[root@localhost imgs]# docker ps
CONTAINER ID        IMAGE               COMMAND                  CREATED             STATUS              PORTS                NAMES
f07c72c29d24        nginx:latest        "/docker-entrypoint.…"   6 minutes ago       Up 6 minutes        0.0.0.0:88->80/tcp   nginx_3
4de72374882f        nginx:latest        "/docker-entrypoint.…"   7 minutes ago       Up 7 minutes        80/tcp               nginx_2
374713f9fec1        nginx:latest        "/docker-entrypoint.…"   10 minutes ago      Up 10 minutes       80/tcp               nginx_1


2. 查看所有容器-正在运行+历史容器
[root@localhost imgs]# docker ps -a
CONTAINER ID        IMAGE               COMMAND                  CREATED             STATUS                      PORTS                NAMES
f07c72c29d24        nginx:latest        "/docker-entrypoint.…"   5 minutes ago       Up 5 minutes                0.0.0.0:88->80/tcp   nginx_3
4de72374882f        nginx:latest        "/docker-entrypoint.…"   6 minutes ago       Up 6 minutes                80/tcp               nginx_2
# 说明
container ID:容器id
image:对应镜像
created:创建时间
status:目前状态:
    	Created:创建后未运行过,使用create命令
		Up: 正在运行,使用run、 start、 unpause等命令
      	Up paused : 被暂停,使用了pause命令
      	Exited : 退出了,执行stop.
ports:占用端口
  	映射主机端口->容器端口
names:容器名称

3. 查看所有容器的id
[root@localhost imgs]# docker ps -qa

4. 查看容器占用情况
[root@localhost test]# docker stats
CONTAINER ID        NAME                CPU %               MEM USAGE / LIMIT     MEM %               NET I/O             BLOCK I/O           PIDS
be16632ce092        nginx_1             0.00%               2.902MiB / 468.4MiB   0.62%               5.95kB / 3.6kB      0B / 16.4kB         4
f50dfae2e329        priceless_wescoff   0.00%               2.352MiB / 468.4MiB   0.50%               1.14kB / 0B         0B / 0B             3
4de72374882f        nginx_2             0.00%               504KiB / 468.4MiB     0.11%               1.14kB / 0B         0B / 0B             1
(3) 启动和停止
- 概念:
对容器进行启动、关闭、重启、强制停止容器。
- 命令:
- 启动:
docker start 容器ID - 关闭:
docker stop 容器ID - 重启:
docker restart 容器ID - 强制停止( 强制关机,类似断电,慎用 ):
docker kill 容器ID- 说明:kill的关闭是强行直接关闭,无视当前正在处理的任务和数据,有一定的风险。
- 启动:
- 案例:
1. 启动nginx_1
[root@localhost imgs]# docker start nginx_1

2. 关闭nginx_1
[root@localhost imgs]# docker stop nginx_1

3. 重启nginx_1
[root@localhost imgs]# docker restart nginx_1

4. 强制关机nginx_1
[root@localhost imgs]# docker kill nginx_1
(4) 删除容器
-
概念:删除本地容器
-
命令:
docker rm [参数] 容器ID -
参数
| 参数 | 描述 |
|---|---|
| -f | 强制删除,默认不能删除正在运行的 |
- 案例:
1. 删除容器,已经停止的
[root@localhost imgs]# docker rm busybox_container1


2. 删除正在运行的
[root@localhost imgs]# docker rm -f nginx_1


3. 删除所有容器
[root@localhost imgs]# docker rm -f $(docker ps -qa)
(4) 进入容器
- 概念:从主机 bash 进入容器 bash
- 命令:
- 进入容器:
docker exec -it 容器id /bin/bash - 退出容器:
ctrl+pctrl+q-
- 进入容器:
- 案例:
1. 进入nginx_1容器
[root@localhost imgs]# docker exec -it nginx_1 /bin/bash

2. 给nginx的html目录添加一个hello.html文件。并退出测试。
root@be16632ce092:/# cd /usr/share/nginx/html/
root@be16632ce092:/usr/share/nginx/html# echo "<h1>hehe</h1>" > hello.html
(5) 查看日志
-
概念:查看容器内部运行日志
-
命令:
docker logs [参数] 容器id注意:查看容器内前台进程的日志。
-
参数
| 参数 | 描述 |
|---|---|
| -t | 日志前显示时间戳 |
| -f | 实时监控日志信息 |
| –tail {number} | 显示日志条数 |
- 案例:
1. 实时跟踪nginx_1容器的日志信息,并显示时间戳
[root@localhost imgs]# docker logs -ft --tail 10 nginx_1
(6) 查看容器进程
- 概念:查看容器中运行的进程
- 命令:
docker top 容器ID
- 案例:
1. 查看容器nginx_1中运行的进程
[root@localhost imgs]# docker top nginx_1
(7) 跨容器拷贝
- 概念:宿主机和容器之间拷贝文件
- 命令:
docker cp 主机文件路径 容器ID:容器文件路径docker cp 容器ID:容器文件路径 主机文件路径
- 案例:
1. 将docker.html文件拷贝到nginx_1的/usr/share/nginx/html目录下
[root@localhost test]# docker cp /opt/test/docker.html nginx_1:/usr/share/nginx/html


2. 将nginx_1容器/usr/share/nginx/html 拷贝到主机的/opt/test目录下
[root@localhost test]# docker cp nginx_1:/usr/share/nginx/html /opt/test
(8) 提交容器
- 概念:提交容器信息为一个镜像
- 命令:
docker commit -a "作者信息" -m "当前版本的修改信息,方便使用者查看" 容器ID 镜像名:Tag标签
- 参数
| 参数 | 描述 |
|---|---|
| -a | 指定作者信息 |
| -m | 提交信息 |
- 案例:
1. 将nginx_1容器打包成镜像nginx_1:v1.0
[root@localhost test]# docker commit -a "反清复明" -m "添加了hello.html和docker.html" nginx_1 nginx_1:v1.0
sha256:7bc96c6c396ab20408955629ce50c02cb65d45025a64872be1538dbb374a086e
[root@localhost test]# docker images
REPOSITORY          TAG                 IMAGE ID            CREATED             SIZE
nginx_1             v1.0                7bc96c6c396a        4 seconds ago       187MB
nginx               latest              a6bd71f48f68        8 days ago          187MB
busybox             latest              a416a98b71e2        4 months ago        4.26MB
(9) 资源限定
通过docker创建启动容器,给容器设定一个资源上限(CPU 和 内存)
-
命令
-
docker run --memory="1g" --cpus=0.2 --name 容器名 -d -p 主机port:容器port 镜像名:tag -
–cpus:限定cpu的核心数,可以小数。
-
–memory:限定容器的最大内存
-
-
案例
1. 创建nginx容器,限定容器的资源CPU=0.2,memory=200m.
docker run --name nginx-1 --cpus=0.2 --memory="200m" -d -p 80:80 nginx:1.21

2.进入容器测试cpu和内存占用情况
a="abc"; while true; do  a = $a$a; done;
5. 其他命令
(1)查看docker引擎空间占用情况
- 概念:查看docker相关资源占用情况
- 命令:
docker system df
- 案例
[root@localhost web1]# docker system df
TYPE            TOTAL     ACTIVE    SIZE      RECLAIMABLE
Images          1         0         625.4MB   625.4MB (100%)		# 镜像空间
Containers      0         0         0B        0B            		# 容器占用空间
Local Volumes   11        0         219.5MB   219.5MB (100%) 		# 数据卷
Build Cache     0         0         0B        0B								# 构建build缓存空间
(2)删除停止使用的容器
- 概念:删除停止使用的容器
- 命令:
docker container prune
(3)删除未使用的数据卷(后面)
- 概念:删除一次也没被使用过的数据卷
- 命令:
docker volume prune
(4)全局清理docker空间(后面)
- 概念:可以用于清理磁盘,删除关闭的容器、无用的数据卷和网络,以及无tag的镜像
- 命令:
docker system prune
(5)彻底清理(谨慎)
- 概念:清理得更加彻底,可以将没有容器使用 Docker镜像都删掉。
- 命令:
docker system prune -a
三 案例
1. nginx部署
1. 拉nginx镜像
	docker pull nginx:1.23
2. 启动容器
	docker run --name nginx-1 -d -p 88:80 nginx:1.23
3. 部署代码到html
	① 宿主机准备代码文件
	② 在容器运行状态:docker cp拷贝到容器中。
	③ 如果修改了配置文件,则重启。
4. 查看日志
	docker logs -t nginx-1
2. Redis部署
docker run --name redis-5-1 -d -p 6379:6379 redis:5
3. tomcat部署
1. 拉tomcat:8.5    tomcat:9.0
	docker pull tomcat:8.5
	说明:阿里docker镜像仓库,阉割了tomcat内置web项目
		① 减少tomcat启动运行加载项目,效率高,节省资源。
		② 去掉了tomcat内置通过网页进行tomcat设置和项目部署的功能,更安全。
		结果:默认启动tomcat容器之后,里面无法访问8080默认网页。
2. 启动容器
	docker run --privileged --name cms-tomcat-8.5-1 -d -p 8081:8080 tomcat:8.5
3. 部署代码到webapps
	① 宿主机准备代码文件
	② 在容器运行状态:docker cp拷贝到容器中。
	③ 如果修改了配置文件,则重启。
4. 查看日志
	docker logs -t cms-tomcat-8.5-1

问题:启动需要指定特定参数命令?
解决问题: 添加参数--privileged
四 数据卷Volume
1. 引言
- 场景:
- 1:如果MySQL容器,运行过程中,产生数据存在容器内部,如果一旦MySQL容器被删除,内部数据文件,也会一同丢失。-- 数据丢失。
- 2:当Nginx-主有配置文件,日志文件,项目文件,主机宕机,切换备机Nginx-备,无法直接读取主机nginx的数据。— 主备无法共享。
- 3:项目部署,需要上传宿主机,然后docker cp拷贝到容器中。-- 容器文件上传麻烦。
- 关键点
- 容器内部的 数据生命周期和容器是一致,容器一旦删除,内部数据丢失。
2. 简介
Docker容器数据卷是一种建立在**
宿主机上的特殊目录,可以在容器和主机之间共享数据**。

3. 特点
-
① 容器删除,数据卷数据不会删除。
-
② 一个数据卷,可以给多个容器共享。
-
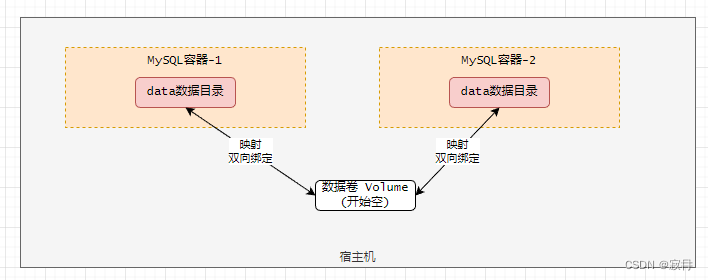
③ 数据卷在容器启动时初始化:如果挂载点空,但是镜像在挂载点包含了数据,则容器数据会同步到挂载点。–数据卷初始化容器数据。
-
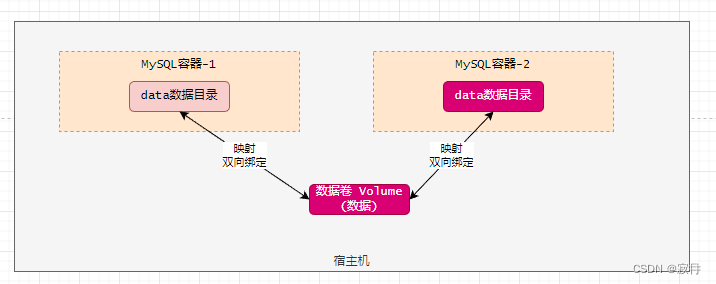
④ 如果挂载点已经存在数据,则启动容器时候,无论容器内是否有数据,都会以数据卷数据为主。(容器内有数据,则会被覆盖)-- 同步数据给容器。
4. 管理命令
-
创建
-
命令:docker volume create 数据卷目录名字
-
命名规范:
项目名_组件_目录 -
例子:
cms_mysql_data -
1. 创建一个nginx_html:
docker volume create test_nginx_html
-
-
查看
-
命令:
docker volume ls -
1. 查看有哪些volume数据卷
 docker volume ls
-
-
查看指定数据卷详细信息
-
命令:
docker volume inspect 数据卷名 -
1. 查看nginx_html数据卷信息
docker volume inspect test_nginx_html
[
    {
        "CreatedAt": "2023-12-26T10:57:30+08:00", #数据卷创建时间。
        "Driver": "local", #本地空间
        "Labels": {}, #标签
        "Mountpoint": "/var/lib/docker/volumes/test_nginx_html/_data", #数据卷对应真正的路径。
        "Name": "test_nginx_html",
        "Options": {},
        "Scope": "local"
    }
]
-
-
删除数据卷
-
命令:
docker volume rm 数据卷名字 -
1. 删除test_nginx_html数据卷
 docker volume rm test_nginx_html

2. 删除test_nginx_html数据卷,直接删除目录
	不要使用直接删除目录,可能会导致数据卷找不到。
-
5. 映射容器
- 命令
1. 命令
docker run --name 容器名 -d -p 宿主机端口:容器端口 --memory="内存" --cpus=核心数 -v 容器卷名:容器目录 -v 容器卷名:容器目录 镜像名:tag
- 案例
# 需求:创建nginx容器绑定数据卷:html、conf、logs
1 创建3个数据卷:
docker volume create app_nginx_html
docker volume create app_nginx_conf
docker volume create app_nginx_logs

2 查看nginx对应目录真正位置
配置目录:/etc/nginx/conf.d/
部署目录:/usr/share/nginx/html
日志目录:/var/log/nginx


3 启动nginx容器,并绑定数据卷
docker run --name nginx-10 -d -p 88:80 -v app_nginx_html:/usr/share/nginx/html -v app_nginx_conf:/etc/nginx/conf.d -v app_nginx_logs:/var/log/nginx nginx:1.21

4 验证双向绑定效果
- 注意:
- 如果数据卷在容器启动挂载,并未创建,docker会自动创建数据卷。
6. 匿名数据卷
Docker创建容器,允许直接使用宿主机目录,映射绑定容器的目录。此刻宿主机的目录,会自动作为数据卷来使用(匿名)。
1. 创建nginx容器,绑定主机 /opt/docker/nginx/html:/usr/share/nginx/html
docker run --name nginx-2 -d -p 88:80 -v /opt/docker/nginx/html:/usr/share/nginx/html nginx:1.21
注意:匿名数据卷中的数据会覆盖容器中的数据,即使数据卷中是空的。— 一切以数据卷中的数据为主。
- 如果匿名数据卷中空的,容器映射目录有文件,最终结果,数据卷不会同步容器的映射目录中的文件,同时容器中的目录中文件被隐藏。
- 总结:如果数据卷是空的,则以数据卷数据为主。
- 数据卷可以向容器同步数据,容器无法修改数据卷中的数据。
五 数据卷案例
(1) tomcat
启动tomcat容器,映射数据卷目录:conf,webapps,logs
1. 创建启动tomcat容器临时,查看容器目录
docker run --name tm_tmp -it tomcat:8.5 bash
目录如下:
项目:/usr/local/tomcat/webapps
配置:/usr/local/tomcat/conf
日志:/usr/local/tomcat/logs

2. 正式启动tomcat容器并容器卷绑定
docker run --name tomcat8.5-10 -d -p 8082:8080 -v app_tomcat_webapps:/usr/local/tomcat/webapps -v app_tomcat_conf:/usr/local/tomcat/conf -v app_tomcat_logs:/usr/local/tomcat/logs --privileged tomcat:8.5
(2) MySQL
分析:启动MySQL容器,需要映射数据卷:data、logs、etc。
1. 启动临时容器,查看目录
docker run --name mysql_tmp -it mysql:5.7 bash
目录位置:
配置:/etc/mysql/conf.d/
日志:/var/log/mysql
数据:/var/lib/mysql

2. 正式启动mysql容器。
docker run --name mysql5.7-1 -d -p 3306:3306 -v app_mysql_logs:/var/log/mysql -v app_mysql_conf:/etc/mysql/conf.d -v app_mysql_data:/var/lib/mysql -e MYSQL_ROOT_PASSWORD=admins  mysql:5.7
(3) Redis
分析:启动Redis容器,映射数据卷:配置文件、日志、持久化文件。
1. 先创建数据卷
目录位置:
数据:/data
配置(自定义):/etc/redis/redis.conf
	注意:默认redis容器,没有redis.conf。

① 创建数据卷:
	docker volume create app_redis_conf
② 在app_redis_conf数据卷对应目录位置中,提前创建一个空的redis.conf文件。
③ 在配置文件中添加下述配置(或者直接写在命令行之后)
appendonly yes
2. 启动redis容器
docker run --name redis5 -d -p 6379:6379 -v app_redis_data:/data -v app_redis_conf:/etc/redis redis:5 redis-server /etc/redis/redis.conf --appendonly yes
六 网络Network
1. 简介
(1) 简介
容器本身提供了网络功能,可以接受外部访问容器,也可以接受容器间的网络连通。

(2) docker虚拟网卡
- docker为每个启动的容器,在宿主机上创建虚拟机网卡,用Veth网络虚拟技术。
- 每个容器内部有自己的网卡,同时有自己的ip地址。
- 宿主机的veth虚拟网卡,和容器内部网卡,映射关系
- ① 只要宿主机的veth网卡的网络是连通,那么容器对应的网卡网络也是连通的。
- ② 向容器的网卡发送数据,等价于向宿主机对应veth网卡发送数据
(3) 命令
- 查看宿主机网卡信息
ip addr
- 查看容器的网卡信息
docker inspect 容器名
- 查看docker网络模式
docker network ls
(4) bridge网桥模式
网桥是一种虚拟网络设备,由Docker引擎(软件安装启动),在宿主上创建bridge网卡,类似一个二层交换机。可以对宿主机内所有容器网络进行管理,默认自动分配ip给容器。
(5) bridge特点
1. 默认docker引擎使用bridge网桥。
2. 网络隔离性比较好,一个容器网络io超载,不会影响其他容器的网络io
3. 网络性能差一些,因为网络需要经过veth转化,以及bridge网桥转化。(略微差)
4. 适合一个宿主中部署多个容器。
2. 注意
- 宿主机内:访问容器服务,使用容器的ip地址,以及容器的端口。
- 跨宿主机,访问容器服务,使用容器映射主机ip+主机映射端口。
3. host仅主机
(1) 简介
容器没有独立的网卡设备,而是和宿主机公用一个网卡设备。

(2) host模式
- 没有虚拟网卡技术,容器直接使用主机网卡作为自己的网卡。
- 这种模式之下,不需要映射容器端口和主机端口。直接占用主机端口。
- 命令
docker run --name xxx -d --network host 镜像名
(3) host特点
- ① 容器网络隔离性差。
- ② 性能好,直接宿主机网络访问,不许要经过网络转化。
- ③ 适合单机部署单个容器场景,独占网络资源。比如:网关。
七 Docker可视化管理
1. 简介
Portainer是Docker的图形化管理工具,提供状态显示面板、应用模板快速部署、容器镜像网络数据卷的基本操作、事件日志显示、容器控制台操作。
本质:用图形化界面操作,代替Docker命令。

2. 安装
(1) 版本
- 英文镜像:
portainer/portainer - 中文镜像:
6053537/portainer-ce
(2) portainer简单架构
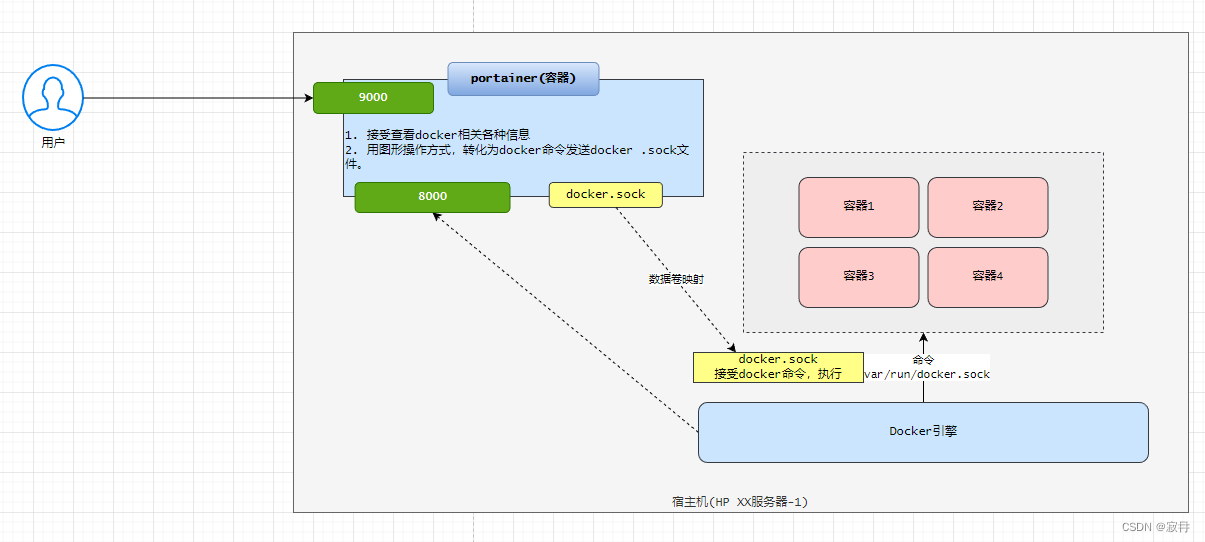
1. 拉取portainer镜像
docker pull 6053537/portainer-ce

2. 启动portainer容器
docker run --name my_portainer -d -p 8000:8000 -p 9000:9000 --restart=always -v /var/run/docker.sock:/var/run/docker.sock -v portianer_data:/data 6053537/portainer-ce

# 说明
--restart=always
	该容器随着docker引擎的启动,自动启动。
(3) 访问
http://portainer主机ip:9000
3. 使用
- 第一次使用,需要设置管理员密码。
- 查看管理:镜像、容器、网络、数据卷。
本文来自互联网用户投稿,该文观点仅代表作者本人,不代表本站立场。本站仅提供信息存储空间服务,不拥有所有权,不承担相关法律责任。 如若内容造成侵权/违法违规/事实不符,请联系我的编程经验分享网邮箱:chenni525@qq.com进行投诉反馈,一经查实,立即删除!
- Python教程
- 深入理解 MySQL 中的 HAVING 关键字和聚合函数
- Qt之QChar编码(1)
- MyBatis入门基础篇
- 用Python脚本实现FFmpeg批量转换
- SQL和NoSQL数据库的全面比较
- 离婚后发现前夫曾在婚内赠与第三者财物,能否要求第三者返还?
- 万户OA-senddocument_import.jsp任意文件上传
- 【高频电子线路】西安电子科技大
- 【前端】html5用range型input标签怎么显示数字
- 扩展检测和响应:零信任安全的核心要素
- 7-3 设计学生类,使用类对象属性来记录学生对象的数量——python
- 【TensorRT】DeviceToHost同步与异步拷贝的区别及带来的问题
- nginx(1.13.7)首次安装出现:【make: *** 没有规则可以创建“default”需要的目标“build” 问题】解决措施
- Python有优点有哪些 为什么近些年使用的人越来越多