mybaits手册
mybaits手册
mybatis官网 https://blog.mybatis.org/
中文文档:https://mybatis.org/mybatis-3/zh/getting-started.html
一、mybatis连接mysql(普通maven工程)
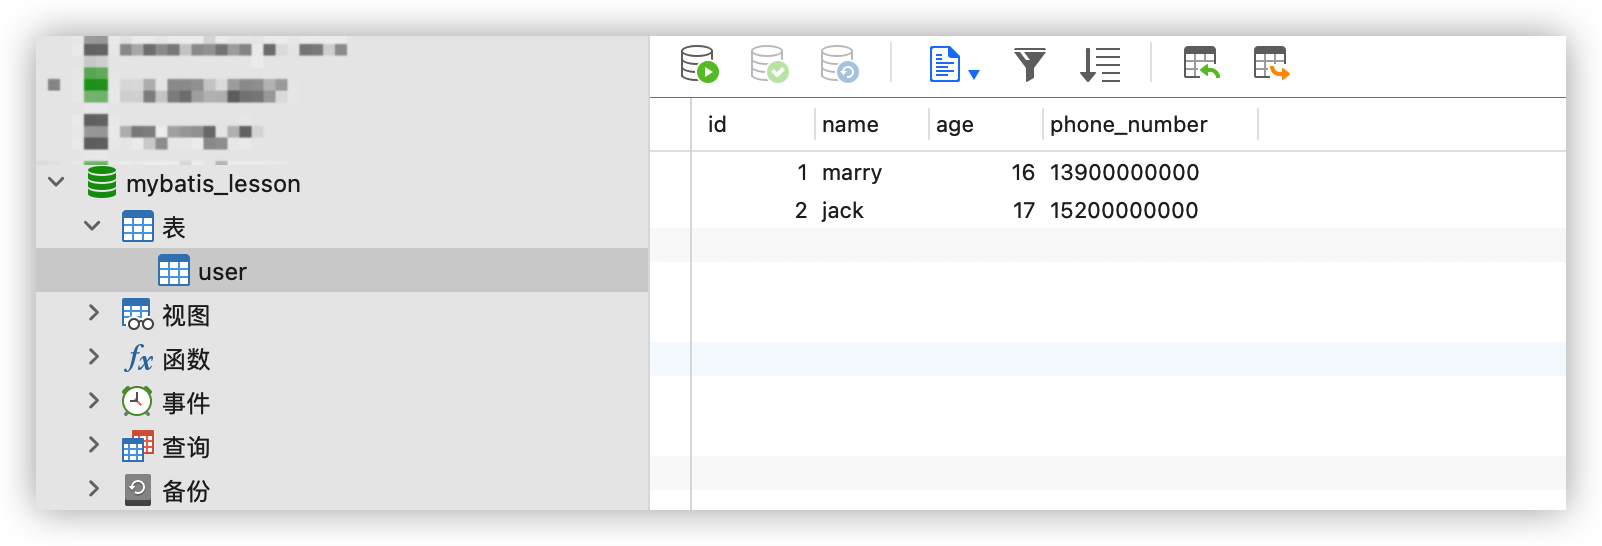
准备:
数据库:mybatis_lesson
表:user
user表的字段:id,name,age,phone_number
1 新建maven工程
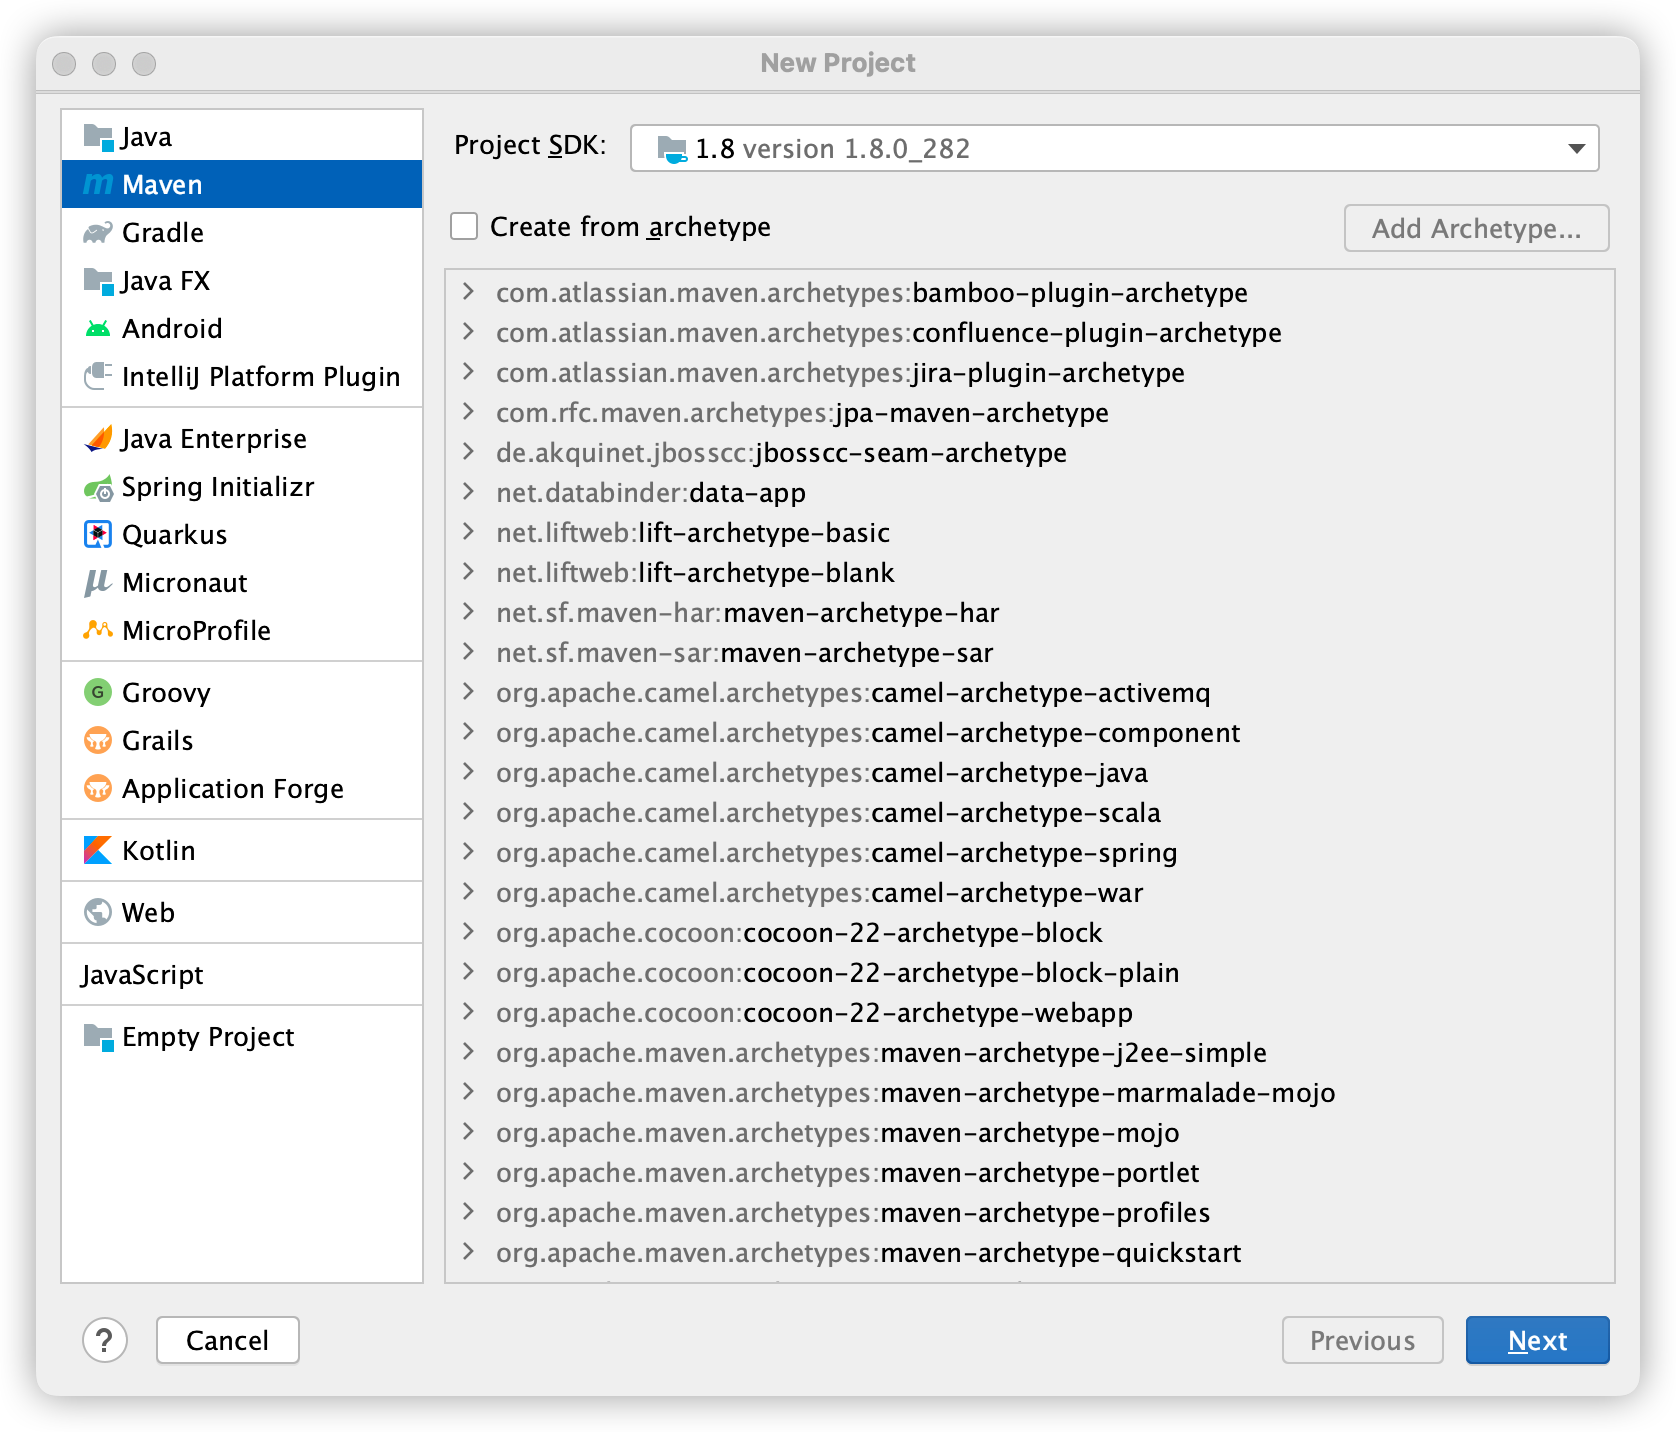
2. pom.xml中添加mybatis和mysql驱动坐标
<dependency>
  <groupId>org.mybatis</groupId>
  <artifactId>mybatis</artifactId>
  <version>3.4.6</version>
</dependency>
<dependency>
  <groupId>mysql</groupId>
  <artifactId>mysql-connector-java</artifactId>
  <version>8.0.18</version>
</dependency>
3. mybatis的核心配置文件
在resources目录下创建mybatis的核心配置文件Mybatis-config.xml,
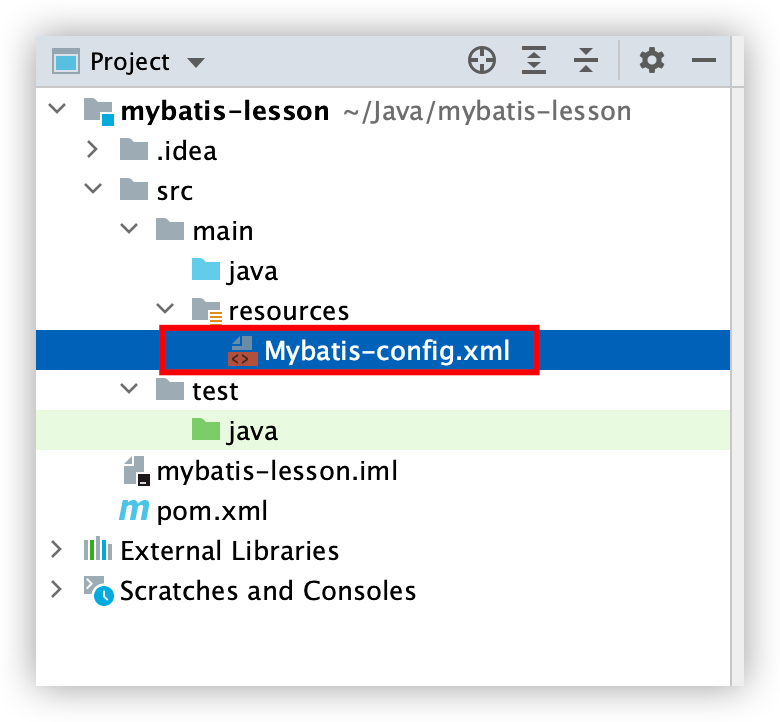
内容如下:
<?xml version="1.0" encoding="UTF-8" ?>
<!DOCTYPE configuration
  PUBLIC "-//mybatis.org//DTD Config 3.0//EN"
  "https://mybatis.org/dtd/mybatis-3-config.dtd">
<configuration>
  <environments default="development">
    <environment id="development">
      <transactionManager type="JDBC"/>
      <!--mysql配置信息-->
      <dataSource type="POOLED">
        <!--mysql 5.x.x连接驱动用com.mysql.jdbc.Driver-->
        <!--mysql 8.x.x连接驱动用com.mysql.cj.jdbc.Driver-->
        <property name="driver" value="com.mysql.cj.jdbc.Driver"/>
        <property name="url" value="jdbc:mysql://localhost:3306/mybatis_lesson"/>
        <property name="username" value="root"/>
        <property name="password" value="12345678"/>
      </dataSource>
    </environment>
  </environments>
<!--sql映射-->
  <mappers>
  </mappers>
</configuration>
4. 编写实体类
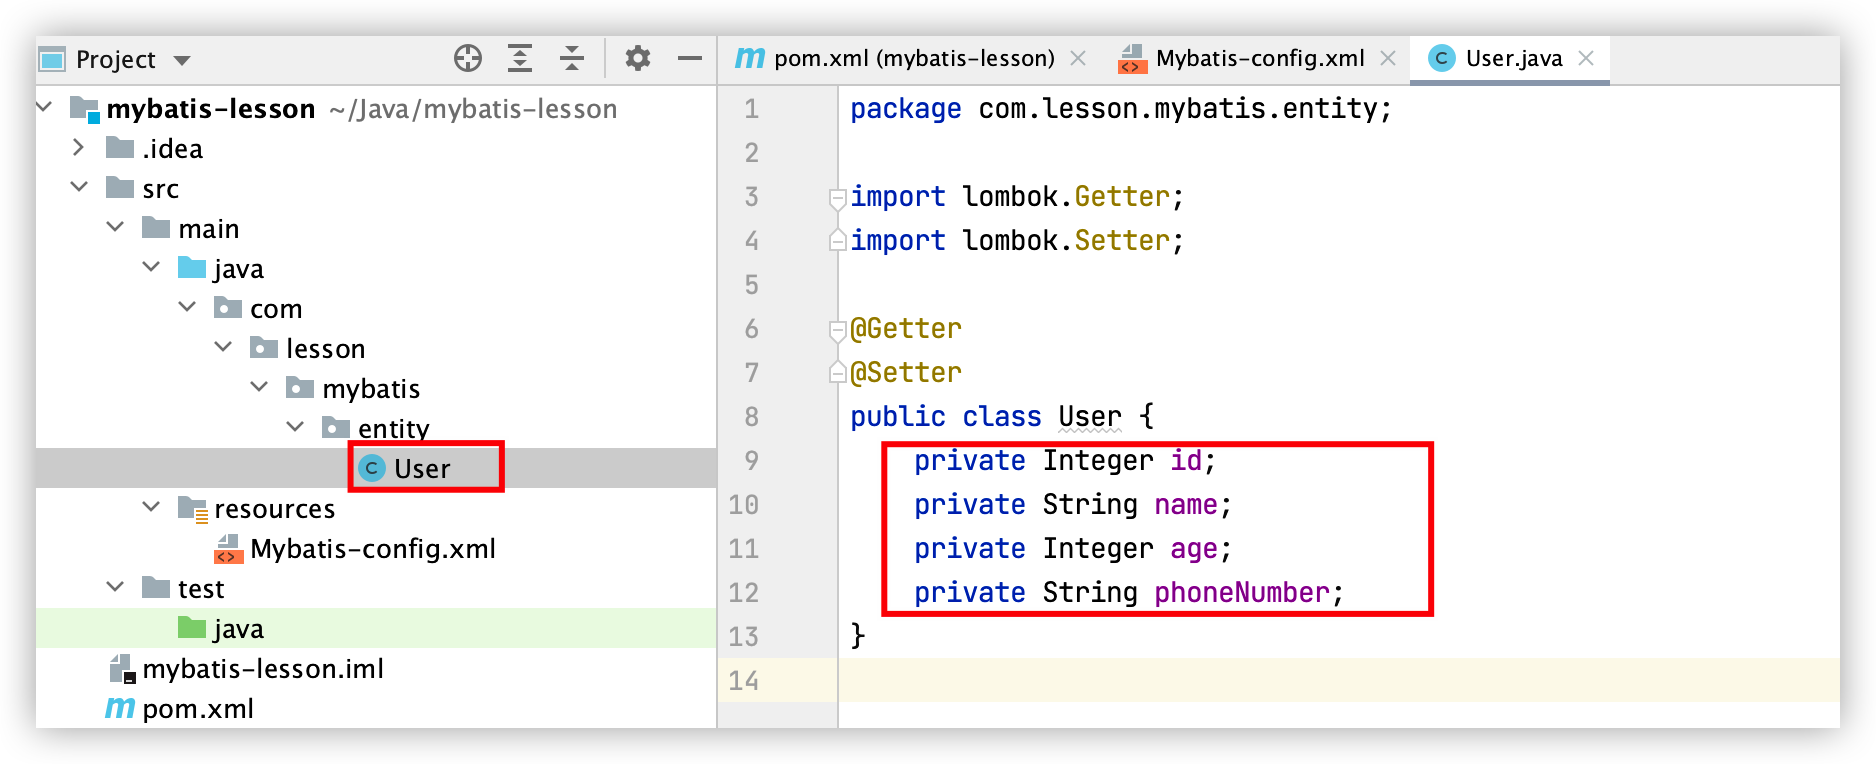
package com.lesson.mybatis.entity;

import lombok.Getter;
import lombok.Setter;

@Getter
@Setter
public class User {
    private Integer id;
    private String name;
    private Integer age;
    private String phoneNumber;
}
5. 编写DAO接口及方法
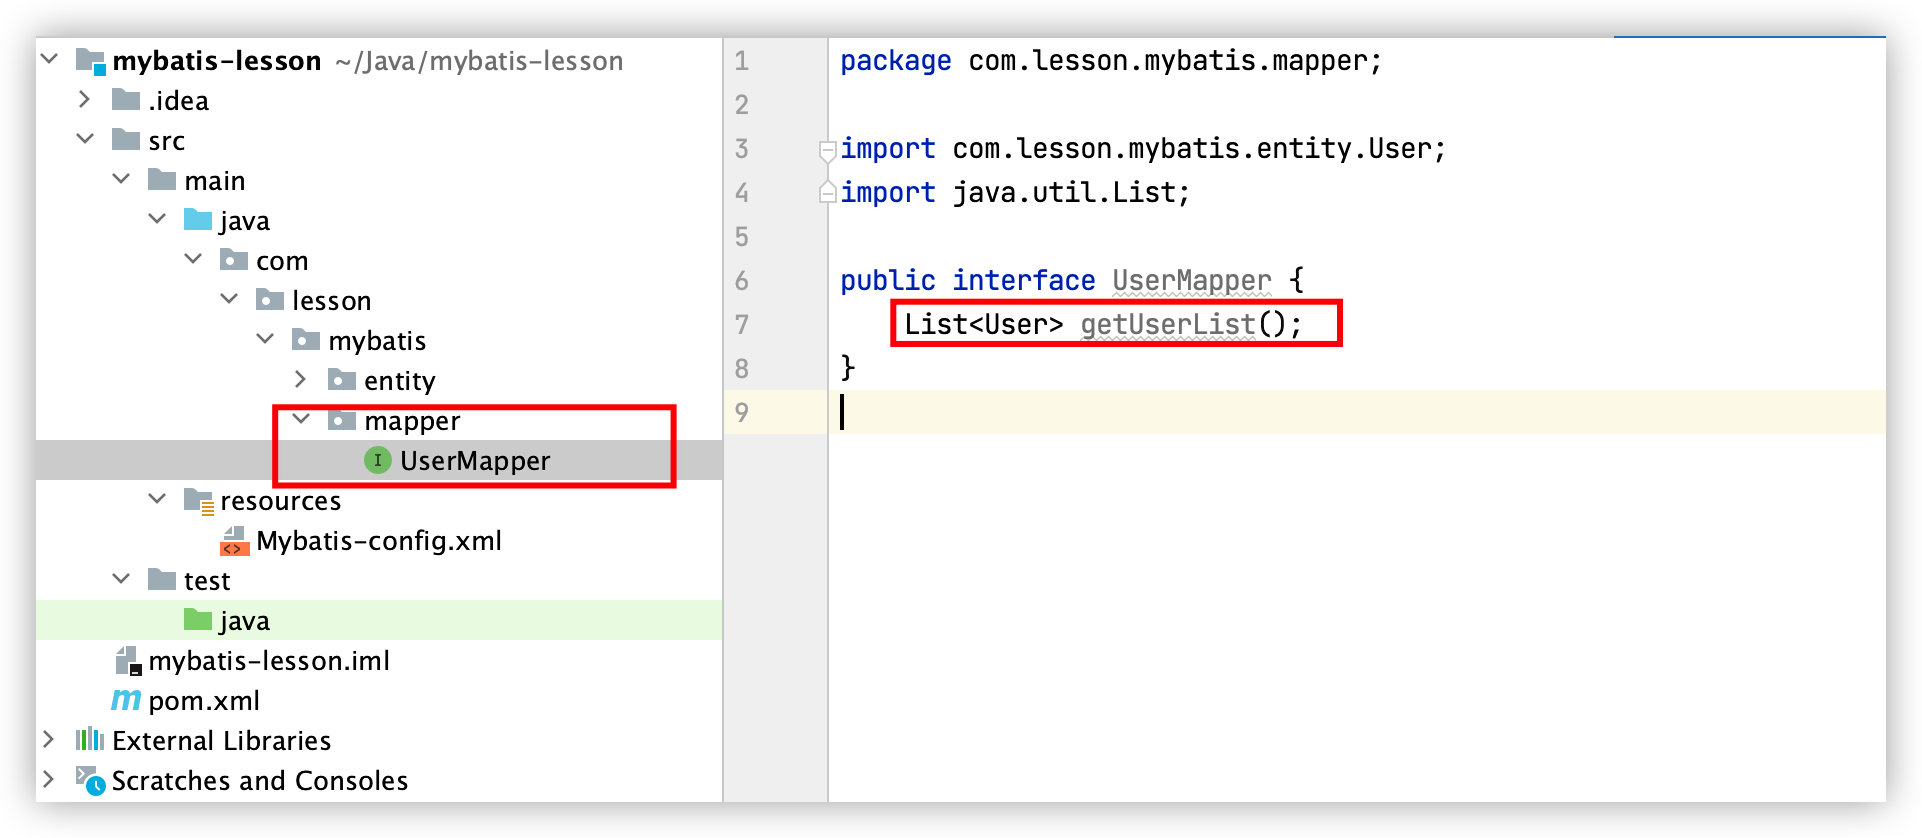
6. 编写DAO接口对应的实现类(Mapper配置文件)
在mybatis中,接口实现类由原来的UserDaoImpl转变为一个 Mapper配置文件

<?xml version="1.0" encoding="UTF-8" ?>
<!DOCTYPE mapper PUBLIC "-//mybatis.org//DTD Mapper 3.0//EN" "http://mybatis.org/dtd/mybatis-3-mapper.dtd">

<!--namespace=绑定一个对应的Dao/Mapper接口-->
<mapper namespace="com.lesson.mybatis.mapper.UserMapper">

    <!--select查询语句-->
    <select id="getUserList" resultType="com.lesson.mybatis.entity.User">
        select * from user
    </select>

</mapper>
7. Mybatis-config.xml中添加mapper映射
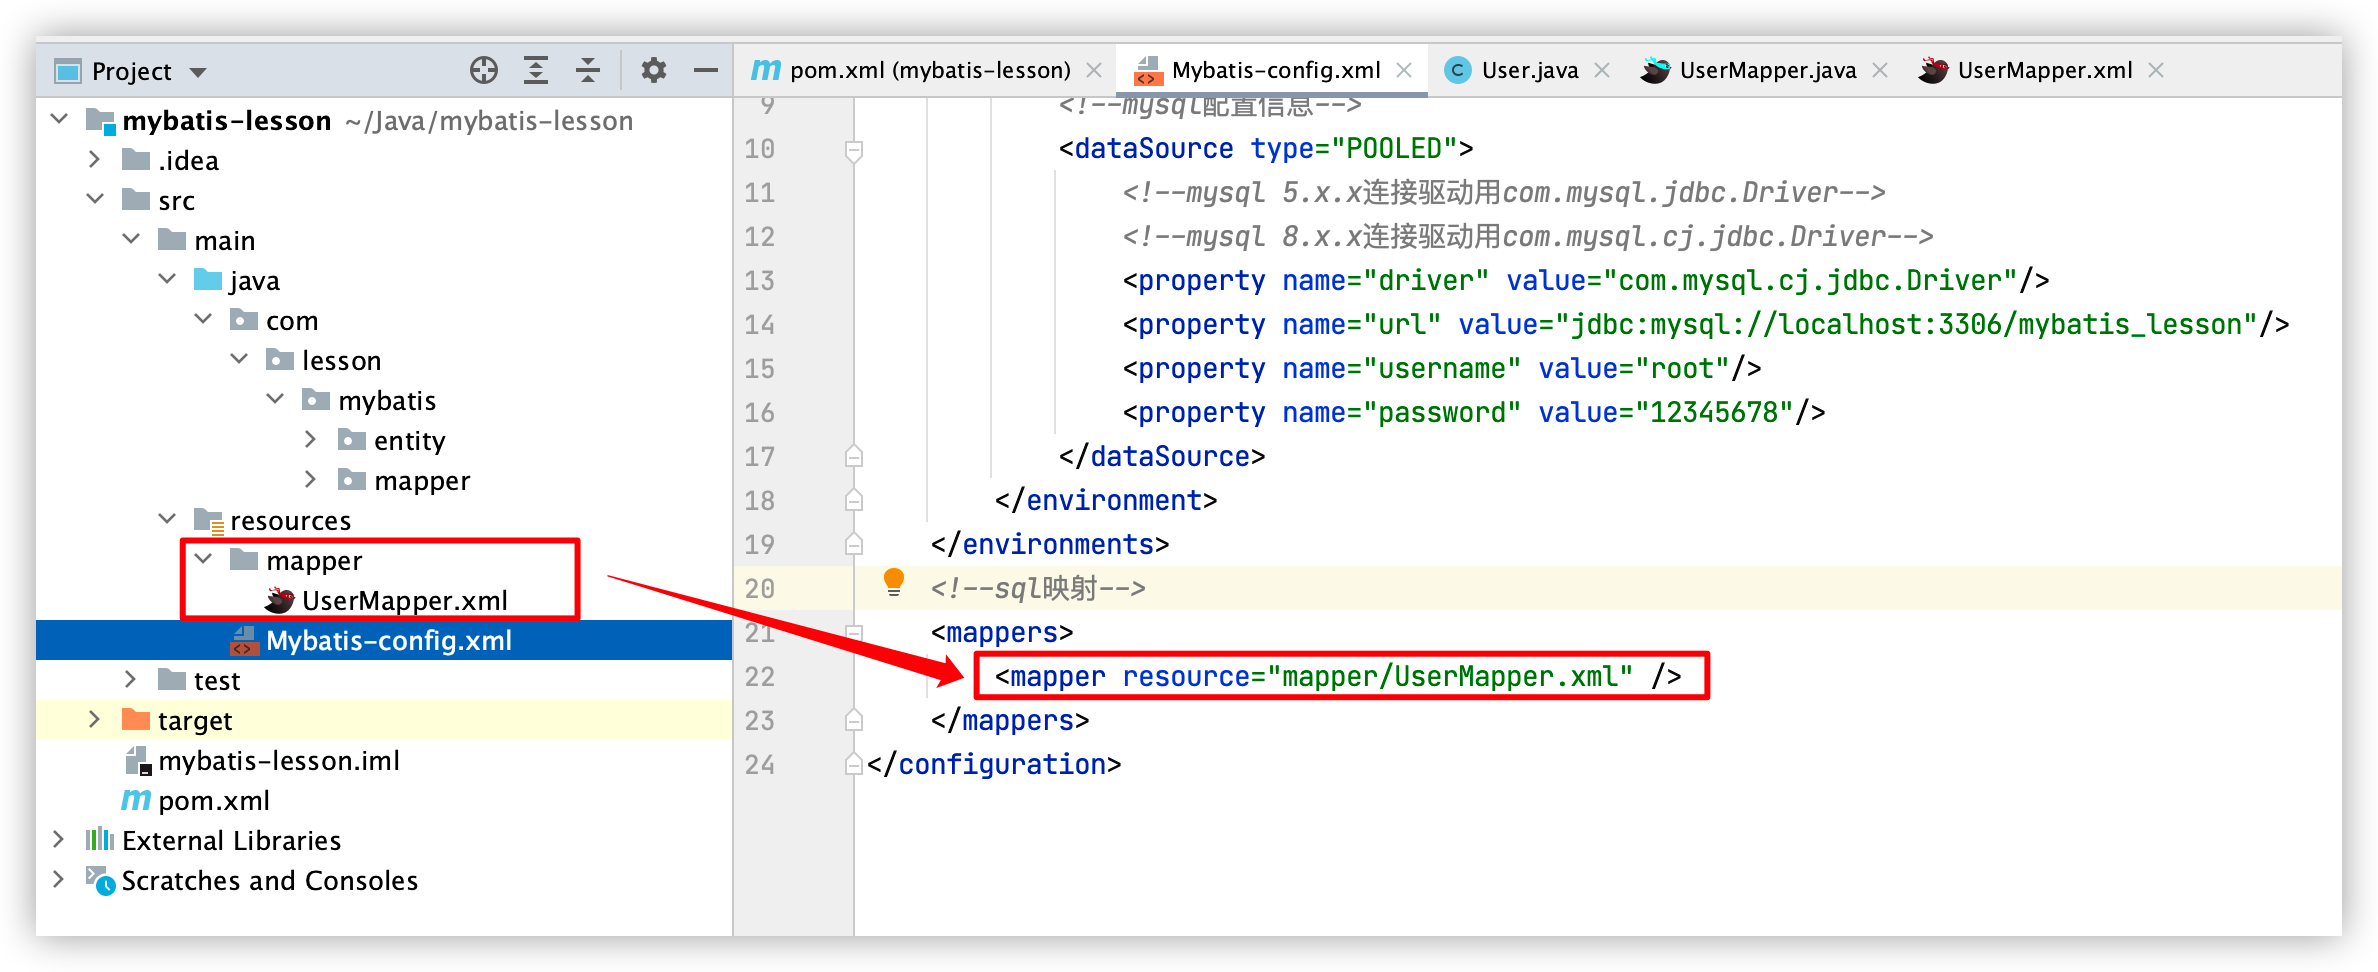
完整的mybatis配置文件(Mybatis-config)如下:
<?xml version="1.0" encoding="UTF-8" ?>
<!DOCTYPE configuration
        PUBLIC "-//mybatis.org//DTD Config 3.0//EN"
        "https://mybatis.org/dtd/mybatis-3-config.dtd">
<configuration>
    <environments default="development">
        <environment id="development">
            <transactionManager type="JDBC"/>
            <!--mysql配置信息-->
            <dataSource type="POOLED">
                <!--mysql 5.x.x连接驱动用com.mysql.jdbc.Driver-->
                <!--mysql 8.x.x连接驱动用com.mysql.cj.jdbc.Driver-->
                <property name="driver" value="com.mysql.cj.jdbc.Driver"/>
                <property name="url" value="jdbc:mysql://localhost:3306/mybatis_lesson"/>
                <property name="username" value="root"/>
                <property name="password" value="12345678"/>
            </dataSource>
        </environment>
    </environments>
    <!--sql映射-->
    <mappers>
      	<!--resource要使用/,不能使用.-->
        <mapper resource="mapper/UserMapper.xml" />
    </mappers>
</configuration>
8. 测试
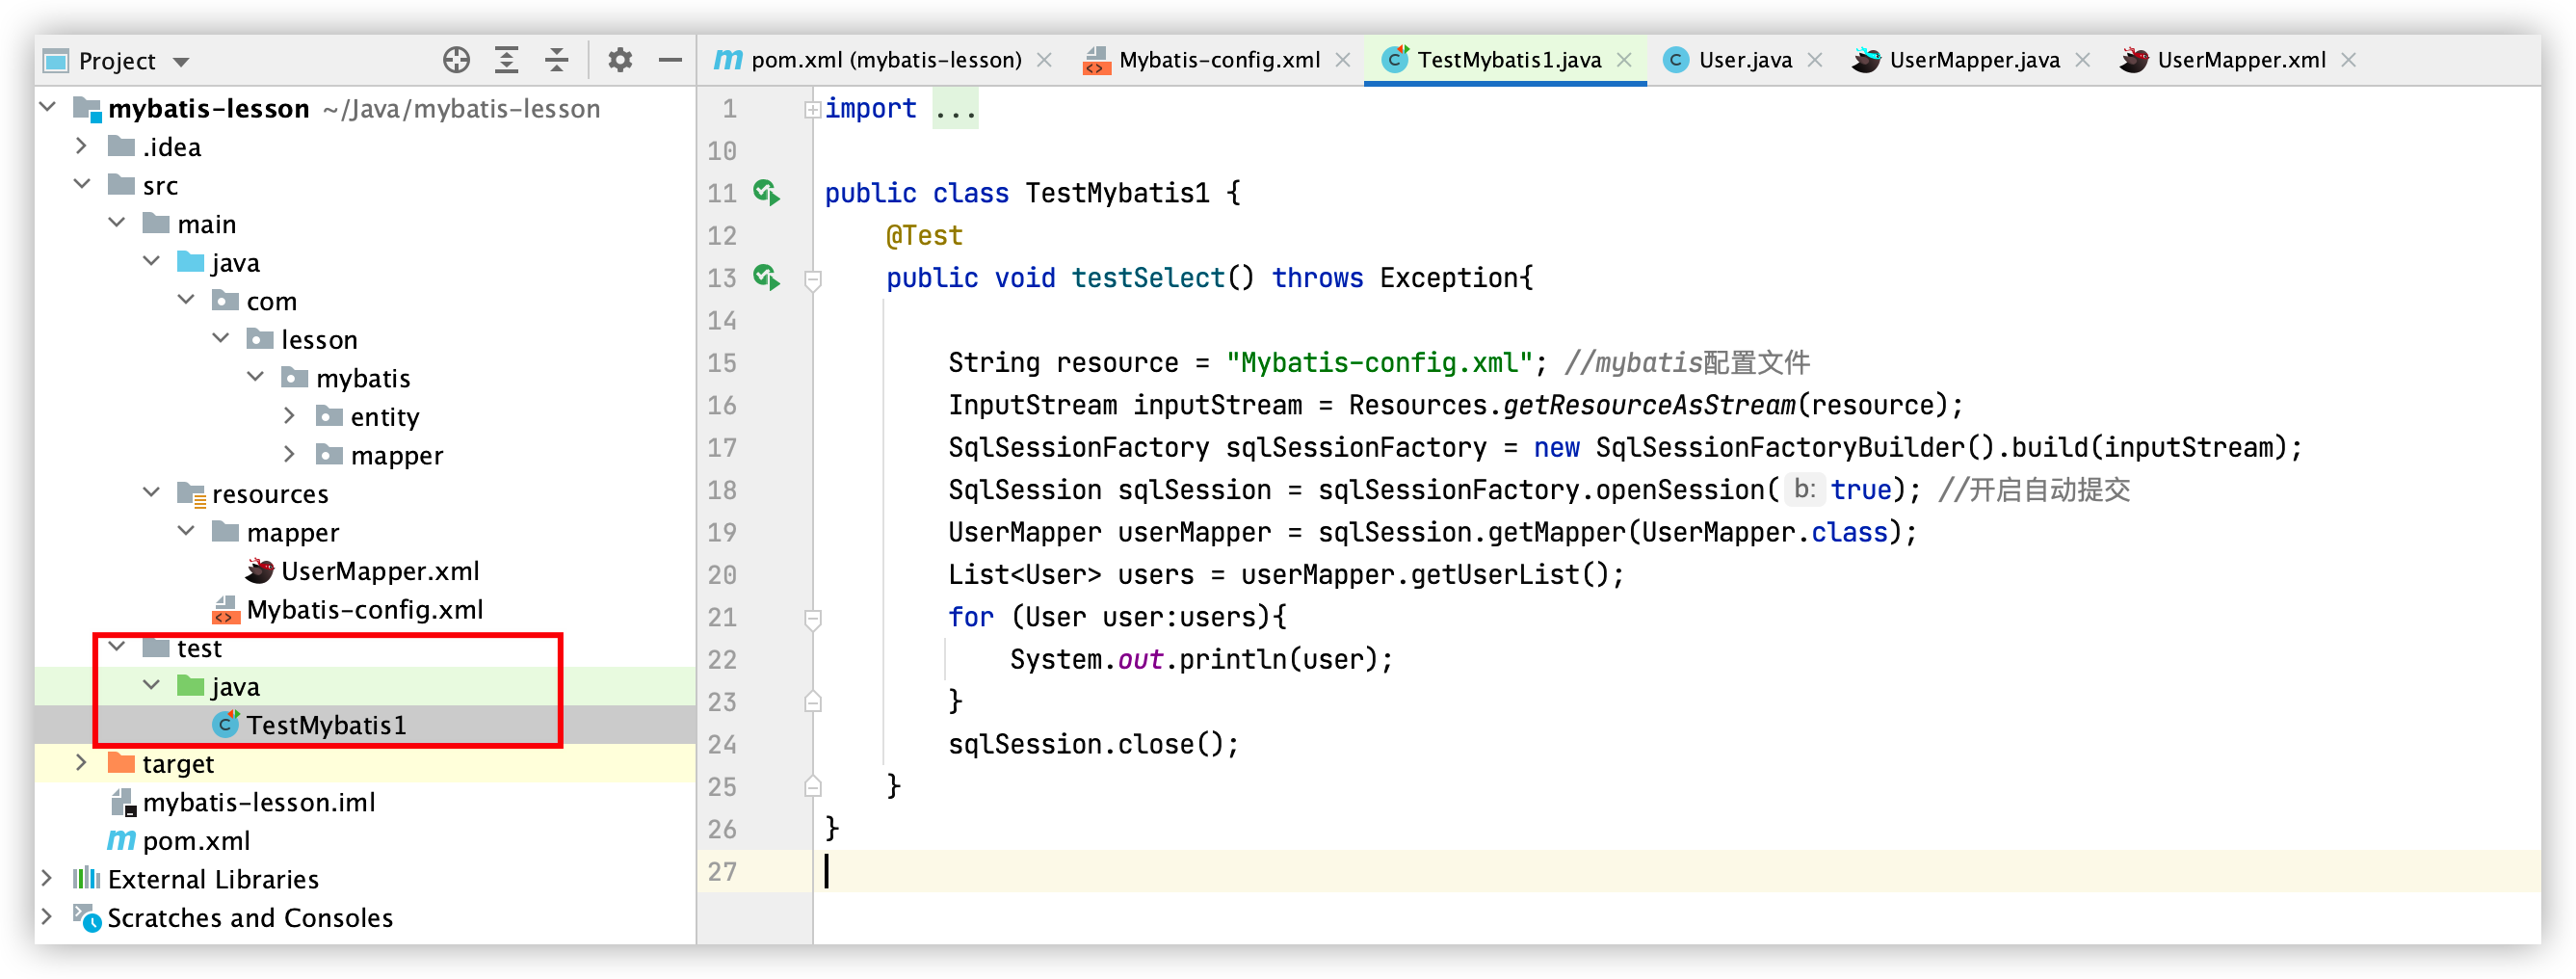
import com.lesson.mybatis.entity.User;
import com.lesson.mybatis.mapper.UserMapper;
import org.apache.ibatis.io.Resources;
import org.apache.ibatis.session.SqlSession;
import org.apache.ibatis.session.SqlSessionFactory;
import org.apache.ibatis.session.SqlSessionFactoryBuilder;
import org.junit.Test;
import java.io.InputStream;
import java.util.List;

public class TestMybatis1 {
    @Test
    public void testSelect() throws Exception{

        String resource = "Mybatis-config.xml"; //mybatis配置文件
        InputStream inputStream = Resources.getResourceAsStream(resource);
        SqlSessionFactory sqlSessionFactory = new SqlSessionFactoryBuilder().build(inputStream);
        SqlSession sqlSession = sqlSessionFactory.openSession(true); //开启自动提交
        UserMapper userMapper = sqlSession.getMapper(UserMapper.class);
        List<User> users = userMapper.getUserList();
        for (User user:users){
            System.out.println(user);
        }
        sqlSession.close();
    }
}
问题
问题1:
打印结果为对象:
com.lesson.mybatis.entity.User@4fb0f2b9
com.lesson.mybatis.entity.User@79924b
原因:
User类中没有重新toString方法
解决:
package com.lesson.mybatis.entity;

import lombok.Getter;
import lombok.Setter;
import lombok.ToString;

@Getter
@Setter
@ToString //添加重新toString方法的注解
public class User {
    private Integer id;
    private String name;
    private Integer age;
    private String phoneNumber;
}
问题2:
打印结果中的某个字段为null:
User(id=1, name=marry, age=16, phoneNumber=null)
User(id=2, name=jack, age=17, phoneNumber=null)
原因:
数据库中的字段为phone_number,实体类中的字段为phoneNumber
解决:
方法1:设置查询字段别名法
我们通过将不一致的字段设置别名,并且别名与对应类的属性名一致,UserMapper.xml中select语句如下:

<select id="getUserList" resultType="com.lesson.mybatis.entity.User">
	select id,name,age,phone_number phoneNumber from user
</select>
方法2: 在mybatis的核心配置文件中设置全局配置信息mapUnderscoreToCamelCase为true,将表中字段的下划线自动转换为驼峰,此方法仅适用于字段名的下划线转化为驼峰后恰好与类的属性名一致的情况。Mybatis-config.xml配置如下:

<?xml version="1.0" encoding="UTF-8" ?>
<!DOCTYPE configuration
        PUBLIC "-//mybatis.org//DTD Config 3.0//EN"
        "https://mybatis.org/dtd/mybatis-3-config.dtd">
<configuration>
    <settings>
        <!--将表中字段的下划线自动转换为驼峰-->
        <setting name="mapUnderscoreToCamelCase" value="true"/>
    </settings>
    <environments default="development">
        <environment id="development">
            <transactionManager type="JDBC"/>
            <!--mysql配置信息-->
            <dataSource type="POOLED">
                <!--mysql 5.x.x连接驱动用com.mysql.jdbc.Driver-->
                <!--mysql 8.x.x连接驱动用com.mysql.cj.jdbc.Driver-->
                <property name="driver" value="com.mysql.cj.jdbc.Driver"/>
                <property name="url" value="jdbc:mysql://localhost:3306/mybatis_lesson"/>
                <property name="username" value="root"/>
                <property name="password" value="12345678"/>
            </dataSource>
        </environment>
    </environments>
    <!--sql映射-->
    <mappers>
        <mapper resource="mapper/UserMapper.xml" />
    </mappers>
</configuration>
方法3:将select语句的resultType换为resultMap,在resultMap中配置字段名和属性值的对应关系,UserMapper.xml配置如下:

<?xml version="1.0" encoding="UTF-8" ?>
<!DOCTYPE mapper PUBLIC "-//mybatis.org//DTD Mapper 3.0//EN" "http://mybatis.org/dtd/mybatis-3-mapper.dtd">

<!--namespace=绑定一个对应的Dao/Mapper接口-->
<mapper namespace="com.lesson.mybatis.mapper.UserMapper">
    <resultMap id="user" type="com.lesson.mybatis.entity.User">
        <id property="id" column="id"></id>
        <result property="name" column="name"></result>
        <result property="age" column="age"></result>
        <result property="phoneNumber" column="phone_number"></result>
    </resultMap>

    <!--select查询语句-->
    <select id="getUserList" resultMap="user"> <!--resultMap="user"中的user与resultMap中的id相同-->
        select * from user
    </select>

</mapper>
二、 mybatis连接mysql(springboot工程)
1. 创建springboot工程
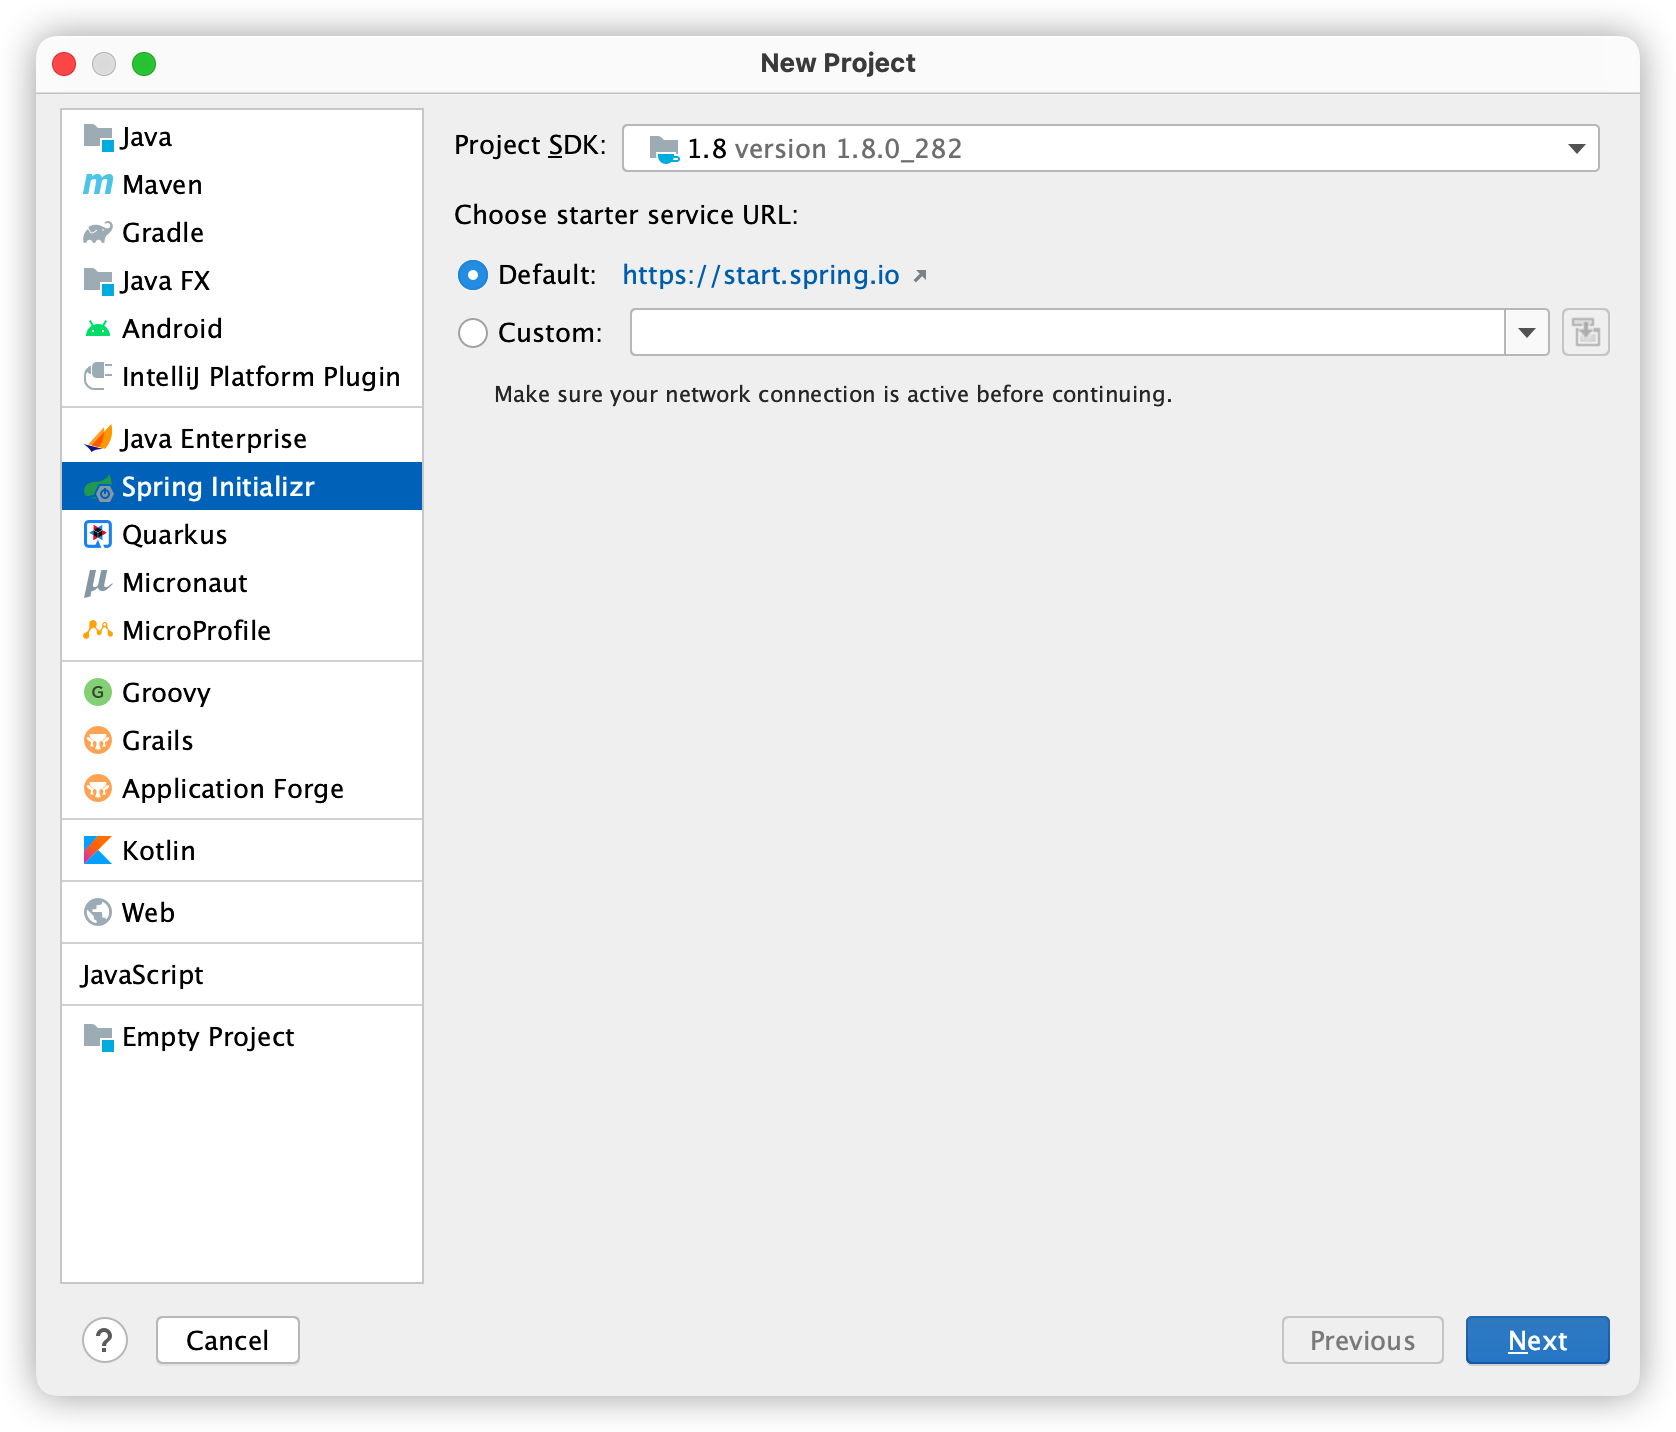
详见https://blog.csdn.net/weixin_43654975/article/details/128842227?spm=1001.2014.3001.5501
2. 修改springboot配置文件
配置配置ip和端口
server:
  ip: localhost
  port: 9090
配置数据库连接信息
spring:
  datasource:
    driver-class-name: com.mysql.cj.jdbc.Driver
    url: jdbc:mysql://localhost:3306/mybatis_lesson?serverTimezone=GMT%2b8
    username: root
    password: 12345678
完整配置文件如下:
server:
  ip: localhost
  port: 9090

spring:
  datasource:
    driver-class-name: com.mysql.cj.jdbc.Driver
    url: jdbc:mysql://localhost:3306/mybatis_lesson?serverTimezone=GMT%2b8
    username: root
    password: 12345678
3. 建立User类
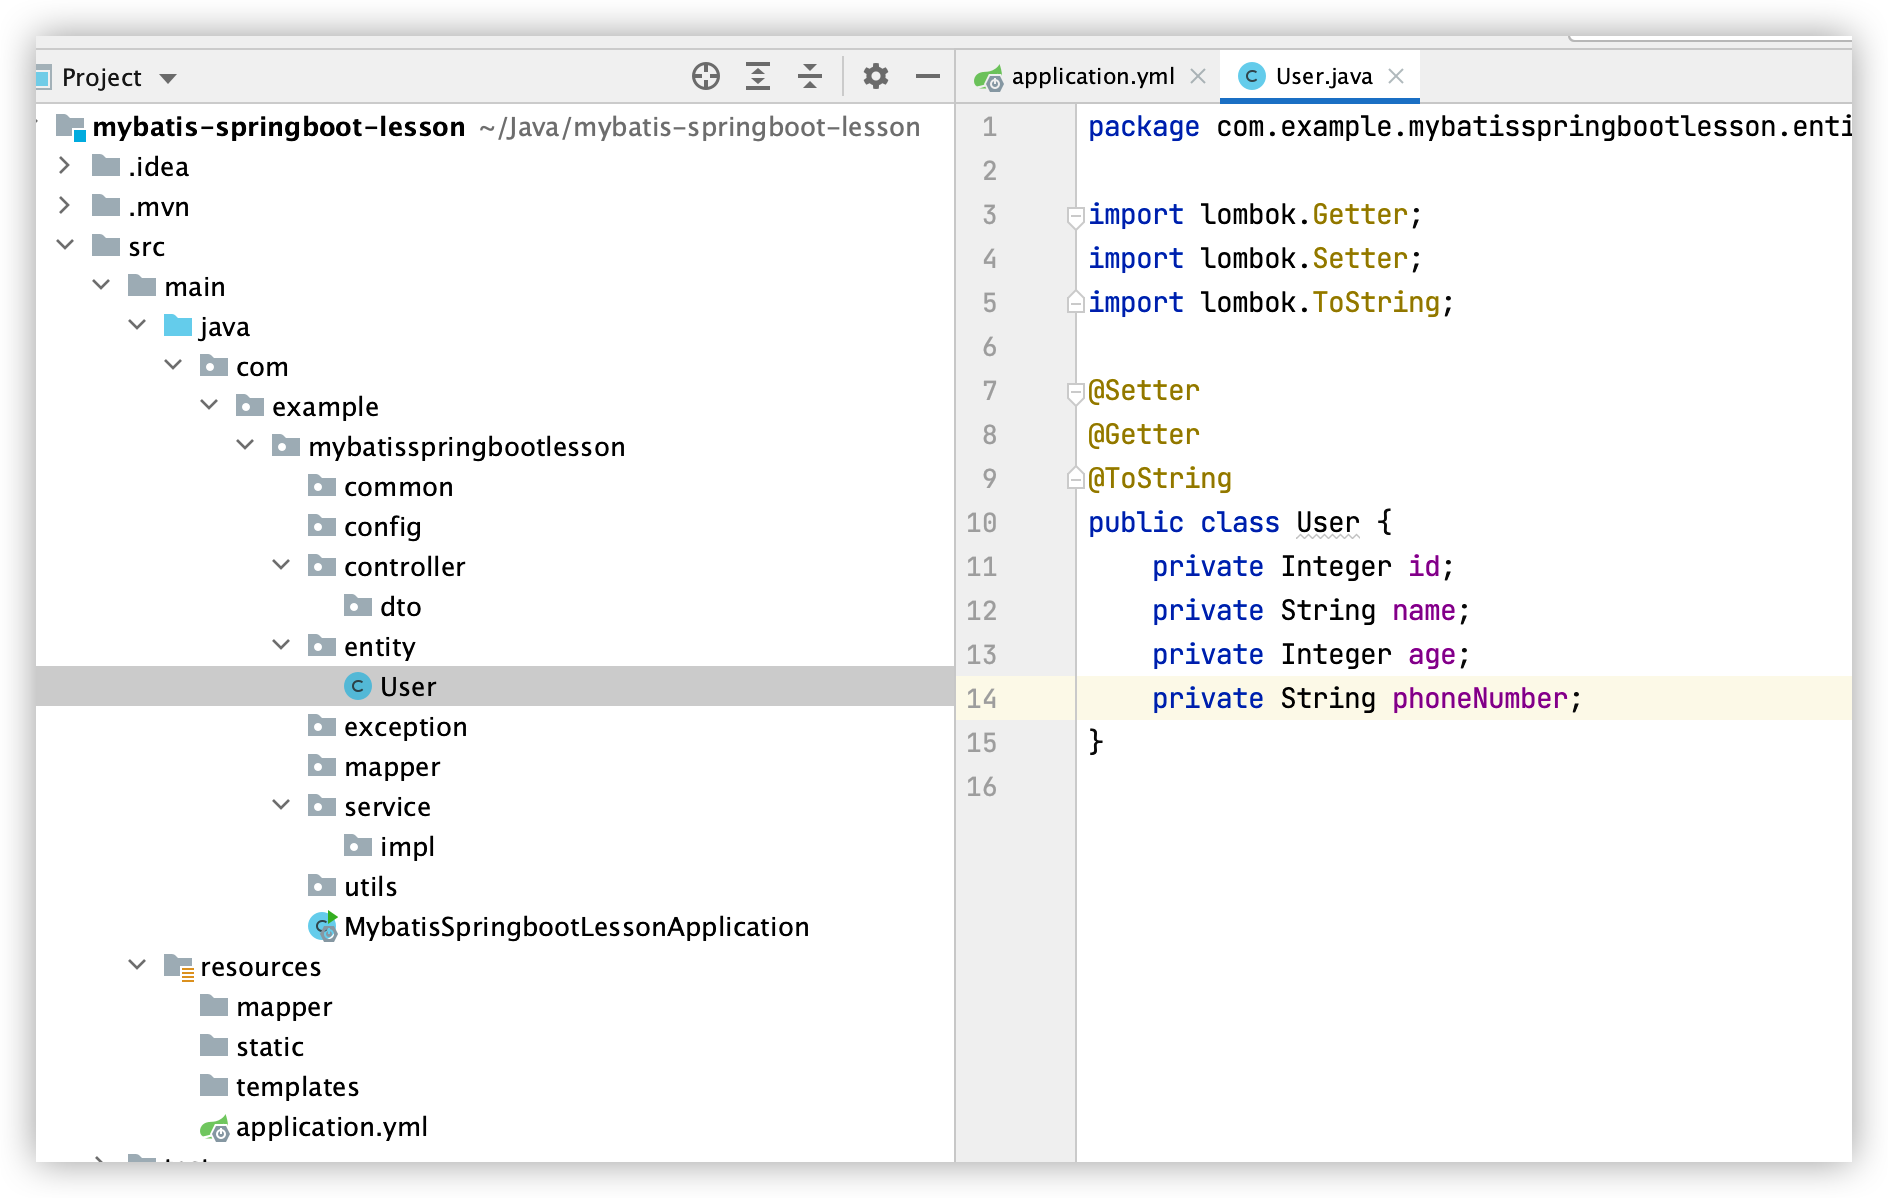
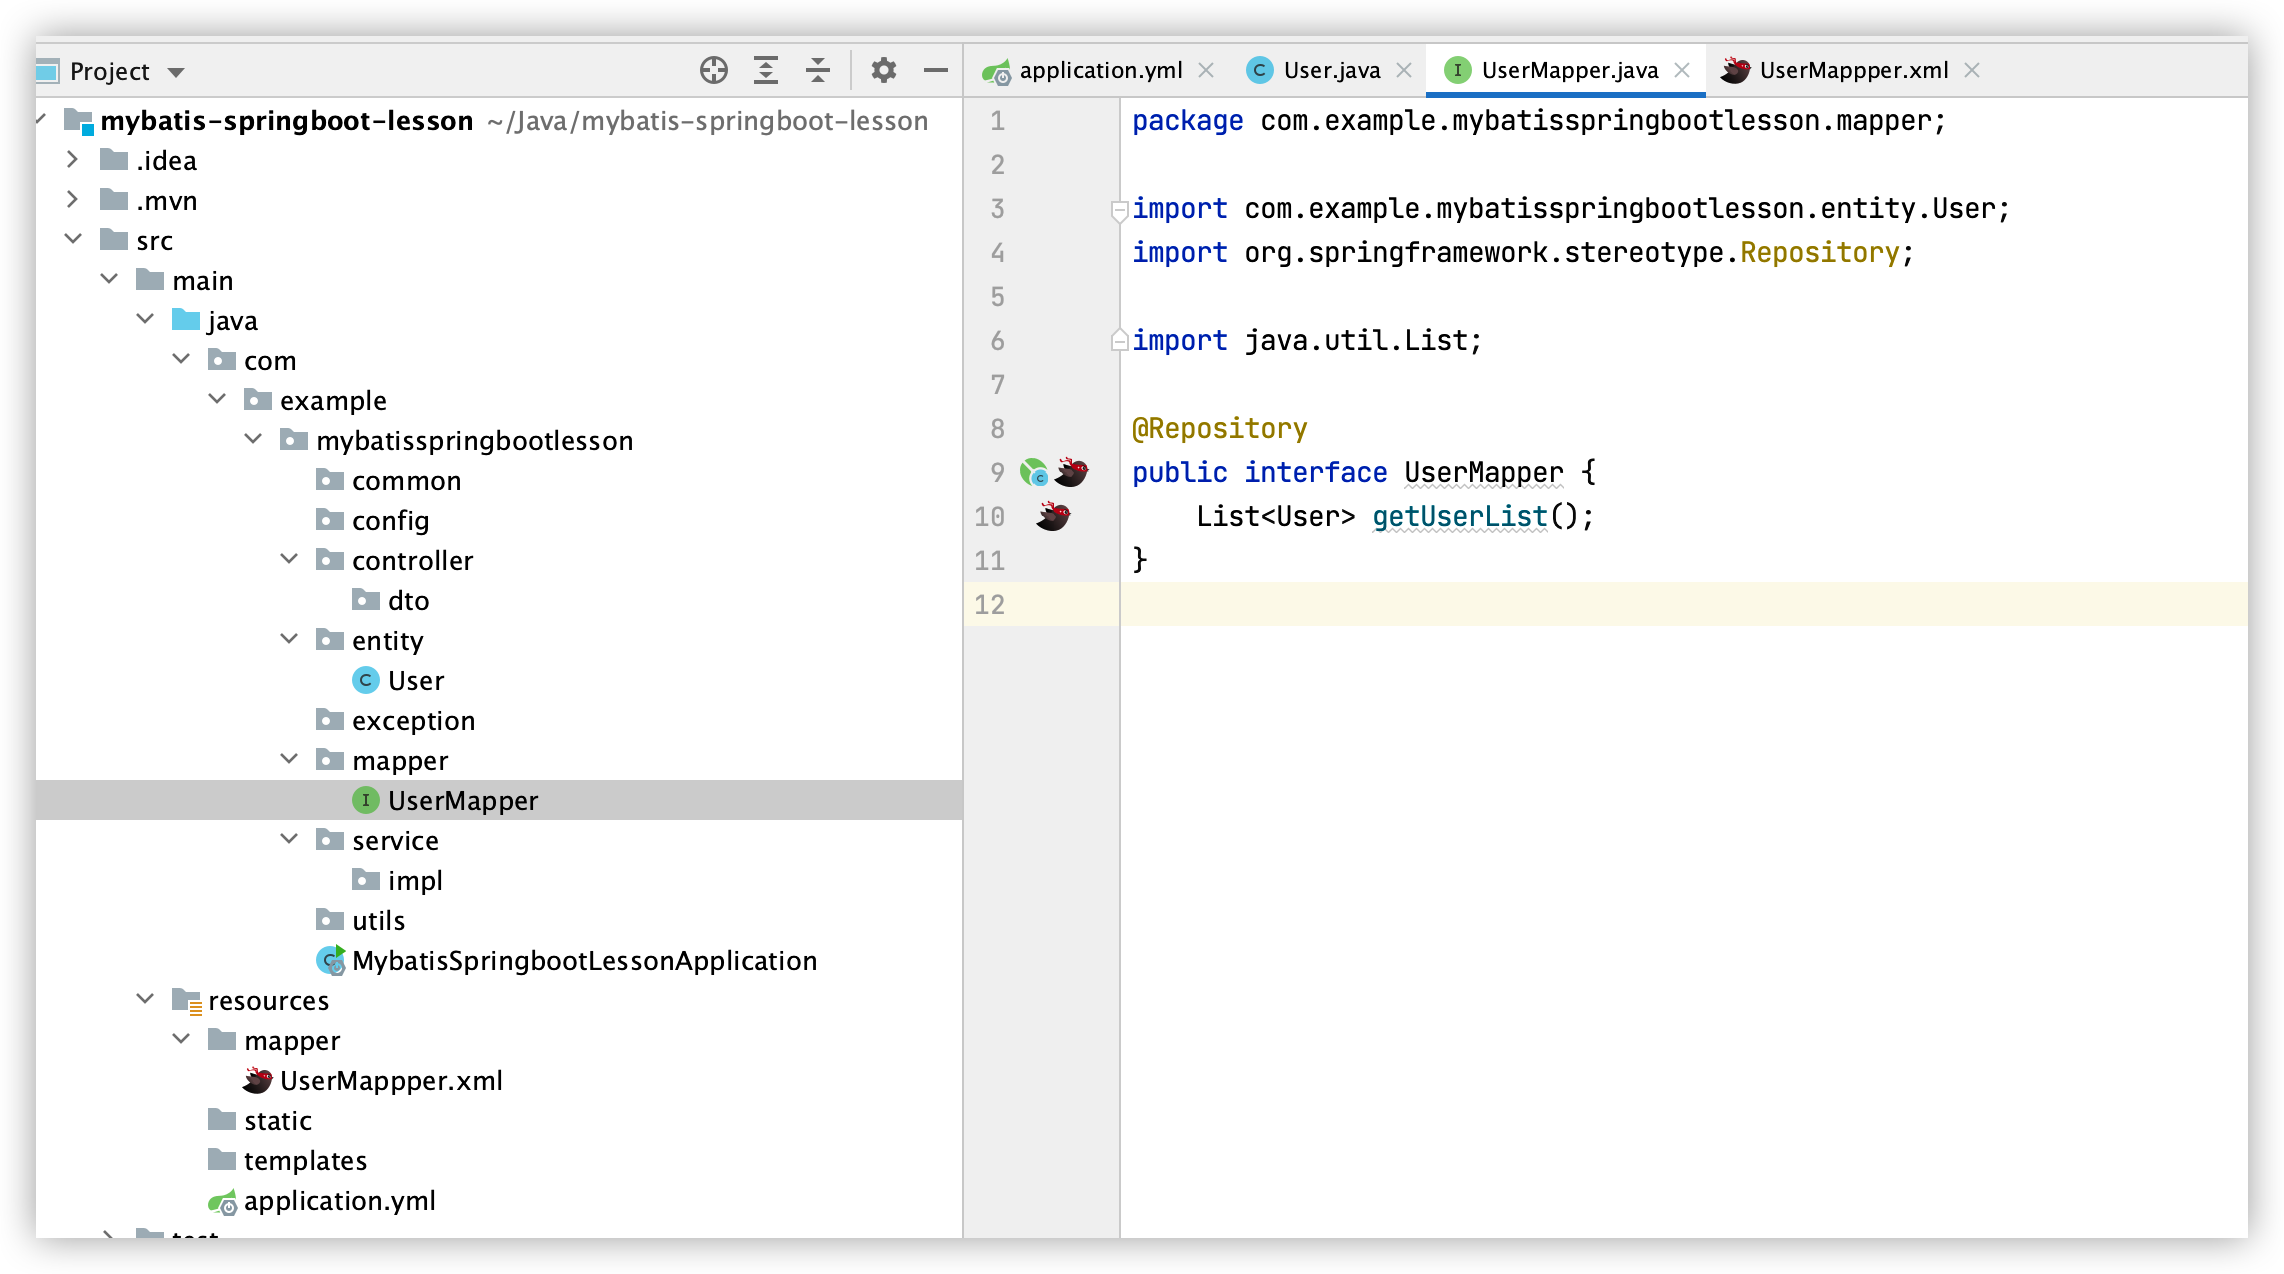
4. 建立UserMapper接口和UserMapper.xml
UserMapper接口
UserMapper.xml
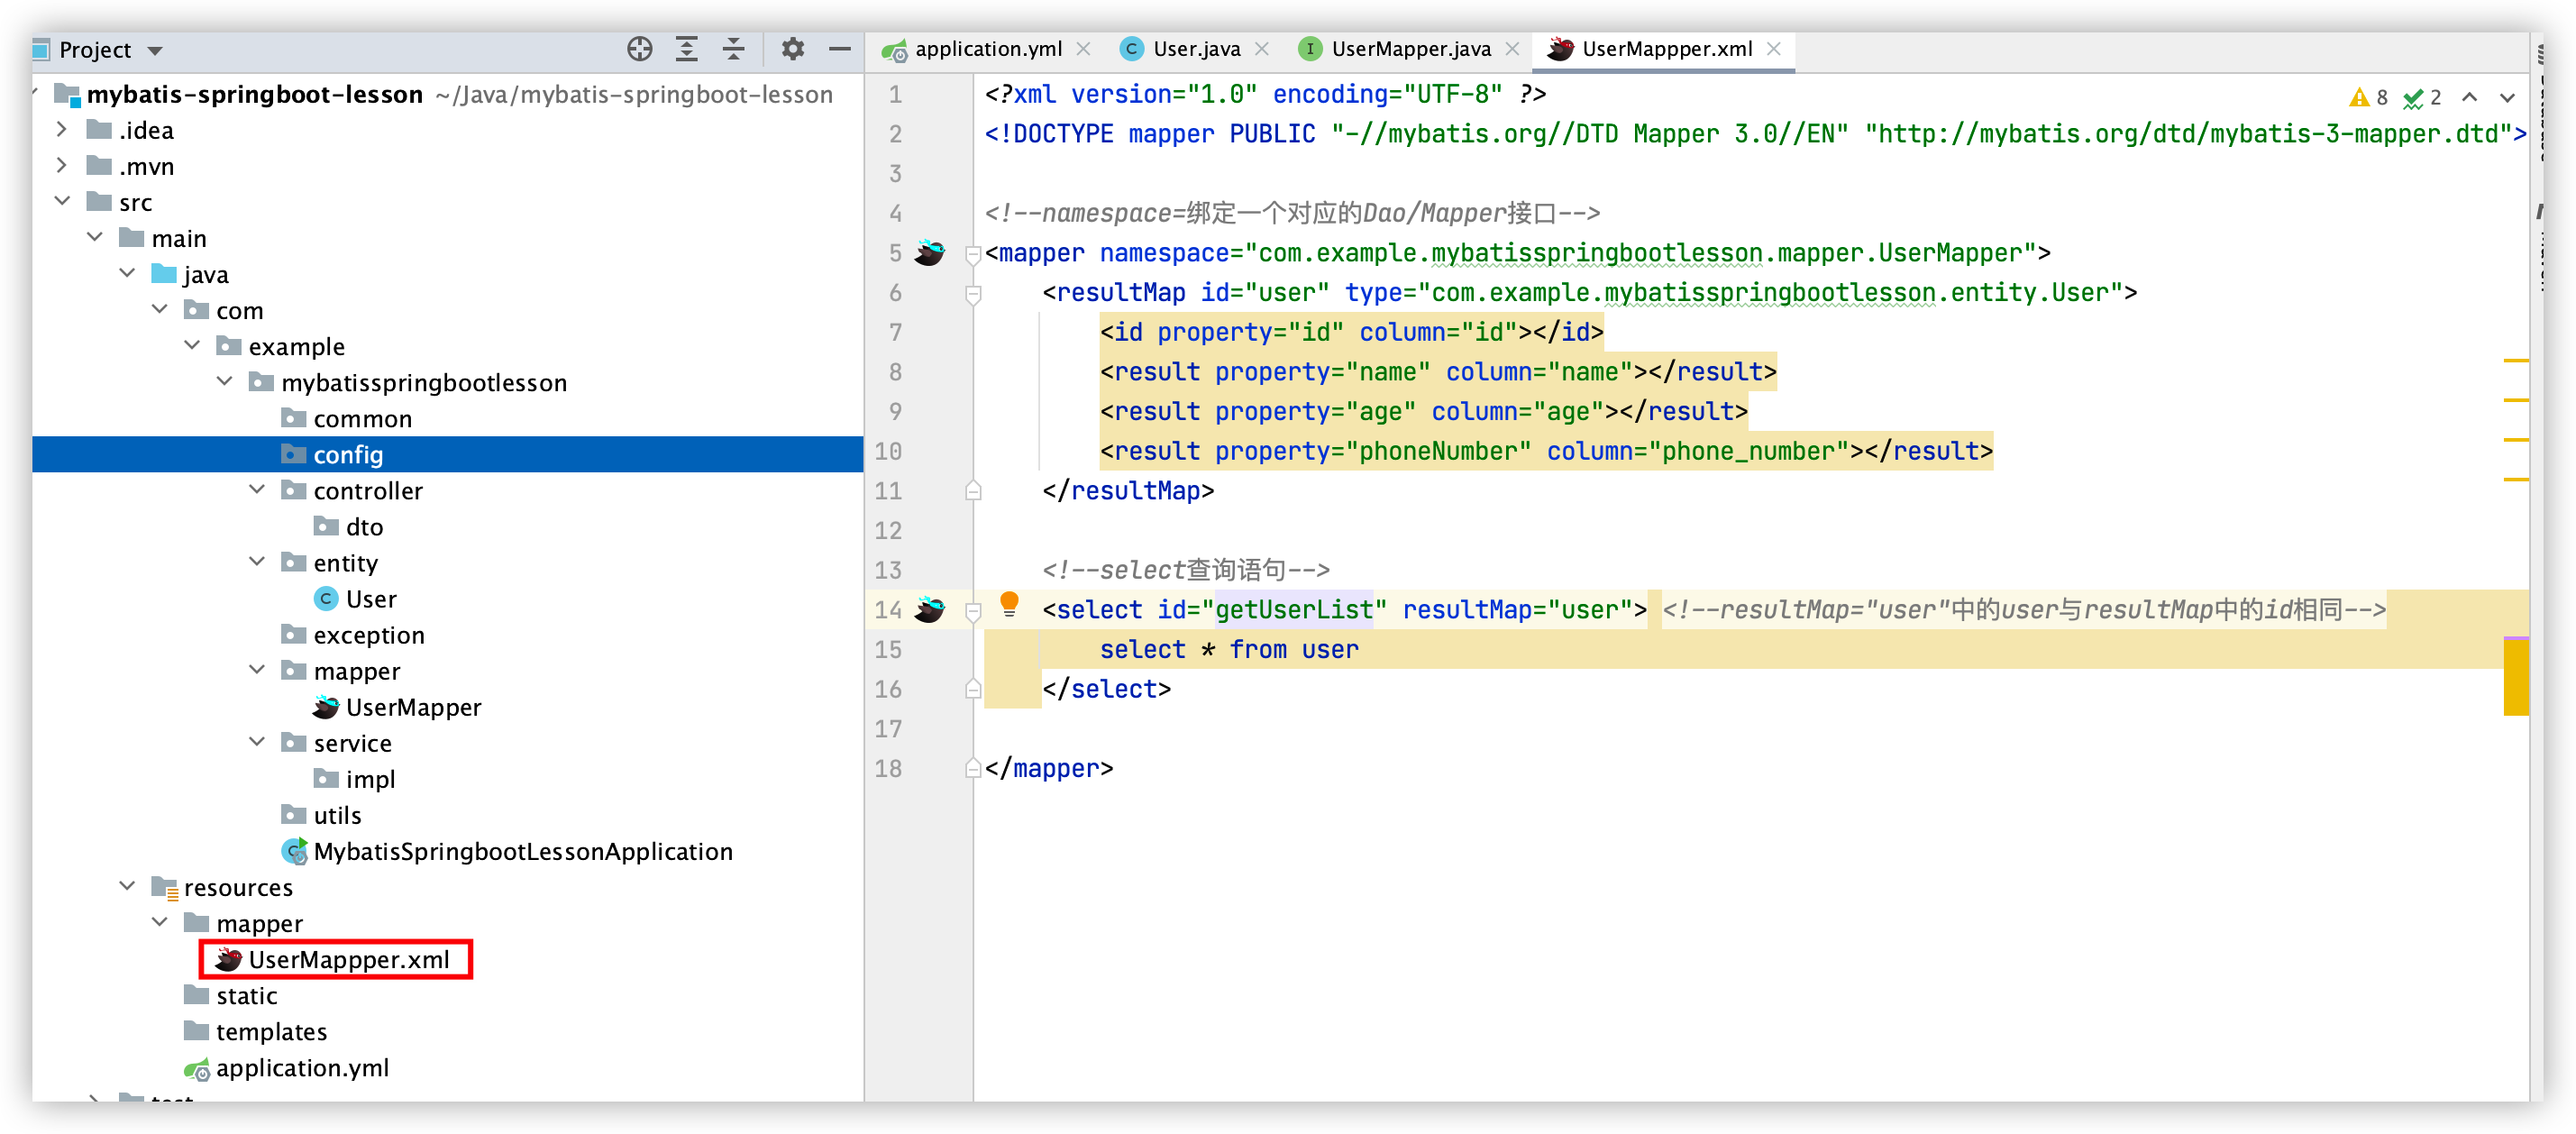
<?xml version="1.0" encoding="UTF-8" ?>
<!DOCTYPE mapper PUBLIC "-//mybatis.org//DTD Mapper 3.0//EN" "http://mybatis.org/dtd/mybatis-3-mapper.dtd">

<!--namespace=绑定一个对应的Dao/Mapper接口-->
<mapper namespace="com.example.mybatisspringbootlesson.mapper.UserMapper">
    <resultMap id="user" type="com.example.mybatisspringbootlesson.entity.User">
        <id property="id" column="id"></id>
        <result property="name" column="name"></result>
        <result property="age" column="age"></result>
        <result property="phoneNumber" column="phone_number"></result>
    </resultMap>

    <!--select查询语句-->
    <select id="getUserList" resultMap="user"> <!--resultMap="user"中的user与resultMap中的id相同-->
        select * from user
    </select>

</mapper>
在application.yml中添加配置mapper.xml文件的路径:
mybatis:
  mapper-locations:
    - classpath:mapper/*.xml
在程序入口类MybatisSpringbootLessonApplication中添加扫描,MybatisSpringbootLessonApplication内容如下:
package com.example.mybatisspringbootlesson;

import org.mybatis.spring.annotation.MapperScan;
import org.springframework.boot.SpringApplication;
import org.springframework.boot.autoconfigure.SpringBootApplication;

@SpringBootApplication
@MapperScan("com.example.mybatisspringbootlesson.mapper")
public class MybatisSpringbootLessonApplication {
    public static void main(String[] args) {
        SpringApplication.run(MybatisSpringbootLessonApplication.class, args);
    }
}
或
在UserMapper接口上添加注解@Mapper,UserMapper接口如下:
package com.example.mybatisspringbootlesson.mapper;

import com.example.mybatisspringbootlesson.entity.User;
import org.apache.ibatis.annotations.Mapper;
import org.springframework.stereotype.Repository;

import java.util.List;

@Repository
@Mapper //添加此注解
public interface UserMapper {
    List<User> getUserList();
}
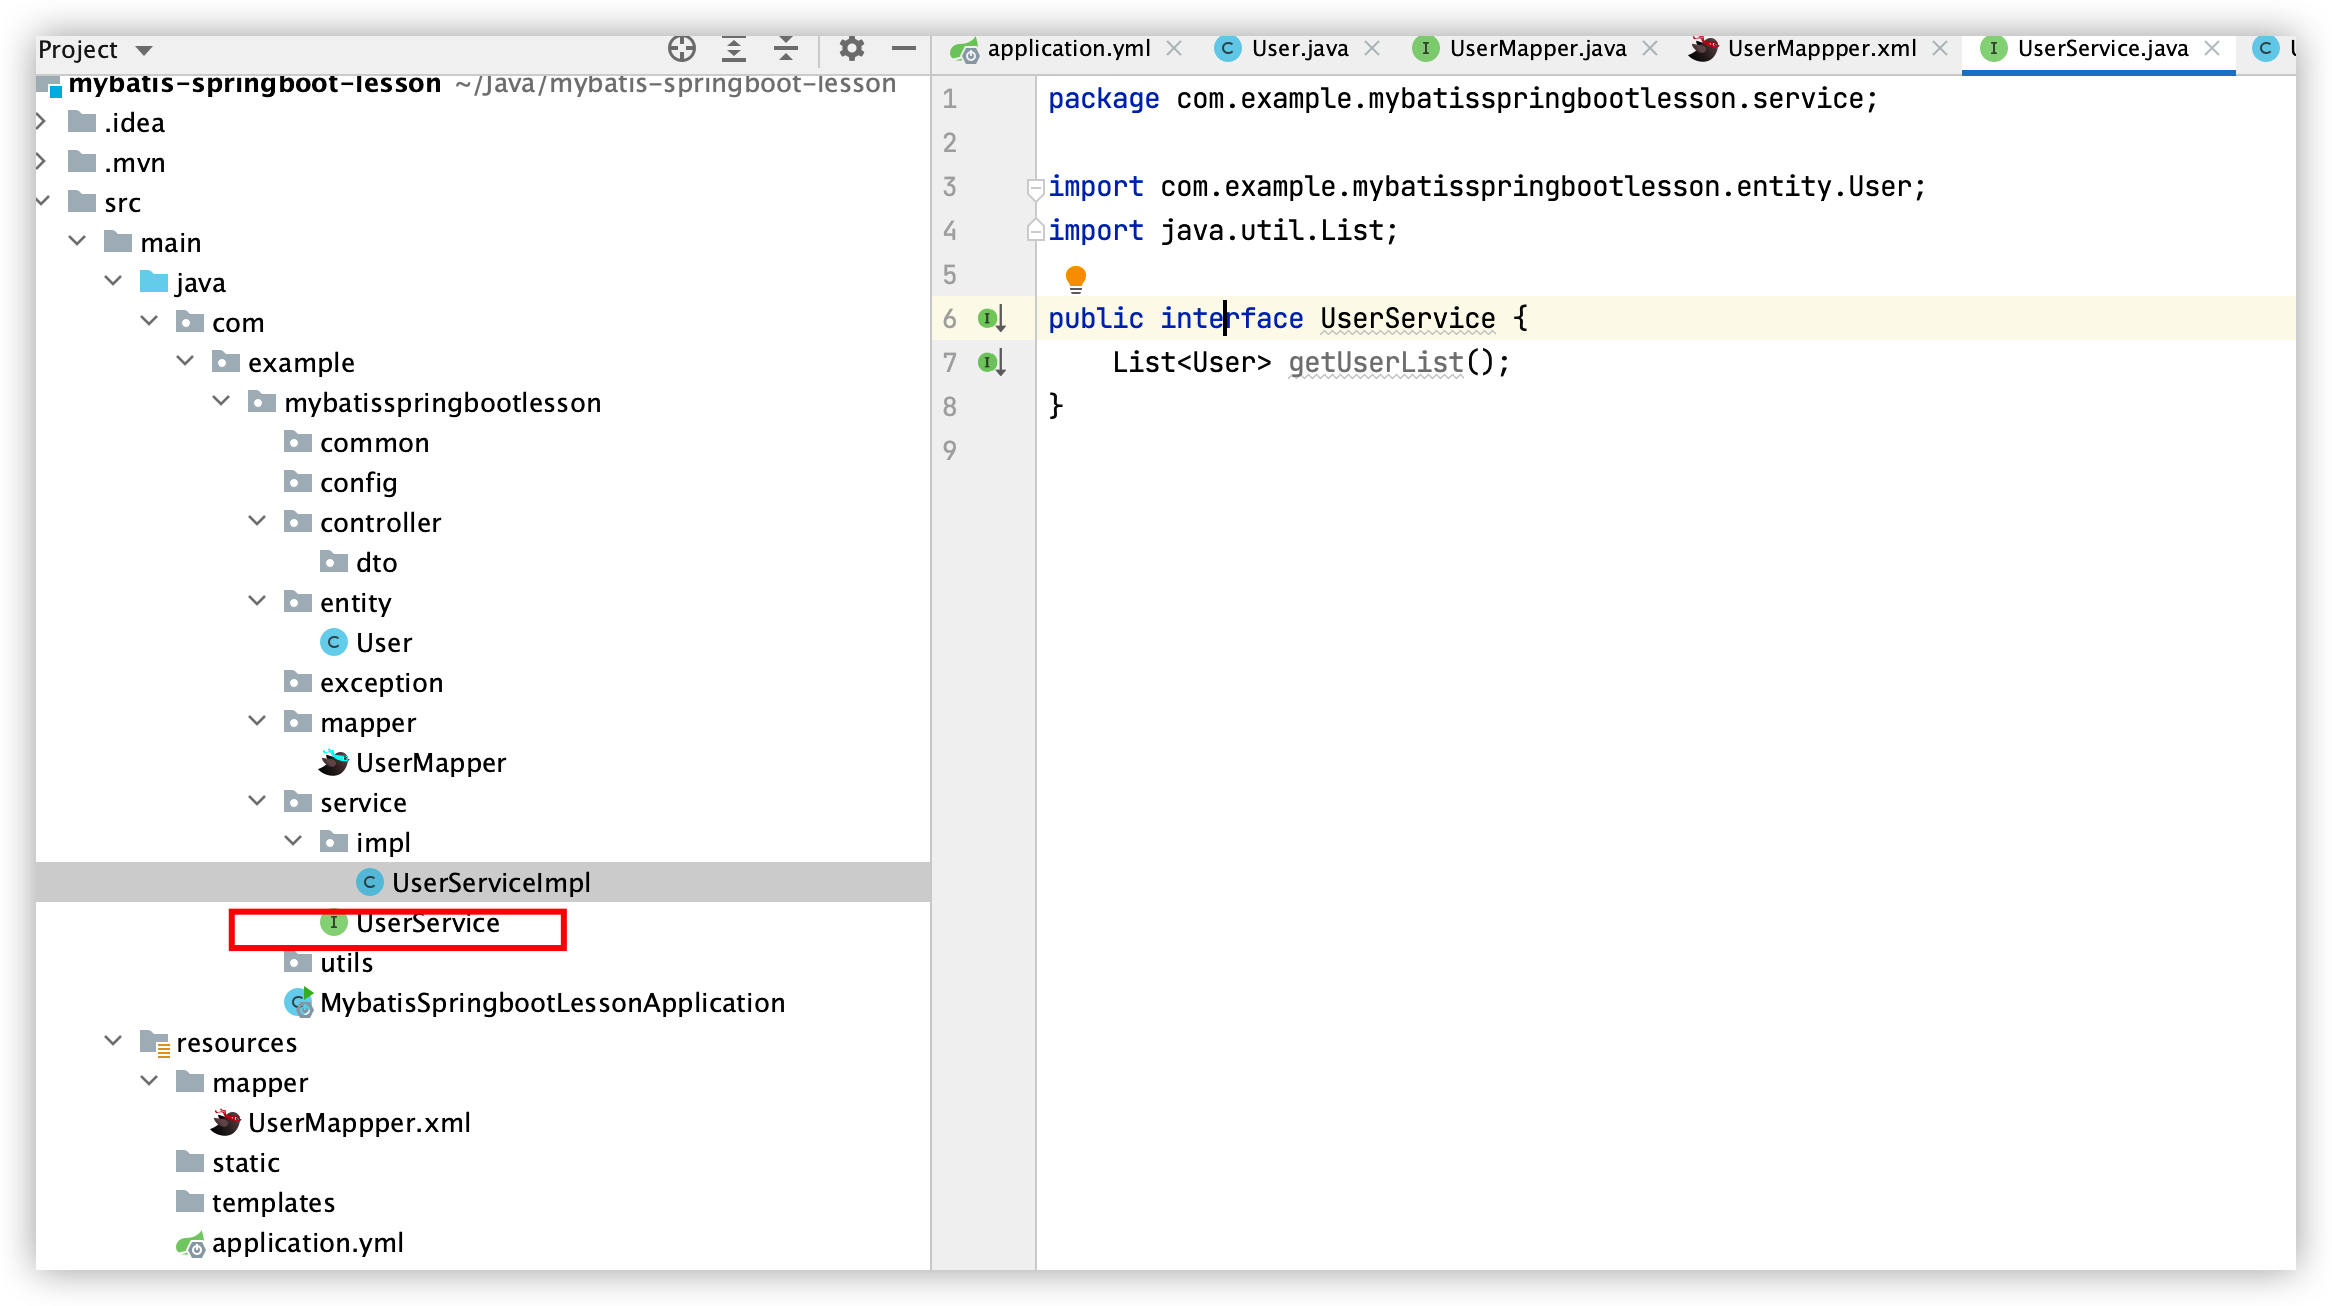
5. 建立业务逻辑层:UserService接口和UserServiceImpl类
UserService接口:
UserServiceImpl类
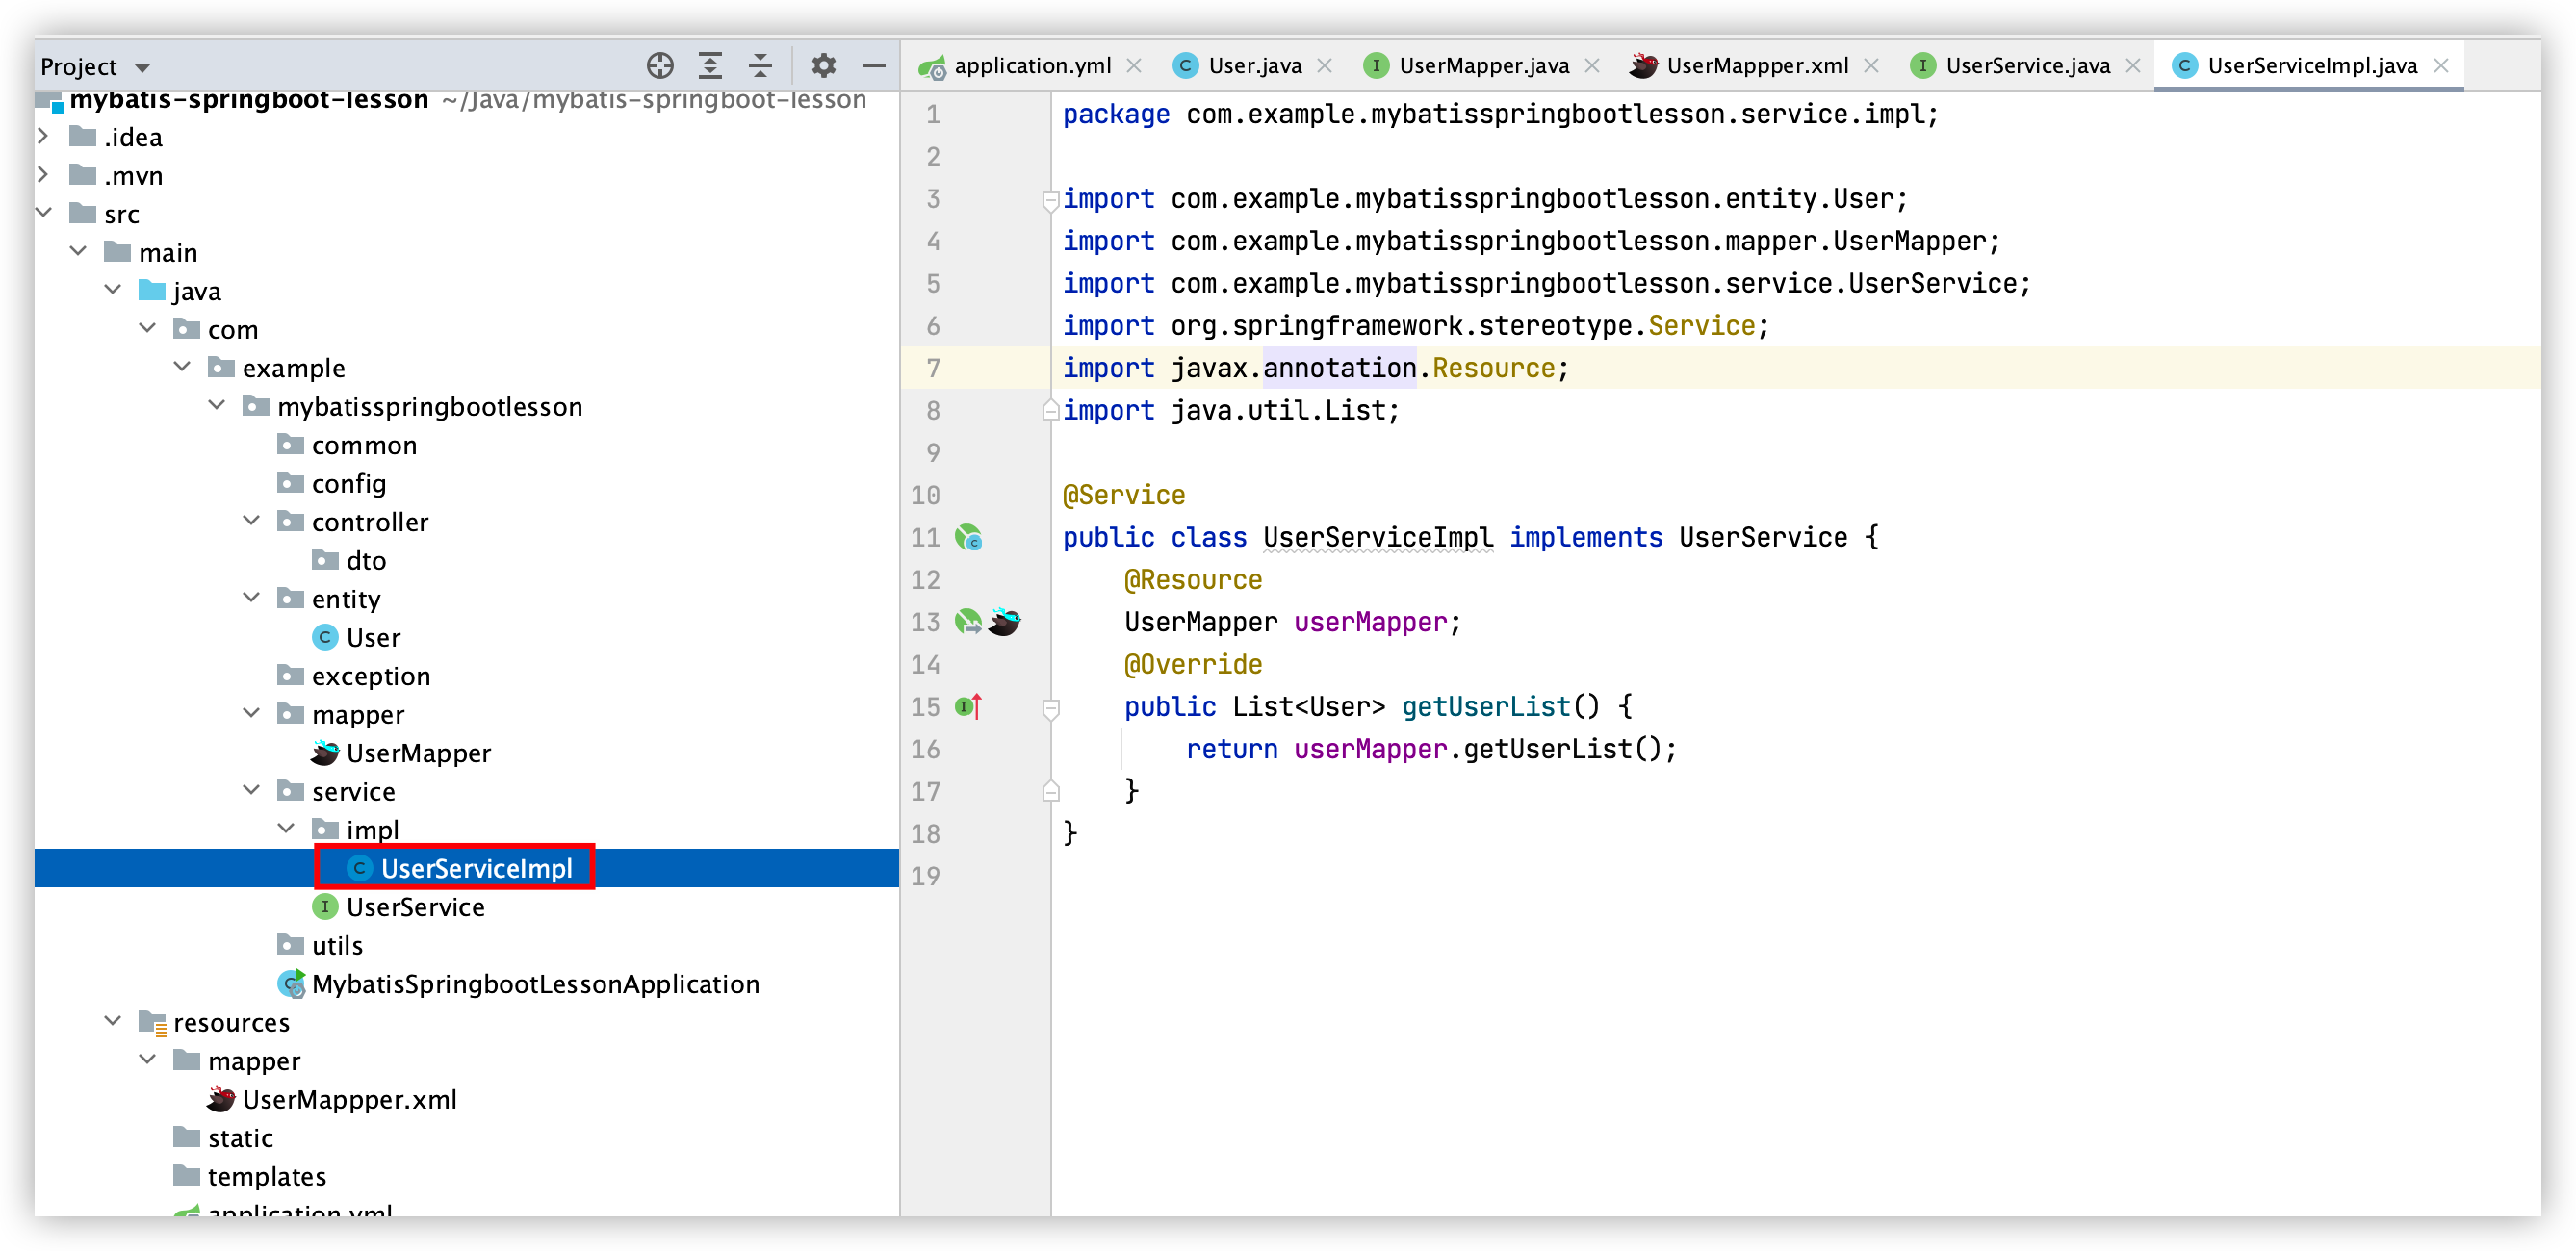
6. 建立页面展示层
UserController类:
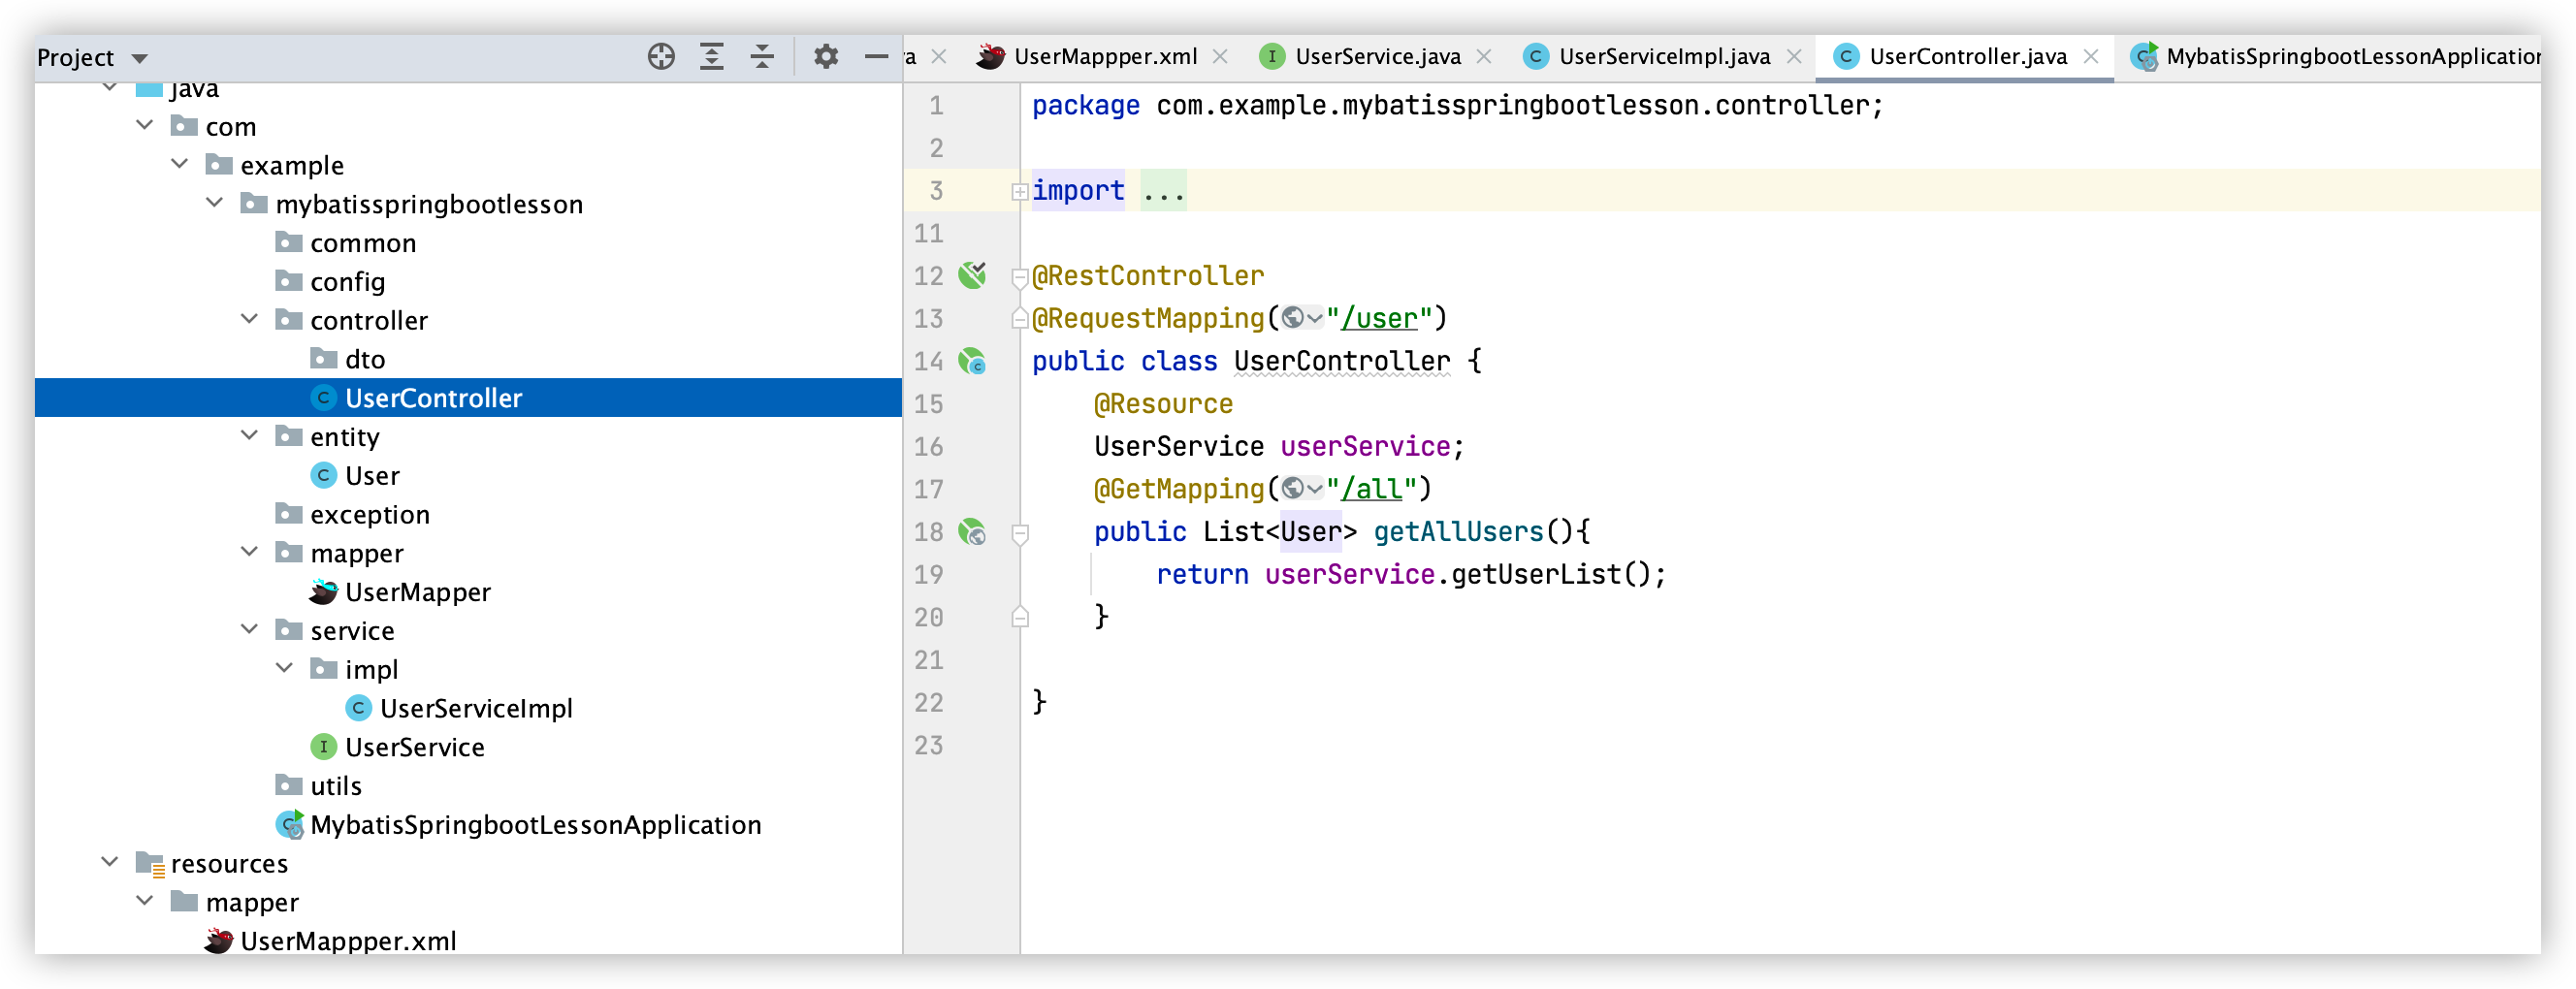
package com.example.mybatisspringbootlesson.controller;

import com.example.mybatisspringbootlesson.entity.User;
import com.example.mybatisspringbootlesson.service.UserService;
import org.springframework.web.bind.annotation.GetMapping;
import org.springframework.web.bind.annotation.RequestMapping;
import org.springframework.web.bind.annotation.RestController;
import javax.annotation.Resource;
import java.util.List;

@RestController
@RequestMapping("/user")
public class UserController {
    @Resource
    UserService userService;
    @GetMapping("/all")
    public List<User> getAllUsers(){
        return userService.getUserList();
    }
}
7. 测试
浏览器访问localhost:9090/user/all

三、mybatis增删改查语法(xml)
<?xml version="1.0" encoding="UTF-8" ?>
<!DOCTYPE mapper PUBLIC "-//mybatis.org//DTD Mapper 3.0//EN" "http://mybatis.org/dtd/mybatis-3-mapper.dtd">
<!--namespace=绑定一个对应的Dao/Mapper接口-->
<mapper namespace="com.lesson.mybatis.mapper.UserMapper">
<resultMap id="user" type="com.lesson.mybatis.entity.User">
<id property="id" column="id"></id>
<result property="name" column="name"></result>
<result property="age" column="age"></result>
<result property="phoneNumber" column="phone_number"></result>
</resultMap>
<!--select查询语句-->
<!--resultMap="user"中的user与resultMap中的id相同-->
<!--虽然UserMapper接口中定义的getUserList返回List<User>,但是UserMapper.xml中只需要写返回List元素的类型即可-->
<select id="getUserList" resultMap="user">
select * from user
</select>
<!--有参数传入时,要写明传入参数的类型parameterType="int"-->
<select id="getUserById" parameterType="int" resultMap="user">
select * from user where id=#{id} <!--传入的参数用#{}包裹-->
</select>
<!--insert插入语句-->
<!--对象中的属性,可以使用#{实体类的属性名}直接取出来-->
<!--insert默认返回值为受影响的行数-->
<insert id="addUser" parameterType="com.lesson.mybatis.entity.User">
insert into user (id, name, age, phone_number) values (#{id},#{name},#{age},#{phoneNumber});
</insert>
<!--使用参数useGeneratedKeys="true" keyProperty="javabean主键属性" keyColumn="数据库主键字段"后,会获得本次插入数据自增的主键。通过User实体类对象的getId()可以获取,java语句如下:-->
<!--
User user = new User(null,"json",20,"19911111235");
Integer integer = userMapper.addUser1(user);//integer为执行本次insert语句后受影响的行数
Integer id = user.getId();//获取刚刚插入数据的自增主键
-->
<insert id="addUser1" parameterType="com.lesson.mybatis.entity.User" useGeneratedKeys="true" keyProperty="id" keyColumn="id">
insert into user (id, name, age, phone_number) values (#{id},#{name},#{age},#{phoneNumber});
</insert>
<!--批量插入-->
<!--最终执行sql为:INSERT INTO user (id,name,age,phone_number) VALUES (?,?,?,?) , (?,?,?,?)-->
<insert id="addUserBatch" parameterType="list">
INSERT INTO user (id,name,age,phone_number)
VALUES
<!--item表示集合中每一个元素进行迭代时的别名,该选项为必选-->
<!--separator 表示在每次迭代之间以什么符号拼接sql语句,通常separator =","-->
<!--
collection ,在不同情况下,该属性的值不一样,该选项为必选,主要有以下3种情况:
1. 如果传入的是单参数且参数类型是一个List的时候,collection属性值为list
2. 如果传入的是单参数且参数类型是一个数组的时候,collection的属性值为array
3. 如果传入的参数是Map的时候,collection 的属性值为map 的key值
-->
<foreach collection ="list" item="user" separator =",">
(#{user.id},#{user.name},#{user.age},#{user.phoneNumber}) <!--一定要用#{item.属性}的方式-->
</foreach>
</insert>
<!--update更新语句-->
<!--insert返回值为受影响的行数。-->
<update id="updateUser" parameterType="com.lesson.mybatis.entity.User">
update user set name=#{name},age=#{age},phone_number=#{phoneNumber} where id = #{id}
</update>
<!--批量更新-->
<!--批量更新默认返回值不是受影响的行数-->
<!--mybatis默认是不支持批量更新的,如果想要进行批量更新,需要在连接数据库的地址上加一个配置:allowMultiQueries=true-->
<!--Mybatis-config.xml中的配置为:
<property name="url" value="jdbc:mysql://localhost:3306/mybatis_lesson?serverTimezone=GMT%2b8&allowMultiQueries=true"/>
-->
<!--application.yml中的配置为:
url: jdbc:mysql://localhost:3306/mybatis_lesson?serverTimezone=GMT%2b8&allowMultiQueries=true
-->
<!--最终的执行sql为:update user set name=?,age=?,phone_number=? where id=? ; update user set name=?,age=?,phone_number=? where id=?-->
<update id="updateUserBatch" parameterType="com.lesson.mybatis.entity.User">
<foreach collection="list" item="user" separator=";">
update user set name=#{user.name},age=#{user.age},phone_number=#{user.phoneNumber} where id=#{user.id}
</foreach>
</update>
<!--delete删除语句-->
<!--返回值为受影响的行数-->
<!--id=#{只有一个参数时,该参数名称任意}-->
<delete id="deleteUserById" parameterType="int" >
delete from user where id=#{id}
</delete>
<!--批量删除-->
<!--返回受影响的行数-->
<!--open和close不能省略-->
<!--最终的执行sql为:delete from user where id in ( ? , ? , ? )-->
<delete id="deleteUserBatch" parameterType="list">
delete from user where id in
<foreach collection="list" item="item" separator="," open="(" close=")">
#{item}
</foreach>
</delete>
<!--根据两个参数删除-->
<!--
mapper层接口的方法为Integer deleteUserByNameAndId(String name,Integer id);
因为name为方法传入的第0个参数,所以name=#{arg0},id为方法传入的第1个参数,所以id=#{arg1}
-->
<delete id="deleteUserByNameAndId" >
delete from user where id=#{arg1} and name=#{arg0}
</delete>
<!--万能的Map:实体类,或者数据库中的表,字段或者参数过多,可以使用Map-->
<!--
Dao层的方法为:
Integer addUserByMap(Map<String,Object> map);
service层的逻辑为:
Map<String, Object> map = new HashMap<String, Object>();
map.put("id",5);
map.put("name","John");
userMapper.addUserByMap(map)
-->
<insert id="addUserByMap" parameterType="map">
insert into user (name, age) values (#{name},#{age});
</insert>
<!--模糊查询-->
<!--dao层接口对应的方法为:List<User> getUserLikeName(String name);-->
<!--方式1-->
<select id="getUserLikeName" resultMap="user" >
select * from user where name like "%"#{name}"%"
</select>
<!--方式2-->
<select id="getUserLikeName" resultMap="user" >
select * from user where name like concat('%',#{name},'%')
</select>
</mapper>
四、Mybatis核心配置文件(Mybatis-config.xml)说明
<?xml version="1.0" encoding="UTF-8" ?>
<!DOCTYPE configuration
        PUBLIC "-//mybatis.org//DTD Config 3.0//EN"
        "https://mybatis.org/dtd/mybatis-3-config.dtd">
<configuration> <!--配置-->
    <properties></properties>(属性)
    <settings></settings>(设置)
    <typeAliases></typeAliases>(类型别名)
    <typeHandlers></typeHandlers>(类型处理器)
    <objectFactory></objectFactory>(对象工厂)
    <plugins></plugins>(插件)
    <environments>(环境配置)
        <environment>(环境变量)
            <transactionManager></transactionManager>(事务管理器)
            <dataSource></dataSource>(数据源)
        </environment>
    </environments>
    <databaseIdProvider></databaseIdProvider>(数据库厂商标识)
    <mappers></mappers>(映射器)
</configuration>
注意:
配置文件中的元素必须按照下面的顺序: properties?,settings?,typeAliases?,typeHandlers?,objectFactory?,objectWrapperFactory?,reflectorFactory?,plugins?,environments?,databaseIdProvider?,mappers?
<properties></properties>
使用<properties></properties>可以将外部的配置文件引入到核心配置文件中,编写一个配置文件db.properties,内容如下:
driver=com.mysql.jdbc.Driver
url=jdbc:mysql://localhost:3306/mybatis?useSSL=true&useUnicode=true&characterEncoding=UTF-8
username=root password=123456
在核心配置文件中引入:
<!--引入外部配置文件-->
<properties resource="db.properties">
  <property name="username" value="root"/>
  <property name="pwd" value="11111"/>
</properties>
**注意:**如果两个文件有同一个字段,优先使用外部配置文件的!
<typeAliases></typeAliases>
可以用来减少类完全限定名的冗余
<typeAliases>
  <typeAlias type="com.lesson.mybatis.entity.User" alias="User"/>
</typeAliases>
也可以指定一个包名,MyBatis 会在包名下面搜索需要的 Java Bean
<!--可以给实体类起别名,默认别名就为这个类的类名,首字母小写-->
<typeAliases>
  <package name="com.lesson.mybatis.entity"/>
</typeAliases>
在实体类比较少的时候,使用第一种方式。 如果实体类十分多,建议使用第二种。 第一种可以DIY别名,第二种则不行·,如果非要改,需要在实体上增加注解@Alias()
@Alias("user")
public class User {}
<settings></settings>
<settings>
		<setting name="logImpl" value="STDOUT_LOGGING" /> 指定 MyBatis 所用日志的具体实现,未指定时将自动查找。可选值为:SLF4J\LOG4J\LOG4J2\JDK_LOGGING\COMMONS_LOGGING\STDOUT_LOGGING\NO_LOGGING
</settings>
STDOUT_LOGGING日志:
标准日志工厂,不需要导包就可以使用,可以在控制台打印执行的sql语句。打印的日志信息格式如下:
		//初始化StdOutImpl类,其实就是这个STDOUT_LOGGING类
    Logging initialized using 'class org.apache.ibatis.logging.stdout.StdOutImpl' adapter.
    ....
    //打开JDBC连接
    Opening JDBC Connection
    Created connection 1293680848.
    Setting autocommit to false on JDBC Connection [com.mysql.cj.jdbc.ConnectionImpl@4d1c00d0]
    //查询语句
    ==>  Preparing: select * from mybatis.user t where t.id = ?
    //输入参数等信息
    ==> Parameters: 2(Integer)
    <==    Columns: id, name, pwd
    <==        Row: 2, RZP1, 123
    <==      Total: 1
    User{id=2, name='RZP1', password='123'}
    Resetting autocommit to true on JDBC Connection [com.mysql.cj.jdbc.ConnectionImpl@4d1c00d0]
    Closing JDBC Connection [com.mysql.cj.jdbc.ConnectionImpl@4d1c00d0]
    //连接放回连接池
    Returned connection 1293680848 to pool.
LOG4J日志:
Log4j是Apache的一个开源项目,通过使用Log4j,我们可以控制日志信息输送的目的地是控制台、文件、GUI组件,甚至是套接口服务器、NT的事件记录器、UNIX/Syslog/守护进程等. 有如下特点:
1. 可以控制每一条日志的输出格式;
2. 通过定义每一条日志信息的级别,我们能够更加细致地控制日志的生成过程。---意思就是可以分等级输出:info/Eception/Error/Debug...
3. 可以通过一个配置文件来灵活地进行配置,而不需要修改应用的代码。
详见LOG4J使用手册。https://www.cnblogs.com/renzhongpei/p/12578461.html
<settings>
    <setting name="useGeneratedKeys" value="false"/> 对于支持自动生成记录主键的数据库,如:MySQL,SQL Server,若设置useGeneratedKeys参数值为true,则在执行添加记录之后可以获取到数据库自动生成的主键ID。在settings元素中设置useGeneratedKeys是一个全局参数,但是只会对接口映射器产生影响,对mapper.xml映射器不起效

    <setting name="mapUnderscoreToCamelCase" value="false"/>把数据库字段的下划线映射成JavaBean小驼峰命名
</settings>
<mappers></mappers>
目的:注册绑定我们的Mapper文件,每一个Mapper.XML都需要在Mybatis核心配置文件中注册!
方式一:
<mappers>
  <mapper resource="mapper/UserMapper.xml"/>
</mappers>
方式二:使用class文件绑定注册
<mappers>
  <mapper class="com.lesson.mybatis.mapper.UserMapper"/>
</mappers>
方式三: 使用扫描包(dao层)进行注入绑定
<mappers>
  <package name="com.lesson.mybatis.mapper"/>
</mappers>
**注意:**使用方式二和方式三时,接口和对应的Mapper.xml映射文件必须同名!且接口和对应的Mapper.xml映射文件必须在同一个包下!且需要在maven中pom.xml文件中增加配置,因为IDEA maven项目默认不会把src下除java文件外的文件打包到classes文件夹,pom.xml内容如下:
<build>
        <resources>
            <resource>
                <directory>src/main/java</directory>
                <includes>
                    <include>**/*.xml</include>
                </includes>
                <!--默认是true-->
                <!--<filtering>true</filtering>-->
            </resource>
        </resources>
</build>
五、生命周期和作用域
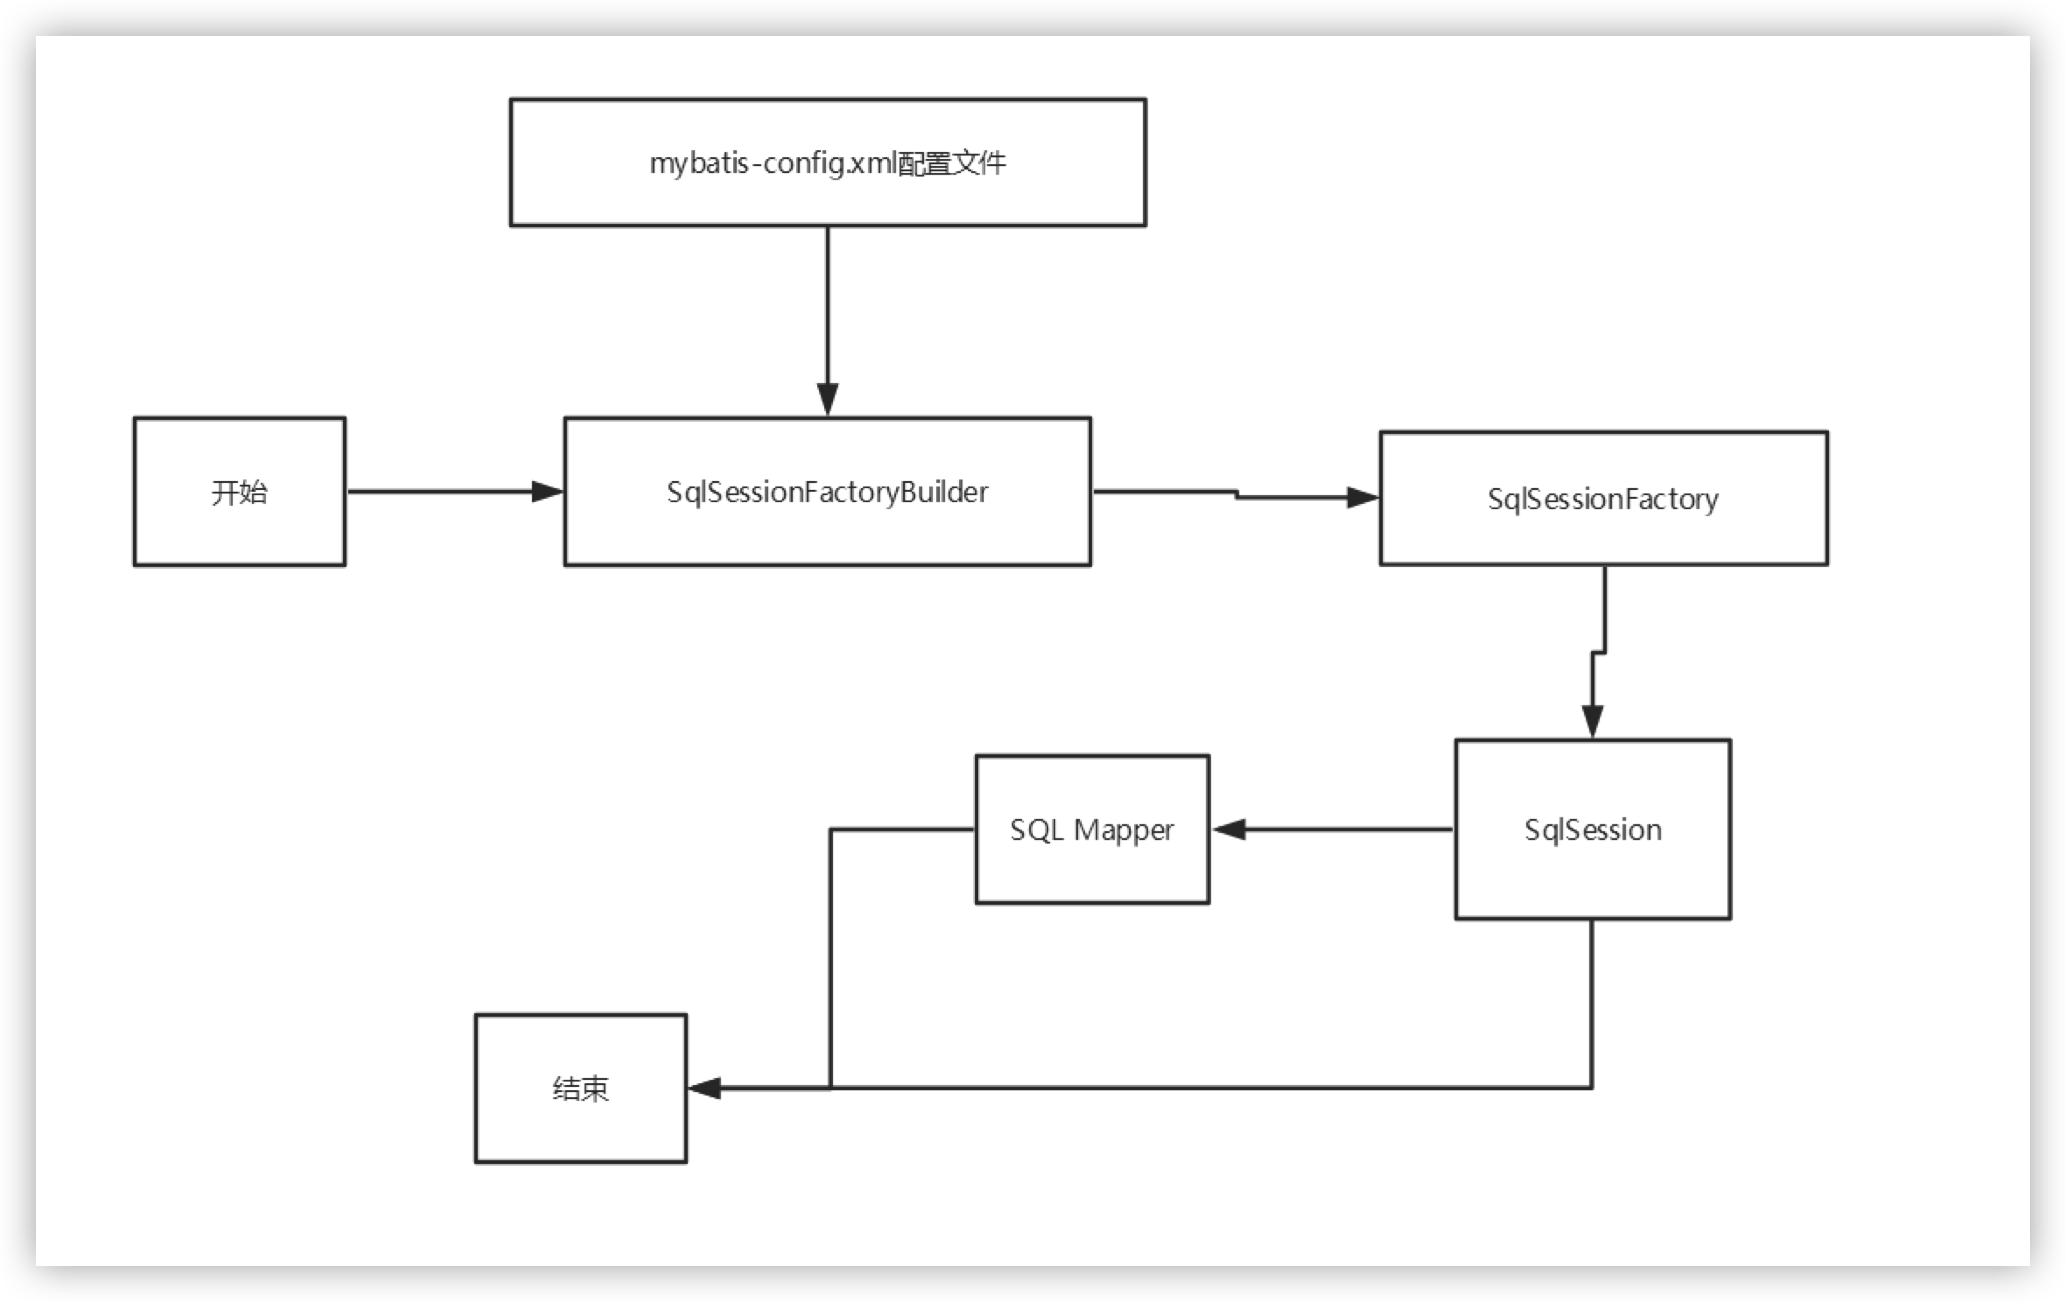
String resource = "Mybatis-config.xml"; //mybatis配置文件
InputStream inputStream = Resources.getResourceAsStream(resource);
SqlSessionFactory sqlSessionFactory = new SqlSessionFactoryBuilder().build(inputStream);
SqlSession sqlSession = sqlSessionFactory.openSession();
UserMapper userMapper = sqlSession.getMapper(UserMapper.class);
Integer integer = userMapper.getAllUser();
sqlSession.commit();
sqlSession.close();
SqlSessionFactoryBuilder:
? 一旦创建了 SqlSessionFactory,就不再需要它了,局部变量
SqlSessionFactory:
? 可以想象为 :数据库连接池。SqlSessionFactory 一旦被创建就应该在应用的运行期间一直存在,没有任何理由丢弃它或重新创建另一个实例,因此 SqlSessionFactory 的最佳作用域是应用作用域。最简单的就是使用单例模式或者静态单例模式。
SqlSession:
? 连接到连接池的一个请求,SqlSession 的实例不是线程安全的,因此是不能被共享的,所以它的最佳的作用域是请求或方法作用域。用完之后需要赶紧关闭,否则资源被占用!
六、 分页
6.1 简单直接的分页方式:Sql中使用Limit分页
sql语句中使用limit进行数据的提取(分页),但是limit不通用,是mysql特有的,其他数据库中没有。limit是sql语句最后执行的一个环节。
select * from user limit m, n
#其中m是指记录开始的index,从0开始,表示第一条记录;m,n是指从m+1条开始,取n条。
select * from user limit 2, 4;
#即从第3条开始,取出4条记录。
select * from user limit 0, 5;
#等价于 select * from user limit 5;
#等同于limit 5;
limit分页公式 :
#currentPage:当前页
#pageSize:每页显示的数量
select * from user limit (currentPage-1) × pageSize,pageSize
实例:
Dao层:UserMapper.java
@Mapper
public interface UserMapper {
    List<User> getUserByPage(
      @Param("currentPage") Integer currentPage, @Param("pageSize") Integer pageSize);
}
UserMapper.xml
<select id="getUserByPage" resultType="com.example.mybatisspringbootlesson.entity.User">
  select * from user limit #{currentPage},#{pageSize}
</select>
Service层:UserService.java
public interface UserService {
    List<User> getUserByPage(Integer currentPage,Integer pageSize);
}
UserServiceImpl.java
@Service
public class UserServiceImpl implements UserService {
    @Resource
    UserMapper userMapper;
    @Override
    public List<User> getUserByPage(Integer currentPage,Integer pageSize) {
        return userMapper.getUserByPage((currentPage-1)*pageSize,pageSize);//分页公式
    }
}
Controller层:UserController
@RestController
@RequestMapping("/user")
public class UserController {
    @Resource
    UserService userService;
    @GetMapping("/page")
    public List<User> getUserByPage(
      @RequestParam("currentPage") Integer currentPage,
      @RequestParam("pageSize") Integer pageSize){
        return userService.getUserByPage(currentPage,pageSize);
    }
}
在Sql中使用Limit分页时,需要先写一个查询count的select语句,然后再写一个真正分页查询的语句,当查询条件多了之后,会浪费大量的时间来写 count 和 select。因此我们可以借助分页插件: pagehelper,pagehelper 是一个强大实用的 MyBatis 分页插件,可以帮助我们快速的实现MyBatis分页功能,而且pagehelper有个优点是,分页和Mapper.xml完全解耦,并以插件的形式实现,对Mybatis执行的流程进行了强化,这有效的避免了我们需要直接写分页SQL语句来实现分页功能。
6.2 使用分页插件分页:pagehelper
-
在 pom.xml 文件中添加分页插件依赖包
<!-- pagehelper --> <dependency> <groupId>com.github.pagehelper</groupId> <artifactId>pagehelper-spring-boot-starter</artifactId> <version>1.4.1</version> </dependency> -
在 application.yml 配置文件中添加分页插件有关的配置。
# pagehelper pagehelper: helperDialect: mysql reasonable: true supportMethodsArguments: true params: count=countSql -
在 DAO 层添加一个分页查找方法。分页查询方法和不分页查询全部数据的方法除了方法名之外,其他几乎一样。UserMapper.java内容如下:
@Mapper public interface UserMapper { //不分页查询全部数据 List<User> getUserList(); //分页查询全部数据 List<User> selectPage(); } -
UserMapper.xml 中加入selectPage的实现。UserMapper.xml中selectPage()方法的具体实现就是不分页查找全部记录的select SQL语句,并不需要写分页SQL,分页插件会拦截查询请求,并读取前台传来的分页查询参数重新生成分页查询语句。
<?xml version="1.0" encoding="UTF-8" ?> <!DOCTYPE mapper PUBLIC "-//mybatis.org//DTD Mapper 3.0//EN" "http://mybatis.org/dtd/mybatis-3-mapper.dtd"> <!--namespace=绑定一个对应的Dao/Mapper接口--> <mapper namespace="com.example.mybatisspringbootlesson.mapper.UserMapper"> <resultMap id="user" type="com.example.mybatisspringbootlesson.entity.User"> <id property="id" column="id"></id> <result property="name" column="name"></result> <result property="age" column="age"></result> <result property="phoneNumber" column="phone_number"></result> </resultMap> <!--不分页查询全部数据--> <select id="getUserList" resultMap="user"> select * from user </select> <!--分页查询全部数据--> <select id="selectPage" resultMap="user"> select * from user </select> </mapper> -
编写Service层,Service层通过调用DAO层分页查询方法来完成分页查询。**可以在Service层统一封装分页查询的请求和结果类,从而避免因为替换ORM框架而导致服务层、控制层的分页接口也需要变动的情况,替换ORM框架也不会影响服务层以上的分页接口,起到了解耦的作用。**UserService.java内容如下:
public interface UserService {
  	//不分页查询全部数据
    List<User> getUserList();
  	//分页查询全部数据,其中PageRequest和PageResult都是自定义类,分别封装了统一分页查询请求和统一分页查询结果
    PageResult selectPage(PageRequest pageRequest);
}
PageRequest (PageRequest类写在DTO包内) 内容如下:
package com.example.mybatisspringbootlesson.controller.dto;
import lombok.Data;

@Data
public class PageRequest {
    //当前页码
    private int pageNum;
    //每页数量
    private int pageSize;
}
PageResult( PageResult类写在DTO包内 )内容如下:
package com.example.mybatisspringbootlesson.controller.dto; import lombok.Data; import java.util.List; @Data public class PageResult { //当前页码 private int pageNum; //每页显示的数量 private int pageSize; //数据总数 private long totalSize; //页码总数 private int totalPages; //具体数据 private List<?> data; } -
编写Service层接口的实现类。UserServiceImpl.java通过调用分页插件完成最终的分页查询,关键代码是 PageHelper.startPage(pageNum, pageSize),将前台分页查询参数传入并拦截MyBtis执行实现分页效果。
package com.example.mybatisspringbootlesson.service.impl; import com.example.mybatisspringbootlesson.controller.dto.PageRequest; import com.example.mybatisspringbootlesson.controller.dto.PageResult; import com.example.mybatisspringbootlesson.entity.User; import com.example.mybatisspringbootlesson.mapper.UserMapper; import com.example.mybatisspringbootlesson.service.UserService; import com.github.pagehelper.PageHelper; import com.github.pagehelper.PageInfo; import org.springframework.stereotype.Service; import javax.annotation.Resource; import java.util.List; @Service public class UserServiceImpl implements UserService { @Resource UserMapper userMapper; /** * 不分页查询全部数据 * @return */ @Override public List<User> getUserList() { return userMapper.getUserList(); } /** * 分页查询全部数据 * @param pageRequest * @return */ @Override public PageResult selectPage(PageRequest pageRequest) { int pageNum = pageRequest.getPageNum(); int pageSize = pageRequest.getPageSize(); PageHelper.startPage(pageNum, pageSize); List<User> sysMenus = userMapper.selectPage();//此语句需要根据实际需求修改,其他语句皆为固定写法 PageInfo<User> userPageInfo = new PageInfo<User>(sysMenus); PageResult pageResult = new PageResult(); pageResult.setPageNum(userPageInfo.getPageNum()); pageResult.setPageSize(userPageInfo.getPageSize()); pageResult.setTotalSize(userPageInfo.getTotal()); pageResult.setTotalPages(userPageInfo.getPages()); pageResult.setData(userPageInfo.getList()); return pageResult; } } -
编写controller层,UserController.java内容如下:
package com.example.mybatisspringbootlesson.controller; import com.example.mybatisspringbootlesson.controller.dto.PageRequest; import com.example.mybatisspringbootlesson.controller.dto.PageResult; import com.example.mybatisspringbootlesson.entity.User; import com.example.mybatisspringbootlesson.service.UserService; import org.springframework.web.bind.annotation.*; import javax.annotation.Resource; import java.util.List; @RestController @RequestMapping("/user") public class UserController { @Resource UserService userService; @GetMapping("/all") public List<User> getAllUsers(){ return userService.getUserList(); } @PostMapping("/selectPage") //注意:这里是post方法 public PageResult selectPage(@RequestBody PageRequest pageRequest){ return userService.selectPage(pageRequest); } } -
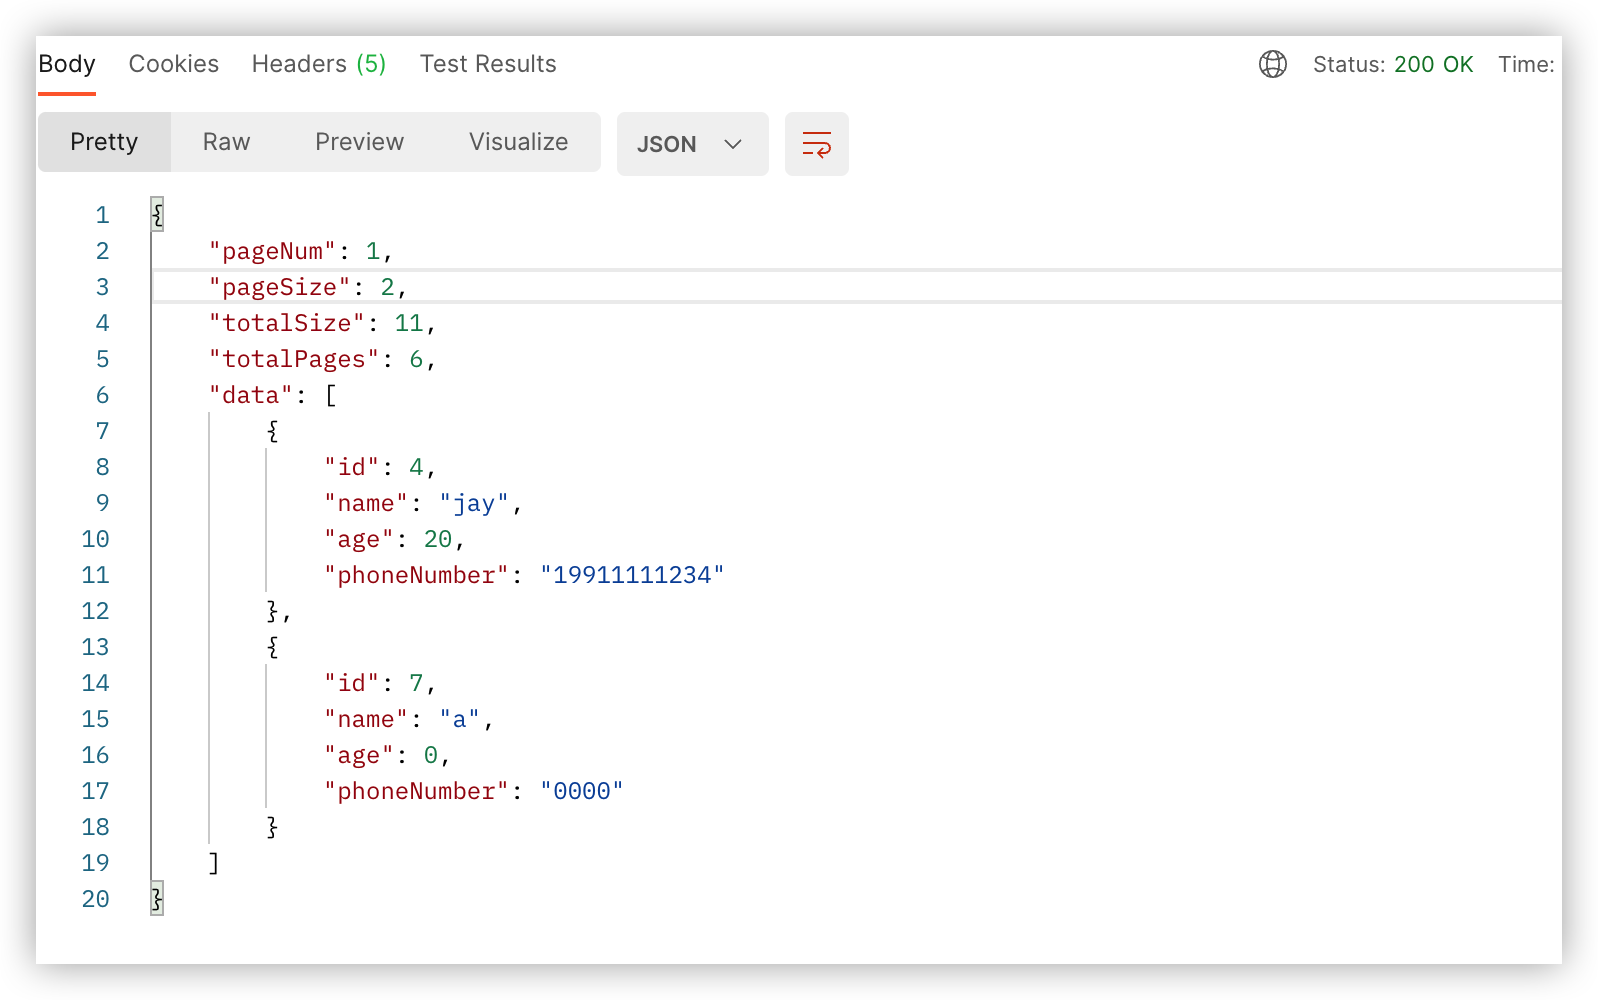
测试:
postman请求:

返回:
-
报错:
Description:

The dependencies of some of the beans in the application context form a cycle:

┌──->──┐
|  com.github.pagehelper.autoconfigure.PageHelperAutoConfiguration
└──<-──┘
Action:

Relying upon circular references is discouraged and they are prohibited by default. Update your application to remove the dependency cycle between beans. As a last resort, it may be possible to break the cycle automatically by setting spring.main.allow-circular-references to true.
? 原因:springboot2.6版本及2.6以上版本禁止循环依赖
? 解决办法:降低springboot版本到2.6以下,或将pagehelper 的版本到1.4.1
七、使用注解开发
使用注解开发,适合简单的增删改查语句。对于批量插入,更新等操作,使用mapper.xml的方式比较好
7.1 普通maven项目
1~4步骤见 一、 mybatis连接mysql(普通maven工程)
-
编写DAO接口及方法,并使用注解编写sql
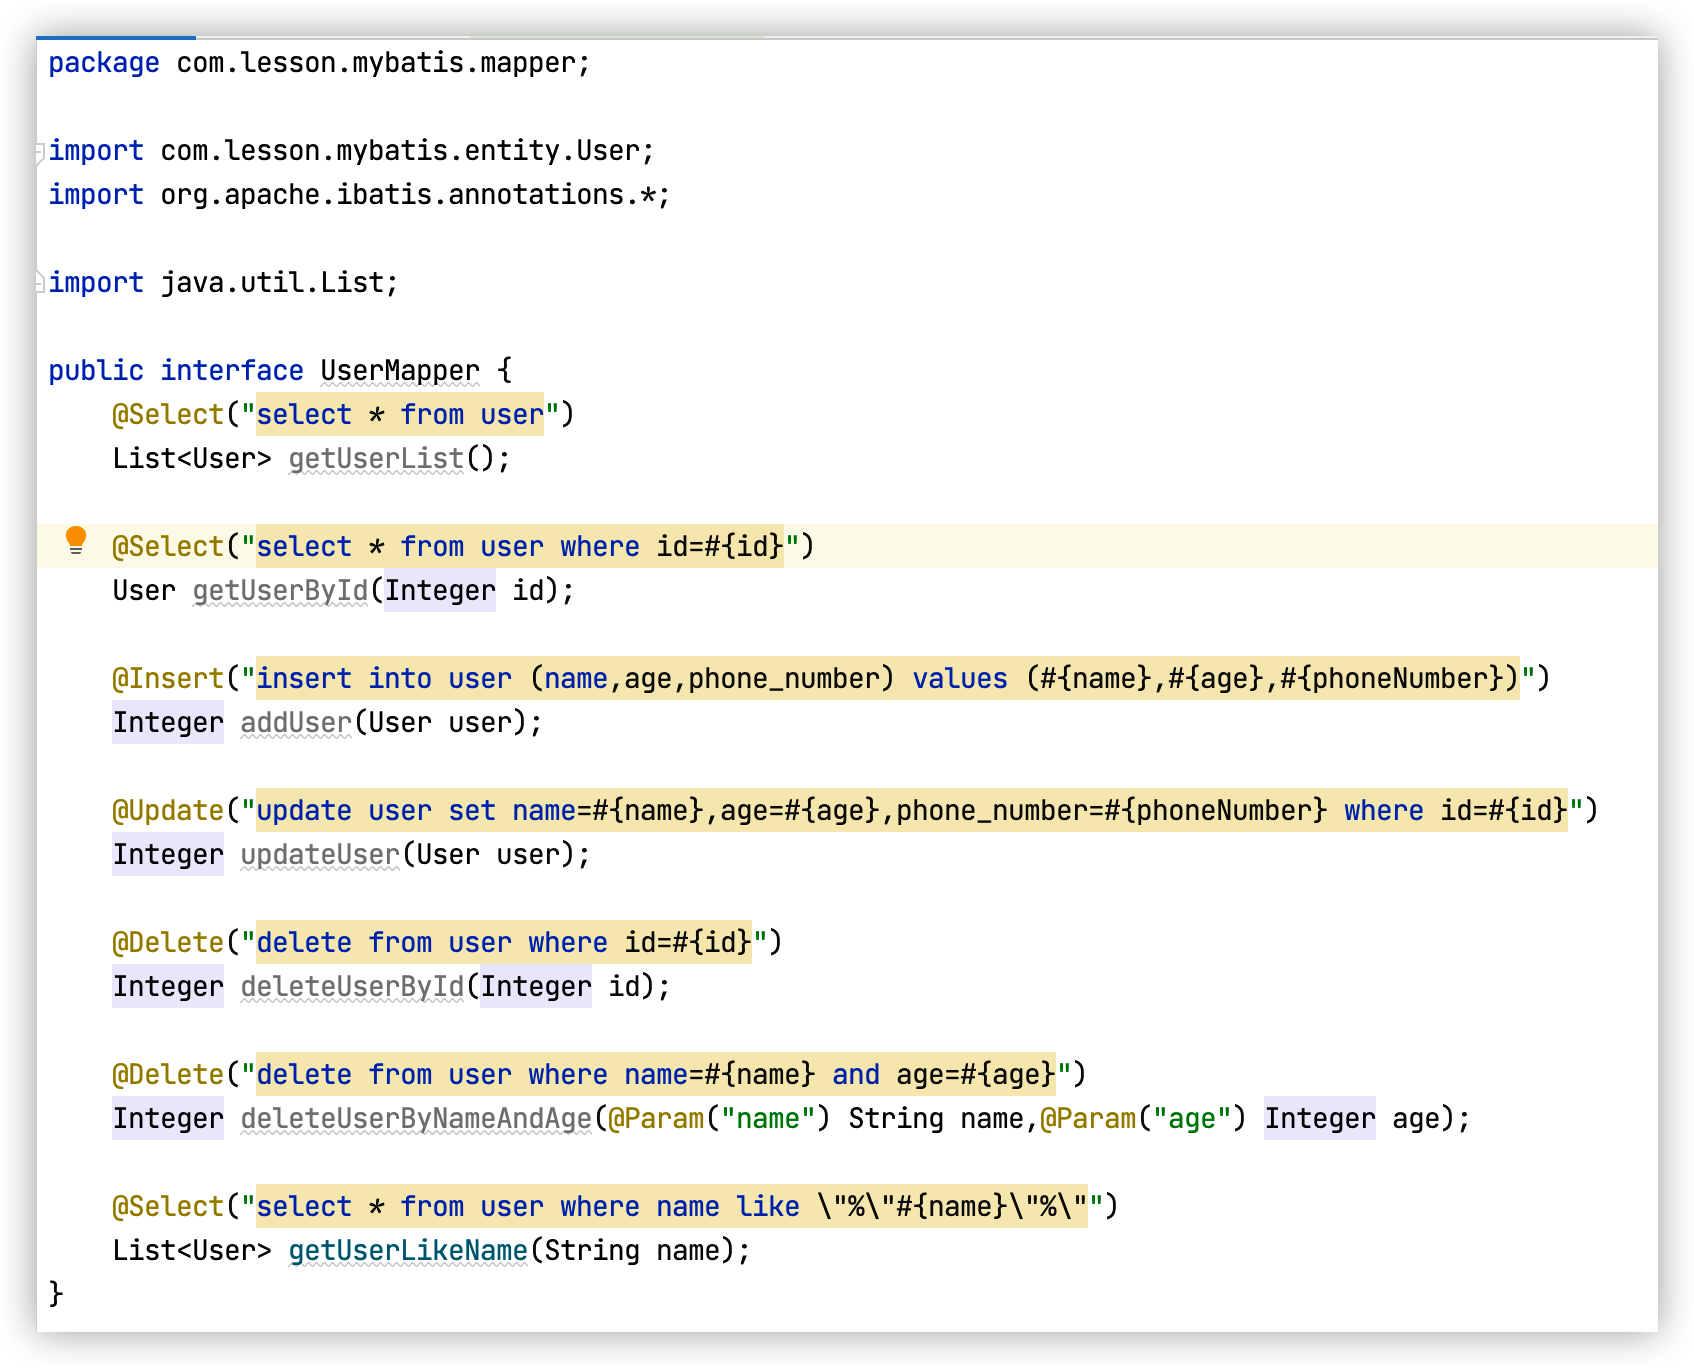
package com.lesson.mybatis.mapper; import com.lesson.mybatis.entity.User; import org.apache.ibatis.annotations.*; import java.util.List; public interface UserMapper { @Select("select * from user") List<User> getUserList(); @Select("select * from user where id=#{id}") User getUserById(Integer id); @Insert("insert into user (name,age,phone_number) values (#{name},#{age},#{phoneNumber})") Integer addUser(User user); @Update("update user set name=#{name},age=#{age},phone_number=#{phoneNumber} where id=#{id}") Integer updateUser(User user); @Delete("delete from user where id=#{id}") Integer deleteUserById(Integer id); @Delete("delete from user where name=#{name} and age=#{age}") Integer deleteUserByNameAndAge(@Param("name") String name,@Param("age") Integer age); @Select("select * from user where name like \"%\"#{name}\"%\"") List<User> getUserLikeName(String name); } -
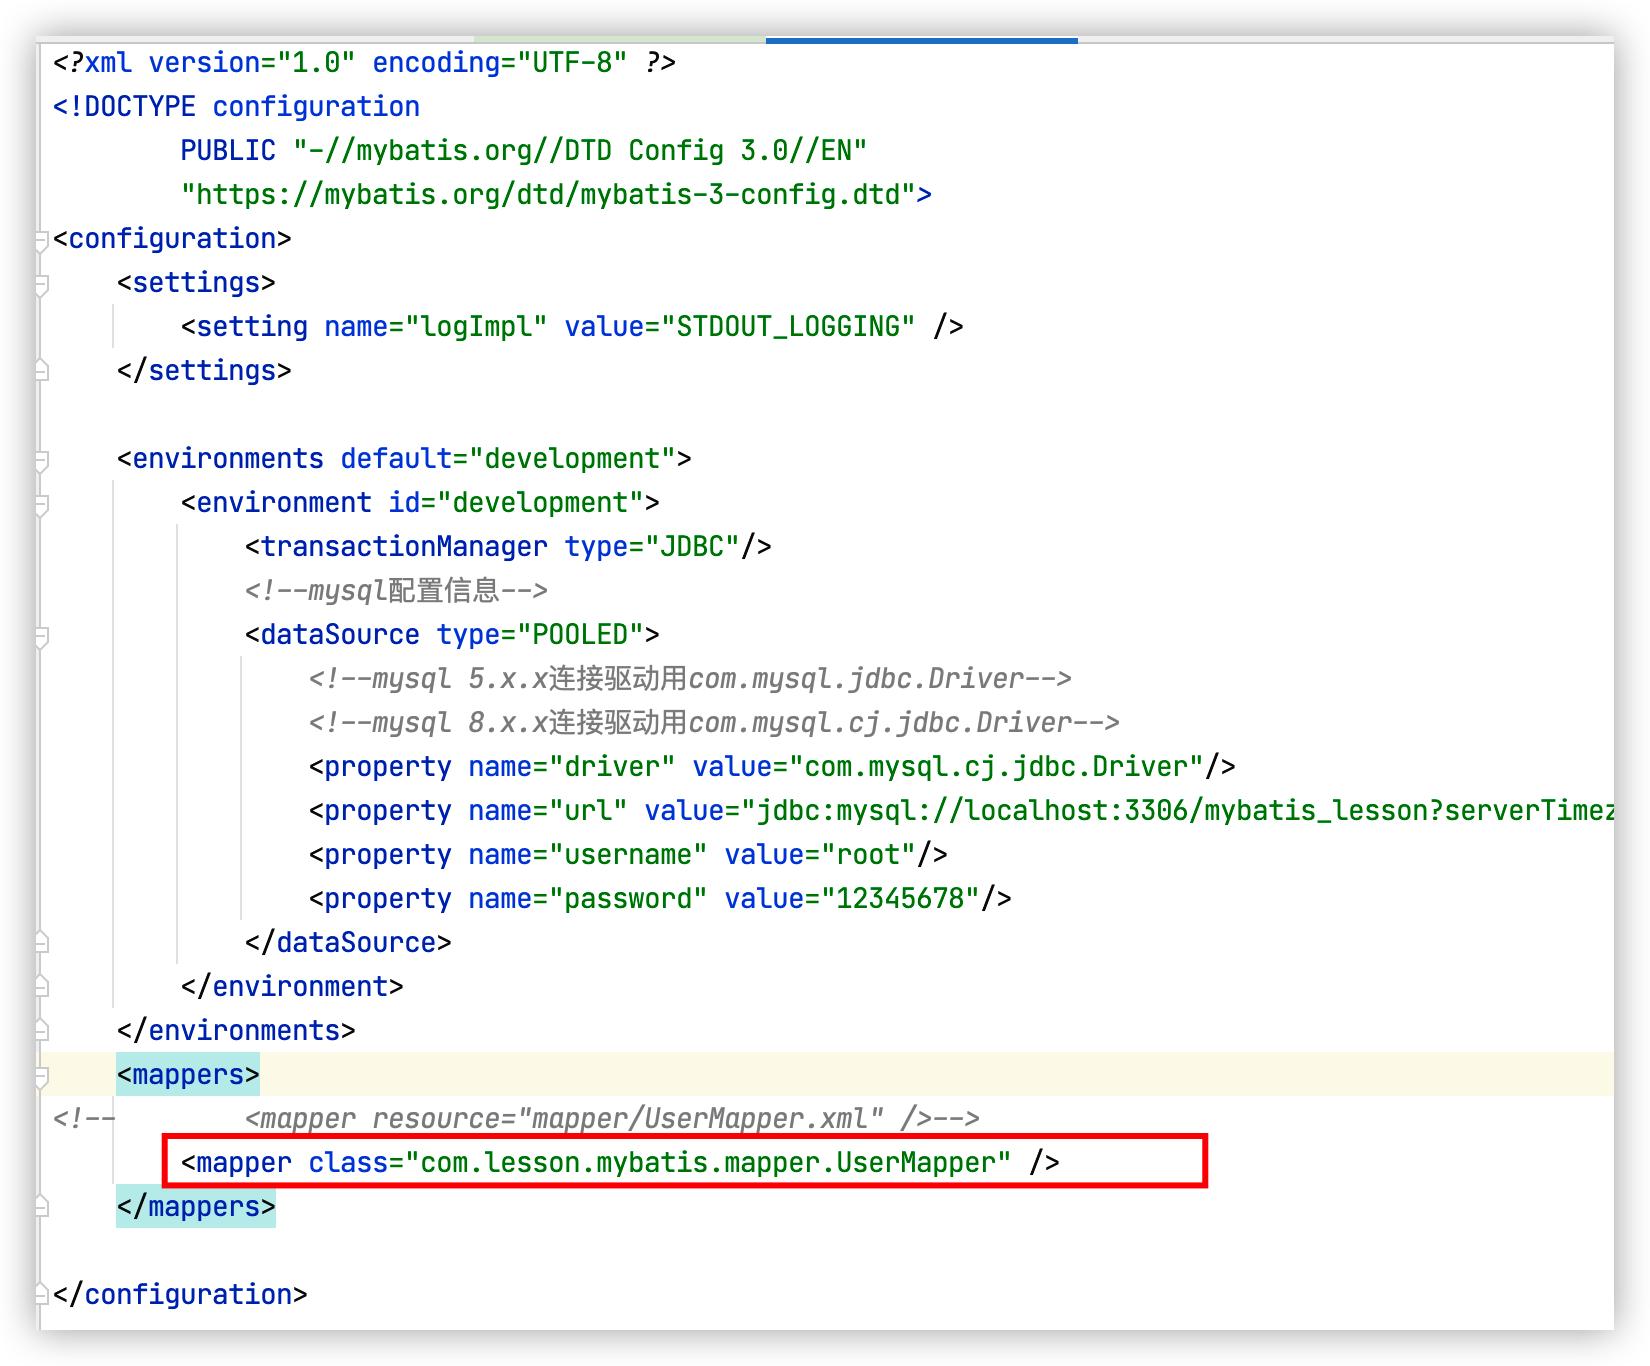
核心配置文件Mybatis-config.xml中绑定dao接口,
<mapper class="" />和<mapper resource="" />只能二选一,两个同时存在时会报错
7.2 SpringBoot项目
方法同上,无需在mybatis核心配置文件Mybatis-config.xml中绑定dao接口,而是需要在dao层接口上添加@Mapper注解或在启动类上添加包扫描注解@MapperScan()
八、 动态SQL
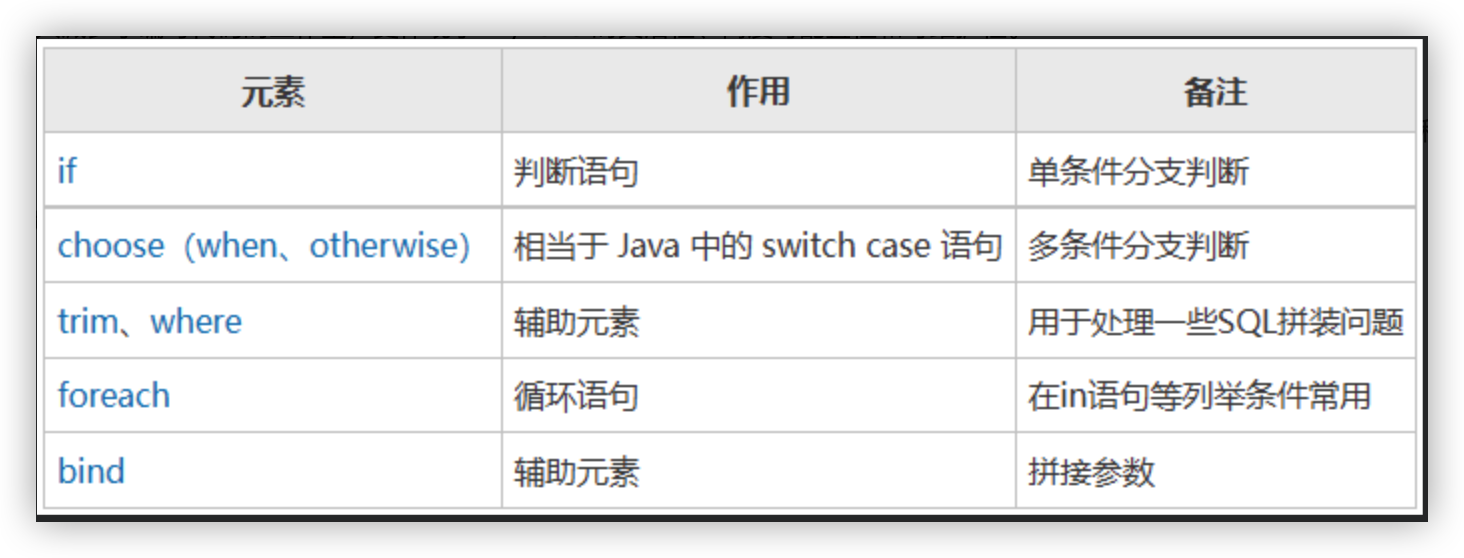
动态 SQL 是 MyBatis 的强大特性之一,在 JDBC 或其它类似的框架中,开发人员通常需要手动拼接 SQL 语句。根据不同的条件拼接 SQL 语句是一件极其痛苦的工作。例如,拼接时要确保添加了必要的空格,还要注意去掉列表最后一个列名的逗号。而动态 SQL 恰好解决了这一问题,可以根据场景动态的构建查询。动态SQL就是指根据不同的条件生成不同的SQL语句。
MyBatis 的动态 SQL 包括以下8种元素,如下表所示:
8.1 if标签:条件判断
语法:
<if test="判断条件"> 需要追加的sql </if>
<!--test的值为一个判断表达式,写法上采用OGNL表达式的方式当test成立的时候,if体内部的sql会被拼接上。-->
DAO层接口:
public interface UserMapper {
	List<User> selectUserIf(Map<String,Object> map);
}
对应xml文件:
<?xml version="1.0" encoding="UTF-8" ?>
<!DOCTYPE mapper PUBLIC "-//mybatis.org//DTD Mapper 3.0//EN" "http://mybatis.org/dtd/mybatis-3-mapper.dtd">

<!--namespace=绑定一个对应的Dao/Mapper接口-->
<mapper namespace="com.lesson.mybatis.mapper.UserMapper">
  <select id="selectUserIf" parameterType="map" resultType="com.lesson.mybatis.entity.User">

    select * from user where 1=1 <!--sql中一定要有个WHERE 1=1-->
    <if test="name != null and name !='' ">
      and name = #{name}
    </if>
    <if test="age != null">
      and age = #{age}
    </if>

  </select>
</mapper>
测试:
public void testSelect() throws Exception{
  String resource = "Mybatis-config.xml"; //mybatis配置文件
	...
  UserMapper userMapper = sqlSession.getMapper(UserMapper.class);

	HashMap<String, Object> stringObjectHashMap = new HashMap<>();
	List<User> users = userMapper.selectUserIf(stringObjectHashMap); //map中没有任何数据,执行的sql语句为:select * from user where 1=1

  HashMap<String, Object> stringObjectHashMap = new HashMap<>();
  stringObjectHashMap.put("name","kiko");
  stringObjectHashMap.put("age",2);
  List<User> users = userMapper.selectUserIf(stringObjectHashMap);//执行的sql语句为:select * from user where 1=1 and name = "kiko" and age = "2"

  HashMap<String, Object> stringObjectHashMap = new HashMap<>();
  stringObjectHashMap.put("name","kiko");
  List<User> users = userMapper.selectUserIf(stringObjectHashMap);//执行的sql语句为:select * from user where 1=1 and name = "kiko"
8.2 choose/when/otherwise元素
choose/when/otherwise相当于java中的if…else if…else
语法:
<choose>
    <when test="条件1">
        满足条件1追加的sql
    </when>
    <when test="条件2">
        满足条件2追加的sql
    </when>
    <when test="条件n">
        满足条件n追加的sql
    </when>
    <otherwise>
        都不满足追加的sql
    </otherwise>
</choose>
<!--choose内部的条件满足一个,choose内部的sql拼接就会结束(相当于else if)。otherwise属于可选的,当所有条件都不满足的时候,otherwise将起效(相当于else)。-->
DAO层接口:
public interface UserMapper {
	List<User> selectUserChoose(Map<String,Object> map);
}
对应xml文件:
<select id="selectUserChoose" parameterType="map" resultType="com.lesson.mybatis.entity.User">
  select * from user where 1=1
  <choose>
    <when test="id !=null">
      and id=#{id}
    </when>
    <when test="name !=null">
      and name=#{name}
    </when>
    <when test="age !=null">
      and age=#{age}
    </when>
  </choose>
</select>
测试:
...
UserMapper userMapper = sqlSession.getMapper(UserMapper.class);
HashMap<String, Object> stringObjectHashMap = new HashMap<>();
stringObjectHashMap.put("id",1);
stringObjectHashMap.put("name","kiko");
stringObjectHashMap.put("age",2);
List<User> users = userMapper.selectUserChoose(stringObjectHashMap);//执行的sql为select * from user where 1=1 and id=1
8.3 where元素
上面2个案例的sql中都有where 1=1这部分代码,虽然可以解决问题,但是看起来不美观,如果将where 1=1中1=1这部分干掉,上面的两个案例都会出问题,where后面会多一个AND符号,mybatis中已经考虑到这种问题了,属于通用性的问题,mybatis中通过where 元素来解决,当使用where元素的时候,mybatis会将where内部拼接的sql进行处理,会将这部分sql前面的AND 或者 OR给去掉,并在前面追加一个where,我们使用where元素来对上面的案例1进行改造,如下:
DAO层接口:
public interface UserMapper {
	List<User> selectUserIf(Map<String,Object> map);
}
对应xml文件:
<select id="selectUserIf" parameterType="map" resultType="com.lesson.mybatis.entity.User">
  select * from user
  <where> <!--where 1=1被替换成了where 元素。-->
    <if test="name != null and name !='' ">
      and name = #{name}
    </if>
    <if test="age != null">
      and age = #{age}
    </if>
  </where>
</select>
8.4 set元素
现在我们想通过用户id更新用户信息,参数为User对象,对象中的属性如果不为空,就进行更新,我们可以这么写:
<update id="updateUserSet" parameterType="com.lesson.mybatis.entity.User">
    UPDATE user SET
    <if test="name!=null">
        name = #{name},
    </if>
    <if test="age!=null">
        age = #{age},
    </if>
    <where>
        <if test="id!=null">
            id = #{id}
        </if>
    </where>
</update>
当所有属性都传值了,sql变成了下面这样:
UPDATE user SET name = ?, age = ?, where id = ?
上面这个sql是有问题的,where前面多了一个逗号,得想办法将这个逗号去掉,这个逗号属于最后一个需要更新的字段后面的逗号,属于多余的,mybatis中提供了set元素来解决这个问题,将上面的代码改成下面这样:
<update id="updateUserSet" parameterType="com.lesson.mybatis.entity.User">
    UPDATE user
    <set>
        <if test="name!=null">
            name = #{name},
        </if>
        <if test="age!=null">
            age = #{age},
        </if>
    </set>
  	id = #{id}
</update>
对应的DAO层接口为:
public interface UserMapper {
    Integer updateUserSet(User user);
}
我们将sql中的set去掉了,加了个set元素,set元素会对其内部拼接的sql进行处理,会将这部分sql前后的逗号给去掉并在前面加上set。
当传入id和age的时候,生成的sql:
UPDATE user SET age = ? where id = ?
8.5 trim元素
trim标记是一个格式化的标记,可以代替set元素或者是where元素的功能
语法:
<trim prefix="" prefixOverrides="" suffix="" suffixOverrides="">
</trim>
trim元素内部可以包含各种动态sql,如where、chose、sql等各种元素,使用trim包含的元素,mybatis处理过程:
? ① 先对trim标签内部的sql进行拼接,比如这部分sql叫做sql1
? ② 将sql1字符串开头的部分中包含prefixOverrides指定的部分给去掉,得到sql2
? ③ 将sql2字符串结尾的部分中包含suffixOverrides指定的部分给去掉,得到sql3
? ④ 在sql3开头追加prefix指定的值,得到sql4
? ⑤ 在sql4结尾追加suffix指定的值,得到最终需要拼接的sql5
? ⑥ 将trim标签外部的sql语句和sql5拼接,得到最终的sql6
8.5.1 使用trim元素对8.3小节的xml文件进行改造:
<select id="selectUserTrim" parameterType="map" resultType="com.lesson.mybatis.entity.User">
  select * from user
  <trim prefix="where" prefixOverrides="and|or">
    <if test="name != null and name !='' ">
      and name = #{name}
    </if>
    <if test="age != null">
      and age = #{age}
    </if>
  </trim>
</select>
当传入的name和age不为空时,mybatis处理过程如下:
? ① 先对trim标签内部的sql进行拼接:and name = ?and age = ?
? ② 因为prefixOverrides="and|or",所以要将and name = ?and age = ?开头的的and或or去掉,得到name = ?and age = ?
? ③ 因为prefix="where",所以要在name = ?and age = ?的开头追加where,得到where name = ?and age = ?
? ④ 将trim标签外部的sql语句: select * from user和where name = ?and age = ?拼接,得到最终的sql语句:select * from user where name = ?and age = ?
8.5.2 使用trim元素对8.4小节的xml文件进行改造:
<update id="updateUserTrim" parameterType="com.lesson.mybatis.entity.User">
  UPDATE user
  <trim prefix="set" prefixOverrides="," suffixOverrides=",">
    <if test="name!=null">
      name = #{name},
    </if>
    <if test="age!=null">
      age = #{age},
    </if>
  </trim>
  where id = #{id}
</update>
上面的prefixOverrides和suffixOverrides都设置的是逗号,表示trim标签内部的sql前后的逗号会被去掉,最后会在结尾拼接一个prefix指定的set。
8.6 foreach元素
相当于java中的循环,可以用来遍历数组、集合、map等。常用于批量操作:批量删除、批量更新、批量插入等操作。
8.7 SQL片段:sql/include元素
这两2个元素一般进行配合使用,可以实现代码重用的效果。在实际开发中会遇到许多相同的SQL,比如根据某个条件筛选,这个筛选很多地方都能用到,我们可以将其抽取出来成为一个公用的部分,这样修改也方便,一旦出现了错误,只需要改这一处便能处处生效了,此时就用到了<sql>这个标签了。
语法:
<sql id="sql片段id">
各种动态sql
</sql>
其他地方需要使用的时候需要通过include关键字进行引入:
<include refid="需要引入的sql片段的id"/>
注意:refid值的写法,refid的值为mapper xml的namespace的值.sql的id,如果在同一个mapper中,namespace可以省略,直接写对应的sql的id就可以了,如:
<include refid="selectSql"/>
<include refid="com.lesson.mybatis.mapper.UserMapper.selectSql"/>
案例:
下面定义2个查询,他们的查询条件一样,最后将条件抽出来用sql元素定义了一个片段,然后进行共用。
抽离:
<sql id="selectSql">
    <where>
        <if test="id !=null">
            AND id = #{id}
        </if>
        <if test="name !=null and name !=''">
            AND name = #{name}
        </if>
        <if test="age !=null">
            AND age = #{age}
        </if>
    </where>
</sql>
引用:
<select id="selectUser" resultType="com.lesson.mybatis.entity.User" parameterType="map">
    SELECT id,name,age FROM user
    <include refid="selectSql" />
</select>
8.8 bind元素
bind元素允许我们通过ognl表达式在上下文中自定义一个变量,最后在动态sql中可以使用这个变量。
语法:
<bind name="变量名称" value="ognl表达式">
案例:
对sql、include中的案例进行扩展,添加一个按照用户名模糊查询,用户名在map中对应的key为likeName,主要修改上面sql片段部分,在sql中加入下面部分:
<if test="likeName != null and likeName.trim() !=''">
  <bind name="nameLike" value="'%'+likeName.trim()+'%'" />
  AND name like #{nameLike}
</if>
先判断传入的参数likeName是否不为空字符串,然后使用bind元素创建了一个变量nameLike,值为’%‘+likeName.trim()+’%'。
测试:
UserMapper userMapper = sqlSession.getMapper(UserMapper.class);
Map<String, Object> paramMap = new HashMap<>();
paramMap.put("likeName","java");
List<User> userList = userMapper.selectUser(paramMap);
运行输出:
==>  Preparing: SELECT id,name,age FROM user WHERE name like ?
==>  Parameters: %java%(String)
<==  Total: 1
...
参数的值为%java%
8.9 总结
动态SQL就是在拼接SQL语句,我们只要保证SQL的正确性,按照SQL的格式,去排列组合就可以了
先在Mysql中写出完整的SQL,再对应的去修改成为我们的动态SQL实现通用即可!
九、 #()和$()
#和KaTeX parse error: Expected 'EOF', got '#' at position 15: 一般都是结合变量来使用,如:#?{}、{}这种来进行使用。
#{}:为参数占位符?,即sql预编译,相当于使用jdbc中的PreparedStatement中的sql占位符,可以防止sql注入
${}:为字符串替换, 即字符串拼接,不能防止sql注入。
#{}的用法上面已经有很多案例了,此处我们来一个${}的案例。
下面通过orderSql变量传入任意的排序sql,如下:
<select id="selectUser" resultType="com.lesson.mybatis.entity.User" parameterType="map">
    SELECT id,name,age FROM user
    <if test="orderSql">
        ${orderSql}
    </if>
</select>
传入值:
orderSql = "order by id asc,age desc"
最后运行产生的sql如下:
==>  Preparing: SELECT id,name,age FROM user order by id asc,age desc
==>  Parameters:
<==  Total: 6
...
mybatis会对$包含部分进行sql替换。
十、mybatisplus 开启雪花算法
本文来自互联网用户投稿,该文观点仅代表作者本人,不代表本站立场。本站仅提供信息存储空间服务,不拥有所有权,不承担相关法律责任。 如若内容造成侵权/违法违规/事实不符,请联系我的编程经验分享网邮箱:chenni525@qq.com进行投诉反馈,一经查实,立即删除!
- Python教程
- 深入理解 MySQL 中的 HAVING 关键字和聚合函数
- Qt之QChar编码(1)
- MyBatis入门基础篇
- 用Python脚本实现FFmpeg批量转换
- 组合设计模式
- UE4 图片环形轮播 蓝图
- Redis浅谈
- 分类预测 | Matlab实现ISSA-SVM基于多策略混合改进的麻雀搜索算法优化支持向量机的数据分类预测
- Linux文件系统结构及相关命令2 什么是Shell? help cd cd的用法 ls 的用法
- 长虹智能电视C1100i、C1080i系列、3D51V50等 ZPM41AiJ机芯 刷机方法,及刷机数据
- 消息队列面试系列-02
- 【Image】超硬核数学推导——WGAN的先“破”后“立”
- [毕业设计源码]精品基于Python实现的非物质文化|博物馆展示平台
- 【PostgreSQL】从零开始:(四十一)约束-排他约束