Shiro框架:Shiro用户访问控制鉴权流程-内置过滤器方式源码解析
目录
3.1.1 通过filterChainDefinitionMap配置url权限
3.1.1.2.1?FilterChainManager解析权限配置
3.1.1.2.2?FilterChainManager注入SpringShiroFilter中
3.2.2.4.1?getAuthorizationInfo获取App用户权限数据
3.2.2.4.2?isPermitted方法校验用户是否具有该权限
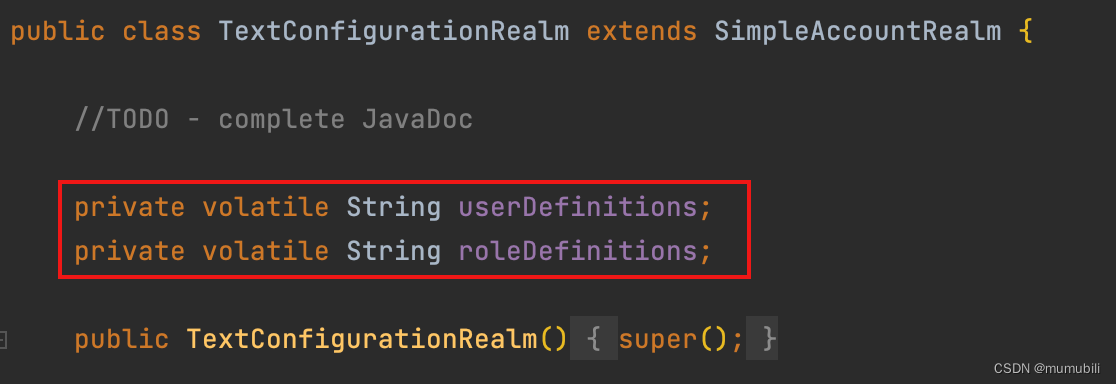
3.2.2.5.3?TextConfigurationRealm
Shiro作为一款比较流行的登录认证、访问控制安全框架,被广泛应用在程序员社区;Shiro登录验证、访问控制、Session管理等流程内部都是委托给SecurityManager安全管理器来完成的,SecurityManager安全管理器前面文章已经进行了详细解析,详见:Shiro框架:Shiro SecurityManager安全管理器解析;在此基础上,上篇文章已对Shiro用户登录认证流程(详见:Shiro框架:Shiro登录认证流程源码解析)进行了源码跟踪,本篇文章继续对下一个核心流程---用户访问控制鉴权流程进行源码解析;
想要深入了解Shiro框架整体原理,可移步:
1.配置访问控制鉴权流程的2种方式
Shiro对配置访问控制鉴权功能提供了2种方式:
- 通过内置过滤器的方式,比如:RolesAuthorizationFilter和PermissionsAuthorizationFilter
- 通过应用层代码注解的方式,比如:@RequiresRoles和@RequiresPermissions
本篇文章主要详细解析通过内置过滤器的配置方式,通过注解的方式下篇文章再进行解析;
2.Shiro内置过滤器
用户访问控制鉴权流程主要包括两部分,角色控制流程和权限控制流程,在Shiro框架:Shiro内置过滤器源码解析一文中,我们知道角色控制和权限控制分别是由内置过滤器RolesAuthorizationFilter和PermissionsAuthorizationFilter完成的,2个过滤器继承结构如下:
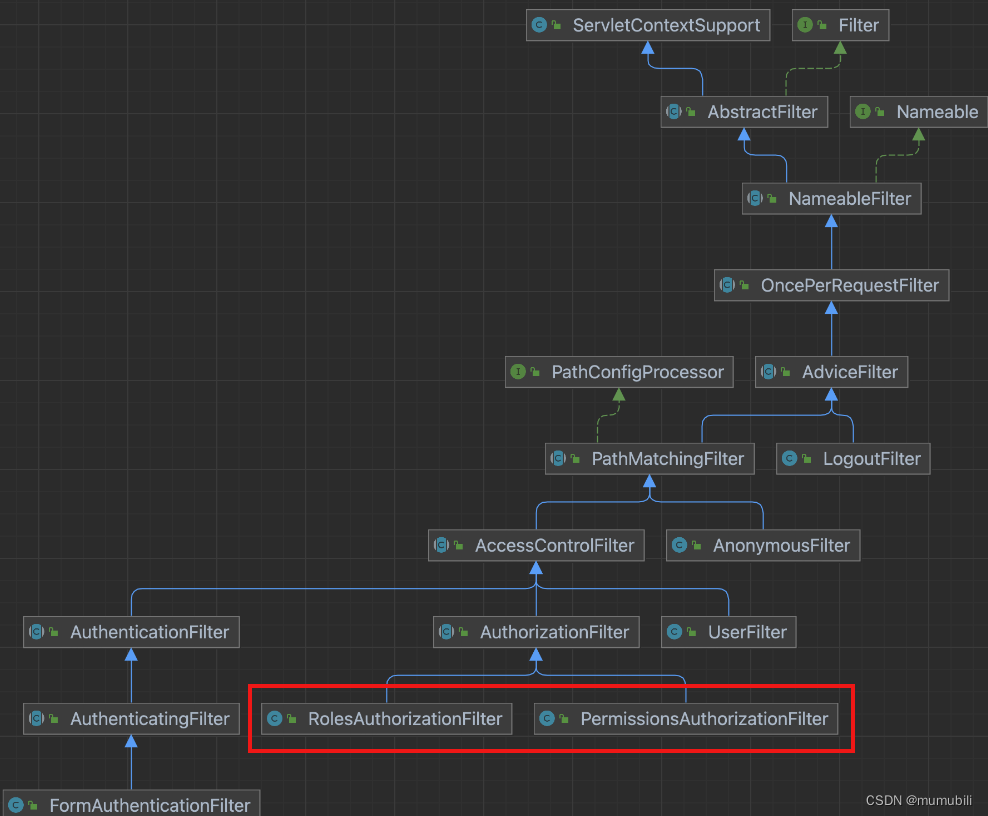
这里可以看到2个内置过滤器的继承层次结构完全一致,实际Shiro内部流程处理时,角色控制和权限控制流程也大致相似,所以,下面主要以权限控制流程进行说明;
3.权限控制流程解析
Shiro的权限控制是在内置过滤器PermissionsAuthorizationFilter中处理的,如下:
public class PermissionsAuthorizationFilter extends AuthorizationFilter {

    //TODO - complete JavaDoc

    public boolean isAccessAllowed(ServletRequest request, ServletResponse response, Object mappedValue) throws IOException {

        Subject subject = getSubject(request, response);
        String[] perms = (String[]) mappedValue;

        boolean isPermitted = true;
        if (perms != null && perms.length > 0) {
            if (perms.length == 1) {
                if (!subject.isPermitted(perms[0])) {
                    isPermitted = false;
                }
            } else {
                if (!subject.isPermittedAll(perms)) {
                    isPermitted = false;
                }
            }
        }

        return isPermitted;
    }
}
如上,首先获取当前登录用户,然后根据请求url已配置的权限(mappedValue),判断当前登录用户是否已配置该权限;
这里需要着重分析的环节主要有2个:
- 请求url配置的权限是如何注册和初始化的?
- 如何校验当前登录用户是否已配置该权限?
下面分别进行分析;
3.1 权限(Permissions)配置和初始化流程
配置url所需权限是通过配置filterChainDefinitionMap完成的,下面进行详细解析;
3.1.1 通过filterChainDefinitionMap配置url权限
下面主要从2个角度进行分析:
- 应用层代码是如何进行配置的
- 应用层的配置在Shiro框架中是如何解析的
3.1.1.1 应用层配置方式
通过filterChainDefinitionMap配置方式如下:
filterChainDefinitionMap.put("/admin/role/list", "perms[角色管理]");如上表示:针对url:/admin/role/list,应用了内置过滤器perms(PermissionsAuthorizationFilter的别名),并且针对该内置过滤器配置了需要有“角色管理”的权限,才能够访问该url;
3.1.1.2?配置解析过程
配置解析过程是在ShiroFilterFactoryBean中初始化时进行解析的,在Shiro框架:ShiroFilterFactoryBean过滤器源码解析中也有提及,源码如下:
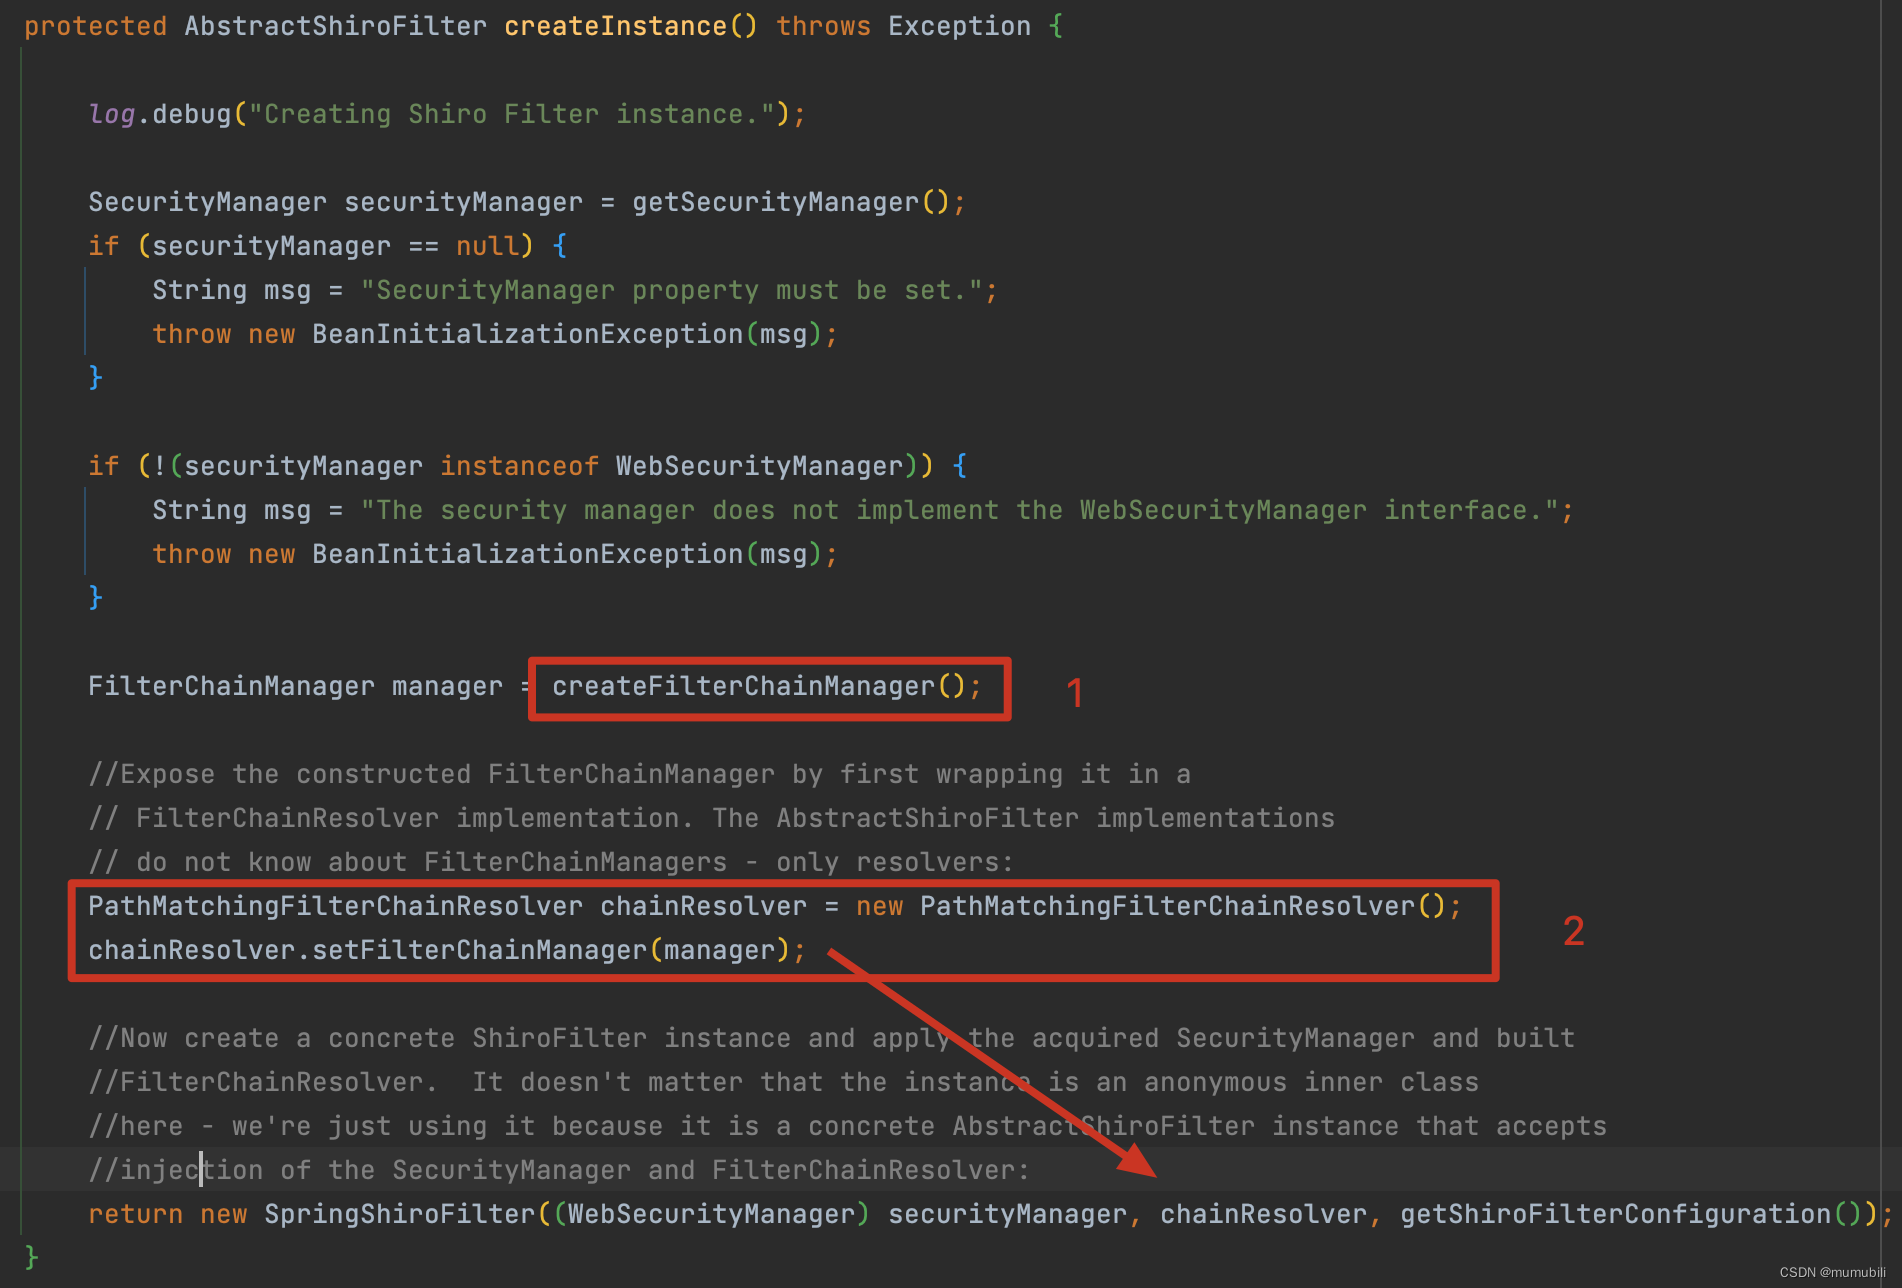
ShiroFilterFactoryBean的方法createInstance实现中,第一部分会创建过滤链管理器FilterChainManager;创建完成后,第二部分会设置到PathMatchingFilterChainResolver中,并进一步设置到Shiro自定义Servlet过滤器SpringShiroFilter中,下面分别进行说明;
3.1.1.2.1?FilterChainManager解析权限配置
FilterChainManager的创建过程如下:
    protected FilterChainManager createFilterChainManager() {

        DefaultFilterChainManager manager = new DefaultFilterChainManager();
        Map<String, Filter> defaultFilters = manager.getFilters();
        //apply global settings if necessary:
        for (Filter filter : defaultFilters.values()) {
            applyGlobalPropertiesIfNecessary(filter);
        }

        //Apply the acquired and/or configured filters:
        Map<String, Filter> filters = getFilters();
        if (!CollectionUtils.isEmpty(filters)) {
            for (Map.Entry<String, Filter> entry : filters.entrySet()) {
                String name = entry.getKey();
                Filter filter = entry.getValue();
                applyGlobalPropertiesIfNecessary(filter);
                if (filter instanceof Nameable) {
                    ((Nameable) filter).setName(name);
                }
                //'init' argument is false, since Spring-configured filters should be initialized
                //in Spring (i.e. 'init-method=blah') or implement InitializingBean:
                manager.addFilter(name, filter, false);
            }
        }

        //build up the chains:
        Map<String, String> chains = getFilterChainDefinitionMap();
        if (!CollectionUtils.isEmpty(chains)) {
            for (Map.Entry<String, String> entry : chains.entrySet()) {
                String url = entry.getKey();
                String chainDefinition = entry.getValue();
                manager.createChain(url, chainDefinition);
            }
        }

        return manager;
    }
前2部分主要是注册Shiro内置过滤器以及注册自定义过滤器,第三部分中通过方法getFilterChainDefinitionMap获取url对应的权限配置,?然后通过方法createChain创建过滤器链,如下:
    public void createChain(String chainName, String chainDefinition) {
        //……
        String[] filterTokens = splitChainDefinition(chainDefinition);

        for (String token : filterTokens) {
            String[] nameConfigPair = toNameConfigPair(token);

            //now we have the filter name, path and (possibly null) path-specific config.  Let's apply them:
            addToChain(chainName, nameConfigPair[0], nameConfigPair[1]);
        }
    }
splitChainDefinition的作用是:对url对应的权限配置分割,比如配置了多个内置过滤器,这里会以逗号分割为多个内置过滤器;
toNameConfigPair的作用是:针对每个内置过滤器,通过中括号"["分割为过滤器名称和过滤器配置;这里以"perms[角色管理]"为例,解析后,nameConfigPair[0]="perms",nameConfigPair[1]="角色管理";
然后调用addToChain方法,如下:
    public void addToChain(String chainName, String filterName, String chainSpecificFilterConfig) {
        if (!StringUtils.hasText(chainName)) {
            throw new IllegalArgumentException("chainName cannot be null or empty.");
        }
        Filter filter = getFilter(filterName);
        if (filter == null) {
            throw new IllegalArgumentException("There is no filter with name '" + filterName +
                    "' to apply to chain [" + chainName + "] in the pool of available Filters.  Ensure a " +
                    "filter with that name/path has first been registered with the addFilter method(s).");
        }

        applyChainConfig(chainName, filter, chainSpecificFilterConfig);

        NamedFilterList chain = ensureChain(chainName);
        chain.add(filter);
    }
这里的方法实现中又包括了3部分,具体如下:
3.1.1.2.1.1 获取过滤器实例
通过方法getFilter根据过滤器名称获取到对应的过滤器实例,如下:
    public Filter getFilter(String name) {
        return this.filters.get(name);
    }
3.1.1.2.1.2?对过滤器进行配置
通过方法applyChainConfig对过滤器进行配置:
    protected void applyChainConfig(String chainName, Filter filter, String chainSpecificFilterConfig) {
        if (log.isDebugEnabled()) {
            log.debug("Attempting to apply path [" + chainName + "] to filter [" + filter + "] " +
                    "with config [" + chainSpecificFilterConfig + "]");
        }
        if (filter instanceof PathConfigProcessor) {
            ((PathConfigProcessor) filter).processPathConfig(chainName, chainSpecificFilterConfig);
        } else {
            if (StringUtils.hasText(chainSpecificFilterConfig)) {
                //they specified a filter configuration, but the Filter doesn't implement PathConfigProcessor
                //this is an erroneous config:
                String msg = "chainSpecificFilterConfig was specified, but the underlying " +
                        "Filter instance is not an 'instanceof' " +
                        PathConfigProcessor.class.getName() + ".  This is required if the filter is to accept " +
                        "chain-specific configuration.";
                throw new ConfigurationException(msg);
            }
        }
    }
过滤器实现接口PathConfigProcessor时(PermissionsAuthorizationFilter实现了PathConfigProcessor),配置实现如下:
    public Filter processPathConfig(String path, String config) {
        String[] values = null;
        if (config != null) {
            values = split(config);
        }

        this.appliedPaths.put(path, values);
        return this;
    }
如上,通过split分割过滤器配置,然后添加到过滤器内成员变量appliedPaths中,key为url;
3.1.1.2.1.3?创建过滤器链
通过ensureChain创建该url对应的过滤器链,并将该过滤器添加进过滤器链;后续通过请求的url可以获取对应的过滤器链,下文会具体分析;
    protected NamedFilterList ensureChain(String chainName) {
        NamedFilterList chain = getChain(chainName);
        if (chain == null) {
            chain = new SimpleNamedFilterList(chainName);
            this.filterChains.put(chainName, chain);
        }
        return chain;
    }
如上,url的权限配置,通过解析后,存放到了2个位置:
- FilterChainManager的成员变量:Map<String, NamedFilterList> filterChains中(Key为url,value为多个过滤器实例)
- url配置的过滤器(实现PathConfigProcessor接口)的成员变量:Map<String, Object> appliedPaths中(Key为url,value为过滤器配置,比如针对"perms[角色管理]",这里的过滤器为:PermissionsAuthorizationFilter,value即为"角色管理")
3.1.1.2.2?FilterChainManager注入SpringShiroFilter中
FilterChainManager首先注入到过滤器链解析器FilterChainResolver中,然后通过SpringShiroFilter的构造方法将FilterChainResolver又注入SpringShiroFilter中,如下:
        protected SpringShiroFilter(WebSecurityManager webSecurityManager, FilterChainResolver resolver) {
            super();
            if (webSecurityManager == null) {
                throw new IllegalArgumentException("WebSecurityManager property cannot be null.");
            }
            setSecurityManager(webSecurityManager);
            if (resolver != null) {
                setFilterChainResolver(resolver);
            }
        }
因为SpringShiroFilter为Servlet过滤器,在执行过滤方法时,在SpringShiroFilter中即为doFilterInternal,会获取请求url对应的过滤链,具体实现在方法executeChain中:
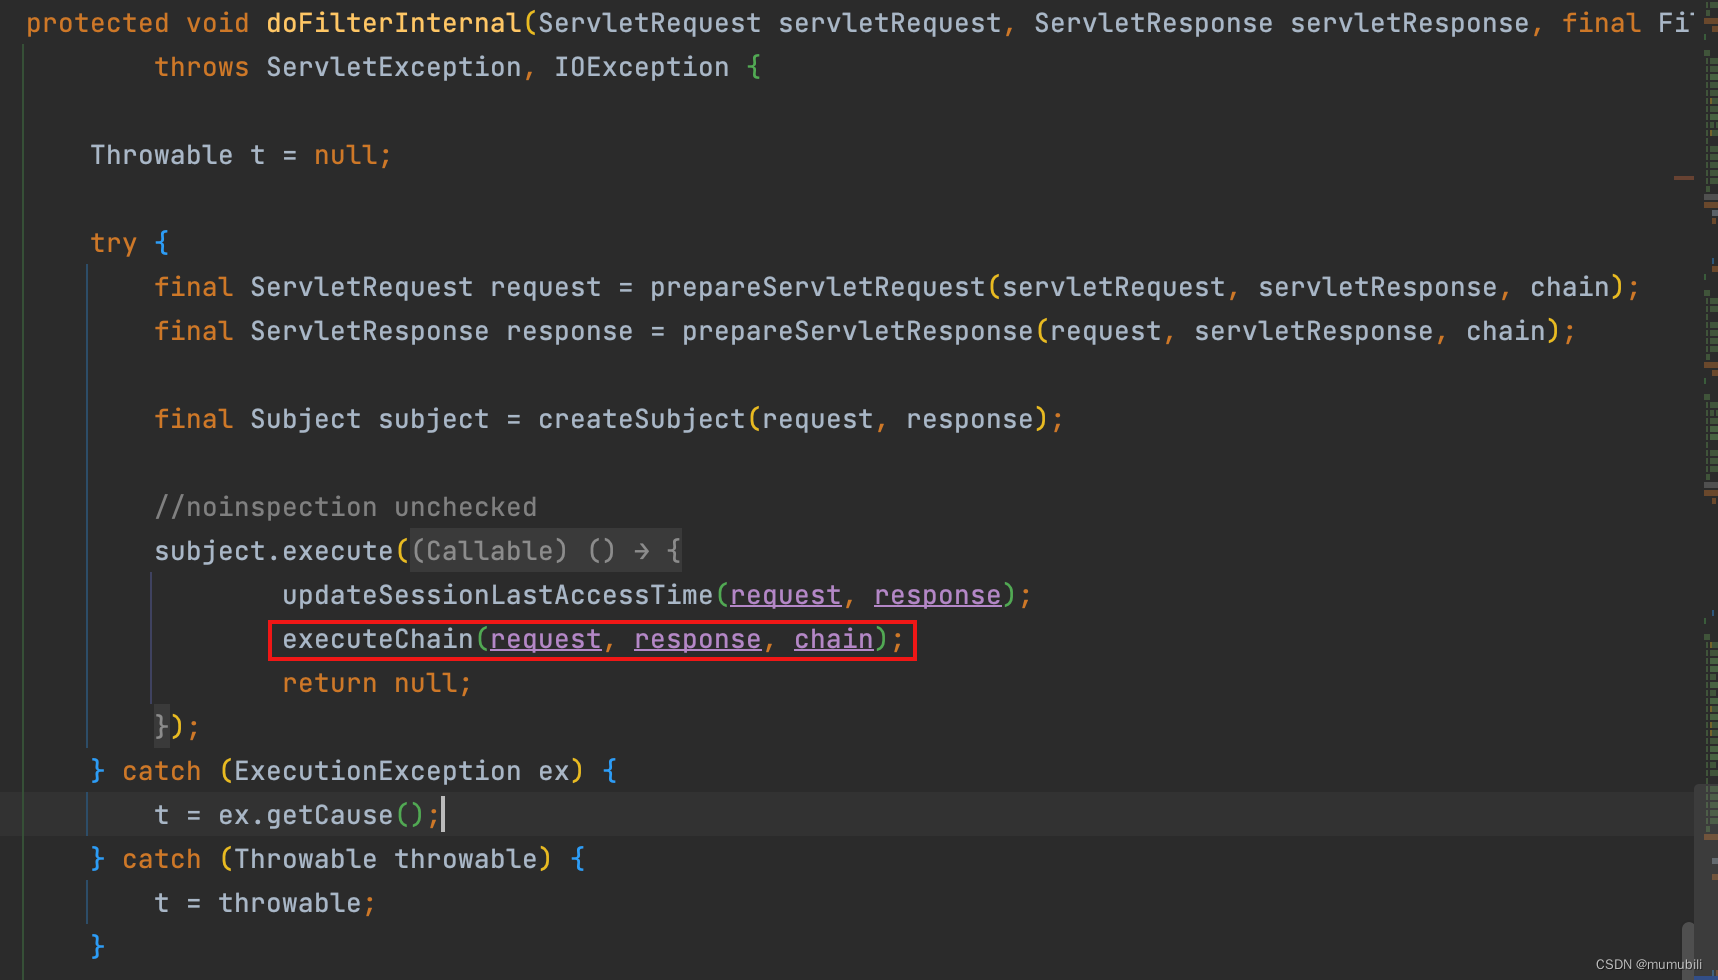
executeChain实现如下:
    protected void executeChain(ServletRequest request, ServletResponse response, FilterChain origChain)
            throws IOException, ServletException {
        FilterChain chain = getExecutionChain(request, response, origChain);
        chain.doFilter(request, response);
    }
进一步,getExecutionChain方法获取过滤器链,实现如下:
    protected FilterChain getExecutionChain(ServletRequest request, ServletResponse response, FilterChain origChain) {
        FilterChain chain = origChain;

        FilterChainResolver resolver = getFilterChainResolver();
        if (resolver == null) {
            log.debug("No FilterChainResolver configured.  Returning original FilterChain.");
            return origChain;
        }

        FilterChain resolved = resolver.getChain(request, response, origChain);
        if (resolved != null) {
            log.trace("Resolved a configured FilterChain for the current request.");
            chain = resolved;
        } else {
            log.trace("No FilterChain configured for the current request.  Using the default.");
        }

        return chain;
    }
方法getFilterChainResolver获取到了前面通过构造方法注入的FilterChainResolver,?然后通过方法getChain获取url对应的过滤器链,具体如下:
    public FilterChain getChain(ServletRequest request, ServletResponse response, FilterChain originalChain) {
        FilterChainManager filterChainManager = getFilterChainManager();
        if (!filterChainManager.hasChains()) {
            return null;
        }

        String requestURI = getPathWithinApplication(request);

        //the 'chain names' in this implementation are actually path patterns defined by the user.  We just use them
        //as the chain name for the FilterChainManager's requirements
        for (String pathPattern : filterChainManager.getChainNames()) {

            // If the path does match, then pass on to the subclass implementation for specific checks:
            if (pathMatches(pathPattern, requestURI)) {
                if (log.isTraceEnabled()) {
                    log.trace("Matched path pattern [" + pathPattern + "] for requestURI [" + requestURI + "].  " +
                            "Utilizing corresponding filter chain...");
                }
                return filterChainManager.proxy(originalChain, pathPattern);
            }
        }

        return null;
    }
这里通过方法getFilterChainManager获取到了前面注册的FilterChainManager(其内部保存着url对应的过滤器链配置),然后通过pathMatches获取请求url所有匹配的过滤器链,并通过方法proxy对originalChain进行代理(这里实际上是多层代理,对应匹配的多个过滤器链),实现如下:
    public FilterChain proxy(FilterChain original, String chainName) {
        NamedFilterList configured = getChain(chainName);
        if (configured == null) {
            String msg = "There is no configured chain under the name/key [" + chainName + "].";
            throw new IllegalArgumentException(msg);
        }
        return configured.proxy(original);
    }
public FilterChain proxy(FilterChain orig) {
return new ProxiedFilterChain(orig, this);
}public class ProxiedFilterChain implements FilterChain {
private FilterChain orig;
private List<Filter> filters;
private int index = 0;
public ProxiedFilterChain(FilterChain orig, List<Filter> filters) {
if (orig == null) {
throw new NullPointerException("original FilterChain cannot be null.");
}
this.orig = orig;
this.filters = filters;
this.index = 0;
}
public void doFilter(ServletRequest request, ServletResponse response) throws IOException, ServletException {
if (this.filters == null || this.filters.size() == this.index) {
//we've reached the end of the wrapped chain, so invoke the original one:
if (log.isTraceEnabled()) {
log.trace("Invoking original filter chain.");
}
this.orig.doFilter(request, response);
} else {
if (log.isTraceEnabled()) {
log.trace("Invoking wrapped filter at index [" + this.index + "]");
}
this.filters.get(this.index++).doFilter(request, response, this);
}
}
}如上通过index递增的方式依次调用匹配的过滤链中的多个过滤器(这里的实现过程和Servlet中多个过滤器的执行过程是一致的),最后执行Servlet的过滤器链orig;言而总之,这里将所有的过滤器成功的串接了起来。
3.2?用户权限校验流程
在上述Part-3:权限控制流程解析一节中,在获取到请求url对应的权限过滤器的配置,上述举例中,mappedValue即为"角色管理",然后调用subject.isPermitted方法校验登录用户是否具有"角色管理"的权限,所以用户权限校验的处理在方法isPermitted中,下面进行具体说明;
3.2.1?isPermitted权限校验
跟踪isPermitted实现如下:
    public boolean isPermitted(String permission) {
        return hasPrincipals() && securityManager.isPermitted(getPrincipals(), permission);
    }
这里会校验当登录用户已包含登录账户Principals,然后委托给securityManager校验用户是否具有该权限,继续跟踪isPermitted实现:
    public boolean isPermitted(PrincipalCollection principals, String permissionString) {
        return this.authorizer.isPermitted(principals, permissionString);
    }
这里进一步委托给了鉴权器authorizer校验用户权限,这里的authorizer具体类型为ModularRealmAuthorizer,其继承结构如下:

可以看出:
- 实现了Authorizer接口,可以执行鉴权操作
- 实现了PermissionResolverAware,Aware类型接口,支持注入PermissionResolver权限解析器
- 实现了RolePermissionResolverAware,Aware类型接口,支持注入RolePermissionResolver角色权限解析器
继续跟踪authorizer.isPermitted实现如下:
    /**
     * Returns <code>true</code> if any of the configured realms'
     * {@link #isPermitted(org.apache.shiro.subject.PrincipalCollection, String)} returns <code>true</code>,
     * <code>false</code> otherwise.
     */
    public boolean isPermitted(PrincipalCollection principals, String permission) {
        assertRealmsConfigured();
        for (Realm realm : getRealms()) {
            if (!(realm instanceof Authorizer)) continue;
            if (((Authorizer) realm).isPermitted(principals, permission)) {
                return true;
            }
        }
        return false;
    }
这里会获取已注册的权限组件Realm(Realm的注册是通过安全管理器的setRealms方法注册的),并过滤出实现鉴权器Authorizer接口的Realm,?然后调用其isPermitted进行权限校验,下面先对Real整体的结构和概念进行解析;
3.2.2?Realm解析
Realm整体继承层次结构如下:
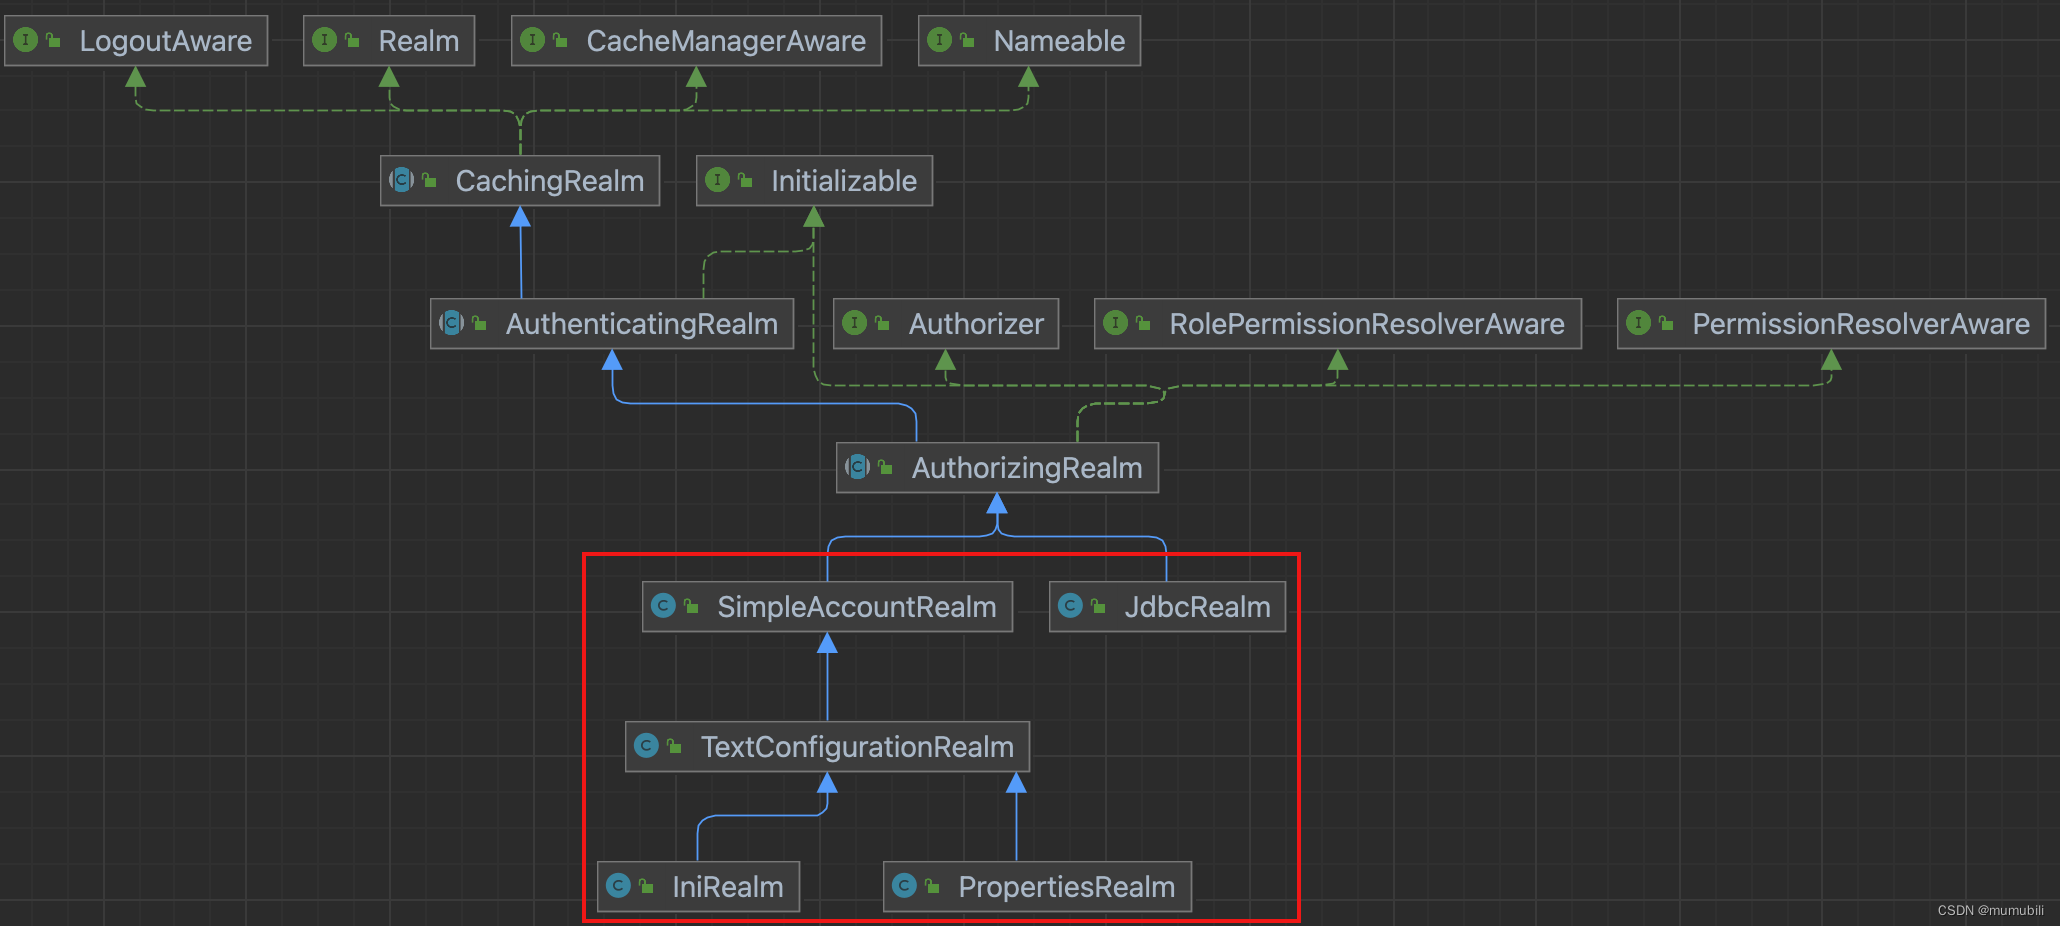
主要的几个类型说明如下;
3.2.2.1?Realm
权限组件顶层接口,定义了Real的名称,支持的Token类型,以及登录认证方法:
public interface Realm {
    /**
     * Returns the (application-unique) name assigned to this <code>Realm</code>. All realms configured for a single
     * application must have a unique name.
     *
     * @return the (application-unique) name assigned to this <code>Realm</code>.
     */
    String getName();

    /**
     * Returns <tt>true</tt> if this realm wishes to authenticate the Subject represented by the given
     * {@link org.apache.shiro.authc.AuthenticationToken AuthenticationToken} instance, <tt>false</tt> otherwise.
     *         <tt>false</tt> otherwise.
     */
    boolean supports(AuthenticationToken token);

    /**
     * Returns an account's authentication-specific information for the specified <tt>token</tt>,
     * or <tt>null</tt> if no account could be found based on the <tt>token</tt>.
     */
    AuthenticationInfo getAuthenticationInfo(AuthenticationToken token) throws AuthenticationException;
}
3.2.2.2?Authorizer
顶层鉴权器接口,主要定义了多个鉴权方法:
public interface Authorizer {

    boolean isPermitted(PrincipalCollection principals, String permission);

    boolean isPermitted(PrincipalCollection subjectPrincipal, Permission permission);

    //……
}
3.2.2.3?AuthenticatingRealm
实现了Realm顶层接口,并默认实现了getAuthenticationInfo方法,同时引入了抽象方法doGetAuthenticationInfo交由子类实现,获取App中用户登录认证信息,用于登录认证,用户登录认证流程详见:Shiro框架:Shiro用户登录认证流程源码解析
    public final AuthenticationInfo getAuthenticationInfo(AuthenticationToken token) throws AuthenticationException {

        AuthenticationInfo info = getCachedAuthenticationInfo(token);
        if (info == null) {
            //otherwise not cached, perform the lookup:
            info = doGetAuthenticationInfo(token);
            log.debug("Looked up AuthenticationInfo [{}] from doGetAuthenticationInfo", info);
            if (token != null && info != null) {
                cacheAuthenticationInfoIfPossible(token, info);
            }
        } else {
            log.debug("Using cached authentication info [{}] to perform credentials matching.", info);
        }

        if (info != null) {
            assertCredentialsMatch(token, info);
        } else {
            log.debug("No AuthenticationInfo found for submitted AuthenticationToken [{}].  Returning null.", token);
        }

        return info;
    }
/**
* Retrieves authentication data from an implementation-specific datasource (RDBMS, LDAP, etc) for the given
* authentication token.
*/
protected abstract AuthenticationInfo doGetAuthenticationInfo(AuthenticationToken token) throws AuthenticationException;
3.2.2.4?AuthorizingRealm
AuthorizingRealm继承了AuthenticatingRealm,并实现了Authorizer,聚合了登录认证和权限控制2方面功能:
这里详细展开解析下前面的权限校验方法:isPermitted,具体如下:
    public boolean isPermitted(PrincipalCollection principals, String permission) {
        Permission p = getPermissionResolver().resolvePermission(permission);
        return isPermitted(principals, p);
    }
这里首先获取权限解析器(实际初始化类型为WildcardPermissionResolver,通配符权限解析器),然后利用权限解析器解析String类型权限为Permission类型,具体为:
    public Permission resolvePermission(String permissionString) {
        return new WildcardPermission(permissionString, caseSensitive);
    }
然后继续调用重载方法isPermitted进行权限校验,实现如下:
    public boolean isPermitted(PrincipalCollection principals, Permission permission) {
        AuthorizationInfo info = getAuthorizationInfo(principals);
        return isPermitted(permission, info);
    }
这里主要包含2部分内容:
1.通过getAuthorizationInfo获取App用户权限数据
2.通过isPermitted方法校验用户是否具有该权限
3.2.2.4.1?getAuthorizationInfo获取App用户权限数据
getAuthorizationInfo实现如下:
    protected AuthorizationInfo getAuthorizationInfo(PrincipalCollection principals) {

        if (principals == null) {
            return null;
        }

        AuthorizationInfo info = null;

        if (log.isTraceEnabled()) {
            log.trace("Retrieving AuthorizationInfo for principals [" + principals + "]");
        }

        Cache<Object, AuthorizationInfo> cache = getAvailableAuthorizationCache();
        if (cache != null) {
            if (log.isTraceEnabled()) {
                log.trace("Attempting to retrieve the AuthorizationInfo from cache.");
            }
            Object key = getAuthorizationCacheKey(principals);
            info = cache.get(key);
            if (log.isTraceEnabled()) {
                if (info == null) {
                    log.trace("No AuthorizationInfo found in cache for principals [" + principals + "]");
                } else {
                    log.trace("AuthorizationInfo found in cache for principals [" + principals + "]");
                }
            }
        }


        if (info == null) {
            // Call template method if the info was not found in a cache
            info = doGetAuthorizationInfo(principals);
            // If the info is not null and the cache has been created, then cache the authorization info.
            if (info != null && cache != null) {
                if (log.isTraceEnabled()) {
                    log.trace("Caching authorization info for principals: [" + principals + "].");
                }
                Object key = getAuthorizationCacheKey(principals);
                cache.put(key, info);
            }
        }

        return info;
    }
如上,首先从缓存中获取用户权限数据,不存在时,通过抽象方法doGetAuthorizationInfo获取权限数据,该方法需要交由子类具体实现;
应用层代码可以自定义实现该方法获取自定义用户权限数据,Shiro框架也提供了一些默认的实现类,比如下面要介绍的:SimpleAccountRealm、?JdbcRealm、TextConfigurationRealm、PropertiesRealm;
3.2.2.4.2?isPermitted方法校验用户是否具有该权限
isPermitted实现如下:
    protected boolean isPermitted(Permission permission, AuthorizationInfo info) {
        Collection<Permission> perms = getPermissions(info);
        if (perms != null && !perms.isEmpty()) {
            for (Permission perm : perms) {
                if (perm.implies(permission)) {
                    return true;
                }
            }
        }
        return false;
    }
首先通过方法getPermissions从已获取的对象AuthorizationInfo中获取用户拥有的权限:
    protected Collection<Permission> getPermissions(AuthorizationInfo info) {
        Set<Permission> permissions = new HashSet<Permission>();

        if (info != null) {
            Collection<Permission> perms = info.getObjectPermissions();
            if (!CollectionUtils.isEmpty(perms)) {
                permissions.addAll(perms);
            }
            perms = resolvePermissions(info.getStringPermissions());
            if (!CollectionUtils.isEmpty(perms)) {
                permissions.addAll(perms);
            }

            perms = resolveRolePermissions(info.getRoles());
            if (!CollectionUtils.isEmpty(perms)) {
                permissions.addAll(perms);
            }
        }

        if (permissions.isEmpty()) {
            return Collections.emptySet();
        } else {
            return Collections.unmodifiableSet(permissions);
        }
    }
然后通过Permission的implies方法判断用户拥有的权限是否包含当前请求url需要的权限,如包含则返回true,表示权限校验通过。?
3.2.2.5?AuthorizingRealm实现子类
根据用户拥有权限存储以及获取方法的不同,Shiro框架中预置了如下一些AuthorizingRealm的实现子类;当然,也支持自定义AuthorizingRealm实现子类通过自定义的方式获取用户拥有的权限数据;
3.2.2.5.1?SimpleAccountRealm
通过Map结构存储用户权限数据,如下:

    protected AuthorizationInfo doGetAuthorizationInfo(PrincipalCollection principals) {
        String username = getUsername(principals);
        USERS_LOCK.readLock().lock();
        try {
            return this.users.get(username);
        } finally {
            USERS_LOCK.readLock().unlock();
        }
    }
3.2.2.5.2?JdbcRealm
通过JDBC查询的方式获取用户权限数据:
    @Override
    protected AuthorizationInfo doGetAuthorizationInfo(PrincipalCollection principals) {

        //null usernames are invalid
        if (principals == null) {
            throw new AuthorizationException("PrincipalCollection method argument cannot be null.");
        }

        String username = (String) getAvailablePrincipal(principals);

        Connection conn = null;
        Set<String> roleNames = null;
        Set<String> permissions = null;
        try {
            conn = dataSource.getConnection();

            // Retrieve roles and permissions from database
            roleNames = getRoleNamesForUser(conn, username);
            if (permissionsLookupEnabled) {
                permissions = getPermissions(conn, username, roleNames);
            }

        } catch (SQLException e) {
            final String message = "There was a SQL error while authorizing user [" + username + "]";
            if (log.isErrorEnabled()) {
                log.error(message, e);
            }

            // Rethrow any SQL errors as an authorization exception
            throw new AuthorizationException(message, e);
        } finally {
            JdbcUtils.closeConnection(conn);
        }

        SimpleAuthorizationInfo info = new SimpleAuthorizationInfo(roleNames);
        info.setStringPermissions(permissions);
        return info;

    }
3.2.2.5.3?TextConfigurationRealm
通过字符串文本的方式获取用户配置权限数据:
3.2.2.5.4?PropertiesRealm
通过配置Properites文件Url的方式获取用户权限数据:
    private void loadProperties() {
        if (resourcePath == null || resourcePath.length() == 0) {
            throw new IllegalStateException("The resourcePath property is not set.  " +
                    "It must be set prior to this realm being initialized.");
        }

        if (log.isDebugEnabled()) {
            log.debug("Loading user security information from file [" + resourcePath + "]...");
        }

        Properties properties = loadProperties(resourcePath);
        createRealmEntitiesFromProperties(properties);
    }
至此,Shiro用户访问控制鉴权流程-使用内置过滤器方式源码解析完毕,Over~~
本文来自互联网用户投稿,该文观点仅代表作者本人,不代表本站立场。本站仅提供信息存储空间服务,不拥有所有权,不承担相关法律责任。 如若内容造成侵权/违法违规/事实不符,请联系我的编程经验分享网邮箱:chenni525@qq.com进行投诉反馈,一经查实,立即删除!
- Python教程
- 深入理解 MySQL 中的 HAVING 关键字和聚合函数
- Qt之QChar编码(1)
- MyBatis入门基础篇
- 用Python脚本实现FFmpeg批量转换
- 计算机毕业设计----ssm赛事打分系统
- 在MeshLab中创建简单的几何对象
- 数字化与鲜食热食,便利店2023两大关键词
- springboot/java/php/node/python订书管理系统【计算机毕设】
- Hive内核调优(一)
- 力扣——C语言:合并两个有序数组
- win10 openvpn搭建与安卓客户端使用
- 如何简单的使用文心一言(高级版)(中国版ChatGPT)
- 【YOLO算法训练数据集处理】缩放训练图片的大小,同时对图片的标签txt文件中目标的坐标进行同等的转换
- Python---多进程的使用