HarmonyOS鸿蒙开发指南:开发一个简单应用
发布时间:2024年01月09日
目录
本章节主要介绍如何开发一个简单应用。该应用通过媒体查询同时适配了手机和TV,通过点击或者将焦点移动到食物的缩略图来选择不同的食物图片,也可以进行添加到购物车操作,应用效果图如下。
图1?手机应用效果图

图2?TV应用效果图
构建页面布局
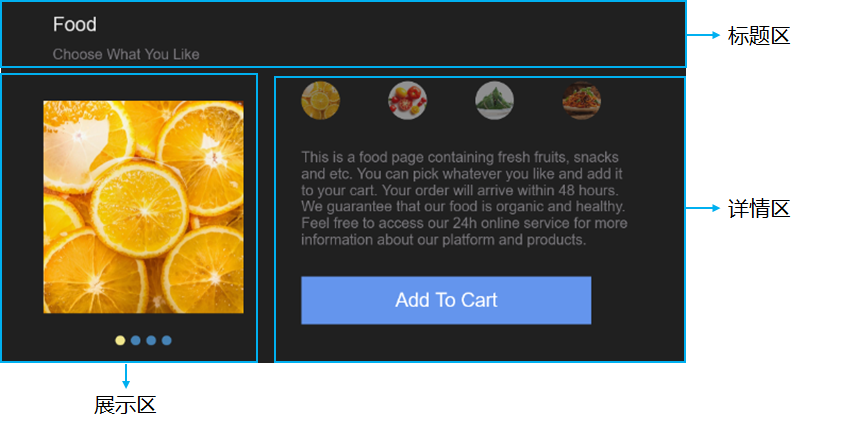
开发者在index.hml文件中构建页面布局。在进行代码开发之前,首先要对页面布局进行分析,将页面分解为不同的部分,用容器组件来承载。根据JS FA应用效果图,此页面一共分成三个部分:标题区、展示区和详情区。值得关注的是,展示区和详情区在手机和TV上分别是按列排列和按行排列。
标题区较为简单,由两个按列排列的text组件构成。展示区由包含了四个image组件的swiper组件构成,详情区由image组件和text组件构成,具体构成如下(以手机效果图为例)。
图3?展示区和详情区布局

根据布局结构的分析,实现页面基础布局的代码示例如下(其中四个image组件是通过for指令来循环创建)。
<!-- index.hml -->
<div class="container">
? <!-- title area -->
? <div class="title">
? ? <text class="name">Food</text>
? ? <text class="sub-title">Choose What You Like</text>
? </div>
? <div class="display-style">
? ? <!-- display area -->
? ? <swiper id="swiperImage" class="swiper-style">
? ? ? <image src="{{$item}}" class="image-mode" focusable="true" for="{{imageList}}"></image>
? ? </swiper>
? ? <!-- product details area -->
? ? <div class="container">
? ? ? <div class="selection-bar-container">
? ? ? ? <div class="selection-bar">
? ? ? ? ? <image src="{{$item}}" class="option-mode" οnfοcus="swipeToIndex({{$idx}})" οnclick="swipeToIndex({{$idx}})" for="{{imageList}}"></image>
? ? ? ? </div>
? ? ? </div>
? ? ? <div class="description-first-paragraph">
? ? ? ? <text class="description">{{descriptionFirstParagraph}}</text>
? ? ? </div>
? ? ? <div class="cart">
? ? ? ? <text class="{{cartStyle}}" οnclick="addCart" οnfοcus="getFocus" οnblur="lostFocus" focusable="true">{{cartText}}</text>
? ? ? </div>
? ? </div>
? </div>
</div>
说明
swiper组件里展示的图片需要开发者自行添加图片资源,放置到“js?>?default?>?common”目录下,common目录需自行创建,详细的目录结构见目录结构。
构建页面样式
index.css文件中通过media query管控手机和TV不同页面样式,具体用法可参考媒体查询。此外,该页面样式还采用了css伪类的写法,当点击时或者焦点移动到image组件上,image组件由半透明变成不透明,以此来实现选中的效果。
.container {
? flex-direction: column;
}
/* tv */
@media screen and (device-type: tv) {
? .title {
? ? align-items:flex-start;
? ? flex-direction: column;
? ? padding-left: 60px;
? ? padding-right: 160px;
? ? margin-top:15px;
? }

? .name {
? ? font-size: 20px;
? }

? .sub-title {
? ? font-size: 15px;
? ? color: #7a787d;
? ? margin-top: 10px;
? }

? .swiper-style {
? ? height: 300px;
? ? width: 350px;
? ? indicator-color: #4682b4;
? ? indicator-selected-color: #f0e68c;
? ? indicator-size: 10px;
? ? margin-left: 50px;
? }

? .image-mode {
? ? object-fit: contain;
? }

? .selection-bar {
? ? flex-direction: row;
? ? align-content: center;
? ? margin-top: 20px;
? ? margin-left: 10px;
? }

? .option-mode {
? ? height: 40px;
? ? width: 40px;
? ? margin-left: 50px;
? ? opacity: 0.5;
? ? border-radius: 20px;
? }

? .option-mode:focus {
? ? opacity: 1;
? }

? .description-first-paragraph {
? ? padding-left: 60px;
? ? padding-right: 60px;
? ? padding-top: 30px;
? }

? .description {
? ? color: #7a787d;
? ? font-size: 15px;
? }

? .cart {
? ? padding-left: 60px;
? ? margin-top: 30px;
? }

? .cart-text {
? ? font-size: 20px;
? ? text-align: center;
? ? width: 300px;
? ? height: 50px;
? ? background-color: #6495ed;
? ? color: white;
? }

? .cart-text-focus {
? ? font-size: 20px;
? ? text-align: center;
? ? width: 300px;
? ? height: 50px;
? ? background-color: #4169e1;
? ? color: white;
? }

? .add-cart-text {
? ? font-size: 20px;
? ? text-align: center;
? ? width: 300px;
? ? height: 50px;
? ? background-color: #ffd700;
? ? color: white;
? }
}

/* phone */
@media screen and (device-type: phone) {
? .title {
? ? align-items:flex-start;
? ? flex-direction: column;
? ? padding-left: 60px;
? ? padding-right: 160px;
? ? padding-top: 20px;
? }

? .name {
? ? font-size: 50px;
? ? color: #000000;
? }

? .sub-title {
? ? font-size: 30px;
? ? color: #7a787d;
? ? margin-top: 10px;
? }

? .display-style {
? ? flex-direction: column;
? ? align-items:center;
? }

? .swiper-style {
? ? height: 600px;
? ? indicator-color: #4682b4;
? ? indicator-selected-color: #ffffff;
? ? indicator-size: 20px;
? ? margin-top: 15px;
? }

? .image-mode {
? ? object-fit: contain;
? }

? .selection-bar-container {
? ? height: 90px;
? ? justify-content: center;
? }

? .selection-bar {
? ? height: 90px;
? ? width: 500px;
? ? margin-top: 30px;
? ? justify-content: center;
? ? align-items:center;
? }

? .option-mode {
? ? object-fit: contain;
? ? opacity: 0.5;
? }

? .option-mode:active {
? ? opacity: 1;
? }

? .description {
? ? color: #7a787d;
? }

? .description-first-paragraph {
? ? padding-left: 60px;
? ? padding-top: 50px;
? ? padding-right: 60px;
? }

? .color-column {
? ? flex-direction: row;
? ? align-content: center;
? ? margin-top: 20px;
? }

? .color-item {
? ? height: 50px;
? ? width: 50px;
? ? margin-left: 50px;
? ? padding-left: 10px;
? }

? .cart {
? ? justify-content: center;
? ? margin-top: 30px;
? }

? .cart-text {
? ? font-size: 35px;
? ? text-align: center;
? ? width: 600px;
? ? height: 100px;
? ? background-color: #6495ed;
? ? color: white;
? }

? .add-cart-text {
? ? font-size: 35px;
? ? text-align: center;
? ? width: 600px;
? ? height: 100px;
? ? background-color: #ffd700;
? ? color: white;
? }
}
构建页面逻辑
开发者在index.js文件中构建页面逻辑,主要实现的是两个逻辑功能:
- 当点击时或者焦点移动到不同的缩略图,swiper滑动到相应的图片;?
- 当焦点移动到购物车区时,“Add To Cart”背景颜色从浅蓝变成深蓝,点击后文字变化为“Cart + 1”,背景颜色由深蓝色变成黄色。添加购物车不可重复操作。?
逻辑页面代码示例如下。
// index.js
export default {
? data: {
? ? cartText: 'Add To Cart',
? ? cartStyle: 'cart-text',
? ? isCartEmpty: true,
? ? descriptionFirstParagraph: 'This is a food page containing fresh fruits, snacks and etc. You can pick whatever you like and add it to your cart. Your order will arrive within 48 hours. We guarantee that our food is organic and healthy. Feel free to access our 24h online service for more information about our platform and products.',
? ? imageList: ['/common/food_000.JPG', '/common/food_001.JPG', '/common/food_002.JPG', '/common/food_003.JPG'],
? },

? swipeToIndex(index) {
? ? this.$element('swiperImage').swipeTo({index: index});
? },

? addCart() {
? ? if (this.isCartEmpty) {
? ? ? this.cartText = 'Cart + 1';
? ? ? this.cartStyle = 'add-cart-text';
? ? ? this.isCartEmpty = false;
? ? }
? },

? getFocus() {
? ? if (this.isCartEmpty) {
? ? ? this.cartStyle = 'cart-text-focus';
? ? }
? },

? lostFocus() {
? ? if (this.isCartEmpty) {
? ? ? this.cartStyle = 'cart-text';
? ? }
? },
}
配置设备类型
在config.json的"deviceType"字段中添加手机和TV的设备类型。
{
? ...
? "module": {
? ? ...
? ? "deviceType": [
? ? ? "phone",
? ? ? "tv"
? ? ],
? ? ...
? }
}
效果示例
实现此实例后,效果示例如下图所示。
图4?手机运行效果

图5?TV运行效果
文章来源:https://blog.csdn.net/m0_68036862/article/details/135454919
本文来自互联网用户投稿,该文观点仅代表作者本人,不代表本站立场。本站仅提供信息存储空间服务,不拥有所有权,不承担相关法律责任。 如若内容造成侵权/违法违规/事实不符,请联系我的编程经验分享网邮箱:chenni525@qq.com进行投诉反馈,一经查实,立即删除!
本文来自互联网用户投稿,该文观点仅代表作者本人,不代表本站立场。本站仅提供信息存储空间服务,不拥有所有权,不承担相关法律责任。 如若内容造成侵权/违法违规/事实不符,请联系我的编程经验分享网邮箱:chenni525@qq.com进行投诉反馈,一经查实,立即删除!
最新文章
- Python教程
- 深入理解 MySQL 中的 HAVING 关键字和聚合函数
- Qt之QChar编码(1)
- MyBatis入门基础篇
- 用Python脚本实现FFmpeg批量转换
- MySQL联合索引最左匹配原则使用详解
- 快递物流查询类API接口推荐,含跨境物流、物流轨迹地图等
- Vue3的使用
- 大模型工具:LangChain 原理与实战案例
- 基于Python的车牌识别
- 为什么云性能监控如此重要?
- 【算法】王晓东期末考题总结(一)
- 个人网站制作 Part 6 添加高级特性(页面动画、服务端集成) | Web开发项目
- LeetCode刷题--- 三步问题
- 美易平台:在经济不确定性中寻找避风港,美股投资者转向“高质量”股票