Vue中的组件
在应用程序的开发中,组件是不可缺少的。在Vue的使用中,同样也会用到组件。
1、组件的名字唯一;
2、组件以Html形式书写;
3、组件可以复用;
4、组件可以嵌套;
5、组件可以相互调用;
6、组件分为可视化组件和非可视化组件。
一般情况下,组件写在一个单独的文件中,在使用的时候按需引入和使用。
一、组件的定义和使用
<!DOCTYPE html>
<html lang="en">
<head>
    <meta charset="UTF-8">
    <meta http-equiv="X-UA-Compatible" content="IE=edge">
    <meta name="viewport" content="width=device-width, initial-scale=1.0">
    <title>Vue组件的定义与使用</title>
    <script src="vue.js"></script>
</head>
<body>
    <div id="demo1" style="background-color: aquamarine;">
        <p>这是demo1组件</p>
        <my-html1></my-html1>
        <my-html2></my-html2>
        <my-html3></my-html3>
        <my-html5></my-html5>
    </div>
    <div id="demo2" style="background-color: darksalmon;">
        <p>这是demo2组件</p>
        <my-html1></my-html1>
        <my-html2></my-html2>
        <my-html4></my-html4>
        <my-html6></my-html6>
    </div>
    <template id="component5">
        <div>
            <p>组件5</p>
        </div>
    </template>
    <script type="text/x-template" id="component6">
        <div>
          <p>{{ mytitle }}</p>
        </div>
    </script>

    <script>
        var mycompponet5={
            template:"#component5"
        }
        //创建组件模板对象
        const mytemplate=Vue.extend ({
            template:`
            <div>
                <p>标签组件1</p>
            </div>
            `
        });
        //注册全局组件
        Vue.component('my-html1',mytemplate);
        Vue.component('my-html5',mycompponet5);
        Vue.component('my-html6',{
            template:'#component6',
            data(){
                { return {mytitle:"组件6"}    }
            }
        });
        //注册组件的另外方式是直接写内容
        Vue.component('my-html2',{
            data(){ return {count:1}    },
            template:`<button v-on:click="count++">按钮组件2,点击数:{{count}}</button>`
        });

        const myhtml3={
            data(){ return { count:0}   },
            template:`<button v-on:click="count++">按钮组件3,点击数:{{count}}</button>`
        }

        //创建vue对象
        const vueApp1=new Vue({
            el:'#demo1',
            components:{
                'my-html3':myhtml3
            }
        });

        const vueApp2=new Vue({
            el:'#demo2',
            components:{
                'my-html4':{
                    data(){ return { count:0}   },
                    template:`<button v-on:click="count++">按钮组件4,点击数:{{count}}</button>`
            }
        }
        });
    </script>
</body>
</html>
显示结果:
从上面的代码中可以看出,vue的组件有多种写法,可以根据个人喜好选择。
二、组件的嵌套
<!DOCTYPE html>
<html lang="en">
<head>
    <meta charset="UTF-8">
    <meta http-equiv="X-UA-Compatible" content="IE=edge">
    <meta name="viewport" content="width=device-width, initial-scale=1.0">
    <title>Vue组件的嵌套</title>
    <script src="vue.js"></script>
</head>
<body>
    <div id="demo" style="background-color: aquamarine;">
        <my-html1></my-html1>
        <my-html2></my-html2>
    </div>

    <script>
        //创建组件模板对象
        const AloneTemplate={
            template:`
            <div>
                <p>独立的组件1</p>
            </div>
            `
        };
        Vue.component('my-html1',{
            data(){ return {count:1}    },
            template:`<div><button>按钮组件</button><childcomponet></childcomponet></div>`,
            components:{
                'childcomponet':AloneTemplate
            }
        });

        Vue.component('my-html2',{
            data(){ return {count:1}    },
            template:`<div><button>按钮组件</button><childcomponet></childcomponet></div>`,
            components:{
                'childcomponet':{
                    template:`
                    <div>
                        <p>独立的组件2{{count}}</p>
                    </div>
                    `
                }
            }
        });

        //创建vue对象
        const vueApp1=new Vue({
            el:'#demo'
        });

    </script>
</body>
</html>
上面是组件嵌套的两种写法。
三、组件的传值
<!DOCTYPE html>
<html lang="en">
<head>
    <meta charset="UTF-8">
    <meta http-equiv="X-UA-Compatible" content="IE=edge">
    <meta name="viewport" content="width=device-width, initial-scale=1.0">
    <title>Vue的通信</title>
    <script src="vue.js"></script>
</head>
<body>
    <div id="demo" style="background-color: aquamarine;">
        <html-a v-bind:incomepara1="worker" v-bind:incomepara2="program"></html-a>
    </div>
    <script>
        const AloneTemplate={
            data(){ return { name:'人员列表' } },
            template:`
            <div>
                <p>{{name}}</p>
                <p>人员1:{{ incomepara1.name +"--"+incomepara1.age}}</p>
                <p>人员2:{{incomepara2.name}}--{{incomepara2.age}}</p>
            </div>
            `,
            props:['incomepara1','incomepara2']
        };
        const vueApp=new Vue({
            el:'#demo',
            data:{
                worker:{    name:"json",age:37    },
                program:{   name:"sdf",age:31   }
            },
            components:{'html-a':AloneTemplate}
        });
    </script>
</body>
</html>
props是一个数组,它起到桥梁的作用,可以传递多个参数,具体的参数可以是数组、变量名,也可是对象,传递对象就可以传递丰富的参数值。
props可以理解为代理,对于组件而言,通过v-bind让props的参数指向父项的具体参数,对于组件内部就可以直接使用了。
v-bind的绑定时括号里面可以是运算表达式。
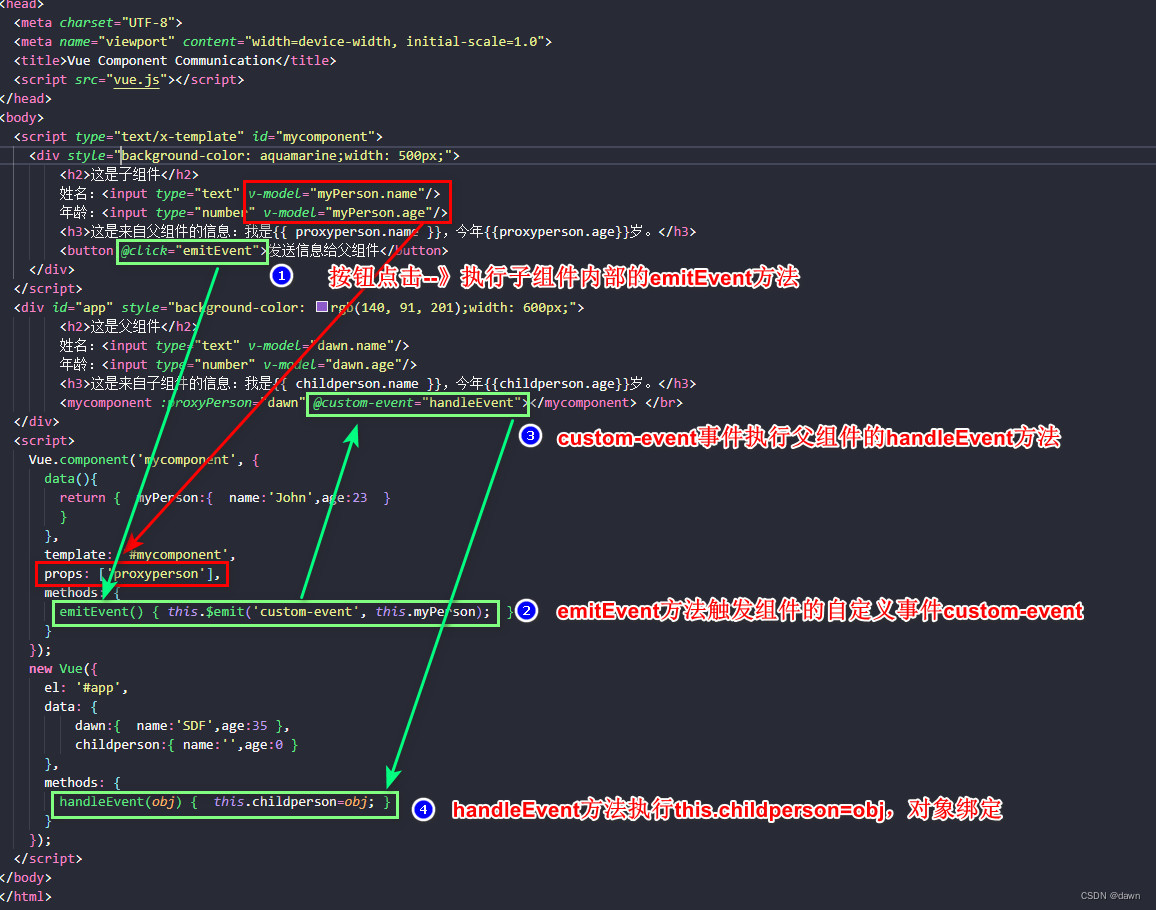
下面是一个子组件与父组件相互通信的例子:
<!DOCTYPE html>
<html lang="en">
<head>
  <meta charset="UTF-8">
  <meta name="viewport" content="width=device-width, initial-scale=1.0">
  <title>Vue Component Communication</title>
  <script src="vue.js"></script>
</head>
<body>
  <script type="text/x-template" id="mycomponent">
    <div style="background-color: aquamarine;width: 500px;">
        <h2>这是子组件</h2>
        姓名:<input type="text" v-model="myPerson.name"/>
        年龄:<input type="number" v-model="myPerson.age"/>
        <h3>这是来自父组件的信息:我是{{ proxyperson.name }},今年{{proxyperson.age}}岁。</h3>
        <button @click="emitEvent">发送信息给父组件</button>
    </div>
  </script>
  <div id="app" style="background-color: rgb(140, 91, 201);width: 600px;">
        <h2>这是父组件</h2>
        姓名:<input type="text" v-model="dawn.name"/>
        年龄:<input type="number" v-model="dawn.age"/>
        <h3>这是来自子组件的信息:我是{{ childperson.name }},今年{{childperson.age}}岁。</h3>
        <mycomponent :proxyPerson="dawn" @custom-event="handleEvent"></mycomponent> </br>
  </div>
  <script>
    Vue.component('mycomponent', {
      data(){
        return {  myPerson:{  name:'John',age:23  }
        }
      },
      template: '#mycomponent',
      props: ['proxyperson'],
      methods: {
        emitEvent() { this.$emit('custom-event', this.myPerson);  }
      }
    });
    new Vue({
      el: '#app',
      data: {
          dawn:{  name:'SDF',age:35 },
          childperson:{ name:'',age:0 }
      },
      methods: {
        handleEvent(obj) {  this.childperson=obj; }
      }
    });
  </script>
</body>
</html>
显示结果:
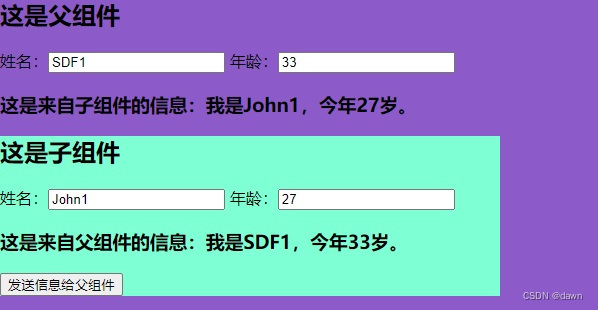
父组件中的信息变化与子组件中的信息同步,这是因为prop起到了绑定对象的作用,子组件中的信息变化在点击按钮【发送信息给父组件】后因为对象绑定了,在自定义的事件custom-event中调用了父组件的方法handleEvent(obj),所以也是实时变化同步。
2023年一月份的时候学习vue,写了三篇文章,分别是:
1、Vue组件化编程的基础知识要点
2、Vue组件化编程的组件通信
3、三种简洁易行的方法解决基于Vue.js的组件通信
一年过去了,我都快忘记了,以前是断断续续地学,并没有做个项目,看来学习需要实时跟进并且要加以适当的练习。
编程就是这样,学会容易,上手也很快,但是不做项目加以巩固,等于没有学!
本文来自互联网用户投稿,该文观点仅代表作者本人,不代表本站立场。本站仅提供信息存储空间服务,不拥有所有权,不承担相关法律责任。 如若内容造成侵权/违法违规/事实不符,请联系我的编程经验分享网邮箱:chenni525@qq.com进行投诉反馈,一经查实,立即删除!
- Python教程
- 深入理解 MySQL 中的 HAVING 关键字和聚合函数
- Qt之QChar编码(1)
- MyBatis入门基础篇
- 用Python脚本实现FFmpeg批量转换
- 手写一个starter来理解SpringBoot的自动装配
- Redis系列之简单实现watchDog自动续期机制
- QT+OSG/osgEarth编译之四十八:pcre+Qt编译(一套代码、一套框架,跨平台编译,版本:Cal3D-0.13)
- 使用FFmpeg4.3.1的SDK官方开发包编译ffmpeg.c
- 基于博弈树的开源五子棋AI教程[6 置换表]
- 什么样的猫粮好?新手必备!5款备受好评的主食冻干推荐!
- 常用排序算法:插入排序、希尔排序、选择排序、冒泡排序、快速排序、归并排序
- 力扣刷题记录(15)LeetCode:509、70、746
- QT实现 三个数的加减法自动生成
- python列表删除元素的三种方法(含例子)