[笔记]Spring AOP
Spring AOP(Aspect Oriented Programming)
-
AOP将应用程序分为核心业务和非核心的公共功能,AOP的关注点是系统中的非核心的公共功能;
-
AOP可以通过预编译或者运行期动态代理的方式,为横跨多个对象(没有继承关系..)的业务逻辑添加统一的功能(
横切关注点Cross Cutting Concern:事务、日志记录、权限检查、异常处理等) -
使用AOP可以实现在不修改核心业务源代码的情况下为核心业务添加统一的功能,实现了核心业务和非核心的公共功能之间的解耦,提高了代码的重用性;
基于注解的AOP
在Spring Boot中,AOP主要通过注解来实现,以简化配置和提升代码的可读性。
@Aspect注解
-
作用:将一个类定义为切面类。
-
用法:与
@Component或@Service等注解结合使用,以便Spring容器管理这个切面。
定义切点(Pointcut)
-
@Pointcut:定义了何处应用AOP(比如哪些方法)。
-
表达式:使用execution表达式指定方法模式。
@Pointcut("execution(* com.example.service.*.*(..))")
public void serviceLayer() {
}
定义通知(Advice)
-
@Before:在方法执行之前执行。
-
@AfterReturning:方法成功执行后执行。
-
@AfterThrowing:方法抛出异常后执行。
-
@After:方法执行后执行,无论其结果如何。
-
@Around:在方法执行前后执行,提供了最大的灵活性。
@Before("serviceLayer()")
public void logBeforeService(JoinPoint joinPoint) {
    // 实现逻辑
}
实际应用示例
-
切面类:结合
@Aspect和@Component定义切面。 -
通知方法:使用
@Before、@After等注解定义不同类型的通知。
@Aspect
@Component
public class LoggingAspect {
    @Before("serviceLayer()")
    public void logBefore(JoinPoint joinPoint) {
        // 日志逻辑
    }

    // 其他通知定义
}
在Spring Boot中的使用
-
依赖:确保已添加AOP相关依赖(如spring-boot-starter-aop)。
-
注解:直接在类和方法上使用
@Aspect和通知相关的注解。 -
无需XML:不需要XML配置,Spring Boot会自动处理这些注解。
静态代理 vs 动态代理
-
静态代理
-
实现方式:
-
通过继承或实现接口。
-
需要为每个目标类创建一个代理类。
-
-
缺点:
-
高耦合度:代理类和目标类紧密绑定。
-
可扩展性差:每个新类都需要新的代理类。
-
-
-
动态代理
-
在运行时动态创建代理类,不需要显式地为每个目标类编写代理类。
-
分为两种类型:
-
JDK动态代理:
-
只能代理实现了接口的类。
-
使用
java.lang.reflect.Proxy类和java.lang.reflect.InvocationHandler接口实现。
-
-
CGLIB动态代理:
-
可以代理没有实现接口的类。
-
通过继承目标类来实现代理。
-
使用
net.sf.cglib.proxy.Enhancer类和net.sf.cglib.proxy.MethodInterceptor接口实现。
-
-
-
补充示例:静态代理与动态代理
静态代理示例:
在Spring框架中,静态代理通常不通过XML配置来实现,因为静态代理涉及到手动创建代理类,而不是在运行时动态生成代理对象。在静态代理中,你会直接编写一个代理类,它实现与目标对象相同的接口,并在代理类中显式调用目标对象的方法。
由于这种方式并不涉及Spring的AOP特性,所以没有特定的XML配置来声明静态代理。
public interface UserService {
    void addUser();
    void deleteUser();
}

public class UserServiceImpl implements UserService {
    public void addUser() {
        System.out.println("添加用户");
    }

    public void deleteUser() {
        System.out.println("删除用户");
    }
}

public class UserServiceProxy implements UserService {
    private UserServiceImpl userService;

    public UserServiceProxy(UserServiceImpl userService) {
        this.userService = userService;
    }

    public void addUser() {
        System.out.println("执行前置逻辑");
        userService.addUser();
        System.out.println("执行后置逻辑");
    }

    public void deleteUser() {
        System.out.println("执行前置逻辑");
        userService.deleteUser();
        System.out.println("执行后置逻辑");
    }
}
XML配置示例
<?xml version="1.0" encoding="UTF-8"?>
<beans xmlns="http://www.springframework.org/schema/beans"
       xmlns:xsi="http://www.w3.org/2001/XMLSchema-instance"
       xsi:schemaLocation="http://www.springframework.org/schema/beans
                           http://www.springframework.org/schema/beans/spring-beans.xsd">

    <!-- 声明原始的UserService实现 -->
    <bean id="userService" class="com.example.service.impl.UserServiceImpl"/>

    <!-- 声明UserService的静态代理类 -->
    <bean id="userServiceProxy" class="com.example.service.impl.UserServiceProxy">
        <!-- 注入原始的UserService -->
        <constructor-arg ref="userService"/>
    </bean>

</beans>
动态代理示例:
??JDK动态代理
??JDK动态代理,也称为Java动态代理,是基于接口的代理方式,使用Java自带的代理机制来实现。
-
原理: 通过实现目标对象的接口并在调用处理器(
InvocationHandler)中定义拦截逻辑。 -
使用场景: 适用于目标对象实现了接口的情况。
-
示例代码:
public interface Teacher {
    void teach();
}
public class Wang implements Teacher {
@Override
public void teach() {
System.out.println("老师讲课");
}
}/**
* 代理对象的执行逻辑
*/
public class MyHandler implements InvocationHandler {
Teacher teacher;
public MyHandler(Teacher teacher) {
this.teacher = teacher;
}
/**
* Object proxy: 代理对象
* Method method: 目标方法
* Object[] args: 方法参数
*/
@Override
public Object invoke(Object proxy, Method method, Object[] args) throws Throwable {
/*
// 前置 公共的功能
System.out.println("上课前 - 检查手机");
// 核心业务 - 执行目标对象的业务
teacher.teach();
// 后置 公共的功能
System.out.println("放学后 - 解决问题");
*/
System.out.println("上课前 - 检查手机");
// 执行代理对象的业务逻辑
Object result = method.invoke(teacher, args);
System.out.println("放学后 - 解决问题");
// 代理对象的方法返回值
return result;
}
}?
XML配置
使用JDK动态代理时,通常不需要特别指定,因为这是Spring的默认行为。
但可以通过设置[aop:aspectj-autoproxy](aop:aspectj-autoproxy)标签的proxy-target-class属性为false来明确指示使用JDK动态代理。
<?xml version="1.0" encoding="UTF-8"?>
<beans xmlns="http://www.springframework.org/schema/beans"
       xmlns:xsi="http://www.w3.org/2001/XMLSchema-instance"
       xmlns:aop="http://www.springframework.org/schema/aop"
       xsi:schemaLocation="http://www.springframework.org/schema/beans
                           http://www.springframework.org/schema/beans/spring-beans.xsd
                           http://www.springframework.org/schema/aop
                           http://www.springframework.org/schema/aop/spring-aop.xsd">

    <!-- 管理目标类 -->
    <bean id="userService" class="com.example.service.impl.UserServiceImpl"/>

    <!-- 管理切面类 -->
    <bean id="myAspect" class="com.example.aspect.MyAspect"/>

    <!-- AOP配置 -->
    <aop:config>
        <aop:aspect id="aspect" ref="myAspect">
            <!-- 配置通知和切点 -->
            <!-- 示例: 前置通知 -->
            <aop:before method="beforeAdvice" pointcut="execution(* com.example.service.*.*(..))"/>
            <!-- 其他通知配置 -->
        </aop:aspect>
    </aop:config>

    <!-- 明确指定使用JDK动态代理 -->
    <aop:aspectj-autoproxy proxy-target-class="false"/>
</beans>
CGLIB动态代理:
CGLIB(Code Generation Library)代理是一种基于类的代理方式,能够代理没有实现接口的类。
-
原理: 通过继承目标类并在方法拦截器(
MethodInterceptor)中定义拦截逻辑。 -
使用场景: 适用于目标对象没有实现任何接口的情况。
-
示例代码:
/**
 * 目标对象 - 被代理对象
 */
public class JayZhou {

    public void teach() {
        System.out.println("老师讲课!");
    }

}
public class MyHandler implements MethodInterceptor {
/**
* @param proxy 代理对象
* @param method 被拦截的方法
* @param args argument 方法参数
* @param methodProxy 用于执行父类的方法
*/
@Override
public Object intercept(Object proxy, Method method, Object[] args, MethodProxy methodProxy) throws Throwable {
System.out.println("上课前检查手机");
// 执行目标对象的方法 super.method
Object result = methodProxy.invokeSuper(proxy, args);
System.out.println("放学后解决问题");
return result;
}
}XML配置
要使用CGLIB代理,您需要将[aop:aspectj-autoproxy](aop:aspectj-autoproxy)标签的
proxy-target-class属性设置为true。
<?xml version="1.0" encoding="UTF-8"?>
<beans xmlns="http://www.springframework.org/schema/beans"
       xmlns:xsi="http://www.w3.org/2001/XMLSchema-instance"
       xmlns:aop="http://www.springframework.org/schema/aop"
       xsi:schemaLocation="http://www.springframework.org/schema/beans
                           http://www.springframework.org/schema/beans/spring-beans.xsd
                           http://www.springframework.org/schema/aop
                           http://www.springframework.org/schema/aop/spring-aop.xsd">

    <!-- 管理目标类 -->
    <bean id="userService" class="com.example.service.impl.UserServiceImpl"/>

    <!-- 管理切面类 -->
    <bean id="myAspect" class="com.example.aspect.MyAspect"/>

    <!-- AOP配置 -->
    <aop:config>
        <aop:aspect id="aspect" ref="myAspect">
            <!-- 配置通知和切点 -->
            <!-- 示例: 前置通知 -->
            <aop:before method="beforeAdvice" pointcut="execution(* com.example.service.*.*(..))"/>
            <!-- 其他通知配置 -->
        </aop:aspect>
    </aop:config>

    <!-- 明确指定使用CGLIB代理 -->
    <aop:aspectj-autoproxy proxy-target-class="true"/>
</beans>
JDK代理和CGLIB代理的比较
-
应用场景:
-
JDK代理只适用于接口方法。
-
CGLIB可以代理类方法,无需接口。
-
-
性能:
-
CGLIB通常性能更优,直接操作字节码。
-
JDK代理使用反射,性能略逊。
-
-
实现方式:
-
JDK代理使用Java原生反射。
-
CGLIB通过字节码生成。
-
无论是使用JDK代理还是CGLIB代理,Spring的配置方式基本相同,主要区别在于[aop:aspectj-autoproxy](aop:aspectj-autoproxy)标签的proxy-target-class属性的设置。
AOP的用途
-
横切关注点
-
AOP允许将应用程序中跨越多个点的功能(如日志、事务管理、安全等)模块化为特殊的类,称为"切面"(Aspects)。
-
这些横切关注点通常与业务逻辑无关,但对多个模块都有影响。
-
-
解耦
-
通过将非业务代码(如日志和安全)从业务代码中分离,AOP有助于降低模块间的耦合度。
-
提高了代码的可维护性和可重用性。
-
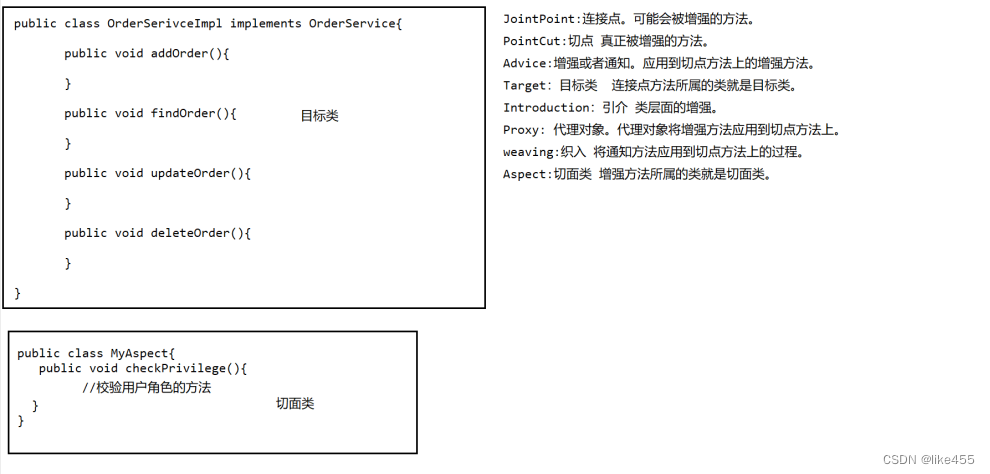
Spring AOP 关键术语和概念
-
JoinPoint(连接点): 指那些可能被拦截到的点。在Spring AOP中,这通常指的是方法的执行。
-
PointCut(切点): 指明哪些JoinPoint(方法)需要被拦截的规则集合。切点的表达式决定了哪些方法会被增强。
-
Advice(通知/增强): 绑定到特定JoinPoint(通过PointCut选择)上的动作。常见的类型有:
-
Before(前置通知)
-
After Returning(后置通知)
-
After Throwing(异常通知)
-
After(最终通知)
-
Around(环绕通知)
-
-
Target(目标对象): 包含JoinPoint的对象。它是被代理的对象。
-
Introduction(引介): 用于给类添加新的方法和属性的AOP概念。
-
Proxy(代理): 为Target对象提供的代理,用于拦截对Target对象的调用。
-
Weaving(织入): 将通知应用到目标对象以创建新的代理对象的过程。织入可以在编译时、类加载时或运行时进行。
-
Aspect(切面): 通知(Advice)和切点(PointCut)的结合。切面定义了何时(切点)和如何(通知)进行跨越应用程序多个点的行为。

依赖:
        <!--aspectJ的依赖-->
        <dependency>
            <groupId>org.aspectj</groupId>
            <artifactId>aspectjweaver</artifactId>
            <version>1.8.7</version>
        </dependency>
Spring AOP与AspectJ密切相关,但在实际使用中,Spring AOP通常被认为是AspectJ的简化版,专注于方法拦截。
xml演示:
<!--管理目标类-->
    <bean id="userService" class="com.xq.service.impl.UserServiceImpl"></bean>

    <!--管理切面类-->
    <bean id="myAspect" class="com.xq.aspect.MyAspect"></bean>

    <!--
      配置目标类和切面类
    -->
    <aop:config>
        <!--
           配置切点
           aop:pointcut  配置切点的标签
                id: 切点的名称 自定义的 唯一即可
                expression: 切点表达式
                     execution: 切点表达式的固定写法  切点方法的形参类型 包名+类名+方法名(参数类型)
                                * 切点方法的返回值任意
                                (..) 代表的是切点方法的参数任意
        -->
        <aop:pointcut id="p1" expression="execution(* com.xq.service.impl.UserServiceImpl.deleteUser(..))"></aop:pointcut>
        <aop:pointcut id="p2" expression="execution(* com.xq.service.impl.UserServiceImpl.findAll(..))"></aop:pointcut>
        <aop:pointcut id="p3" expression="execution(* com.xq.service.impl.UserServiceImpl.updateUser(..))"></aop:pointcut>
        <aop:pointcut id="p4" expression="execution(* com.xq.service.impl.UserServiceImpl.addUser(..))"></aop:pointcut>
        <!--
          配置代理对象 将通知应用到切点方法上
          aop:aspect标签  配置代理对象
               ref: 引用的就是切面类的id
        -->
        <aop:aspect ref="myAspect">
            <!--
               aop:before 前置通知的配置
                   method: 增强的方法的名称
                   pointcut-ref:引用哪一个切点
            -->
            <aop:before method="checkPrivilege" pointcut-ref="p1"></aop:before>
            <!--
               后置通知的配置
               aop:after-returning: 描述后置通知的标签
            -->
            <aop:after-returning method="printLog" pointcut-ref="p2"></aop:after-returning>

            <!--
               配置环绕通知
               aop:around  环绕通知的标签
            -->
            <aop:around method="around" pointcut-ref="p3"></aop:around>

            <!--
              抛出异常通知
              aop:after-throwing 抛出异常通知的标签
            -->
            <aop:after-throwing method="throwing" pointcut-ref="p4"></aop:after-throwing>

            <!--
               最终通知的标签 aop:after
            -->
            <aop:after method="after" pointcut-ref="p4"></aop:after>
        </aop:aspect>
    </aop:config>
注解:
??别忘了先对切面类扛注释
??@Aspect注解标记了一个类作为切面。
??@Before, @AfterReturning, @Around, @AfterThrowing, 和 @After 注解分别用于定义不同类型的通知。
@Component
@Aspect //标识当前类是一个切面类
??逐条注解:
/**
 * 切面类
 */
@Component
@Aspect //标识当前类是一个切面类
public class MyAspect {


    //权限校验的方法  @Before注解: 前置通知的注解
    @Before(value = "execution(* com.xq.service.impl.UserServiceImpl.deleteUser(..))")
    public void checkPrivilege(){
        System.out.println("开启了权限校验......");
    }

    //打印日志的方法 @AfterReturning注解  后置通知的注解
    @AfterReturning(value = "execution(* com.xq.service.impl.UserServiceImpl.findAll(..))")
    public void printLog(){
        System.out.println("开启了日志打印功能");
    }

    //开启环绕通知的方法 环绕通知:就是在目标方法前后都执行的方法  @Around 环绕通知的注解
    @Around(value = "execution(* com.xq.service.impl.UserServiceImpl.updateUser(..))")
    public void around(ProceedingJoinPoint joinPoint){
        try {
            System.out.println("开启了环绕通知1");
            joinPoint.proceed();
            System.out.println("开启了环绕通知2");
        } catch (Throwable throwable) {
            throwable.printStackTrace();
        }
    }

    //抛出异常通知 只有目标方法出现异常之后,才会执行的增强方法 @AfterThrowing 抛出异常通知的注解
    @AfterThrowing(value = "execution(* com.xq.service.impl.UserServiceImpl.addUser(..))")
    public void throwing(){
        System.out.println("抛出了运行时异常....");
    }

    //最终通知 不管目标方法有没有出现异常 都会执行该增强方法
    @After(value = "execution(* com.xq.service.impl.UserServiceImpl.addUser(..))")
    public void after(){
        System.out.println("最终通知的方法执行了.....");
    }
}
??抽象方法注解:
-
@Pointcut 注解用于定义切点表达式。
-
其他注解(如
@Before,@Around等)则用于将方法标记为特定类型的通知,并通过它们的value属性指向对应的切点。
/**
 * 切面类
 */
@Component
@Aspect //标识当前类是一个切面类
public class MyAspect {

    //定义切点
    @Pointcut(value = "execution(* com.xq.service.impl.UserServiceImpl.deleteUser(..))")
    public void pointCut1(){

    }

    //权限校验的方法  @Before注解: 前置通知的注解
    //@Before(value = "execution(* com.xq.service.impl.UserServiceImpl.deleteUser(..))")
    @Before(value = "pointCut1()")
    public void checkPrivilege(){
        System.out.println("开启了权限校验......");
    }

}
applicationContext.xml配置:
applicationContext.xml文件中的配置启用了基于注解的AOP。这样,Spring可以自动检测带有@Aspect注解的类,并根据其中定义的注解来配置AOP。
<?xml version="1.0" encoding="UTF-8"?>
<beans xmlns="http://www.springframework.org/schema/beans"
       xmlns:xsi="http://www.w3.org/2001/XMLSchema-instance"
       xmlns:context="http://www.springframework.org/schema/context"
       xmlns:aop="http://www.springframework.org/schema/aop"
       xsi:schemaLocation="http://www.springframework.org/schema/beans http://www.springframework.org/schema/beans/spring-beans.xsd http://www.springframework.org/schema/context https://www.springframework.org/schema/context/spring-context.xsd http://www.springframework.org/schema/aop https://www.springframework.org/schema/aop/spring-aop.xsd">

    <!--
       开启包扫描
    -->
    <context:component-scan base-package="com.xq"></context:component-scan>

    <!--
      开启spring对aop的注解支持
    -->
    <aop:aspectj-autoproxy></aop:aspectj-autoproxy>
</beans>本文来自互联网用户投稿,该文观点仅代表作者本人,不代表本站立场。本站仅提供信息存储空间服务,不拥有所有权,不承担相关法律责任。 如若内容造成侵权/违法违规/事实不符,请联系我的编程经验分享网邮箱:chenni525@qq.com进行投诉反馈,一经查实,立即删除!
- Python教程
- 深入理解 MySQL 中的 HAVING 关键字和聚合函数
- Qt之QChar编码(1)
- MyBatis入门基础篇
- 用Python脚本实现FFmpeg批量转换
- 竞赛保研 基于卷积神经网络的乳腺癌分类 深度学习 医学图像
- AXure的情景交互
- ModuleNotFoundError: No module named ‘cv2‘,‘yaml‘,‘einops‘,安装指令
- 子集状压DP
- 【动态规划】通配符匹配
- 557. 反转字符串中的单词 III --力扣 --JAVA
- AI-数学-初中-1.1二次函数图像及顶点式
- 学python一定要下载python吗,学python都需要什么软件
- 【目标检测】YOLOv8算法实现(一):模型搭建
- 倒排索引介绍