Qt+FFmpeg仿VLC接收RTSP流并播放
本文提供可运行的源码,供大家参考。
本文福利, 免费领取C++音视频学习资料包+学习路线大纲、技术视频/代码,内容包括(音视频开发,面试题,FFmpeg ,webRTC ,rtmp ,hls ,rtsp ,ffplay ,编解码,推拉流,srs)↓↓↓↓↓↓见下面↓↓文章底部点击免费领取↓↓
效果

 ?
?
产生RTSP流
比播放文件复杂一点是,为了接收RTSP流,我们需要产生RTSP流。简单搭建一个RTSP推流环境:
用EasyDarwin开启RTSP服务作为RTSP服务器。
![]()
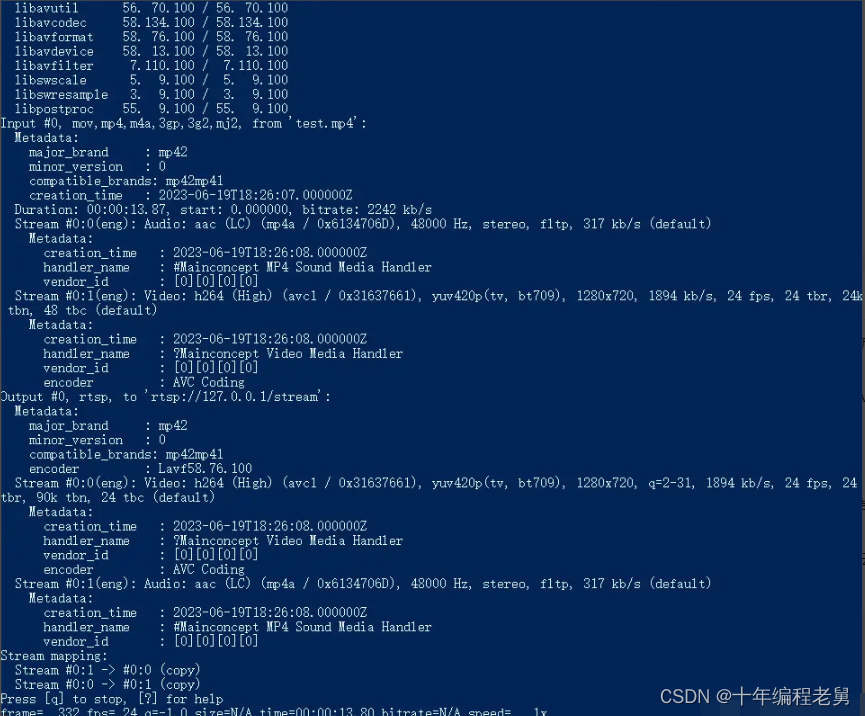
用ffmpeg命令行作为客户端,向EasyDarwin循环推送一个视频文件。
./ffmpeg.exe -re -stream_loop -1 -i test.mp4 -c copy -f rtsp rtsp://127.0.0.1/stream
这样就可以从EasyDarwin接收RTSP流了。

我们用vlc接收RTSP流看看。

成功接收。
FFmepg接收RTSP流代码
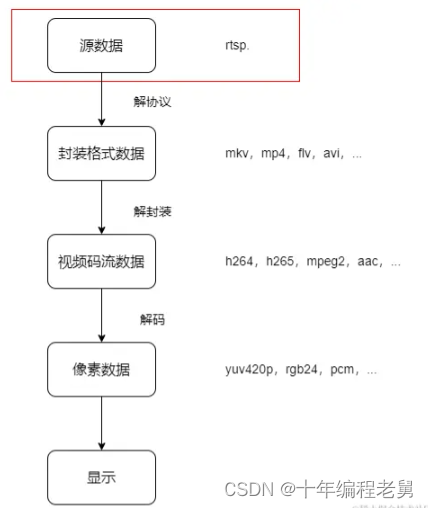
用FFmpeg接收RTSP流并播放的流程和播放mp4文件的流程差不多,只不过播放mp4文件时,文件作为播放源,而接收RTSP流时,RTSP流作为了播放源:

我们依旧看下流程中的关键代码:
if (avformat_open_input(&fileFmtCtx, url.toStdString().c_str(), nullptr, nullptr) != 0) {
 ? ?qDebug() << "avformat_open_input() failed";
 ? ?return;
}
用于打开一个RTSP地址,跟打开一个文件相比,不仅要查找流信息,还需要和RTSP服务器建立连接,让RTSP服务器开始推流。
接收上述RTSP流后,我们打印AVFormatContext的相关属性:
qDebug() << "stream name: " << streamFmtCtx->url;
 ? ?qDebug() << "stream iformat: " << streamFmtCtx->iformat->name;
 ? ?qDebug() << "stream duration: " << streamFmtCtx->duration << " microseconds";
 ? ?qDebug() << "stream bit_rate: " << streamFmtCtx->bit_rate;
/*
stream name:  rtsp://127.0.0.1/stream
stream iformat:  rtsp
stream duration:  -9223372036854775808  microseconds
stream bit_rate:  0
*/
这次由于是RTSP流,并不能获取准确的duration。继续打印流相关的信息:
qDebug() << "nb_streams:";
 ? ?for (unsigned int i = 0; i < streamFmtCtx->nb_streams; i++) {
 ? ? ? ?AVStream *stream = streamFmtCtx->streams[i];
 ? ? ? ?qDebug() << "Stream " << i + 1 << ":";
 ? ? ? ?qDebug() << "  Codec: " << avcodec_get_name(stream->codecpar->codec_id);
 ? ? ? ?qDebug() << "  Duration: " << stream->duration << " microseconds";
 ?  }
/*
nb_streams:
Stream  1 :
 ?Codec:  h264
 ?Duration:  -9223372036854775808  microseconds
Stream  2 :
 ?Codec:  aac
 ?Duration:  -9223372036854775808  microseconds
*/
可以看到和上次直接读取文件的结果一样,包括1个H264视频流和1个AAC音频流。
swsCtx = sws_getContext(decoderCtx->width, decoderCtx->height, decoderCtx->pix_fmt,
 ? ? ? ? ? ? ? ? ? ? ? ? ? ? ? ? ? ? decoderCtx->width, decoderCtx->height, FMT_PIC_SHOW,
 ? ? ? ? ? ? ? ? ? ? ? ? ? ? ? ? ? ? SWS_BICUBIC, NULL, NULL, NULL);
qDebug() << "decoderCtx->pix_fmt:" << av_get_pix_fmt_name(decoderCtx->pix_fmt);
//decoderCtx->pix_fmt: yuv420p
sws_getContext()用于将RTSP流格式转换为将要显示的格式,这里是yuv420p=>AV_PIX_FMT_RGB24。
int numBytes = av_image_get_buffer_size(FMT_PIC_SHOW, decoderCtx->width, decoderCtx->height, 1);
showBuffer = (unsigned char*)av_malloc(static_cast<unsigned long long>(numBytes) * sizeof(unsigned char));
if(av_image_fill_arrays(showFrame->data, showFrame->linesize,
 ? ? ? ? ? ? ? ? ? ? ? ?showBuffer, FMT_PIC_SHOW, decoderCtx->width, decoderCtx->height, 1) < 0)
{
 ? ?qDebug() << "av_image_fill_arrays() failed";
 ? ?return;
}
av_image_get_buffer_size计算了计算图像数据的缓冲区大小。av_malloc分配了1个内存块给showBuffer。av_image_fill_arrays用图像参数和showBuffer初始化AVFrame的data和linesize成员,并且让AVFrame和showBuffer关联。
while(av_read_frame(streamFmtCtx, packet) >= 0){
 ? ?if(packet->stream_index == nVideoIndex){
 ? ? ? ?if(avcodec_send_packet(decoderCtx, packet)>=0){
 ? ? ? ? ? ?while((ret = avcodec_receive_frame(decoderCtx, decodedFrame)) >= 0){
 ? ? ? ? ? ? ? ?//...
 ? ? ? ? ?  }
 ? ? ?  }
 ?  }
}
和播放mp4文件类似的解码步骤,从RTSP流中读取一个数据包AVPacket,将AVPacket送入解码器进行解码,尝试从解码器中接收已解码的视频帧,并将接收到的帧数据存储在decodedFrame中。
经过上述基本步骤,我们的代码已经可以和VLC一样,从RTSP服务器接收RTSP流并播放了。
RTSP协议简述及验证
FFmpeg内部将RTSP连接建立处理得很好,但我们有必要进一步学习一下RTSP协议。RTSP全称Real Time Sreaming Protocol,是TCP/IP协议体系中的一个应用层协议。数据传输由RTP/RTCP完成,底层通过TCP/UDP实现。
一个标准的RTSP的收流协议层的交互流程如下:

话不多说,我们直接在上面的推流环境下(由于EasyDarwin似乎加密了某些信息,我们选择了一个其他的RTSP服务器,效果是一样的),用VLC收流,并用wireshark抓包看看协议流程是不是这样的:

直接看看每条信息都是什么:
client => server
Real Time Streaming Protocol
 ?  Request: OPTIONS rtsp://127.0.0.1:554/stream RTSP/1.0\r\n
 ? ? ?  Method: OPTIONS
 ? ? ?  URL: rtsp://127.0.0.1:554/stream
 ?  CSeq: 2\r\n
 ?  User-Agent: LibVLC/3.0.18 (LIVE555 Streaming Media v2016.11.28)\r\n
 ?  \r\n
client发送OPTIONS向rtsp://127.0.0.1:554/stream询问server支持哪些RTSP方法。
server=> client
Real Time Streaming Protocol
    Response: RTSP/1.0 200 OK\r\n
        Status: 200
    CSeq: 2\r\n
    Session: 4J_bOCNSg
    Public: DESCRIBE, SETUP, TEARDOWN, PLAY, PAUSE, OPTIONS, ANNOUNCE, RECORD\r\n
    \r\n
server回复支持DESCRIBE, SETUP, TEARDOWN, PLAY, PAUSE, OPTIONS, ANNOUNCE, RECORD
client => server
Real Time Streaming Protocol
    Request: DESCRIBE rtsp://127.0.0.1:554/stream RTSP/1.0\r\n
        Method: DESCRIBE
        URL: rtsp://127.0.0.1:554/stream
    CSeq: 3\r\n
    User-Agent: LibVLC/3.0.18 (LIVE555 Streaming Media v2016.11.28)\r\n
    Accept: application/sdp\r\n
    \r\n
client请求媒体描述文件,格式为application/sdp。
一般server会进行用户认证,如果未携带Authorization鉴权信息,或者认证失败,server会返回错误号为401的响应,client接收到401响应时,需要根据已知的用户鉴权信息,生成Authorization,再次发送DESCRIBE,如果认证成功,服务器返回携带有SDP的响应信息。
是否进行认证和RTSP服务器有关,这里我们没有为EasyDarwin设置认证。
server=> client
Real Time Streaming Protocol
    Response: RTSP/1.0 200 OK\r\n
    CSeq: 3\r\n
    Session: _ZLZ7_NSR
    Content-type: application/sdp
    Content-length: 511
    \r\n
    Session Description Protocol
        Session Description Protocol Version (v): 0
        Owner/Creator, Session Id (o): - 0 0 IN IP4 127.0.0.1
        Session Name (s): No Name
        Connection Information (c): IN IP4 127.0.0.1
        Time Description, active time (t): 0 0
        Session Attribute (a): tool:libavformat 58.76.100
        Media Description, name and address (m): video 0 RTP/AVP 96
        Bandwidth Information (b): AS:1894
        Media Attribute (a): rtpmap:96 H264/90000
        Media Attribute (a): fmtp:96 packetization-mode=1; sprop-parameter-sets=Z2QAKqwspQFAFumoCAgKAAADAAIAAAMAYcTAAc/YABW+f4xwEA==,aOkJNSU=; profile-level-id=64002A
        Media Attribute (a): control:streamid=0
        Media Description, name and address (m): audio 0 RTP/AVP 97
        Bandwidth Information (b): AS:317
        Media Attribute (a): rtpmap:97 MPEG4-GENERIC/48000/2
        Media Attribute (a): fmtp:97 profile-level-id=1;mode=AAC-hbr;sizelength=13;indexlength=3;indexdeltalength=3; config=1190
        Media Attribute (a): control:streamid=1
server返回SDP信息,告诉client当前有哪些音视频流和属性,sdp协议不做展开。这里我们要关注的比较重要的信息是:server可以发送streamid=0的H264视频流和streamid=1的AAC音频流。
client => server
Real Time Streaming Protocol
    Request: SETUP rtsp://127.0.0.1:554/stream/streamid=0 RTSP/1.0\r\n
        Method: SETUP
        URL: rtsp://127.0.0.1:554/stream/streamid=0
    CSeq: 4\r\n
    User-Agent: LibVLC/3.0.18 (LIVE555 Streaming Media v2016.11.28)\r\n
    Transport: RTP/AVP;unicast;client_port=52024-52025
    \r\n
client发送SETUP告诉server需要建立streamid=0即视频流的连接,这里RTP/AVP表示通过UDP传输,unicast表示单播,client_port=52024-52025需要单独解释一下,前面说到RTSP协议数据传输通过RTP+RTCP完成。RTP和RTCP都是建立在UDP之上的,RTP默认使用1个偶数端口号,而RTCP则默认使用RTP端口的下1个奇数端口号,就是这里的52024和52025。
server => client
Real Time Streaming Protocol
    Response: RTSP/1.0 200 OK\r\n
        Status: 200
    CSeq: 4\r\n
    Session: 4J_bOCNSg
    Transport: RTP/AVP;unicast;client_port=52024-52025
    \r\n
server向client返回确认。
client => server
Real Time Streaming Protocol
    Request: SETUP rtsp://127.0.0.1:554/stream/streamid=1 RTSP/1.0\r\n
        Method: SETUP
        URL: rtsp://127.0.0.1:554/stream/streamid=1
    CSeq: 5\r\n
    User-Agent: LibVLC/3.0.18 (LIVE555 Streaming Media v2016.11.28)\r\n
    Transport: RTP/AVP;unicast;client_port=52028-52029
    Session: 4J_bOCNSg
    \r\n
client告诉server需要建立streamid=1的音频流的连接,RTP和RTCP的端口分别在52028和52029。
server => client
Real Time Streaming Protocol
    Response: RTSP/1.0 200 OK\r\n
        Status: 200
    Transport: RTP/AVP;unicast;client_port=52028-52029
    CSeq: 5\r\n
    Session: 4J_bOCNSg
    \r\n
server向client返回确认。
client=>server
Real Time Streaming Protocol
    Request: PLAY rtsp://127.0.0.1:554/stream RTSP/1.0\r\n
        Method: PLAY
        URL: rtsp://127.0.0.1:554/stream
    CSeq: 6\r\n
    User-Agent: LibVLC/3.0.18 (LIVE555 Streaming Media v2016.11.28)\r\n
    Session: 4J_bOCNSg
    Range: npt=0.000-\r\n
    \r\n
client发送PLAY告诉server开始传输,Range代表媒体播放时间,server会根据Range的值播放指定段的数据流,对于实时流,一般只会指定起点,即Range: npt=0.000-
server=>client
Real Time Streaming Protocol
    Response: RTSP/1.0 200 OK\r\n
        Status: 200
    CSeq: 6\r\n
    Session: 4J_bOCNSg
    Range: npt=0.000-\r\n
    \r\n
server返回确认,使用同一Session。
client=>server
Real Time Streaming Protocol
    Request: TEARDOWN rtsp://127.0.0.1:554/stream RTSP/1.0\r\n
        Method: TEARDOWN
        URL: rtsp://127.0.0.1:554/stream
    CSeq: 7\r\n
    User-Agent: LibVLC/3.0.18 (LIVE555 Streaming Media v2016.11.28)\r\n
    Session: 4J_bOCNSg
    \r\n
client发送TEARDOWN发起停止流传输请求。
server=>client
Real Time Streaming Protocol
    Response: RTSP/1.0 200 OK\r\n
        Status: 200
    CSeq: 7\r\n
    Session: 4J_bOCNSg
    \r\n
server返回确认,使用同一Session,停止流传输。
搭建摘要认证环境
上面说到了server可能会进行用户认证,那我们现在得创造一个需要认证的环境,直接看看EasyDarwin能不能直接选择认证,打开easydarwin.ini:
[http]
port=10008
default_username=admin
default_password=admin
#...
;是否使能向服务器推流或者从服务器播放时验证用户名密码. [注意] 因为服务器端并不保存明文密码,所以推送或者播放时,客户端应该输入密码的md5后的值。
;password should be the hex of md5(original password)
authorization_enable=0
#...
可以看到authorization_enable变量是控制认证的,把它的值改为1,重新启动服务。这时候发现原来的ffmpeg命令推流不成功了。

那就是说,向EasyDarwin推流的时候,也需要进行认证。从注释上来看,需要加入用户名和密码的md5值,我们用正确的参数再推流(下面mad5ofpassword换成你密码的md5):
./ffmpeg.exe -re -stream_loop -1 -i test.mp4 -c copy -f rtsp rtsp://admin:mad5ofpassword@127.0.0.1/stream成功了:
![]()
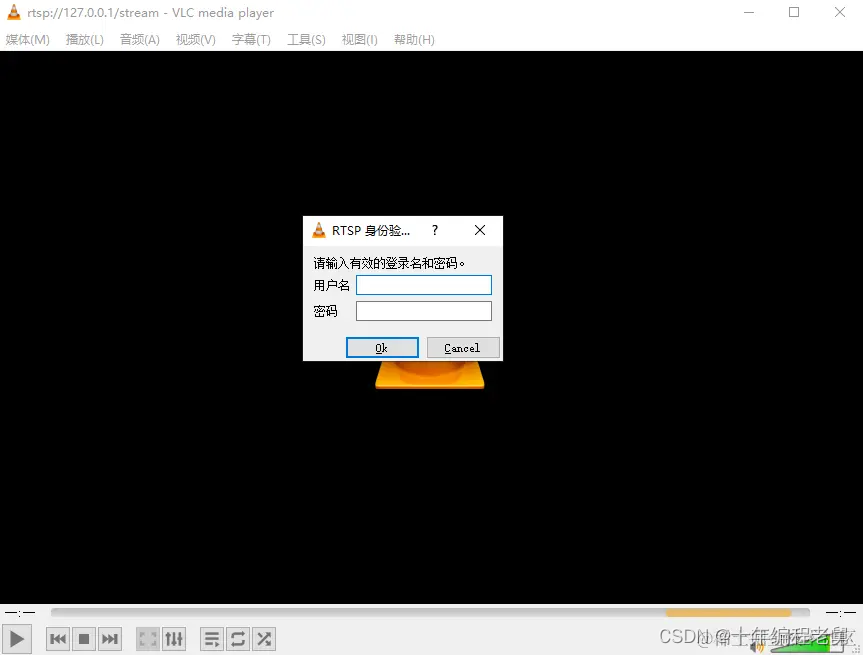
这时候用vlc接收试试,果然要进行认证,要求输入用户名和密码:

注意这里密码也要输入md5后的值。输入正确的密码后,vlc可以接收RTSP流了:

同样地,用wireshark抓包看看带有认证的流程是什么样的:

client=>server
Real Time Streaming Protocol
    Request: DESCRIBE rtsp://127.0.0.1:554/stream RTSP/1.0\r\n
        Method: DESCRIBE
        URL: rtsp://127.0.0.1:554/stream
    CSeq: 6\r\n
    User-Agent: LibVLC/3.0.18 (LIVE555 Streaming Media v2016.11.28)\r\n
    Accept: application/sdp\r\n
    \r\n
首先client同样发起DESCRIBE
server=>client
Real Time Streaming Protocol
    Response: RTSP/1.0 401 Unauthorized\r\n
        Status: 401
    CSeq: 6\r\n
    Session: ayQBojNIg
    WWW-Authenticate: Digest realm="EasyDarwin", nonce="539c6afee35b8edd354e983a6af947bf", algorithm="MD5"\r\n
    \r\n
server返回401,WWW-Authenticate: Digest表示需要摘要认证,realm和nonce用于生成response,algorithm="MD5"表示需要md5算法生成response。
client=>server
Real Time Streaming Protocol
    Request: DESCRIBE rtsp://127.0.0.1:554/stream RTSP/1.0\r\n
        Method: DESCRIBE
        URL: rtsp://127.0.0.1:554/stream
    CSeq: 7\r\n
    Authorization: Digest username="admin", realm="EasyDarwin", nonce="539c6afee35b8edd354e983a6af947bf", uri="rtsp://127.0.0.1:554/stream", response="d6a48b37f2010b3ddfad1eef18692648"\r\n
    User-Agent: LibVLC/3.0.18 (LIVE555 Streaming Media v2016.11.28)\r\n
    Accept: application/sdp\r\n
    \r\n
client用对应算法生成response并返回给server,response的计算方法单独再讲。
server=>client
Real Time Streaming Protocol
    Response: RTSP/1.0 200 OK\r\n
        Status: 200
    Content-length: 511
    CSeq: 7\r\n
    Session: ayQBojNIg
    \r\n
    Data (511 bytes)
server验证response通过,则返回200。
这里其实和上面一样返回了SDP信息(Data 511 bytes中的信息),但EasyDarwin是做了加密处理还是什么,是无法解析出来的。
之后的流程就和没有摘要认证的过程是一样的了。
完善代码,处理摘要认证
既然可能会存在认证,那我们代码中得处理server有认证的情况,否则肯定收不到RTSP流。首先我们定位server的返回在哪里被捕捉了,经过一番尝试,发现在方法avformat_open_input中:
if ((ret = avformat_open_input(&streamFmtCtx, url.toStdString().c_str(), nullptr, nullptr)) != 0) {
    qDebug() << "ret:" << ret;
}
//打印输出
//ret: -825242872
//ffmpeg日志输出
//[rtsp @ 000001d2d3940ec0] method DESCRIBE failed: 401 Unauthorized
在需要认证的情况下,avformat_open_input直接返回了一个负数。再结合ffmpeg的日志,大致可以断定这是server返回Unauthorized时的情况。但我们需要更具体的确认,所以查看avformat_open_input的声明:
//avformat.h
/*
* @return 0 on success, a negative AVERROR on failure.
*/
int avformat_open_input(AVFormatContext **ps, const char *url, ff_const59 AVInputFormat *fmt, AVDictionary **options);
返回值是一个int,注释中写到如果是失败,则返回AVERROR,那么接下来,我们可以去ffmpeg的源码中,找关于AVERROR的内容了。
如果编译了ffmpeg源码,直接debug就可以看到最终是如何返回的,但现在我们不想花额外的时间去编译源码,所以我们用宇宙第一IDE——Visual Studio,打开ffmpeg的源码文件夹,直接搜索AVERROR,很方便找到了AVERROR的定义:
//error.h
#define AVERROR(e) (-(e))   ///< Returns a negative error code from a POSIX error code, to return from library functions.
可以看到AVERROR是用来取POSIX中标准错误相反数的宏,继续追踪没有发现相关返回的地方。但我们在头文件却看见了Unauthorized的相关定义:
//error.h
#define AVERROR_HTTP_UNAUTHORIZED  FFERRTAG(0xF8,'4','0','1')
#define FFERRTAG(a, b, c, d) (-(int)MKTAG(a, b, c, d))
//common.h
#define MKTAG(a,b,c,d) ((a) | ((b) << 8) | ((c) << 16) | ((unsigned)(d) << 24))
按照定义,AVERROR_HTTP_UNAUTHORIZED实际上是(0xF8,'4','0','1')组合的移位,按照定义计算后AVERROR_HTTP_UNAUTHORIZED确实等于-825242872。为了验证,我们把宏定义从ffmpeg源码中复制出来,直接在我们项目中打印:
//mainwindow.h
#define AVERROR_HTTP_UNAUTHORIZED  FFERRTAG(0xF8,'4','0','1')
#define MKTAG(a, b, c, d) ((a) | ((b) << 8) | ((c) << 16) | ((unsigned)(d) << 24))
#define FFERRTAG(a, b, c, d) (-(int)MKTAG(a, b, c, d))
//mainwindow.cpp
qDebug() << "AVERROR_HTTP_UNAUTHORIZED:" <<FFERRTAG(0xF8,'4','0','1');

//输出
//AVERROR_HTTP_UNAUTHORIZED: -825242872
输出和前面的日志输出还有我们计算出来的结果都是一样的,到这里我们确定报出了AVERROR_HTTP_UNAUTHORIZED错误。顺手把error.h中其他宏定义打印出来,ffmpeg常用错误码错误码表如下:
| 错误码宏定义 | 错误码 | 错误说明 |
| AVERROR_BSF_NOT_FOUND | -1179861752 | Bitstream filter not found |
| AVERROR_BUG | -558323010 | Internal bug, also see AVERROR_BUG2 |
| AVERROR_BUFFER_TOO_SMALL | -1397118274 | Buffer too small |
| AVERROR_DECODER_NOT_FOUND | -1128613112 | Decoder not found |
| AVERROR_DEMUXER_NOT_FOUND | -1296385272 | Demuxer not found |
| AVERROR_ENCODER_NOT_FOUND | -1129203192 | Encoder not found |
| AVERROR_EOF | -541478725 | End of file |
| AVERROR_EXIT | -1414092869 | Immediate exit was requested; the called function should not be restarted |
| AVERROR_EXTERNAL | -542398533 | Generic error in an external library |
| AVERROR_FILTER_NOT_FOUND | -1279870712 | Filter not found |
| AVERROR_INVALIDDATA | -1094995529 | Invalid data found when processing input |
| AVERROR_MUXER_NOT_FOUND | -1481985528 | Muxer not found |
| AVERROR_OPTION_NOT_FOUND | -1414549496 | Option not found |
| AVERROR_PATCHWELCOME | -1163346256 | Not yet implemented in FFmpeg, patches welcome |
| AVERROR_PROTOCOL_NOT_FOUND | -1330794744 | Protocol not found |
| AVERROR_STREAM_NOT_FOUND | -1381258232 | Stream not found |
| AVERROR_BUG2 | -541545794 | |
| AVERROR_UNKNOWN | -1313558101 | |
| AVERROR_EXPERIMENTAL | -733130664 | |
| AVERROR_INPUT_CHANGED | -1668179713 | |
| AVERROR_OUTPUT_CHANGED | -1668179714 | |
| AVERROR_HTTP_BAD_REQUEST | -808465656 | |
| AVERROR_HTTP_UNAUTHORIZED | -825242872 | |
| AVERROR_HTTP_FORBIDDEN | -858797304 | |
| AVERROR_HTTP_NOT_FOUND | -875574520 | |
| AVERROR_HTTP_OTHER_4XX | -1482175736 | |
| AVERROR_HTTP_SERVER_ERROR | -1482175992 |
于是可以在代码中增加Unauthorized情况的处理,如果Unauthorized则让用户输入用户名和密码。
//ffmpegmanager.cpp
if ((ret = avformat_open_input(&streamFmtCtx, url.toStdString().c_str(), nullptr, nullptr)) != 0) {
    if (ret == AVERROR_HTTP_UNAUTHORIZED)
    {
        //...
        return;
    }else{
        //...
        return;
    }
}
vlc中,如果输入的用户名和密码无法通过验证,则会重新弹出验证框(且用户名不用重新输入),直至输入正确或取消输入(效果看开头)。所以我们也加入RTSP地址合法性的检查等操作:
//ffmpegmanager.cpp
int rtspIndex = url.indexOf("rtsp://");
int atIndex = url.lastIndexOf("@");
if(rtspIndex != -1 && atIndex != -1){
    QString couple = url.mid(rtspIndex + 7, atIndex - rtspIndex - 7);
    username = couple;
    if(couple.contains(':')){
        username = couple.mid(0, couple.lastIndexOf(':'));
    }
}
到这里,我们的代码可以适配需要摘要认证的情况了。
增加错误窗口
vlc在无法打开RTSP地址的时候会弹出错误窗口。

我们也增加一个错误窗口,把所有错误都归为无法打开地址,并打印出来。

解决内存泄漏
最然程序可以正常接收RTSP流了,但出现了之前没出现的情况:内存持续增加。这种情况下一般是发生了内存泄露,之前读取MP4文件没有发现,可能是因为文件大小固定,现在持续收流,现象比较明显,我们得排查我们的代码。简单定位之后,我们发现是下面的代码块发生泄露:
while(av_read_frame(streamFmtCtx, packet) >= 0){
    if(packet->stream_index == nVideoIndex){
        if(avcodec_send_packet(decoderCtx, packet)>=0){
            while((ret = avcodec_receive_frame(decoderCtx, decodedFrame)) >= 0){
                //...
            }
        }
    }
}
接下来我们逐句排查,首先是av_read_frame,查看它的声明:
//avformat.h
/**
 *.....
 * On success, the returned packet is reference-counted (pkt->buf is set) and
 * valid indefinitely. The packet must be freed with av_packet_unref() when
 * it is no longer needed.
 *.....
 */
int av_read_frame(AVFormatContext *s, AVPacket *pkt);
这里面有些有用的信息:pkt是reference-counted的,如果不av_packet_unref(),则它将永久有效。继续看它的定义,我们的目标是找出和pkt相关的进行reference-counted的语句:
//avformat.cpp
int av_read_frame(AVFormatContext *s, AVPacket *pkt){
    //...
    ret = read_frame_internal(s, pkt);
    ret = avpriv_packet_list_put(&s->internal->packet_buffer,
                                 &s->internal->packet_buffer_end,
                                 pkt, NULL, 0);
    //...
}
最终pkt都要执行这两个函数,avpriv_packet_list_put就是我们要找的地方,继续看它的声明和定义:
//packet_internal.h
/**
 * Append an AVPacket to the list.
 *
 * @param head  List head element
 * @param tail  List tail element
 * @param pkt   The packet being appended. The data described in it will
 *              be made reference counted if it isn't already.
 */
int avpriv_packet_list_put(PacketList **head, PacketList **tail,
                           AVPacket *pkt,
                           int (*copy)(AVPacket *dst, const AVPacket *src),
                           int flags);
//avpacket.c
int avpriv_packet_list_put(PacketList **packet_buffer,
                           PacketList **plast_pktl,
                           AVPacket      *pkt,
                           int (*copy)(AVPacket *dst, const AVPacket *src),
                           int flags)
{
    //...
    if (*packet_buffer)
        (*plast_pktl)->next = pktl;
    else
        *packet_buffer = pktl;
    *plast_pktl = pktl;
    return 0;
}
最后pkt添加到了buffered packet中。其他细节我们可以不用深究,只需要知道pkt被添加到了一个list中,那么这里的确会产生内存泄漏。根据前面声明中的提示,我们需要使用av_packet_unref()来释放pkt的引用,那么直接在读取和使用完1个AVPacket和结束时调用av_packet_unref()。
while(av_read_frame(streamFmtCtx, packet) >= 0){
    //...
    av_packet_unref(packet);
}
av_packet_unref(packet);
加上后发现,内存泄漏的问题被解决了,那就不再继续向下排查了。
本文福利, 免费领取C++音视频学习资料包+学习路线大纲、技术视频/代码,内容包括(音视频开发,面试题,FFmpeg ,webRTC ,rtmp ,hls ,rtsp ,ffplay ,编解码,推拉流,srs)↓↓↓↓↓↓见下面↓↓文章底部点击免费领取↓↓
本文来自互联网用户投稿,该文观点仅代表作者本人,不代表本站立场。本站仅提供信息存储空间服务,不拥有所有权,不承担相关法律责任。 如若内容造成侵权/违法违规/事实不符,请联系我的编程经验分享网邮箱:chenni525@qq.com进行投诉反馈,一经查实,立即删除!
- Python教程
- 深入理解 MySQL 中的 HAVING 关键字和聚合函数
- Qt之QChar编码(1)
- MyBatis入门基础篇
- 用Python脚本实现FFmpeg批量转换
- 电工技术实验指导书-万用表的使用
- 万辰集团十年经营首度亏损,泡沫式增长是喜是忧?
- 【STM32】STM32学习笔记-定时器定时中断 定时器外部时钟(14)
- Windows 环境下安装 Python 解释器
- 了解JavaScript中的操作符(一)
- 如何使用 Helm 在 K8s 上集成 Prometheus 和 Grafana|Part 1
- 初识 WebGPU 以及遇到 WebGPU not supported 错误的解决方法
- 使用Termux+Hexo搭建个人博客结合内网穿透工具轻松实现公网访问内网博客
- A01、class文件简要说明
- Spark中Rdd算子和Action算子--学习笔记