AWS EKS1.26+kubesphere3.4.1
1、前提准备
- 1台EC2服务器Amazon Linux2,设置admin的角色
- 安装 aws cli V2
?
curl "https://awscli.amazonaws.com/awscli-exe-linux-x86_64.zip" -o "awscliv2.zip"

unzip awscliv2.zip

sudo ./aws/install

export PATH=/usr/local/bin:$PATH

source ~/.bash_profile

?- 安装kubectl 1.27
?
curl -O https://s3.us-west-2.amazonaws.com/amazon-eks/1.27.1/2023-04-19/bin/linux/amd64/kubectl

chmod +x ./kubectl

mkdir -p $HOME/bin && cp ./kubectl $HOME/bin/kubectl && export PATH=$PATH:$HOME/bin

echo 'export PATH=$PATH:$HOME/bin' >> ~/.bashrc

kubectl version --short --client

?- 安装 eksctl 最新版本
?
使用以下命令下载并提取最新版本的?eksctl。

curl --silent --location "https://github.com/weaveworks/eksctl/releases/latest/download/eksctl_$(uname -s)_amd64.tar.gz" | tar xz -C /tmp

将提取的二进制文件移至?/usr/local/bin。

sudo mv /tmp/eksctl /usr/local/bin

使用以下命令测试您的安装是否成功。

eksctl version

?- 安装helm
?
wget?https://get.helm.sh/helm-v3.11.1-linux-amd64.tar.gz

tar -zxvf helm-v3.11.1-linux-amd64.tar.gz?

sudo mv linux-amd64/helm /usr/local/bin/helm

?
2、创建集群
- 使用eksctl安装EKS集群(这里自动新建了一个VPC,以及对应的子网。自动创建的子网,EKS 相关的标签已自动打好)
修改下面的集群名字
sudo yum install -y jq

export AWS_REGION=$(curl -s 169.254.169.254/latest/dynamic/instance-identity/document | jq -r '.region')

echo "export AWS_REGION=${AWS_REGION}" | tee -a ~/.bash_profile

aws configure set default.region ${AWS_REGION}

export ACCOUNT_ID=$(curl -s 169.254.169.254/latest/dynamic/instance-identity/document | jq -r '.accountId')

echo "export ACCOUNT_ID=${ACCOUNT_ID}" | tee -a ~/.bash_profile


export CLUSTER_NAME="eks-demo2"
需要根据实际场景修改下面的实例类型
cat << EOF > ${CLUSTER_NAME}-cluster.yaml

---

apiVersion: eksctl.io/v1alpha5

kind: ClusterConfig


metadata:

? name: ${CLUSTER_NAME} # EKS Cluster name

? region: ${AWS_REGION} # Region Code to place EKS Cluster

? version: "1.26"

? tags:

??? karpenter.sh/discovery: ${CLUSTER_NAME}


vpc:

? cidr: "10.101.0.0/16" # CIDR of VPC for use in EKS Cluster

? nat:

??? gateway: Disable # Disable NAT Gateway

karpenter:

? version: 'v0.30.0'

? createServiceAccount: true # default is false

? defaultInstanceProfile: 'KarpenterNodeInstanceProfile' # default is to use the IAM instance profile created by eksctl

? withSpotInterruptionQueue: true # adds all required policies and rules for supporting Spot Interruption Queue, default is false

iam:

? withOIDC: true # required


managedNodeGroups:

? - name: node-group # Name of node group in EKS Cluster

??? instanceType: t3.xlarge # Instance type for node group

??? desiredCapacity: 2 # The number of worker node in EKS Cluster

??? volumeSize: 100? # EBS Volume for worker node (unit: GiB)

??? volumeType: 'gp3'

??? maxPodsPerNode: 100

??? privateNetworking: false

??? ssh:

????? enableSsm: true

??? iam:

????? withAddonPolicies:

??????? imageBuilder: true # Add permission for Amazon ECR

??????? albIngress: true? # Add permission for ALB Ingress

??????? cloudWatch: true # Add permission for CloudWatch

??????? autoScaler: true # Add permission Auto Scaling

??????? ebs: true # Add permission EBS CSI driver

EOF


eksctl create cluster -f ${CLUSTER_NAME}-cluster.yaml
3、安装应的LB Controller
获取ID,确认 OIDC 是否已安装
aws eks describe-cluster --name ${CLUSTER_NAME} --query "cluster.identity.oidc.issuer" --output text
输出如下文本:
https://oidc.eks.cn-northwest-1.amazonaws.com.cn/id/36A3B4C5ED098358C3C724DA105EBC86
若没有安装,则执行:
安装OIDC
eksctl utils associate-iam-oidc-provider \
??? --region ${AWS_REGION} \
??? --cluster ${CLUSTER_NAME} \
??? --approve
创建一个 IAM policy。
下载 Amazon Load Balancer Controller 的 IAM policy,该策略允许负载均衡器代表您调用 Amazon API。
curl -O https://raw.githubusercontent.com/kubernetes-sigs/aws-load-balancer-controller/v2.5.4/docs/install/iam_policy.json
使用上一步中下载的策略创建一个 IAM policy。
aws iam create-policy \
??? --policy-name AWSLoadBalancerControllerIAMPolicy_${CLUSTER_NAME} ?\
??? --policy-document file://iam_policy.json
??????????? 创建serviceaccount
eksctl create iamserviceaccount \
? --cluster=${CLUSTER_NAME} \
? --namespace=kube-system \
? --name=aws-load-balancer-controller \
? --role-name AmazonEKSLoadBalancerControllerRole_${CLUSTER_NAME} \
? --attach-policy-arn=arn:aws:iam::${ACCOUNT_ID}:policy/AWSLoadBalancerControllerIAMPolicy_${CLUSTER_NAME} \
? --approve
添加?eks-charts?存储库。
helm repo add eks https://aws.github.io/eks-charts
更新您的本地存储库,以确保您拥有最新的图表。
helm repo update
??????????? 进行安装
helm install aws-load-balancer-controller eks/aws-load-balancer-controller \

? -n kube-system \

? --set clusterName=${CLUSTER_NAME} \

? --set serviceAccount.create=false \

? --set serviceAccount.name=aws-load-balancer-controller \

? --set enableShield=false \

? --set enableWaf=false \

? --set enableWafv2=false \

?????
验证控制器是否已安装。
kubectl get deployment -n kube-system aws-load-balancer-controller
输出示例如下。
NAME?????????????????????????? READY?? UP-TO-DATE?? AVAILABLE?? AGE
aws-load-balancer-controller?? 2/2???? 2??????????? 2?????????? 84s
- 安装EBS CSI驱动
eksctl create iamserviceaccount \

??? --name ebs-csi-controller-sa \

??? --namespace kube-system \

??? --cluster ${CLUSTER_NAME} \

??? --role-name AmazonEKS_EBS_CSI_DriverRole_${CLUSTER_NAME} \

??? --role-only \

??? --attach-policy-arn arn:aws:iam::aws:policy/service-role/AmazonEBSCSIDriverPolicy \

??? --approve


eksctl create addon --name aws-ebs-csi-driver --cluster ${CLUSTER_NAME} --service-account-role-arn? arn:aws:iam::${ACCOUNT_ID}:role/AmazonEKS_EBS_CSI_DriverRole_${CLUSTER_NAME} –force
4、安装kubesphere
4.1、最小化安装
- 使用 kubectl 安装 KubeSphere,
以下命令仅用于默认的最小安装。
kubectl apply -f https://github.com/kubesphere/ks-installer/releases/download/v3.4.1/kubesphere-installer.yaml

kubectl apply -f https://github.com/kubesphere/ks-installer/releases/download/v3.4.1/cluster-configuration.yaml
检查安装日志:
kubectl logs -n kubesphere-system $(kubectl get pod -n kubesphere-system -l 'app in (ks-install, ks-installer)' -o jsonpath='{.items[0].metadata.name}') -f
安装完成后,您会看到以下消息:
-
#####################################################
###????????????? Welcome to KubeSphere!?????????? ###
#####################################################
Account: admin
Password: P@88w0rd
NOTES:
??1. After logging into the console, please check the
????monitoring status of service components in
????the "Cluster Management". If any service is not
????ready, please wait patiently until all components
????are ready.
??2. Please modify the default password after login.
#####################################################
https://kubesphere.io???????????? 2020-xx-xx xx:xx:xx
- 访问 KubeSphere 控制台
现在已经安装了 KubeSphere,您可以按照以下步骤访问 KubeSphere 的 Web 控制台。
- 查看 ks-console 服务。
kubectl get svc -n kubesphere-system
但是这种内网 IP 无法直接用于外部访问,需要通过NodePort来暴露external-ip
- 执行kubectl edit ks-console将 service 类型NodePort?更改为LoadBalancer,并且增加三条注解,完成后保存文件。
kubectl edit svc ks-console -n kubesphere-system
??? service.beta.kubernetes.io/aws-load-balancer-nlb-target-type: ip

??? service.beta.kubernetes.io/aws-load-balancer-scheme: internet-facing

??? service.beta.kubernetes.io/aws-load-balancer-type: external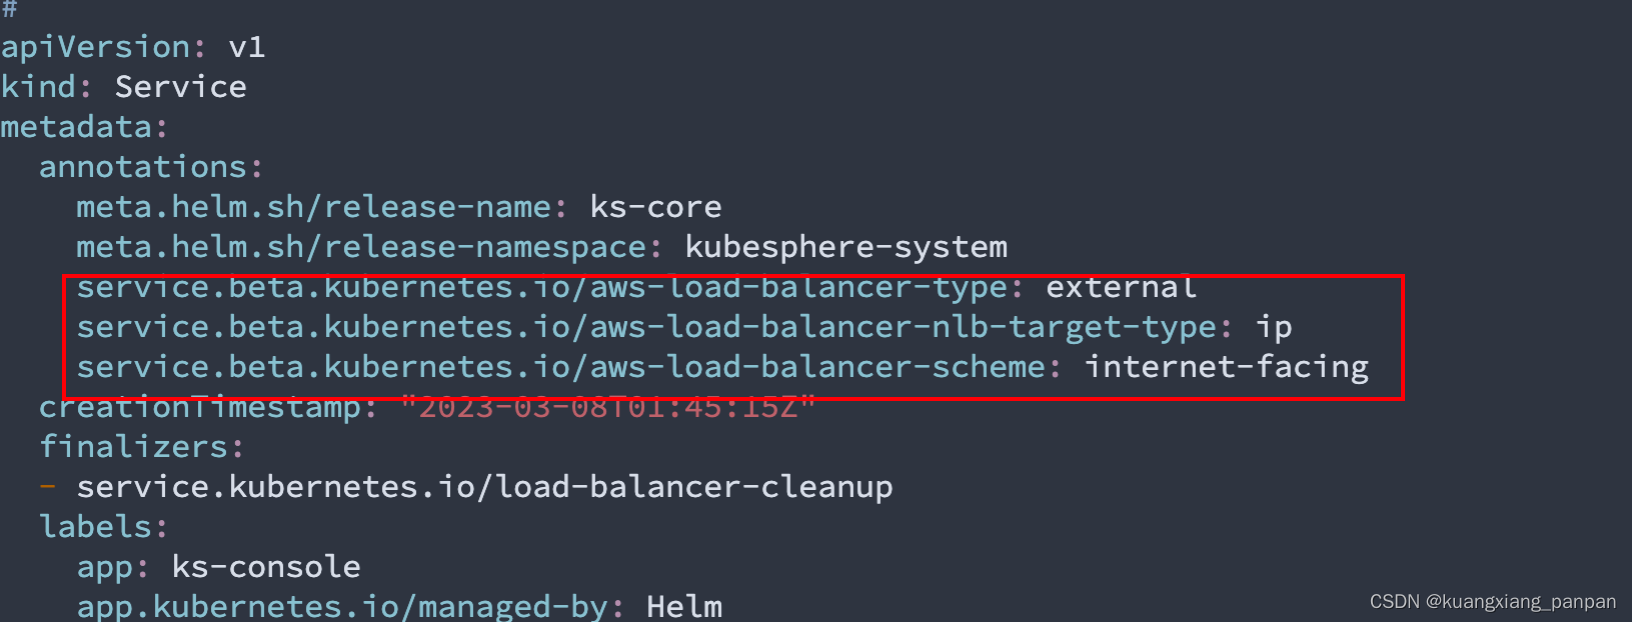
-
#
......
spec:
??clusterIP: 10.100.160.240
??externalTrafficPolicy: Cluster
??ports:
??- name: nginx
????nodePort: 30880
????port: 80
????protocol: TCP
????targetPort: 8000
??selector:
????app: ks-console
????tier: frontend
????version: v3.0.0
??sessionAffinity: None
??type: LoadBalancer
- 执行kubectl get svc -n kubesphere-system获取您的 EXTERNAL-IP。
-
# kubectl get svc -n kubesphere-system
NAME??????????????????? TYPE?????????? CLUSTER-IP?????? EXTERNAL-IP?????????????????????????????????????????????????????????????? PORT(S)??????? AGE
ks-apiserver??????????? ClusterIP????? 10.100.108.212?? <none>??????????????????????????????????????????????????????????????????? 80/TCP???????? 6m28s
ks-console????????????? LoadBalancer?? 10.100.160.240?? ad107c54ee456744c91c8da0b9321f2c-1235661477.ap-east-1.elb.amazonaws.com?? 80:30880/TCP?? 6m25s
ks-controller-manager?? ClusterIP????? 10.100.126.96??? <none>??????????????????????????????????????????????????????????????????? 443/TCP??????? 6m28s
openldap??????????????? ClusterIP????? None???????????? <none>??????????????????????????????????????????????????????????????????? 389/TCP??????? 6m54s
redis?????????????????? ClusterIP????? 10.100.218.34??? <none>??????????????????????????????????????????????????????????????????? 6379/TCP?????? 6m59s
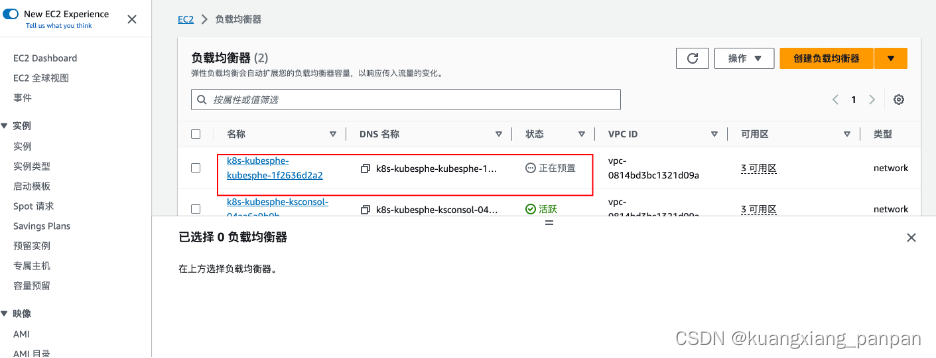
- 使用 EKS 生成的 external-ip 访问 KubeSphere 的 Web 控制台。
注:这里在自动创建 aws 的 NLB,需要几分钟后,才能通过个external-ip正常访问
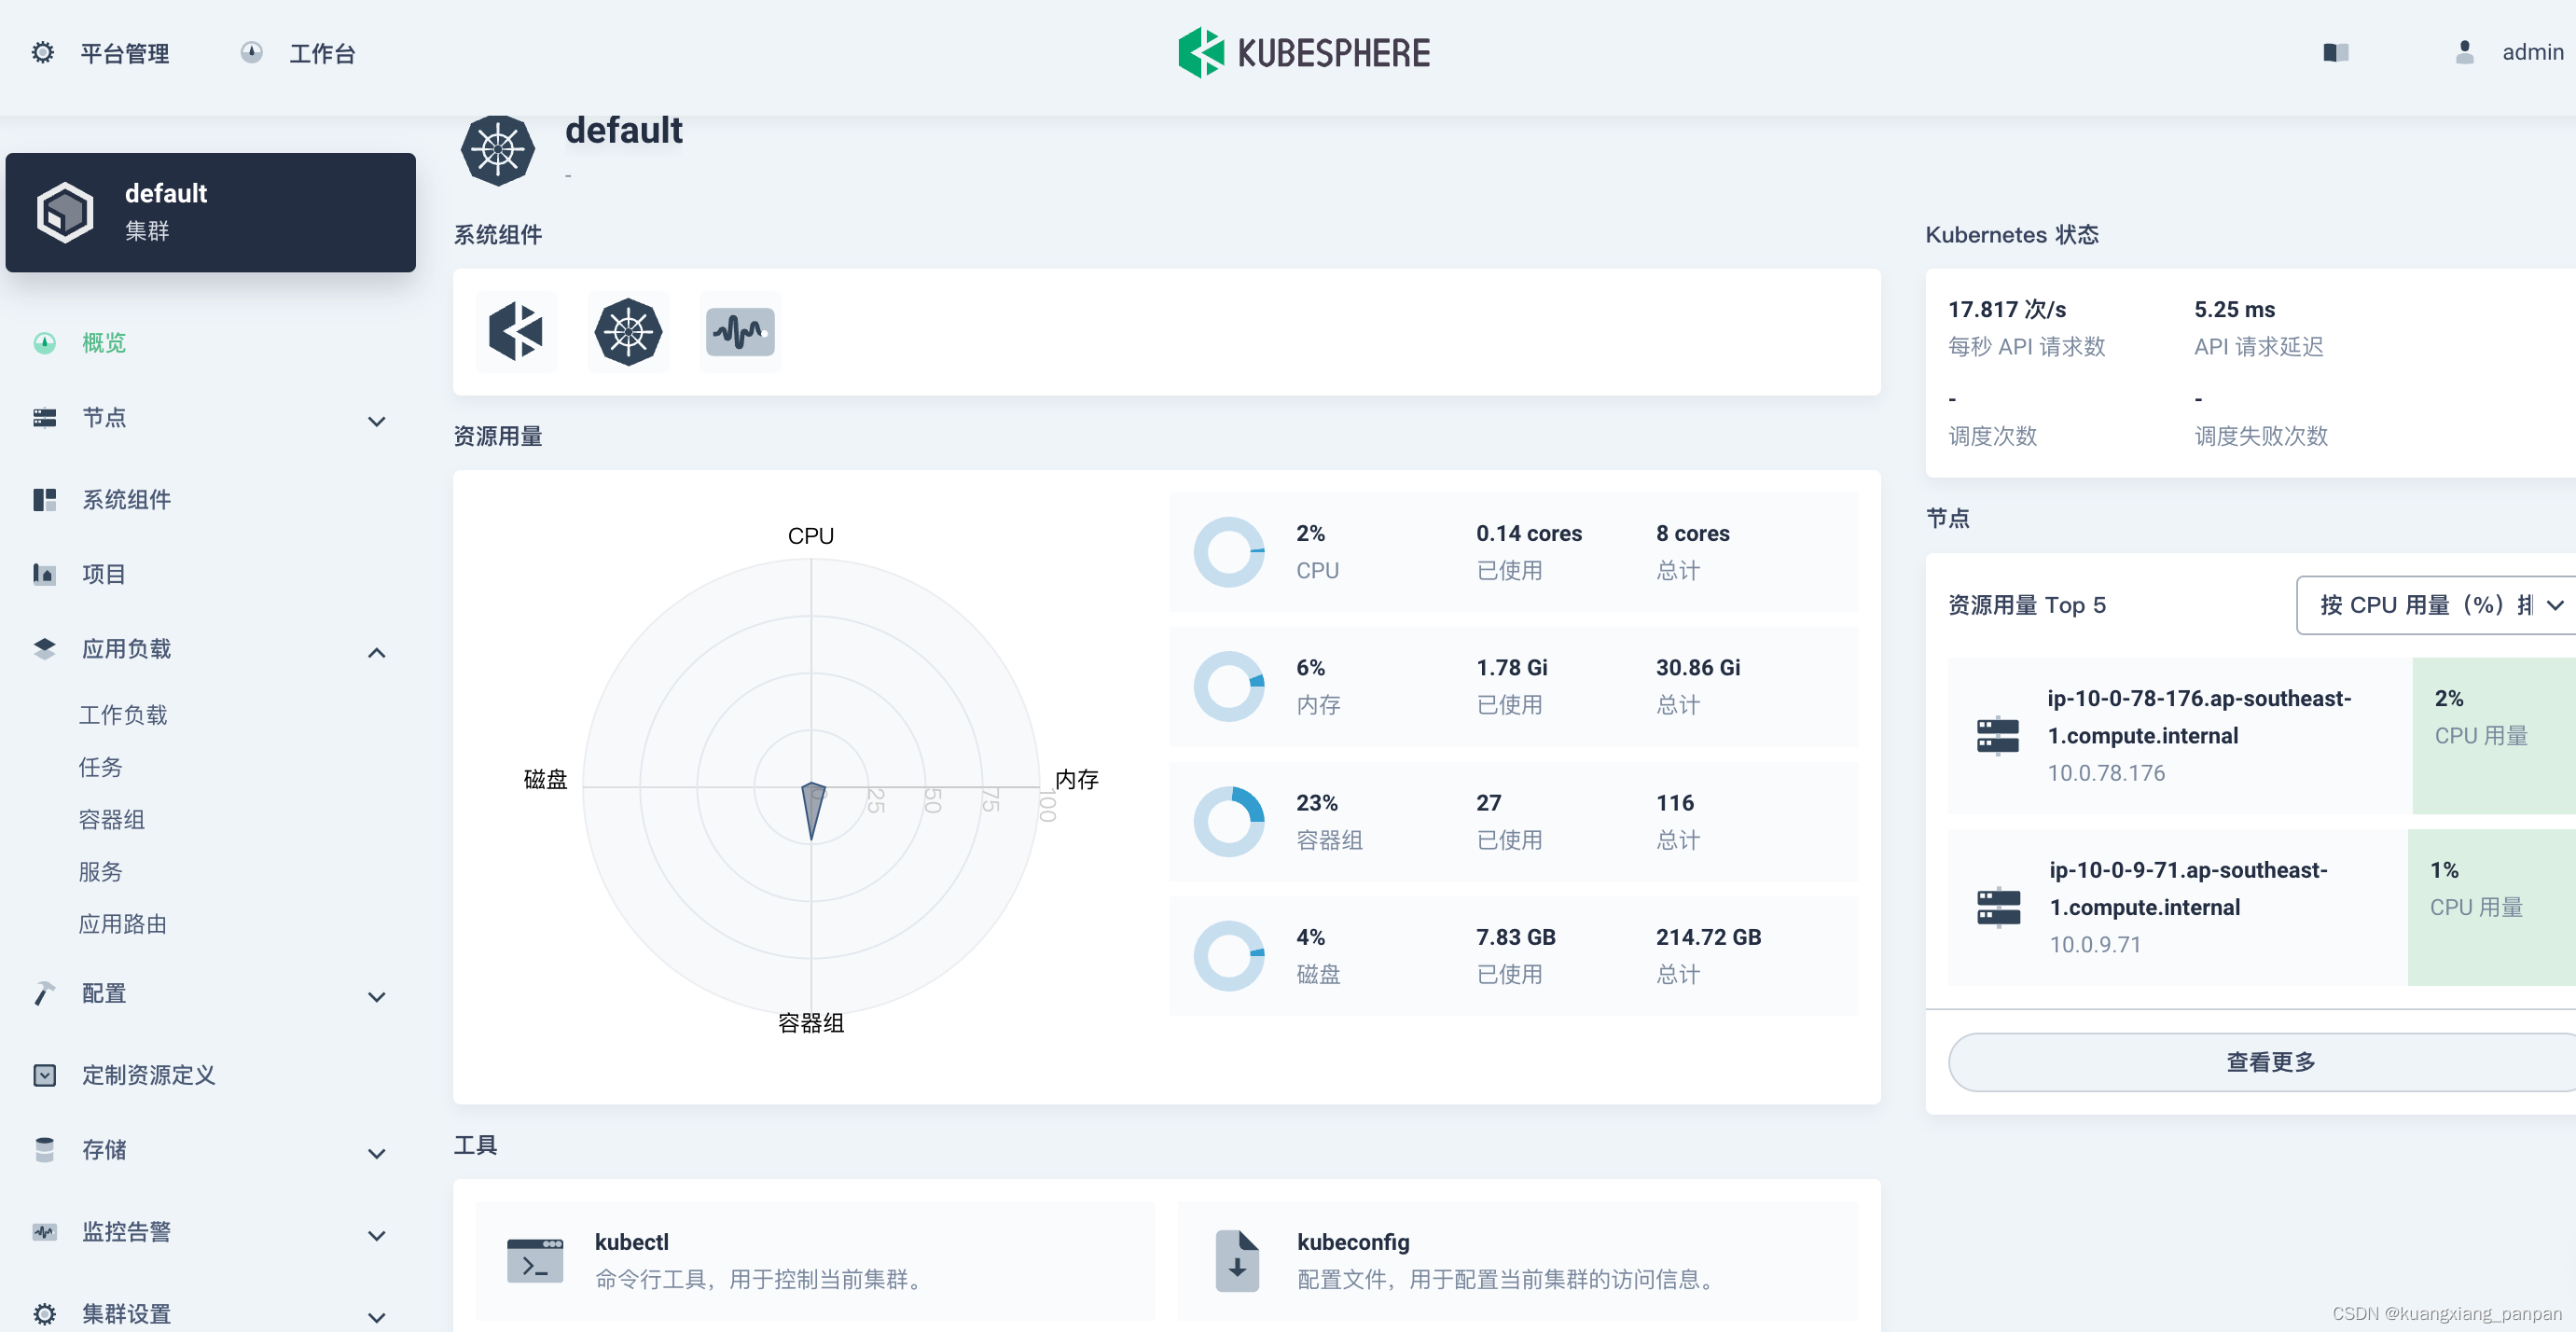
- 使用默认帐户和密码(admin/P@88w0rd)登录控制台

4.2、网关(Ingress)设置
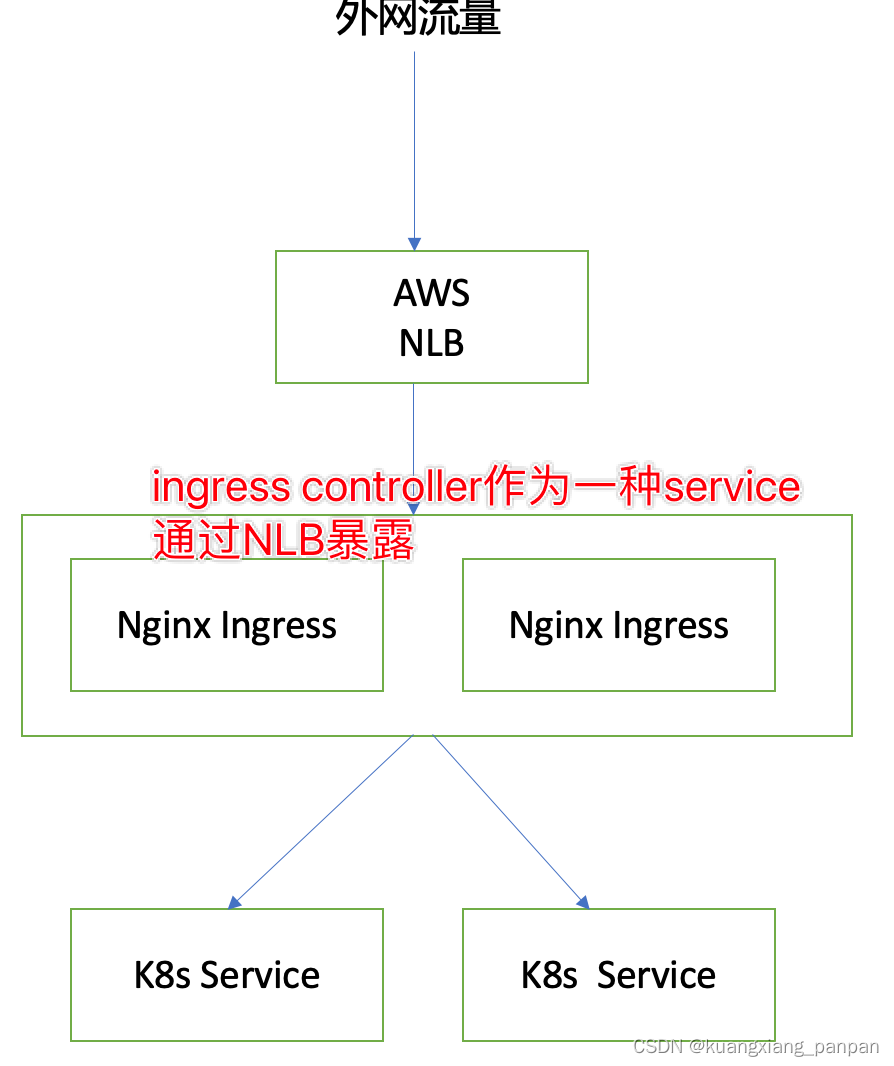
针对k8s的外网暴露,AWS做了优化,让ALB直接路由到k8s的service,如下图所示。此种方式性能更优,更稳定,但不支持跨域的相关配置 (跨域的配置通常在nginx或者应用程序内部实现)。

为了实现跨域名配置,采用如下图的做法,LB通过Nginx Ingressk路由到服务。如果想 100 兼容k8s的特性,建议此种办法做为实现。
 ?
?
?Kubesphere中进行网关配置 (2到3步完成配置)
进入kubeshpere。
1、启动用网设置,如下图所示。
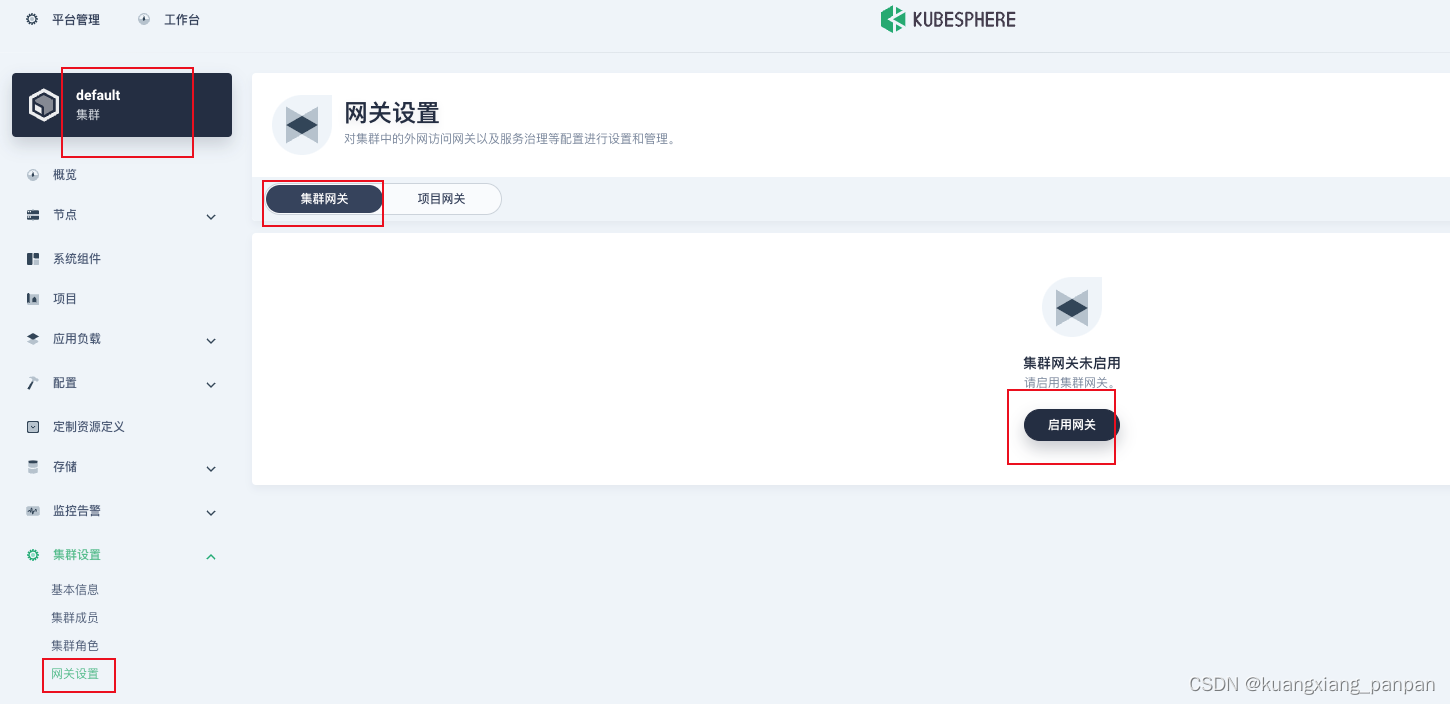
2.配置网关
??? service.beta.kubernetes.io/aws-load-balancer-nlb-target-type: ip
??? service.beta.kubernetes.io/aws-load-balancer-scheme: internet-facing
??? service.beta.kubernetes.io/aws-load-balancer-type: external
注:复制时,去掉“:”号

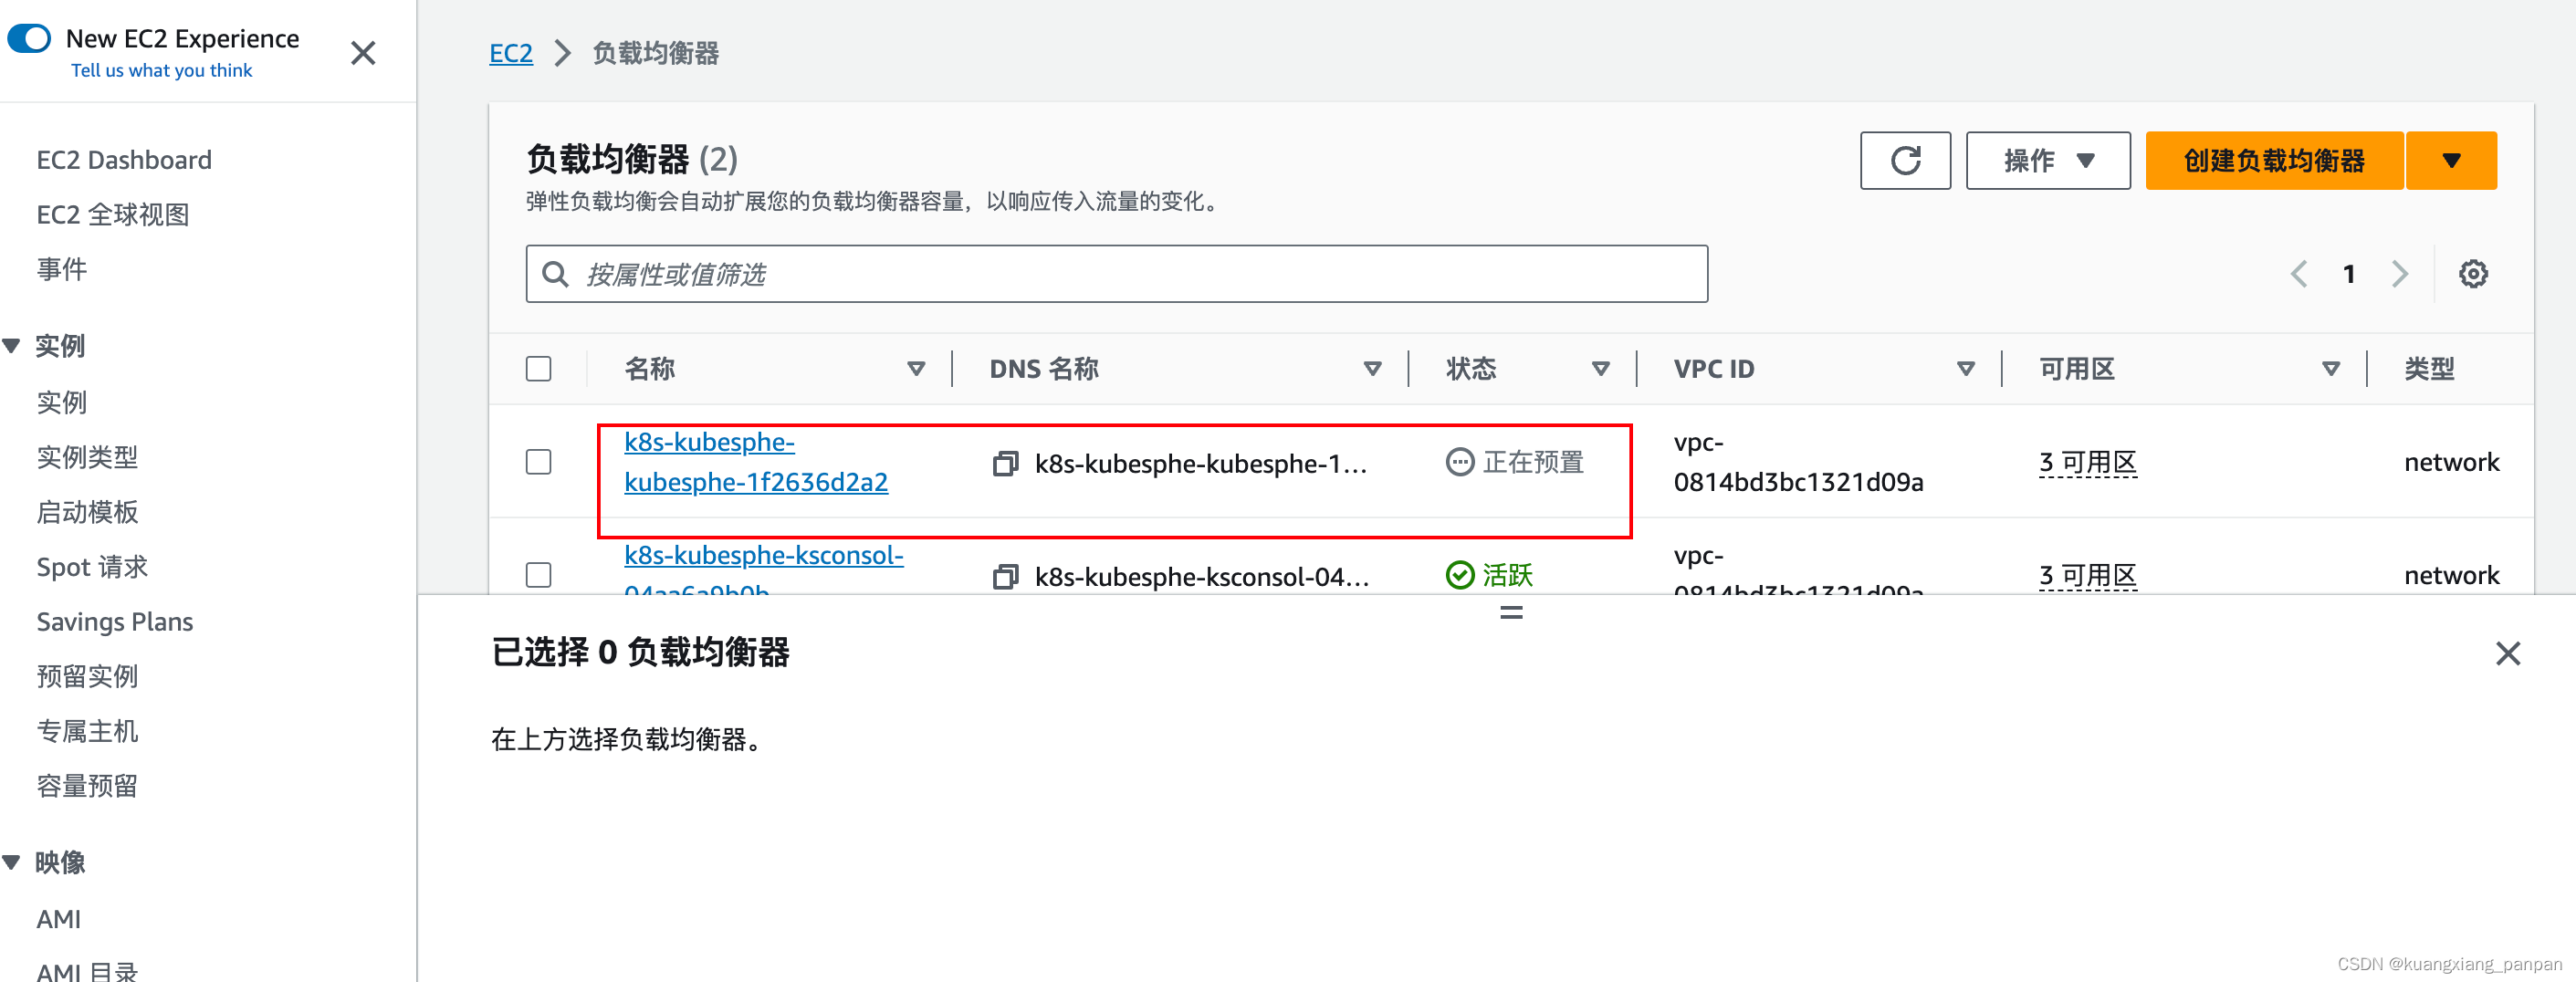
3. 网关设置完成后,会发现在服务中会出一个router的服务,并且具有外网访问地址(NLB的地址),拷贝这里的外网地址作为,与域名绑定,做CName映射。(测试阶段,也可以使用本地hosts配置)

4、后续可以正常使用应用网关配置 路由。涉及的SSL证书也在这里上传和创建。

5、部署一个示例应用
创建deployment
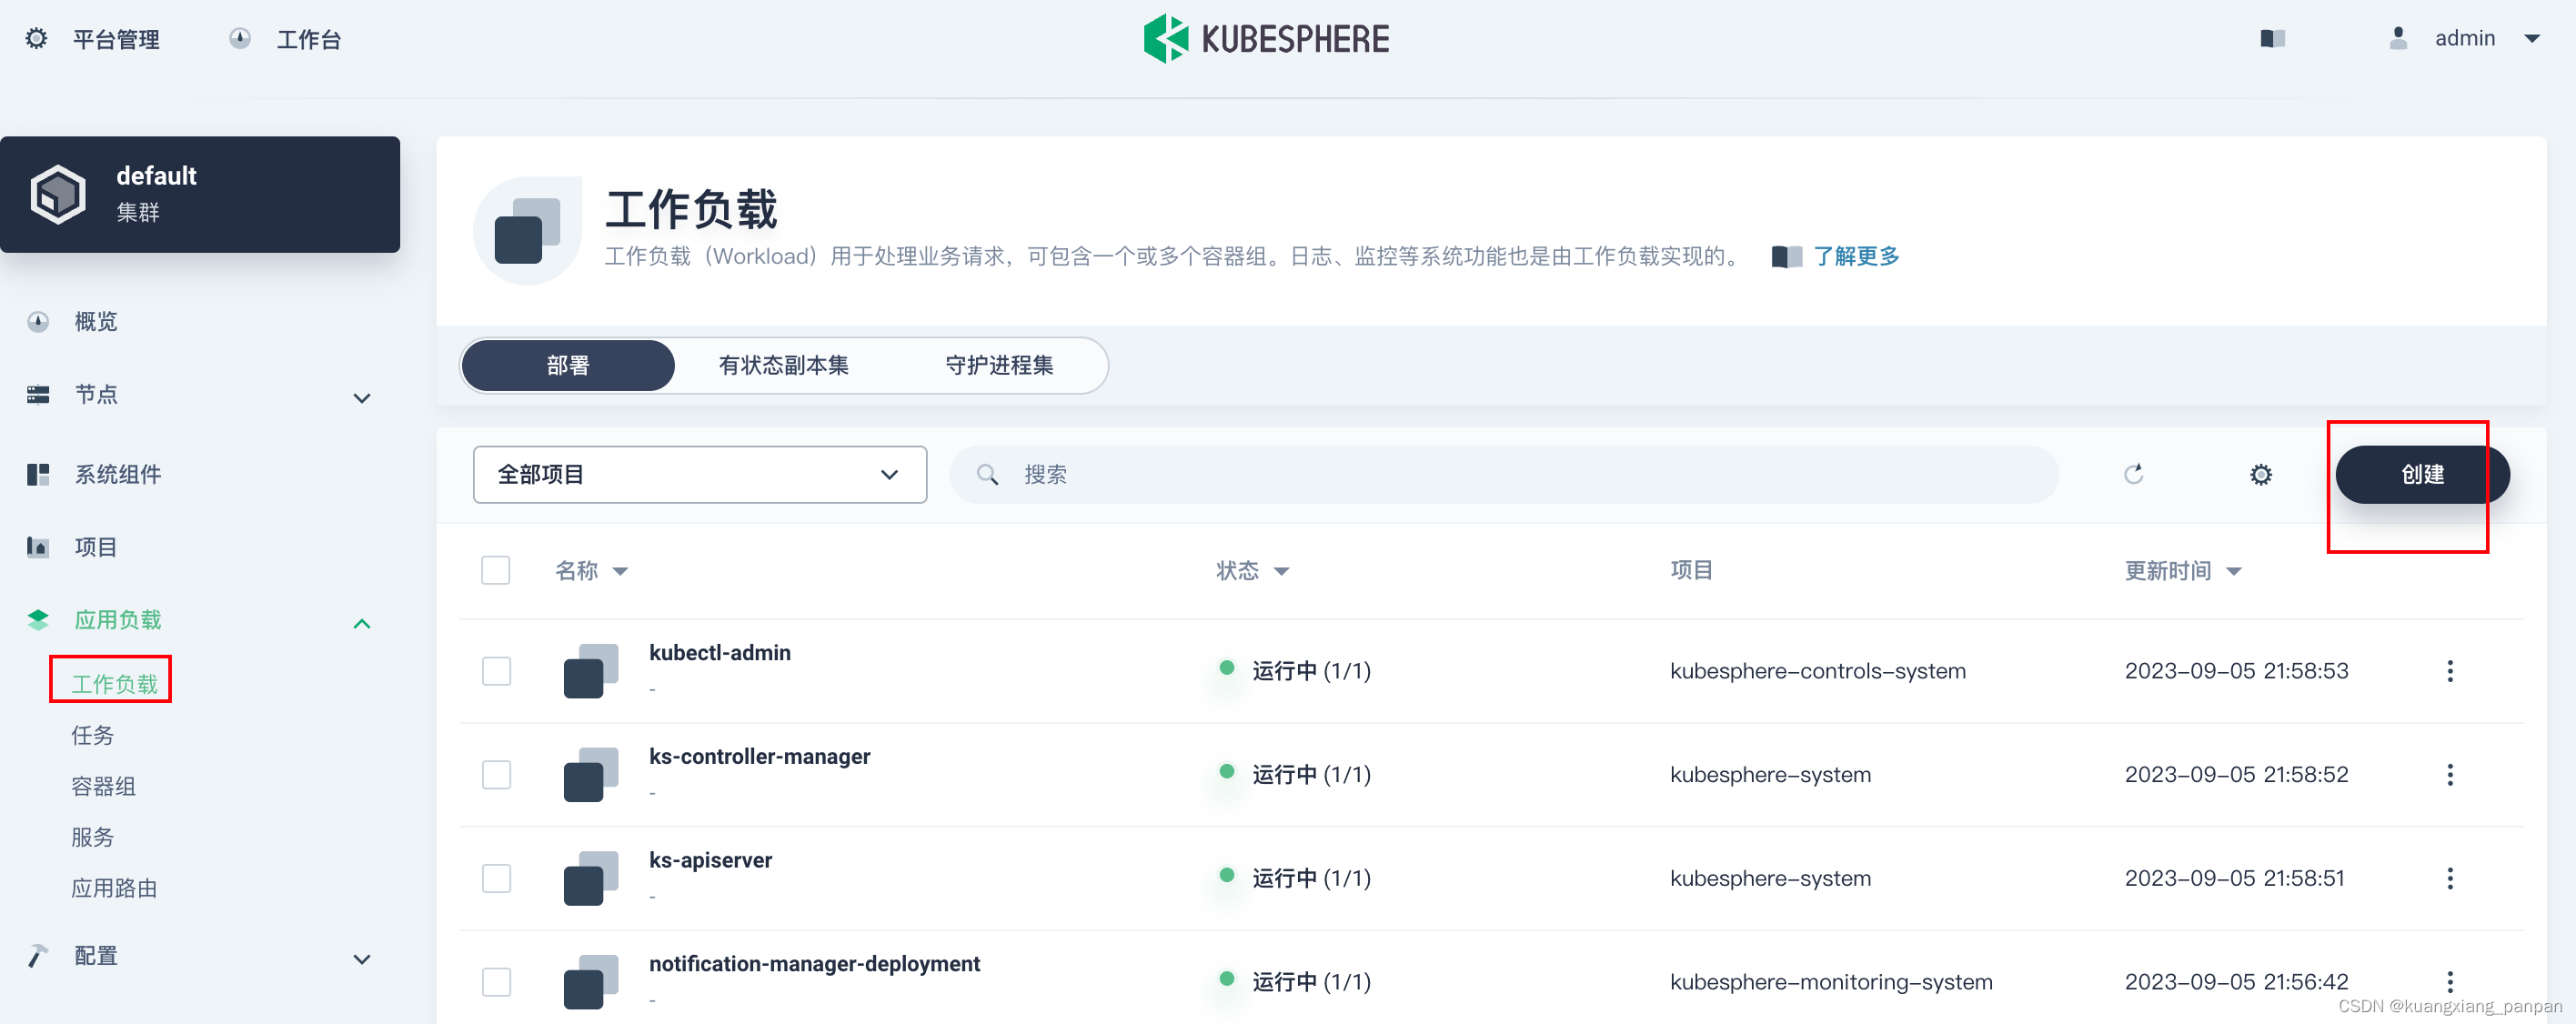
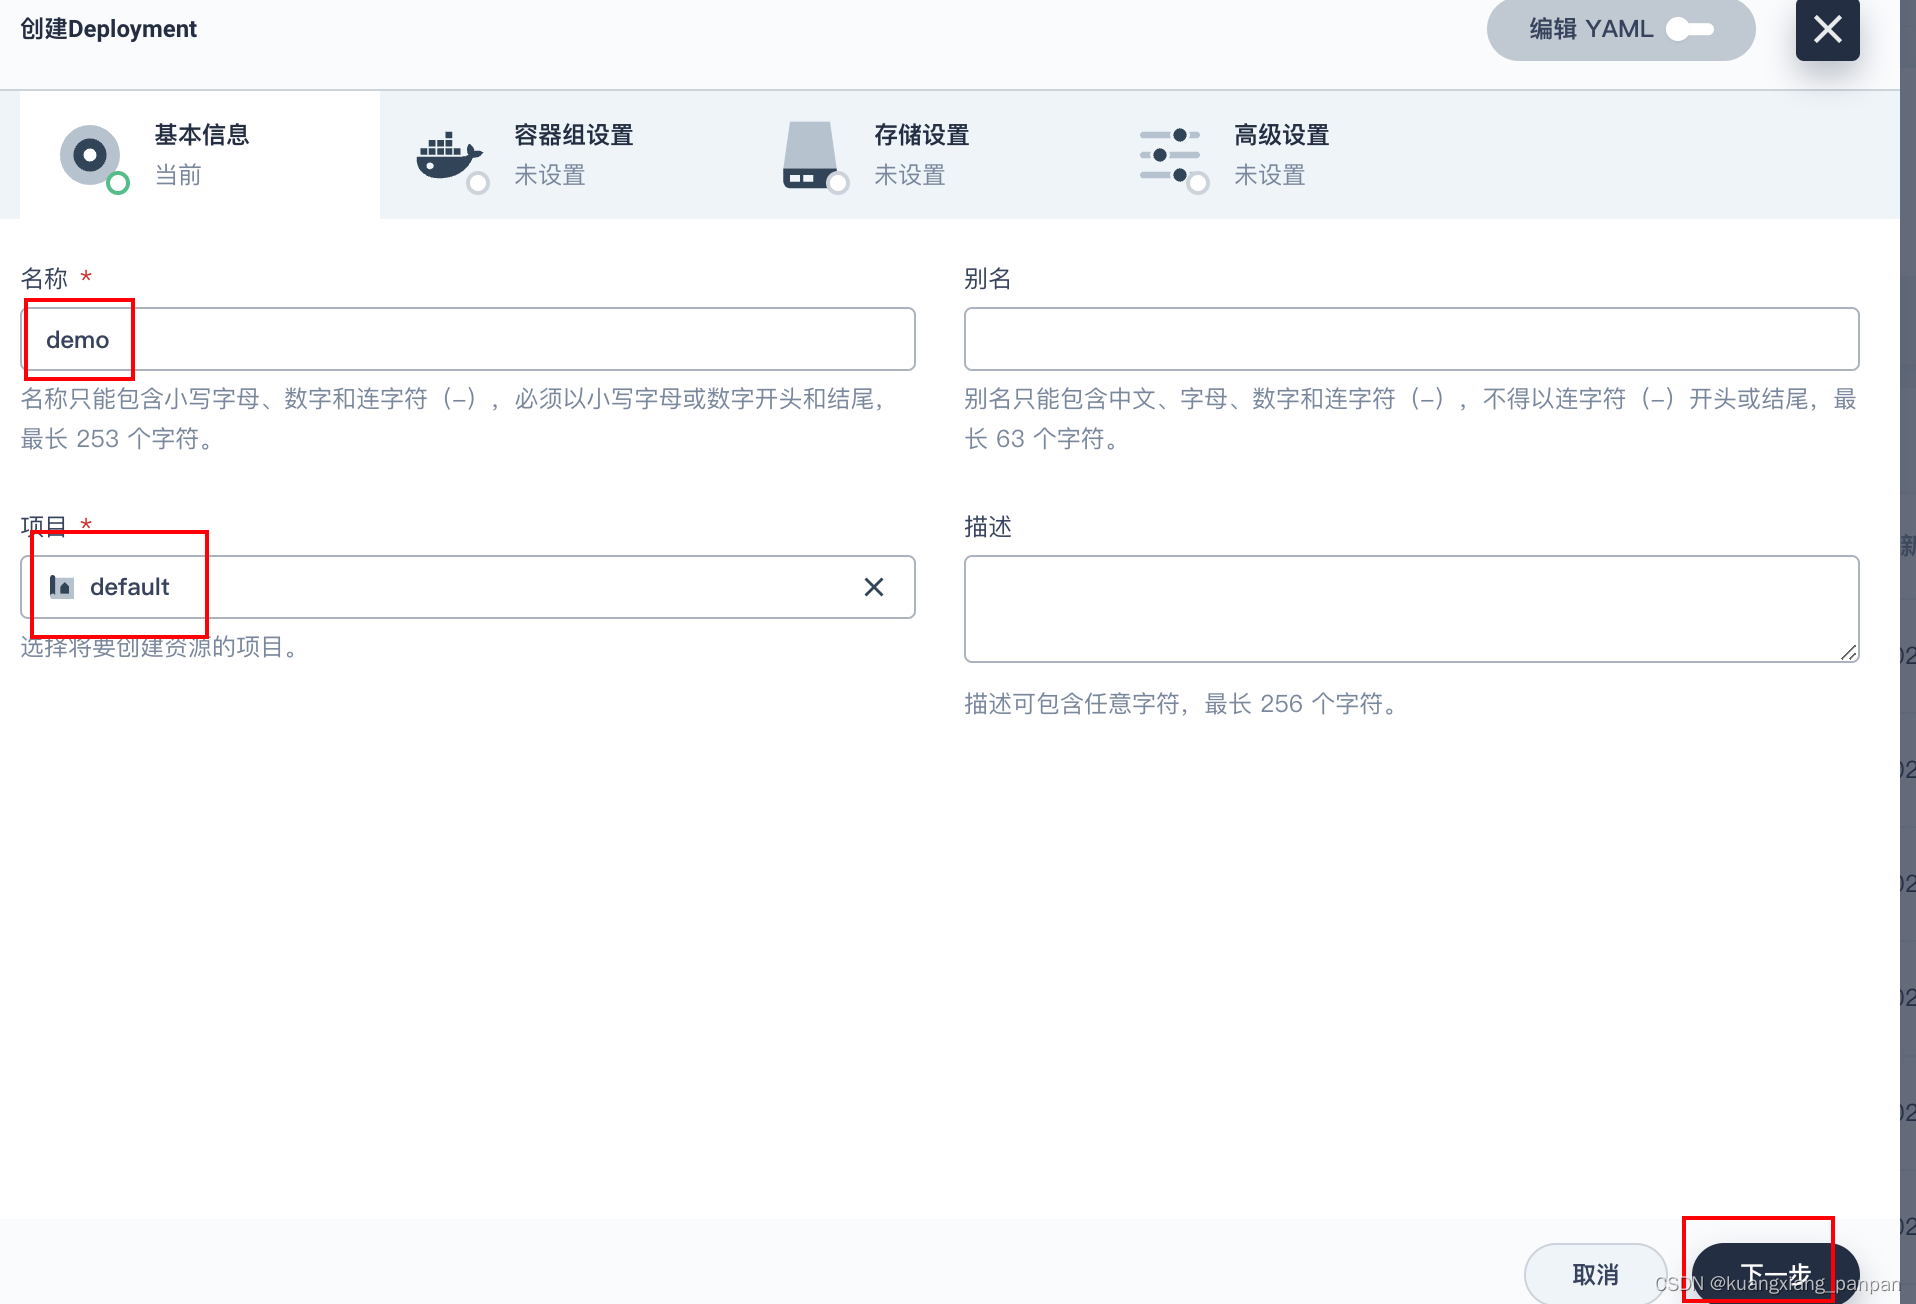
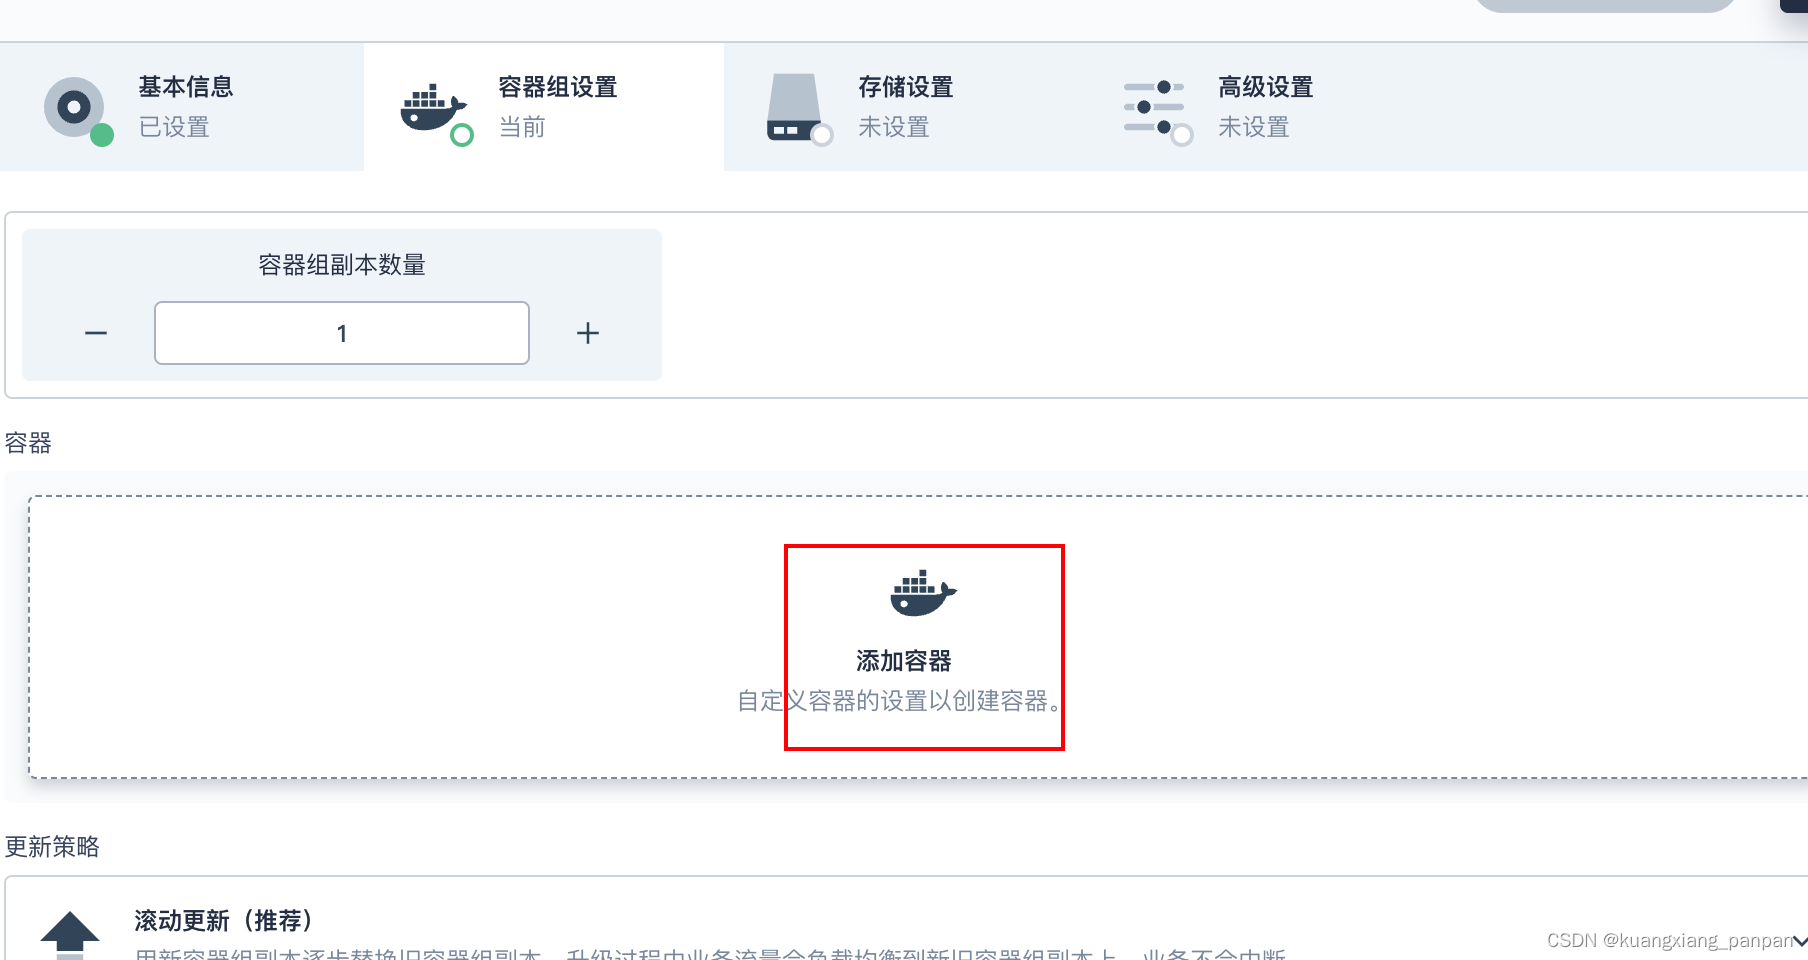

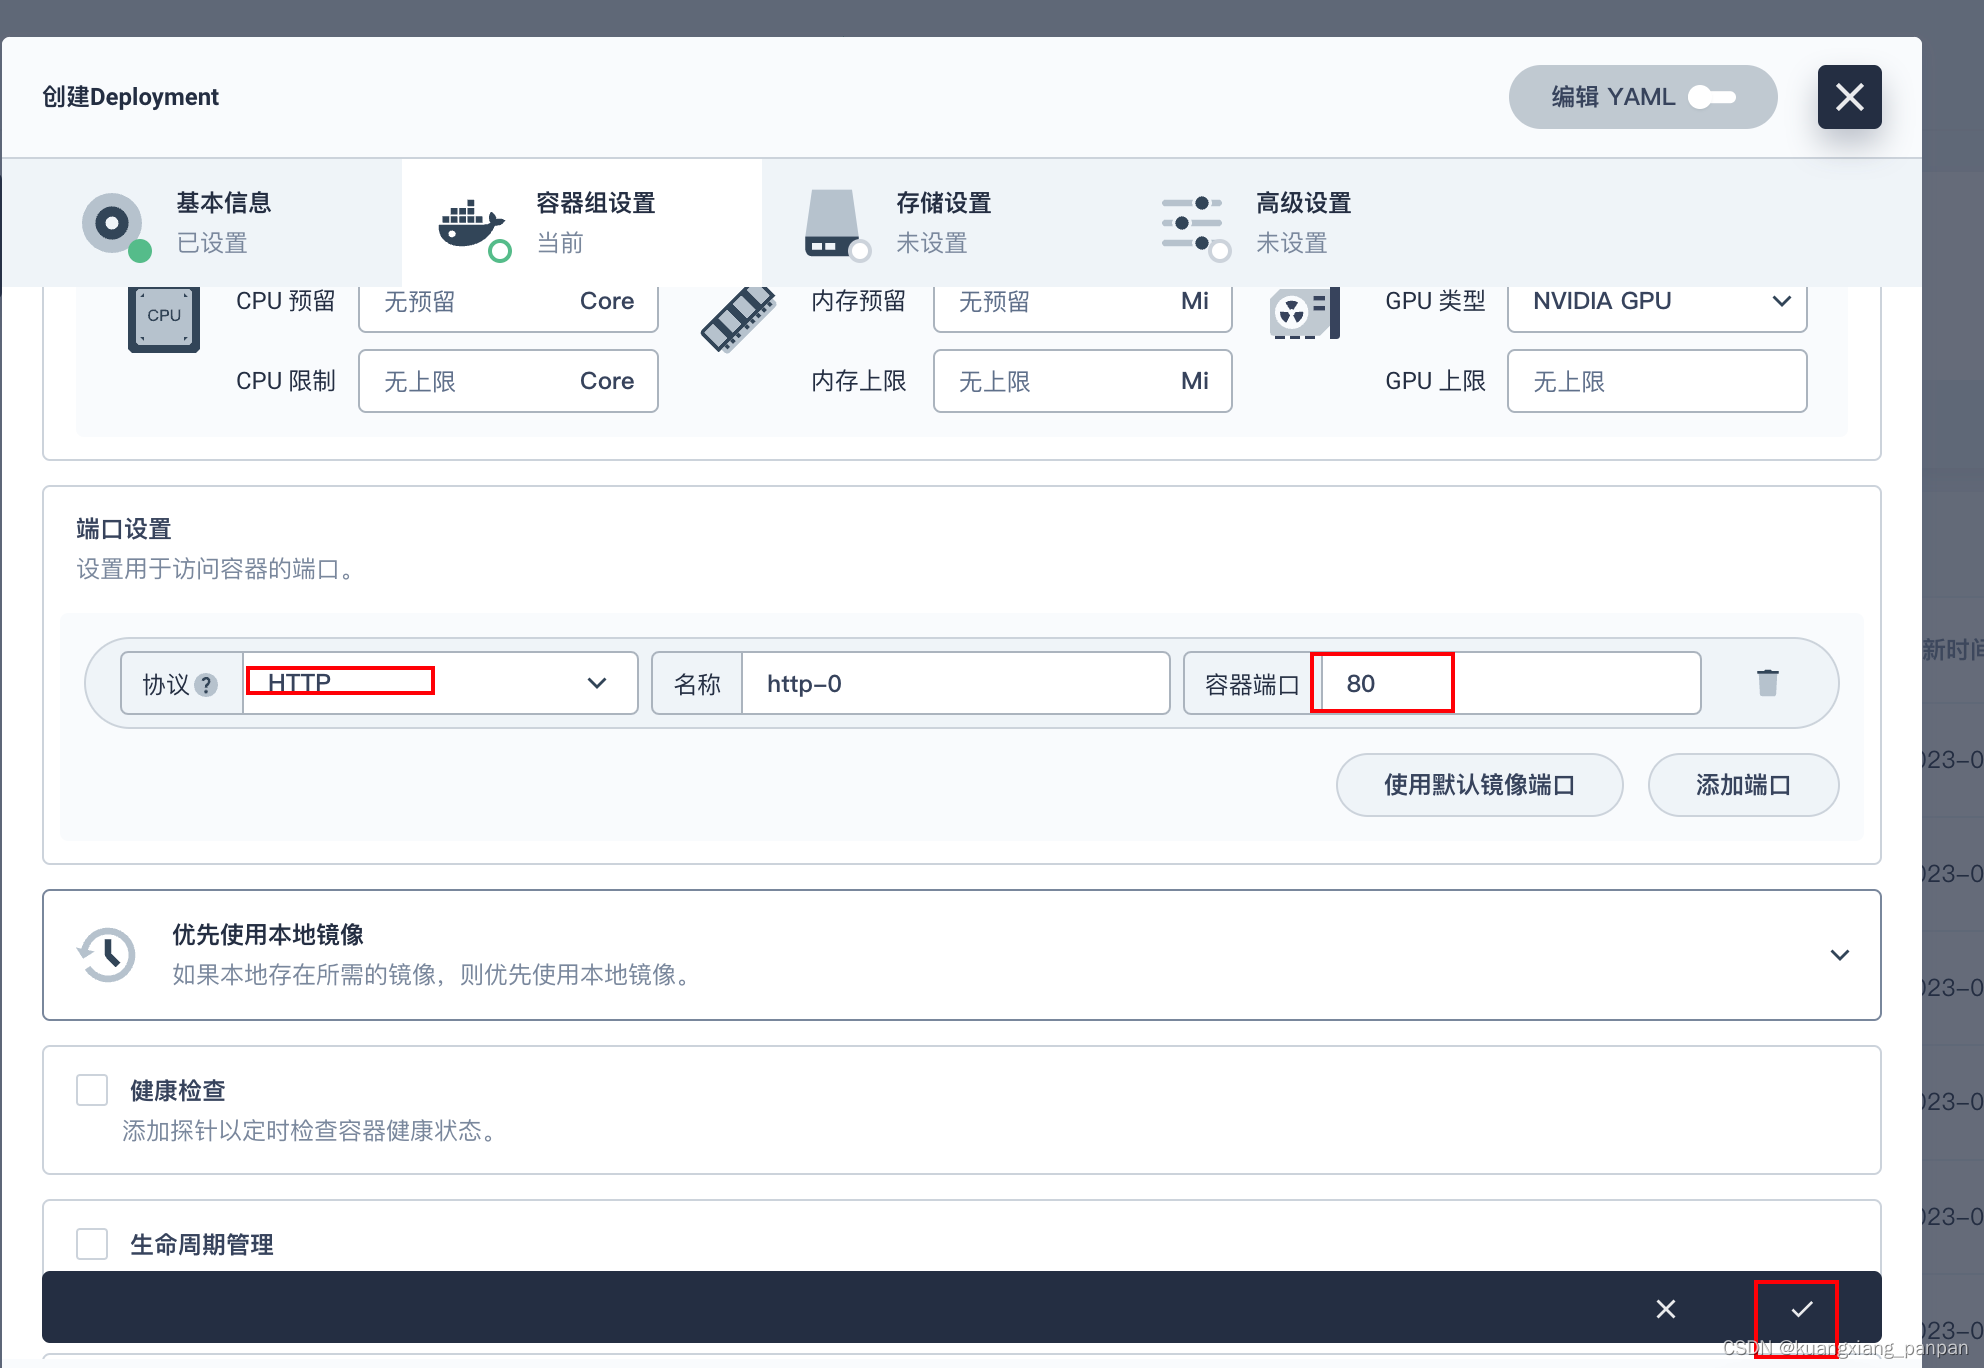
后面继续下一步,一路保持默认设置,直到创建按钮,点击创建。
创建service


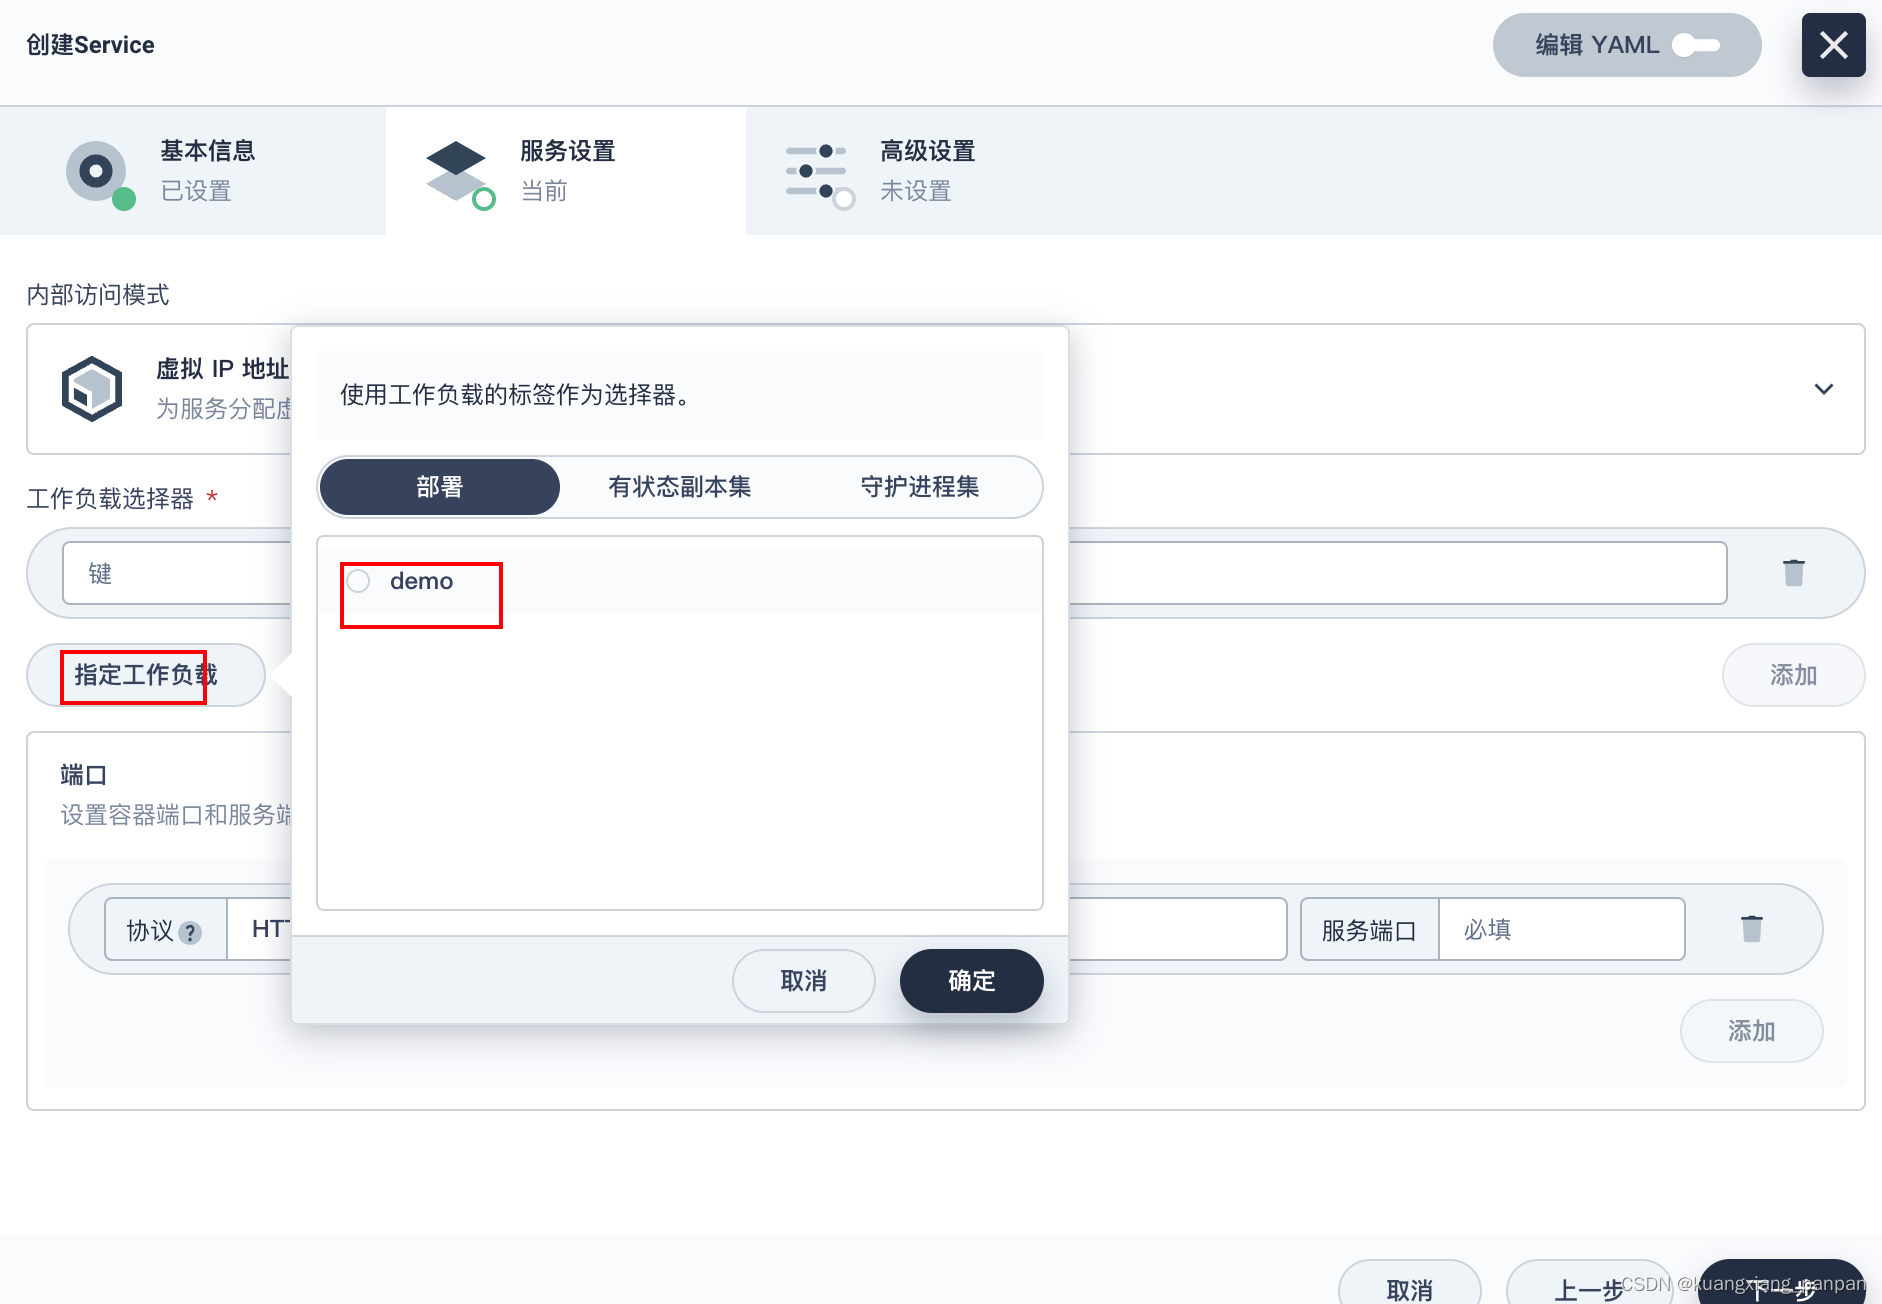

后面的操作,保持默认设置。
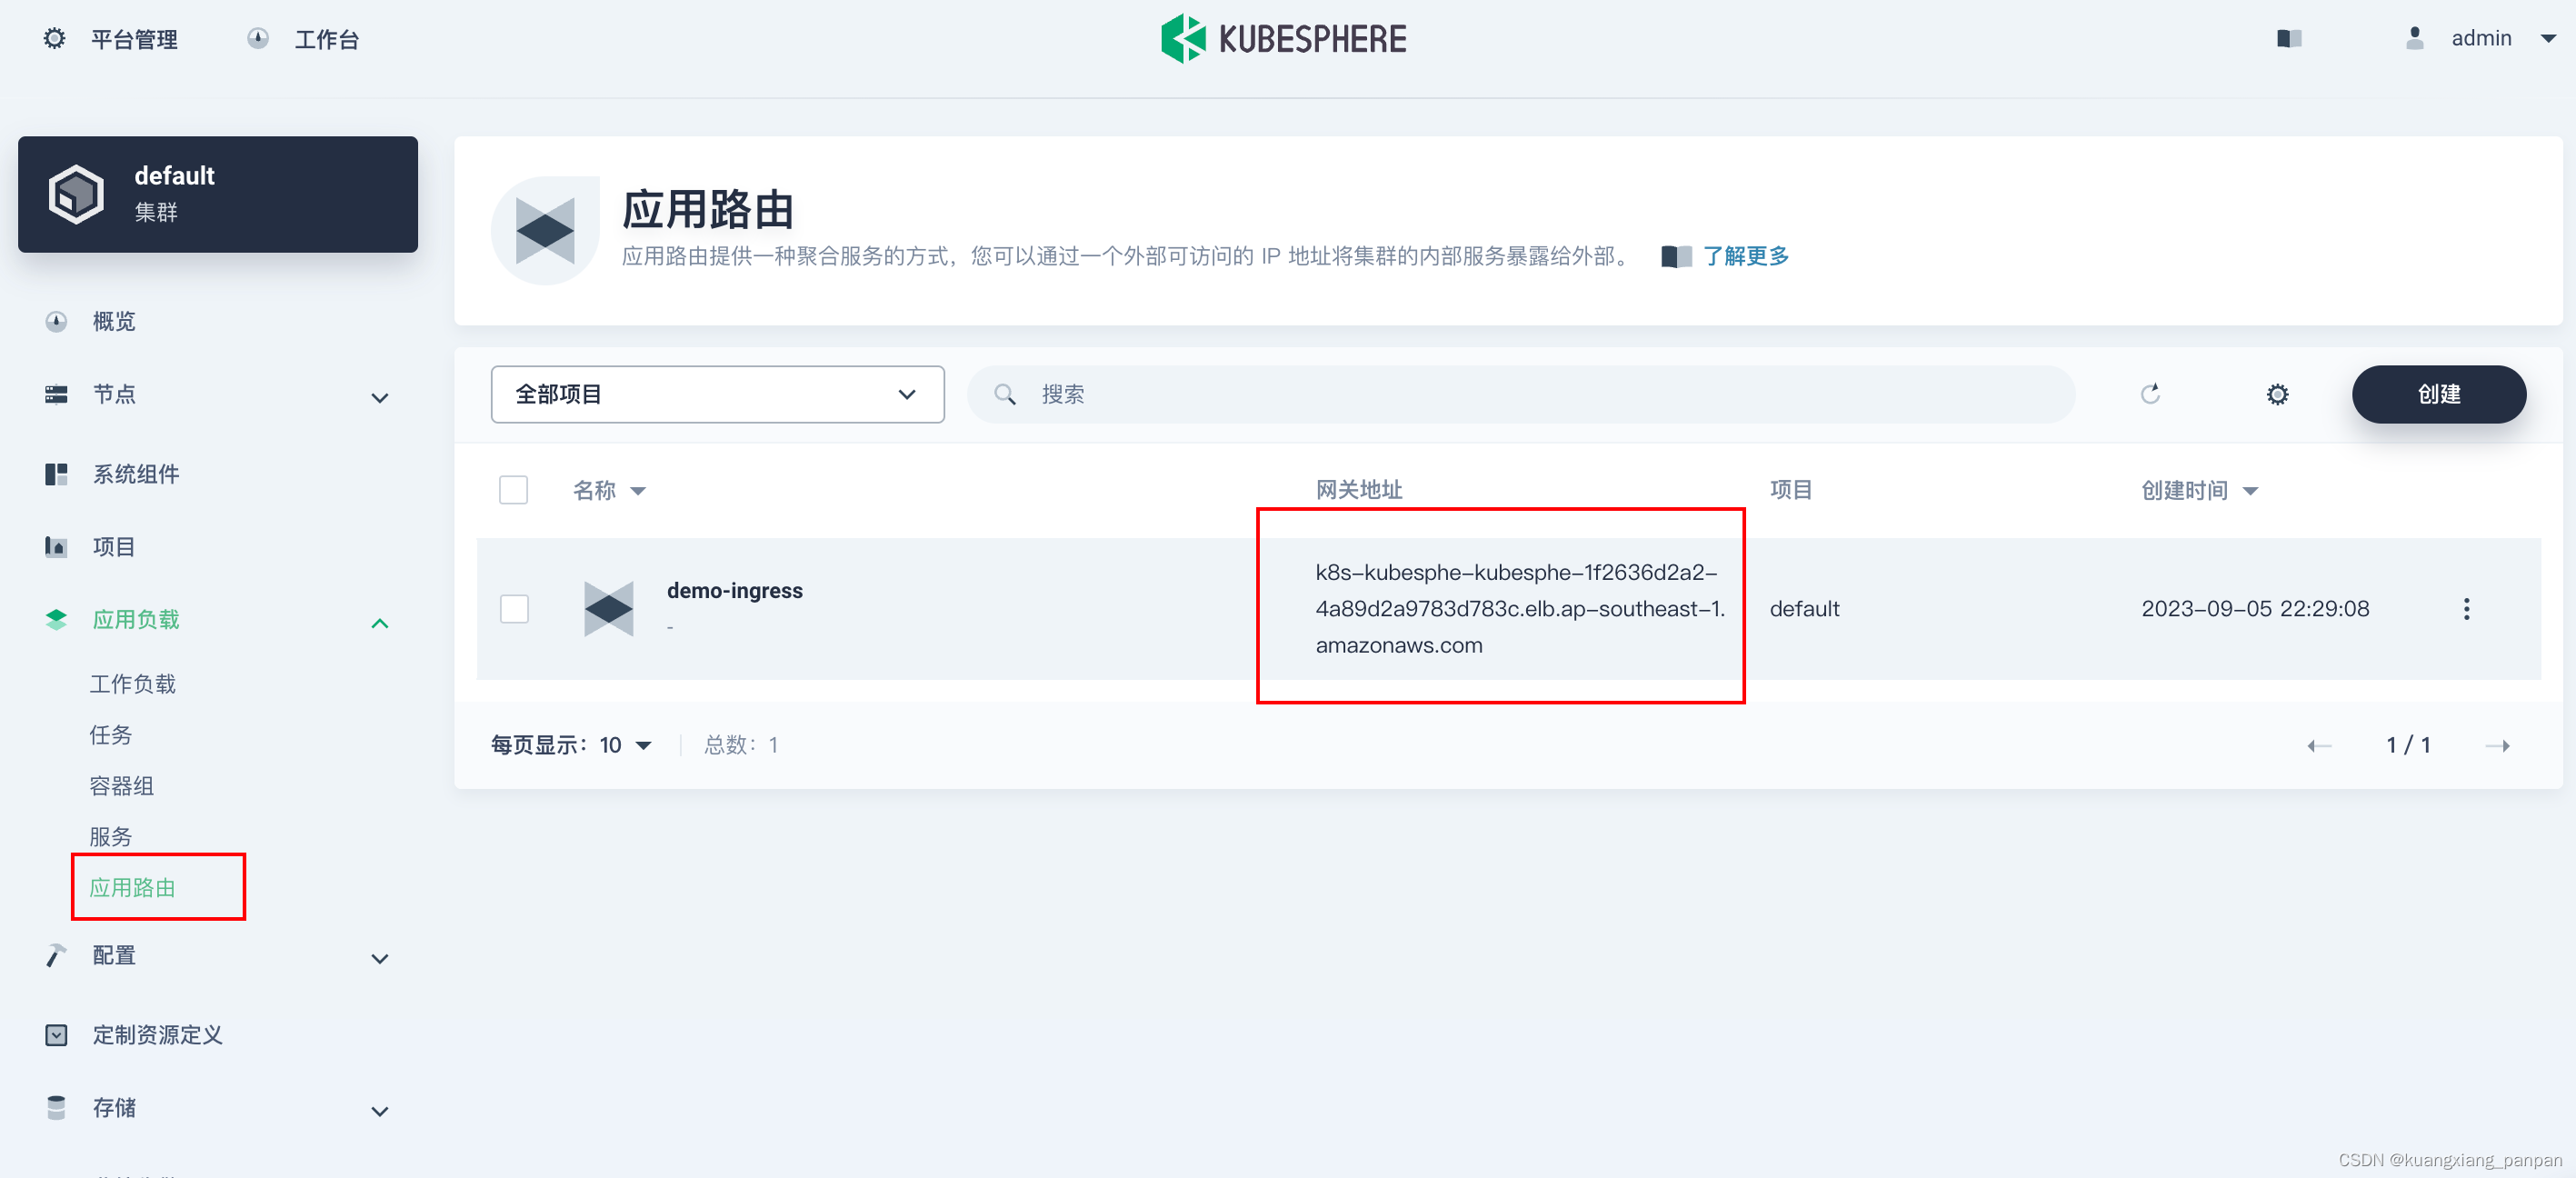
创建应用路由(Ingress)
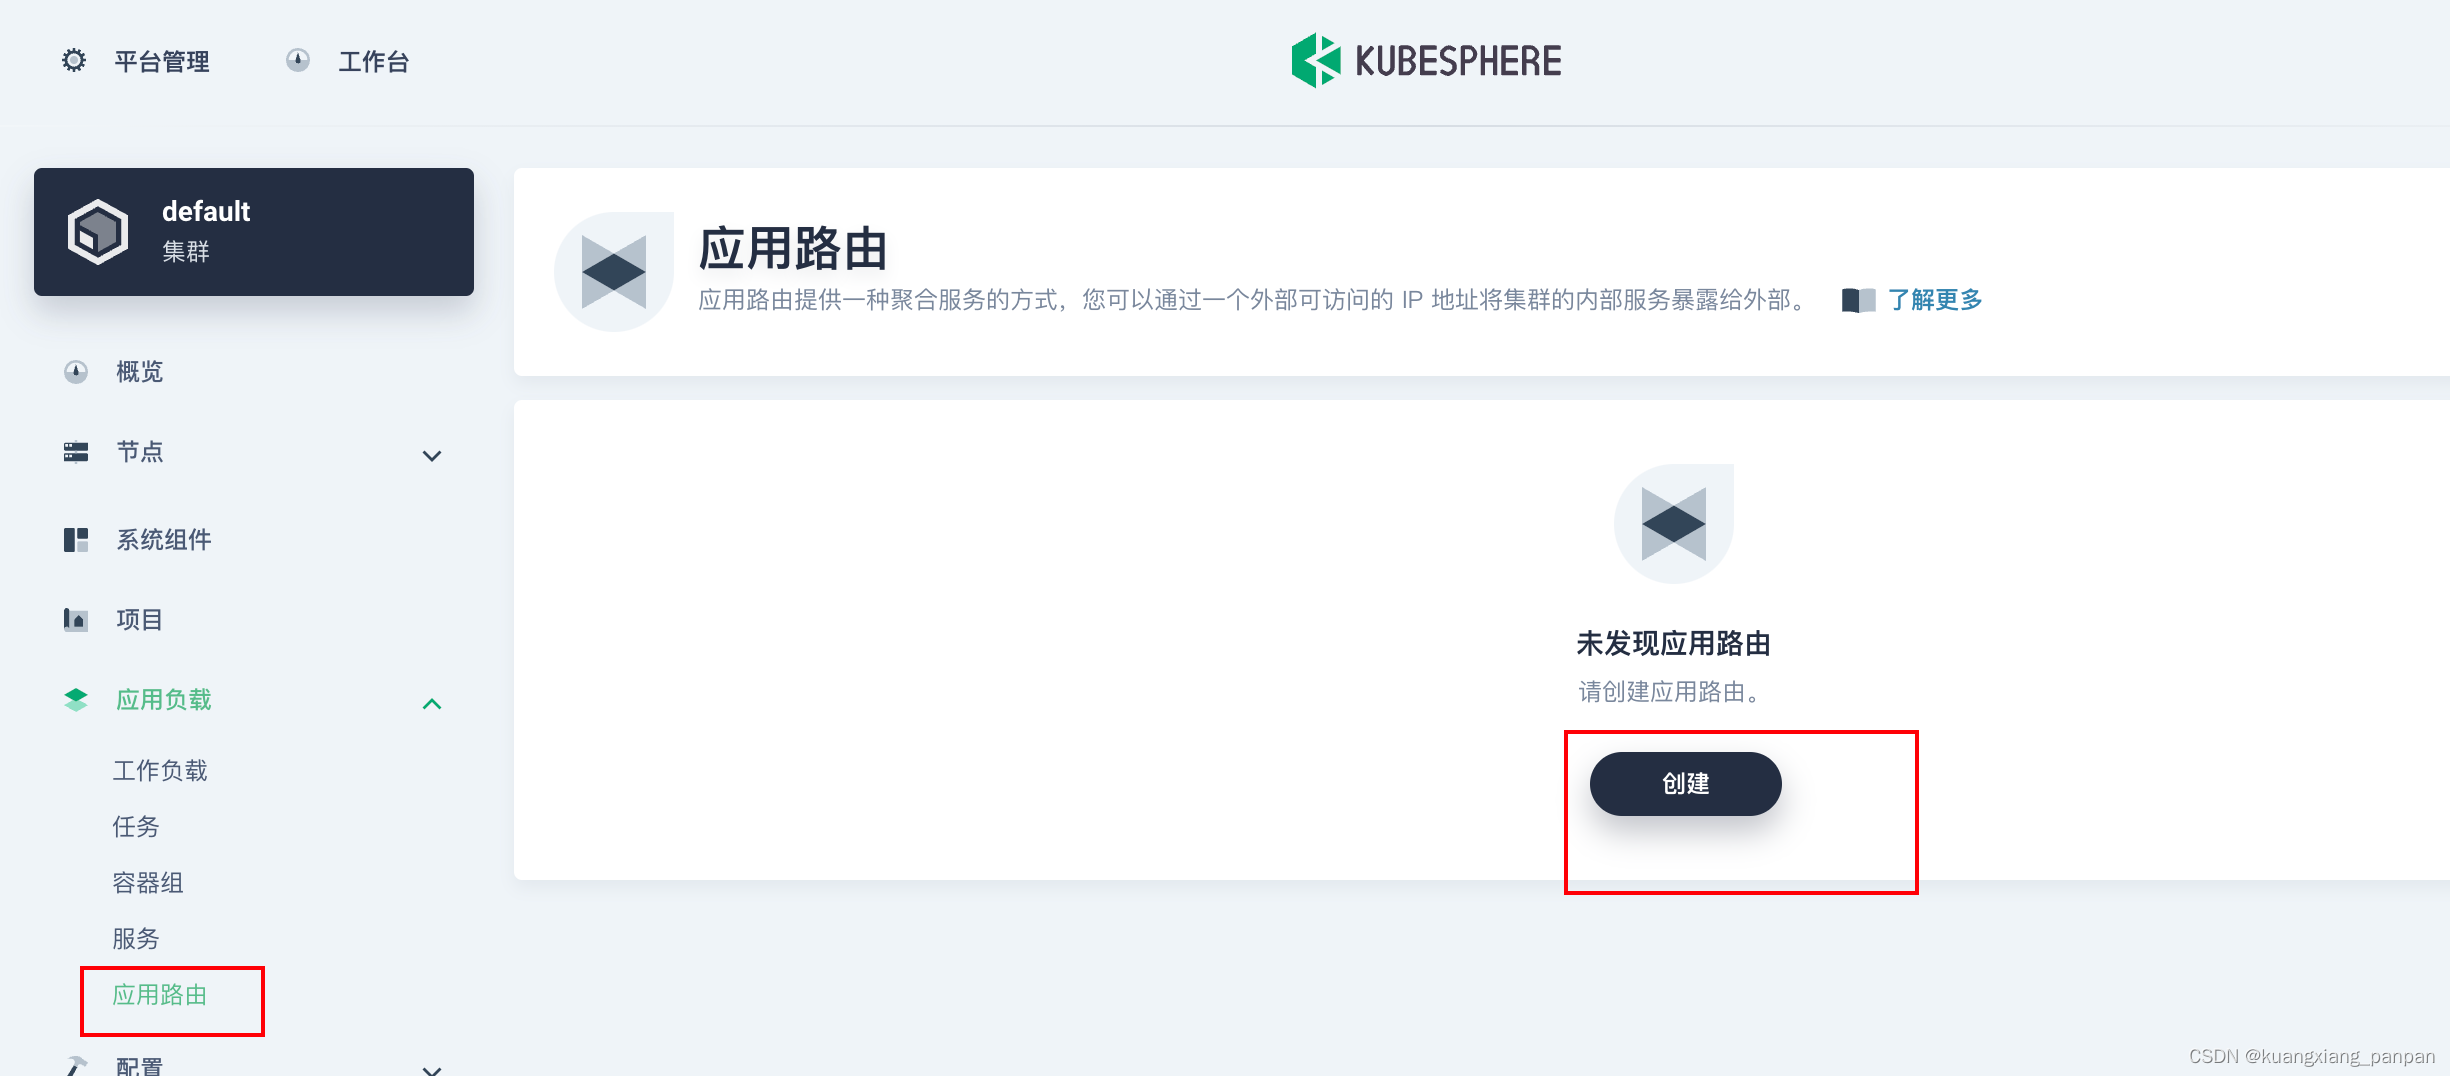


后面一路保持默认设置。
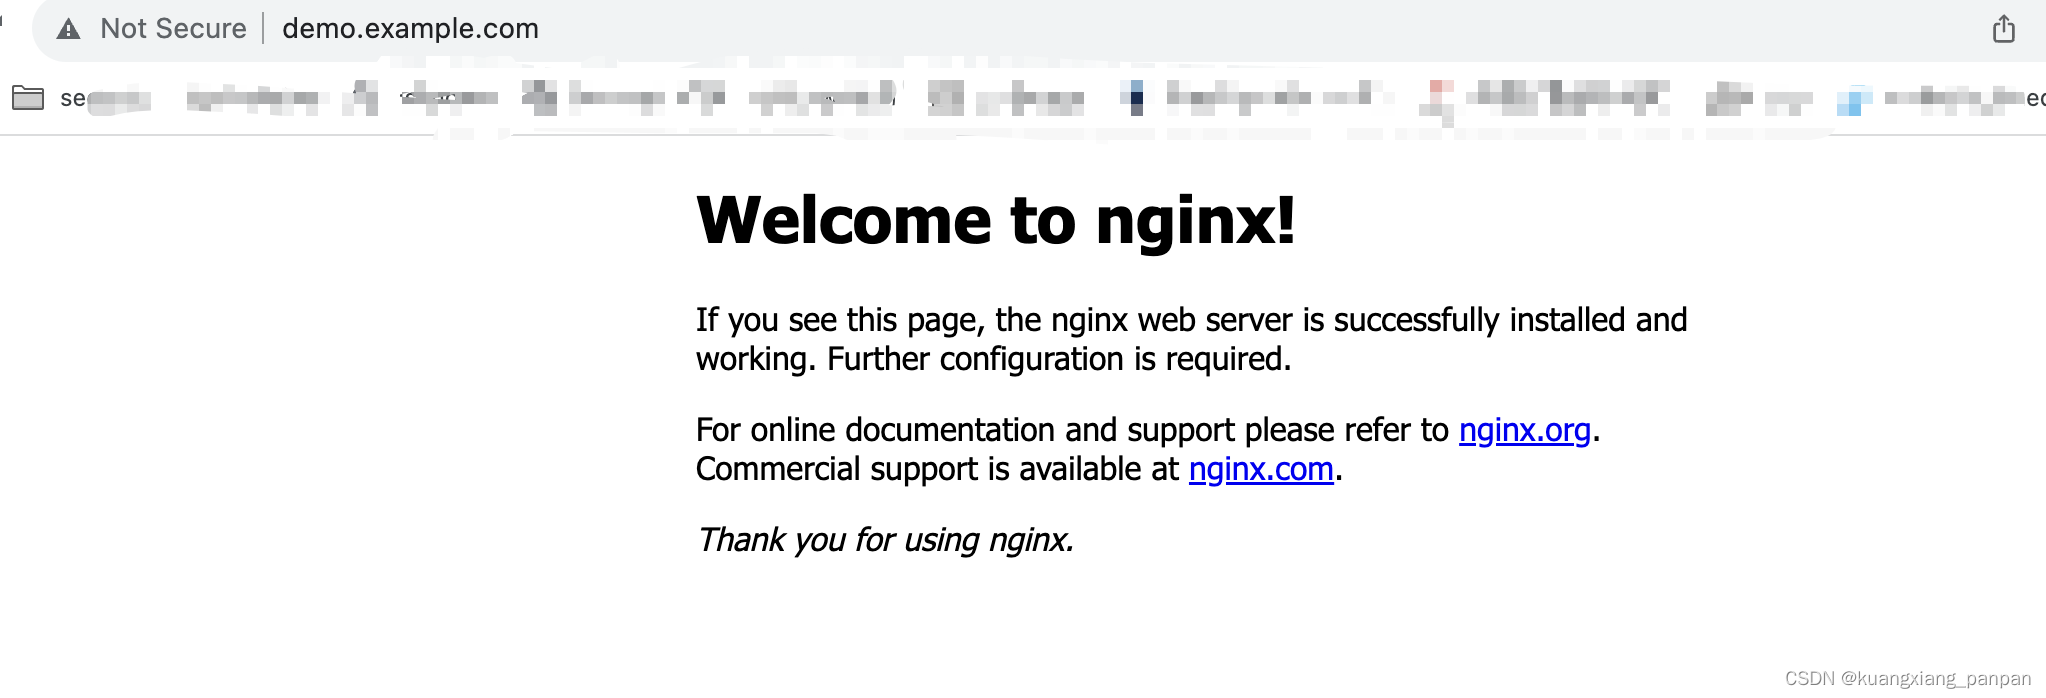
在本地电脑配置hosts后,访问如下:


本文来自互联网用户投稿,该文观点仅代表作者本人,不代表本站立场。本站仅提供信息存储空间服务,不拥有所有权,不承担相关法律责任。 如若内容造成侵权/违法违规/事实不符,请联系我的编程经验分享网邮箱:chenni525@qq.com进行投诉反馈,一经查实,立即删除!
- Python教程
- 深入理解 MySQL 中的 HAVING 关键字和聚合函数
- Qt之QChar编码(1)
- MyBatis入门基础篇
- 用Python脚本实现FFmpeg批量转换
- 如何向领导汇报工作?一篇文章告诉你!
- 我的创作纪念日
- Ansible
- [HTML]Web前端开发技术13(HTML5、CSS3、JavaScript )横向二级导航菜单 Web页面设计实例——喵喵画网页
- OpenGL排坑指南—贴图纹理绑定和使用
- 关于Vue前端接口对接的思考
- 【贪心算法】Dijkstra 算法及其衍生
- Linux .a .so 整理记录
- TensorBoard(代码注释有一些对梯度计算,优化器,学习率,反向传播,损失这些基础概念的理解)
- MySQL 一个线程(或事务)在更新表时,另一个线程能否读取这个表