flink-java使用介绍,flink,java
1、环境准备
文档:https://nightlies.apache.org/flink/flink-docs-release-1.18/zh/
仓库:https://github.com/apache/flink
下载:https://flink.apache.org/zh/downloads/
下载指定版本:https://archive.apache.org/dist/flink/flink-1.17.1/
注意:现在的flink没有bat执行文件,需要自己创建,而网上复制的 bat 文件大都有问题,最好在 Linux 系统跑!!
我下载的是 flink-1.17.1
> java -version
java version "1.8.0_201"
Java(TM) SE Runtime Environment (build 1.8.0_201-b09)
Java HotSpot(TM) 64-Bit Server VM (build 25.201-b09, mixed mode)
java8, jdk-1.8.0_181
start-cluster.bat 文件
::###############################################################################
::  Licensed to the Apache Software Foundation (ASF) under one
::  or more contributor license agreements.  See the NOTICE file
::  distributed with this work for additional information
::  regarding copyright ownership.  The ASF licenses this file
::  to you under the Apache License, Version 2.0 (the
::  "License"); you may not use this file except in compliance
::  with the License.  You may obtain a copy of the License at
::
::      http://www.apache.org/licenses/LICENSE-2.0
::
::  Unless required by applicable law or agreed to in writing, software
::  distributed under the License is distributed on an "AS IS" BASIS,
::  WITHOUT WARRANTIES OR CONDITIONS OF ANY KIND, either express or implied.
::  See the License for the specific language governing permissions and
:: limitations under the License.
::###############################################################################

@echo off
setlocal EnableDelayedExpansion

SET bin=%~dp0
SET FLINK_HOME=%bin%..
SET FLINK_LIB_DIR=%FLINK_HOME%\lib
SET FLINK_PLUGINS_DIR=%FLINK_HOME%\plugins
SET FLINK_CONF_DIR=%FLINK_HOME%\conf
SET FLINK_LOG_DIR=%FLINK_HOME%\log

SET JVM_ARGS=-Xms1024m -Xmx1024m

SET FLINK_CLASSPATH=%FLINK_LIB_DIR%\*

SET logname_jm=flink-%username%-jobmanager.log
SET logname_tm=flink-%username%-taskmanager.log
SET log_jm=%FLINK_LOG_DIR%\%logname_jm%
SET log_tm=%FLINK_LOG_DIR%\%logname_tm%
SET outname_jm=flink-%username%-jobmanager.out
SET outname_tm=flink-%username%-taskmanager.out
SET out_jm=%FLINK_LOG_DIR%\%outname_jm%
SET out_tm=%FLINK_LOG_DIR%\%outname_tm%

SET log_setting_jm=-Dlog.file="%log_jm%" -Dlogback.configurationFile=file:"%FLINK_CONF_DIR%/logback.xml" -Dlog4j.configuration=file:"%FLINK_CONF_DIR%/log4j.properties"
SET log_setting_tm=-Dlog.file="%log_tm%" -Dlogback.configurationFile=file:"%FLINK_CONF_DIR%/logback.xml" -Dlog4j.configuration=file:"%FLINK_CONF_DIR%/log4j.properties"

:: Log rotation (quick and dirty)
CD "%FLINK_LOG_DIR%"
for /l %%x in (5, -1, 1) do (
SET /A y = %%x+1
RENAME "%logname_jm%.%%x" "%logname_jm%.!y!" 2> nul
RENAME "%logname_tm%.%%x" "%logname_tm%.!y!" 2> nul
RENAME "%outname_jm%.%%x" "%outname_jm%.!y!"  2> nul
RENAME "%outname_tm%.%%x" "%outname_tm%.!y!"  2> nul
)
RENAME "%logname_jm%" "%logname_jm%.0"  2> nul
RENAME "%logname_tm%" "%logname_tm%.0"  2> nul
RENAME "%outname_jm%" "%outname_jm%.0"  2> nul
RENAME "%outname_tm%" "%outname_tm%.0"  2> nul
DEL "%logname_jm%.6"  2> nul
DEL "%logname_tm%.6"  2> nul
DEL "%outname_jm%.6"  2> nul
DEL "%outname_tm%.6"  2> nul

for %%X in (java.exe) do (set FOUND=%%~$PATH:X)
if not defined FOUND (
    echo java.exe was not found in PATH variable
    goto :eof
)

echo Starting a local cluster with one JobManager process and one TaskManager process.

echo You can terminate the processes via CTRL-C in the spawned shell windows.

echo Web interface by default on http://localhost:8081/.

start /b java %JVM_ARGS% %log_setting_jm% -cp "%FLINK_CLASSPATH%"; org.apache.flink.runtime.entrypoint.StandaloneSessionClusterEntrypoint --configDir "%FLINK_CONF_DIR%" > "%out_jm%" 2>&1
start /b java %JVM_ARGS% %log_setting_tm% -cp "%FLINK_CLASSPATH%"; org.apache.flink.runtime.taskexecutor.TaskManagerRunner --configDir "%FLINK_CONF_DIR%" > "%out_tm%" 2>&1

endlocal
flink.bat文件
::###############################################################################
::  Licensed to the Apache Software Foundation (ASF) under one
::  or more contributor license agreements.  See the NOTICE file
::  distributed with this work for additional information
::  regarding copyright ownership.  The ASF licenses this file
::  to you under the Apache License, Version 2.0 (the
::  "License"); you may not use this file except in compliance
::  with the License.  You may obtain a copy of the License at
::
::      http://www.apache.org/licenses/LICENSE-2.0
::
::  Unless required by applicable law or agreed to in writing, software
::  distributed under the License is distributed on an "AS IS" BASIS,
::  WITHOUT WARRANTIES OR CONDITIONS OF ANY KIND, either express or implied.
::  See the License for the specific language governing permissions and
:: limitations under the License.
::###############################################################################

@echo off
setlocal

SET bin=%~dp0
SET FLINK_HOME=%bin%..
SET FLINK_LIB_DIR=%FLINK_HOME%\lib
SET FLINK_PLUGINS_DIR=%FLINK_HOME%\plugins

SET JVM_ARGS=-Xmx512m

SET FLINK_JM_CLASSPATH=%FLINK_LIB_DIR%\*

java %JVM_ARGS% -cp "%FLINK_JM_CLASSPATH%"; org.apache.flink.client.cli.CliFrontend %*

endlocal
查看信息
> flink.bat -h

./flink <ACTION> [OPTIONS] [ARGUMENTS]

The following actions are available:

Action "run" compiles and runs a program.

......
2、WordCount 示例
安装 IntelliJ 编辑器,IntelliJ IDEA 2023.3.2
并安装 maven
2.1、DatStream API 实现批处理
创建项目 New Project --> Maven Archetype
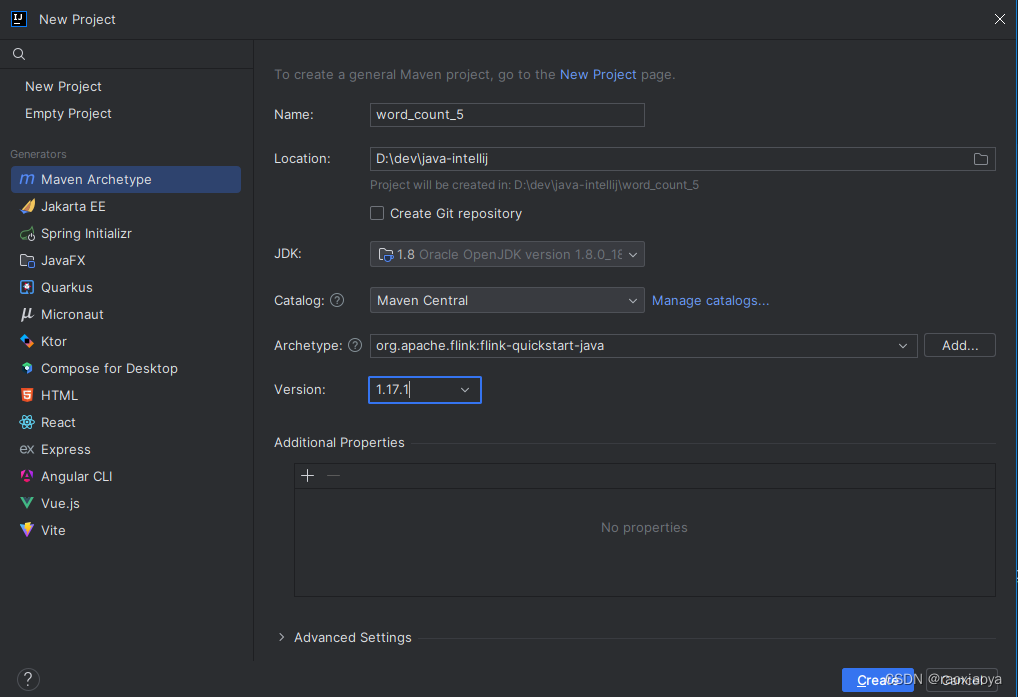
Catalog参数是Archetype的存储的地方,可以理解为大致的分类,此处我选择Maven Central,点击后面的Manage catalogs可以知道Maven Central是要从线上下载,因此需要等一会。
Archetype参数是Maven Project Template,可以帮你快速初始化项目结构,等到catalog下载好之后,在这里输入 flink 来检索,然后选择org.apache.flink:flink-quickstart-java。
Version为模板的版本号,它同时也是 flink 包的版本号。
然后点击Create创建之。
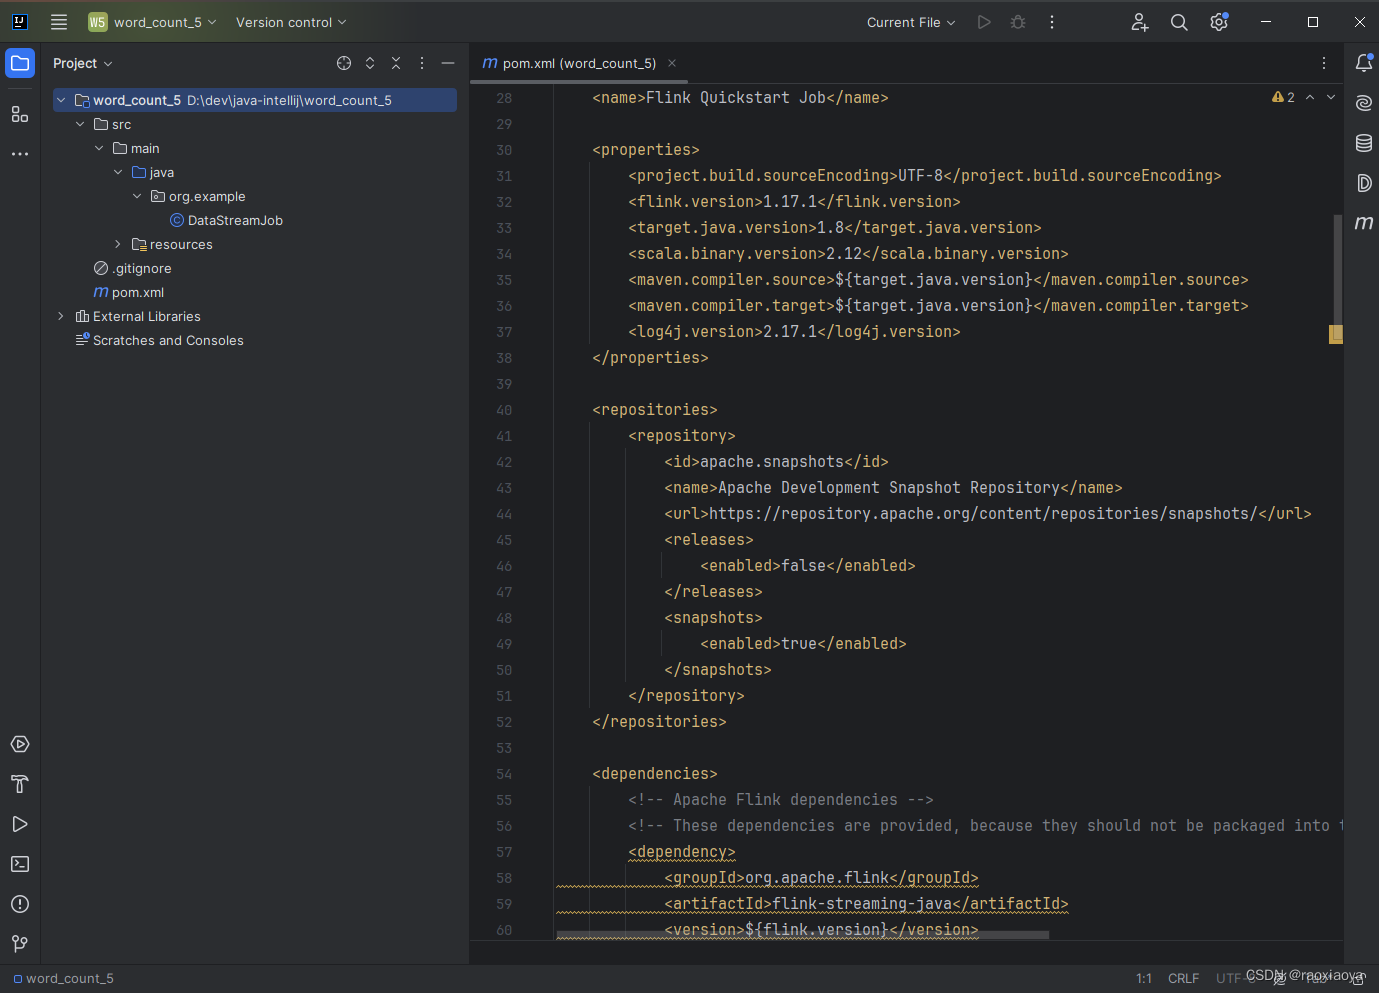
我们发现pom.xml文件里面已经添加好了很多依赖,这就是使用 Maven 模板的好处。
除此之外,我们还可以使用 mvn命令来开始创建 flink应用,参考地址,
mvn archetype:generate -DarchetypeGroupId=org.apache.flink -DarchetypeArtifactId=flink-quickstart-java -DarchetypeVersion=1.17.1
可以发现,跟我们在 IntelliJ 中创建的参数是一样的。
它默认提供的DEMO是流式的执行环境,即 Streaming。
注意,从Flink 1.12开始,官方推荐直接使用 DataStream API 来处理流和批,然后在提交任务时通过将执行模式设置为 BATCH 来进行批处理。比如bin/flink run -Dexecution.runtime-mode=BATCH WordCount.jar,这样的好处是官方只需要维护一套 API 即可。
所以,我们可以在官方给的DEMO中来实现对 txt 内容的处理。
在项目根目录下创建文件input/wordcount.txt
hello flink
hello java
hello scala
编辑DataStreamJob这个类
package org.example;

import org.apache.flink.api.common.functions.FlatMapFunction;
import org.apache.flink.api.java.functions.KeySelector;
import org.apache.flink.api.java.tuple.Tuple2;
import org.apache.flink.streaming.api.datastream.DataStreamSource;
import org.apache.flink.streaming.api.datastream.SingleOutputStreamOperator;
import org.apache.flink.streaming.api.environment.StreamExecutionEnvironment;
import org.apache.flink.util.Collector;

/**
 * Skeleton for a Flink DataStream Job.
 *
 * <p>For a tutorial how to write a Flink application, check the
 * tutorials and examples on the <a href="https://flink.apache.org">Flink Website</a>.
 *
 * <p>To package your application into a JAR file for execution, run
 * 'mvn clean package' on the command line.
 *
 * <p>If you change the name of the main class (with the public static void main(String[] args))
 * method, change the respective entry in the POM.xml file (simply search for 'mainClass').
 */
public class DataStreamJob {
	public static void main(String[] args) throws Exception {
		// 使用 DataStream API

         // 创建执行环境
		StreamExecutionEnvironment env = StreamExecutionEnvironment.getExecutionEnvironment();

         // 读取数据
         // 相对路径相对的是工程跟路径
         // D:\dev\java-intellij\word_count_5\input\wordcount.txt
         // /mnt/d/dev/java-intellij/word_count_5/input/wordcount.txt
		DataStreamSource<String> stringDataStreamSource = env.readTextFile("D:\dev\java-intellij\word_count_5\input\wordcount.txt");

         // 按行切分,转换成元组(word, 1)
         // 如果参数是接口,可以直接使用匿名类的对象,即直接实例化此接口 new InterfaceA() {}
         // alt+enter 实现接口方法
		SingleOutputStreamOperator<Tuple2<String, Integer>> wordAndOne = stringDataStreamSource.flatMap(new FlatMapFunction<String, Tuple2<String, Integer>>() {
			@Override
			public void flatMap(String s, Collector<Tuple2<String, Integer>> collector) throws Exception {
				String[] words = s.split(" ");
				for (String word : words) {
                      //转换为 (word, 1)
					Tuple2<String, Integer> stringIntegerTuple2 = Tuple2.of(word, 1);

					// 使用collector向下游发送数据
					collector.collect(stringIntegerTuple2);
				}
			}
		});

         // 按照单词分组
		wordAndOne.keyBy(new KeySelector<Tuple2<String, Integer>, String>() {
			@Override
			public String getKey(Tuple2<String, Integer> stringIntegerTuple2) throws Exception {
				return stringIntegerTuple2.f0;// 按照二元组的第一个位置聚合
			}
		})
            .sum(1) // 按照二元组的第二个位置求和
            .print(); // 输出

		env.execute();
	}
}
注意,wordcount.txt的路径要正确,第一个是在编辑器中运行此程序的时候要能找到这个文件;第二个是在打成 jar 包的时候,此txt文件是不会包含在内的,那么发送到flink服务器去运行的时候怎么去找到这个文件呢,我的flink也是在windows本地启动的,所以我这里填绝对路径就没问题。
此时点击main方法运行会报错,提示类找不到,我们来到 pom.xml 中,就会发现
<dependency>
    <groupId>org.apache.flink</groupId>
    <artifactId>flink-streaming-java</artifactId>
    <version>${flink.version}</version>
    <scope>provided</scope>
</dependency>
<dependency>
    <groupId>org.apache.flink</groupId>
    <artifactId>flink-clients</artifactId>
    <version>${flink.version}</version>
    <scope>provided</scope>
</dependency>
其中<scope>provided</scope>的意思是,在编译和运行的时候并不会将此依赖编译进去,自然在运行的时候是找不到此依赖的。那么为什么要这么做呢,这是因为在某些情况下,此项目B会被打包成 jar 然后被程序A加载进去使用的,如果程序A中已经包含了这些依赖,那么在项目B打包的时候就没必要再把这些依赖编译进去了,这样的 jar 包会小很多,而flink就是这样的使用场景。
那么问题来了,本地该如何运行呢?
Run -> Edit Configurations,在 Build and run右边点击Modify options,勾选中Add dependencies with 'provided' scope to classpath,点击 Apply
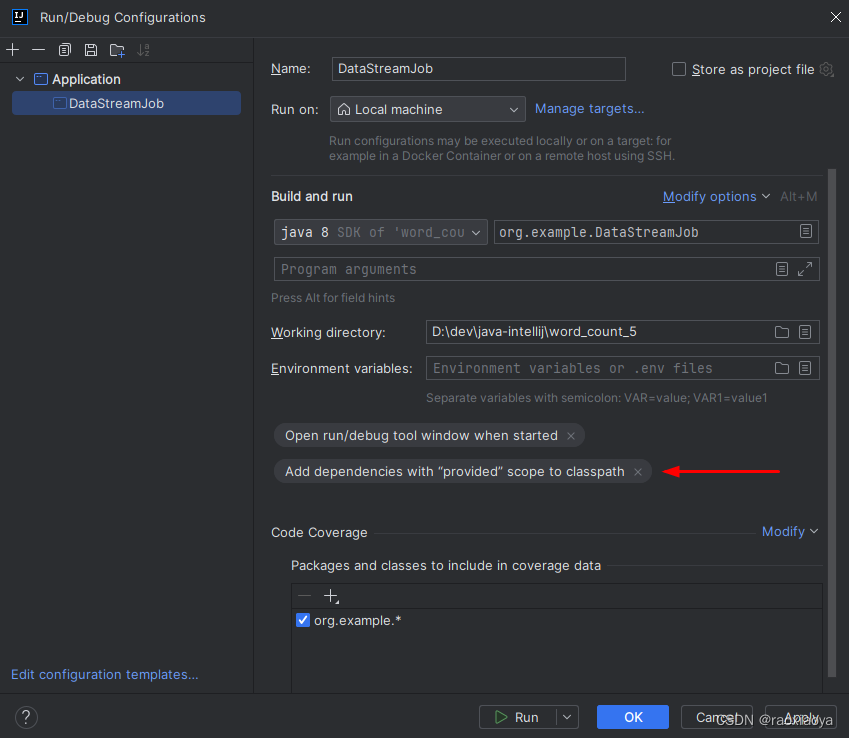
注意,这里 Application 下面的类必须是执行了一次之后才有的。
再来运行 main方法,可以找到打印信息
3> (hello,1)
1> (scala,1)
3> (hello,2)
3> (hello,3)
7> (flink,1)
2> (java,1)
注意看,每一行输出前面都有个编号,可以理解为这是线程编号。并且这里输出了6行,顺序是乱的,是并行处理的,而且统计的结果是逐渐在变化,可见,虽然每个单词都由不同的线程在处理,但是聚合的结果却是正确的,这就是有状态的意思(StateFull),它内部已经维护好了这个结果。
说明程序运行正常,但是乱七八糟的打印太多,于是修改pom.xml删除以下依赖
<dependency>
    <groupId>org.apache.logging.log4j</groupId>
    <artifactId>log4j-slf4j-impl</artifactId>
    <version>${log4j.version}</version>
    <scope>runtime</scope>
</dependency>
<dependency>
    <groupId>org.apache.logging.log4j</groupId>
    <artifactId>log4j-api</artifactId>
    <version>${log4j.version}</version>
    <scope>runtime</scope>
</dependency>
<dependency>
    <groupId>org.apache.logging.log4j</groupId>
    <artifactId>log4j-core</artifactId>
    <version>${log4j.version}</version>
    <scope>runtime</scope>
</dependency>
在修改了pom.xml文件,或者修改了代码,或者有些class提示找不到了,我们都需要刷新一下maven。可以右键pom.xml --> Maven --> Reload Project;或者点开编辑器右边的 maven 按钮,点击刷新按钮。
最终运行结果如下
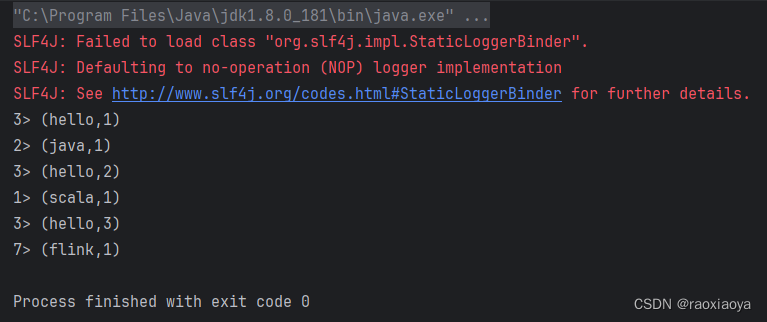
其实,这是以流的方式在处理 txt 文件内容,因为我们并没有设置-Dexecution.runtime-mode=BATCH参数。
2.2、DataSet API 实现批处理
为了对比批处理和流处理的效果,再写一个 DataSet API 的例子。
package org.example;

import org.apache.flink.api.common.functions.FlatMapFunction;
import org.apache.flink.api.java.ExecutionEnvironment;
import org.apache.flink.api.java.operators.DataSource;
import org.apache.flink.api.java.operators.FlatMapOperator;
import org.apache.flink.api.java.tuple.Tuple2;
import org.apache.flink.util.Collector;

public class DataSetBatchJob {
    public static void main(String[] args) throws Exception {
        // 使用 DataSet API 方式实现的批处理

        // 创建执行环境
        ExecutionEnvironment env = ExecutionEnvironment.getExecutionEnvironment();

        // 读取数据
        // 相对路径相对的是工程跟路径
        // /mnt/d/dev/java-intellij/word_count_5/input/wordcount.txt
        DataSource<String> dataSource = env.readTextFile("D:\\dev\\java-intellij\\word_count_5\\input\\wordcount.txt");

        // 按行切分,转换成元组(word, 1)
        // 如果参数是接口,可以直接使用匿名类的对象,即直接实例化此接口 new InterfaceA() {}
        // alt+enter 实现接口方法
        FlatMapOperator<String, Tuple2<String, Integer>> wordAndOne = dataSource.flatMap(new FlatMapFunction<String, Tuple2<String, Integer>>() {
            @Override
            public void flatMap(String s, Collector<Tuple2<String, Integer>> collector) throws Exception {
                String[] words = s.split(" ");
                for (String word : words) {
                    //转换为 (word, 1)
                    Tuple2<String, Integer> stringIntegerTuple2 = Tuple2.of(word, 1);

                    // 使用collector向下游发送数据
                    collector.collect(stringIntegerTuple2);
                }
            }
        });

        // 按照单词分组
        wordAndOne
                .groupBy(0)// 按照二元组的第一个位置聚合
                .sum(1)// 按照二元组的第二个位置求和
                .print();// 输出
    }
}
成功执行后的打印结果

批处理是所有的记录执行完之后打印最终结果的。
2.3、处理无界数据流
使用 socket 连接来模拟无界的数据流。
写法跟DataStreamJob一模一样,就是数据源改一下。
package org.example;

import org.apache.flink.api.common.functions.FlatMapFunction;
import org.apache.flink.api.java.functions.KeySelector;
import org.apache.flink.api.java.tuple.Tuple2;
import org.apache.flink.streaming.api.datastream.DataStreamSource;
import org.apache.flink.streaming.api.datastream.SingleOutputStreamOperator;
import org.apache.flink.streaming.api.environment.StreamExecutionEnvironment;
import org.apache.flink.util.Collector;

public class DataStreamSocketJob {
    public static void main(String[] args) throws Exception {
        StreamExecutionEnvironment env = StreamExecutionEnvironment.getExecutionEnvironment();

        DataStreamSource<String> stringDataStreamSource = env.socketTextStream("127.0.0.1", 7777);

        SingleOutputStreamOperator<Tuple2<String, Integer>> tuple2SingleOutputStreamOperator = stringDataStreamSource.flatMap(new FlatMapFunction<String, Tuple2<String, Integer>>() {
            @Override
            public void flatMap(String s, Collector<Tuple2<String, Integer>> collector) throws Exception {
                String[] words = s.split(" ");
                for (String word : words) {
                    Tuple2<String, Integer> stringIntegerTuple2 = Tuple2.of(word, 1);
                    collector.collect(stringIntegerTuple2);
                }
            }
        });

        tuple2SingleOutputStreamOperator.keyBy(new KeySelector<Tuple2<String, Integer>, String>() {
            @Override
            public String getKey(Tuple2<String, Integer> stringIntegerTuple2) throws Exception {
                return stringIntegerTuple2.f0;
            }
        }).sum(1).print();

        env.execute();
    }
}
在 WSL 启动一个TCP监听服务 nc -l 7777
执行 main 方法。
然后在 nc 这边输入
hello boy
hello girl
hello flink
我们能看到编辑器有输出

2.4、有界数据和无界数据
结合 2.1,2.2,2.3 的内容,可以发现,
对于有界数据(一般指日志文件),既可以使用 DataSet API批处理,也可以使用DataStream API配合参数-Dexecution.runtime-mode=BATCH来批处理,还可以使用DataStream API不带参数来流处理。
对于无界数据,我们使用DataStream API来流处理。
3、使用Maven打包成 jar
打开 maven, lifecycle ,先 clean ,再 package
打包结果在 target 目录,其中带 origin 的包是不包含任何依赖的,因此不够通用,包也很小;另外一个包是按照pom.xml来打包的。

为什么两个都是 7KB,那是因为在 pom.xml 中定义了provided
4、提交任务
启动 flink
> start-cluster.bat

Starting a local cluster with one JobManager process and one TaskManager process.
You can terminate the processes via CTRL-C in the spawned shell windows.
Web interface by default on http://localhost:8081/.
访问:http://localhost:8081/
关闭cmd窗口就可以停止flink
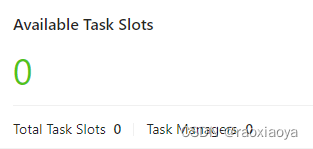
为什么Available Task Slots都是 0 呢?Task Managers 为空?
使用自带的example测试
> flink.bat run D:\dev\php\magook\trunk\server\flink-1.17.1\examples\batch\WordCount.jar

Executing WordCount example with default input data set.
Use --input to specify file input.
Printing result to stdout. Use --output to specify output path.
Job has been submitted with JobID 241dfa34420ee6e8beb68a86997cd9f1
也可以来到 web 上面手动提交。
任务都会超时报错:NoResourceAvailableException: Could not acquire the minimum required resources
事实证明 TaskManager 启动失败了,也可能是我复制过来的 bat 文件有问题。为什么 Flink 官方不再提供 bat 文件呢?
5、在 WSL 安装 java-1.8.0
看来只能换到 Linux 系统啦。
下载 java-1.8.0_202
https://www.oracle.com/java/technologies/javase/javase8-archive-downloads.html#license-lightbox
开始安装
> mkdir /usr/lib/jdk

> tar -zxf jdk-8u202-linux-x64.tar.gz -C /usr/lib/jdk

> vi /etc/profile

export JAVA_HOME=/usr/lib/jdk/jdk1.8.0_202
export JRE_HOME=${JAVA_HOME}/jre
export CLASSPATH=.:${JAVA_HOME}/lib:${JRE_HOME}/lib
export PATH=${JAVA_HOME}/bin:$PATH


> source /etc/profile

> java -version
java version "1.8.0_202"
Java(TM) SE Runtime Environment (build 1.8.0_202-b08)
Java HotSpot(TM) 64-Bit Server VM (build 25.202-b08, mixed mode)
运行 Flink
> cd /mnt/d/dev/php/magook/trunk/server/flink-1.17.1

> bin/start-cluster.sh

Starting cluster.
Starting standalonesession daemon on host windows10-jack.
Starting taskexecutor daemon on host windows10-jack.
访问:http://localhost:8081/

5.1、命令行提交任务
使用自带的example测试
> bin/flink run /mnt/d/dev/php/magook/trunk/server/flink-1.17.1/examples/batch/WordCount.jar

Executing WordCount example with default input data set.
Use --input to specify file input.
Printing result to stdout. Use --output to specify output path.
Job has been submitted with JobID 1999ddc8ad4d3ba97eb0e07e76692705
Program execution finished
Job with JobID 1999ddc8ad4d3ba97eb0e07e76692705 has finished.
Job Runtime: 1463 ms
Accumulator Results:
- 6687ca7bfce1aae232b5c6988b84ee8e (java.util.ArrayList) [170 elements]


(a,5)
(action,1)
(after,1)
(against,1)
(all,2)
(and,12)
(arms,1)
(arrows,1)
(awry,1)
(ay,1)
(bare,1)
(be,4)
.
.
.
可见 flink 是启动成功的。
我们现在有了三个类
DataSetBatchJob
DataStreamJob
DataStreamSocketJob
接下来我们要修改一下,将txt文件地址改成/mnt/d/dev/java-intellij/word_count_5/input/wordcount.txt,重新打包。
如果在 pom.xml 中没有指定 mainClass ,或者设置的 mainClass 并不是你要执行的,那么在提交任务的时候就要指定 entryCLass,比如 -c org.example.DataSetBatchJob

> bin/flink run -c org.example.DataSetBatchJob /mnt/d/dev/java-intellij/word_count_5/target/word_count_5-1.0-SNAPSHOT.jar

Job has been submitted with JobID f6b25200fdba6be70dbd595adf57372e
Program execution finished
Job with JobID f6b25200fdba6be70dbd595adf57372e has finished.
Job Runtime: 1380 ms
Accumulator Results:
- 79e0e4dadaeee895df041c1ff01385f8 (java.util.ArrayList) [4 elements]


(flink,1)
(hello,3)
(java,1)
(scala,1)
命令是阻塞状态,直到任务被执行完毕,可以加上参数 -d 或 --detached,命令立即返回,但是打印信息要去 webUI 查看。
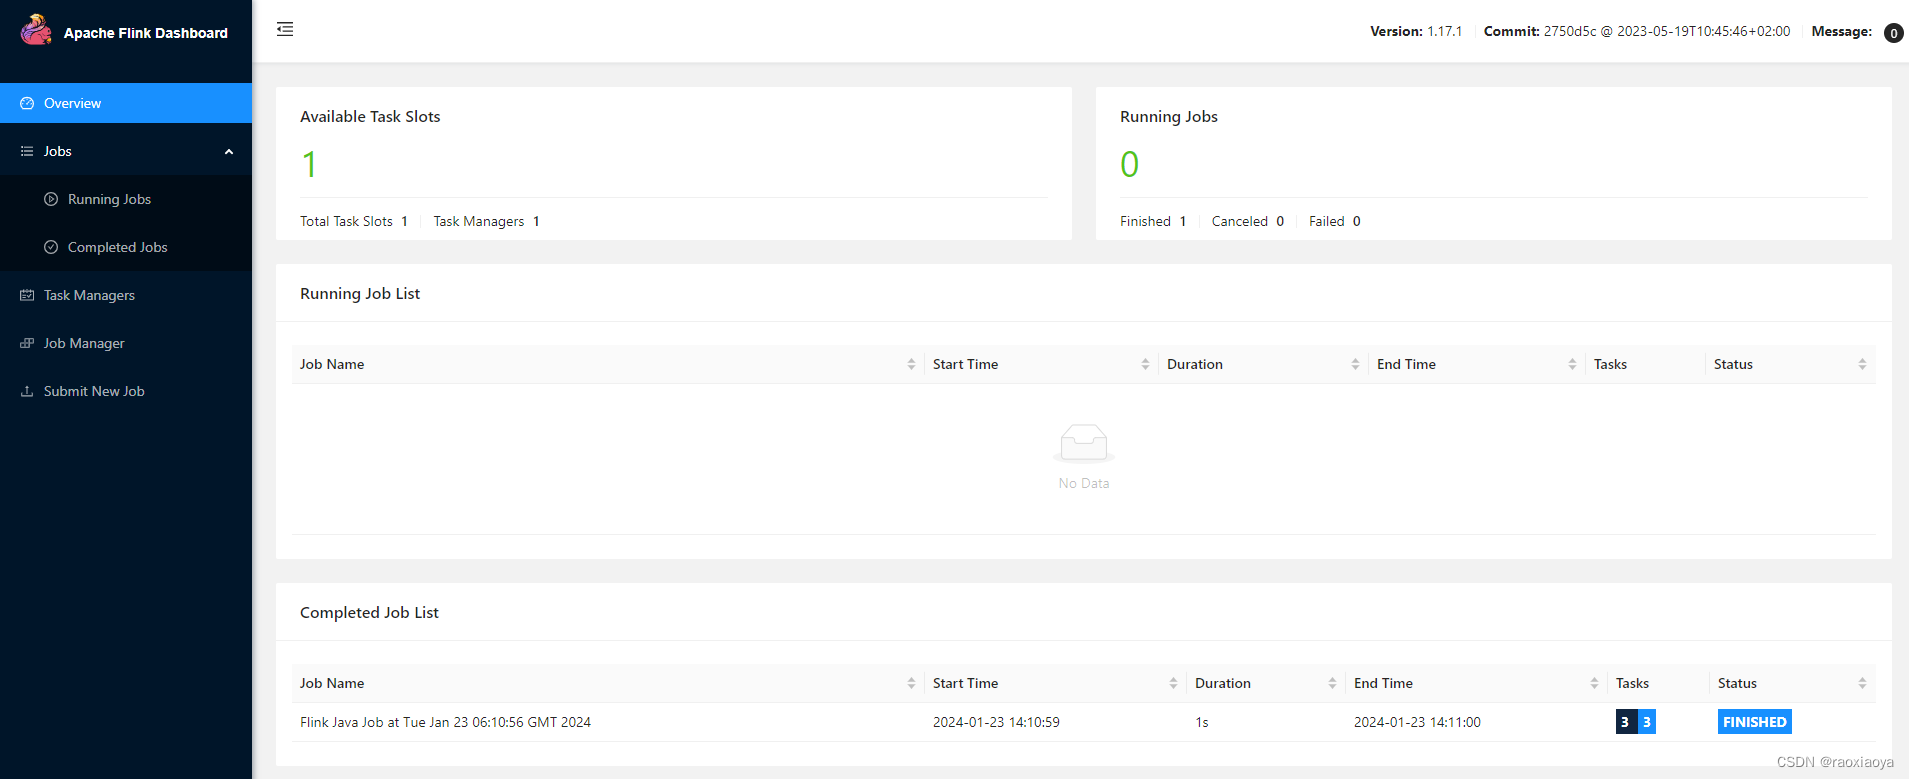
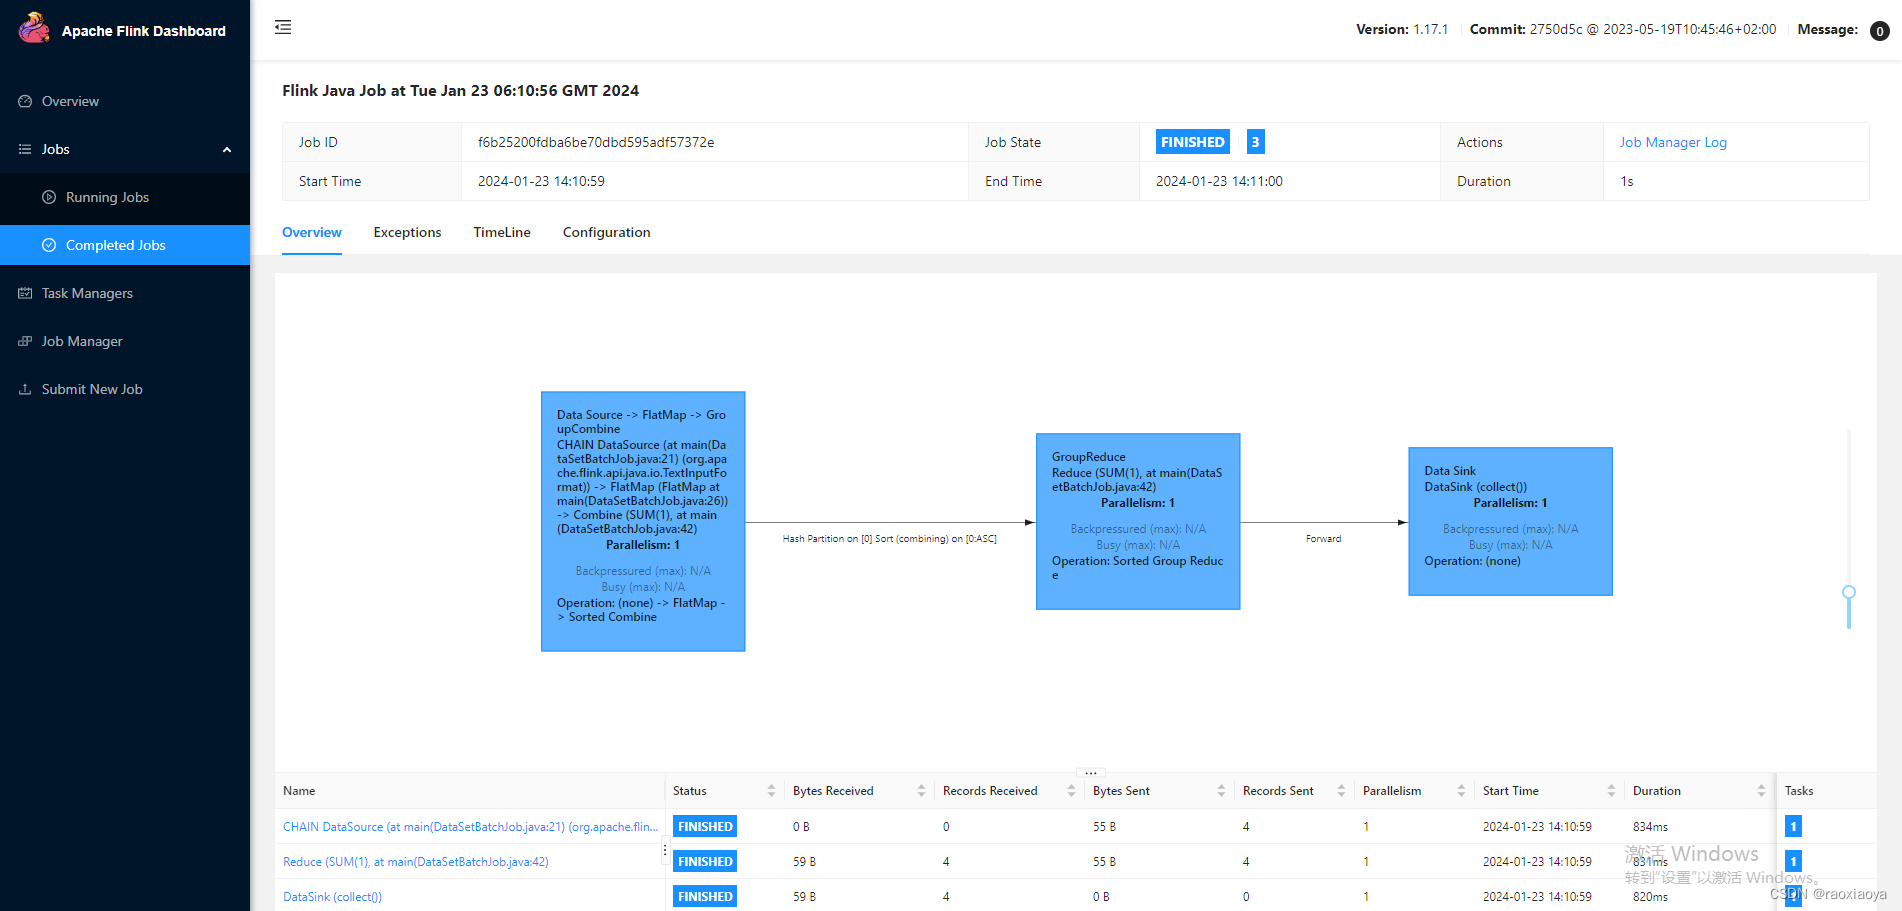
5.2、webUI 上提交任务
还是选择这个 jar 包

可见 entryClass 默认就是 pom.xml 中的设置,当然你还以修改这个参数,此处我们改为DataSetBatchJob,然后点击submit。报错
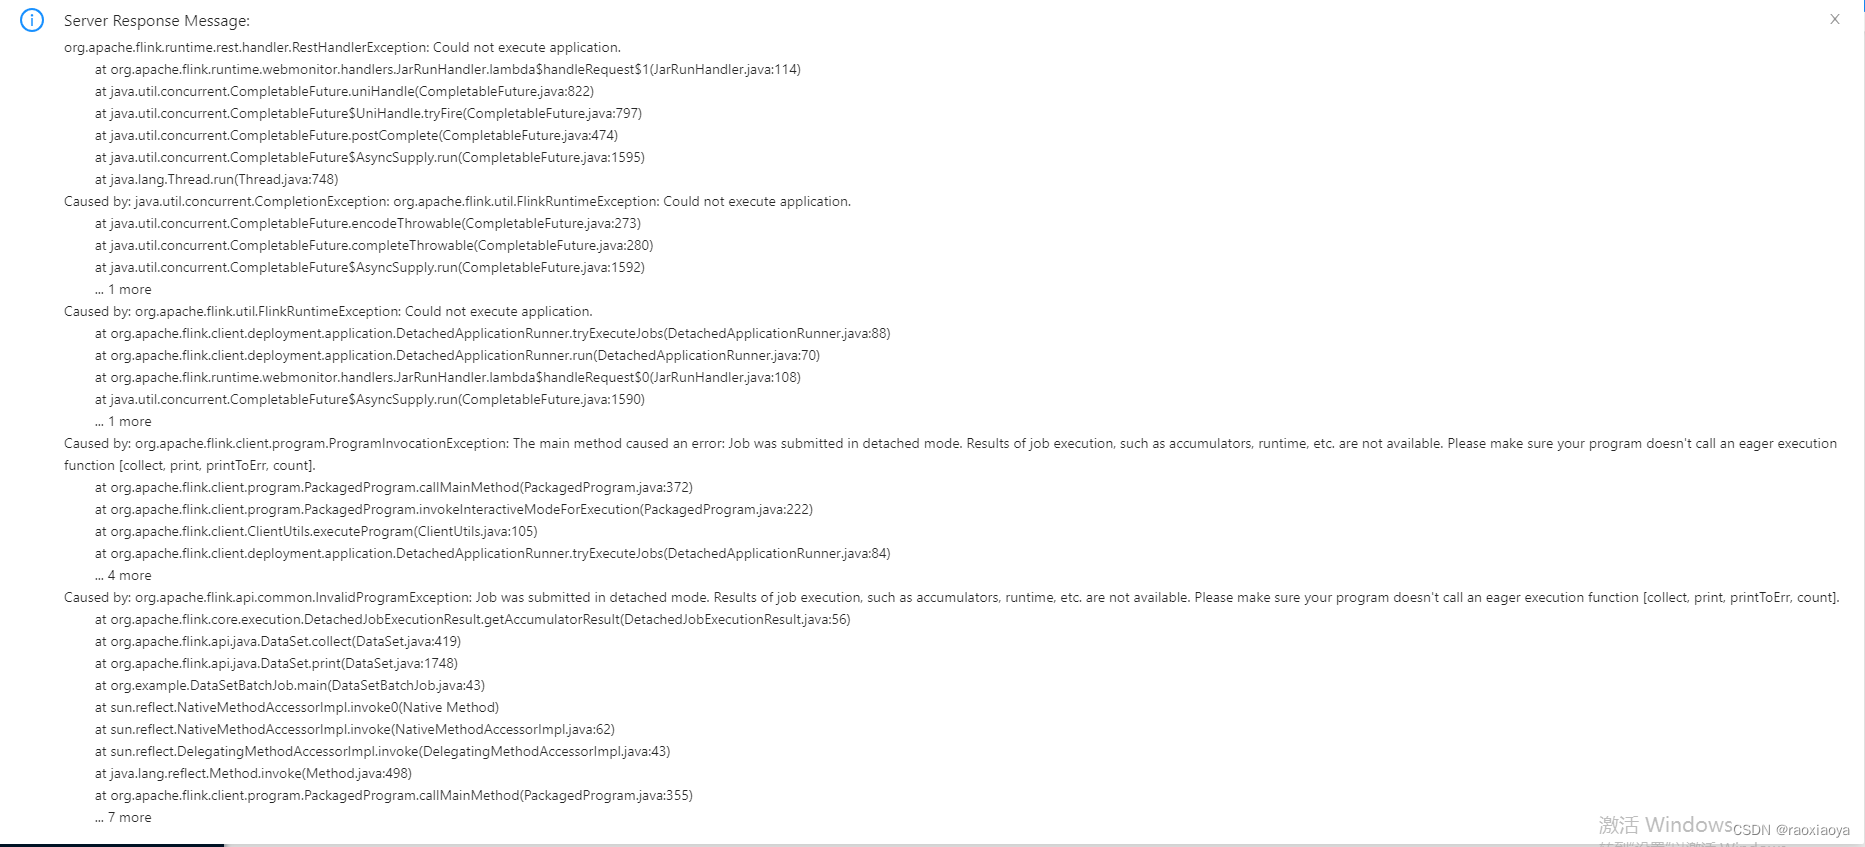
重点是下面这句
Caused by: org.apache.flink.api.common.InvalidProgramException: Job was submitted in detached mode. Results of job execution, such as accumulators, runtime, etc. are not available. Please make sure your program doesn't call an eager execution function [collect, print, printToErr, count].
detached 模式:分离的,指的是通过客户端、Java API 或 Restful 等方式提交的任务,是不会等待作业运行结束的。如果代码中带有collect, print, printToErr, count 操作,对于DataSet API,会直接报错,如上;对于DataStream API,是可以运行的,需要去 webUI 中查看打印信息。
blocking 模式:同步阻塞的,指的是提交作业的时候,会等待作业被执行完,返回结果,打印结果,我们可以通过关闭终端或 Ctrl + C 的方式直接关闭正在运行的 flink 作业,比如我们在命令行执行 bin/flink run ...。当然,也可以在命令行下通过指定 --detached 来使用 detached 模式提交,这样命令行是看不到打印结果的。
bin/flink -h
我们来提交DataStreamJob这个类试试。

这次居然没有报错,那么它打印的信息在哪里呢?
任务是已经FINISHED,找到 Task Manager --> Log List找到.out结尾的日志文件,比如我的flink-Ubuntu-taskexecutor-1-windows10-jack.out。
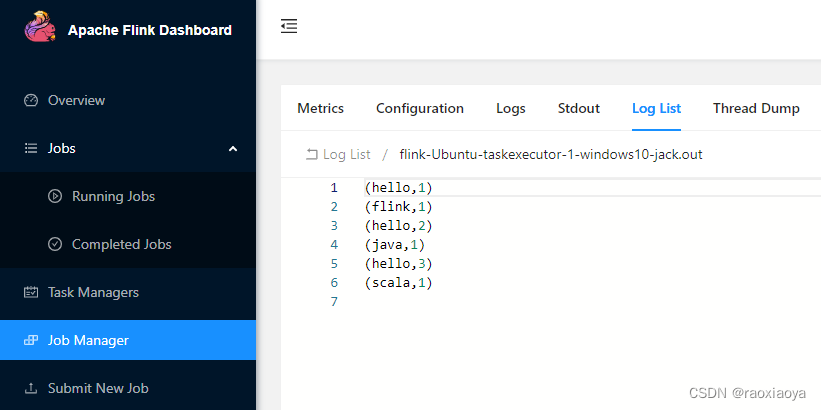
很明显这是流式处理。
接下来我们提交一个无界数据流的任务,也就是DataStreamSocketJob这个类,注意 nc 服务要启动。在 nc 上依次输入
hi girl
hi boy
hi lady
查看日志文件
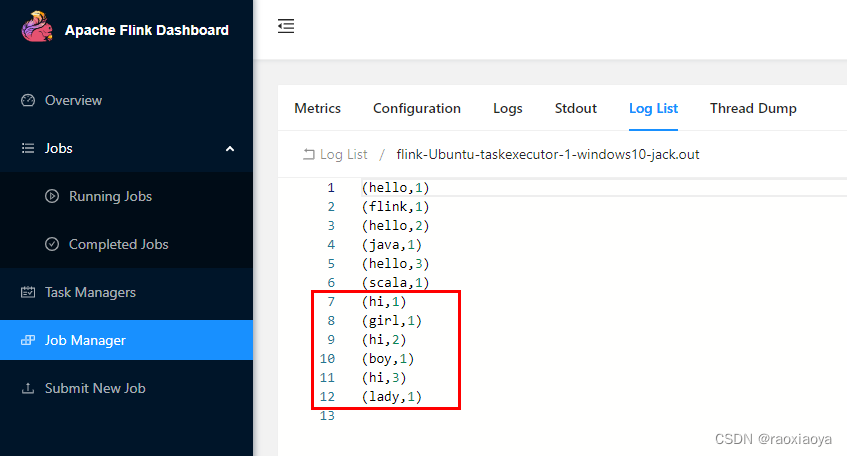
这种任务会一直处于RUNNING状态,可以点击Cancel Job将其结束。
所以,使用 webUI 来提交任务还是挺局限的,首先它是detached,其次还不能设置命令参数。
重启 flink ,清除任务记录
> bin/stop-cluster.sh
> bin/start-cluster.sh
依次执行以下命令
> bin/flink run -c org.example.DataSetBatchJob /mnt/d/dev/java-intellij/word_count_5/target/word_count_5-1.0-SNAPSHOT.jar

> bin/flink run -c org.example.DataStreamJob /mnt/d/dev/java-intellij/word_count_5/target/word_count_5-1.0-SNAPSHOT.jar

> bin/flink run -c org.example.DataStreamJob -Dexecution.runtime-mode=BATCH /mnt/d/dev/java-intellij/word_count_5/target/word_count_5-1.0-SNAPSHOT.jar

flink run 命令其实也是投递到webui那个接口,因此可以指定IP和端口,比如-m hadoop002:8081
6、运行与部署
部署模式:会话模式(session mode),应用模式(application mode),单作业模式(per-job mode)
运行模式,standalone模式,k8s模式,yarn模式
本文来自互联网用户投稿,该文观点仅代表作者本人,不代表本站立场。本站仅提供信息存储空间服务,不拥有所有权,不承担相关法律责任。 如若内容造成侵权/违法违规/事实不符,请联系我的编程经验分享网邮箱:chenni525@qq.com进行投诉反馈,一经查实,立即删除!