动物分类识别教程+分类释义+界面展示
1.项目简介
动物分类教程+分类释义+界面展示
动物分类是生物学中的一个基础知识,它是对动物进行分类、命名和描述的科学方法。本教程将向您介绍动物分类的基本原则和方法,并提供一些常见的动物分类释义。
- 动物分类的基本原则
动物分类根据动物的形态、结构、生活习性、遗传等特征进行分类。动物分类的基本原则包括以下几点:
(1)分类的基础:分类应该以形态学为基础,主要从外部形态、内部结构、发育过程和生理生化特征等方面进行分类。
(2)系统的体系分类:采用分层次、阶梯式的分类方法,把各个分类单元按一定顺序排列成一个大的分类系统。
(3)分类的稳定性:分类的稳定性是指在一定的时间和空间范围内,由于物种的进化和分化关系而形成的分类不会轻易发生变动。
- 常见动物分类释义
(1)哺乳动物:是一类具有乳腺并能哺育幼崽的动物,如猫、狗、猪、牛等。
(2)鸟类:是一类具有翅膀和羽毛的脊椎动物,如鹰、鸽子、鸡等。
(3)爬行动物:是一类冷血动物,具有鳞片、角质板、甲壳等外壳,如蛇、龟、鳄鱼等。
(4)两栖动物:是一类既能在水中生活,也能在陆地上生活的动物,如青蛙、蝾螈等。
- 界面展示
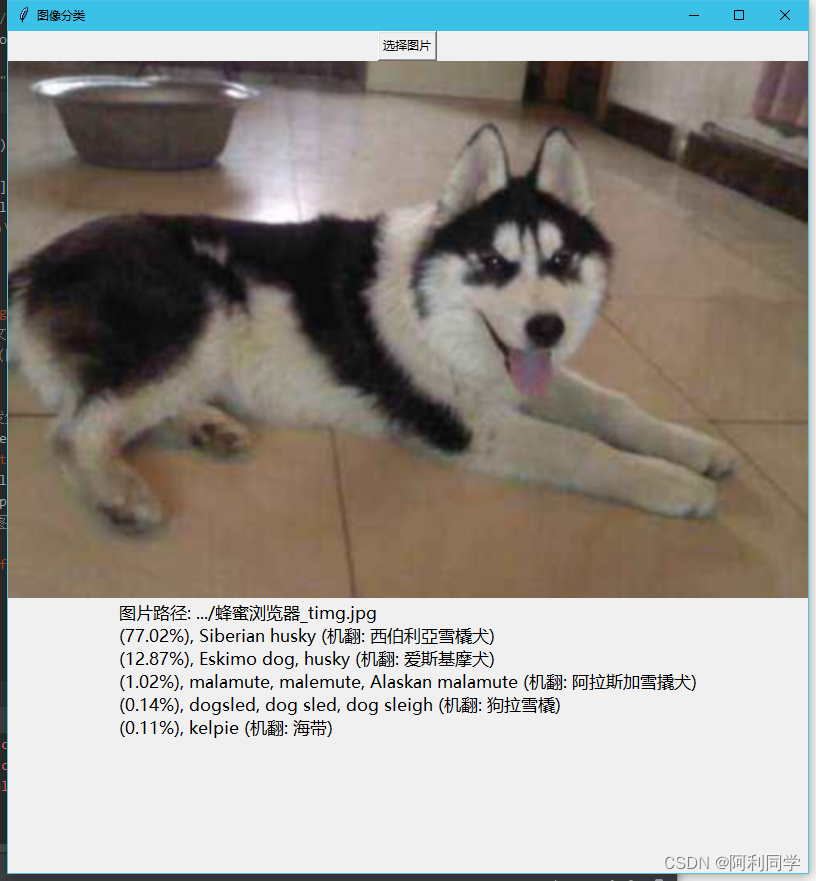
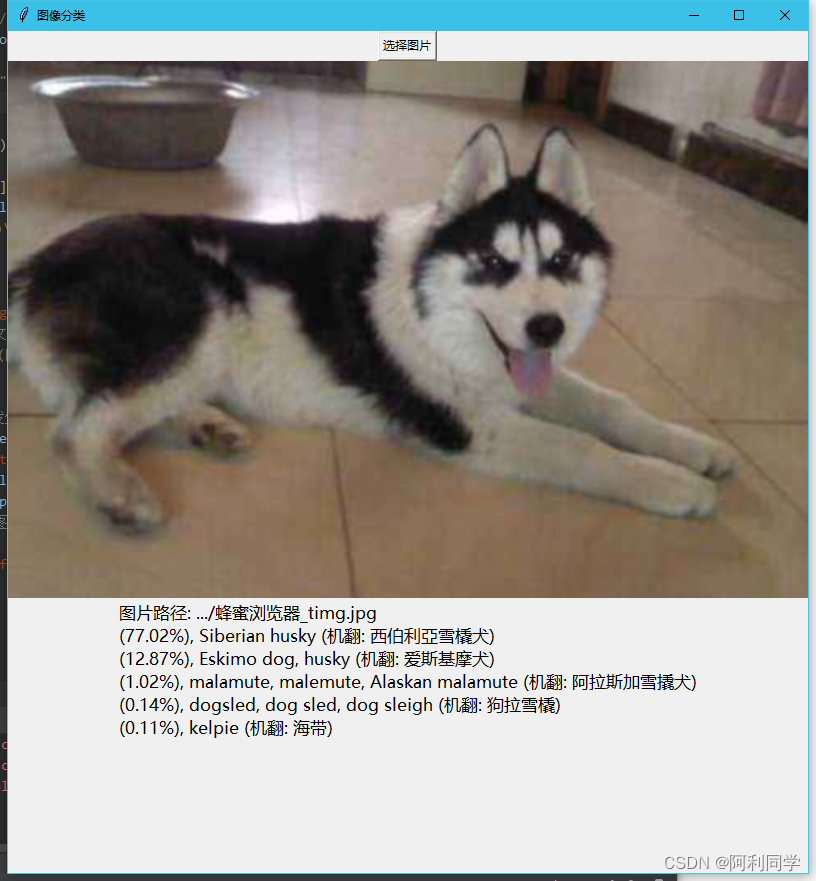
本教程提供了一个简单易用的动物分类界面,用户可以上传自己拍摄的动物图片,系统会自动识别出动物的种类,并显示相应的分类释义。同时,用户还可以通过界面查看其他用户上传的动物图片及其分类结果,以便更好地了解动物分类知识。
总之,本教程旨在向广大用户介绍动物分类的基本原则和方法,帮助用户更好地了解动物世界,同时提供一个方便快捷的界面,让用户可以轻松地进行动物分类。

主要功能:利用tinker封装InceptionV3[论文]MOD进行图像分类的一个小Demo
环境:anaconda+Python3+tensorflow
IDE:pycharm + jupyter notebook
2.代码框架
需要的库模块:
-
os
tarfile
requests
tensorflow
numpy
translate
PIL
一共四个代码文件:
-
get_Inception_model.py
方法模块,下载模型将模型保存到本地
def download_inception_model(): #下载模型将模型保存到本地 '......' -
nodelookup.py
类文件,主要功能将官方标签解码成可读文本
class NodeLookup(object): def __init__(self): self.node_lookup # 字典,id to string '......' @staticmethod def _load(labels_path, uids_path): # 输入:node_id, 输出:id to string字典 '......' return dict def id_to_string(self, node_id): # 输入:node_id, 输出:可读字符串 '......' return str -
tensorflow_predictor.py
类文件,主要功能实现图像预测
class TensorflowPredictor(): def __init__(self): # 加载模型,新建session, '......' def predict_image(self, image_path): # '......' return str -
gui.py
界面代码,面向用户
btn_sel  # 选择图片按钮
img_label  # 这是是显示预测图片的全局变量
res_label  # 这是是显示预测文字的全局变量

def translator_prediction_result(pre_res):# 翻译模块 输入:英文字符串,输出:格式化中文字符串
	'......'
    return res

def selector_image():  # 选择图片按钮点击发生的事件
    '......'

root.mainloop()  # 进入消息循环
3.实现细节
3.1.下载模型
3.1.1.实现功能
下载模型将模型保存到本地
3.1.2.Inception文件简介
Inception为Google开源的CNN模型,至今已经公开四个版本,每一个版本都是基于大型图像数据库ImageNet中的数据训练而成。因此我们可以直接利用Google的Inception模型来实现图像分类。本项目主要以Inception_v3模型为基础。分类一张图像可以在几秒内完成。
3.1.3.流程图
3.1.4.代码
# get_Inception_model.py

import tarfile
import requests


def download_inception_model():
    # inception_v3模型下载
    inception_pre_mod_url = 'http://download.tensorflow.org/models/image/imagenet/inception-2015-12-05.tgz'
    # 模型存放地址
    inception_pre_mod_dir = "inception_model"
    if not os.path.exists(inception_pre_mod_dir):
        os.makedirs(inception_pre_mod_dir)
    # 获取文件名,以及文件路径
    filename = inception_pre_mod_url.split('/')[-1]
    filepath = os.path.join(inception_pre_mod_dir, filename)
    # 下载模型
    if not os.path.exists(filepath):
        print('Downloading: ', filename)
        r = requests.get(inception_pre_mod_url, stream=True)
        with open(filepath, 'wb') as f:
            for chunk in r.iter_content(chunk_size=1024):
                if chunk: f.write(chunk)
    print("Done: ", filename)
    # 解压文件
    tarfile.open(filepath, 'r:gz').extractall(inception_pre_mod_dir)
3.2.标签解码
3.2.1.实现功能
将标签编码和标签内容一一对应(解码)
3.2.2.文件
官方下载的文件夹下有两个文件
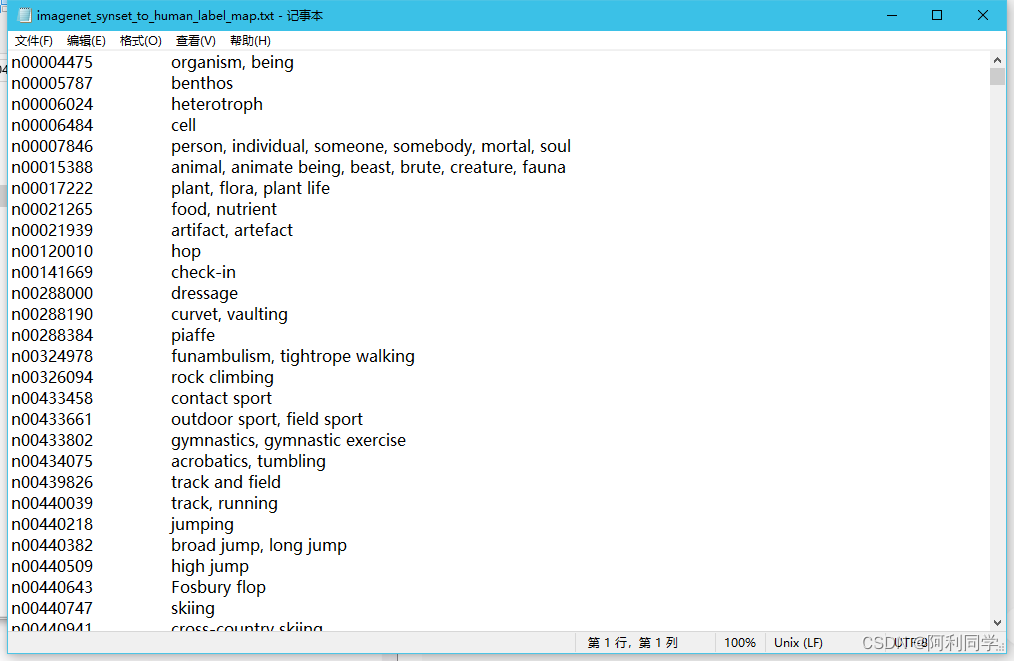
- imagenet_synset_to_human_label_map.txt

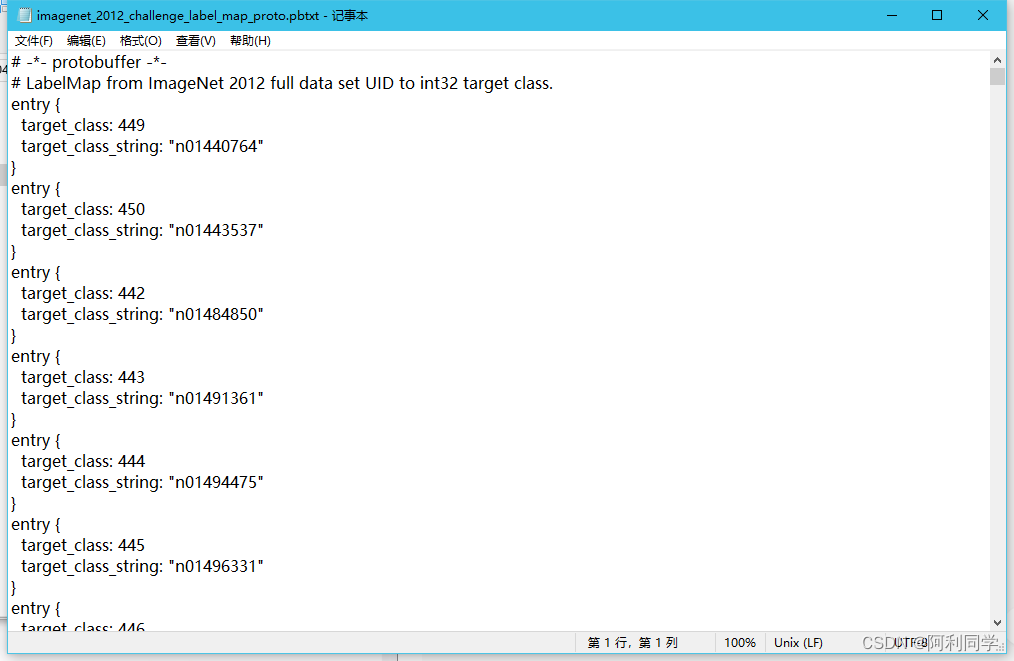
- imagenet_2012_challenge_label_map_proto.pbtx

target_class对应着一个class_string,这里我们要做的任务就是将traget_class与human_string一一对应
3.2.3.代码
# nodelookup.py

import tensorflow.compat.v1 as tf
tf.disable_v2_behavior


class NodeLookup(object):
    def __init__(self):
        labels_path = 'inception_model/imagenet_2012_challenge_label_map_proto.pbtxt'
        uids_path = 'inception_model/imagenet_synset_to_human_label_map.txt'
        self.node_lookup = self.load(labels_path, uids_path)

    @staticmethod
    def _load(labels_path, uids_path):
        uid_to_human = {}
        for line in tf.gfile.GFile(uids_path).readlines():
            items = line.strip('\n').split('\t')
            uid_to_human[items[0]] = items[1]
        node_id_to_uid = {}
        for line in tf.gfile.GFile(labels_path).readlines():
            if line.startswith('  target_class:'):
                target_class = int(line.split(': ')[1])
            if line.startswith('  target_class_string:'):
                target_class_string = line.split(': ')[1]
                node_id_to_uid[target_class] = target_class_string[1:-2]
        node_id_to_name = {}
        for key, val in node_id_to_uid.items():
            name = uid_to_human[val]
            node_id_to_name[key] = name
        return node_id_to_name

    def id_to_string(self, node_id):
        if node_id not in self.node_lookup:
            return ''
        return self.node_lookup[node_id]
3.3.运行模型
3.3.1.流程图
3.3.2.代码
import tensorflow.compat.v1 as tf

tf.disable_v2_behavior
import numpy as np
import nodelookup


class TensorflowPredictor():
    def __init__(self):
        self.sess = tf.Session()
        with tf.gfile.FastGFile('./inception_model/classify_image_graph_def.pb', 'rb') as f:
            graph_def = tf.GraphDef()  # 定义一个计算图
            graph_def.ParseFromString(f.read())  #
            tf.import_graph_def(graph_def, name='')
        self.softmax_tensor = self.sess.graph.get_tensor_by_name('softmax:0')

    def predict_image(self, image_path):
        # 载入图片
        image_data = tf.gfile.FastGFile(image_path, 'rb').read()
        predictions = self.sess.run(self.softmax_tensor, {'DecodeJpeg/contents:0': image_data})  # 图片格式是jpg格式
        predictions = np.squeeze(predictions)  # 把结果转为1维
        # 打印图片路径及名称
        res_str = ''
        res_str += '图片路径: ' + image_path + '\n'
        # 排序
        top_k = predictions.argsort()[-5:][::-1]
        node_lookup = nodelookup.NodeLookup()
        for node_id in top_k:
            # 获取分类名称
            name_str = node_lookup.id_to_string(node_id)
            # 获取该分类的置信度
            score = predictions[node_id] * 100
            res_str += '(%.2f' % (score) + '%), ' + name_str + '\n'
        return res_str
3.4.GUI
3.4.1.运行图

3.4.2.代码
import os
import tkinter
from tkinter import *
from tkinter import filedialog
from PIL import ImageTk
from translate import Translator

import get_Inception_model
from tensorflow_predictor import TensorflowPredictor

root = tkinter.Tk()  # 生成root主窗口
root.title("图像分类")  # 设置窗体标题
root.geometry("800x800")  # 设置窗体大小

if not os.path.exists('./inception_model/classify_image_graph_def.pb'):  # 如果没下载model,则下载model
    get_Inception_model.download_inception_model()  # 下载model

translator = Translator(to_lang="chinese")  # 新建Translator对象

def translator_prediction_result(pre_res):  # 翻译模块
    res = pre_res.split("\n")[0] + '\n'
    for line in pre_res.split("\n")[1:-1]:
        s = translator.translate(line.split(',')[1])
        res += line + " (机翻结果: " + s + ")\n"
    return res  # 返回翻译结果


img_label = Label(root, width='800', height='533')  # 这是是显示预测图片的全局变量
res_label = Label(root)  # 这是是显示预测文字的全局变量
pdt = TensorflowPredictor()  # 新建预测类(自己写的)


def selector_image():  # 选择图片按钮点击发生的事件
    img_path = filedialog.askopenfilename(initialdir='./images')  # 弹窗选择图像文件返回图像地址
    pre_res = pdt.predict_image(image_path=img_path)  # 利用地址调用预测函数返回结果字符串
    pre_res = translator_prediction_result(pre_res)  # 机器翻译结果字符串
    photo = ImageTk.PhotoImage(file=img_path)
    img_label.config(imag=photo)  # 更新图片
    img_label.pack()
    res_label.config(text=pre_res, justify=LEFT)  # 更新文字
    res_label.pack()
    root.mainloop()  # 进入消息循环
    return


btn_sel = tkinter.Button(root, text='选择图片', command=selector_image)  # 选择图片按钮
btn_sel.pack()

root.mainloop()  # 进入消息循环(必需组件)
果字符串
photo = ImageTk.PhotoImage(file=img_path)
img_label.config(imag=photo) # 更新图片
img_label.pack()
res_label.config(text=pre_res, justify=LEFT) # 更新文字
res_label.pack()
root.mainloop() # 进入消息循环
return
btn_sel = tkinter.Button(root, text=‘选择图片’, command=selector_image) # 选择图片按钮
btn_sel.pack()
root.mainloop() # 进入消息循环(必需组件)
总结
Inception 是一种深度学习模型,主要用于图像分类任务。它是由 Google 团队于 2014 年开发的,并在 ImageNet 图像识别竞赛中取得了很好的成绩。

Inception 模型的设计目标是在保持高准确率的同时,降低模型的计算复杂度。它采用了一种称为 Inception 模块的特殊结构,该模块可以同时应用多个不同大小的卷积核和池化操作,并将它们的输出拼接在一起。这样可以捕捉到不同尺度和层次的图像特征。

Inception 模型的核心思想是使用多个并行的卷积操作来处理输入图像,并通过合并它们的输出来提取更丰富的特征表示。这种设计可以减少网络的参数数量,并增加模型的计算效率。

Inception 模型的经典版本是 Inception V3,它包含多个 Inception 模块,每个模块都包含多个并行的卷积和池化操作。Inception V3 在 ImageNet 数据集上取得了很好的性能,同时也被广泛应用于其他图像分类任务。

除了 Inception V3,还有其他版本的 Inception 模型,如 Inception V1、Inception V2 等,每个版本在模型结构和性能上都有所不同。

总结起来,Inception 是一种用于图像分类任务的深度学习模型,通过使用多个并行的卷积操作和池化操作来提取图像特征。它在准确率和计算效率方面取得了良好的平衡,并被广泛应用于图像分类领域。
本文来自互联网用户投稿,该文观点仅代表作者本人,不代表本站立场。本站仅提供信息存储空间服务,不拥有所有权,不承担相关法律责任。 如若内容造成侵权/违法违规/事实不符,请联系我的编程经验分享网邮箱:chenni525@qq.com进行投诉反馈,一经查实,立即删除!
- Python教程
- 深入理解 MySQL 中的 HAVING 关键字和聚合函数
- Qt之QChar编码(1)
- MyBatis入门基础篇
- 用Python脚本实现FFmpeg批量转换
- 教程:在Django中实现微信授权登录
- 【云原生】认识docker容器操作命令
- 微信公众号的建立
- 字节跳动机器人研究团队:用大规模视频数据训练GR-1,机器人轻松应对复杂任务
- 【精心整理】DB2 + HADR + TSA 高可用配置(实用)
- vulhub通关实战一(附docker vulhub 虚拟机环境)
- 使用Java处理HTTP响应
- 【本科生通信原理】【实验报告】【北京航空航天大学】实验二:AM、DSB调制/解调
- NetApp 存储和数据管理技术助力 Be The Match 改进研究分析,提高数据库性能
- 现在学鸿蒙开发有前途吗?能找到工作吗?