QT上位机开发(多线程中锁的使用)
【 声明:版权所有,欢迎转载,请勿用于商业用途。 联系信箱:feixiaoxing @163.com】
? ? ? ? 前面,我们讨论到了如何使用qt进行多线程开发。毋庸讳言,使用多线程开发有很多的优点,比如说提高产品的运行效率,提高界面的反应速度等等。但是多线程本身也有很多的问题,其中最为人所诟病的,就是它的互斥并发的问题。
? ? ? ? 这方面有一个例子,就是喂鱼的场景。假设有一个鱼塘,有两个人同时喂鱼。鱼本身一天只能吃一顿,而且鱼塘边上有一个牌子,记录当天的喂鱼情况。一个人喂完鱼之后,就会把牌子打上勾,提示另外一个人,今天已经喂完。这么做看上去没有什么问题。但是有没有这么一种场景,第一个人喂完之后,准备回来打勾之前,另外一个人正好来准备喂鱼,由于他没有看到打勾的情况,那么就会出现鱼被喂了两遍的情形。要解决这一个问题,只能加锁来处理,比如说把牌子锁住。
1、创建qt widget工程
? ? ? ? 因为涉及到界面,和之前一样需要创建一个qt widget工程。
2、用designer调整界面
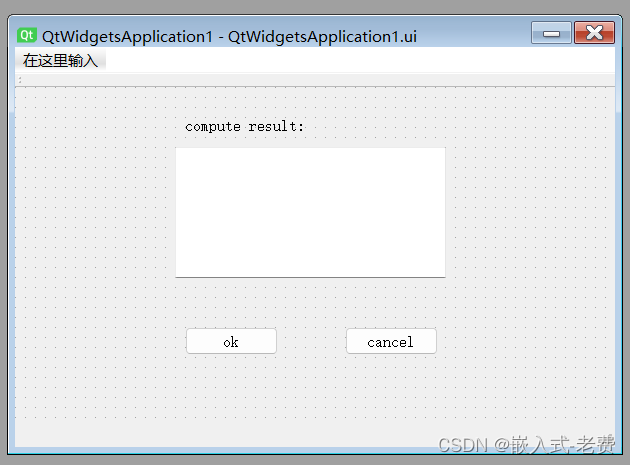
? ? ? ? 需要用designer设计一下界面,目前为止添加两个button、一个label、一个textbox即可。结束后,整体的界面是这样的,

3、头文件设计
? ? ? ? 头文件中的内容,大部分和之前多线程的测试用例是一样。只不过增加了三个thread,因为我们需要三个thread同时对一个全局变量进行递增处理,并且递增结束之后,检验下统计的结果和预测是否一致。
#pragma once

#include <QtWidgets/QMainWindow>
#include <QThread>
#include "ui_QtWidgetsApplication1.h"

// class MyThread
class MyThread : public QThread
{
	Q_OBJECT

signals:
	void result_ready(int data);

public:
	void run() override;
};

// class QtWidgetsApplication1
class QtWidgetsApplication1 : public QMainWindow
{
    Q_OBJECT

public:
    QtWidgetsApplication1(QWidget *parent = nullptr);
    ~QtWidgetsApplication1();

private:
    Ui::QtWidgetsApplication1Class ui;
	MyThread thread1;
	MyThread thread2;
	MyThread thread3;

private slots:
	void ok_clicked();
	void cancel_clicked();
	void handle_result(int data);

};
4、源代码设计
? ? ? ? 实际测试的方法其实比较简单,主要就是判断一下加了锁之后,三个thread累计的结果是否稳定;不加锁之后,累计的结果又是什么样的。如果我们希望结果能够稳定、可靠,那么在处理全局数据的时候,一定要保证操作的过程是原子的、连续的。这一点做不到,得到了数据也是没有什么意义的。
? ? ? ? 另外一点,为了检验不同线程结束后的数值,我们也对handle_result进行了重新设计。之前是每次都重新打印,现在改成了数据追加的形式,这样更有针对性一点。
#include <string>
using namespace std;

#include <QDebug>
#include <QMutex>
#include "QtWidgetsApplication1.h"

//global variable defined here
static int total = 0;
static QMutex qmutex;

// function of class MyThread
void MyThread::run()
{
	for (int i = 0; i < 100000; ++i)
	{
		qmutex.lock();
		total += 1;
		qmutex.unlock();
	}

	// emit signal from simultaneous thread
	emit result_ready(total);
}

// function of class QtWidgetsApplication1
QtWidgetsApplication1::QtWidgetsApplication1(QWidget *parent)
    : QMainWindow(parent)
{
    ui.setupUi(this);

	connect(ui.pushButton1, &QPushButton::clicked, this, &QtWidgetsApplication1::ok_clicked);
	connect(ui.pushButton2, &QPushButton::clicked, this, &QtWidgetsApplication1::cancel_clicked);

	// connect function with signal
	QObject::connect(&thread1, &MyThread::result_ready, this, &QtWidgetsApplication1::handle_result);
	QObject::connect(&thread2, &MyThread::result_ready, this, &QtWidgetsApplication1::handle_result);
	QObject::connect(&thread3, &MyThread::result_ready, this, &QtWidgetsApplication1::handle_result);
}

QtWidgetsApplication1::~QtWidgetsApplication1()
{
	return;
}

void QtWidgetsApplication1::ok_clicked()
{
	ui.textEdit->setPlainText("");
	total = 0;

	thread1.start(); // no block here
	thread2.start();
	thread3.start();
}

void QtWidgetsApplication1::cancel_clicked()
{
	thread3.wait();
	thread2.wait();
	thread1.wait();

	this->close();
}

void QtWidgetsApplication1::handle_result(int data)
{
	string s = "";
	s += std::to_string(data);
	s += "\n";

	QString result = ui.textEdit->toPlainText() + QString::fromStdString(s);
	ui.textEdit->setPlainText("");
	ui.textEdit->setPlainText(result);
}
5、测试和验证
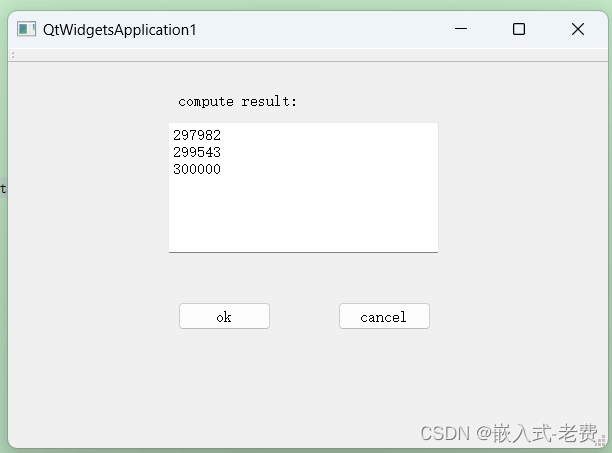
? ? ? ? 测试方面,首先肯定是看编译是否通过。其实就是看,用qmutex与不用qmutex,这两种情况下打印的数据有没有什么区别。只有看出来区别,才能明白我们为什么需要在全局数据处理的时候,添加一把锁了。

本文来自互联网用户投稿,该文观点仅代表作者本人,不代表本站立场。本站仅提供信息存储空间服务,不拥有所有权,不承担相关法律责任。 如若内容造成侵权/违法违规/事实不符,请联系我的编程经验分享网邮箱:chenni525@qq.com进行投诉反馈,一经查实,立即删除!
- Python教程
- 深入理解 MySQL 中的 HAVING 关键字和聚合函数
- Qt之QChar编码(1)
- MyBatis入门基础篇
- 用Python脚本实现FFmpeg批量转换
- (简单有效,亲测可行)python实现每天准时发送邮件,每隔n秒发送邮件
- 尺度感知调制器(SAM)—在浅层优雅的构建注意力机制
- 华为——配置小型网络WLAN基本业务示例
- 【网络安全】一文讲清文件写入漏洞原理及利用方式
- 【C#】基础巩固
- 注册中心与服务发现环境搭建实例--Eureka和Nacos
- Shell脚本③条件语句、if命令和case命令
- 丢失的数字
- Java版 招投标系统简介 招投标系统源码 java招投标系统 招投标系统功能设计
- 浅谈企业不同发展阶段对定岗定编工作的不同需求