C#winform上位机开发学习笔记2-串口助手的波特率参数设置功能添加
发布时间:2024年01月22日
1.功能描述
上位机与下位机进行通讯时需要用到波特率设置功能,以及尝试与下位机实体进行通讯。
2.代码部分
步骤1:串口开启按钮事件中添加代码
serialPort1.BaudRate = Convert.ToInt32(comboBox14.Text, 10);//将十进制的文本转换为32位整型赋值给串口1的波特率步骤2:波特率参数设置复选框事件中添加代码
//波特率设置复选框事件
        private void comboBox14_SelectedIndexChanged(object sender, EventArgs e)
        {
            serialPort1.BaudRate = Convert.ToInt32(comboBox14.Text, 10);//将十进制的文本转换为32位整型赋值给串口1的波特率
        }
    }
3.完整代码
功能关联有以下两处地方
//打开串口按钮事件
        private void button2_Click(object sender, EventArgs e)
        {
            if (button2.Tag.ToString() == "ON")
            {
                //关闭串口
                try
                {
                    serialPort1.Close();
                    button2.BackgroundImage = Properties.Resources.Image_CloseSerial;
                    button2.Tag = "OFF";
                    textBox1.AppendText("[" + DateTime.Now.ToString("HH:mm:ss") + "]" + "->");
                    textBox1.AppendText("手动关闭串口!\r\n");

                    timer1.Stop();//串口关闭情况下关闭串口有效检测功能
                }
                catch
                {

                }
            }
            else //串口已关闭
            {
                //打开串口
                try
                {
                    serialPort1.PortName = comboBox1.Text;    //端口号
                    serialPort1.BaudRate = Convert.ToInt32(comboBox14.Text, 10);//将十进制的文本转换为32位整型赋值给串口1的波特率

                    serialPort1.Open();                       //打开端口
                    button2.BackgroundImage = Properties.Resources.Image_OpenSerial;
                    button2.Tag = "ON";
                    textBox1.AppendText("[" + DateTime.Now.ToString("HH:mm:ss") + "]" + "->");
                    textBox1.AppendText("串口打开成功!\r\n");

                    //WritePrivateProfileString("串口1", "端口号", comboBox1.Text, FileName);
                    timer1.Start();
                }
                catch
                {
                    serialPort1.Close();
                    button2.BackgroundImage = Properties.Resources.Image_CloseSerial;
                    button2.Tag = "OFF";
                    textBox1.AppendText("[" + DateTime.Now.ToString("HH:mm:ss") + "]" + "->");
                    textBox1.AppendText("串口打开失败!\r\n");

                    timer1.Stop();//串口关闭情况下关闭串口有效检测功能
                }
            }
        }
//波特率设置复选框事件
        private void comboBox14_SelectedIndexChanged(object sender, EventArgs e)
        {
            serialPort1.BaudRate = Convert.ToInt32(comboBox14.Text, 10);//将十进制的文本转换为32位整型赋值给串口1的波特率
        }
    }
4.测试结果
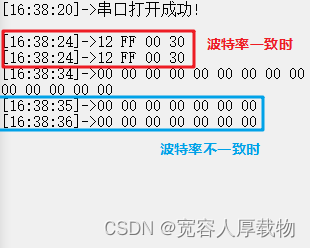
测试时注意不要用Configure Virtual Serial Port Driver虚拟串口,虚拟串口中默认两路com通讯连接,修改波特率并不影响两com之间的数据收发,故无法验证此功能。
正确方式,找到两个TTL转串口模块,TXRX通讯线交换连接,上位机使用sscom与自己开发的上位机进行串口端口绑定,进行波特率参数设置,测试不同波特率下数据收发情况,测试结果正常,此功能开发成功。

参考自B站硬件家园
文章来源:https://blog.csdn.net/weixin_49048045/article/details/135751485
本文来自互联网用户投稿,该文观点仅代表作者本人,不代表本站立场。本站仅提供信息存储空间服务,不拥有所有权,不承担相关法律责任。 如若内容造成侵权/违法违规/事实不符,请联系我的编程经验分享网邮箱:chenni525@qq.com进行投诉反馈,一经查实,立即删除!
本文来自互联网用户投稿,该文观点仅代表作者本人,不代表本站立场。本站仅提供信息存储空间服务,不拥有所有权,不承担相关法律责任。 如若内容造成侵权/违法违规/事实不符,请联系我的编程经验分享网邮箱:chenni525@qq.com进行投诉反馈,一经查实,立即删除!
最新文章
- Python教程
- 深入理解 MySQL 中的 HAVING 关键字和聚合函数
- Qt之QChar编码(1)
- MyBatis入门基础篇
- 用Python脚本实现FFmpeg批量转换
- 【微服务核心】ZooKeeper
- 二分查找 经典例题
- 了解 Node.js 的运行机制:从事件循环到模块系统(下)
- Androidstudio加载编译时kotlin-compiler-embeddable一直下载中
- 【PHP】二维数组转一维数组
- JVM系列-1.初识JVM
- HarmonyOS UI框架简介
- 京东年度数据报告-2023全年度打印机十大热门品牌销量(销额)榜单
- 2024年腾讯云轻量服务器和CVM云服务器性能如何?
- 【已解决】 ubuntu apt-get update连不上dl.google.com