Flume基础知识(十一):Flume自定义接口
1)案例需求
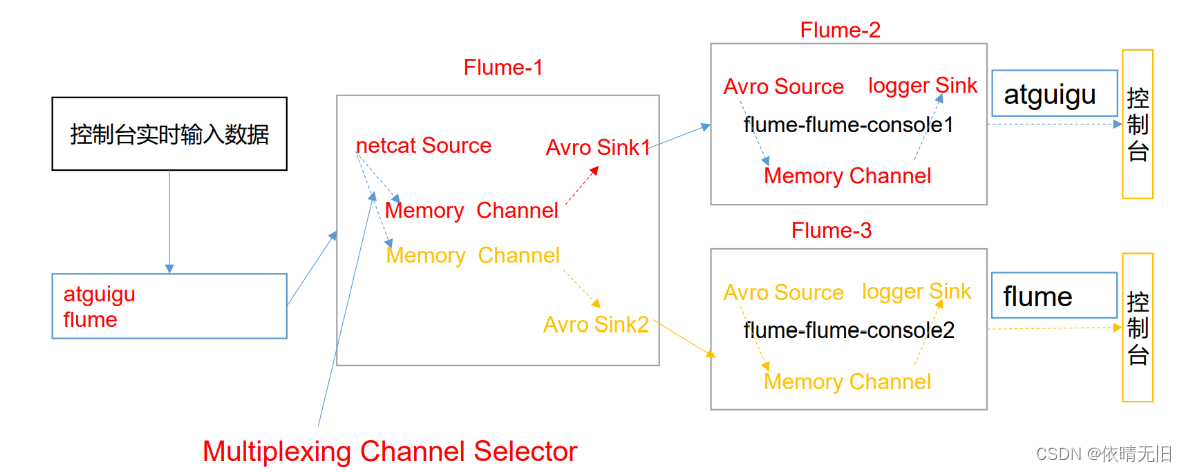
使用 Flume 采集服务器本地日志,需要按照日志类型的不同,将不同种类的日志发往不同的分析系统。
2)需求分析
在实际的开发中,一台服务器产生的日志类型可能有很多种,不同类型的日志可能需要 发送到不同的分析系统。此时会用到 Flume 拓扑结构中的 Multiplexing 结构,Multiplexing 的原理是,根据 event 中 Header 的某个 key 的值,将不同的 event 发送到不同的 Channel中,所以我们需要自定义一个 Interceptor,为不同类型的 event 的 Header 中的 key 赋予 不同的值。
在该案例中,我们以端口数据模拟日志,以是否包含”atguigu”模拟不同类型的日志, 我们需要自定义 interceptor 区分数据中是否包含”atguigu”,将其分别发往不同的分析 系统(Channel)。
3)实现步骤
(1)创建一个 maven 项目,并引入以下依赖。
<dependencies>
 ? ?<dependency>
 ? ? ? ?<groupId>org.apache.flume</groupId>
 ? ? ? ?<artifactId>flume-ng-core</artifactId>
 ? ? ? ?<version>1.9.0</version>
 ? ?</dependency>
</dependencies>
(2)定义 CustomInterceptor 类并实现 Interceptor 接口。
package com.atguigu.interceptor;
?
import org.apache.flume.Context;
import org.apache.flume.Event;
import org.apache.flume.interceptor.Interceptor;
?
import java.util.ArrayList;
import java.util.List;
import java.util.Map;
?
/**
 * @author:左泽林
 * @date:日期:2022-01-17-时间:14:47
 * @message:
 */
public class TypeInterceptor implements Interceptor {
?
 ? ?/*声明一个集合,用于存放拦截器处理后的事件*/
 ? ?private List<Event> addHeaderEvents ;
?
 ? ?//初始化
 ? ?public void initialize() {
 ? ? ? ?/*初始化*/
 ? ? ? ?addHeaderEvents = new ArrayList<Event>();
 ?  }
?
 ? ?//处理单个事件
 ? ?public Event intercept(Event event) {
?
 ? ? ? ?//1.获取header & body
 ? ? ? ?Map<String, String> headers = event.getHeaders();
 ? ? ? ?String body = new String(event.getBody());
?
 ? ? ? ?//2.根据body中是否包含“atguigu”添加不同的头信息
 ? ? ? ?if (body.contains("atguigu")){
 ? ? ? ? ? ?headers.put("type","atguigu");
 ? ? ?  }else{
 ? ? ? ? ? ?headers.put("type","other");
 ? ? ?  }
?
 ? ? ? ?/*返回数据*/
 ? ? ? ?return event;
 ?  }
?
 ? ?/*批处理事件*/
 ? ?public List<Event> intercept(List<Event> events) {
?
 ? ? ? ?//1. 清空集合
 ? ? ? ?addHeaderEvents.clear();
?
 ? ? ? ?/*遍历events*/
 ? ? ? ?for (Event event : events) {
 ? ? ? ? ? ?addHeaderEvents.add(intercept(event));
 ? ? ?  }
?
 ? ? ? ?/*返回数据*/
 ? ? ? ?return events;
 ?  }
 ? ?
 ? ?public void close() {
?
 ?  }
 ? ?
 ? ?public static class Builder implements Interceptor.Builder{
?
 ? ? ? ?public Interceptor build() {
 ? ? ? ? ? ?return new TypeInterceptor();
 ? ? ?  }
?
 ? ? ? ?public void configure(Context context) {
 ? ? ? ? ? ?
 ? ? ?  }
 ?  }
}
打包,上传到服务器Flume的lib下,Flume会在启动时调用
(3)编辑 flume 配置文件
为 hadoop100 上的 Flume1 配置 1 个 netcat source,1 个 sink group(2 个 avro sink), 并配置相应的 ChannelSelector 和 interceptor。
# Name the components on this agent
a1.sources = r1
a1.sinks = k1 k2
a1.channels = c1 c2
# Describe/configure the source
a1.sources.r1.type = netcat
a1.sources.r1.bind = localhost
a1.sources.r1.port = 44444
a1.sources.r1.interceptors = i1
#拦截器
a1.sources.r1.interceptors.i1.type = com.atguigu.flume.interceptor.TypeInterceptor$Builder
a1.sources.r1.selector.type = multiplexing
a1.sources.r1.selector.header = type
#映射需要对应代码中的拦截类型,这里就是atguigu、other
a1.sources.r1.selector.mapping.atguigu = c1
a1.sources.r1.selector.mapping.other = c2
# Describe the sink
a1.sinks.k1.type = avro
a1.sinks.k1.hostname = hadoop101
a1.sinks.k1.port = 4141
a1.sinks.k2.type=avro
a1.sinks.k2.hostname = hadoop102
a1.sinks.k2.port = 4242
# Use a channel which buffers events in memory
a1.channels.c1.type = memory
a1.channels.c1.capacity = 1000
a1.channels.c1.transactionCapacity = 100
# Use a channel which buffers events in memory
a1.channels.c2.type = memory
a1.channels.c2.capacity = 1000
a1.channels.c2.transactionCapacity = 100
# Bind the source and sink to the channel
a1.sources.r1.channels = c1 c2
a1.sinks.k1.channel = c1
a1.sinks.k2.channel = c2
为 hadoop103 上的 Flume4 配置一个 avro source 和一个 logger sink。
a1.sources = r1
a1.sinks = k1
a1.channels = c1
a1.sources.r1.type = avro
a1.sources.r1.bind = hadoop101
a1.sources.r1.port = 4141
a1.sinks.k1.type = logger
a1.channels.c1.type = memory
a1.channels.c1.capacity = 1000
a1.channels.c1.transactionCapacity = 100
a1.sinks.k1.channel = c1
a1.sources.r1.channels = c1
为 hadoop102 上的 Flume3 配置一个 avro source 和一个 logger sink。
a1.sources = r1
a1.sinks = k1
a1.channels = c1
a1.sources.r1.type = avro
a1.sources.r1.bind = hadoop102
a1.sources.r1.port = 4242
a1.sinks.k1.type = logger
a1.channels.c1.type = memory
a1.channels.c1.capacity = 1000
a1.channels.c1.transactionCapacity = 100
a1.sinks.k1.channel = c1
a1.sources.r1.channels = c1
(4)分别在 hadoop100,hadoop101,hadoop102 上启动 flume 进程,注意先后顺序。
[root@hadoop102 flume]$ bin/flume-ng agent --conf conf/ --name a1 --conf-file job/group4/flume3.conf -Dflume.root.logger=INFO,console
[root@hadoop101 flume]$ bin/flume-ng agent --conf conf/ --name a1 --conf-file job/group4/flume2.conf -Dflume.root.logger=INFO,console
[root@hadoop100 flume]$ bin/flume-ng agent --conf conf/ --name a1 --conf-file job/group4/flume1.conf
(5)在 hadoop100 使用 netcat 向 localhost:44444 发送字母和数字。
(6)观察 hadoop101 和 hadoop102 打印的日志。
本文来自互联网用户投稿,该文观点仅代表作者本人,不代表本站立场。本站仅提供信息存储空间服务,不拥有所有权,不承担相关法律责任。 如若内容造成侵权/违法违规/事实不符,请联系我的编程经验分享网邮箱:chenni525@qq.com进行投诉反馈,一经查实,立即删除!
- Python教程
- 深入理解 MySQL 中的 HAVING 关键字和聚合函数
- Qt之QChar编码(1)
- MyBatis入门基础篇
- 用Python脚本实现FFmpeg批量转换
- ASTM D7031-11(2019)木塑复合材料检测
- Spring-MVC--ControllerAdvice 全局控制器增强
- 基于bp神经网络变压器的故障分类
- 【数学笔记】集合及简要逻辑
- 【新功能上线】mooncakes.io:新一代MoonBit包管理平台来啦!!
- 小程序隐私保护指引组件wx.getPrivacySetting
- autojump 命令行工具 - 快速跳转目录
- c语言-库函数memcpy()、memmove()、memcmp()、memset()介绍
- AI项目十八:YOLOV8自训练关键点检测
- Github基础入门(2):github打不开?保姆级教程教你流畅使用GIthub