【HarmonyOS开发】ArkTs实现应用配色随系统深浅模式自动切换的三种方式

应用深浅配色模式是一种常见的系统外观选项,环境变暗时切换到深色模式,可以减轻眼睛疲劳和节省设备电量。
注意:DevEco Studio 4.0版本存在bug,无法生效。
1、实现思路
-
利用系统颜色资源:这种方法最简单,只需要在应用中引用系统提供的颜色资源,例如
ohos_id_color_tertiary或ohos_id_color_primary等,就可以让应用自动跟随系统的颜色设置变化。 -
使用限定词目录:这种方法稍微复杂一些,需要在应用中创建不同的限定词目录,例如
resources/dark或resources/light等,来表示不同的应用场景,然后在每个目录下定义不同资源,来适配不同的模式。最后,在应用中只需要引用这些资源的名称,而不需要指定具体的目录,系统会根据当前的模式自动选择合适的资源。 -
订阅系统环境变量变化:这种方法最灵活,但也最复杂。它需要在应用中监听系统环境变量的变化,并在变化发生时调用相应的函数来处理。这样,可以在函数中实现任何想要的逻辑,来改变应用外观。
?2、使用系统颜色资源
OpenHarmony提供了一套系统资源供开发者直接使用。如果在UI组件中指定颜色属性为系统颜色ID,那么应用就可以自动适配系统深/浅模式,无需额外的工作。
开发者可以使用“$r('sys.type.resource_id')”语法来引用系统资源。其中,sys表示这是一个系统资源,type表示资源的类型,可以是“color”、“string”、“media”等,resource_id表示资源的ID,例如“ohos_id_color_background”、“ohos_id_color_primary”等。
@Entry
@Component
struct Index {
  @State message: string = 'Hello World'

  build() {
    Row() {
      Column() {
        Text(this.message)
          .fontSize(50)
          .fontWeight(FontWeight.Bold)
          // 引入系统资源颜色设置文字颜色
          .fontColor($r('sys.color.ohos_id_color_text_primary'))
      }
      .width('100%')
    }
    // 引入系统资源颜色设置应用背景颜色
    .backgroundColor($r('sys.color.ohos_id_color_sub_background'))
    .height('100%')
  }
}
3、使用限定词目录
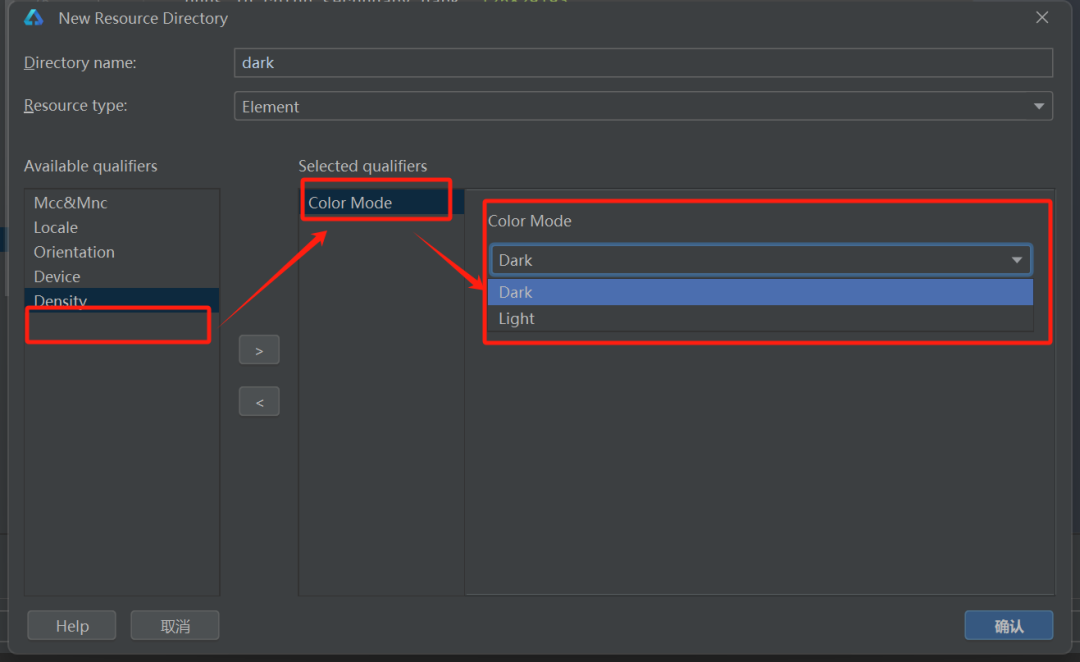
为了让应用能够适配系统的深浅模式,我们可以创建一个特殊的Color Mode类型资源目录resources/dark,来存放适用于深色模式的资源。当系统处于深色模式时,应用就会优先读取这个目录下的资源。如果没有找到对应的资源,应用会使用默认的resources/base目录下的资源。
创建资源目录

新增的resources/dark/element目录,创建color.json文件。新建颜色ID并赋予具体色值,bg_color为黑色,txt_color为白色。
{
  "color": [
    {
      "name": "bg_color",
      "value": "#000000"
    },
    {
      "name": "txt_color",
      "value": "#c6c6c6"
    }
  ]
}
在resources/base/element/color.json,同样创建这两个颜色ID并赋予不同的色值,bg_color为白色,txt_color为黑色。
{
  "color": [
    {
      "name": "start_window_background",
      "value": "#FFFFFF"
    },
    {
      "name": "bg_color",
      "value": "#f1f3f5"
    },
    {
      "name": "txt_color",
      "value": "#121212"
    }
  ]
}
设置组件属性为我们创建的颜色ID,此时,我们的应用在深色模式下取用ID在dark目录下对应的色值,其他情况下会使用base目录下对应的色值。
@Entry
@Component
struct Index {
  @State message: string = 'Hello World'

  build() {
    Row() {
      Column() {
        Text(this.message)
          .fontSize(50)
          .fontWeight(FontWeight.Bold)
          .fontColor($r('app.color.txt_color'))
      }
      .width('100%')
    }
    .backgroundColor($r('app.color.bg_color'))
    .height('100%')
  }
}
4、订阅系统环境变量的变化
系统配置更新时会调用onConfigurationUpdate,我们可以获取系统配置信息中ColorMode(系统深浅模式)属性,再使用AppStorage存储系统深浅模式状态, 使用@StorageProp建立AppStorage和自定义组件的单向数据同步,通过@Watch监听状态变量变化并创建回调方法,在状态变量改变时修改颜色变量值,从而实现应用配色随系统深浅模式自动切换。
-
在AbilityStage的onCreate()生命周期中获取当前的颜色模式并保存到AppStorage
// EntryAbility.ts入口文件中保存状态 onCreate(want, launchParam) { AppStorage.SetOrCreate('currentColorMode', this.context.config.colorMode); } -
在AbilityStage的onConfigurationUpdate()生命周期中获取最新变更的颜色模式并刷新到AppStorage
// EntryAbility.ts入口文件中获取环境变化,修改状态 onConfigurationUpdate(newConfig: Configuration): void { AppStorage.SetOrCreate('currentColorMode', newConfig.colorMode); } -
在UI Page中通过@StorageProp + @Watch方式获取当前最新深浅模式并监听设备深浅模式变化
@StorageProp('currentColorMode') @Watch('onColorModeChange') currentMode: number -
创建UI状态变量,设置组件颜色属性为该状态变量
@State color_txt: string = '' @State color_bg: string = '' build() { Row() { Column() { Text(this.message) .fontSize(50) .fontWeight(FontWeight.Bold) .fontColor(this.color_txt) } .width('100%') } .height('100%') .backgroundColor(this.color_bg) } -
在@Watch回调函数中执行自定义的适配逻辑
onColorModeChange(): void { if (this.currentMode === ConfigurationConstant.ColorMode.COLOR_MODE_LIGHT) { this.color_txt = '#121212' this.color_bg = '#f1f3f5' } else { this.color_txt = '#c6c6c6' this.color_bg = '#000000' } } -
@Watch装饰器装饰的方法,在第一次初始化的时候不会被调用。只有在后续状态改变时,才会调用@Watch回调方法。所以在第一次初始化时需要根据currentMode的值做一次逻辑适配,具体内容与onColorModeChange保持一致
aboutToAppear() {
    if (this.currentMode === ConfigurationConstant.ColorMode.COLOR_MODE_LIGHT) {
      this.color_txt = '#121212'
      this.color_bg = '#f1f3f5'
    } else {
      this.color_txt = '#c6c6c6'
      this.color_bg = '#000000'
    }
}
5、完整代码
5.1?EntryAbility.ts
import UIAbility from '@ohos.app.ability.UIAbility';
import window from '@ohos.window';
import { Configuration } from '@ohos.app.ability.Configuration';

export default class EntryAbility extends UIAbility {
  onCreate(want, launchParam) {
    AppStorage.SetOrCreate('currentColorMode', this.context.config.colorMode);
  }

  onWindowStageCreate(windowStage: window.WindowStage) {
    windowStage.loadContent('pages/Index', (err, data) => {
    });
  }

  onConfigurationUpdate(newConfig: Configuration): void {
    AppStorage.SetOrCreate('currentColorMode', newConfig.colorMode);
  }
}
5.2?index.ets
import ConfigurationConstant from '@ohos.app.ability.ConfigurationConstant';
@Entry
@Component
struct Index {
  @State message: string = 'Hello World'
  @State color_txt: string = ''
  @State color_bg: string = ''
  @StorageProp('currentColorMode') @Watch('onColorModeChange') currentMode: number = 1;

  build() {
    Row() {
      Column() {
        Text(this.message)
          .fontSize(50)
          .fontWeight(FontWeight.Bold)
          .fontColor(this.color_txt)
      }
      .width('100%')
    }
    .height('100%')
    .backgroundColor(this.color_bg)
  }

  aboutToAppear() {
    if (this.currentMode === ConfigurationConstant.ColorMode.COLOR_MODE_LIGHT) {
      this.color_txt = '#121212'
      this.color_bg = '#f1f3f5'
    } else {
      this.color_txt = '#c6c6c6'
      this.color_bg = '#000000'
    }
  }

  onColorModeChange(): void {
    if (this.currentMode === ConfigurationConstant.ColorMode.COLOR_MODE_LIGHT) {
      this.color_txt = '#121212'
      this.color_bg = '#f1f3f5'
    } else {
      this.color_txt = '#c6c6c6'
      this.color_bg = '#000000'
    }
  }
}
6、扩展:自定义实现切换主题
6.1 配置Theme,抛出改变主题的方法
export namespace theme {
  declare type THEME = Resource | string | Color;

  export interface Theme {
    BG_COLOR: THEME;
    Text_COLOR: THEME;
    Text_BG: THEME;
  }

  class LightTheme implements Theme {
    BG_COLOR = "#eeeeee";
    Text_COLOR = Color.Black;
    Text_BG = Color.Blue;
  }

  class NightTheme implements Theme {
    BG_COLOR = "#111111";
    Text_COLOR = Color.White;
    Text_BG = Color.Orange;
  }

  export function getTheme(theme: number): Theme {
    let key = "app_global_theme_" + theme;
    let cachedTheme = AppStorage.Get<any>(key)
    if (!cachedTheme) {
      cachedTheme = (0 == theme ? new LightTheme() : new NightTheme());

      AppStorage.SetOrCreate<any>(key, cachedTheme)
    }
    return cachedTheme as Theme;
  }
}
6.2?通过传入主题状态改变显示
import { theme } from './theme'
@Entry
@Component
struct ArkUITools {
  @State theme: number = 0;
  build() {
     Column() {
        Button("切换主题")
          .fontSize(18)
          .margin(24)
          .fontWeight(FontWeight.Bold)
          .backgroundColor(theme.getTheme(this.theme).Text_BG)
          .onClick(() => {
            this.theme = 0 == this.theme ? 1 : 0;
          })
      }
  }
}
本文来自互联网用户投稿,该文观点仅代表作者本人,不代表本站立场。本站仅提供信息存储空间服务,不拥有所有权,不承担相关法律责任。 如若内容造成侵权/违法违规/事实不符,请联系我的编程经验分享网邮箱:chenni525@qq.com进行投诉反馈,一经查实,立即删除!
- Python教程
- 深入理解 MySQL 中的 HAVING 关键字和聚合函数
- Qt之QChar编码(1)
- MyBatis入门基础篇
- 用Python脚本实现FFmpeg批量转换
- 【小白专用】PHP基础知识 - PHP 使用 PDO
- Mysql配置服务器
- IntelliJ IDEA 中输出乱码解决
- 产品面试题
- LanChatRoom局域网聊天室
- 大创项目推荐 深度学习大数据物流平台 python
- 2023年全球软件质量&效能大会(QECon上海站):核心内容与学习收获(附大会核心PPT下载)
- 233.【2023年华为OD机试真题(C卷)】找座位(Java&Python&C++&JS实现)
- Centos7 如何设置开机启动某个程序
- TypeScript【枚举、联合类型函数_基础、函数_参数说明 、类的概念、类的创建】(二)-全面详解(学习总结---从入门到深化)