技术面没过,居然是因为没用过Pytest框架
01 概述
pytest是一个非常成熟的全功能的Python测试框架,主要特点有以下几点:
简单灵活,容易上手,文档丰富;
支持参数化,可以细粒度地控制要测试的测试用例;
能够支持简单的单元测试和复杂的功能测试,还可以用来做selenium/appnium等自动化测试、接口自动化测试(pytest+requests);
pytest具有很多第三方插件,并且可以自定义扩展,比较好用的如pytest-selenium(集成selenium)、pytest-html(完美html测试报告生成)、pytest-rerunfailures(失败case重复执行)、pytest-xdist(多CPU分发)等;
测试用例的skip和xfail处理;
可以很好的和CI工具结合,例如jenkins
02 使用介绍
安装:pip install pytest
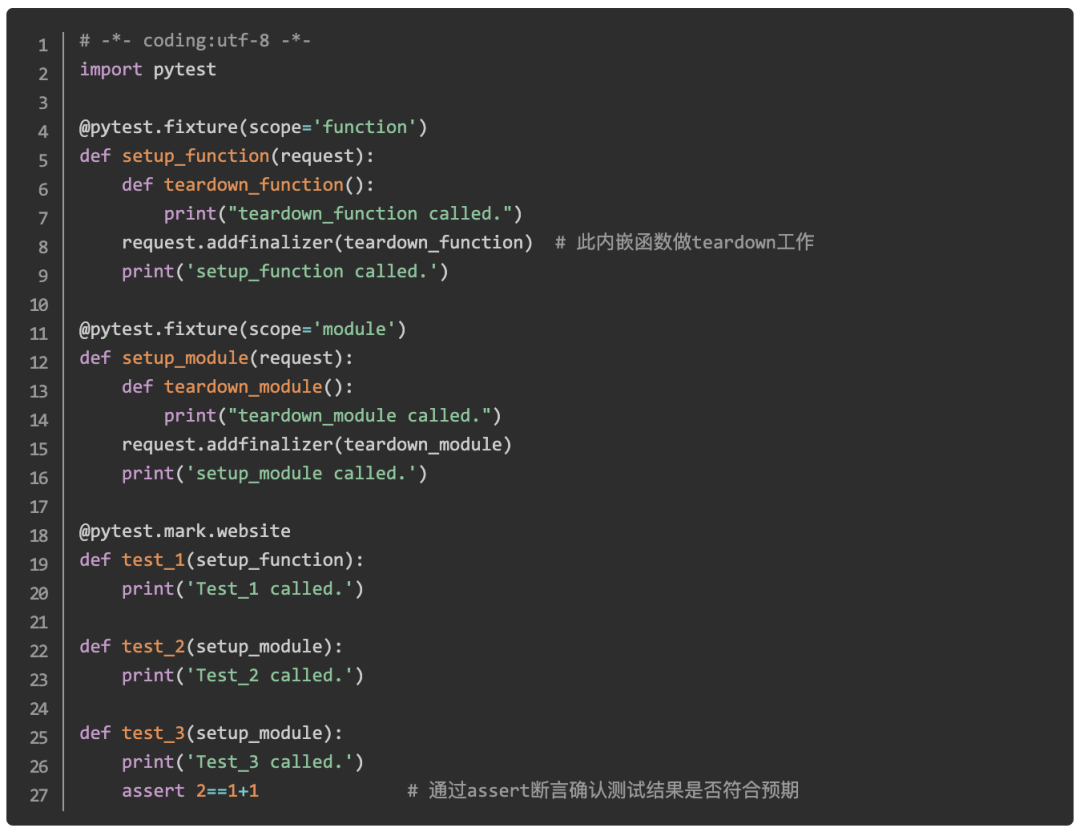
1、示例代码
编写规则:编写pytest测试样例非常简单,只需要按照下面的规则:
测试文件以test_开头(以_test结尾也可以)
测试类以Test开头,并且不能带有 init 方法
测试函数以test_开头
断言使用基本的assert即可
pytest1.py
fixture的scope参数
scope参数有四种,默认为function
function:每个test都运行,默认是function的scope
class:每个class的所有test只运行一次
module:每个module的所有test只运行一次
session:每个session只运行一次
setup和teardown操作
setup,在测试函数或类之前执行,完成准备工作,例如数据库链接、测试数据、打开文件等
teardown,在测试函数或类之后执行,完成收尾工作,例如断开数据库链接、回收内存资源等
备注:
也可以通过在fixture函数中通过yield实现setup和teardown功能

2、测试结果
如何执行

通过pytest.mark对test方法分类执行
通过@pytest.mark控制需要执行哪些feature的test,例如在执行test前增加修饰
@pytest.mark.website
通过 -m “website” 执行有website标记的test方法
$ pytest  -v -m "website" pytest1.py

============================================================================== test session starts ===============================================================================platform linux2 -- Python 2.7.14, pytest-3.0.0, py-1.5.2, pluggy-0.3.1 -- /home/kevin/soft/anaconda2/bin/python

cachedir: .cacheUsing --randomly-seed=1522925202rootdir: /home/kevin/learn/python-web/tox/case2, inifile:plugins: randomly-1.0.0, mock-1.2, cov-2.0.0collected 3 items

pytest1.py::test_1 PASSED

============================================================================= pytest-warning summary =============================================================================WC1 None pytest_funcarg__cov: declaring fixtures using "pytest_funcarg__" prefix is deprecated and scheduled to be removed in pytest 4.0.  Please remove the prefix and use the @pytest.fixture decorator instead.=============================================================================== 2 tests deselected ========================================================================================================================================== 1 passed, 2 deselected, 1 pytest-warnings in 0.00 seconds ============================================================
通过 -m “not website” 执行没有website标记的test方法
$ pytest  -v -m "not website" pytest1.py

============================================================================== test session starts ===============================================================================platform linux2 -- Python 2.7.14, pytest-3.0.0, py-1.5.2, pluggy-0.3.1 -- /home/kevin/soft/anaconda2/bin/python

cachedir: .cacheUsing

--randomly-seed=1522925192rootdir: /home/kevin/learn/python-web/tox/case2, inifile:plugins: randomly-1.0.0, mock-1.2, cov-2.0.0collected 3 items

pytest1.py::test_3 PASSED

pytest1.py::test_2 PASSED============================================================================= pytest-warning summary =============================================================================WC1 None pytest_funcarg__cov: declaring fixtures using "pytest_funcarg__" prefix is deprecated and scheduled to be removed in pytest 4.0.  Please remove the prefix and use the @pytest.fixture decorator instead.=============================================================================== 1 tests deselected ========================================================================================================================================== 2 passed, 1 deselected, 1 pytest-warnings in 0.00 seconds ============================================================
Console参数介绍
-v 用于显示每个测试函数的执行结果
-q 只显示整体测试结果
-s 用于显示测试函数中print()函数输出
-x, --exitfirst, exit instantly on first error or failed test
-h 帮助
Case 1
$ pytest -v pytest1.py

============================================================================== test session starts ===============================================================================

platform linux2 -- Python 2.7.14, pytest-3.0.0, py-1.5.2, pluggy-0.3.1 -- /home/kevin/soft/anaconda2/bin/python

cachedir: .cache

Using --randomly-seed=1522920341

rootdir: /home/kevin/learn/python-web/tox/case2, inifile:

plugins: randomly-1.0.0, mock-1.2, cov-2.0.0

collected 3 items

pytest1.py::test_1 PASSED

pytest1.py::test_3 PASSED

pytest1.py::test_2PASSED

============================================================================= pytest-warning summary =============================================================================WC1 None pytest_funcarg__cov: declaring fixtures using "pytest_funcarg__" prefix is deprecated and scheduled to be removed in pytest 4.0.  Please remove the prefix and use the @pytest.fixture decorator instead.================================================================== 3 passed, 1 pytest-warnings in 0.01 seconds ===================================================================
Case 2
$ pytest -s pytest1.py

============================================================================== test session starts ===============================================================================

platform linux2 -- Python 2.7.14, pytest-3.0.0, py-1.5.2, pluggy-0.3.1

Using --randomly-seed=1522920508

rootdir: /home/kevin/learn/python-web/tox/case2, inifile:

plugins: randomly-1.0.0, mock-1.2, cov-2.0.0

collected 3 items

pytest1.py setup_function called.Test_1

called..teardown_function called.setup_module called.Test_2 called..Test_3 called..teardown_module called.============================================================================= pytest-warning summary =============================================================================WC1 None pytest_funcarg__cov: declaring fixtures using "pytest_funcarg__" prefix is deprecated and scheduled to be removed in pytest 4.0.  Please remove the prefix and use the @pytest.fixture decorator instead.================================================================== 3 passed, 1 pytest-warnings in 0.01 seconds ===================================================================
03 扩展插件
测试报告
安装与样例
pip install pytest-cov   # 计算pytest覆盖率,支持输出多种格式的测试报告
pytest --cov-report = html --cov = ./ test_code_target_dir
- 1
- 2
Console参数介绍
–cov=[path], measure coverage for filesystem path (multi-allowed)
指定被测试对象,用于计算测试覆盖率
–cov-report=type, type of report to generate: term, term-missing, annotate, html, xml (multi-allowed)
测试报告的类型
–cov-config=path, config file for coverage, default: .coveragerc, coverage
配置文件
–no-cov-on-fail, do not report coverage if test run fails, default: False
如果测试失败,不生成测试报告
–cov-fail-under=MIN, Fail if the total coverage is less than MIN.
如果测试覆盖率低于MIN,则认为失败
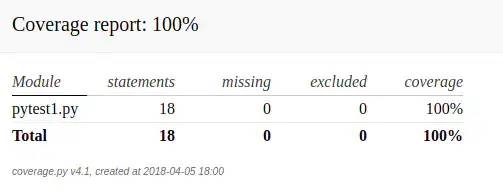
Console Result
Html Result
测试顺序随机
pip install pytest-randomly
- 1
分布式测试
pip install pytest-xdist
- 1
出错立即返回
pip install pytest-instafail?
总结:
感谢每一个认真阅读我文章的人!!!
作为一位过来人也是希望大家少走一些弯路,如果你不想再体验一次学习时找不到资料,没人解答问题,坚持几天便放弃的感受的话,在这里我给大家分享一些自动化测试的学习资源,希望能给你前进的路上带来帮助。

文档获取方式:
加入我的软件测试交流群:1007119548免费获取~(同行大佬一起学术交流,每晚都有大佬直播分享技术知识点)这份文档,对于想从事【软件测试】的朋友来说应该是最全面最完整的备战仓库,这个仓库也陪伴我走过了最艰难的路程,希望也能帮助到你!
以上均可以分享,只需要你搜索vx公众号:程序员雨果,即可免费领取
本文来自互联网用户投稿,该文观点仅代表作者本人,不代表本站立场。本站仅提供信息存储空间服务,不拥有所有权,不承担相关法律责任。 如若内容造成侵权/违法违规/事实不符,请联系我的编程经验分享网邮箱:chenni525@qq.com进行投诉反馈,一经查实,立即删除!
- Python教程
- 深入理解 MySQL 中的 HAVING 关键字和聚合函数
- Qt之QChar编码(1)
- MyBatis入门基础篇
- 用Python脚本实现FFmpeg批量转换
- 作为班主任如何管理好班级
- thinkphp的生命周期
- 【征稿进行中|见刊快速】2024年社会发展与艺术鉴赏国际学术会议(IACSDAA 2024)
- .NET 分享一个获取客户端合法IP的函数
- 提升设备维修效率:易点易动设备管理系统的应用
- [数据结构与算法]数据结构基础、排序算法详解、算法思想详解、领域算法详解------
- 全覆盖规划算法学习笔记-------
- 掌握 Vue 响应式系统,让数据驱动视图(上)
- 面试官:了解CountDownLatch吗
- Linux内核--进程管理(九)Linux内核进程管理进程优先级