【Kubernetes】认证授权RBAC (二)
认证授权RBAC
一、资源引用方式
1.1、通过资源名称的字符串引用
多数资源可以用其名称的字符串表示,也就是Endpoint中的URL相对路径
例如pod中的日志是GET /api/v1/namaspaces/{namespace}/pods/{podname}/log
如果需要在一个RBAC对象中体现上下级资源,就需要使用“/”分割资源和下级资源。
例如:若想授权让某个主体同时能够读取Pod和Pod log,则可以配置 resources为一个数组。
【1】创建role,与sa绑定
在test空间下,创建logs-reader的role,赋予对Pod和Pod log的读取权限。
并将其与test空间下的sa-test这个sa进行绑定。
[root@master 16]# kubectl create  ns test
namespace/test created

[root@master 16]# vim role-test.yaml
[root@master 16]# cat role-test.yaml
apiVersion: rbac.authorization.k8s.io/v1
kind: Role
metadata:
  name: logs-reader
  namespace: test
rules:
- apiGroups: [""]
  resources: ["pods","pods/log"]
  verbs: ["get","list","watch"]

[root@master 16]#  kubectl apply -f role-test.yaml
role.rbac.authorization.k8s.io/logs-reader created
[root@master 16]#  kubectl create sa sa-test -n test
serviceaccount/sa-test created
[root@master 16]# kubectl create rolebinding sa-test-1 -n test  --role=logs-reader --serviceaccount=test:sa-test
rolebinding.rbac.authorization.k8s.io/sa-test-1 created
[root@master 16]# kubectl get role -n test
NAME          CREATED AT
logs-reader   2024-01-06T14:22:26Z
【2】创建pod,与sa关联
在test空间下,创建sa-test-pod的pod。并将其与test空间下的sa-test这个sa进行关联。
[root@master 16]# vim pod-test.yaml
[root@master 16]# cat pod-test.yaml
apiVersion: v1
kind: Pod
metadata:
  name: sa-test-pod
  namespace: test
  labels:
    app: sa
spec:
  serviceAccountName: sa-test
  containers:
  - name:  sa-tomcat
    ports:
    - containerPort: 80
    image: nginx
    imagePullPolicy: IfNotPresent

[root@master 16]#  kubectl apply -f pod-test.yaml
pod/sa-test-pod created
[root@master 16]# kubectl get pod -n test
NAME          READY   STATUS    RESTARTS   AGE
sa-test-pod   1/1     Running   0          26s
【3】验证
[root@master 16]#  kubectl exec -it sa-test-pod -n test -- /bin/bash
root@sa-test-pod:/#
root@sa-test-pod:/# cd /var/run/secrets/kubernetes.io/serviceaccount
# 该pod对默认ns下的资源是没有访问权限的
root@sa-test-pod:/var/run/secrets/kubernetes.io/serviceaccount# curl --cacert ./ca.crt  -H "Authorization: Bearer $(cat ./token)"  https://kubernetes.default/api/v1/namespaces/default/pods/read-pod/log
{
  "kind": "Status",
  "apiVersion": "v1",
  "metadata": {},
  "status": "Failure",
  "message": "pods \"read-pod\" is forbidden: User \"system:serviceaccount:test:sa-test\" cannot get resource \"pods/log\" in API group \"\" in the namespace \"default\"",
  "reason": "Forbidden",
  "details": {
    "name": "read-pod",
    "kind": "pods"
  },
  "code": 403
}root@sa-test-pod:/var/run/secrets/kubernetes.io/serviceaccount#
# 验证对test空间的pod是否有访问权限
}root@sa-test-pod:/var/run/secrets/kubernetes.io/serviceaccount# curl --cacert ./ca.crt  -H "Authorization: Bearer $(cat ./token)"  https://kubernetesdefault/api/v1/namespaces/test/pods
......
# 验证对test空间的pod的log是否有访问权限
}root@sa-test-pod:/var/run/secrets/kubernetes.io/serviceaccount# curl --cacert ./ca.crt  -H "Authorization: Bearer $(cat ./token)"  https://kubernetesdefault/api/v1/namespaces/test/pods/sa-test-pod/log
{
  "kind": "Status",
  "apiVersion": "v1",
  "metadata": {},
  "status": "Failure",
  "message": "pods \"sa-test-pod\" is forbidden: User \"system:serviceaccount:test:sa-test\" cannot get resource \"pods/logs\" in API group \"\" in the namespace \"test\"",
  "reason": "Forbidden",
  "details": {
    "name": "sa-test-pod",
    "kind": "pods"
  },
  "code": 403
}root@sa-test-pod:/var/run/secrets/kubernetes.io/serviceaccount#
以上报错:pods \"sa-test-pod\" is forbidden: User \"system:serviceaccount:test:sa-test\" cannot get resource \"pods/logs\" in API group \"\" in the namespace \"test\"
原因:system:serviceaccount:test:sa-test这个系统用户不能获取pod资源
解决:
[root@master 16]# kubectl create rolebinding sa-test-2 -n test  --role=logs-reader --user=system:serviceaccount:test:sa-test
rolebinding.rbac.authorization.k8s.io/sa-test-2 created
root@sa-test-pod:/var/run/secrets/kubernetes.io/serviceaccount# curl --cacert ./ca.crt  -H "Authorization: Bearer $(cat ./token)"  https://kubernetesdefault/api/v1/namespaces/test/pods/sa-test-pod/log
/docker-entrypoint.sh: /docker-entrypoint.d/ is not empty, will attempt to perform configuration
/docker-entrypoint.sh: Looking for shell scripts in /docker-entrypoint.d/
/docker-entrypoint.sh: Launching /docker-entrypoint.d/10-listen-on-ipv6-by-default.sh
10-listen-on-ipv6-by-default.sh: info: Getting the checksum of /etc/nginx/conf.d/default.conf
10-listen-on-ipv6-by-default.sh: info: Enabled listen on IPv6 in /etc/nginx/conf.d/default.conf
/docker-entrypoint.sh: Sourcing /docker-entrypoint.d/15-local-resolvers.envsh
/docker-entrypoint.sh: Launching /docker-entrypoint.d/20-envsubst-on-templates.sh
/docker-entrypoint.sh: Launching /docker-entrypoint.d/30-tune-worker-processes.sh
/docker-entrypoint.sh: Configuration complete; ready for start up
2024/01/06 14:28:03 [notice] 1#1: using the "epoll" event method
2024/01/06 14:28:03 [notice] 1#1: nginx/1.25.3
2024/01/06 14:28:03 [notice] 1#1: built by gcc 12.2.0 (Debian 12.2.0-14)
2024/01/06 14:28:03 [notice] 1#1: OS: Linux 3.10.0-1160.92.1.el7.x86_64
2024/01/06 14:28:03 [notice] 1#1: getrlimit(RLIMIT_NOFILE): 1048576:1048576
2024/01/06 14:28:03 [notice] 1#1: start worker processes
2024/01/06 14:28:03 [notice] 1#1: start worker process 29
2024/01/06 14:28:03 [notice] 1#1: start worker process 30
2024/01/06 14:28:03 [notice] 1#1: start worker process 31
2024/01/06 14:28:03 [notice] 1#1: start worker process 32
1.2、通过名称(ResourceName)引用
在指定ResourceName后,使用get、delete、update、patch请求,就会被限制在这个资源实例范围内
例如,下面的声明让一个主体只能对名为my-configmap的Configmap进行get和update操作:
apiVersion: rabc.authorization.k8s.io/v1
kind: Role
metadata:
  namaspace: default
  name: configmap-update
rules:
- apiGroups: [""]
  resources: ["configmaps"]
  resourceNames: ["my-configmap"]
  verbs: ["get","update"]
二、常见案例
2.1、常见角色(role)授权的案例
【1】允许读取核心API组的Pod资源
rules:
- apiGroups: [""]
  resources: ["pods"]
  verbs: ["get","list","watch"]
【2】允许读写apps API组中的deployment资源
rules:
- apiGroups: ["apps"]
  resources: ["deployments"]
  verbs: ["get","list","watch","create","update","patch","delete"]
【3】允许读取Pod以及读写job信息
rules:
- apiGroups: [""]
  resources: ["pods"]
  verbs: ["get","list","watch"]
- apiGroups: [""]
  resources: ["jobs"]
  verbs: ["get","list","watch","create","update","patch","delete"]
【4】允许读取一个名为my-config的ConfigMap
(必须绑定到一个RoleBinding来限制到一个Namespace下的ConfigMap):
rules:
- apiGroups: [""]
  resources: ["configmaps"]
  resourceNames: ["my-configmap"]
  verbs: ["get"]
【5】读取核心组的Node资源
(Node属于集群级的资源,所以必须存在于ClusterRole中,并使用ClusterRoleBinding进行绑定):
rules:
- apiGroups: [""]
  resources: ["nodes"]
  verbs: ["get","list","watch"]
【6】允许对非资源端点“/healthz”及其所有子路径进行GET和POST操作
必须使用ClusterRole和ClusterRoleBinding):
rules:
- nonResourceURLs: ["/healthz","/healthz/*"]
  verbs: ["get","post"]
2.2、常见的sa授权案例
(1)my-namespace中的my-sa Service Account授予只读权限
kubectl create rolebinding my-sa-view --clusterrole=view --serviceaccount=my-namespace:my-sa --namespace=my-namespace
(2)为一个命名空间中名为default的Service Account授权
如果一个应用没有指定 serviceAccountName,则会使用名为default的Service Account。注意,赋予Service Account “default”的权限会让所有没有指定serviceAccountName的Pod都具有这些权限
例如,在my-namespace命名空间中为Service Account“default”授予只读权限:
kubectl create rolebinding default-view --clusterrole=view --serviceaccount=my-namespace:default --namespace=my-namespace
(3)为命名空间中所有Service Account都授予一个角色
如果希望在一个命名空间中,任何Service Account应用都具有一个角色,则可以为这一命名空间的Service Account群组进行授权
kubectl create rolebinding serviceaccounts-view --clusterrole=view --group=system:serviceaccounts:my-namespace --namespace=my-namespace
(4)为集群范围内所有Service Account都授予一个低权限角色
如果不想为每个命名空间管理授权,则可以把一个集群级别的角色赋给所有Service Account。
kubectl create clusterrolebinding serviceaccounts-view --clusterrole=view --group=system:serviceaccounts
(5)为所有Service Account授予超级用户权限
kubectl create clusterrolebinding serviceaccounts-view --clusterrole=cluster-admin --group=system:serviceaccounts
2.3、常见的角色绑定的案例
(1)在命名空间rbac中为用户es授权admin ClusterRole:
kubectl create rolebinding bob-admin-binding --clusterrole=admin --user=es --namespace=rbac
(2)在命名空间rbac中为名为myapp的Service Account授予view ClusterRole:
kubctl create rolebinding myapp-role-binding --clusterrole=view --serviceaccount=rbac:myapp --namespace=rbac
(3)在全集群范围内为用户root授予cluster-admin ClusterRole:
kubectl create clusterrolebinding cluster-binding --clusterrole=cluster-admin --user=root
(4)在全集群范围内为名为myapp的Service Account授予view ClusterRole:
kubectl create clusterrolebinding service-account-binding --clusterrole=view --serviceaccount=myapp
yaml文件进行rbac授权:https://kubernetes.io/zh/docs/reference/access-authn-authz/rbac/
三、限制不同的用户操作k8s集群
3.1、限制用户只对特定ns有管理员权限
【1】生成证书
[root@master ~]# cd /etc/kubernetes/pki/
# 1、生成私钥
[root@master pki]# (umask 077; openssl genrsa -out lucky.key 2048)
Generating RSA private key, 2048 bit long modulus
.........+++
.........................................................+++
e is 65537 (0x10001)
# 2、生成证书请求文件
[root@master pki]# openssl req -new -key lucky.key -out lucky.csr -subj "/CN=lucky"
# 3、生成证书
[root@master pki]# openssl x509 -req -in lucky.csr -CA ca.crt -CAkey ca.key -CAcreateserial -out lucky.crt -days 3650
Signature ok
subject=/CN=lucky
Getting CA Private Key
【2】新增lucky用户
(1)把lucky这个用户添加到kubernetes集群中,可以用来认证apiserver的连接
[root@master pki]# kubectl config set-credentials lucky --client-certificate=./lucky.crt --client-key=./lucky.key --embed-certs=true
User "lucky" set.
(2)在kubeconfig下新增加一个lucky这个账号
[root@master pki]# kubectl config set-context lucky@kubernetes --cluster=kubernetes --user=lucky
Context "lucky@kubernetes" created.
(3)切换账号到lucky,默认没有任何权限
kubectl config use-context lucky@kubernetes
kubectl config use-context kubernetes-admin@kubernetes 这个是集群用户,有任何权限
[root@master pki]# kubectl config use-context lucky@kubernetes
Switched to context "lucky@kubernetes".
[root@master pki]# kubectl get pod
Error from server (Forbidden): pods is forbidden: User "lucky" cannot list resource "pods" in API group "" in the namespace "default"
把lucky这个用户通过rolebinding绑定到clusterrole上,授予权限,权限只是在lucky这个名称空间有效
【3】lucky用户绑定到名为cluster-admin的clusterrole
[root@master pki]# kubectl create ns lucky-test
namespace/lucky-test created
# 把lucky这个用户通过rolebinding绑定到clusterrole上
[root@master pki]# kubectl create rolebinding lucky -n lucky-test --clusterrole=cluster-admin --user=lucky
rolebinding.rbac.authorization.k8s.io/lucky created
# 切换到lucky这个用户
[root@master pki]# kubectl config use-context lucky@kubernetes
Switched to context "lucky@kubernetes".
# 测试是否有权限
[root@master pki]# kubectl get pods -n lucky-test
No resources found in lucky-test namespace.
# 有权限操作这个名称空间
[root@master pki]# kubectl create sa aa -n lucky-test
serviceaccount/aa created
[root@master pki]# kubectl get sa -n lucky-test
NAME      SECRETS   AGE
aa        0         27s
default   0         6m24s
【4】添加一个test的普通用户
将自己集群的k8s配置文件拷贝到/tmp下,不一定是/root/.kube/config,也有可能是/etc/kubernetes/admin.conf。使用echo $KUBECONFIG 查看
[root@master pki]# useradd test
[root@master pki]# cp -ar /root/.kube /tmp/
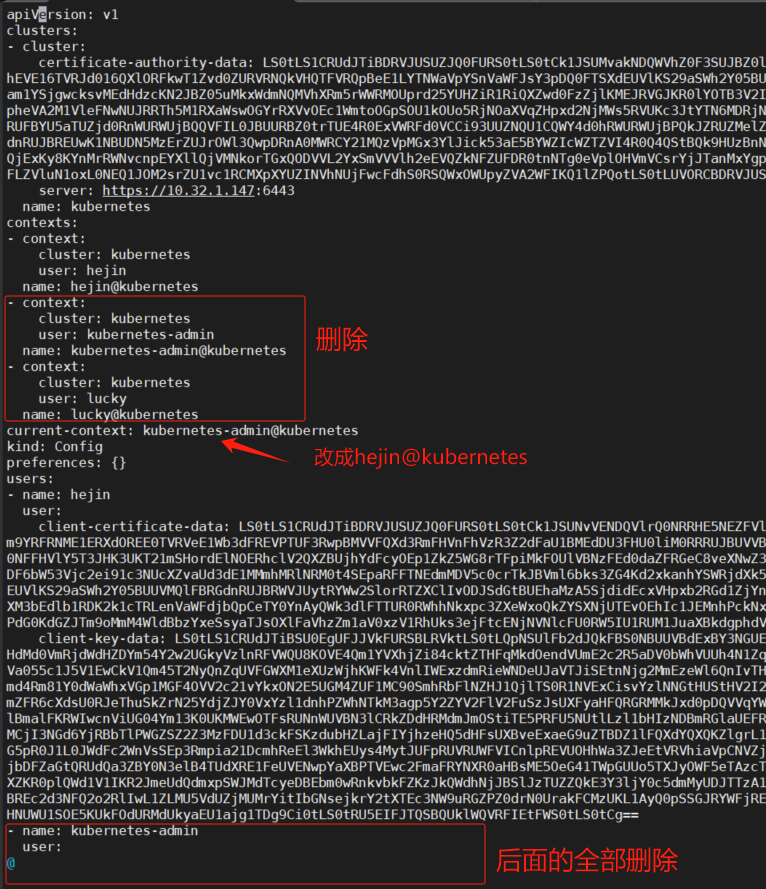
# 修改/tmp/.kube/config文件,把kubernetes-admin相关的删除,只留lucky用户
# 将修改好的文件cp到test用户指定的配置文件路径下
[root@master pki]# cp -ar /tmp/.kube /home/test/.kube
[root@master .kube]# pwd
/home/test/.kube
[root@master .kube]# chown -R test:test /home/test/
[root@master .kube]# passwd test
Changing password for user test.
New password:
BAD PASSWORD: The password is shorter than 8 characters
Retype new password:
passwd: all authentication tokens updated successfully.
test用户登录,查看权限。
如何查看不了,可以指定–kubeconfig=/home/test/kubernetes/admin.conf。因为我这里的配置文件不是~/.kube/config
[test@master ~]$ kubectl get pod --kubeconfig=/home/test/kubernetes/admin.conf
Error from server (Forbidden): pods is forbidden: User "lucky" cannot list resource "pods" in API group "" in the namespace "default"
[test@master ~]$ kubectl get pod -n lucky-test --kubeconfig=/home/test/kubernetes/admin.conf
No resources found in lucky-test namespace.
3.2、授权用户对所有ns的pod查看权限
【1】生成证书
[root@master test]# cd /etc/kubernetes/pki/
# 1、生成一个私钥
[root@master pki]# (umask 077; openssl genrsa -out hejin.key 2048)
Generating RSA private key, 2048 bit long modulus
....................................+++
...............+++
e is 65537 (0x10001)
# 2、生成一个请求证书
[root@master pki]# openssl req -new -key hejin.key -out hejin.csr -subj "/CN=hejin"
# 3、生成一个证书
[root@master pki]# openssl x509 -req -in hejin.csr -CA ca.crt -CAkey ca.key -CAcreateserial -out hejin.crt -days 3650
Signature ok
subject=/CN=hejin
Getting CA Private Key
【2】新增hejin用户,创建clusterrole对所有pod有访问权限
(1)把hejin这个用户添加到kubernetes集群中,可以用来认证apiserver的连接
[root@master pki]# kubectl config set-credentials hejin --client-certificate=./hejin.crt --client-key=./hejin.key --embed-certs=true
User "hejin" set.
(2)在kubeconfig下新增加一个lucky这个账号
[root@master pki]# kubectl config set-context hejin@kubernetes --cluster=kubernetes --user=hejin
Context "hejin@kubernetes" created.
(3)创建一个clusterrole
[root@master 20240106]# cat hejin-clusterrole.yaml
apiVersion: rbac.authorization.k8s.io/v1
kind: ClusterRole
metadata:
  name: hejin-get-pod
rules:
- apiGroups: [""]
  resources: ["pods"]
  verbs: ["get", "list", "watch"]
[root@master 20240106]# kubectl apply -f hejin-clusterrole.yaml
clusterrole.rbac.authorization.k8s.io/hejin-get-pod created
【3】hejin用户绑定到clusterrole
[root@master 20240106]# kubectl get ClusterRole |grep hejin
hejin-get-pod                                                          2024-01-07T08:27:22Z
# 通过clusterrolebinding 绑定可以访问所有ns下的pod资源
[root@master 20240106]# kubectl create clusterrolebinding hejin-get-pods --clusterrole=hejin-get-pod --user=hejin
clusterrolebinding.rbac.authorization.k8s.io/hejin-get-pods created
【4】添加一个test66的普通用户
[root@master 20240106]# useradd test66
[root@master 20240106]# echo $KUBECONFIG
/etc/kubernetes/admin.conf
[root@master 20240106]# cp -ar /etc/kubernetes /home/test66/
[root@master 20240106]# chown -R test66:test66 /home/test66/
[root@master 20240106]# cd /home/test66/kubernetes
[root@master kubernetes]# ll
total 40
-rw-------. 1 root root 13007 Jan 7 16:19 admin.conf
-rw-------. 1 root root 5671 Dec 6 10:46 controller-manager.conf
-rw-------. 1 root root 1959 Dec 6 10:47 kubelet.conf
drwxr-xr-x. 2 root root 113 Dec 11 11:03 manifests
drwxr-xr-x. 3 root root 4096 Jan 7 16:15 pki
-rw-------. 1 root root 5619 Dec 6 10:46 scheduler.conf
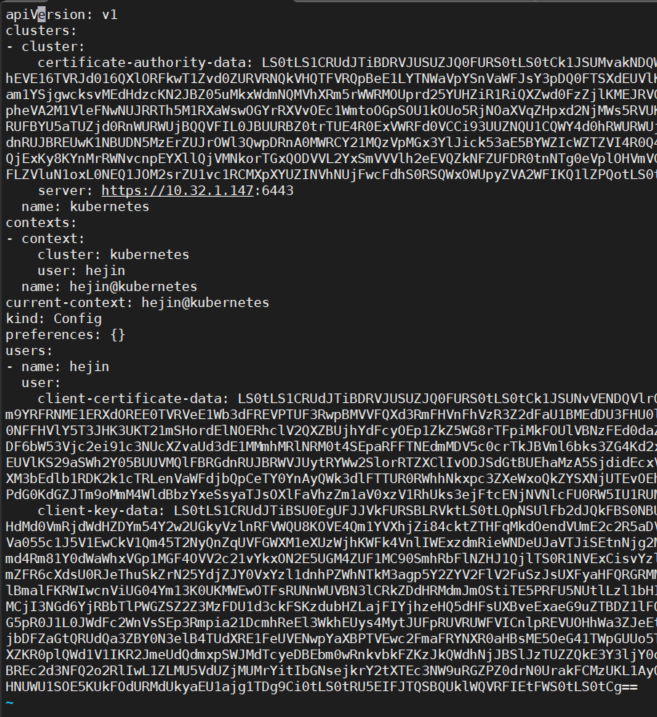
[root@master kubernetes]# vim admin.conf
把kubernetes-admin和lucky相关的删除,只留hejin用户
修改后:
[root@master kubernetes]# su - test66
[test66@master ~]$ kubectl get pods  -n kube-system --kubeconfig=/home/test66/kubernetes/admin.conf
NAME                                       READY   STATUS             RESTARTS      AGE
calico-kube-controllers-6744f6b6d5-lpxpn   1/1     Running            0             2d2h
calico-node-jlwwd                          1/1     Running            0             18h
calico-node-jvrr2                          1/1     Running            0             18h
calico-node-smw6v                          1/1     Running            0             18h
      2d2h
.......
[test66@master ~]$ kubectl get pods --kubeconfig=/home/test66/kubernetes/admin.conf
NAME                              READY   STATUS    RESTARTS       AGE
busybox-demo                      1/1     Running   49 (54m ago)   2d1h
front-end-5849b54454-29g9m        1/1     Running   0              47h
front-end-5849b54454-qlvlq        1/1     Running   0              47h
.......
四 、准入控制
4.1、ResourceQuota准入控制器
ResourceQuota准入控制器是k8s上内置的,默认是启用状态。主要作用是用来限制一个ns下资源的使用,能防止在一个ns下的pod被过多创建时,导致过多占用k8s资源。
简单来讲它是用来在名称空间级别显示用户的资源使用。
【1】限制cpu、内存、pod、deployment数量
[root@master 16]# kubectl create ns quota
namespace/quota created
[root@master 16]# cat resourcequota-1.yaml
apiVersion: v1
kind: ResourceQuota
metadata:
  name: quota-test
  namespace: quota
spec:
  hard:        # 定义对应名称空间下的资源限制规则
    pods: "6"            # 限制在对应名称空间下的pod数量
    requests.cpu: "2"    # 限制对应名称空间下所有pod的cpu资源的下限总和
    requests.memory: 2Gi # 限制对应名称空间下pod的内存资源的下限总和
    limits.cpu: "4"      # 限制对应名称空间下的podcpu资源的上限总和
    limits.memory: 10Gi  # 限制对应名称空间下pod内存资源上限总和
    count/deployments.apps: "6"  # 限制对应名称空间下apps群组下的deployments的个数
    persistentvolumeclaims: "6"  # pvc限制
[root@master 16]# kubectl apply -f resourcequota-1.yaml
resourcequota/quota-test created
[root@master 16]# kubectl get ResourceQuota -n quota
NAME         AGE     REQUEST                                                                                                               LIMIT
quota-test   5m55s   count/deployments.apps: 1/6, persistentvolumeclaims: 0/6, pods: 6/6, requests.cpu: 60m/2, requests.memory: 60Mi/2Gi   limits.cpu: 60m/4, limits.memory: 60Mi/10Gi
以上配置清单表示,在quota名称空间下运行的pod数量不能超过6个,所有pod的cpu资源下限总和不能大于2个核心,内存资源下限总和不能大于2G,cpu上限资源总和不能大于4个核心,内存上限总和不能超过10G,apps群组下的deployments控制器不能超过6个, pvc个数不能超过6个;以上条件中任意一个条目不满足,都将无法在对应名称空间创建对应的资源。
创建pod进行演示验证:
[root@master 16]# cat quota-deployment.yaml
apiVersion: apps/v1
kind: Deployment
metadata:
  name: quota
  namespace: quota
spec:
  replicas: 7  # 之前限制了最多只能创建6个pod,此处定义7个,看是否限制成功
  selector:
    matchLabels:
      app: quota
  template:
    metadata:
      labels:
         app: quota
    spec:
      containers:
      - name: myapp
        image: janakiramm/myapp:v1
        imagePullPolicy: IfNotPresent
        ports:
        - containerPort: 80
        resources:
         requests:
            cpu: 10m
            memory: 10Mi # 如果这里定义成1Gi,那么最终只能创建2个pod,可自行测试
         limits:
            cpu: 10m
            memory: 10Mi
[root@master 16]#  kubectl apply -f quota-deployment.yaml
deployment.apps/quota created
[root@master 16]#  kubectl get pods -n quota -owide
NAME                     READY   STATUS    RESTARTS   AGE   IP               NODE     NOMINATED NODE   READINESS GATES
quota-6d5c459f69-5lg72   1/1     Running   0          62s   10.244.196.189   node01   <none>           <none>
quota-6d5c459f69-5zsz8   1/1     Running   0          62s   10.244.196.191   node01   <none>           <none>
quota-6d5c459f69-6xhmj   1/1     Running   0          62s   10.244.196.190   node01   <none>           <none>
quota-6d5c459f69-8jd4l   1/1     Running   0          62s   10.244.196.187   node01   <none>           <none>
quota-6d5c459f69-d76n4   1/1     Running   0          62s   10.244.196.132   node01   <none>           <none>
quota-6d5c459f69-qlssq   1/1     Running   0          62s   10.244.196.188   node01   <none>           <none>
查看资源使用情况
[root@master 16]# kubectl get ResourceQuota -n quota
NAME         AGE     REQUEST                                                                                                               LIMIT
quota-test   5m55s   count/deployments.apps: 1/6, persistentvolumeclaims: 0/6, pods: 6/6, requests.cpu: 60m/2, requests.memory: 60Mi/2Gi   limits.cpu: 60m/4, limits.memory: 60Mi/10Gi
[root@master 16]# kubectl describe quota -n quota
Name:                   quota-test
Namespace:              quota
Resource                Used  Hard
--------                ----  ----
count/deployments.apps  1     6
limits.cpu              60m   4
limits.memory           60Mi  10Gi
persistentvolumeclaims  0     6
pods                    6     6
requests.cpu            60m   2
requests.memory         60Mi  2Gi
【2】限制存储空间大小
[root@master 16]# cat resourcequota-2.yaml
apiVersion: v1
kind: ResourceQuota
metadata:
  name: quota-storage-test
  namespace: quota
spec:
  hard:
    requests.storage: "5Gi"         # 限制对应名称空间下的存储下限总和
    persistentvolumeclaims: "5"     # 限制pvc总数量
    requests.ephemeral-storage: "1Gi"  # 限制使用本地临时存储的下限总容量
    limits.ephemeral-storage: "2Gi"    # 限制使用本地临时存储上限总容量
[root@master 16]# kubectl apply -f resourcequota-2.yaml
resourcequota/quota-storage-test created
以上配置表示在default名称空间下非停止状态的容器存储下限总容量不能超过5G,pvc的数量不能超过5个,本地临时存储下限容量不能超过1G,上限不能超过2G。
可自行创建pod测试
4.2、LimitRanger准入控制器
LimitRanger准入控制器也是k8s内置的,是k8s上的一个标准资源,主要用来定义在某个名称空间下限制pod和pod里容器对k8s上的cpu和内存资源使用。
它能够定义我们在某个ns下创建pod时使用的cpu和内存上下限以及默认的cpu和内存上下限。
如果我们创建pod时定义了资源上下限,但不满足LimitRange规则中定义的资源上下限,此时LimitRanger救护拒绝我们创建pod。
如果LimitRanger规则中定义了默认的资源上下限,我们创建资源的时候没有指定资源限制,就会使用这个默认的
同样的逻辑,LimitRanger可以限制一个pod使用资源的上下限,它还可以限制pod中的容器的资源上下限,比限制pod更加精准;不管是针对pod还是pod里的容器,它始终只是限制单个pod资源使用。
[root@master 16]# cat limitrange.yaml
apiVersion: v1
kind: Namespace
metadata:
  name: limit
---
apiVersion: v1
kind: LimitRange
metadata:
  name: cpu-memory
  namespace: limit
spec:
  limits:
  - default:              # 指定默认容器资源上限值
      cpu: 1000m
      memory: 1000Mi
    defaultRequest:   	  # 指定默认容器资源下限值
      cpu: 500m
      memory: 500Mi
    min:                  # 限制用户指定的资源下限不能小于对应资源的值
      cpu: 500m
      memory: 500Mi
    max:                  # 限制用户指定资源上限值不能大于该值
      cpu: 2000m
      memory: 2000Mi
    maxLimitRequestRatio: # 指定资源的上限和下限的比值,上限是下限的多少倍
      cpu: 4
      memory: 4
    type: Container       # 描述对应资源限制的级别,该字段有两个值pod和container。

[root@master 16]# kubectl apply -f limitrange.yaml
namespace/limit created
limitrange/cpu-memory created
上述资源清单表示在该名称空间下创建pod时,默认不指定其容器的资源限制,就限制对应容器最少要有0.5个核心的cpu和500M的内存;最大为1个核心cpu,1g内存;
如果我们手动定义了容器的资源限制,那么对应资源限制最小不能小于cpu为0.5个核心,内存为500M,最大不能超过cpu为2个核心,内存为2000M;
如果我们在创建pod时,只指定了容器的资源上限或下限,那么上限最大是下限的的4倍,如果指定cpu上限为2000m那么下限一定不会小于500m,如果只指定了cpu下限为500m那么上限最大不会超过2000m,对于内存也是同样的逻辑。
【1】在limit名称空间创建pod,不指定资源,看看是否会被limitrange规则自动附加其资源限制?
[root@master 16]# vim pod-limit.yaml
[root@master 16]# kubectl apply -f pod-limit.yaml
pod/nginx-pod-demo created
[root@master 16]# cat pod-limit.yaml
apiVersion: v1
kind: Pod
metadata:
  name: nginx-pod-demo
  namespace: limit
spec:
  containers:
  - image: nginx
    imagePullPolicy: IfNotPresent
    name: nginx
[root@master 16]# kubectl describe pods nginx-pod-demo -n limit
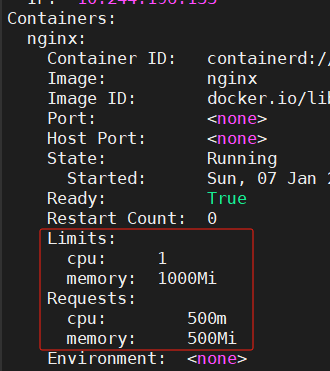
通过上面结果可以看到我们在limit名称空间下创建的pod没有指定其容器资源限制,创建pod后,其内部容器自动就有了默认的资源限制;其大小就是我们在定义LimitRange规则中的default和defaultRequest字段中指定的资源限制。
【2】创建pod,指定cpu请求是100m,看看是否允许创建
[root@master 16]# vim pod-request.yaml
[root@master 16]# cat pod-request.yaml
apiVersion: v1
kind: Pod
metadata:
  name: pod-request
  namespace: limit
spec:
  containers:
  - image: nginx
    imagePullPolicy: IfNotPresent
    name: nginx
    resources:
      requests:
        cpu: 100m
[root@master 16]# kubectl apply -f pod-request.yaml
Error from server (Forbidden): error when creating "pod-request.yaml": pods "pod-request" is forbidden: [minimum cpu usage per Container is 500m, but request is 100m, cpu max limit to request ratio per Container is 4, but provided ratio is 10.000000]
# 默认容器资源下限值cpu为500m,所以这里创建不成功
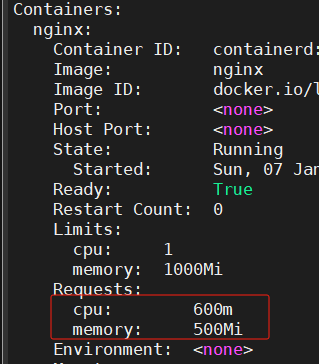
# cpu修改成600m,可以创建成功
[root@master 16]# vim pod-request.yaml
[root@master 16]# kubectl apply -f pod-request.yaml
pod/pod-request created
[root@master 16]# kubectl describe pod pod-request -n limit
本文来自互联网用户投稿,该文观点仅代表作者本人,不代表本站立场。本站仅提供信息存储空间服务,不拥有所有权,不承担相关法律责任。 如若内容造成侵权/违法违规/事实不符,请联系我的编程经验分享网邮箱:chenni525@qq.com进行投诉反馈,一经查实,立即删除!
- Python教程
- 深入理解 MySQL 中的 HAVING 关键字和聚合函数
- Qt之QChar编码(1)
- MyBatis入门基础篇
- 用Python脚本实现FFmpeg批量转换
- 目标检测:如何将VOC标注的xml数据转为YOLO标注的txt格式,且生成classes的txt文件
- Redisson 分布式限流器 RRateLimiter 的使用及原理
- 【php】php去除excel导入时的空格
- 机器学习——特征选择(一)
- 算法练习——3005. 最大频率元素计数
- 一个项目的心得
- 【读书笔记】信息架构:超越Web设计-第五章《信息架构详解》
- 全网最详细的Cortex-M0指令集汇总
- 新字符设备驱动所涉及的函数
- 八个理由:从java8升级到Java17