手把手教你用深度学习做物体检测(一): 快速感受物体检测的酷炫
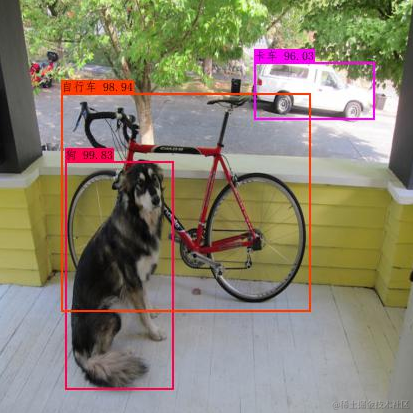
我们先来看看什么是物体检测,见下图:

如上图所示,?物体检测就是需要检测出图像中有哪些目标物体,并且框出其在图像中的位置。
本篇文章,我将会介绍如何利用训练好的物体检测模型来快速实现上图的效果,这里我们将会用到基于coco数据集训练的yolov3模型,该模型能识别80类物品,具体如下:
人 自行车 汽车 摩托车 飞机 公共汽车 火车 卡车 船 红绿灯 消防栓 停车标志 停车收费码表 长凳 鸟 猫 狗 马 羊 牛 大象 熊 斑马 长颈鹿
双肩包 雨伞 手提包 领带 手提箱 飞盘 双架滑雪板 滑雪板 球 风筝 棒球棍 棒球手套 滑板 冲浪板 网球拍 瓶子 酒杯 杯子 叉子 刀 勺子 碗
香蕉 苹果 三明治 橙子 西兰花 胡萝卜 热狗 披萨 炸面圈 蛋糕 椅子 沙发 盆栽 床 餐桌 厕所 显示器 笔记本电脑 鼠标 遥控器 键盘 手机
微波炉 电烤箱 烤面包器 水槽 冰箱 书 钟 花瓶 剪刀 泰迪熊 吹风机 牙刷
下面,我们来看具体如何实现。
第一步:从github上下载项目:?https://github.com/qqwweee/keras-yolo3
该项目是基于keras的yolov3实现,keras是一个深度学习高层框架,提供了更友好的接口,其底层可以兼容很多深度学习框架,比如tensorflow等。yolo是目前很流行的物体检测算法,yolov3是第三个版本,也是最新的版本。
第二步:安装keras。
通过pip安装即可,如果后续有遇到本地环境没有的包,也通过pip安装就好了(这里假设你已经装好了python的相关环境,并且知道如何使用pip,如果你还不清楚,可以自行网上搜索,过程也不复杂)。
第三步:下载yolov3.weights,这个文件是darknet预训练好的yolov3模型,可以检测coco数据集中涵盖的80类物体。地址:https://pjreddie.com/media/files/yolov3.weights
第四步:执行以下命令,将下载下来的文件转换为keras可以使用的.h5模型文件
python convert.py yolov3.cfg yolov3.weights model_data/yolo.h5
第五步:将项目中的yolo.py,用下面代码替换,注意检查_defaults中的配置路径是否正确
# -*- coding: utf-8 -*-
"""
Class definition of YOLO_v3 style detection model on image and video
"""

import colorsys
import os
from timeit import default_timer as timer
import numpy as np
from PIL import Image, ImageFont, ImageDraw
from keras import backend as K
from keras.layers import Input
from keras.models import load_model
from keras.utils import multi_gpu_model
from yolo3.model import yolo_eval, yolo_body, tiny_yolo_body
from yolo3.utils import letterbox_image


class YOLO(object):
    _defaults = {
        "model_path": 'model_data/yolo_weights.h5',
        "anchors_path": 'model_data/yolo_anchors.txt',
        "classes_path": 'model_data/coco_classes.txt',
        "score" : 0.3,
        "iou" : 0.45,
        "model_image_size" : (416, 416),
        "gpu_num" : 0,
    }


    @classmethod
    def get_defaults(cls, n):
        if n in cls._defaults:
            return cls._defaults[n]
        else:
            return "Unrecognized attribute name '" + n + "'"


    def __init__(self, **kwargs):
        self.__dict__.update(self._defaults)  # set up default values
        self.__dict__.update(kwargs)  # and update with user overrides
        self.class_names = self._get_class()
        self.anchors = self._get_anchors()
        self.sess = K.get_session()
        self.boxes, self.scores, self.classes = self.generate()


    def _get_class(self):
        classes_path = os.path.expanduser(self.classes_path)
        with open(classes_path, encoding="utf-8") as f:
            class_names = f.readlines()
        class_names = [c.strip() for c in class_names]
        return class_names


    def _get_anchors(self):
        anchors_path = os.path.expanduser(self.anchors_path)
        with open(anchors_path, encoding="utf-8") as f:
            anchors = f.readline()
        anchors = [float(x) for x in anchors.split(',')]
        return np.array(anchors).reshape(-1, 2)


    def generate(self):
        model_path = os.path.expanduser(self.model_path)
        assert model_path.endswith('.h5'), 'Keras model or weights must be a .h5 file.'

        # Load model, or construct model and load weights.
        num_anchors = len(self.anchors)
        num_classes = len(self.class_names)
        is_tiny_version = num_anchors == 6  # default setting
        try:
            self.yolo_model = load_model(model_path, compile=False)
        except:
            self.yolo_model = tiny_yolo_body(Input(shape=(None, None, 3)), num_anchors // 2, num_classes) \
                if is_tiny_version else yolo_body(Input(shape=(None, None, 3)), num_anchors // 3, num_classes)
            self.yolo_model.load_weights(self.model_path)  # make sure model, anchors and classes match
        else:
            assert self.yolo_model.layers[-1].output_shape[-1] == \
                   num_anchors / len(self.yolo_model.output) * (num_classes + 5), \
                'Mismatch between model and given anchor and class sizes'

        print('{} model, anchors, and classes loaded.'.format(model_path))

        # Generate colors for drawing bounding boxes.
        hsv_tuples = [(x / len(self.class_names), 1., 1.)
                      for x in range(len(self.class_names))]
        self.colors = list(map(lambda x: colorsys.hsv_to_rgb(*x), hsv_tuples))
        self.colors = list(
            map(lambda x: (int(x[0] * 255), int(x[1] * 255), int(x[2] * 255)),
                self.colors))
        np.random.seed(10101)  # Fixed seed for consistent colors across runs.
        np.random.shuffle(self.colors)  # Shuffle colors to decorrelate adjacent classes.
        np.random.seed(None)  # Reset seed to default.

        # Generate output tensor targets for filtered bounding boxes.
        self.input_image_shape = K.placeholder(shape=(2,))
        if self.gpu_num >= 2:
            self.yolo_model = multi_gpu_model(self.yolo_model, gpus=self.gpu_num)
        boxes, scores, classes = yolo_eval(self.yolo_model.output, self.anchors,
                                           len(self.class_names), self.input_image_shape,
                                           score_threshold=self.score, iou_threshold=self.iou)
        return boxes, scores, classes


    def detect_image(self, image):
        start = timer()
        if self.model_image_size != (None, None):
            assert self.model_image_size[0] % 32 == 0, 'Multiples of 32 required'
            assert self.model_image_size[1] % 32 == 0, 'Multiples of 32 required'
            boxed_image = letterbox_image(image, tuple(reversed(self.model_image_size)))
        else:
            new_image_size = (image.width - (image.width % 32),
                              image.height - (image.height % 32))
            boxed_image = letterbox_image(image, new_image_size)
        image_data = np.array(boxed_image, dtype='float32')

        print(image_data.shape)
        image_data /= 255.
        image_data = np.expand_dims(image_data, 0)  # Add batch dimension.


        out_boxes, out_scores, out_classes = self.sess.run(
            [self.boxes, self.scores, self.classes],
            feed_dict={
                self.yolo_model.input: image_data,
                self.input_image_shape: [image.size[1], image.size[0]],
                K.learning_phase(): 0
            })

        print('Found {} boxes for {}'.format(len(out_boxes), 'img'))

        # font = ImageFont.truetype(font='font/FiraMono-Medium.otf',
        #                           size=np.floor(3e-2 * image.size[1] + 0.5).astype('int32'))
               # 使用中文字体
        font = ImageFont.truetype(font='font/simfang.ttf',
                                  size=np.floor(3e-2 * image.size[1] + 0.5).astype('int32'))
        thickness = (image.size[0] + image.size[1]) // 300


        for i, c in reversed(list(enumerate(out_classes))):
            predicted_class = self.class_names[c]
            box = out_boxes[i]
            score = out_scores[i]


            label = '{} {:.2f}'.format(predicted_class, score)
            draw = ImageDraw.Draw(image)
            label_size = draw.textsize(label, font)


            top, left, bottom, right = box
            top = max(0, np.floor(top + 0.5).astype('int32'))
            left = max(0, np.floor(left + 0.5).astype('int32'))
            bottom = min(image.size[1], np.floor(bottom + 0.5).astype('int32'))
            right = min(image.size[0], np.floor(right + 0.5).astype('int32'))
            print(label, (left, top), (right, bottom))


            if top - label_size[1] >= 0:
                text_origin = np.array([left, top - label_size[1]])
            else:
                text_origin = np.array([left, top + 1])


            # My kingdom for a good redistributable image drawing library.
            for i in range(thickness):
                draw.rectangle(
                    [left + i, top + i, right - i, bottom - i],
                    outline=self.colors[c])
            draw.rectangle(
                [tuple(text_origin), tuple(text_origin + label_size)],
                fill=self.colors[c])
            draw.text(text_origin, label, fill=(0, 0, 0), font=font)
            del draw


        end = timer()
        print(end - start)
        return image


    def close_session(self):
        self.sess.close()


def detect_video(yolo, video_path, output_path=""):
    import cv2
    vid = cv2.VideoCapture(video_path)
    if not vid.isOpened():
        raise IOError("Couldn't open webcam or video")
    # video_FourCC = int(vid.get(cv2.CAP_PROP_FOURCC))
    video_FourCC = cv2.VideoWriter_fourcc(*"mp4v")
    video_fps = vid.get(cv2.CAP_PROP_FPS)
    video_size = (int(vid.get(cv2.CAP_PROP_FRAME_WIDTH)),
                  int(vid.get(cv2.CAP_PROP_FRAME_HEIGHT)))
    isOutput = True if output_path != "" else False
    if isOutput:
        print("!!! TYPE:", type(output_path), type(video_FourCC), type(video_fps), type(video_size))
        out = cv2.VideoWriter(output_path, video_FourCC, video_fps, video_size)
    accum_time = 0
    curr_fps = 0
    fps = "FPS: ??"
    prev_time = timer()
    while True:
        return_value, frame = vid.read()
        if return_value:
            image = Image.fromarray(frame)
            image = yolo.detect_image(image)
            result = np.asarray(image)
            curr_time = timer()
            exec_time = curr_time - prev_time
            prev_time = curr_time
            accum_time = accum_time + exec_time
            curr_fps = curr_fps + 1
            if accum_time > 1:
                accum_time = accum_time - 1
                fps = "FPS: " + str(curr_fps)
                curr_fps = 0
            cv2.putText(result, text=fps, org=(3, 15), fontFace=cv2.FONT_HERSHEY_SIMPLEX,
                        fontScale=0.50, color=(255, 0, 0), thickness=2)
            cv2.namedWindow("Object Detect", cv2.WINDOW_NORMAL)
            cv2.resizeWindow("Object Detect", 640, 480);
            cv2.imshow("Object Detect", result)
            if isOutput:
                print("start write...==========================================================================")
                out.write(result)
            if cv2.waitKey(1) & 0xFF == ord('q'):
                break
        else:
            break
    out.release()
    vid.release()
    cv2.destroyAllWindows()
    yolo.close_session()


def for_img(yolo):
    path = 'images/IMG_0728.JPG'
    try:
        image = Image.open(path)
    except:
        print('Open Error! Try again!')
    else:
        r_image = yolo.detect_image(image)
        r_image.show()
    yolo.close_session()


def for_video(yolo):
    detect_video(yolo, "videos/xx.mp4", "videos/xx_detect.mp4")


if __name__ == '__main__':
    _yolo = YOLO()
    for_img(_yolo)
    # for_video(_yolo)
本项目是可以在CPU上运行的,但是GPU上运行的更快。关于如何搭建GPU的运行环境,感兴趣的读者可以参考《如何在阿里云租一台GPU服务器做深度学习?》,然后将上面的代码的gpu_num改为你的GPU号(可以使用nvidia-smi命令查看),并注意加入对GPU显存的使用控制即可,这里为了快速体验物体检测效果,就不再对GPU下运行程序做过多的介绍,虽然在CPU下运行会慢很多,但用于体验足够了。
做完上面的步骤后,执行yolo.py,将会看到你想检测的图像的物体检测效果,左边是原图,该图项目中是没有的,可以自行下载,或者用你喜欢的其它图片来尝试检测:

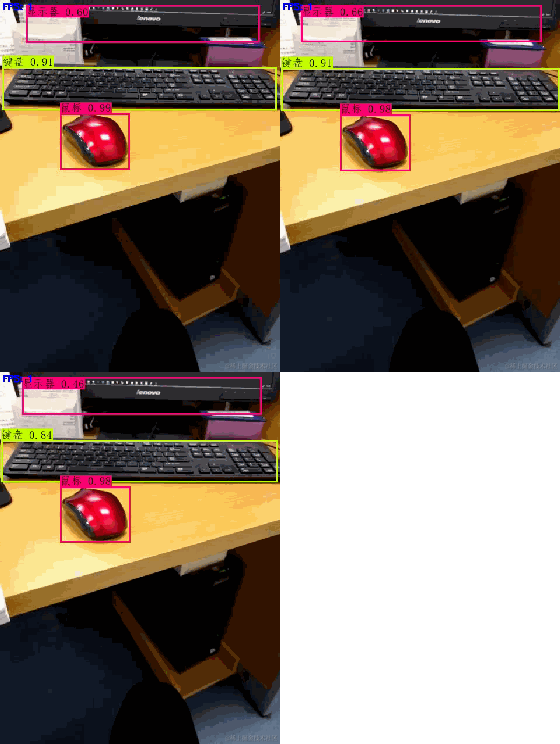
除了图片的检测,还可以对视频进行检测,修改yolo.py中的最后一行,将图片检测注释掉,放开视频检测的注释,然后执行yolo.py即可,下面是检测效果:

本文来自互联网用户投稿,该文观点仅代表作者本人,不代表本站立场。本站仅提供信息存储空间服务,不拥有所有权,不承担相关法律责任。 如若内容造成侵权/违法违规/事实不符,请联系我的编程经验分享网邮箱:chenni525@qq.com进行投诉反馈,一经查实,立即删除!