Mongodb分片副本集群,实战部署全攻略
📢📢📢📣📣📣
哈喽!大家好,我是【IT邦德】,江湖人称jeames007,10余年DBA及大数据工作经验
一位上进心十足的【大数据领域博主】!😜😜😜
中国DBA联盟(ACDU)成员,目前服务于工业互联网
擅长主流Oracle、MySQL、PG、高斯及Greenplum运维开发,备份恢复,安装迁移,性能优化、故障应急处理等。
? 如果有对【数据库】感兴趣的【小可爱】,欢迎关注【IT邦德】💞💞💞
??????感谢各位大可爱小可爱!??????
文章目录
前言
想把大量数据放到内存里提高性能,MongoDB通过分片使用分片服务器自身的资源。📣 1.高可用概述
? 1.1 副本集
副本集是一种在多台机器同步数据的进程,副本集体提供了数据冗余,扩展了数据可用性。在多台服务器保存数据可以避免因为一台服务器导致的数据丢失。
也可以从硬件故障或服务中断解脱出来,利用额外的数据副本,可以从一台机器致力于灾难恢复或者备份。
主从复制其实就是一个单副本的应用,没有很好的扩展性饿容错性。然而副本集具有多个副本保证了容错性,就算一个副本挂掉了还有很多个副本存在,并且解决了"主节点挂掉后,整个集群内会自动切换"的问题.

? 1.2 分片集群
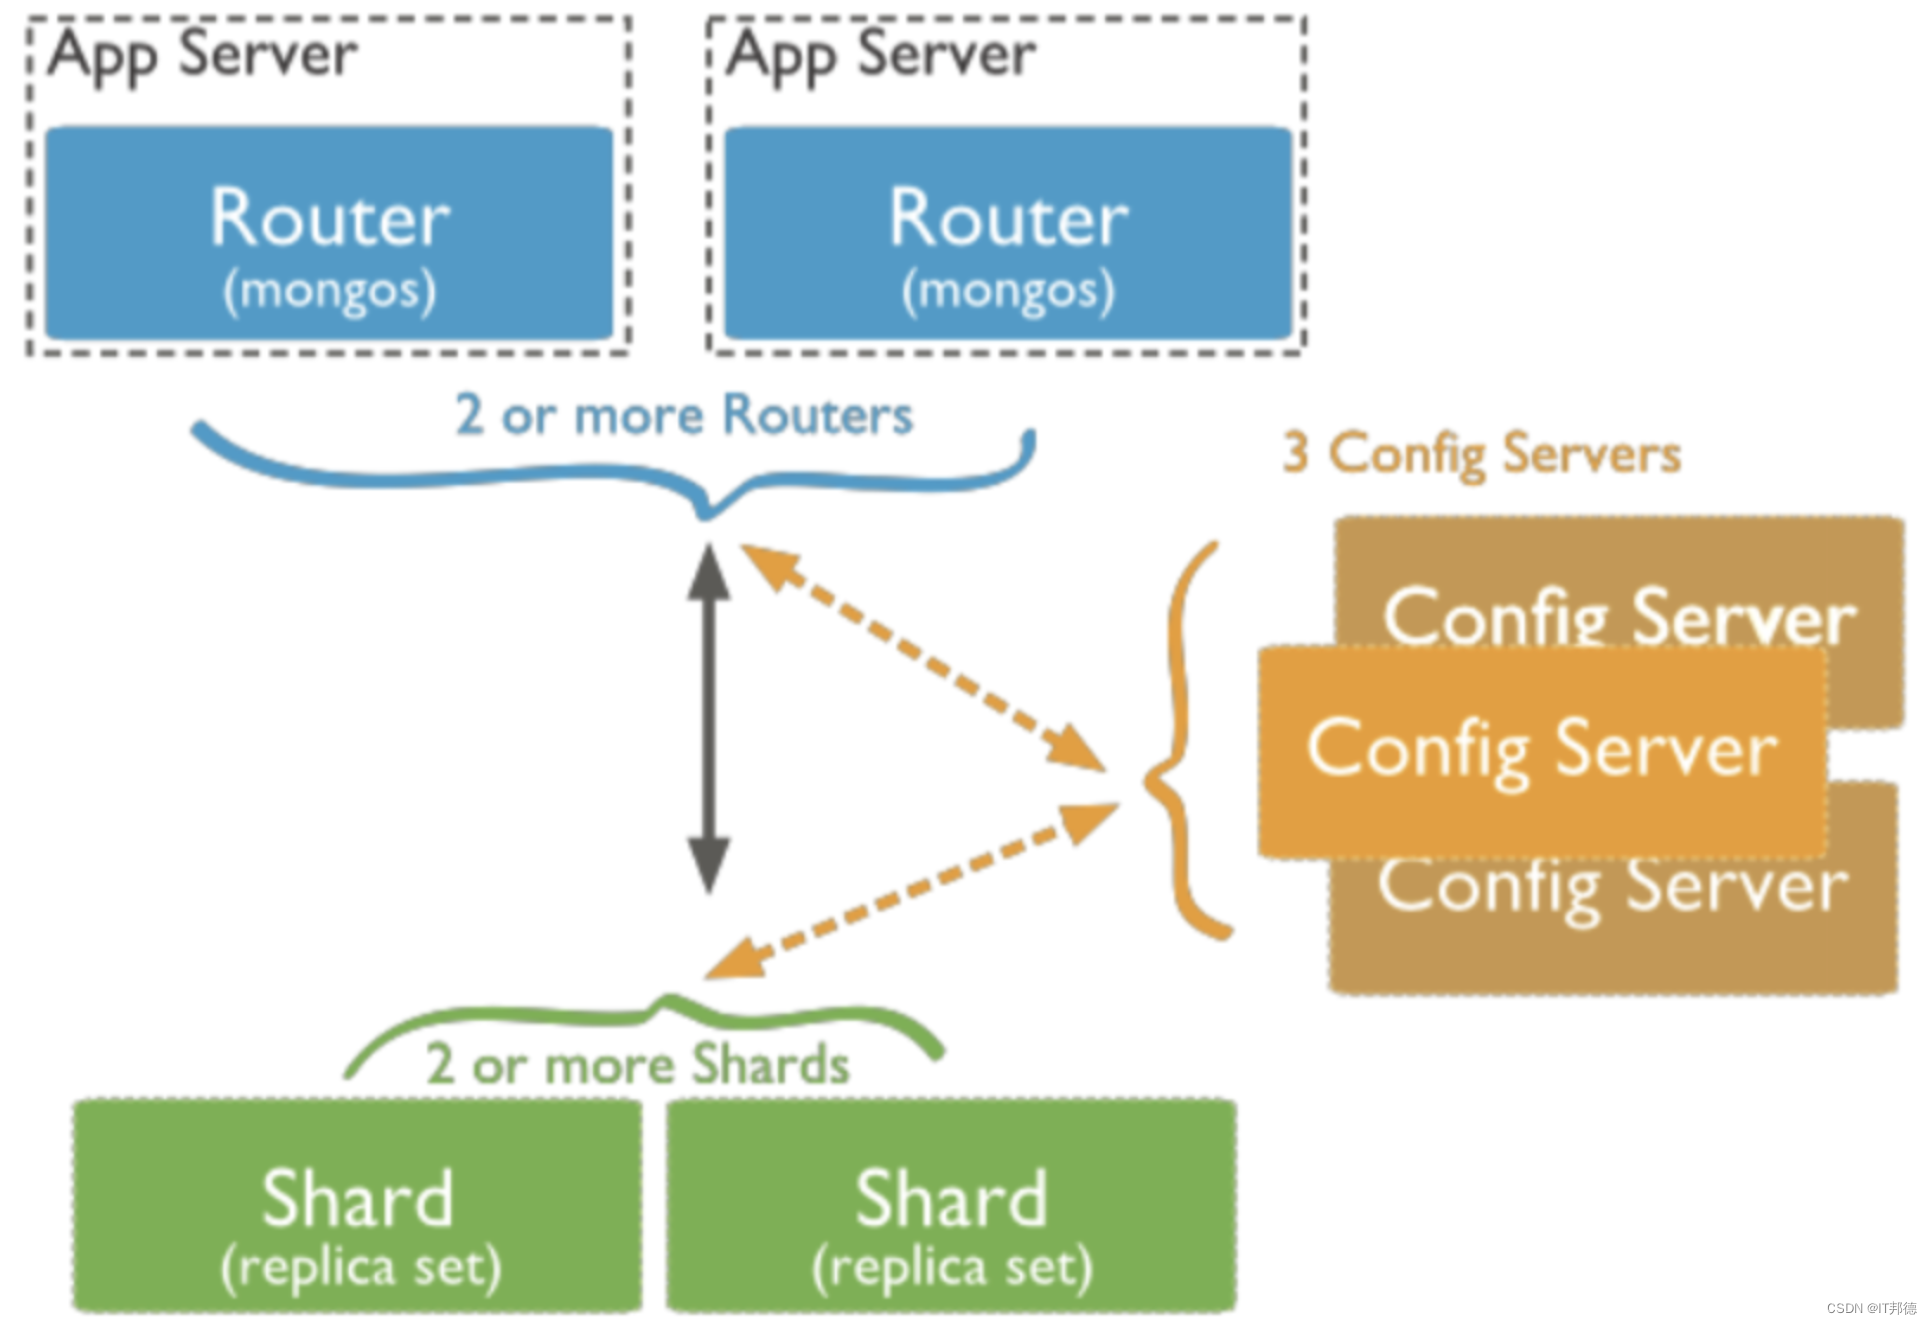
Sharding cluster是一种可以水平扩展的模式,在数据量很大时特给力,实际大规模应用一般会采用这种架构去构建。sharding分片很好的解决了单台服务器磁盘空间、内存、cpu等硬件资源的限制问题,把数据水平拆分出去,降低单节点的访问压力。每个分片都是一个独立的数据库,所有的分片组合起来构成一个逻辑上的完整的数据库。因此,分片机制降低了每个分片的数据操作量及需要存储的数据量,达到多台服务器来应对不断增加的负载和数据的效果。
使用场景:
1)机器的磁盘不够用了。使用分片解决磁盘空间的问题。
2)单个mongod已经不能满足写数据的性能要求。通过分片让写压力分散到各个分片上面,使用分片服务器自身的资源。
3)想把大量数据放到内存里提高性能。和上面一样,通过分片使用分片服务器自身的资源。

? 1.3 架构规划
| 172.18.12.76 | 172.18.12.77 | 172.18.12.78 |
|---|---|---|
| mongos: 20000 | mongos: 20000 | mongos: 20000 |
| config: 21000 | config: 21000 | config: 21000 |
| shard01: 27001 | shard01: 27001 | shard01: 27001 |
| Shard02: 27002 | Shard02: 27002 | Shard02: 27002 |
| shard03: 27103 | shard03: 27103 | shard03: 27103 |
📣 2.环境准备
? 2.1 HOST设置
用host解析的方式判定各个节点,所以我们这里设置的host的配置

vi /etc/hosts

172.18.12.76 node1
172.18.12.77 node2
172.18.12.78 node3
? 2.2 依赖包安装
yum install -y libcurl openssl
yum install -y xz-libs
yum install wget
? 2.3 添加用户及组
groupadd mongod
groupadd mongodb
useradd -g mongod -G mongodb mongod
echo “passwd”|passwd mongod --stdin
? 2.4 解压安装
1.mongodb 下载、安装
wget https://fastdl.mongodb.org/linux/mongodb-linux-x86_64-rhel70-7.0.4.tgz
wget https://fastdl.mongodb.org/linux/mongodb-linux-x86_64-rhel80-7.0.4.tgz

mkdir -p /mog
KDR=/mog
cd ${KDR}
TGZ=mongodb-linux-x86_64-rhel70-7.0.4

#cp_unzip_chown_ln:
cp /opt/${TGZ}.tgz .
tar zxvf ${TGZ}.tgz
chown -R mongod:mongod ${TGZ}
ln -s ${KDR}/${TGZ}/bin/* /usr/local/bin/
2.database-tools 下载、安装

6.0版本开始,将数据库相关的工具单独管理,以利于实时升级、发布
https://www.mongodb.com/download-center/database-tools/releases/archive
wget https://fastdl.mongodb.org/tools/db/mongodb-database-tools-rhel70-x86_64-100.9.4.tgz

KDR=/mog
cd ${KDR}
TGZ=mongodb-database-tools-rhel70-x86_64-100.9.4
【后续步骤同上】
#cp_unzip_chown_ln:

cp /opt/${TGZ}.tgz .
tar zxvf ${TGZ}.tgz
chown -R mongod:mongod ${TGZ}
ln -s ${KDR}/${TGZ}/bin/* /usr/local/bin/
3.mongosh 下载、安装
wget https://downloads.mongodb.com/compass/mongosh-2.0.0-linux-x64.tgz

KDR=/mog
cd ${KDR}
TGZ=mongosh-2.0.0-linux-x64
【后续步骤同上】
#cp_unzip_chown_ln:

cp /opt/${TGZ}.tgz .
tar zxvf ${TGZ}.tgz
chown -R mongod:mongod ${TGZ}
ln -s ${KDR}/${TGZ}/bin/* /usr/local/bin/
? 2.5 配置时间同步
为了保证主备节点时间同步,需要设置ntp时间同步即可
yum install -y ntp

#没有联网的情况下,添加以下两条即可
--Server端
vi /etc/ntp.conf

#外部时间服务器不可用时,以本地时间作为时间服务
server 127.127.1.0
fudge 127.127.1.0 stratum 10

# ntp server配置允许内网其他机器同步时间(允许192.168.6.0/24 网段主机进行时间同步)
restrict 192.168.12.0 mask 255.255.255.0 nomodify notrap


--客户端同步Server端
vi /etc/ntp.conf

server 127.127.1.0
fudge 127.127.1.0 stratum 10
#指定ntp服务器地址
server 192.168.12.76


启动ntp服务,并开机自启动
systemctl restart ntpd
systemctl enable ntpd

[root@node1 mog]# ntpq -p
     remote           refid      st t when poll reach   delay   offset  jitter
==============================================================================
+ntp1.flashdance 192.36.143.150   2 u   26   64    7  168.896   87.657  10.536
+dns1.synet.edu. 202.118.1.47     2 u   23   64    7   52.190   81.372  11.757
*time.neu.edu.cn .PTP.            1 u   22   64    7   51.353   82.965  19.014
 139.199.214.202 .INIT.          16 u    -   64    0    0.000    0.000   0.000
 LOCAL(0)        .LOCL.          10 l  156   64    4    0.000    0.000   0.000

 [root@node2 mog]# ntpq -p
     remote           refid      st t when poll reach   delay   offset  jitter
==============================================================================
*LOCAL(0)        .LOCL.          10 l   11   64    1    0.000    0.000   0.000
 192.168.12.76   .INIT.          16 u    -   64    0    0.000    0.000   0.000

 [root@node3 mog]# ntpq -p
     remote           refid      st t when poll reach   delay   offset  jitter
==============================================================================
*LOCAL(0)        .LOCL.          10 l    5   64    1    0.000    0.000   0.000
 192.168.12.76   .INIT.          16 u    -   64    0    0.000    0.000   0.000
? 2.6 防火墙关闭
1.检查防火墙是否关闭
systemctl status firewalld
若防火墙状态显示为active (running),则表示防火墙未关闭
若防火墙状态显示为inactive (dead),则无需再关闭防火墙
2.关闭防火墙并禁止开机重启
systemctl disable firewalld.service
systemctl stop firewalld.service
? 2.8 关闭安全服务
vi /etc/selinux/config
这一行注释掉: SELINUX=enforcing
增加这一行: SELINUX=disabled
? 2.9 文件目录创建
3个节点创建mongodb数据库文件目录

MongoDir=/mog/mongodb
mkdir -p ${MongoDir}
chown -R mongod:mongod ${MongoDir}
cat >> /etc/profile << EOF
export MongoDir=${MongoDir}
EOF

source /etc/profile


--以下均用mongod用户操作
su - mongod
echo ${MongoDir}

3个节点均建立6个目录:conf、mongos、config、shard1、shard2、shard3
mkdir -p ${MongoDir}/conf
mkdir -p ${MongoDir}/mongos/log
mkdir -p ${MongoDir}/config/data
mkdir -p ${MongoDir}/config/log
mkdir -p ${MongoDir}/shard1/data
mkdir -p ${MongoDir}/shard1/log
mkdir -p ${MongoDir}/shard2/data
mkdir -p ${MongoDir}/shard2/log
mkdir -p ${MongoDir}/shard3/data
mkdir -p ${MongoDir}/shard3/log
📣 3.配置文件
? 3.1 server配置
–3个节点执行,mongod用户操作
cat > ${MongoDir}/conf/config.conf << EOF
processManagement:
fork: true
pidFilePath: ${MongoDir}/config/log/configsvr.pid
net:
bindIpAll: true
port: 21000
ipv6: true
maxIncomingConnections: 20000
storage:
dbPath: ${MongoDir}/config/data
wiredTiger:
engineConfig:
cacheSizeGB: 1
systemLog:
destination: file
path: ${MongoDir}/config/log/configsvr.log
logAppend: true
sharding:
clusterRole: configsvr
replication:
replSetName: configs
setParameter:
connPoolMaxConnsPerHost: 20000
EOF
–启动3个 config server
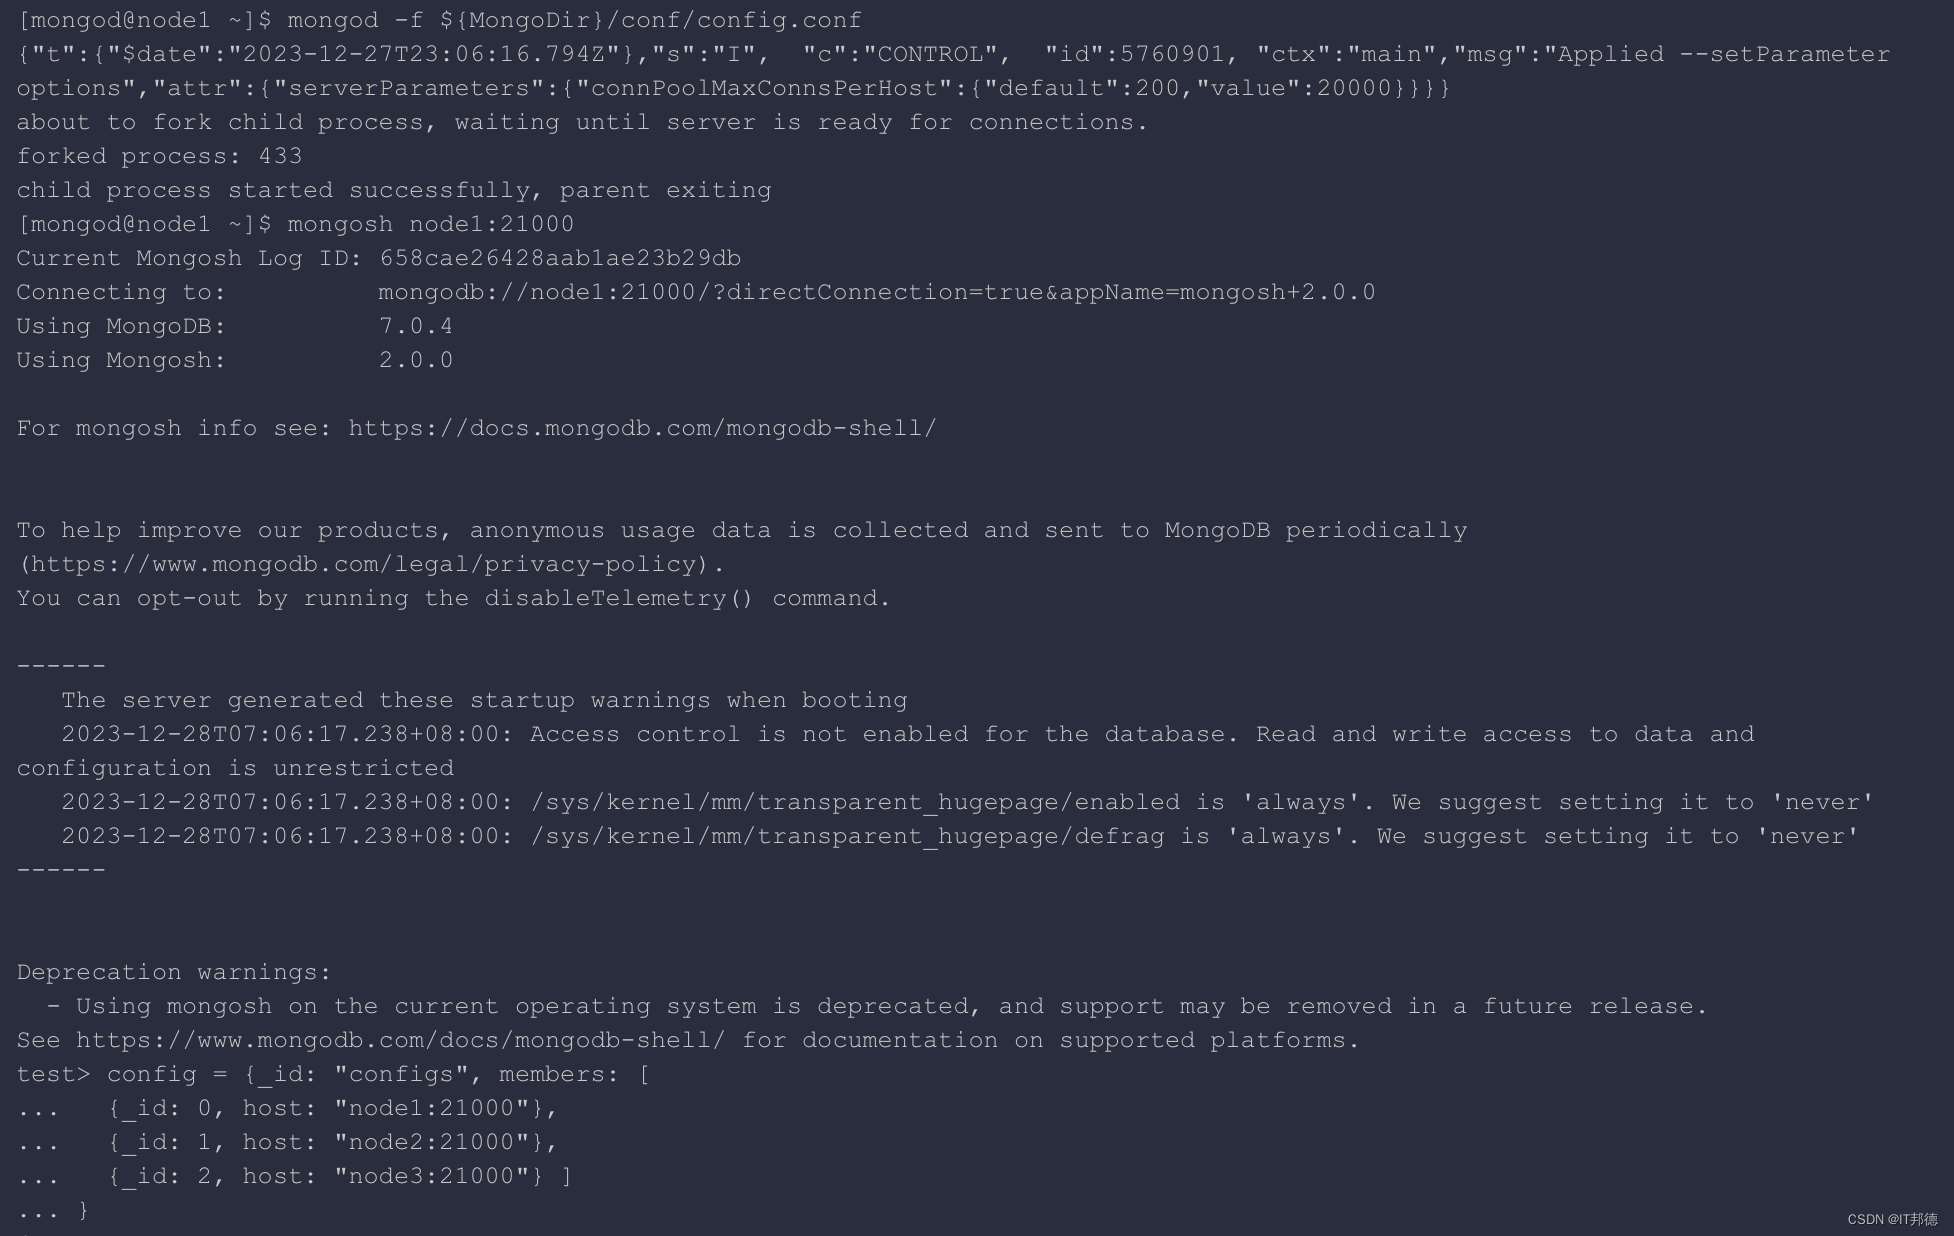
mongod -f ${MongoDir}/conf/config.conf
--登录任意一台配置服务器,初始化配置副本集
mongosh node1:21000
use admin

定义config变量:
config = {_id: "configs", members: [
  {_id: 0, host: "node1:21000"},
  {_id: 1, host: "node2:21000"},
  {_id: 2, host: "node3:21000"} ]
}
其中,_id: "configs"应与配置文件中的配置一致,"members" 中的 "host" 为三个节点的 ip 和 port

初始化副本集:
rs.initiate(config)

查看此时状态:
rs.status()

? 3.2 shard配置
3个节点执行,如果数据量并不大,分片需求不明显,可以先只创建shard server1,另外的分片2、分片3先不创建,后续根据实际需求可随时创建。
在这里我们设置分片

--shard1.conf

cat > ${MongoDir}/conf/shard1.conf << EOF
processManagement:
  fork: true
  pidFilePath: ${MongoDir}/shard1/log/shard1.pid
net:
  bindIpAll: true
  port: 27001
  ipv6: true
  maxIncomingConnections: 20000
storage:
  dbPath: ${MongoDir}/shard1/data
  wiredTiger:
    engineConfig:
      cacheSizeGB: 5
systemLog:
  destination: file
  path: ${MongoDir}/shard1/log/shard1.log
  logAppend: true
sharding:
  clusterRole: shardsvr
replication:
  replSetName: shard1
setParameter:
  connPoolMaxConnsPerHost: 20000
  maxNumActiveUserIndexBuilds: 6
EOF


--shard2.conf

cat > ${MongoDir}/conf/shard2.conf << EOF
processManagement:
  fork: true
  pidFilePath: ${MongoDir}/shard2/log/shard2.pid
net:
  bindIpAll: true
  port: 27002
  ipv6: true
  maxIncomingConnections: 20000
storage:
  dbPath: ${MongoDir}/shard2/data
  wiredTiger:
    engineConfig:
      cacheSizeGB: 5
systemLog:
  destination: file
  path: ${MongoDir}/shard2/log/shard2.log
  logAppend: true
sharding:
  clusterRole: shardsvr
replication:
  replSetName: shard2
setParameter:
  connPoolMaxConnsPerHost: 20000
  maxNumActiveUserIndexBuilds: 6
EOF


--shard3.conf

cat > ${MongoDir}/conf/shard3.conf << EOF
processManagement:
  fork: true
  pidFilePath: ${MongoDir}/shard3/log/shard3.pid
net:
  bindIpAll: true
  port: 27003
  ipv6: true
  maxIncomingConnections: 20000
storage:
  dbPath: ${MongoDir}/shard3/data
  wiredTiger:
    engineConfig:
      cacheSizeGB: 5
systemLog:
  destination: file
  path: ${MongoDir}/shard3/log/shard3.log
  logAppend: true
sharding:
  clusterRole: shardsvr
replication:
  replSetName: shard3
setParameter:
  connPoolMaxConnsPerHost: 20000
  maxNumActiveUserIndexBuilds: 6
EOF

--key文件生成
node1 创建副本集认证的key文件
su - mongod
cd ${MongoDir}/conf
openssl rand -out mongo.keyfile -base64 90
chmod 600 mongo.keyfile

[mongod@node1 conf]$ ll
total 12
-rw-rw-r-- 1 mongod mongod 477 Dec 28 07:05 config.conf
-rw------- 1 mongod mongod 122 Dec 28 07:36 mongo.keyfile
-rw-rw-r-- 1 mongod mongod 555 Dec 28 07:10 shard1.conf

提示:所有副本集节点都必须要用同一份keyfile,一般是在一台机器上生成,然后拷贝到其他机器上,且必须有读的权限,否则将来会报错:
permissions on ${MongoDir}/conf/mongo.keyfile are too open

node1 修改配置文件指定keyfile
编辑配置文件,添加如下内容:
for FILE in ${MongoDir}/conf/{config,shard1,shard2,shard3,mongos}.conf
do
cat >> ${FILE} << EOF
security:
  keyFile: /mog/mongodb/conf/mongo.keyfile
EOF
done

node1 将修改后的配置文件和key文件拷贝到 node2、node3,拷贝过去记得改权限

cd /mog/mongodb/conf/
chmod 600 mongo.keyfile
chown mongod:mongod mongo.keyfile

依次启动配置节点、分片节点、路由节点


--启动3个 shard1 server:
mongod -f ${MongoDir}/conf/shard1.conf

--启动3个 shard2 server:
mongod -f ${MongoDir}/conf/shard2.conf

--启动3个 shard3 server:
mongod -f ${MongoDir}/conf/shard3.conf
? 3.3 mongos配置
【3个节点执行】
mongos对外提供服务,是集群的入口。需要先将分片添加到mongos配置中

注:需先启动 config server 和 shard server, 后启动 mongos server (3个节点)

cat > ${MongoDir}/conf/mongos.conf << EOF
processManagement:
  fork: true
  pidFilePath: ${MongoDir}/mongos/log/mongos.pid
net:
  bindIpAll: true
  port: 20000
  ipv6: true
  maxIncomingConnections: 20000
systemLog:
  destination: file
  path: ${MongoDir}/mongos/log/mongos.log
  logAppend: true
sharding:
  configDB: configs/node1:21000,node2:21000,node3:21000
EOF

启动3个 mongos server:
mongos -f ${MongoDir}/conf/mongos.conf

[mongod@node1 ~]$ mongos -f ${MongoDir}/conf/mongos.conf
about to fork child process, waiting until server is ready for connections.
forked process: 3082
child process started successfully, parent exiting
📣 4.配置分片
–登陆任一 mongos server, 使用 admin 数据库,串联路由服务器与分配副本集:
mongosh node1:20000
use admin
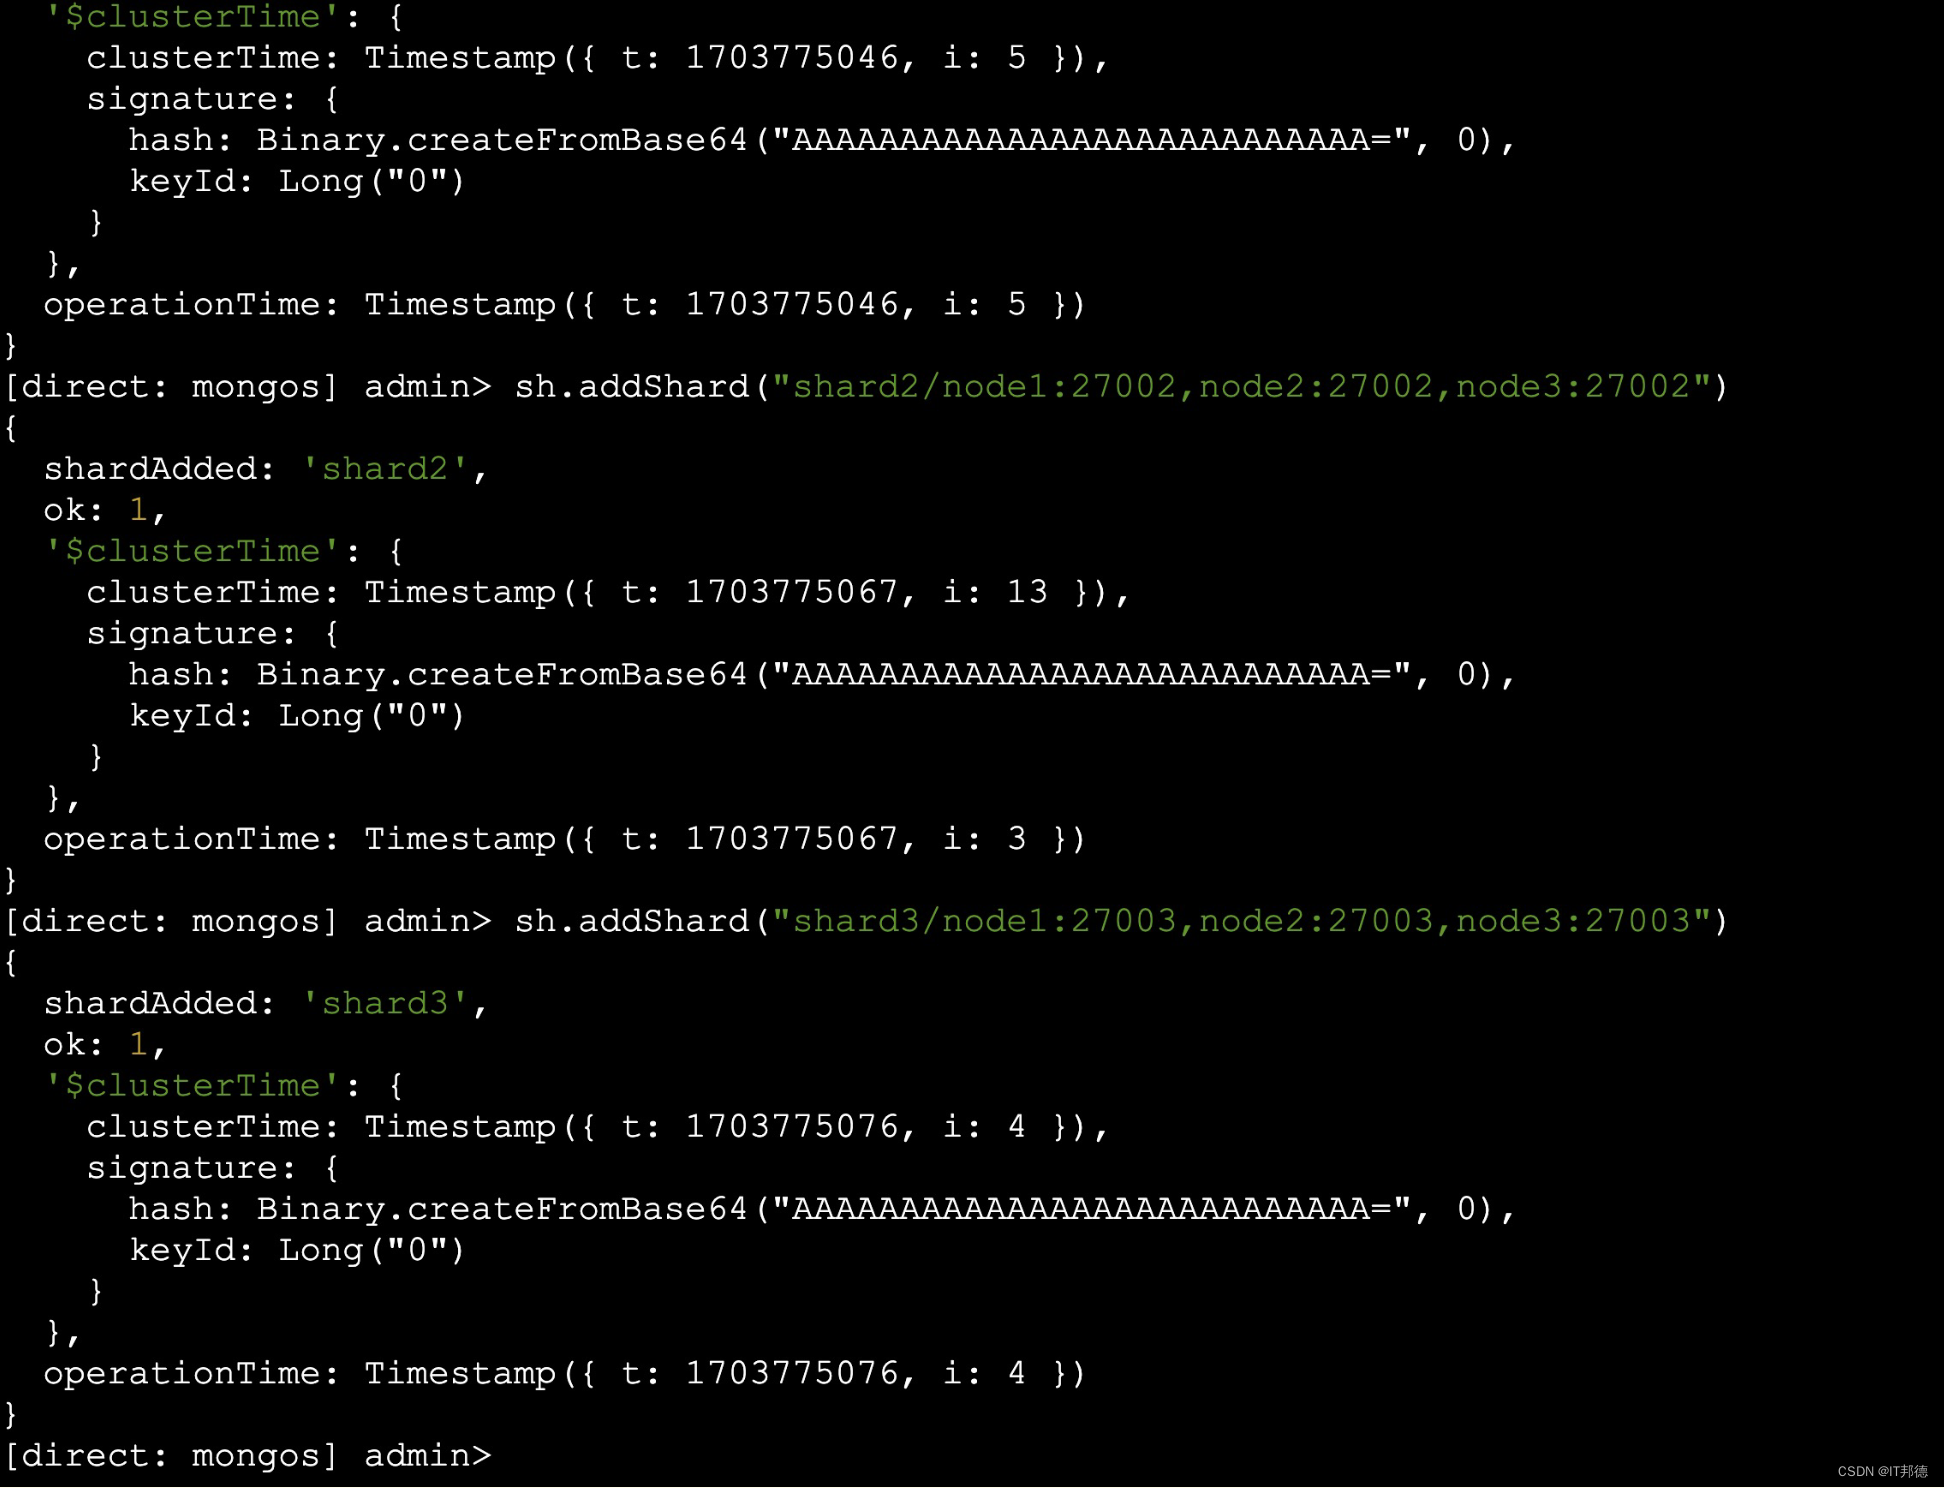
sh.addShard(“shard1/node1:27001,node2:27001,node3:27001”)
sh.addShard(“shard2/node1:27002,node2:27002,node3:27002”)
sh.addShard(“shard3/node1:27003,node2:27003,node3:27003”)
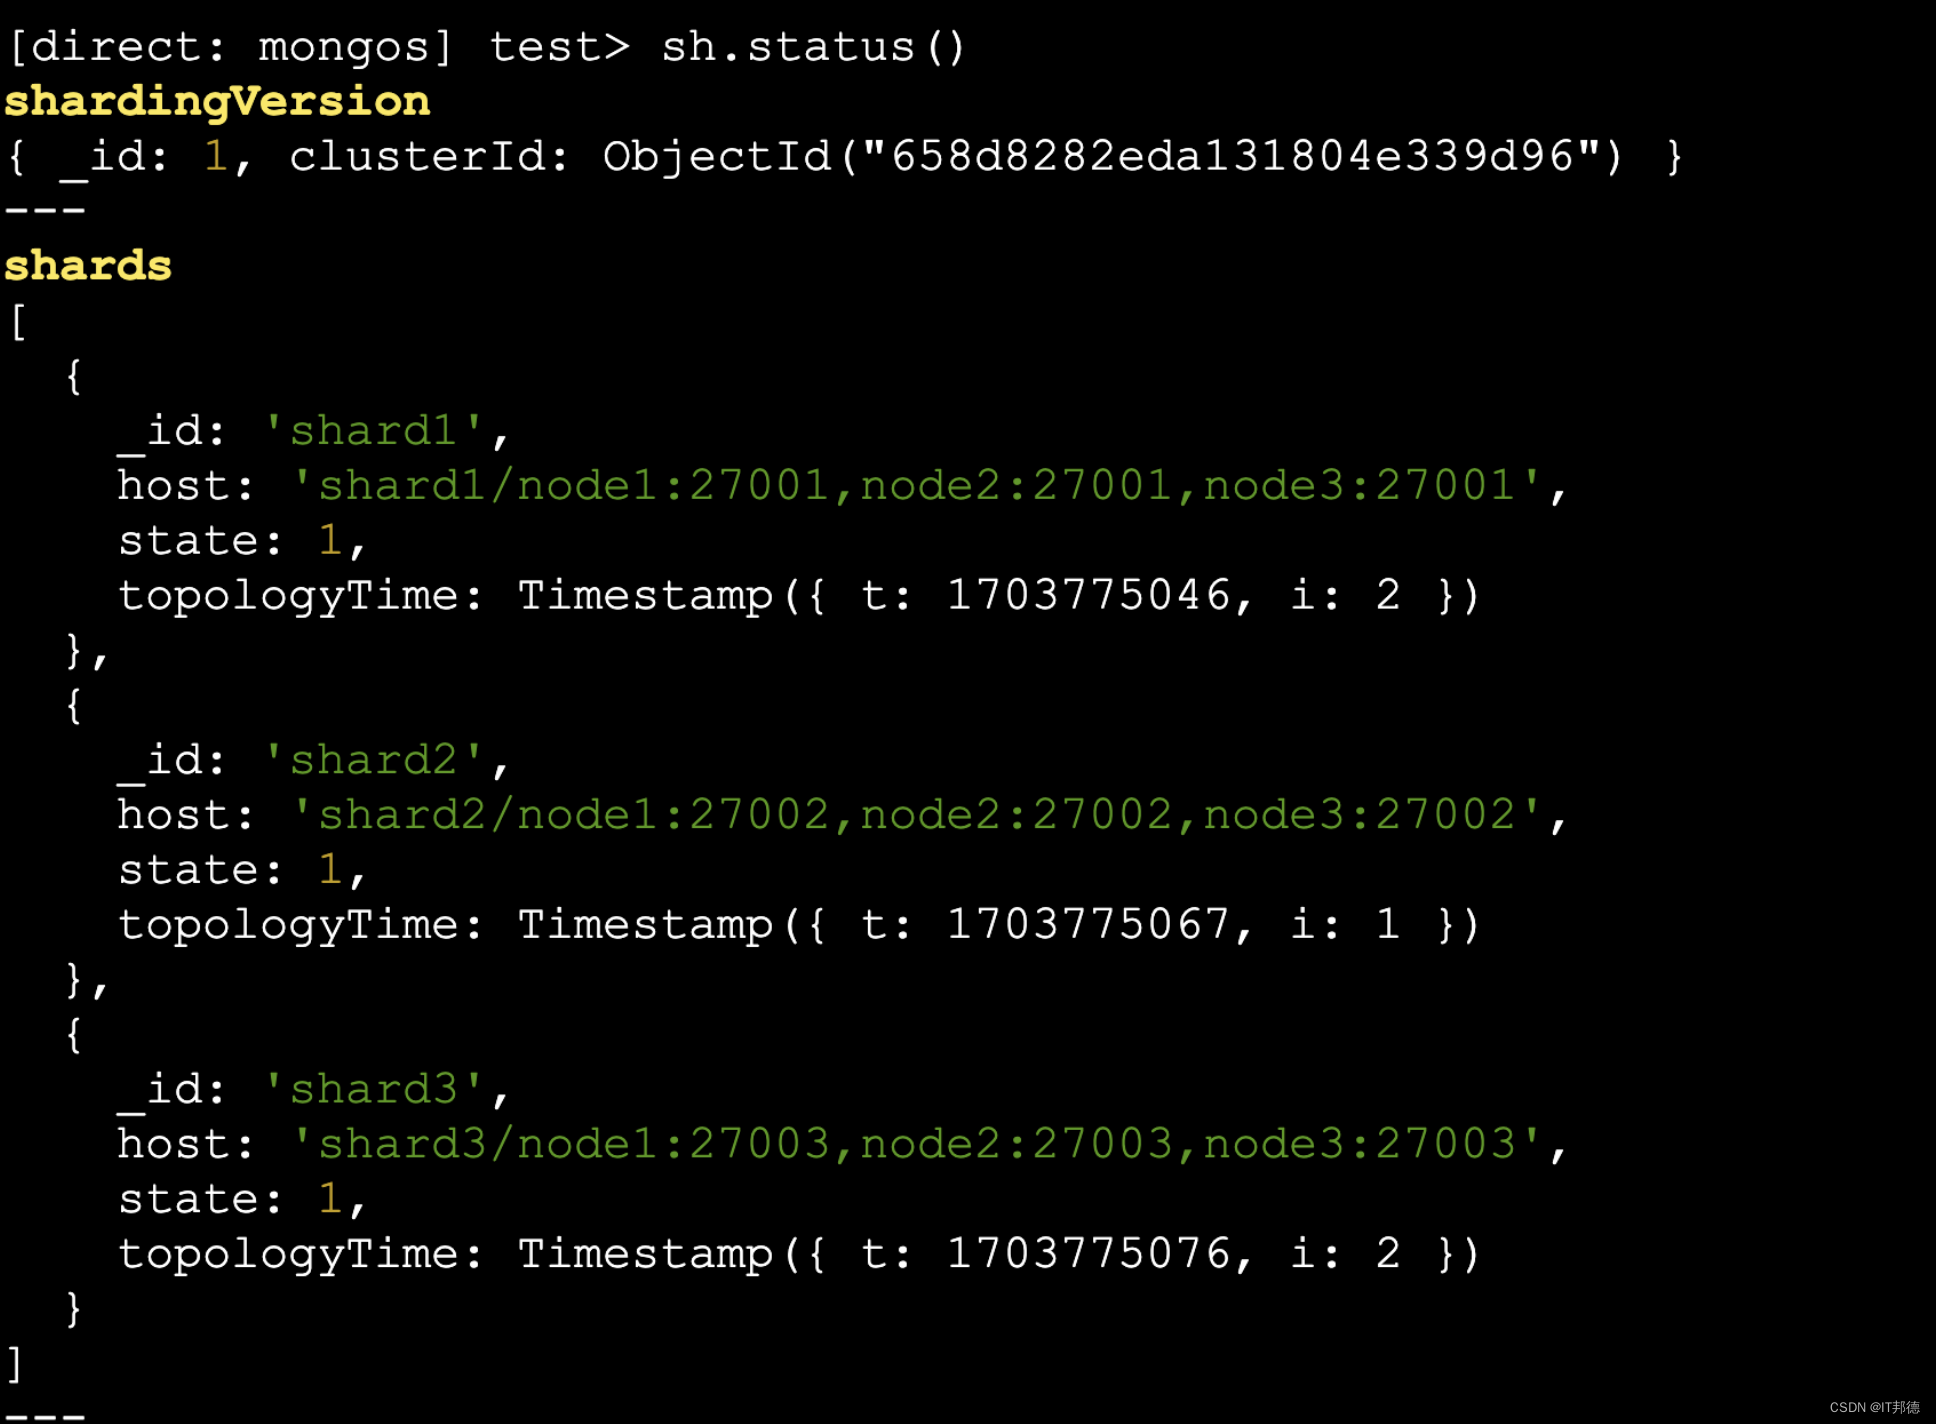
查看集群状态:
sh.status()
sh.removeShard(“shard1”)

📣 5.分片生效
mongosh node1:20000

use admin
db.auth('admin', 'admin1234')
db.runCommand( { enablesharding :"test"});

[direct: mongos] admin> db.runCommand( { enablesharding :"test"});
{
  ok: 1,
  '$clusterTime': {
    clusterTime: Timestamp({ t: 1703776050, i: 8 }),
    signature: {
      hash: Binary.createFromBase64("AAAAAAAAAAAAAAAAAAAAAAAAAAA=", 0),
      keyId: Long("0")
    }
  },
  operationTime: Timestamp({ t: 1703776050, i: 2 })
}


# 指定数据库里需要分片的集合和片键
db.runCommand( { shardcollection : "test.table1",key : {id: 1} } )

[direct: mongos] admin> db.runCommand( { shardcollection : "test.table1",key : {id: 1} } )
{
  collectionsharded: 'test.table1',
  ok: 1,
  '$clusterTime': {
    clusterTime: Timestamp({ t: 1703776090, i: 35 }),
    signature: {
      hash: Binary.createFromBase64("AAAAAAAAAAAAAAAAAAAAAAAAAAA=", 0),
      keyId: Long("0")
    }
  },
  operationTime: Timestamp({ t: 1703776090, i: 35 })
}

本文来自互联网用户投稿,该文观点仅代表作者本人,不代表本站立场。本站仅提供信息存储空间服务,不拥有所有权,不承担相关法律责任。 如若内容造成侵权/违法违规/事实不符,请联系我的编程经验分享网邮箱:chenni525@qq.com进行投诉反馈,一经查实,立即删除!
- Python教程
- 深入理解 MySQL 中的 HAVING 关键字和聚合函数
- Qt之QChar编码(1)
- MyBatis入门基础篇
- 用Python脚本实现FFmpeg批量转换
- 2024程序猿面试八股文分享~
- 初识双指针
- 麒麟KYLINOS域名解析失败的修复方法
- Halcon阈值处理的几种分割方法threshold/auto_threshold/binary_threshold/dyn_threshold
- MAC使用python下载字幕
- Baumer工业相机堡盟工业相机如何通过BGAPI SDK实现Raw格式的图像保存(C#)
- ssm农资电子监管系统的设计与实现(程序+开题)
- MVC环境搭建
- springboot 共享自习室座位管理系统 -计算机毕业设计源码55732
- ECMAScript 的未来:预测 JavaScript 创新的下一个浪潮